- Method 1 (new project):
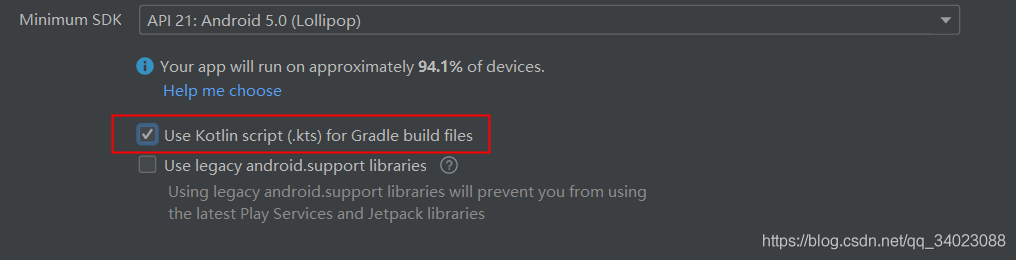
Use the latest Canary version of Android studio, and check Use Kotlin script(.kts) for Gradle build files when creating a new project
- Mode 2:
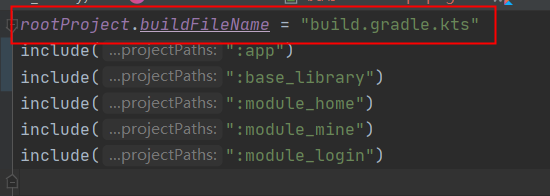
All items in the project will be The gradle file is changed to gradle. KTS, and modify the content syntax to kotlin script syntax (for details, please refer to demo), including settings.gradle, and then add settings.gradle.kts
rootProject.buildFileName = "build.gradle.kts"
Using buildSrc
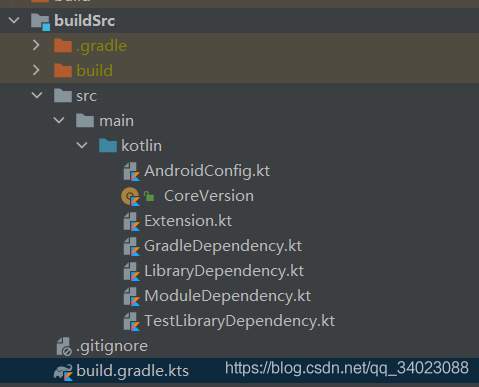
- Create a new Android library. The name must be buildSrc. After creation, it will be reported that the module with this name already exists. Because this name is reserved, go to setting Delete include from gradle
The line of buildSrc is OK.
- The buildSrc directory file is as follows
- Build. In buildSrc gradle. KTS content
plugins {
    `kotlin-dsl`
}

repositories {
    google()
    mavenCentral()
}
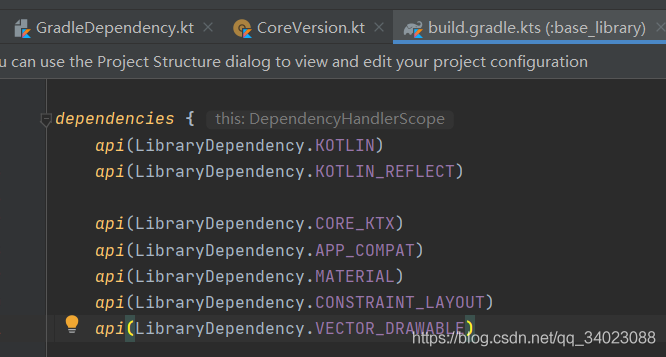
- Then it can be referenced as follows
Android Jetpack
Jetpack is a suite composed of multiple libraries, which can help developers follow best practices, reduce template code, and write code that can run consistently in various Android versions and devices, so that developers can focus on writing important code
Navigation navigation
Navigation is a framework for navigating between "target locations" in Android applications. The navigation component of Android Jetpack can help you navigate, whether it is a simple button click or more complex modes such as application bar and drawer navigation bar. The navigation component also ensures a consistent and predictable user experience by following a set of established principles. The navigation component consists of three key parts:
- Navigation map: an XML resource that contains all navigation related information in a centralized location. This includes all individual content areas within the application (called targets) and possible paths that users can obtain through the application.
- NavHost: displays a blank container for the target in the navigation diagram. The navigation component contains a default NavHost implementation (NavHostFragment) that displays the Fragment target.
- NavController: manages the objects of application navigation in NavHost. When the user moves in the whole application, NavController will arrange the exchange of target content in NavHost.
navigation dependency
- app dependency
implementation "androidx.navigation:navigation-fragment-ktx:$nav_version"
implementation "androidx.navigation:navigation-ui-ktx:$nav_version"
implementation "androidx.navigation:navigation-dynamic-features-fragment:$nav_version"
- If you want to use Safe Args to pass security parameters, you need to build in the project The gradle file contains the following classpath
buildscript {
    repositories {
        google()
    }
    dependencies {
        def nav_version = "2.3.4"
        classpath "androidx.navigation:navigation-safe-args-gradle-plugin:$nav_version"
    }
}
In addition, it also needs to build in the application module Gradle add
apply plugin: "androidx.navigation.safeargs.kotlin"
NavHost:
- NavigationActivity
class NavigationActivity: AppCompatActivity(R.layout.activity_navigation)
- activity_navigation
<?xml version="1.0" encoding="utf-8"?>
<LinearLayout xmlns:android="http://schemas.android.com/apk/res/android"
    xmlns:app="http://schemas.android.com/apk/res-auto"
    android:layout_width="match_parent"
    android:layout_height="match_parent"
    android:orientation="vertical">

    <fragment
        android:id="@+id/navHostFragment"
        android:name="androidx.navigation.fragment.NavHostFragment"
        android:layout_width="match_parent"
        android:layout_height="match_parent"
        app:defaultNavHost="true"
        app:layout_constraintBottom_toTopOf="@id/navView"
        app:layout_constraintLeft_toLeftOf="parent"
        app:layout_constraintRight_toRightOf="parent"
        app:layout_constraintTop_toTopOf="parent"
        app:navGraph="@navigation/navigation_demo_navigation" />
</LinearLayout>
android:name="androidx.navigation.fragment.NavHostFragment" this is a fragment in the dependency package, which is used to define the beginning of the whole navigation
Setting app:defaultNavHost = "true" will intercept the return button of the system. At this time, switching fragment s will be stacked by default
navGraph refers to the defined navigation file
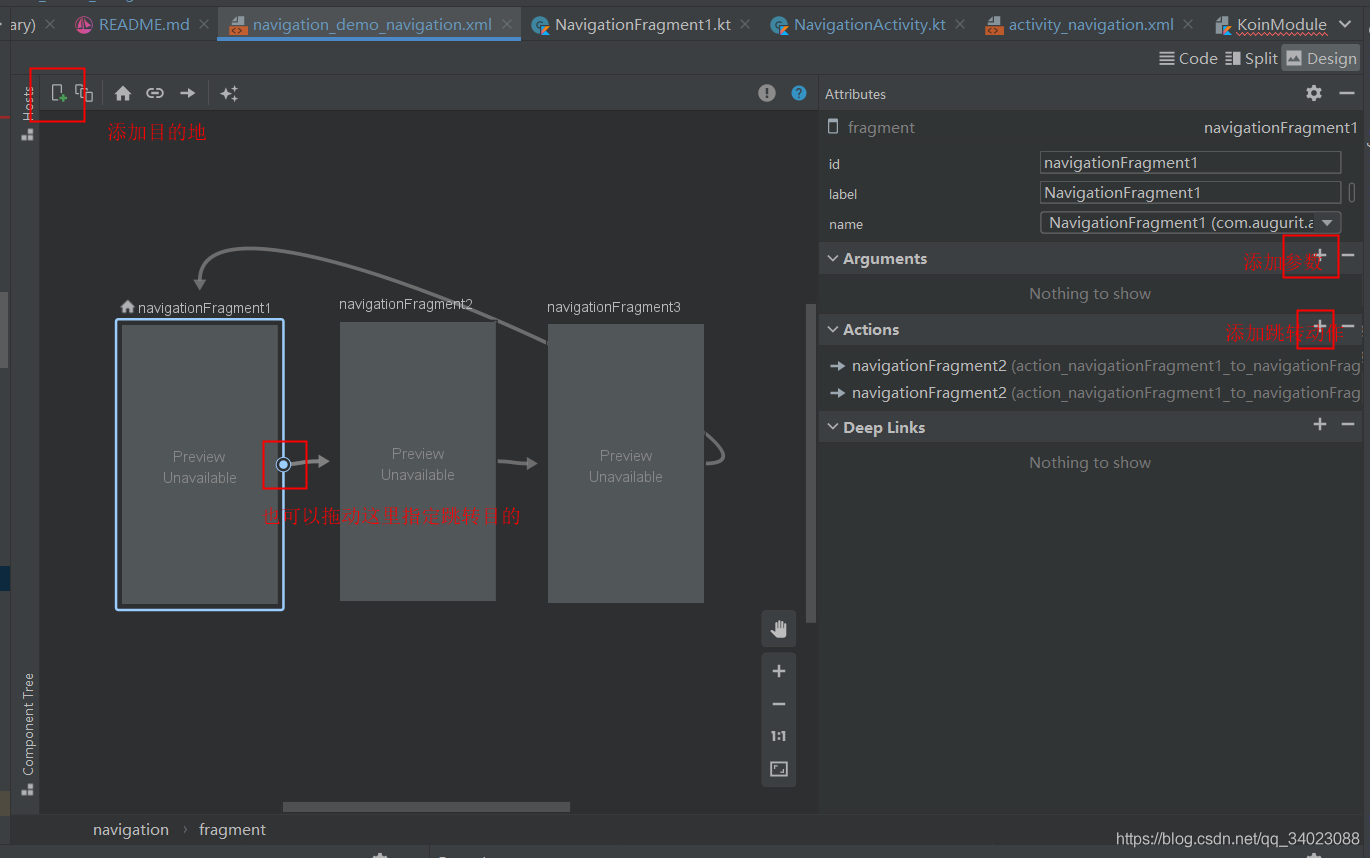
Navigation map
- res/navigation/navigation_demo_navigation.xml
<?xml version="1.0" encoding="utf-8"?>
<navigation xmlns:android="http://schemas.android.com/apk/res/android"
xmlns:app="http://schemas.android.com/apk/res-auto"
android:id="@+id/navigation_demo_navigation"
app:startDestination="@id/navigationFragment1">
<!--startDestination Initial destination-->
<fragment
android:id="@+id/navigationFragment1"
android:name="com.haikun.jetpackapp.home.ui.demo.navigation.NavigationFragment1"
android:label="NavigationFragment1">
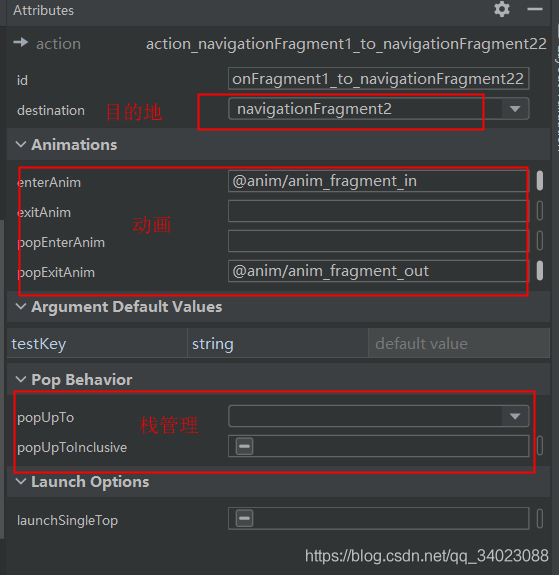
<action
android:id="@+id/action_navigationFragment1_to_navigationFragment2"
app:destination="@id/navigationFragment2" />
<action
android:id="@+id/action_navigationFragment1_to_navigationFragment22"
app:destination="@id/navigationFragment2"
app:enterAnim="@anim/anim_fragment_in"
app:popExitAnim="@anim/anim_fragment_out" />
<!--action Jump Action-->
<!--enterAnim popExitAnim Assign animation-->
</fragment>
<fragment
android:id="@+id/navigationFragment2"
android:name="com.haikun.jetpackapp.home.ui.demo.navigation.NavigationFragment2"
android:label="NavigationFragment2">
<argument
android:name="testKey"
app:argType="string"
app:nullable="true" />
<!--argument Received parameters-->
<action
android:id="@+id/action_navigationFragment2_to_navigationFragment3"
app:destination="@id/navigationFragment3"
app:enterAnim="@anim/anim_fragment_in"
app:popExitAnim="@anim/anim_fragment_out" />
</fragment>
<fragment
android:id="@+id/navigationFragment3"
android:name="com.haikun.jetpackapp.home.ui.demo.navigation.NavigationFragment3"
android:label="NavigationFragment3">
<action
android:id="@+id/action_navigationFragment3_to_navigationFragment1"
app:destination="@id/navigationFragment1"
app:popUpTo="@id/navigationFragment1"
app:popUpToInclusive="true" />
<!--app:popUpTo Removes 2 and 3 from the stack-->
<!--app:popUpToInclusive="true" It also pops the first 1 off the stack, effectively clearing it-->
</fragment>
</navigation>
- You can also switch to Design mode for editing
NavController
- Call the following code directly in fragment1 to switch from fragment1 to fragment2 and pass in parameters
findNavController().navigate(NavigationFragment1Directions.actionNavigationFragment1ToNavigationFragment22("test"))
Other functions
- Global operations use global operations to create common operations that can be shared by multiple destinations
- Create deep links that direct users to specific destinations within the app
- Use the navigation UI to update the interface components. Use the top application bar, drawer navigation bar and bottom navigation bar to manage navigation
- Custom return navigation
Lifecycle
Disadvantages of traditional life cycle methods for writing logic code
- Too many calls to management interfaces and other components in response to the current state of the lifecycle. Managing multiple components places a lot of code in lifecycle methods such as onStart() and onStop(), which makes them difficult to maintain
- There is no guarantee that the component will start before the Activity or Fragment stops. This is especially true when we need to perform long-running operations, such as some configuration check in onStart()
Lifecycle benefits
- Lifecycle aware components can perform actions in response to changes in the lifecycle state of another component (such as Activity and Fragment). These components help you write more organized and often streamlined code. You can move component dependent code from the lifecycle method into the component itself, which is easier to maintain.
lifecycle usage
- Define LifecycleObserver
inner class MyLifecycleObserver(val lifecycle: Lifecycle) : LifecycleObserver {

        @OnLifecycleEvent(Lifecycle.Event.ON_START)
        fun onStart() {
            CoroutineScope(scope).launch {
                delay(3000)
                if (lifecycle.currentState.isAtLeast(Lifecycle.State.STARTED)) {
                    LogUtil.e("Open positioning")
                }
            }
        }

        @OnLifecycleEvent(Lifecycle.Event.ON_STOP)
        fun onStop() {
            LogUtil.e("Close positioning")
        }
    }
- Add lifecycle observer
override fun onCreate(savedInstanceState: Bundle?) {
    super.onCreate(savedInstanceState)
    lifecycle.addObserver(MyLifecycleObserver(lifecycle))
}
ViewModel
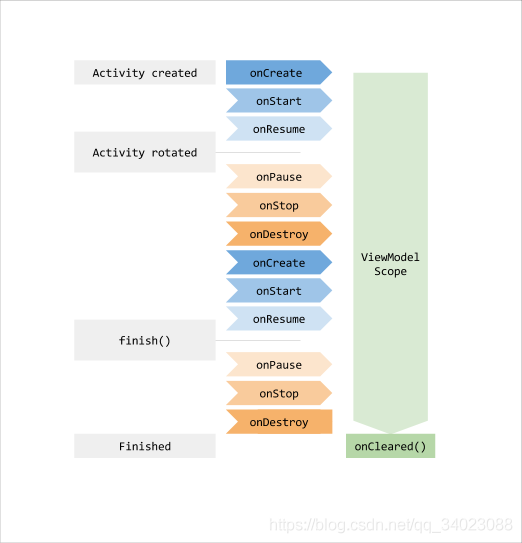
- Designed to store and manage interface related data in a lifecycle focused manner. The ViewModel class allows data to remain after configuration changes such as screen rotation, and is responsible for preparing data for the interface. ViewModel objects are automatically retained during configuration changes so that the data they store is immediately available to the next Activity or Fragment instance.
What problems can ViewModel solve
- If the system destroys or recreates the interface controller, any transient interface related data stored in it will be lost. In order to avoid the above situation in our program, we save the data by using the savedinstancestate of Activity (only suitable for a small amount of data that can be serialized and then deserialized), You can also use ViewModel to process data (large data can be saved)
- Simplify resource management and avoid the risk of memory leakage, Activity and Fragment often need to make asynchronous calls (such as network requests) that may take some time to return. We need to ensure that the system cleans up these calls after they are destroyed to avoid potential memory leakage. At the same time, if the configuration changes, the previously completed work may be repeated when re creating the object, resulting in a waste of resources
- Let the Activity and Fragment focus on the interface display. If the interface controller is also required to load data from the database or network, the class will expand more and more, and the ViewModel can separate the view data operation more easily and efficiently
- Share data between Fragment and Activity/Fragment
ViewModel usage
- Implement ViewModel and inherit the ViewModel abstract class
class ViewModelViewModel: ViewModel() {
    val userList = mutableListOf<User>()
}
- Reference ViewModel
Use in fragment/activity
val viewModel:ViewModelViewModel by viewModels()
viewModel.userList
For the ViewModel shared in multiple fragments, the ViewModel created with by activityViewModels() depends on the Activity and is the same object in multiple fragments
val shareViewModel:ViewModelViewModel by activityViewModels()
Alternatively, use koin dependency injection, which is described below
val viewModel: ViewModelViewModel by viewModel()

val viewModel: ViewModelViewModel by sharedViewModel()
ViewModel lifecycle
Lifecycle aware data LiveData
Is an observable data storage class. Unlike conventional observable classes, LiveData has life cycle awareness, which means that it follows the life cycle of other application components (such as Activity, Fragment or Service). This awareness ensures that LiveData only updates application component observers in the active life cycle state.
Advantages of LiveData
- Ensure that the interface conforms to the data state: LiveData follows the Observer mode. When the underlying data changes, LiveData will notify the Observer object. You can integrate code to update the interface in these Observer objects.
- No memory leakage: the observer binds to the Lifecycle object and cleans itself after its associated Lifecycle is destroyed.
- No crash due to Activity stopping: if the observer's lifecycle is inactive (such as returning an Activity in the stack), it will not receive any LiveData events.
- There is no need to manually process the life cycle: the interface components only observe the relevant data, and will not stop or resume the observation. LiveData will automatically manage all these operations because it can perceive relevant lifecycle state changes when observing.
- Data is always up-to-date: if the lifecycle becomes inactive, it receives the latest data when it becomes active again.
- Appropriate configuration changes: if an Activity or Fragment is recreated due to a configuration change (such as device rotation), it will immediately receive the latest available data.
- Shared resources: you can use singleton mode to extend LiveData objects to encapsulate system services so that they can be shared in applications.
LiveData usage
- definition
private val normaLiveData1 = MutableLiveData<String>()
- assignment
normaLiveData1.value="LiveDataValue"//UI thread
normaLiveData1.postValue("LiveDataValue")//Non UI main thread
- Observation data
normaLiveData1.observe(viewLifecycleOwner, Observer {
     LogUtil.e("A change in the first value was observed")
     tv.text = it
})
- Observe data without life cycle awareness. This method requires manual cancellation of observation, otherwise memory leakage will occur
val observer=Observer<String>{
    LogUtil.e("A change in the first value was observed")
}
normaLiveData1.observeForever(observer)
//Remove observations in the appropriate life cycle
normaLiveData1.removeObserver(observer)
- Convert LiveData
private val transLiveData= Transformations.map(normaLiveData1){
    "$it -----transformation"
}
- Merge multiple LiveData
private val mediatorLiveData = MediatorLiveData<String>()

mediatorLiveData.addSource(normaLiveData1){
     mediatorLiveData.value="Combined value: $it---${normaLiveData2.value}"
}

mediatorLiveData.addSource(normaLiveData2){
     mediatorLiveData.value="Combined value: ${normaLiveData1.value}---$it"
}
- LiveData is used in combination with room and collaborative process (below)
kotlin data flow Flow
Flow data flow is built on the basis of collaborative process and can provide multiple values. Conceptually, a data stream is a set of data sequences that can be calculated and processed asynchronously, a bit like RxJava.
Use of Flow
- Create Flow
val flow = flow<String> {
    emit("value1")
    emit("value2")
    delay(1000)
    emit("value3")
}
val flow = flowOf("value")
val flow = listOf(1, 2, 3).asFlow()
```

*   collect Flow----collect()

because collect Is a pending function, so it needs to be executed in the coroutine

```
scope.launch {
    flow.collect {
        LogUtil.e(it)
    }
}
```

*   transformation Flow----map()

```
flowOf(1, 2, 3).map {
    "The first $it individual"
}.collect {
    LogUtil.e(it)
}
```

*   filter Flow----filter()

```
flowOf(1, 2, 3).filter {
     it > 1
}.collect {
     LogUtil.e(it)
}
```

*   merge Flow

**zip**The operator will flow1 One of item and flow2 Corresponding one in item Merge,If flow1 in item Number greater than flow2 in item number,New after merger flow of item number = Smaller flow of item number

```
val flow1 = flowOf(1, 2, 3, 4, 5)
val flow2 = flowOf("one", "two", "three", "four", "five", "six")
flow1.zip(flow2) { a, b ->
    "$a---$b"
}.collect {
    LogUtil.e(it)
}
```

**combine**When merging, each time from flow1 Issue new item ,Will compare it with flow2 The latest item merge

```
val flow1 = flowOf(1, 2, 3, 4, 5).onEach { delay(1000) }
val flow2 = flowOf("one", "two", "three", "four", "five", "six").onEach { delay(500) }
flow1.combine(flow2) { a, b ->
    "$a---$b"
}.collect {
    LogUtil.e(it)
}
```

*   Catch exception----catch()

```
flow {
   emit(1)
   emit(1 / 0)
   emit(2)
}.catch {
   it.printStackTrace()
}.collect {
   LogUtil.e(it)
}
```

*   Thread switching----flowOn()

```
withContext(Dispatchers.IO){
    flowOf(1, 2, 3, 4).onEach {
        //Controlled by the following nearest flowOn - Main
        LogUtil.e("init---${Thread.currentThread().name}")
    }.filter {
        //Controlled by the following nearest flowOn - Main
        LogUtil.e("filter---${Thread.currentThread().name}")
        it > 1
    }.flowOn(Dispatchers.Main).map {
        //Controlled by the following nearest flowOn - IO
        LogUtil.e("map---${Thread.currentThread().name}")
        "The first $it"
    }.flowOn(Dispatchers.IO).map {
        //Controlled by the following nearest flowOn - Main
        LogUtil.e("The second time map---${Thread.currentThread().name}")
        "$it Results"
    }.flowOn(Dispatchers.Main).collect {
        //collect depends on which thread the whole flow is in. This is IO
        LogUtil.e("collect---${Thread.currentThread().name}")
        LogUtil.e(it)
    }
}
```

*   Turn into liveData----asLiveData()

Add dependency

```
"androidx.lifecycle:lifecycle-livedata-ktx:${LibraryVersion.LIVEDATA_KTX}"
flowOf(1, 2, 3, 4).asLiveData().observe(viewLifecycleOwner, Observer {
LogUtil.e(it)
})
[More operators]( )

### Save [DataStore] locally ()

DataStore Is a data storage solution,Allows you to use protocol buffers to store key value pairs or typed objects. DataStore use Kotlin Synergetic sum Flow Store data asynchronously and consistently. [Refer to Hongyang's official account.]( )

#### Problems with SharedPreferences

*   adopt getXXX() Method, which may cause the main thread to block
*   SharedPreference Type safety cannot be guaranteed
*   SharedPreference The loaded data will remain in memory, wasting memory
*   apply() Although the method is asynchronous, it may occur ANR,At 8.0 Before and 8.0 After that, the implementation is different
*   apply() Method cannot get the result of successful or failed operation

#### What problems does DataStore solve

*   DataStore Is based on Flow Implementation, so it ensures the safety in the main thread
*   Update data is processed in transaction mode. Transaction has four characteristics (atomicity, consistency, isolation and persistence)
*   No, apply() and commit() And so on
*   Automatic completion SharedPreferences Migrate to DataStore,Ensure data consistency without data damage
*   You can listen to the success or failure of the operation
*   in addition Jetpack DataStore Provided Proto DataStore Method for storing objects of a class( typed objects ),adopt protocol buffers Store object serialization locally, protocol buffers Now it has been widely used, both by wechat and Alibaba

#### DataStore usage

Add dependency
const val DATA_STORE = "1.0.0-alpha05"
const val PROTOBUF = "3.11.0"
"androidx.datastore:datastore-preferences:
L
i
b
r
a
r
y
V
e
r
s
i
o
n
.
D
A
T
A
S
T
O
R
E
"
/
/
p
r
o
t
o
b
u
f
need
lower
noodles
of
according to
Depend on
"
a
n
d
r
o
i
d
x
.
d
a
t
a
s
t
o
r
e
:
:
d
a
t
a
s
t
o
r
e
−
c
o
r
e
:
{libraryversion. Data_store} "/ / protobuf requires the following dependencies" androidx datastore::datastore-core:
LibraryVersion. Data store "/ / protobuf requires the following dependencies" androidx datastore::datastore−core:{LibraryVersion.DATA_STORE}”
"com.google.protobuf:protobuf-java:${LibraryVersion.PROTOBUF}"
##### Save key value pairs
object DataStore {
private const val APP_DATA_STORE_NAME = "APP_DATA_STORE_NAME"
private lateinit var dataStore: DataStore<Preferences>

fun init(context: Context) {
    dataStore = context.createDataStore(APP_DATA_STORE_NAME)
}

suspend fun <T> save(key: Preferences.Key<T>, value: T) {
    dataStore.edit {
        it[key] = value
    }
}

suspend fun <T> get(key: Preferences.Key<T>): T? {
    val value = dataStore.data.map {
        it[key]
    }
    return value.first()
}
}
preservation
CoroutineScope(scope).launch {
DataStore.save(preferencesKey("key1"), "aa")
}
read
CoroutineScope(scope).launch {
val get = DataStore.get(preferencesKey("key1"))
}
##### Save protobuf

protobuf Relevant knowledge is not described here

*   definition.proto file
syntax = "proto3";
option java_package = "com.haikun.jetpackapp.home.ui.demo.datastore.bean";
option java_multiple_files = true;
message MessageEvent {
int32 type = 1;
string message = 2;
}
* Compiled file After compilation, the following three files are obtained  * definition Serializer
object MessageSerializer : Serializer {
override val defaultValue: MessageEvent
get() = MessageEvent.getDefaultInstance()
override fun readFrom(input: InputStream): MessageEvent {
    return MessageEvent.parseFrom(input)
}

override fun writeTo(t: MessageEvent, output: OutputStream) {
    t.writeTo(output)
}
}
* preservation
val createDataStore = context?.createDataStore("data", MessageSerializer)
createDataStore?.updateData {
it.toBuilder().setType(12).setMessage("message") build()
}
* read
CoroutineScope(scope).launch {
context?.createDataStore("data", MessageSerializer)?.data?.first()?.let {
LogUtil.e("
i
t
.
t
y
p
e
−
−
−
{it.type}---
it.type−−−{it.message}")
}
}
### Declarative UI [DataBinding] ()

The data binding library is a support library that allows you to bind interface components in a layout to data sources in an application in a declarative format rather than programmatically,_**have access to LiveData Object is used as the data binding source to automatically notify the interface of data changes**_ .

#### Declarative UI VS imperative UI

*   _**Declarative UI**_ Just give the interface to「statement」It is not necessary to update manually. As long as the declared data changes, UI Just change

*   _**Imperative UI**_ Need to take the initiative UI Updates, such as setText()


#### DataBinding usage

##### Open DataBinding
android {
...
dataBinding {
enabled = true
}
}
##### Basic Usage

*   stay ViewModel Data and methods defined in
class DataBindingViewModel : ViewModel() {
val userName = MutableLiveData<String>()
val clickTimes = MutableLiveData<Int>()
val sexCheckId = MutableLiveData<Int>()
val love = MutableLiveData<String>()

fun save(){
    LogUtil.e("${userName.value}---${sex.value}---${love.value}")
}
}
* xml References and calls in
<import type="android.view.View" />
<import type="com.haikun.jetpackapp.home.R" />

<variable
    name="viewModel"
    type="com.haikun.jetpackapp.home.ui.demo.databinding.DataBindingViewModel" />
<TextView
    android:layout_width="match_parent"
    android:layout_height="wrap_content"
    android:text="@{viewModel.userName}" />


<RadioGroup
    android:layout_width="match_parent"
    android:layout_height="wrap_content"
    android:layout_marginTop="8dp"
    android:checkedButton="@={viewModel.sexCheckId}"
    android:orientation="horizontal">

    <RadioButton
        android:id="@+id/rb1"
        android:layout_width="wrap_content"
        android:layout_height="wrap_content"
        android:text="male" />

    <RadioButton
        android:id="@+id/rb2"
        android:layout_width="wrap_content"
        android:layout_height="wrap_content"
        android:text="female" />
</RadioGroup>


<EditText
    android:layout_width="wrap_content"
    android:layout_height="wrap_content"
    android:layout_marginTop="8dp"
    android:text="@={viewModel.love}"
    android:visibility="@{viewModel.sexCheckId==R.id.rb1?View.VISIBLE:View.GONE}" />

<Button
    android:layout_width="wrap_content"
    android:layout_height="wrap_content"
    android:layout_marginTop="8dp"
    android:onClick="@{v->viewModel.save()}"
    android:text="preservation" />
- Fragment
class DataBindingFragment : Fragment() {

    private val mViewModel: DataBindingViewModel by viewModels()

    override fun onCreateView(
        inflater: LayoutInflater,
        container: ViewGroup?,
        savedInstanceState: Bundle?
    ): View {
        val dataBinding = DataBindingUtil.inflate<FragmentDataBindingBinding>(
            inflater,
            R.layout.fragment_data_binding,
            container,
            false
        )
        //lifecycleOwner must be set to use liveData, otherwise the data cannot be updated
        dataBinding.lifecycleOwner = viewLifecycleOwner
        dataBinding.viewModel = mViewModel
        return dataBinding.root

    }
}
Advanced usage
- BindingMethods binding method name
@BindingMethods(value = [BindingMethod(type = MyButton::class, attribute = "maxTimes", method = "setMaxTimes")])
Used in xml
app:maxTimes="@{15}"
- BindingAdapter provides custom logic
Some properties require custom binding logic. For example, the android:paddingLeft feature does not have an associated setter, but provides a setPadding(left, top, right, bottom) method. The static binding adapter method annotated with BindingAdapter supports the calling method of custom attribute setter.
object ViewAdapter {
    @BindingAdapter("minTimes")
    @JvmStatic
    fun setMinTimes(view: MyButton, minTimes: Int) {
        view.setMin(minTimes)
    }
}
Used in xml
app:minTimes="@{8}"
- Custom bidirectional binding
@InverseBindingAdapter(attribute = "clickTimes")
@JvmStatic
fun getClickTimes(view: MyButton): Int {
    return view.clickTimes
}


@BindingAdapter("clickTimesAttrChanged")
@JvmStatic
fun setListener(view: MyButton, listener: InverseBindingListener?) {

    view.onTimesChangeListener = {
        listener?.onChange()
    }

}
``
Used in xml
app:maxTimes="@{15}"
- BindingAdapter provides custom logic
Some properties require custom binding logic. For example, the android:paddingLeft feature does not have an associated setter, but provides a setPadding(left, top, right, bottom) method. The static binding adapter method annotated with BindingAdapter supports the calling method of custom attribute setter.
object ViewAdapter {
    @BindingAdapter("minTimes")
    @JvmStatic
    fun setMinTimes(view: MyButton, minTimes: Int) {
        view.setMin(minTimes)
    }
}
Used in xml
app:minTimes="@{8}"
- Custom bidirectional binding
@InverseBindingAdapter(attribute = "clickTimes")
@JvmStatic
fun getClickTimes(view: MyButton): Int {
    return view.clickTimes
}


@BindingAdapter("clickTimesAttrChanged")
@JvmStatic
fun setListener(view: MyButton, listener: InverseBindingListener?) {

    view.onTimesChangeListener = {
        listener?.onChange()
    }

}