Original author: Puke
Original link: http://puke3615.github.io/2017/03/21/Android-Studio-Code-Block-Mark/
Original copyright notice: unless otherwise stated, all articles of this blog adopt CC BY-NC-SA 4.0 license agreement. Reprint please indicate the source!
Android Studio code block marking allows us to quickly locate the code logic block. When the code volume of some classes written in our development is relatively large, we will encounter the problem that it becomes difficult to maintain this class. Regardless of the factors at the design level of this class, we can only look at this problem from the perspective of code volume. The IDE based on IntelliJ provides us with a label that can summarize our code blocks (hereinafter referred to as code block marking), as follows:
// <editor-fold defaultstate="collapsed" desc="[A]">
[B]
// </editor-fold>
Where, [A] corresponds to the description language of marking and [B] corresponds to the code block to be marked.
According to the above rules, we mark MainActivity. The code is as follows
/**
 * @author zijiao
 * @version 17/3/21
 */
public class MainActivity extends Activity {

    // < editor fold defaultstate = "collapsed" desc = "member variable" >
    private Button button;
    // </editor-fold>

    // < editor fold defaultstate = "collapsed" desc = "oncreate logic" >
    @Override
    protected void onCreate(Bundle savedInstanceState) {
        super.onCreate(savedInstanceState);
        setContentView(R.layout.activity_main);
        initView();
        initListener();
    }
    // </editor-fold>

    // < editor fold defaultstate = "collapsed" desc = "findview logic" >
    private void initView() {
        button = (Button) findViewById(R.id.button);
    }
    // </editor-fold>

    // < editor fold defaultstate = "collapsed" desc = "click event processing logic" >
    private void initListener() {
        button.setOnClickListener(new View.OnClickListener() {
            @Override
            public void onClick(View v) {
                Toast.makeText(MainActivity.this, "Click button", Toast.LENGTH_SHORT).show();
            }
        });
    }
    // </editor-fold>


}
You can see that we classify each code block according to logic and add corresponding description labels. When we open the class next time, it will be clear to view or modify some code at a glance (its advantages will be particularly obvious when the code is large). See the figure below
It can be seen that marking code blocks is very convenient, but one thing is not good. When we need to mark a code block, we always add it before the code block
// <editor-fold defaultstate="collapsed" desc="[A]">
Then add after the code block
// </editor-fold>
This step is cumbersome, but the good news is that we can package this process into a marking template in combination with the LiveTempalte provided by AS to see the specific operation:
1. Open Android Studio, enter Preferences - Editor - Live Templates, and create a new Live Template
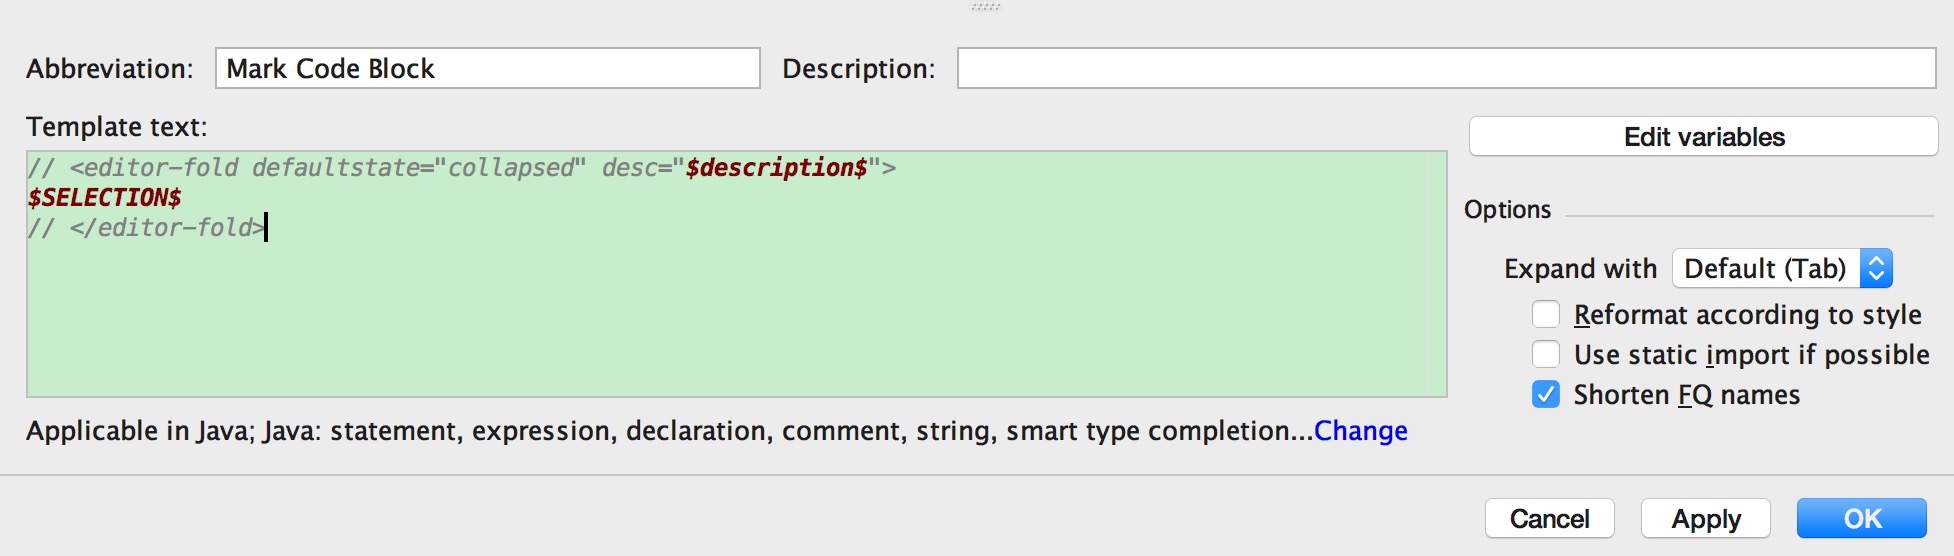
2. Mark Code Block shall be filled in the exemption and Template text
// <editor-fold defaultstate="collapsed" desc="$description$">
$SELECTION$
// </editor-fold>
3. Click Define and check the Java check box
4. Click Apply
At this time, your interface should be like this. You can check it
Here, the marking template has been completed. You can find any class to test, select a code block, and press the shortcut key Command + Option + J (Windows system can search the shortcut key corresponding to Surround with Live Template in Preferences - Keymap) to select the Mark Code Block template. At this time, we can quickly mark the code block, As shown below