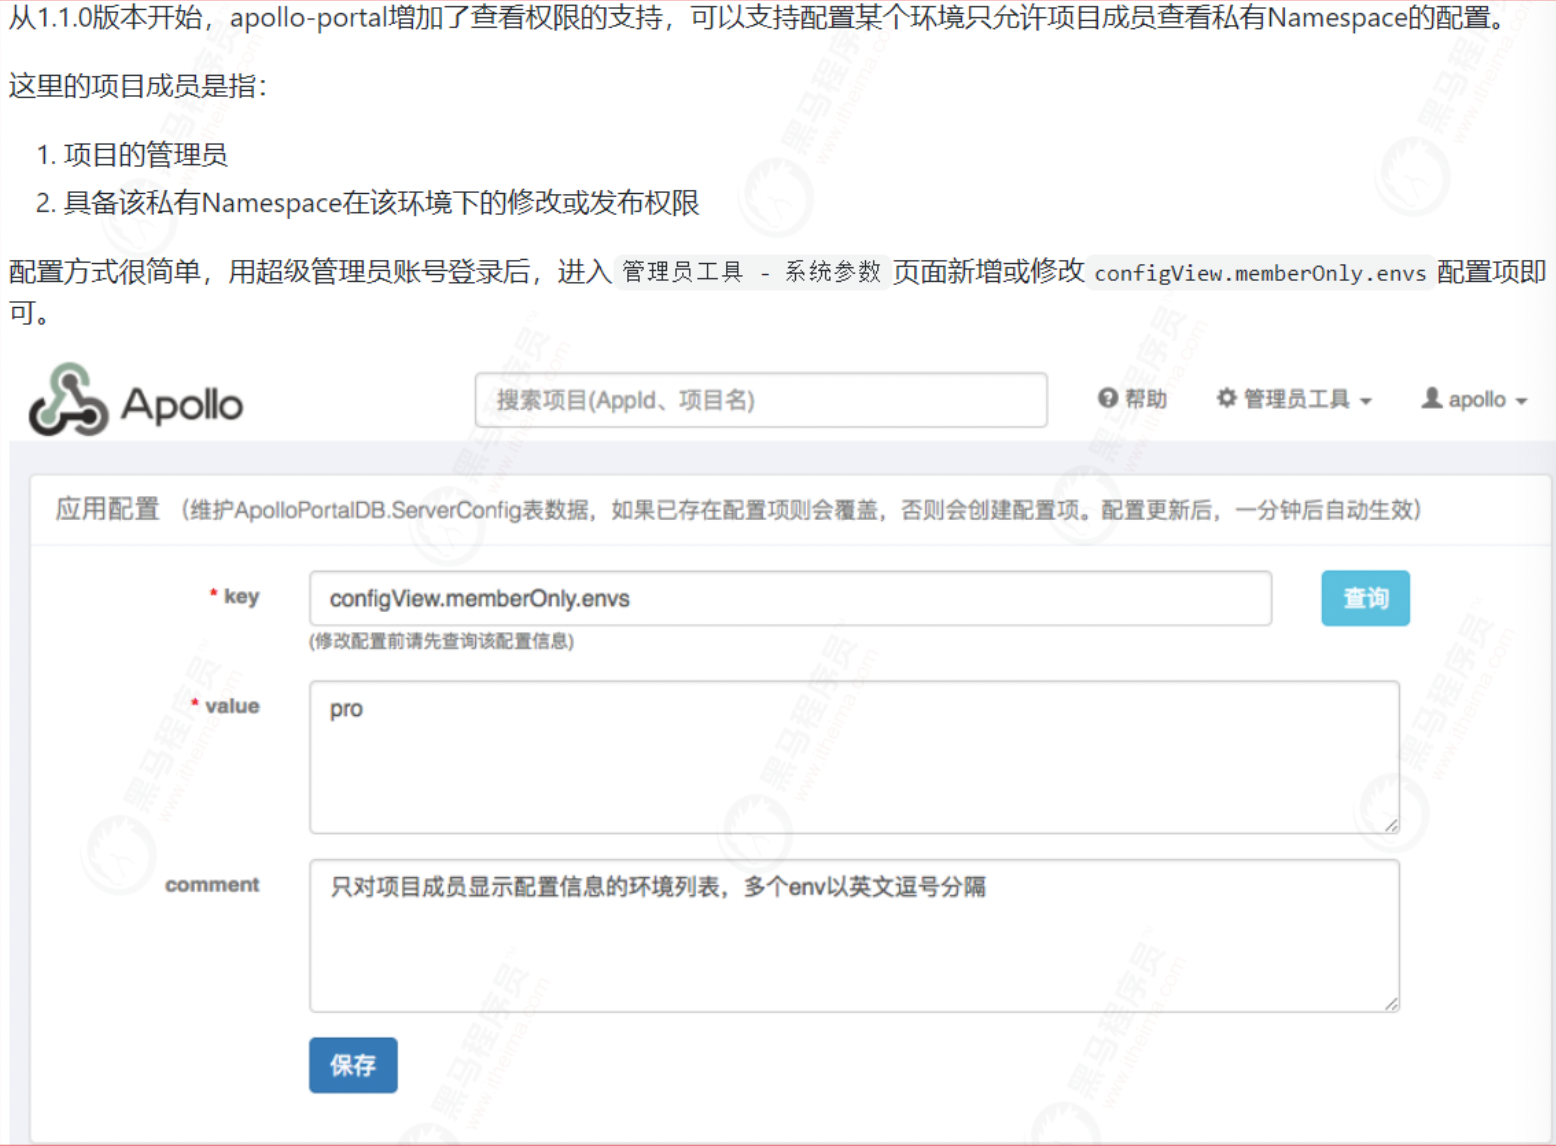
Apollo project practice
1 Apollo application

Project address: https://github.com/ctripcorp/apollo
Instruction manual: https://github.com/ctripcorp/apollo/wiki
1.1 first acquaintance with Apollo
Apollo (Apollo) is a distributed configuration center developed by Ctrip framework department. It can centrally manage the configuration of different application environments and different clusters. After the configuration is modified, it can be pushed to the application end in real time. It also has standardized permissions, process governance and other characteristics. It is suitable for micro service configuration management scenarios.
The server is developed based on Spring Boot and Spring Cloud. After packaging, it can run directly without installing additional application containers such as Tomcat.
The Java client does not rely on any framework and can run in all Java runtime environments. At the same time, it also has good support for Spring/Spring Boot environment.
1) Core functions:
Unified management of different environments and different cluster configurations:
    1:Apollo Provides a unified interface for centralized management of different environments( environment),Different clusters( cluster),Different namespace( namespace)Configuration of.
    2:The same code is deployed in different clusters and can have different configurations, such as zk Address, etc
    3:By namespace( namespace)It can easily support multiple different applications to share the same configuration, and allow applications to overwrite the shared configuration
    4:The configuration interface supports multiple languages (Chinese, English)

Hot release:
    User in Apollo After modifying and publishing the configuration, the client can receive the latest configuration in real time (1 second) and notify the application.

Version release management:
    All configuration releases have a version concept, which can easily support configuration rollback.

Gray Publishing:
    Support gray-scale publishing of configuration. For example, after clicking publish, it will only take effect for some application instances, and then push it to all application instances after observation for a period of time.

Authority management, release audit, operation audit:
   1:The management of application and configuration has a perfect authority management mechanism. The management of configuration is also divided into two links: editing and publishing, so as to reduce human errors.
   2:All operations have audit logs, which can easily track problems.
Client configuration information monitoring:
   You can easily see which instances of the configuration are being used
provide Java and.Net Native Client :
    1:Provided Java and.Net Native client for easy application integration
    2:support Spring Placeholder,Annotation and Spring Boot of ConfigurationProperties,Convenient for application (required) Spring 3.1.1+)
    3:It also provides Http Interface, non Java and.Net The application can also be used conveniently

Provide open platform API:
    1:Apollo It provides a relatively complete unified configuration management interface, and supports multi environment and multi data center configuration management, authority, process governance and other features.
    2:however Apollo For the sake of generality, the modification of the configuration will not be too limited. It can be saved as long as it conforms to the basic format.
    3:In our research, we found that for some users, their configuration may have complex formats, such as xml, json,The format needs to be verified.
    4:There are other ways to use, such as DAL,There is not only a specific format, but also the input value needs to be verified before saving, such as checking whether the database, user name and password match.
    5:For such applications, Apollo Support the application through open interface Apollo Modify and publish the configuration, and have perfect authorization and authority control

Simple deployment:
   1:As a basic service, the availability of the configuration center is very high, which requires Apollo Minimize external dependence
   2:At present, the only external dependency is MySQL,So the deployment is very simple, as long as it is installed Java and MySQL You can make Apollo Run
   3:Apollo It also provides packaging scripts, which can generate all required installation packages with one click, and supports custom run-time parameters
2) Who's using it
Many large domestic manufacturers are using Apollo as the distributed configuration center. If your website is also using it, it is https://github.com/ctripcorp/apollo/issues/451 You can register.
Many large domestic manufacturers such as Ctrip, Huawei, jd.com, Zhilian recruitment, China Mobile, 360 finance, Zhongtong express, Zhuanzhuan, shell, tuba rabbit, Ping An Bank and youzan are using Apollo.

1.2 Apollo stand-alone deployment
Next, we will implement Apollo installation. Before installation, we will first introduce the architecture of stand-alone installation, as shown in the following figure:
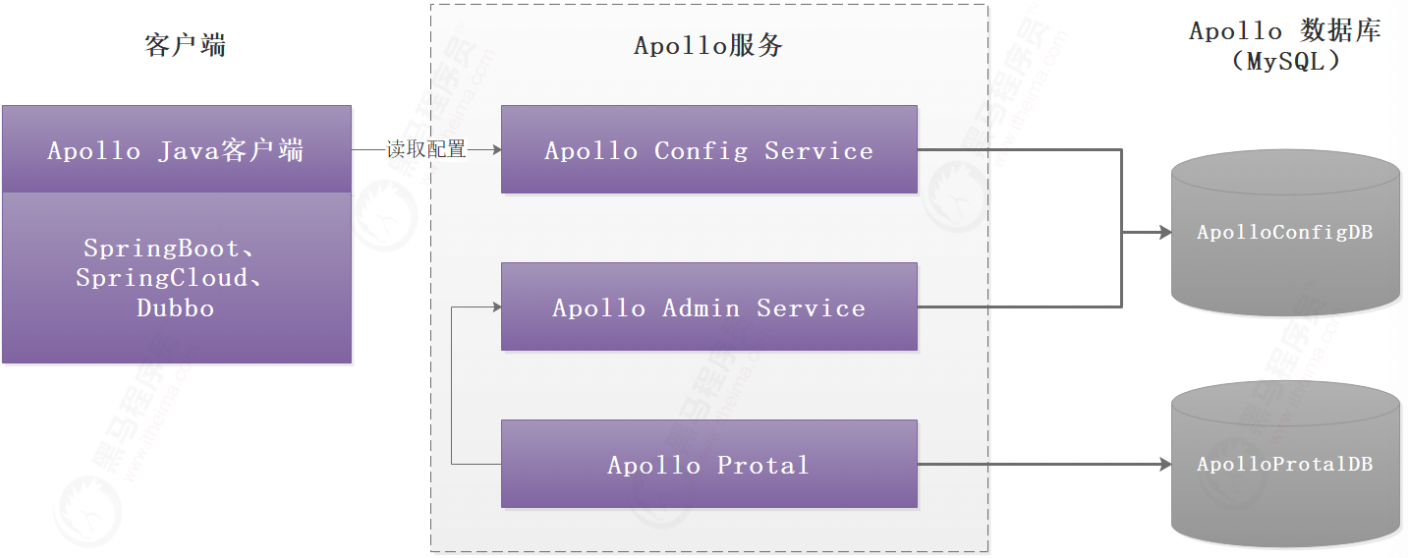
The figure above shows the Apollo stand-alone deployment architecture. We explain each node:
Apollo Config Service:It provides functions such as reading and pushing configuration, and the service object is Apollo client.
Apollo Admin Service:It provides functions such as configuration modification and publishing. The service object is Apollo Portal.
Apollo Portal:Apollo To configure different items (item configuration, permission configuration, etc.), and the service object is open
Sender and open platform API
Environmental description:
MySQL:MySQL 5 is recommended.7,Version requirements 5.6.5+
Apollo Server:JDK1.8+
Apollo client:JDK1.7+
There are many ways to install Apollo. The official provides quick installation mode and Docker installation mode. We implement both installation modes once, but if it is a production environment, please use the distributed deployer
https://github.com/ctripcorp/apollo/wiki/%E5%88%86%E5%B8%83%E5%BC%8F%E9%83%A8%E7%BD%B2%E6%8C%87%E5%8D%97
1.2.1 quick installation
1)JDK version:
[root@skywalking ~]# java -version
java version "1.8.0_144"
Java(TM) SE Runtime Environment (build 1.8.0_144-b01)
Java HotSpot(TM) 64-Bit Server VM (build 25.144-b01, mixed mode)
2)MySQL version:
SELECT VERSION()
-----------------
5.7.32-log
3) Installation package download:
Apollo has prepared a Quick Start installation package Zip, which contains jar packages that can be started automatically, as well as all dependent jar packages, database scripts, built-in Tomcat containers, etc. the installation package has a total of 63M. You only need to download it locally and you can use it directly, eliminating the compilation and packaging process.
Github download address: https://github.com/nobodyiam/apollo-build-scripts
Quick Start is only used for local testing, so ordinary users do not need to download the source code and package by themselves, but only need to download the packaged package. However, some users want to repackage after modifying the code, so you can refer to the following steps:
1:modify apollo-configservice, apollo-adminservice and apollo-portal of pom.xml,Comment out
spring-boot-maven-plugin and maven-assembly-plugin
2:Execute under the root directory mvn clean package -pl apollo-assembly -am -DskipTests=true
3:copy apollo-assembly/target Lower jar Bag, rename by apollo-all-in-one.jar
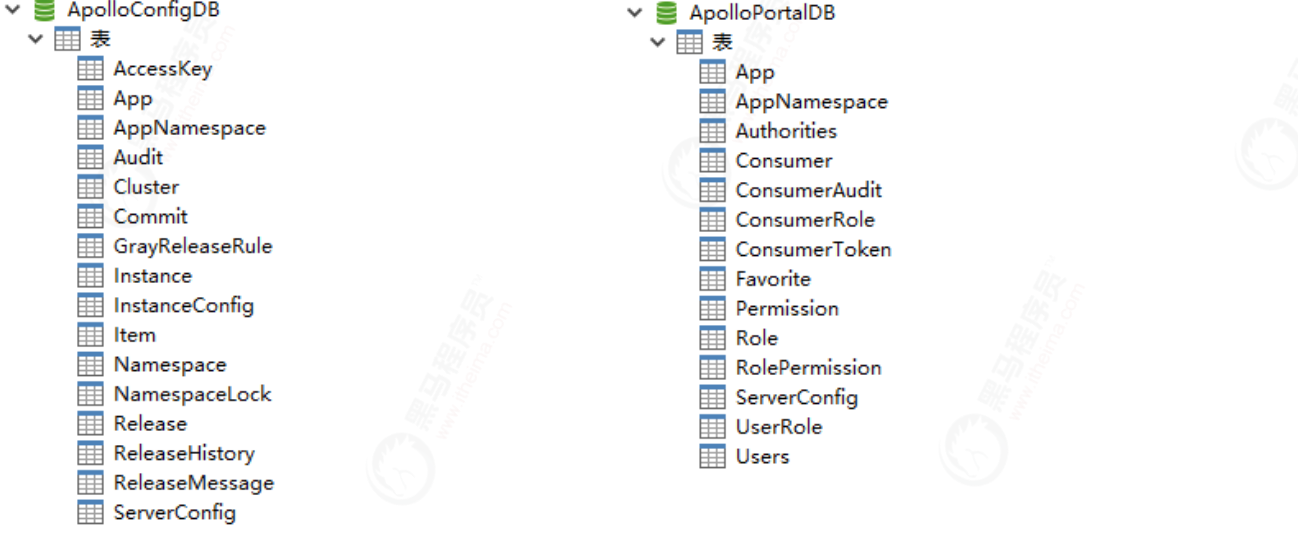
4) Create database:
The Apollo server requires two databases: Apollo PORTALDB and Apollo configdb. We have prepared sql files for the creation of databases, tables and sample data respectively. We only need to import the database.
Note: if you have created an Apollo database locally, please pay attention to backing up the data. The sql file we prepared will empty the table related to Apollo.
5) Configure database connection:
Our database address is not fixed. The Apollo server needs to know how to connect to the database you created earlier, so you need to modify the database connection address. There is a startup script demo in the installation package Modify the connection string of configalportdb and the related information of aplosh database:
# apollo config db info
apollo_config_db_url="jdbc:mysql://192.168.211.145:3306/ApolloConfigDB?
characterEncoding=utf8&serverTimezone=Asia/Shanghai"
apollo_config_db_username=root
apollo_config_db_password=123456
# apollo portal db info
apollo_portal_db_url="jdbc:mysql://192.168.211.145:3306/ApolloPortalDB?
characterEncoding=utf8&serverTimezone=Asia/Shanghai"
apollo_portal_db_username=root
apollo_portal_db_password=123456
6) Start service:
Quick Start script will start three services locally, using ports 8070, 8080 and 8090 respectively. Please ensure that these three ports are not currently used. If the ports are not used, we can directly start the program and execute demo SH script is enough, and the startup process is relatively slow.
./demo.sh start
When you see the following output, it indicates that the startup is successful!
==== starting service ====
Service logging file is ./service/apollo-service.log
Started [10768]
Waiting for config service startup.......
Config service started. You may visit http://localhost:8080 for service status
now!
Waiting for admin service startup....
Admin service started
==== starting portal ====
Portal logging file is ./portal/apollo-portal.log
Started [10846]
Waiting for portal startup......
Portal started. You can visit http://localhost:8070 now!
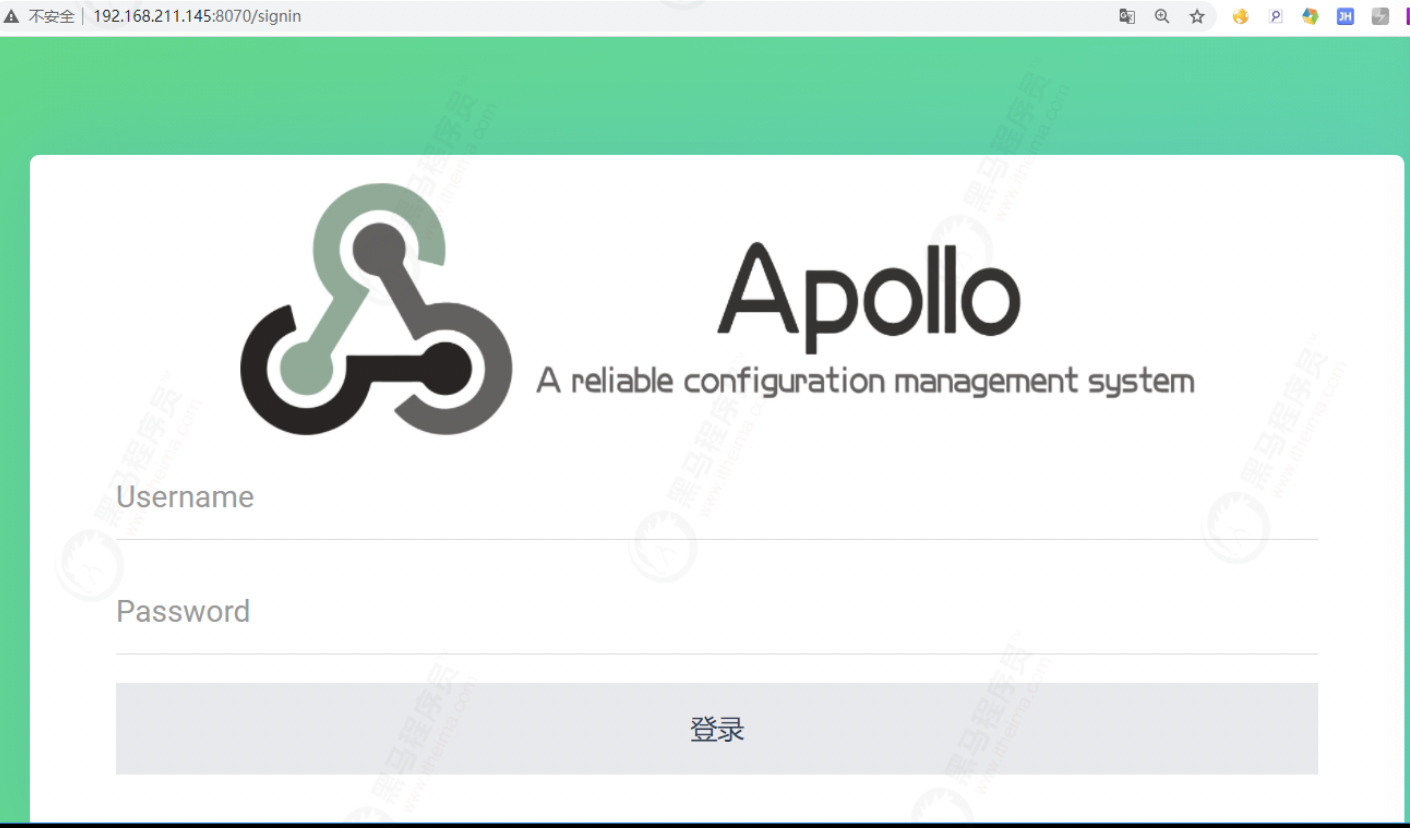
Access after startup http://192.168.211.145:8070/ , you can see the Apollo configuration interface
1.2.2 installation of docker container
If you are very familiar with Docker, you can use Docker to quickly deploy Apollo to quickly understand Apollo. Ensure that the Docker quick start folder already exists locally. If you have clone d the code of Apollo locally, you can skip this step.
Execute docker compose up in the docker quick start directory. The first execution will trigger operations such as downloading images. You need to wait patiently for some time.
Search all logs beginning with Apollo quick start, and see the following logs to indicate that the startup is successful:
apollo-quick-start | ==== starting service ====
apollo-quick-start | Service logging file is ./service/apollo-service.log
apollo-quick-start | Started [45]
apollo-quick-start | Waiting for config service startup.......
apollo-quick-start | Config service started. You may visit
http://localhost:8080 for service status now!
apollo-quick-start | Waiting for admin service startup......
apollo-quick-start | Admin service started
apollo-quick-start | ==== starting portal ====
apollo-quick-start | Portal logging file is ./portal/apollo-portal.log
apollo-quick-start | Started [254]
apollo-quick-start | Waiting for portal startup.......
apollo-quick-start | Portal started. You can visit http://localhost:8070 now!
However, there are some problems to pay attention to in Docker based installation:
1:The port of the database is mapped to 13306, so if you want to access the database on the host, you can use the localhost:13306,user
Name is root,Leave the password blank.
2:To view the logs of more services, you can docker exec -it apollo-quick-start bash Log in and
reach/apollo-quick-start/service and/apollo-quick-start/portal View log information under.
Access after installation http://192.168.211.145:8070/ , you can see the Apollo configuration interface
2. Use of configuration center
Next, let's learn how to use the Apollo configuration center. The configuration center is mainly used to provide configuration services for distributed applications. The access address is http://192.168.211.145:8070 , login account Apollo, password admin
After login, the interface is as follows:

2.1 project configuration trusteeship
Next, we use Apollo as the configuration center to host the project configuration into Apollo.
2.2.1 configuration creation
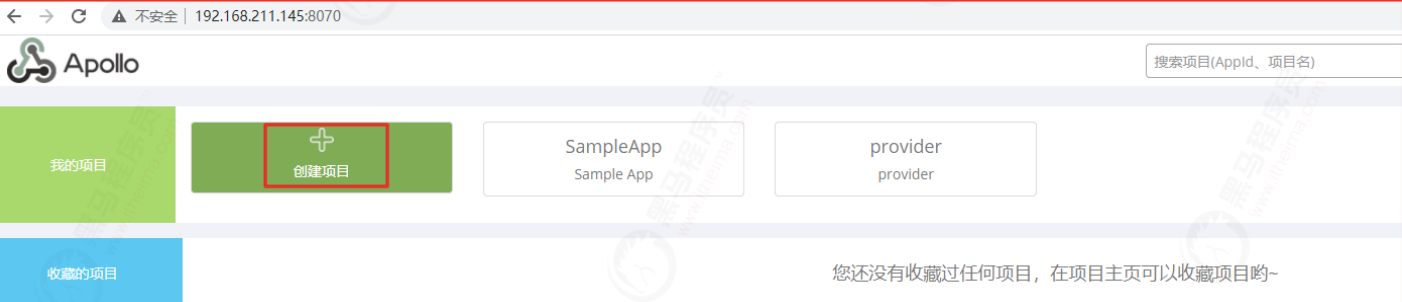
Click create application, and the following form will appear:

Create application parameter description:
- Department: select the Department where the application is located. The Department data comes from the record corresponding to Key = organizations in the ServerConfig table of Apollo PORTALDB library.
- App AppId: the unique id used to identify the application identity. The format is string. It needs to be the same as the client app App configured in properties id correspondence.
- Application Name: application name, which is only used for interface display.
- Application leader: project administrator permission by default.
- Project administrator: you can create namespaces and clusters and assign user permissions.
Default configuration
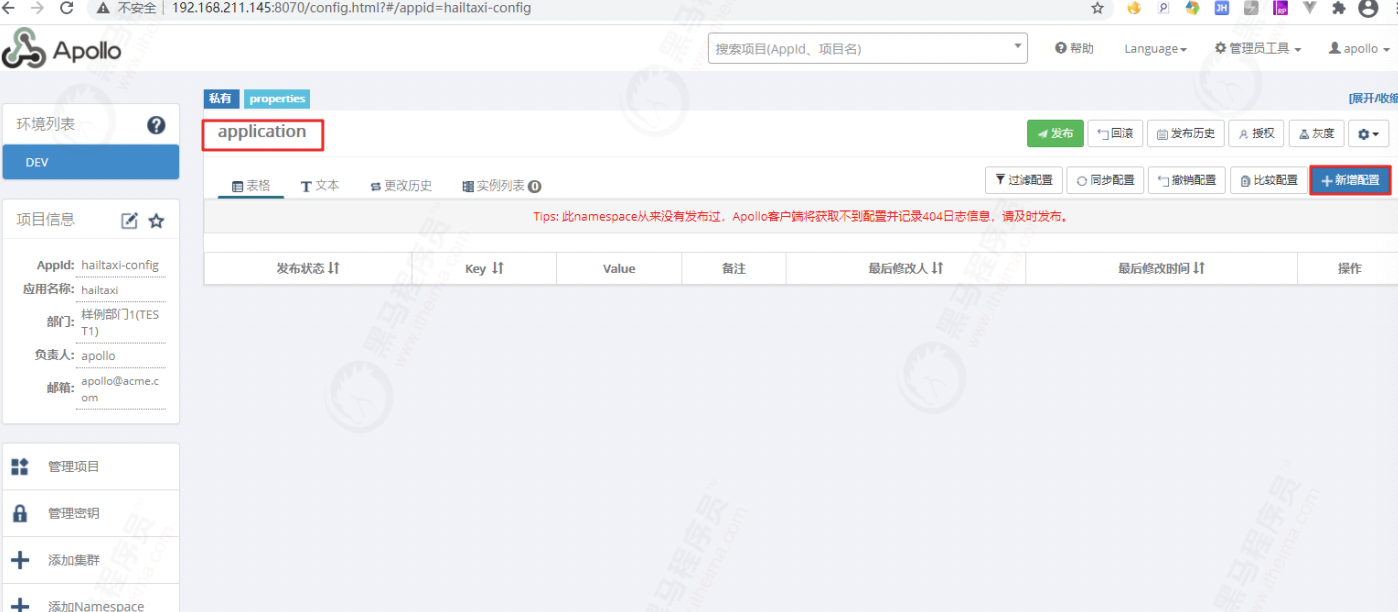
To create a configuration, you need to move the configuration in the project to Apollo. You can click the add configuration button. By default, each project has a default configuration application Properties, as shown in the following figure:
Add configuration as shown below:
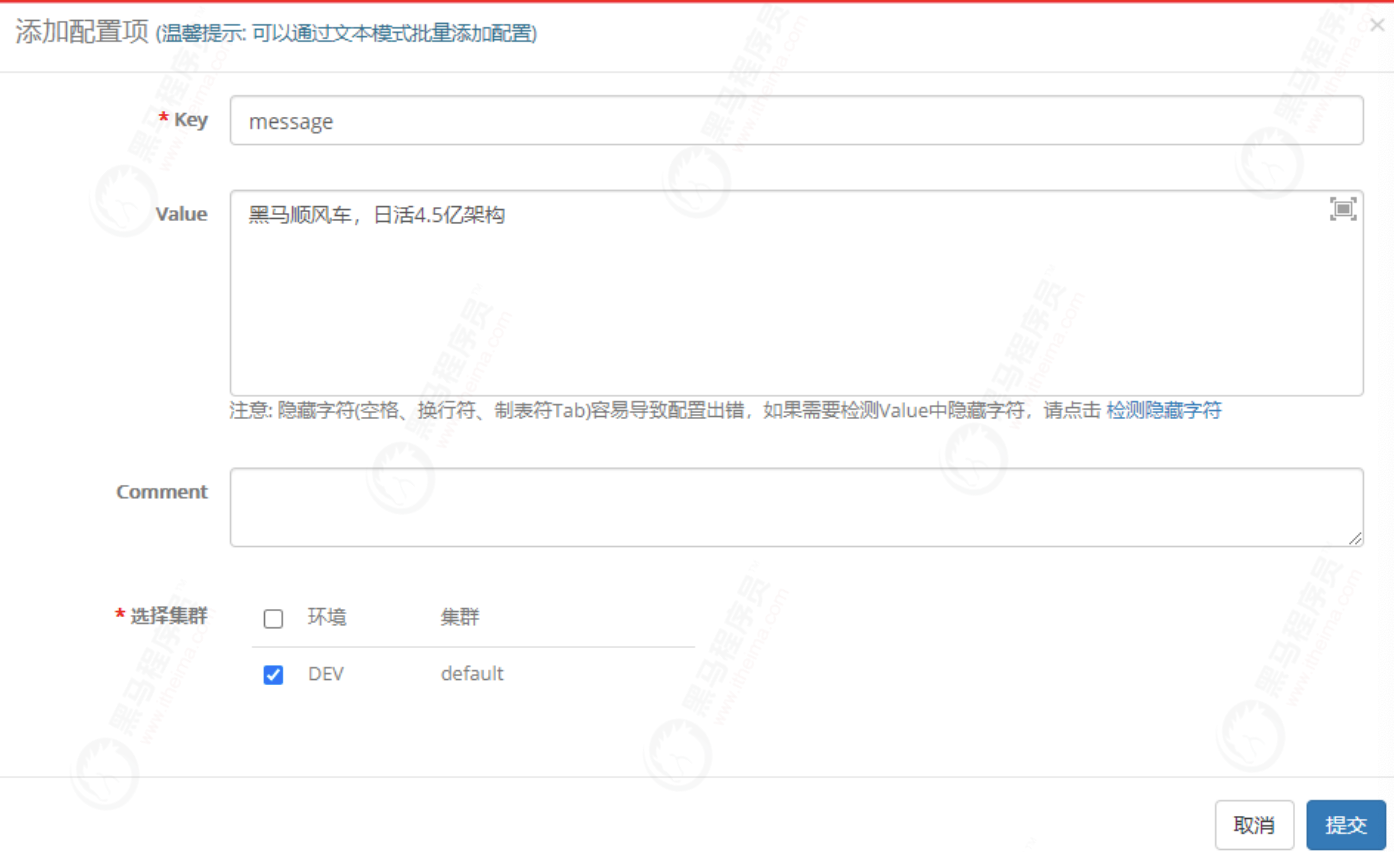
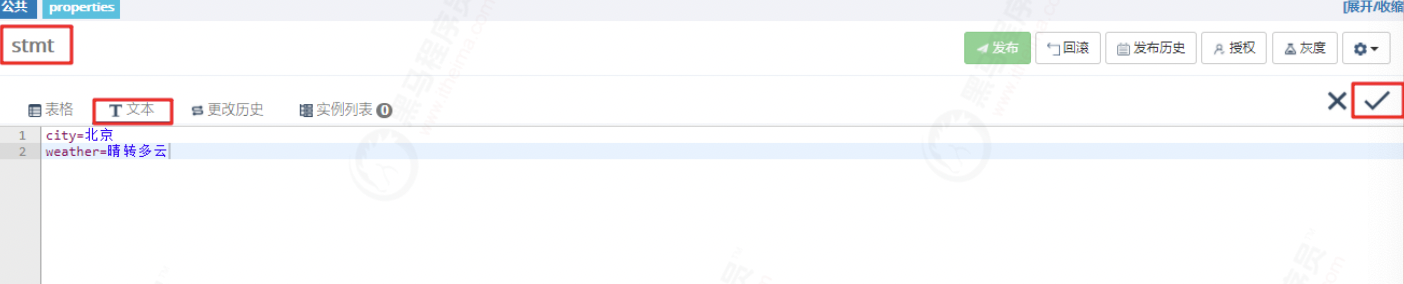
At this point, it is equivalent to in application A key: value data is added to properties:
#bootstrap.properties
message=Dark horse ride, day 4.5 Billion architecture
After saving the configuration, you can see the configuration information, but the data in the project cannot be read directly. You can only read it after publishing. As shown in the figure below, you can also view the history of each modification, which projects are using the instance, modify the configuration, and delete the current configuration file. Each configuration file is defined as a namespace:

Public configuration creation
In addition to the default configuration, we can also create more configurations by ourselves. To create a new configuration, click Add Namespace to open the following add interface:
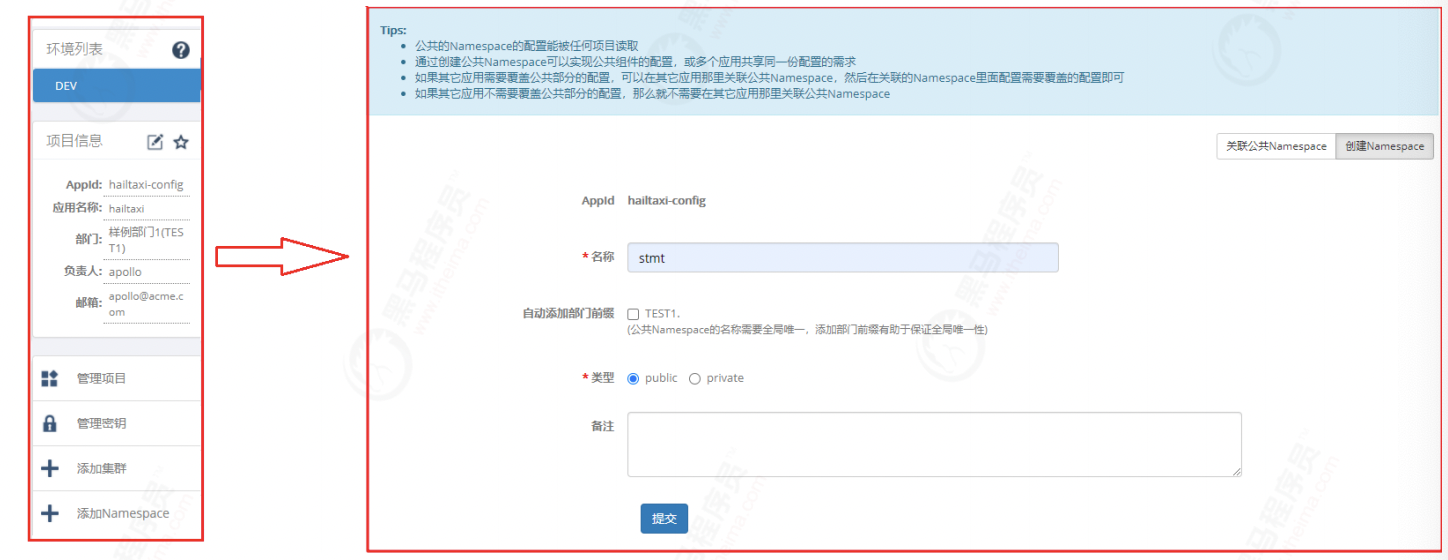
There are two options for this type. One is to create a public configuration and the other is to create a private configuration. The differences between them are as follows:
public:
Public Namespace The configuration of can be read by any item
By creating a public Namespace It can realize the configuration of common components or the requirement that multiple applications share the same configuration
If other applications need to cover the configuration of the public part, the public part can be associated with other applications Namespace,Then in the associated
Namespace The configuration that needs to be covered can be configured inside
If other applications do not need to cover the configuration of the public part, there is no need to associate the public part with other applications Namespace
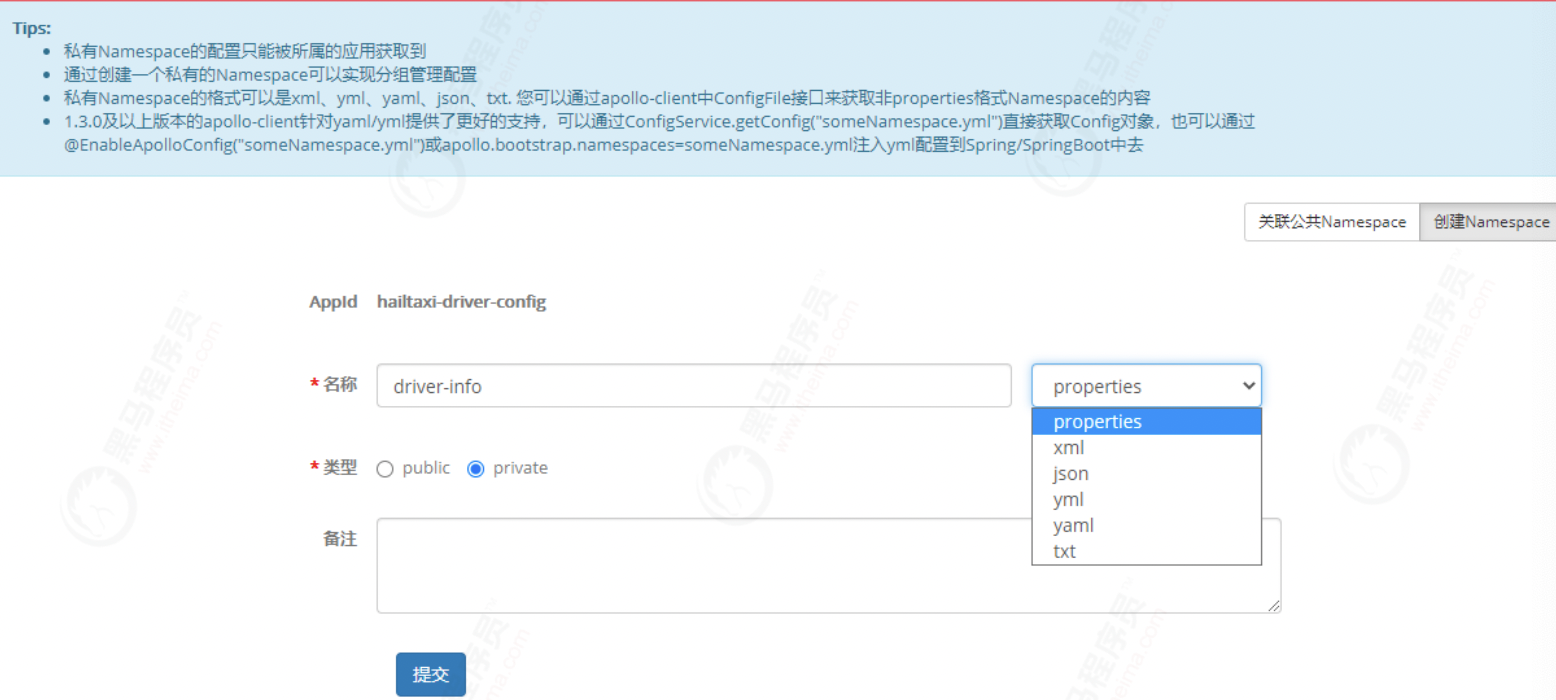
private:
private Namespace The configuration of can only be obtained by the application to which it belongs
By creating a private Namespace Group management configuration can be realized
private Namespace The format can be xml,yml,yaml,json,txt. You can apollo-client in
ConfigFile Interface to get non properties format Namespace Content of
1.3.0 And above apollo-client in the light of yaml/yml Better support can be provided through
ConfigService.getConfig("someNamespace.yml")Direct acquisition Config Object, or through
@EnableApolloConfig("someNamespace.yml")or
apollo.bootstrap.namespaces=someNamespace.yml injection yml Configure to Spring/SpringBoot Zhongqu
Next, we can add some data and publish it, as shown in the following figure:
Configure Association
Next, we can create a configuration association public configuration. We can first create a project hailtaxi driver config and create a private configuration in this project. ipinfo inherits the above stmt public configuration:
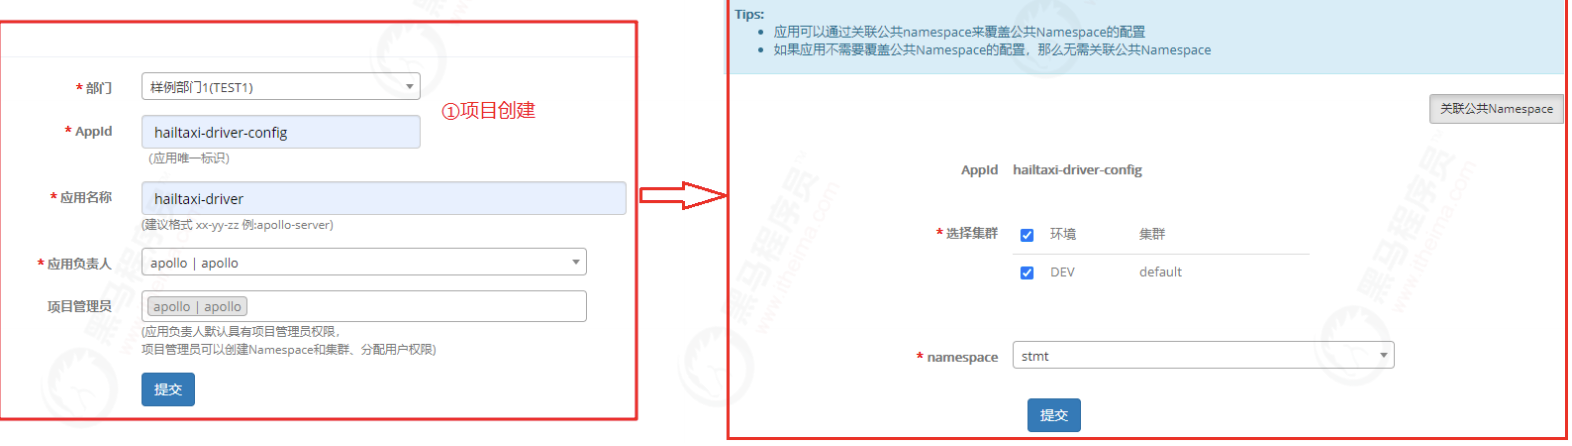
Let's add another part of the data, as shown in the figure below:

Private configuration
Next, we can create a private configuration for hailtaxi driver config, as shown in the following figure:
We added some information as shown in the figure below:

2.2.2 spring boot integration Apollo
Configure use cases
In order to give more resources to Apollo, we add a new namespace in hailtaxi driver config to configure the core configuration of springboot. The contents of springboot config are as follows:
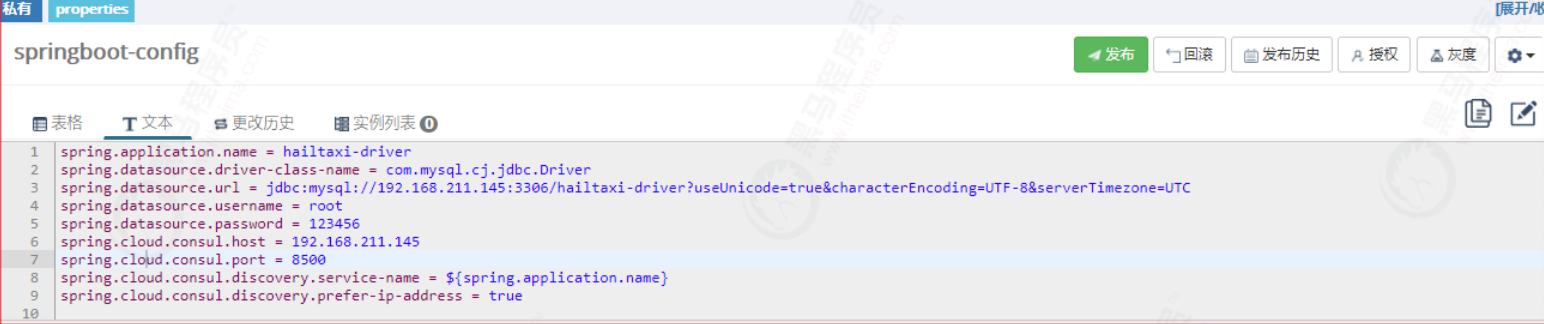
The configuration data are as follows:
spring.application.name = hailtaxi-driver
spring.datasource.driver-class-name = com.mysql.cj.jdbc.Driver
spring.datasource.url = jdbc:mysql://192.168.211.145:3306/hailtaxi-driver?
useUnicode=true&characterEncoding=UTF-8&serverTimezone=UTC
spring.datasource.username = root
spring.datasource.password = 123456
spring.cloud.consul.host = 192.168.211.145
spring.cloud.consul.port = 8500
spring.cloud.consul.discovery.service-name = ${spring.application.name}
spring.cloud.consul.discovery.prefer-ip-address = true
We write a case to obtain the data in the configuration (stmt, driver info), output friendly tips to the outside world, and create com in hailtaxi- driver itheima. driver. controller. Tripcontroller code is as follows:
@RestController
@RequestMapping(value = "/trip")
@ConfigurationProperties(prefix = "platform")
@Data
public class TripController {

    @Autowired
    private Environment environment;

    /***
     * Travel reminder
     * @return
     */
    @GetMapping(value = "/message")
    public String message(){
        //Get stmt data in hailtaxi driver config
        String ip = environment.getProperty("ip");
        String city = environment.getProperty("city");
        String weather = environment.getProperty("weather");

        //Get driver info data in hailtaxi driver config
        String drivertype = environment.getProperty("drivertype");
        String driveryear = environment.getProperty("driveryear");

        //Assembly prompt
        String message = "Yours IP["+ip+"],Welcome["+
                city+"]User, current weather"+weather+". The model you selected is["+
                drivertype+"],Age of the vehicle"+driveryear+",I wish you a pleasant trip! ["+
                name+"]From["+coursename+"],Contact address:"+address;
        return message;
    }
}
Integrated Apollo
There are two steps to integrate Apollo. First, introduce the client of Apollo, and then introduce the configuration information that needs to be injected from Apollo into the spring boot core configuration file.
1) Introduce dependency
POM in hailtaxi driver The following dependencies are introduced into XML:
 <!--ApolloClient-->
        <dependency>
            <groupId>com.ctrip.framework.apollo</groupId>
            <artifactId>apollo-client</artifactId>
            <version>1.7.0</version>
        </dependency>
2) Modify configuration
In bootstrap Remove the following configuration from YML:
spring:
  application:
    name: hailtaxi-driver
  datasource:
    driver-class-name: com.mysql.cj.jdbc.Driver
    url: jdbc:mysql://192.168.211.145:3306/hailtaxi-order?useUnicode=true&characterEncoding=UTF-8&serverTimezone=UTC
    username: root
    password: 123456
  cloud:
    #Consul configuration
    consul:
      host: 192.168.211.145
      port: 8500
      discovery:
        #Service name registered in Consul
        service-name: ${spring.application.name}
        prefer-ip-address: true
In bootstrap Add the following configuration to YML:
app:
  id: hailtaxi-driver-config  #Project (application) number of Apollo used
apollo:
  meta: http://192.168.211.145:8080 #Apollo Meta Server address
  bootstrap:
    enabled: true   #Whether to enable the Apollo configuration preload function. The default is false.
    eagerLoad:
      enable: true  #Whether to enable the loading time of Apollo support log level. The default is false.
    namespaces: application,stmt,driver-info,springboot-config  #The namespace of the used Apollo. The default is application.
The complete configuration file is as follows:
server:
  port: 18081
#Apollo application
app:
  id: hailtaxi-driver-config  #Project (application) number of Apollo used
apollo:
  meta: http://192.168.211.145:8080 #Apollo Meta Server address
  bootstrap:
    enabled: true   #Whether to enable the Apollo configuration preload function. The default is false.
    eagerLoad:
      enable: true  #Whether to enable the loading time of Apollo support log level. The default is false.
    namespaces: application,stmt,driver-info,springboot-config  #The namespace of the used Apollo. The default is application.
We ask http://localhost:18081/trip/message The test results are as follows:

2.2 practical functions of Apollo
In real project applications, there are many areas that need attention, such as configuration automatic refresh, configuration loading sequence, complex environment configuration, data encryption, log configuration, etc., which will perplex our production environment. Next, let's learn the solutions to these problems.
auto refresh
Previously, we have implemented SpringBoot to read the configuration, but we use Environment. Let's use @ Value and @ ConfigurationProperties respectively, and then observe whether the configuration will be refreshed.
We add the following data to stmt:
#Configuration using @ ConfigurationProperties
platform.name=Black horse ride
platform.address=Beijing jinyanlong scientific research building
platform.coursename=Dark horse architect course
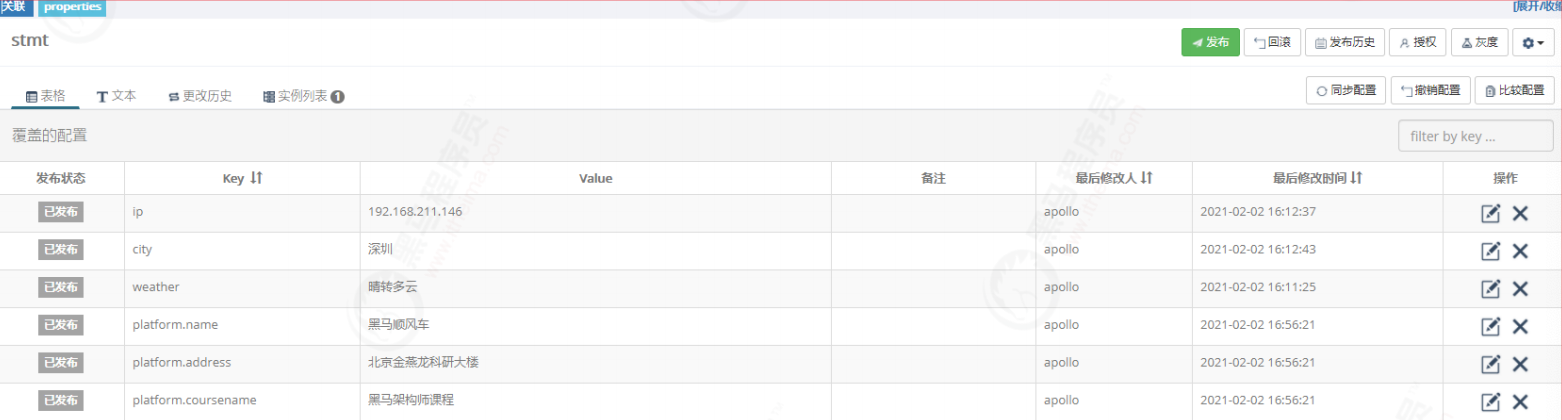
We modify ip, city and platform Name, and publish it, as shown in the figure below:
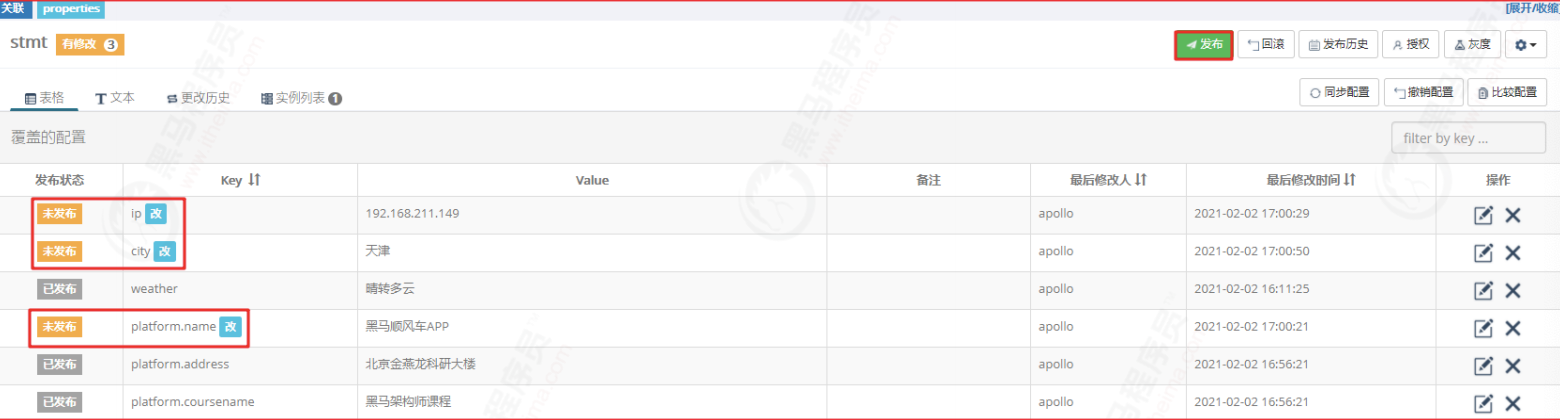
We can find that the ip and city have changed, while the plateform Name has not changed, as shown in the following figure:

At present, Apollo does not provide the function of automatically refreshing the configuration of the configuration class annotated by @ ConfigurationProperties, and there is not a good way to automatically refresh the configuration in the pure Spring Boot project, so we will use Apollo as the configuration center in the future. It is recommended to use @ Value or Environment to load the configuration, If @ ConfigurationProperties must be used in some scenarios, it needs to be solved in combination with Apollo's listener.
Apollo listener
Apollo has been able to meet the function of automatic refresh configuration in most of our scenarios, but if we use @ConfigurationProperties in the project, we can only use Apollo listener function to achieve data refresh. We can read the contents of the changes in the listener first, then call the specified set method to perform the reassignment operation.
We create listener com.com in hailtaxi driver itheima. driver. apollo. Apollo configlistener, the code is as follows:
@Component
public class ApolloConfigListener {

    /***
     * Data change monitoring
     * @param changeEvent
     * @throws Exception
     */
    @ApolloConfigChangeListener(
            value = {"stmt", "driver-info"},        //Listen for specified file changes
            interestedKeyPrefixes = {"platform."})  //In plateform Listen only when the initial key changes
    public void onChange(ConfigChangeEvent changeEvent) throws Exception {
        //Get all configuration items of Apollo
        Set<String> strings = changeEvent.changedKeys();
        for (String key : strings) {
            System.out.println("Altered Key="+key);
            System.out.println("Pre change value="+changeEvent.getChange(key).getOldValue());
            System.out.println("Changed value="+changeEvent.getChange(key).getNewValue());
        }
    }

}
We modify the stmt configuration and remember to publish it after modification, as follows:
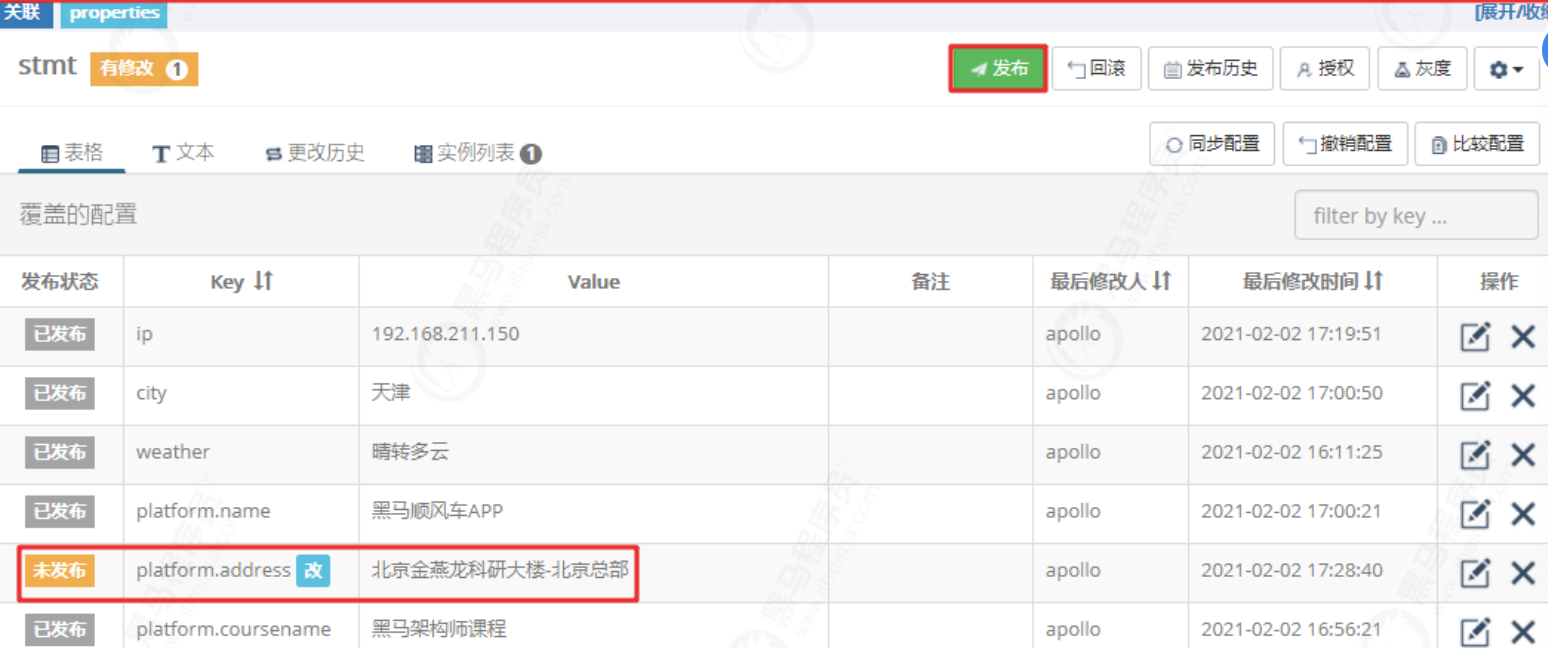
In the project, our commissioning results are as follows:

Console output:
Altered Key=platform.address
Pre change value=Beijing jinyanlong scientific research building
Changed value=Beijing jinyanlong scientific research building-Beijing headquarters
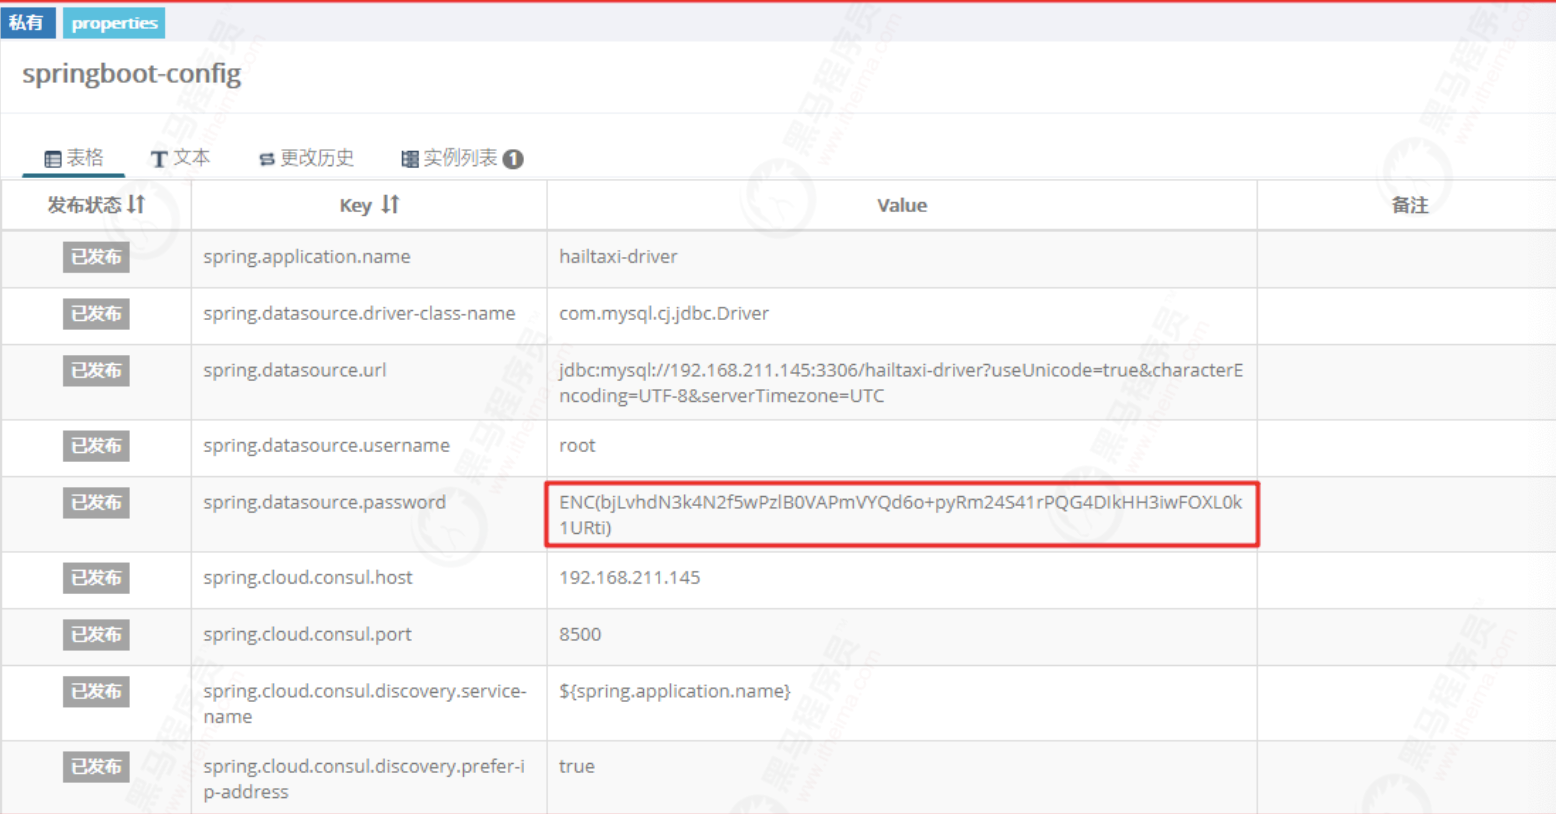
Configure encryption
For security reasons, it may be best to encrypt sensitive information in the configuration file. For example, the user name and password of MySQL, the Token token of the third-party platform, and so on. However, Apollo has no built-in encryption function. The official documents are as follows:
Project address: https://github.com/ctripcorp/apollo-use-cases/tree/master/spring-boot-encrypt
1) Ciphertext acquisition
We first use StringEncryptor to obtain the ciphertext. We can first create a plaintext, encrypt the plaintext, and create jasypt in stmt encryptor. Password = 123456, encrypt it in the program.
Encryption test procedure:
@SpringBootTest
@RunWith(SpringRunner.class)
public class PasswordTest {

    @Autowired
    private StringEncryptor encryptor;

    @Test
    public void encode() {
        String password = "123456";
        System.out.println(encryptor.encrypt(password));
    }
}
Ciphertext of test run output: bjLvhdN3k4N2f5wPzlB0VAPmVYQd6o+pyRm24S41rPQG4DIkHH3iwFOXL0k1URti
2) Ciphertext input
We configure the ciphertext into Apollo and decorate it with enc (ciphertext). We encrypt the password in the data connection, as shown in the following figure:
Next, we run the hailtaxi driver program to obtain the specified driver information from the database
http://localhost:18081/driver/info/1
Configure loading order
The loading order of multiple namespaces in Apollo is different. We can create the same key in multiple namespaces to test the loading process. As shown below:
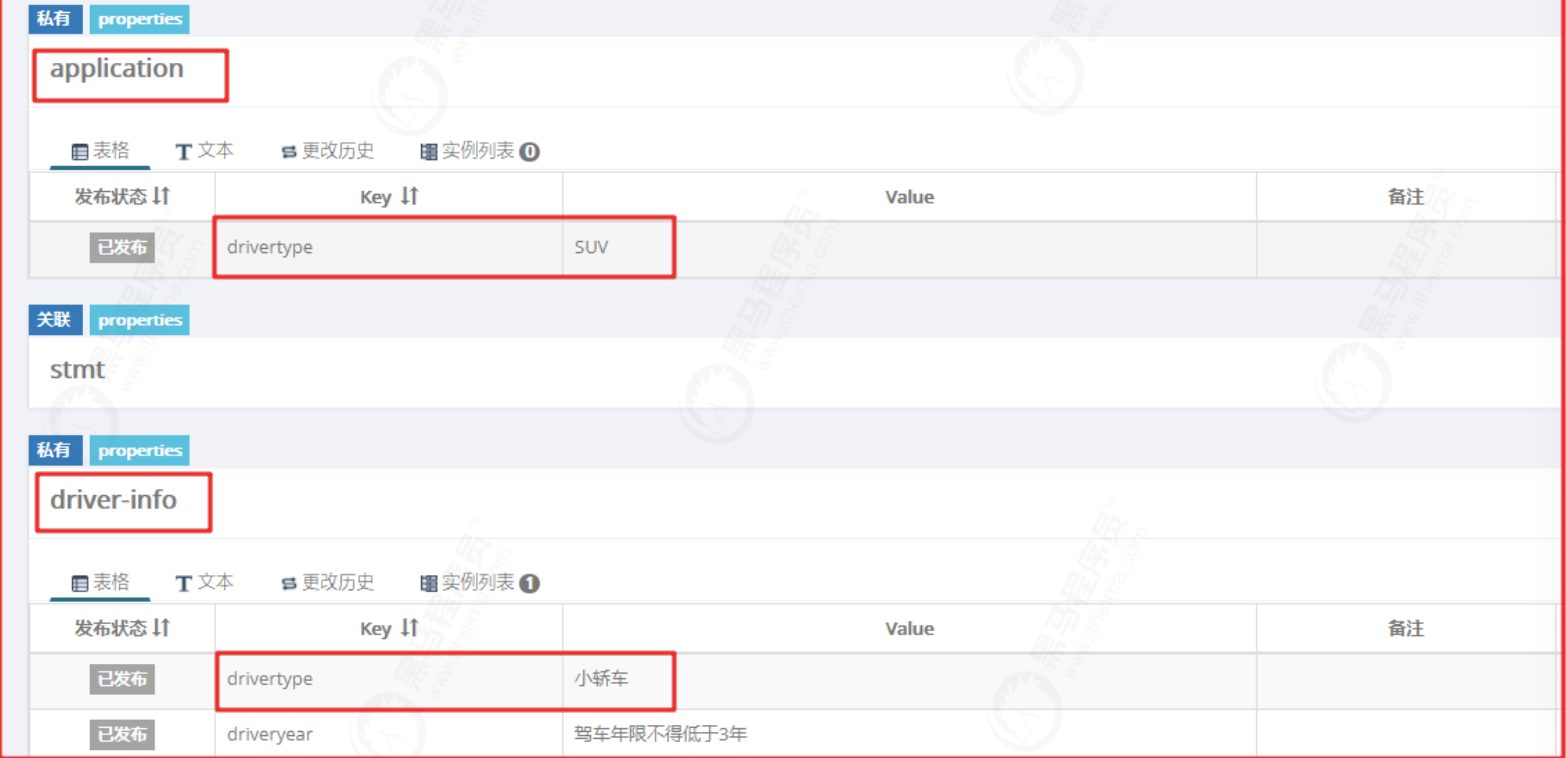
We configure two files, the drivertype of application and the drivertype of driver info. Let's look at the configuration in the program:
server:
  port: 18081
#Apollo application
app:
  id: hailtaxi-driver-config  #Project (application) number of Apollo used
apollo:
  meta: http://192.168.211.145:8080 #Apollo Meta Server address
  bootstrap:
    enabled: true   #Whether to enable the Apollo configuration preload function. The default is false.
    eagerLoad:
      enable: true  #Whether to enable the loading time of Apollo support log level. The default is false.
    namespaces: application,stmt,driver-info,springboot-config  #The namespace of the used Apollo. The default is application.
In the code, we get the Spring Environment object because we need to get the PropertySource configuration source from it.
@SpringBootApplication
@EnableDiscoveryClient
@MapperScan(basePackages = "com.itheima.driver.mapper")
public class DriverApplication {

    public static void main(String[] args) {
        ApplicationContext act = SpringApplication.run(DriverApplication.class,args);
        Environment environment = act.getEnvironment();
        System.out.println(environment);
    }
}
Remember to run in Application.DEBUG out. println(environment); A breakpoint in the code block can
See the debugging information as shown in the figure below:
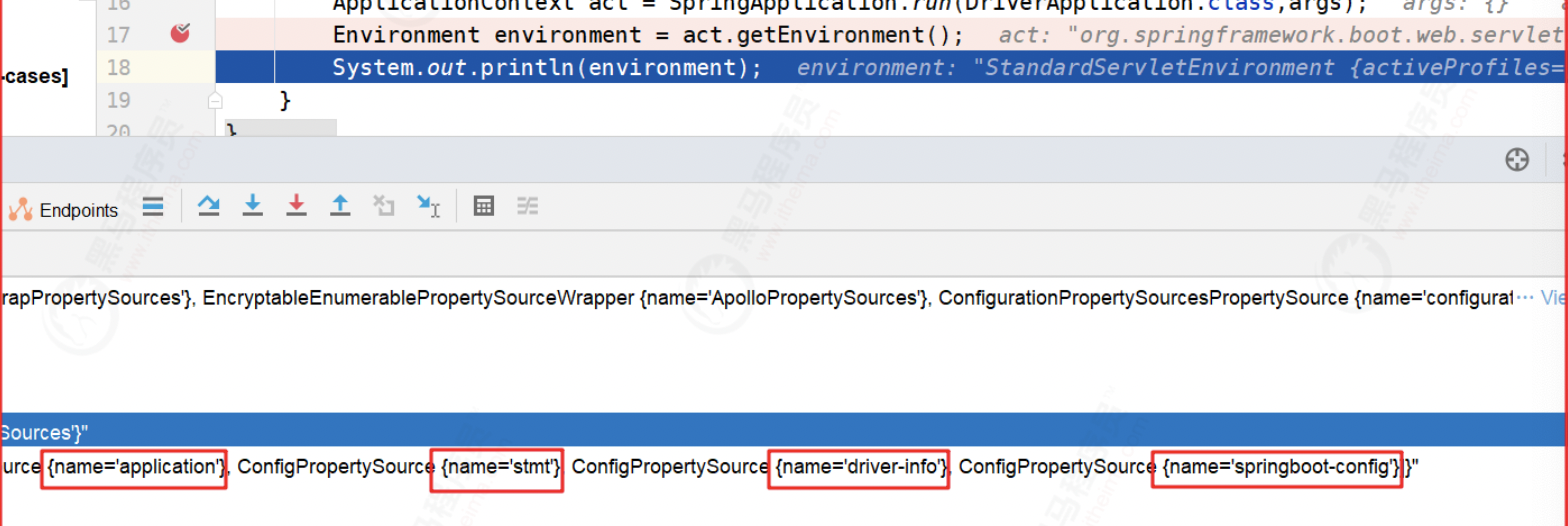
We can draw the following conclusions:
1:about apollo.bootstrap Corresponding to one CompositePropertySource Object, even if there are corresponding multiple Apollo Namespace. And, multiple Namespace According to apollo.bootstrap.namespaces Configuration sequence.
2:All Apollo Corresponding PropertySource The priority of the object is very high. At present, it seems that it is only lower than server.ports Corresponding MapPropertySource. Basically, we can think of it as the highest priority.
Gray Publishing
By creating a grayscale version, you can perform grayscale tests on some configurations. The grayscale process is as follows:
1.Create grayscale version
2.Configure grayscale configuration items
3.Configure grayscale rules.If it's private namespace You can follow the client's IP Grayscale, if it is public namespace You can press at the same time AppId And client IP Gray scale
4.Gray Publishing
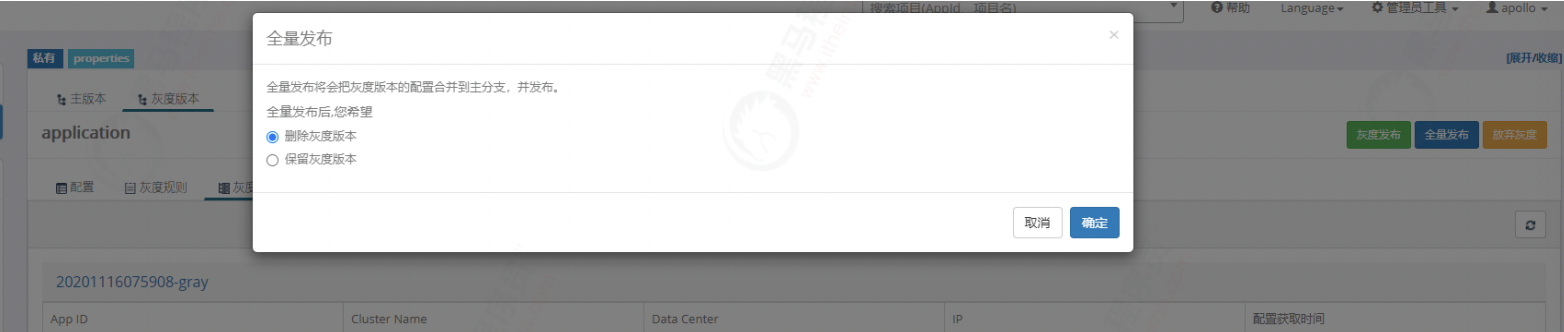
Grayscale version has two final results: full release and discard grayscale full release: the grayscale configuration is merged into the main version and released, and all clients will use the merged configuration. Discard grayscale: delete the grayscale version, and all clients will use the configuration of the main version. Notes: if the grayscale version has been published, after modifying the grayscale rules, Take effect immediately without publishing again

As shown in the figure below, if the test version has additional configuration, we can click Add gray configuration

After adding a new configuration, click gray publishing to take effect

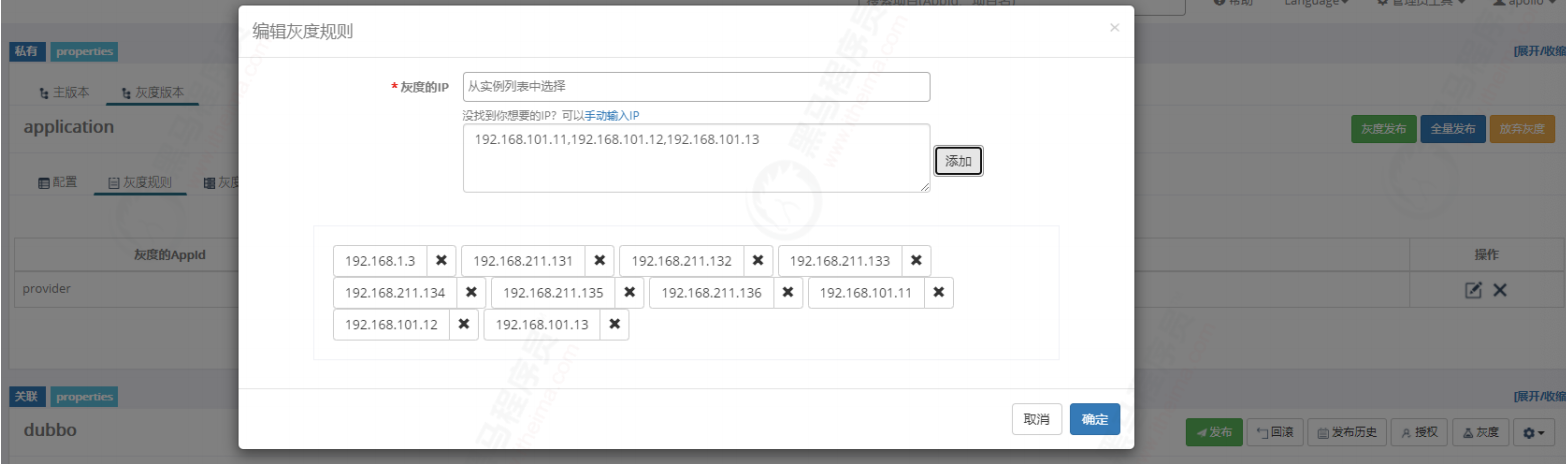
We can make the service of the specified IP as grayscale version. As shown in the figure below, we can select the IP that has accessed the service currently. If there are other specified IPS, you can manually enter them directly. Manually enter multiple IPS separated by commas. When users access the services specified by these IPS, the corresponding configuration will take effect.
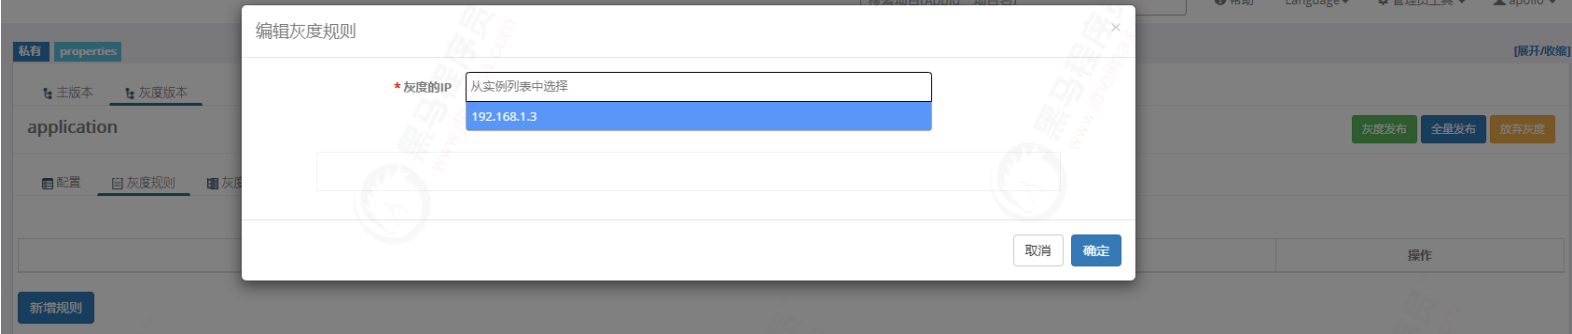
Enter IP manually
In real work, full volume grayscale release means that there is no problem with the grayscale version. We need to switch all the versions of all services to the grayscale version that has completed the test. We can click full volume release. When full volume release, we can delete the grayscale version.
Apollo loading process
Configure loading process:
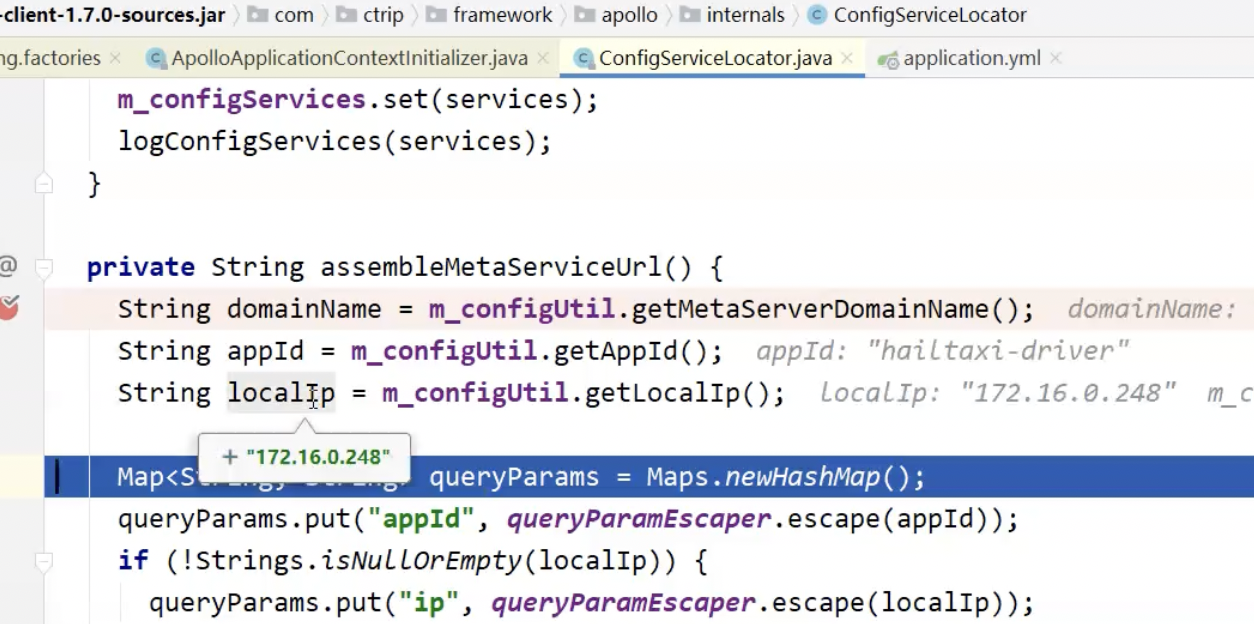
spring.factories configure the class to start loading - > Apollo applicationcontextinitializer implements applicationcontextinitializer the method of this object will be executed before the spring container is refreshed
ApolloApplicationContextInitializer:
	1: obtain ConfigurableEnvironment,Profile information
	2: Config config = ConfigService.getConfig(namespace);->Execute remote request(Http request->ConfigServiceLocator.updateConfigServices)obtain Apollo Service configuration information
	3: Get the remote configuration file, parse the configuration file and store it in Environment in
public class ApolloApplicationContextInitializer implements
    ApplicationContextInitializer<ConfigurableApplicationContext> , EnvironmentPostProcessor, Ordered {
  public static final int DEFAULT_ORDER = 0;

  private static final Logger logger = LoggerFactory.getLogger(ApolloApplicationContextInitializer.class);
  private static final Splitter NAMESPACE_SPLITTER = Splitter.on(",").omitEmptyStrings().trimResults();
  private static final String[] APOLLO_SYSTEM_PROPERTIES = {"app.id", ConfigConsts.APOLLO_CLUSTER_KEY,
      "apollo.cacheDir", "apollo.accesskey.secret", ConfigConsts.APOLLO_META_KEY, PropertiesFactory.APOLLO_PROPERTY_ORDER_ENABLE};

  private final ConfigPropertySourceFactory configPropertySourceFactory = SpringInjector
      .getInstance(ConfigPropertySourceFactory.class);

  private int order = DEFAULT_ORDER;

  @Override
  public void initialize(ConfigurableApplicationContext context) {
    ConfigurableEnvironment environment = context.getEnvironment();

    if (!environment.getProperty(PropertySourcesConstants.APOLLO_BOOTSTRAP_ENABLED, Boolean.class, false)) {
      logger.debug("Apollo bootstrap config is not enabled for context {}, see property: ${{}}", context, PropertySourcesConstants.APOLLO_BOOTSTRAP_ENABLED);
      return;
    }
    logger.debug("Apollo bootstrap config is enabled for context {}", context);

    initialize(environment);
  }


  /**
   * Initialize Apollo Configurations Just after environment is ready.
   *
   * @param environment
   */
  protected void initialize(ConfigurableEnvironment environment) {

    if (environment.getPropertySources().contains(PropertySourcesConstants.APOLLO_BOOTSTRAP_PROPERTY_SOURCE_NAME)) {
      //already initialized
      return;
    }

    String namespaces = environment.getProperty(PropertySourcesConstants.APOLLO_BOOTSTRAP_NAMESPACES, ConfigConsts.NAMESPACE_APPLICATION);
    logger.debug("Apollo bootstrap namespaces: {}", namespaces);
    List<String> namespaceList = NAMESPACE_SPLITTER.splitToList(namespaces);

    CompositePropertySource composite = new CompositePropertySource(PropertySourcesConstants.APOLLO_BOOTSTRAP_PROPERTY_SOURCE_NAME);
    for (String namespace : namespaceList) {
      Config config = ConfigService.getConfig(namespace);

      composite.addPropertySource(configPropertySourceFactory.getConfigPropertySource(namespace, config));
    }

    environment.getPropertySources().addFirst(composite);
  }
 public static Config getConfig(String namespace) {
    return s_instance.getManager().getConfig(namespace);
  }