target
- Understand the introduction of HTTP protocol communication, and be able to say what is HTTP protocol
- Master the usage of HttpURLConnection and be able to use HttpURLConnection to access the network
- Master the use of WebView control, and be able to use WebView control to load different web pages
- Master the parsing of JSON data and be able to parse JSON data in different ways
- Be familiar with the overview of Handler message mechanism, and be able to summarize the principle of Handler message mechanism
In the era of mobile Internet, the realization of information exchange through mobile phone networking is the most basic functional experience. For example, on the way to work or travel, as long as there is time, people will take out their mobile phones to surf the Internet, receive new information and search network resources through their mobile phones. As the mainstream operating system in the smartphone market, Android's strength is inseparable from its support for network functions. Android system provides a variety of ways to realize network communication. Next, we will start with the most basic HTTP protocol, and explain in detail the native HttpURLConnection in Android, the use of WebView control and the analysis of network data.
1, Access the network via HTTP
- Understand the introduction of HTTP protocol communication, and be able to say what is HTTP protocol
- Master the usage of HttpURLConnection and be able to use HttpURLConnection to access the network
1.1 introduction to HTTP protocol communication
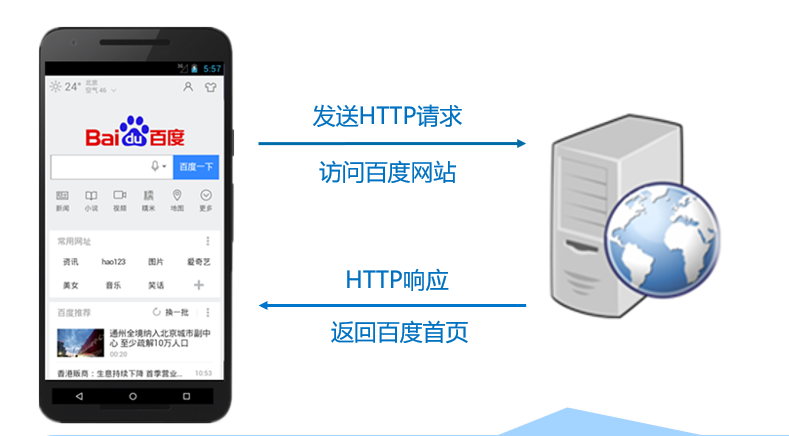
HTTP(Hyper Text Transfer Protocol) is hypertext transfer protocol, which stipulates the rules of communication between browser and server.
HTTP protocol is a request / response protocol.
-
When the client establishes a connection with the server, the request sent to the server is called HTTP request.
-
When the server receives the request, it will respond, which is called HTTP response.
When using the mobile client to access Baidu, it will send an HTTP request. When the server receives the request, it will respond and return the baidu page (data) to the client browser. The process of request response is the process of HTTP communication.
1.2 accessing the network using HttpURLConnection
GET and POST requests
(1) GET mode
GET method is to obtain the resource information pointed to by the request URL in the form of entity, and the parameters submitted to the server follow the request URL. Using GET to access the network URL is generally less than 1KB in length.
(2) POST mode
When sending a request to the server in POST mode, you need to attach an entity after the request. The parameters it submits to the server are in the entity after the request. The POST method has no limit on the length of the URL.
When submitting data in POST mode, users cannot see the request parameters submitted to the server in the browser, so POST mode is relatively safer than GET mode.
Submit data in GET mode
//Spell the user name and password after the specified resource path, and encode the user name and password
String path = "http://192.168.1.100:8080/web/LoginServlet?username="
                  + URLEncoder.encode("zhangsan")
                  +"&password="+ URLEncoder.encode("123");
URL url =  new  URL(path);
HttpURLConnection  conn  =  (HttpURLConnection)url.openConnection();
conn.setRequestMethod("GET");
conn.setConnectTimeout(5000);
int responseCode = conn.getResponseCode();  //Get status code
if(responseCode == 200){          //The status code is 200, indicating that the access is successful and the input stream of the returned content is obtained
        InputStream is = conn.getInputStream();
}
Submit data by POST
URL url = new URL("http://192.168.1.100:8080/web/LoginServlet");
HttpURLConnection conn = (HttpURLConnection) url.openConnection();
conn.setConnectTimeout(5000);
conn.setRequestMethod("POST");
//Prepare data and code parameters
String data = "username=" + URLEncoder.encode("zhangsan")
                  + "&password=" + URLEncoder.encode("123");
//Set the submission method of request header data and the length of submitted data. Here, it is submitted in form form
conn.setRequestProperty("Content-Type", "application/x-www-form-urlencoded");
conn.setRequestProperty("Content-Length", data.length() + "");
//Write data to the server in the form of stream
conn.setDoOutput(true);
OutputStream os = conn.getOutputStream();
os.write(data.getBytes());
int code = conn.getResponseCode();
if (code == 200) {
    InputStream is = conn.getInputStream();
}
be careful
In the actual development, it is inevitable to submit Chinese to the server in the process of interaction between the mobile phone and the server. At this time, Chinese garbled code will appear. When submitting parameters in either GET or POST mode, the parameters must be encoded, and the encoding method must be consistent with the server decoding method. Similarly, when obtaining the Chinese characters returned by the server, it also needs to decode in the specified format.
2, Using WebView for network development
target
- Master the use of WebView, be able to use WebView to browse different web pages, execute HTML code and support JavaScript
2.1 using WebView to browse web pages
In Android programs, WebView controls can be added with tags in XML layout files or created with the new keyword in Java files.
It is usually in the form of adding labels in the XML layout file. The specific code is as follows
<!--WebView Control id-->
<WebView
    android:id="@+id/webView"
    android:layout_width="match_parent"
    android:layout_height="match_parent" />
The common methods of control are shown in the following table.
| Attribute name | Function description |
|---|---|
| loadUrl(String url) | Used to load the web page corresponding to the specified URL |
| loadData(String data, String mimeType, String encoding) | Used to load the specified string data into the browser |
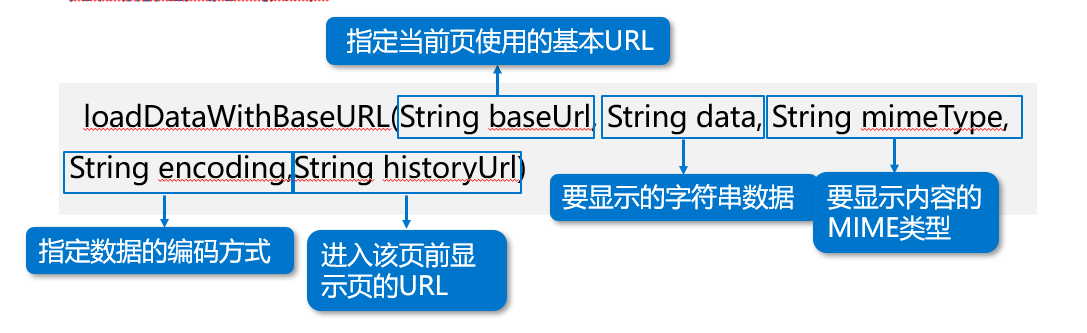
| loadDataWithBaseURL(String baseUrl, String data, String mimeType, String encoding,String historyUrl) | Loads the specified data based on the URL |
| capturePicture() | Used to create a snapshot of the current screen |
| goBack() | Used to perform the back operation, which is equivalent to the function of the back button on the browser |
| goForward() | Used to perform forward operation, which is equivalent to the function of the forward button on the browser |
| stopLoading() | Used to stop loading the current page |
| reload() | Used to refresh the current page |
emulator.exe -list-avds
emulator.exe -avd Nexus_4_API_28 -dns-server 192.168.1.1
setprop net.dns1 192.168.1.1
setprop net.eth0.dns1 192.168.1.1
setprop net.eth0.gw 192.168.1.1
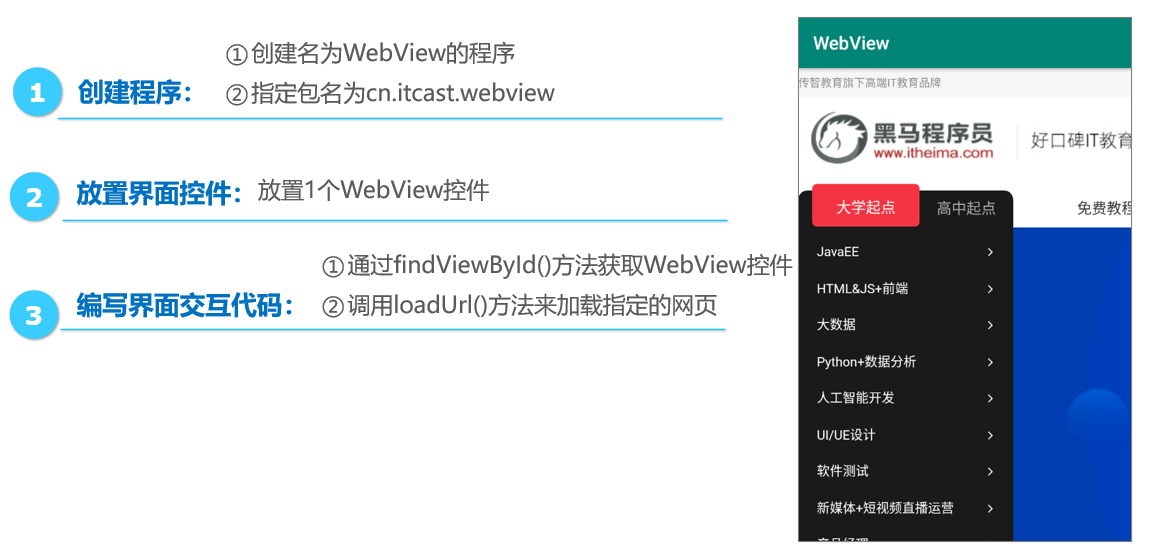
Next, a case is used to demonstrate how to use WebView control to load web pages. The interface effect of this case is shown in the figure below.
Place interface control res\layout\activity_main.xml
<?xml version="1.0" encoding="utf-8"?>
<RelativeLayout xmlns:android="http://schemas.android.com/apk/res/android"
    android:layout_width="match_parent"
    android:layout_height="match_parent">
    <WebView
        android:id="@+id/webView"
        android:layout_width="match_parent"
        android:layout_height="match_parent" />
</RelativeLayout>
Write interface interaction code WebView \ mainactivity java
package cn.itcast.webview;
import android.support.v7.app.AppCompatActivity;
import android.os.Bundle;
import android.webkit.WebView;
public class MainActivity extends AppCompatActivity {
    @Override
    protected void onCreate(Bundle savedInstanceState) {
        super.onCreate(savedInstanceState);
        setContentView(R.layout.activity_main);
        // Gets the WebView control added in the layout manager
        WebView webview=findViewById(R.id.webView);
        webview.loadUrl("http://m.itheima.com / "); / / specify the web page to load
    }
}
Realize the function of WebView control browsing web pages in MainActivity, and load the specified web pages through the loadUrl() method of WebView control. The main code is as follows.
WebView webview=(WebView)findViewById(R.id.webView);
webview.loadUrl("http://www.itheima.com/");  	// Load web page by loading web page address
Need to be in the manifest file( AndroidManifest.xml)of< manifest>In label<font color='cornflowerblue'>Add permission to allow access to network resources</font>.
be careful
If you want the above WebView control to have the function of zooming in and out of web pages, you need to set the control as follows:
//Set the WebView control to support zooming using screen controls or gestures
webview.getSettings().setSupportZoom(true);
//Set the WebView control to use its built-in zoom mechanism, which is used by the screen zoom control
webview.getSettings().setBuiltInZoomControls(true);
2.2 using WebView to execute HTML code
The WebView class provides loadData() and loaddatawithbaseurl () methods to load HTML code. When using the loadData() method to load HTML content with Chinese, there will be garbled code, but this will not happen using the loaddatawithbaseurl () method. The loadDataWithBaseURL() method is defined as follows:
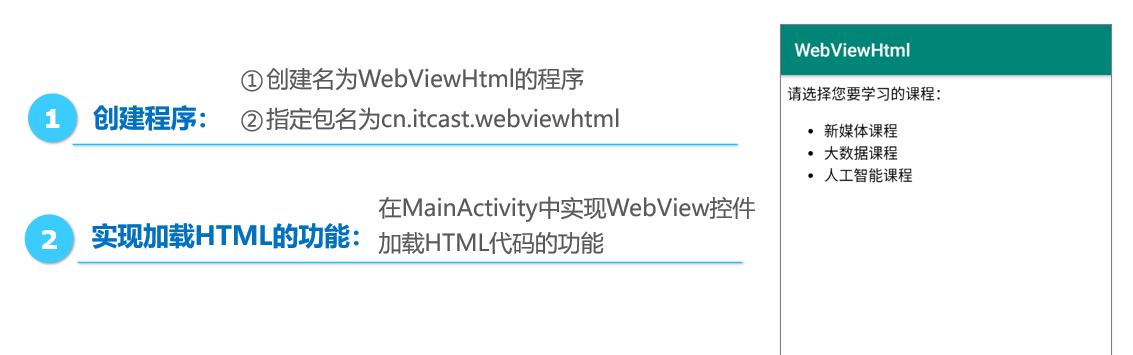
Next, a case is used to demonstrate how to use WebView control to load HTML code. The interface effect of this case is shown in the figure below.
Place interface control res\layout\activity_main.xml
<?xml version="1.0" encoding="utf-8"?>
<RelativeLayout xmlns:android="http://schemas.android.com/apk/res/android"
    android:layout_width="match_parent"
    android:layout_height="match_parent">
    <WebView
        android:id="@+id/webView"
        android:layout_width="match_parent"
        android:layout_height="match_parent" />
</RelativeLayout>
Realize the function of loading HTML. Webviewwhtml \ mainactivity java
package cn.itcast.webviewhtml;
import android.support.v7.app.AppCompatActivity;
import android.os.Bundle;
import android.webkit.WebView;
public class MainActivity extends AppCompatActivity {
    @Override
    protected void onCreate(Bundle savedInstanceState) {
        super.onCreate(savedInstanceState);
        setContentView(R.layout.activity_main);
        // Gets the WebView control added in the layout manager
        WebView webview = findViewById(R.id.webView);
        // Create a string builder and place the HTML content to be displayed in the builder
        StringBuilder sb = new StringBuilder();
        sb.append("<div>Please select the course you want to study:</div>");
        sb.append("<ul>");
        sb.append("<li>New Media Course</li>");
        sb.append("<li>Big data course</li>");
        sb.append("<li>Artificial intelligence course</li>");
        sb.append("</ul>");
        // Load data
//        null indicates the default blank page
//        sb. Tostring() data in sb
//        "text/html" specifies the MIME type of content to display
        webview.loadDataWithBaseURL(null, sb.toString(), "text/html", "utf-8",
                null);
    }
}
WebView supports JavaScript settings
To solve the problem that the WebView control does not support JavaScript code by default, we need to set the WebView control to support JavaScript code through the setjavascript enabled() method.
WebSettings settings= webview.getSettings(); // Get WebSettings object
settings.setJavaScriptEnabled(true); 		//Set JavaScript available
//Causes the WebView control to display a prompt box with JavaScript code
webview.setWebChromeClient(new WebChromeClient());
Next, a case is used to demonstrate how to use WebView control to support a web page with JavaScript code. The interface effect of this case is shown in the figure below.
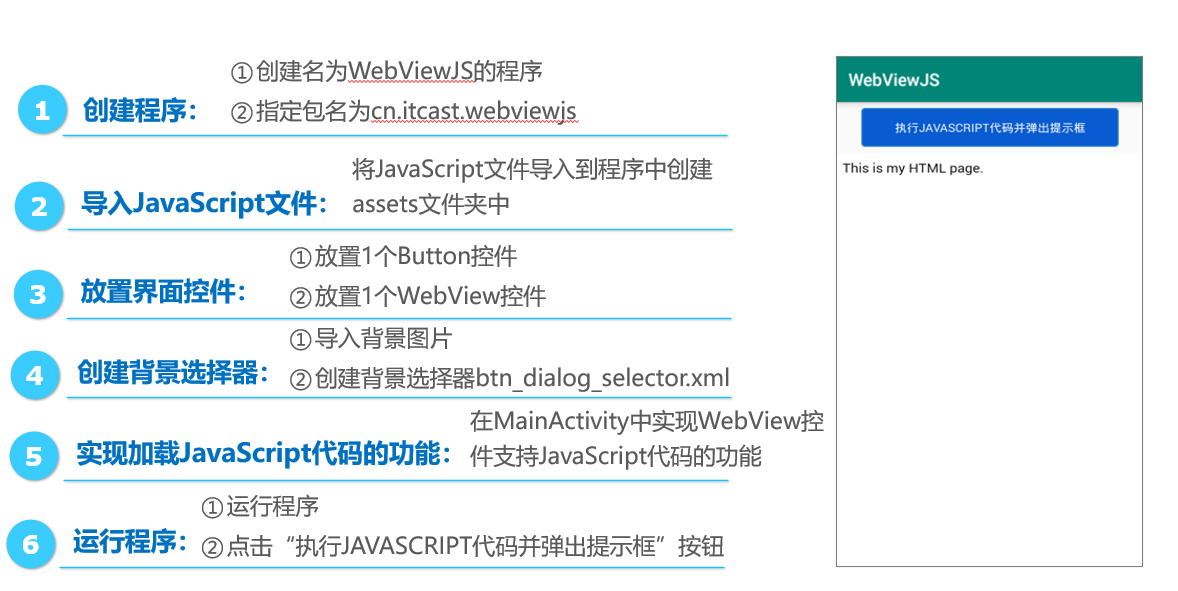

Import JS file SRC \ main \ assets \ alert HTML and alert js
<!DOCTYPE html>
<html>
<head>
<title>alert.html</title>
<meta charset="UTF-8">
<meta name="content-type" content="text/html; charset=UTF-8">
</head>
<body>
	This is my HTML page.
	<br>
	<script type="text/javascript" src="alert.js"></script>
	<script type="text/javascript">
alert("I am a message prompt box");
</script>
</body>
</html>
window.alert = function(msg, callback) {
	var div = document.createElement("div");
	div.innerHTML = "<style type=\"text/css\">"
			+ ".nbaMask { position: fixed; z-index: 1000; top: 0; right: 0; left: 0; bottom: 0; background: rgba(0, 0, 0, 0.5); }                                                                                                                                                                       "
			+ ".nbaMaskTransparent { position: fixed; z-index: 1000; top: 0; right: 0; left: 0; bottom: 0; }                                                                                                                                                                                            "
			+ ".nbaDialog { position: fixed; z-index: 5000; width: 80%; max-width: 300px; top: 50%; left: 50%; -webkit-transform: translate(-50%, -50%); transform: translate(-50%, -50%); background-color: #fff; text-align: center; border-radius: 8px; overflow: hidden; opacity: 1; color: white; }"
			+ ".nbaDialog .nbaDialogHd { padding: .2rem .27rem .08rem .27rem; }                                                                                                                                                                                                                         "
			+ ".nbaDialog .nbaDialogHd .nbaDialogTitle { font-size: 17px; font-weight: 400; }                                                                                                                                                                                                           "
			+ ".nbaDialog .nbaDialogBd { padding: 0 .27rem; font-size: 15px; line-height: 1.3; word-wrap: break-word; word-break: break-all; color: #000000; }                                                                                                                                          "
			+ ".nbaDialog .nbaDialogFt { position: relative; line-height: 48px; font-size: 17px; display: -webkit-box; display: -webkit-flex; display: flex; }                                                                                                                                          "
			+ ".nbaDialog .nbaDialogFt:after { content: \" \"; position: absolute; left: 0; top: 0; right: 0; height: 1px; border-top: 1px solid #e6e6e6; color: #e6e6e6; -webkit-transform-origin: 0 0; transform-origin: 0 0; -webkit-transform: scaleY(0.5); transform: scaleY(0.5); }               "
			+ ".nbaDialog .nbaDialogBtn { display: block; -webkit-box-flex: 1; -webkit-flex: 1; flex: 1; color: #09BB07; text-decoration: none; -webkit-tap-highlight-color: transparent; position: relative; margin-bottom: 0; }                                                                       "
			+ ".nbaDialog .nbaDialogBtn:after { content: \" \"; position: absolute; left: 0; top: 0; width: 1px; bottom: 0; border-left: 1px solid #e6e6e6; color: #e6e6e6; -webkit-transform-origin: 0 0; transform-origin: 0 0; -webkit-transform: scaleX(0.5); transform: scaleX(0.5); }             "
			+ ".nbaDialog a { text-decoration: none; -webkit-tap-highlight-color: transparent; }"
			+ "</style>"
			+ "<div id=\"dialogs2\" style=\"display: none\">"
			+ "<div class=\"nbaMask\"></div>"
			+ "<div class=\"nbaDialog\">"
			+ "	<div class=\"nbaDialogHd\">"
			+ "		<strong class=\"nbaDialogTitle\"></strong>"
			+ "	</div>"
			+ "	<div class=\"nbaDialogBd\" id=\"dialog_msg2\">Pop up the content to inform the current status, information and solutions, and the description text shall be controlled within three lines as far as possible</div>"
			+ "	<div class=\"nbaDialogHd\">"
			+ "		<strong class=\"nbaDialogTitle\"></strong>"
			+ "	</div>"
			+ "	<div class=\"nbaDialogFt\">"
			+ "		<a href=\"javascript:;\" class=\"nbaDialogBtn nbaDialogBtnPrimary\" id=\"dialog_ok2\">determine</a>"
			+ "	</div></div></div>";
	document.body.appendChild(div);

	var dialogs2 = document.getElementById("dialogs2");
	dialogs2.style.display = 'block';

	var dialog_msg2 = document.getElementById("dialog_msg2");
	dialog_msg2.innerHTML = msg;

	// var dialog_cancel = document.getElementById("dialog_cancel");
	// dialog_cancel.onclick = function() {
	// dialogs2.style.display = 'none';
	// };
	var dialog_ok2 = document.getElementById("dialog_ok2");
	dialog_ok2.onclick = function() {
		dialogs2.style.display = 'none';
		callback();
	};
};
Place interface control res\layout\activity_main.xml
<?xml version="1.0" encoding="utf-8"?>
<LinearLayout xmlns:android="http://schemas.android.com/apk/res/android"
    android:layout_width="match_parent"
    android:layout_height="match_parent"
    android:orientation="vertical">
    <Button
        android:id="@+id/btn_dialog"
        android:layout_width="300dp"
        android:layout_height="wrap_content"
        android:layout_gravity="center_horizontal"
        android:text="implement JAVASCRIPT Code and pop-up prompt box"
        android:layout_margin="8dp"
        android:textColor="@android:color/white"
        android:background="@drawable/btn_dialog_selector"/>
    <WebView
        android:id="@+id/webView"
        android:layout_width="match_parent"
        android:layout_height="match_parent" />
</LinearLayout>
Create background selector res\drawable\btn_dialog_selector.xml
<?xml version="1.0" encoding="utf-8"?>
<selector xmlns:android="http://schemas.android.com/apk/res/android">
    <item android:drawable="@drawable/btn_dialog_selected"
        android:state_pressed="true" />
    <item android:drawable="@drawable/btn_dialog_normal" />
</selector>
Realize the function of loading JS code webviewjs \ mainactivity java
package cn.itcast.webviewjs;

import android.os.Bundle;
import android.support.v7.app.AppCompatActivity;
import android.view.View;
import android.webkit.WebChromeClient;
import android.webkit.WebView;
import android.widget.Button;

public class MainActivity extends AppCompatActivity {
    @Override
    protected void onCreate(Bundle savedInstanceState) {
        super.onCreate(savedInstanceState);
        setContentView(R.layout.activity_main);
        final WebView webview = findViewById(R.id.webView);
        Button btn = findViewById(R.id.btn_dialog);
        webview.loadUrl("file:///android_asset/alert.html "); / / specify the web page to load
        btn.setOnClickListener(new View.OnClickListener() {
            @Override
            public void onClick(View view) {
                // Set the webview control to support JavaScript code
                webview.getSettings().setJavaScriptEnabled(true);
                // Display the prompt box popped up through JavaScript code in the web page
                webview.setWebChromeClient(new WebChromeClient());
                webview.loadUrl("file:///android_asset/alert.html");
            };
        });
    }
}
3, JSON data parsing
target
- Master the parsing of JSON data and be able to parse JSON data in different ways
3.1 JSON data
Characteristics of JSON data
(1) JSON, namely JavaScript Object Notation, is a lightweight data exchange format.
(2) JSON is a data format based on plain text. It can transfer String, Number and Boolean data, as well as array or Object objects.
(3) The extension of JSON file is json.
(4) JSON is divided into two data structures: JSON object and JSON array.
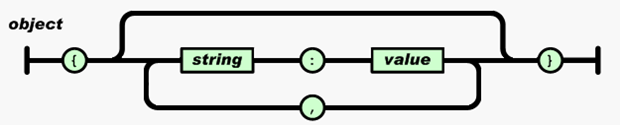
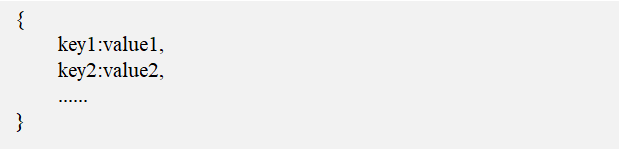
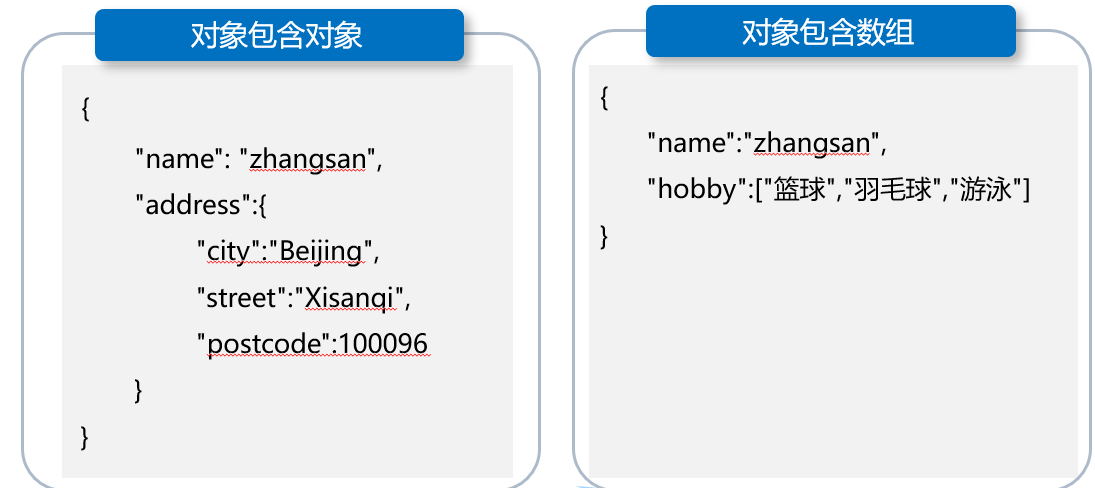
JSON data of object structure
Start with "{" and end with "}". The middle part consists of 0 or more key:value pairs separated by ",". Note that keywords and values are separated by ":".
The keyword key must be of String type, and the value can be of String, Number, Object, Array and other data types.
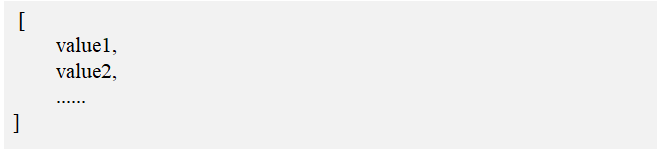
JSON data of array structure
Start with "[" and end with "]". The middle part consists of a list of 0 or more values separated by ",".
The value can be String, Number, Boolean, null and other data types.

be careful:
If you use JSON to store single data (such as "abc"), you must use array structure, because the object structure must be in the form of "key:value".
3.2 JSON parsing
Two analytical methods
- org.json
- Provided for developers in the Android SDK, JSON data can be parsed by using JSONObject and JSONArray classes.
- Gson
- Provided by Google, before using the Gson library, you first need to add Gson Jar is added to the project before calling the methods it provides.
Parsing JSON objects
For example, the JSON data to be parsed is as follows:
{ "name": "zhangsan", "age": 27, "married":true }         //json 1 is a json object
[{"name": "lisi","age": 25},{"name": "Jason","age": 20}]  //json 2 is a json array
Parsing JSON objects using JSONObject:
The optXXX() method is safer than the getXXX() method when parsing data. If the corresponding field does not exist, the optXXX() method will return a null value or 0, and the getXXX() method will throw an exception.
JSONObject   jsonObj  =  new JSONObject(json1);
String name = jsonObj.optString("name");
int age = jsonObj.optInt("age");
boolean married = jsonObj.optBoolean("married");
Parsing JSON arrays
Parsing JSON arrays using JSONArray:
The parsing method of array is similar to that of object, except that the key value is replaced by the subscript in the array.
JSONArray jsonArray = new JSONArray(json2);
for(int i = 0; i < jsonArray.length(); i++) {
     JSONObject jsonObj = jsonArray.getJSONObject(i);
     String name = jsonObj.optString("name");
     int age = jsonObj.optInt("age");
}
Parsing JSON data with Gson Library
For example, the JSON data to be parsed is as follows (the same as org.json parsing data):
Before using the Gson library, you first need to add Gson Jar is added to the project, and entity classes Person1 and Person2 corresponding to JSON data are created. It should be noted that the member name in the entity class should be consistent with the key value in JSON data.
{ "name": "zhangsan", "age": 27, "married":true }         //json 1 is a json object
[{"name": "lisi","age": 25},{"name": "Jason","age": 20}]  //json 2 is a json array
Parsing JSON objects using Gson
 Gson gson = new Gson();
 Person person1 = gson.fromJson(json1, Person1.class);	//Convert JSON data into objects
Parsing JSON arrays using Gson
 Gson gson = new Gson();
//TypeToken is a class provided by Google to parse JSON data
 Type listType = new TypeToken<List<Person2>>(){}.getType();
 List<Person2> person2 = gson.fromJson(json2, listType);
Add library files to Android Studio
Add a library file in the Android program to explain. The specific steps are as follows:
- In Android Studio, select the [File] and [Project Structure...] options, and a Project Structure window will pop up, as shown in the following figure.

- Select the [Dependencies] tab in the Project Structure window, then click "" in the upper right corner of the window and select the Library dependency option. A Choose Library Dependency window will pop up, in which you can find gson library com google. code. Gson: gson: 2.8.5 and select it, as shown in the following figure.

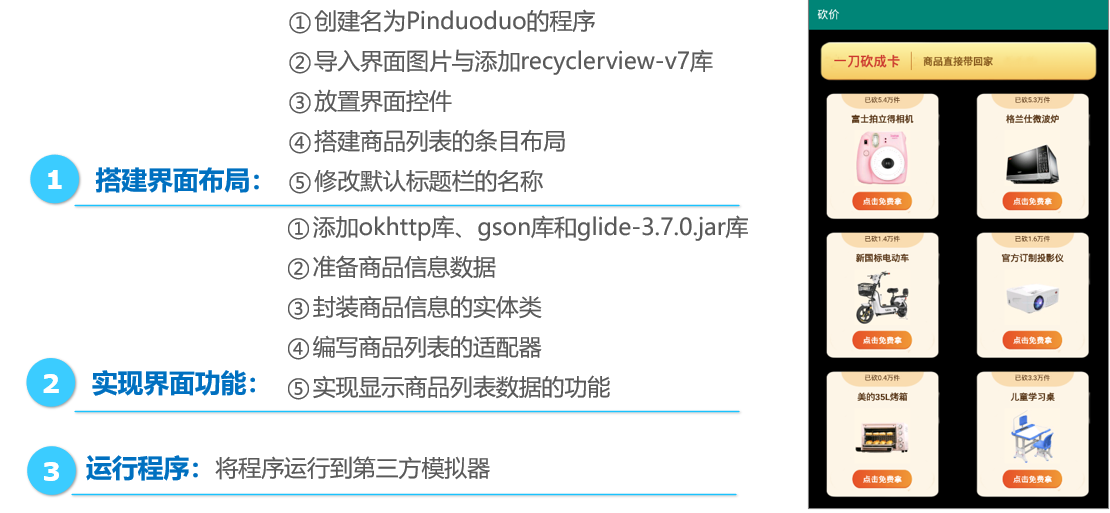
3.3 actual combat drill - imitation fight and more bargaining interface
In this section, we will demonstrate how to parse JSON data and display the data on the interface through the case of imitating the pinduoduo bargaining interface. The interface effect of this case is shown in the figure below.
Place interface control res\layout\activity_main.xml
<?xml version="1.0" encoding="utf-8"?>
<LinearLayout xmlns:android="http://schemas.android.com/apk/res/android"
    android:layout_width="match_parent"
    android:layout_height="match_parent"
    android:background="@android:color/black"
    android:orientation="vertical">
    <LinearLayout
        android:layout_width="match_parent"
        android:layout_height="wrap_content"
        android:layout_marginLeft="20dp"
        android:layout_marginTop="20dp"
        android:layout_marginRight="20dp"
        android:background="@drawable/title_bg"
        android:gravity="center_vertical"
        android:orientation="horizontal">
        <TextView
            android:layout_width="wrap_content"
            android:layout_height="wrap_content"
            android:layout_marginLeft="25dp"
            android:text="Cut into cards with one knife"
            android:textColor="#ce4032"
            android:textSize="24sp"
            android:textStyle="bold" />
        <View
            android:layout_width="1dp"
            android:layout_height="match_parent"
            android:layout_margin="20dp"
            android:background="#af560e" />
        <TextView
            android:layout_width="wrap_content"
            android:layout_height="wrap_content"
            android:text="Take the goods home directly"
            android:textColor="#875a1e"
            android:textSize="18sp"
            android:textStyle="bold" />
    </LinearLayout>
    <android.support.v7.widget.RecyclerView
        android:id="@+id/rv_list"
        android:layout_width="match_parent"
        android:layout_height="match_parent" />
</LinearLayout>
Build item layout res\layout\goods_item.xml
<?xml version="1.0" encoding="utf-8"?>
<LinearLayout xmlns:android="http://schemas.android.com/apk/res/android"
    android:layout_width="wrap_content"
    android:layout_height="230dp"
    android:layout_marginLeft="30dp"
    android:layout_marginTop="20dp"
    android:background="@android:color/black"
    android:orientation="vertical">
    <LinearLayout
        android:layout_width="match_parent"
        android:layout_height="match_parent"
        android:background="@drawable/goods_bg"
        android:gravity="center_horizontal"
        android:orientation="vertical">
        <TextView
            android:id="@+id/tv_count"
            android:layout_width="wrap_content"
            android:layout_height="27dp"
            android:layout_gravity="center_horizontal"
            android:gravity="center"
            android:padding="5dp"
            android:textColor="#573516"
            android:textSize="12sp" />
        <TextView
            android:id="@+id/tv_goods_name"
            android:layout_width="wrap_content"
            android:layout_height="wrap_content"
            android:layout_marginTop="10dp"
            android:textColor="#573516"
            android:textSize="16sp"
            android:textStyle="bold" />
        <ImageView
            android:id="@+id/iv_img"
            android:layout_width="100dp"
            android:layout_height="100dp"
            android:layout_marginTop="10dp" />
        <Button
            android:id="@+id/btn_free"
            android:layout_width="110dp"
            android:layout_height="35dp"
            android:layout_margin="10dp"
            android:background="@drawable/btn_free_bg"
            android:text="Click to get it for free"
            android:textColor="@android:color/white"
            android:textSize="14sp"
            android:textStyle="bold" />
    </LinearLayout>
</LinearLayout>
Entity class that encapsulates commodity information pinduoduo \ goodsinfo java
package cn.itcast.pinduoduo;
public class GoodsInfo {
    private int id;             // Commodity id
    private String count;      // Quantity of goods cut
    private String goodsName; // Trade name
    private String goodsPic;  // Product picture
    public int getId() {
        return id;
    }
    public void setId(int id) {
        this.id = id;
    }
    public String getCount() {
        return count;
    }
    public void setCount(String count) {
        this.count = count;
    }
    public String getGoodsName() {
        return goodsName;
    }
    public void setGoodsName(String goodsName) {
        this.goodsName = goodsName;
    }
    public String getGoodsPic() {
        return goodsPic;
    }
    public void setGoodsPic(String goodsPic) {
        this.goodsPic = goodsPic;
    }
}
Pinduoduo \ goodsadapter. For compiling the product list java
package cn.itcast.pinduoduo;

import android.content.Context;
import android.support.v7.widget.RecyclerView;
import android.view.LayoutInflater;
import android.view.View;
import android.view.ViewGroup;
import android.widget.Button;
import android.widget.ImageView;
import android.widget.TextView;

import com.bumptech.glide.Glide;

import java.util.ArrayList;
import java.util.List;

public class GoodsAdapter extends RecyclerView.Adapter<RecyclerView.ViewHolder> {
    private Context mContext;
    private List<GoodsInfo> GoodsList = new ArrayList<>();

    public GoodsAdapter(Context context) {
        this.mContext = context;
    }

    /**
     * Get data update interface
     */
    public void setData(List<GoodsInfo> GoodsList) {
        this.GoodsList = GoodsList;     //Get the data GoodsList passed from the Activity interface
        notifyDataSetChanged();
    }

//    The inflate() method loads the layout file
    @Override
    public RecyclerView.ViewHolder onCreateViewHolder(ViewGroup parent, int viewType) {
        View itemView = null;
        RecyclerView.ViewHolder holder = null;
        itemView = LayoutInflater.from(mContext).inflate(R.layout.goods_item, parent, false);
        holder = new MyViewHolder(itemView);
        return holder;
    }

//    Data binding
    @Override
    public void onBindViewHolder(RecyclerView.ViewHolder holder, int position) {
        GoodsInfo bean = GoodsList.get(position);
//        Set the quantity and name of the cut goods to the interface control
        ((MyViewHolder) holder).tv_count.setText("Cut" + bean.getCount() + "piece");
        ((MyViewHolder) holder).tv_goods_name.setText(bean.getGoodsName());
//        Set product picture data to picture control iv_img up
        Glide.with(mContext)
                .load(bean.getGoodsPic())
                .error(R.mipmap.ic_launcher)
                .into(((MyViewHolder) holder).iv_img);
    }

//    Get the total number of entries
    @Override
    public int getItemCount() {
        return GoodsList.size();
    }

    class MyViewHolder extends RecyclerView.ViewHolder {
        TextView tv_count, tv_goods_name;
        ImageView iv_img;
        Button btn_free;

        public MyViewHolder(View view) {
            super(view);
            tv_count = view.findViewById(R.id.tv_count);
            tv_goods_name = view.findViewById(R.id.tv_goods_name);
            iv_img = view.findViewById(R.id.iv_img);
            btn_free = view.findViewById(R.id.btn_free);
        }
    }
}
Realize the product display function pinduoduo \ mainactivity java
package cn.itcast.pinduoduo;

import android.os.Bundle;
import android.os.Handler;
import android.os.Message;
import android.support.v7.app.AppCompatActivity;
import android.support.v7.widget.GridLayoutManager;
import android.support.v7.widget.RecyclerView;

import com.google.gson.Gson;
import com.google.gson.reflect.TypeToken;

import java.io.IOException;
import java.lang.reflect.Type;
import java.util.List;

import okhttp3.Call;
import okhttp3.Callback;
import okhttp3.OkHttpClient;
import okhttp3.Request;
import okhttp3.Response;

public class MainActivity extends AppCompatActivity {
    private GoodsAdapter adapter;             // List of adapters
    public static final int MSG_GOODS_OK = 1; // get data
    private MHandler mHandler;
    // Intranet interface
    public static final String WEB_SITE = "http://172.16.43.20:8080/goods";
    // Product list interface
    public static final String REQUEST_GOODS_URL = "/goods_list_data.json";
    private RecyclerView rv_list;

    @Override
    protected void onCreate(Bundle savedInstanceState) {
        super.onCreate(savedInstanceState);
        setContentView(R.layout.activity_main);
        mHandler = new MHandler();
        init();
        initData();
    }

    private void init() {
        rv_list = findViewById(R.id.rv_list);
//        this represents the context
//        2 indicates that two pieces of product information are displayed in each item of the product list
        GridLayoutManager manager = new GridLayoutManager(this, 2);
//        Set the manager object to the control RV_ On the list
        rv_list.setLayoutManager(manager);
        adapter = new GoodsAdapter(MainActivity.this);
//        Set the object adapter of the data adapter to the control RV_ On the list
        rv_list.setAdapter(adapter);
    }

    private void initData() {
        OkHttpClient okHttpClient = new OkHttpClient();
        Request request = new Request.Builder().url(WEB_SITE +
                REQUEST_GOODS_URL).build();
        Call call = okHttpClient.newCall(request);
        // Open the asynchronous thread to access the network and obtain the data of the commodity list from the server
        call.enqueue(new Callback() {
            @Override
            public void onResponse(Call call, Response response) throws IOException {
                String res = response.body().string(); // Get product data
                Message msg = new Message();
                msg.what = MSG_GOODS_OK;
                msg.obj = res;
                mHandler.sendMessage(msg);
            }

            @Override
            public void onFailure(Call call, IOException e) {
            }
        });
    }

    /**
     * Event capture
     */
    class MHandler extends Handler {
        @Override
        public void dispatchMessage(Message msg) {
            super.dispatchMessage(msg);
            switch (msg.what) {
                case MSG_GOODS_OK:
                    if (msg.obj != null) {
//                        Get the passed JSON data vlResult
                        String vlResult = (String) msg.obj;
                        // Parse the obtained JSON data vlResult, and store the parsed data in the collection goodsInfos
                        List<GoodsInfo> goodsInfos = getGoodsList(vlResult);
//                        Set the collection goodsInfos into the object adapter of the data adapter
                        adapter.setData(goodsInfos);
                    }
                    break;
            }
        }
    }

    public List<GoodsInfo> getGoodsList(String json) {
        Gson gson = new Gson(); // Parsing JSON data using gson Library
        // Create an anonymous subclass of gettypetoken () object and call it
        Type listType = new TypeToken<List<GoodsInfo>>() {
        }.getType();
        // Store the collected data in goodsInfos
        List<GoodsInfo> goodsInfos = gson.fromJson(json, listType);
        return goodsInfos;
    }
}
3.4 installing and configuring Tomcat server
Tomcat runs stably, reliably and efficiently. It can not only work with most mainstream Web servers (such as Apache and IIS servers), but also act as an independent Web server software.
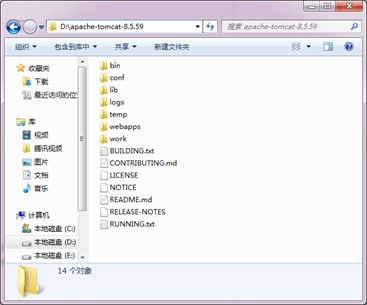
1. Download Tomcat
Download apache-tomcat-8.5.59-windows-x64.0 from Tomcat's official website Zip file. Unzip the file to see the directory structure of tomcat, as shown in the following figure.
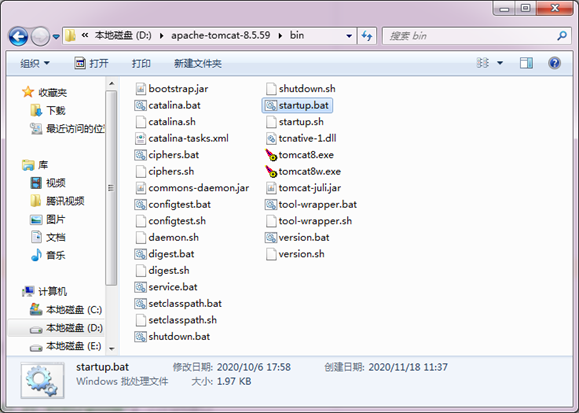
2. Start Tomcat
In the bin directory of Tomcat installation directory, many script files are stored, including startup Bat is the script file for starting tomcat, as shown in the following figure.
Double click Startup Bat file, the Tomcat server will be started, and the Tomcat startup information window is shown in the figure below.
[the external chain image transfer fails. The source station may have an anti-theft chain mechanism. It is recommended to save the image and upload it directly (img-my5jpd61-164657752524) (C: / users / 23061 / appdata / roaming / typora / typora user images / image-20220306160518981. PNG)]
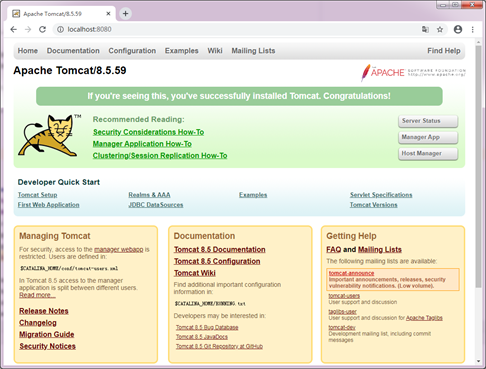
After the Tomcat server starts, enter in the address bar of the browser http://localhost:8080 Visit the Tomcat server. If the Tomcat page displayed in the browser is as shown in the figure below, the installation and deployment of the Tomcat server is successful.
3. Close Tomcat
In the bin folder under the Tomcat root directory, run shutdown Bat script file can close Tomcat or directly close the Tomcat startup information window.
4, Handler message mechanism
target
- Be familiar with the overview of Handler message mechanism, and be able to summarize the principle of Handler message mechanism
Handler is an asynchronous callback mechanism, which is mainly responsible for communicating with sub threads.
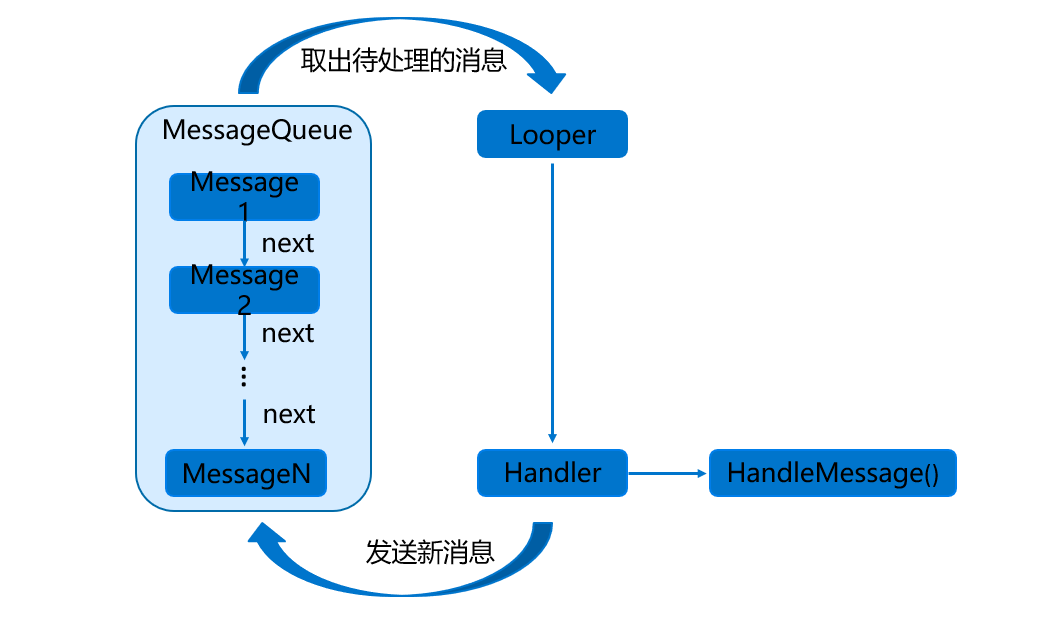
The Handler mechanism mainly includes four key objects:
-
Message: it is a message passed between threads. It can carry a small amount of information internally, which is used to exchange data between different threads.
-
Handler: it means handler. It is mainly used to send and process messages.
-
MessageQueue: it means message queue. It is mainly used to store messages sent through the Handler. Messages sent through the Handler will be stored in the MessageQueue for processing, and there will only be one MessageQueue object in each thread.
-
Looper: is the steward of the MessageQueue in each thread. After calling Looper's loop() method, you will enter an infinite loop. Whenever a message is found in the MessageQueue, it is taken out and passed to the Handler's handleMessage() method.
Yq-1646577542523)]
Double click Startup Bat file, the Tomcat server will be started, and the Tomcat startup information window is shown in the figure below.
[external chain picture transferring... (img-my5jpd61-164657754254)]
After the Tomcat server starts, enter in the address bar of the browser http://localhost:8080 Visit the Tomcat server. If the Tomcat page displayed in the browser is as shown in the figure below, the installation and deployment of the Tomcat server is successful.
[external chain picture transferring... (IMG drbjyjc3-164657754255)]
3. Close Tomcat
In the bin folder under the Tomcat root directory, run shutdown Bat script file can close Tomcat or directly close the Tomcat startup information window.
4, Handler message mechanism
target
- Be familiar with the overview of Handler message mechanism, and be able to summarize the principle of Handler message mechanism
Handler is an asynchronous callback mechanism, which is mainly responsible for communicating with sub threads.
The Handler mechanism mainly includes four key objects:
-
Message: it is a message passed between threads. It can carry a small amount of information internally, which is used to exchange data between different threads.
-
Handler: it means handler. It is mainly used to send and process messages.
-
MessageQueue: it means message queue. It is mainly used to store messages sent through the Handler. Messages sent through the Handler will be stored in the MessageQueue for processing, and there will only be one MessageQueue object in each thread.
-
Looper: is the steward of the MessageQueue in each thread. After calling Looper's loop() method, you will enter an infinite loop. Whenever a message is found in the MessageQueue, it is taken out and passed to the Handler's handleMessage() method.
[external chain picture transferring... (img-g5m4r1nb-164657754255)]