1. What's Hive
1. General
Apache Hive data warehouse software provides query and management of large data sets stored in distributed. It is built on Apache Hadoop and mainly provides the following functions:
(1) It provides a series of tools that can be used to extract / transform / load data (ETL);
(2) It is a mechanism that can store, query and analyze large-scale data stored in HDFS (or HBase);
(3) HQL query is completed through MapReduce [select *from]
2. The difference between data warehouse and data hive is to solve the problem of structural data analysis of MR and complete the storage of massive data
2.1. Concept:
Database: the number of structured data storage is small, and it is more inclined to fine data management. When data storage is divided into databases and tables, the concept of transaction is stored
Data warehouse: a structure with a large amount of data. Data storage tends to data management, without the concept of transaction
2.2. Usage: Database: mysql/oracle/sql server standard sql data warehouse: hql dialect sql in hive
2.3. Application scenario: Database: OLTP on line transaction processing insert delete update data warehouse: OLAP: on line analysis processing online analysis transaction processing select does not support update delete in hive, but supports insert
**2.4. Data volume database: * * centralized data volume is relatively small. Data warehouse: distributed data volume is large. 2.5. Delayed database: real-time data warehouse: offline
3. Summary
3.1 hive3 is a data warehouse. Hive is based on Hadoop. The final original data of hive is stored in HDFS. 3.2 provides a way similar to SQL statements to complete MapReduce. The essence of hive is to convert SQL statements into MapReduce tasks
3.3 users unfamiliar with MapReduce can easily use HQL to process and calculate structured data on HDFS
Hive Architecture Principle
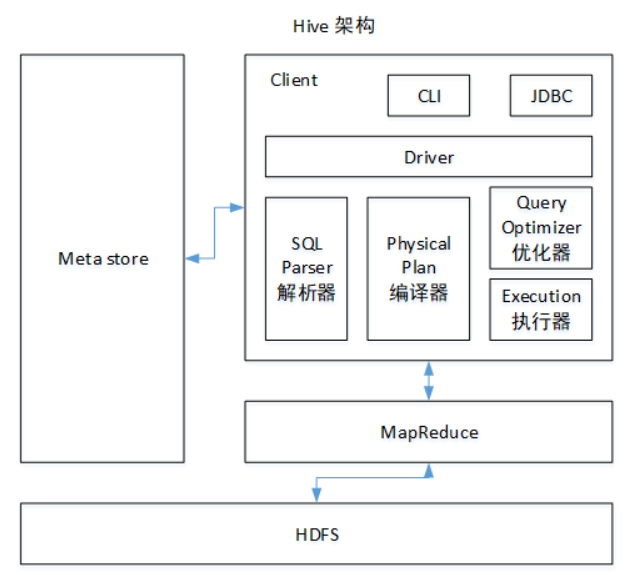
Data storage location
Hive is built on Hadoop, and all hive data is stored in HDFS. The database can save the data in a block device or a local file system.
Execution delay
When Hive queries data, it needs to scan the whole table because there is no index, so the delay is high. Another factor causing high Hive execution latency is the MapReduce framework. Because MapReduce itself has high latency, it will also have high latency when using MapReduce to execute Hive queries. In contrast, the execution latency of the database is low. Of course, this low is conditional, that is, the data scale is small. When the data scale is large enough to exceed the processing capacity of the database, Hive's parallel computing can obviously reflect its advantages.
Scalability
Because Hive is built on Hadoop, the scalability of Hive is consistent with that of Hadoop (the world's largest Hadoop cluster is Yahoo!, with a scale of about 4000 nodes in 2009). Due to the strict restriction of ACID semantics, the extended rows in the database are very limited. At present, the theoretical expansion capacity of the most advanced parallel database Oracle is only about 100.
Hive installation
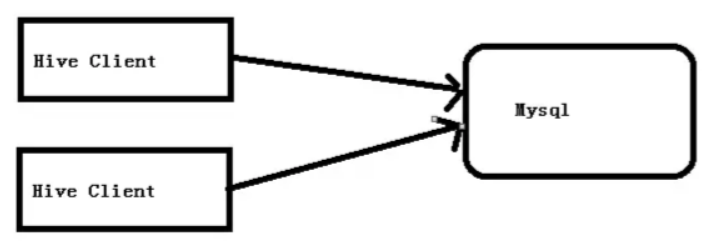
mysql database is used instead of Derby to store metadata to solve the problem of multi-user concurrent access
2.Hive installation address
1. Hive official website address
2. Document viewing address
https://cwiki.apache.org/confluence/display/Hive/GettingStarted
3. Download address
http://archive.apache.org/dist/hive/
4. github address
https://github.com/apache/hive
Hive installation deployment
1. Hive installation and configuration
(1) Upload apache-hive-1.2.1-bin.tar.gz to the / opt/software directory of linux
(2) Unzip apache-hive-1.2.1-bin.tar.gz to / opt/module /
[root@hadoop102 software]$ tar -zxvf apache-hive-1.2.1-bin.tar.gz -C
 /opt/module/
(3) Change the name of apache-hive-1.2.1-bin.tar.gz to hive
# 1. Switch to the module directory
[root@hadoop102 software]$ cd ../module

# 2. Modify the name
[root@hadoop102 module]$ mv apache-hive-1.2.1-bin/ hive
(4) Modify the name of hiv-env.sh.template in / opt/module/hive/conf directory to hiv-env.sh
[root@hadoop102 conf]$ mv hive-env.sh.template hive-env.sh
(5) Configure the hive-env.sh file
(a)to configure HADOOP_HOME route

export HADOOP_HOME=/opt/module/hadoop-2.7.2

(b)to configure HIVE_CONF_DIR route

export HIVE_CONF_DIR=/opt/module/hive/conf
2. Hadoop cluster configuration
(1) hdfs and yarn must be started
[root@hadoop102 hadoop-2.7.2]$ start-dfs.sh
[root@hadoop103 hadoop-2.7.2]$ start-yarn.sh
(2) Create / tmp and / user/hive/warehouse directories on HDFS and modify their same group permissions to be writable
[root@hadoop102 hadoop-2.7.2]$ hadoop fs -mkdir /tmp
[root@hadoop102 hadoop-2.7.2]$ hadoop fs -mkdir -p /user/hive/warehouse
[root@hadoop102 hadoop-2.7.2]$ hadoop fs -chmod g+w /tmp
[root@hadoop102 hadoop-2.7.2]$ hadoop fs -chmod g+w /user/hive/warehouse
3. Hive basic operation
(1)start-up hive
 /opt/module/hive
[root@hadoop102 hive]$ bin/hive
(2)view the database
hive> show databases;
(3)Open default database
hive> use default;
(4)display default Table in database
hive> show tables;
(5)Create a table
hive> create table student(id int, name string);
(6)Displays how many tables are in the database
hive> show tables;
(7)View table structure
hive> desc student;
(8)Insert data into a table
hive> insert into student values(1000,"ss");
(9)Data in query table
hive> select * from student;
(10)sign out hive
hive> quit;
Description: (view) hive stay hdfs (structure in)
Databases: in hdfs As shown in ${hive.metastore.warehouse.dir}Next folder under directory
Table: displays a folder under the db directory in hdfs, where the specific data in the table is stored
Import local files into Hive cases
demand
Import the data in the local / opt / module / hive / data / student.txt directory into the student (ID, int, name string) table of hive.
1. Data preparation
Prepare data in the directory / opt / module / data
(1) Create data in the / opt/module / directory
[root@hadoop102 module]$ mkdir datas
(2) Create a student.txt file in the / opt / module / data / directory and add data
[root@hadoop102 datas]$ touch student.txt
[root@hadoop102 datas]$ vi student.txt

1001	zhangshan
1002	lishi
1003	zhaoliu
Note the tab interval.
2. Hive actual operation
(1)start-up hive
[root@hadoop102 hive]$ bin/hive

(2)show database
hive> show databases;

(3)use default database
hive> use default;

(4)display default Table in database
hive> show tables;

(5)Delete created student surface
hive> drop table student;

(6)establish student surface, And declare the file separator'\t'
hive> create table student(id int, name string) ROW FORMAT DELIMITED FIELDS TERMINATED
 BY '\t';

(7)load/opt/module/datas/student.txt File to student In the database table.
hive> load data local inpath '/opt/module/hive/datas/student.txt' into table student;

(8)Hive Query results
hive> select * from student;
OK

1001	zhangshan
1002	lishi
1003	zhaoliu

Time taken: 0.266 seconds, Fetched: 3 row(s)
3.Mysql installation
Installation package preparation
1. Check whether MySQL is installed. If so, uninstall mysql
(1) view
[root@hadoop102 desktop]# rpm -qa|grep mysql
		rpm -qa |grep -i mysql
mysql-libs-5.1.73-5.el6_6.x86_64
(2) unloading
[root@hadoop102 desktop]# rpm -e --nodeps mysql-libs-5.1.73-5.el6_6.x86_64
2. Unzip the mysql-libs.zip file to the current directory
[root@hadoop102 software]# unzip mysql-libs.zip
[root@hadoop102 software]# ls
mysql-libs.zip
mysql-libs
3. Enter the MySQL LIBS folder
[root@hadoop102 mysql-libs]# ll
 Total consumption 76048
-rw-r--r--. 1 root root 18509960 3 June 26, 2015 MySQL-client-5.6.24-1.el6.x86_64.rpm
-rw-r--r--. 1 root root  3575135 12 January 2013 mysql-connector-java-5.1.27.tar.gz
-rw-r--r--. 1 root root 55782196 3 June 26, 2015 MySQL-server-5.6.24-1.el6.x86_64.rpm
Install MySql server
1. Install mysql server
[root@hadoop102 mysql-libs]# rpm -ivh MySQL-server-5.6.24-1.el6.x86_64.rpm
2. View the generated random password
[root@hadoop102 mysql-libs]# cat /root/.mysql_secret
sP2wb_zdwA1o3zAh
3. View mysql status
[root@hadoop102 mysql-libs]# service mysql status
4. Start mysql
[root@hadoop102 mysql-libs]# service mysql start
Install MySql client
1. Install mysql client
[root@hadoop102 mysql-libs]# rpm -ivh MySQL-client-5.6.24-1.el6.x86_64.rpm
2. Link mysql
cat /root/.mysql_secret [root@hadoop102 mysql-libs]# mysql -uroot -pdDpX_qNGzPgXomRd
3. Change password
mysql>SET PASSWORD=PASSWORD('000000');
4. Exit mysql
mysql>exit
Host configuration in user table in MySql
As long as the configuration is root + password, you can log in to MySQL database on any host.
1. Enter mysql
[root@hadoop102 mysql-libs]# mysql -uroot -p000000
2. Display database
mysql>show databases;
3. Use mysql database
mysql>use mysql;
4. Display all tables in mysql database
mysql>show tables;
5. Show the structure of the user table
mysql>desc user;
6. Query user table
mysql>select User, Host, Password from user;
7. Modify the user table and the Host table to%
mysql>update user set host='%' where host='localhost';
8. Delete other host s of the root user
mysql>delete from user where Host='node2';
mysql>delete from user where Host='127.0.0.1';
mysql>delete from user where Host='::1';
9. Refresh
mysql>flush privileges;
10. Exit
mysql>quit;
4. Configure hive metadata to MySql
4.1 driver copy
1. Unzip the mysql-connector-java-5.1.27.tar.gz driver package in / opt / software / MySQL LIBS directory
[root@hadoop102 mysql-libs]# tar -zxvf mysql-connector-java-5.1.27.tar.gz
2. Copy mysql-connector-java-5.1.27-bin.jar in / opt / software / MySQL LIBS / mysql-connector-java-5.1.27 directory to / opt/module/hive/lib/
[root@hadoop102 mysql-connector-java-5.1.27]# cp mysql-connector-java-5.1.27-bin.jar /opt/module/hive/lib/
4.2 configuring Metastore to MySql
1. Create a hive-site.xml in the / opt/module/hive/conf directory
[root@hadoop102 conf]$ touch hive-site.xml
[root@hadoop102 conf]$ vi hive-site.xml
2. Copy the data to hive-site.xml file according to the official document configuration parameters
https://cwiki.apache.org/confluence/display/Hive/AdminManual+MetastoreAdmin
<?xml version="1.0"?>
<?xml-stylesheet type="text/xsl" href="configuration.xsl"?>
<configuration>
	<property>
	  <name>javax.jdo.option.ConnectionURL</name>
	  <value>jdbc:mysql://hadoop102:3306/metastore?createDatabaseIfNotExist=true</value>
	  <description>JDBC connect string for a JDBC metastore</description>
	</property>

	<property>
	  <name>javax.jdo.option.ConnectionDriverName</name>
	  <value>com.mysql.jdbc.Driver</value>
	  <description>Driver class name for a JDBC metastore</description>
	</property>

	<property>
	  <name>javax.jdo.option.ConnectionUserName</name>
	  <value>root</value>
	  <description>username to use against metastore database</description>
	</property>

	<property>
	  <name>javax.jdo.option.ConnectionPassword</name>
	  <value>000000</value>
	  <description>password to use against metastore database</description>
	</property>
</configuration>
3. After configuration, if hive is abnormal, you can restart the virtual machine. (after restarting, don't forget to start the hadoop cluster)
4.3 multi window launch Hive test
1. Start MySQL first
[root@hadoop102 mysql-libs]$ mysql -uroot -p000000
How many databases are there
mysql> show databases;
±-------------------+
| Database |
±-------------------+
| information_schema |
| mysql |
| performance_schema |
| test |
±-------------------+
2. Open multiple windows again and start hive respectively
[root@hadoop102 hive]$ bin/hive
3. After you start hive, go back to the MySQL window to view the database. The metastore database is added
mysql> show databases;
±-------------------+
| Database |
±-------------------+
| information_schema |
| metastore |
| mysql |
| performance_schema |
| test |
±-------------------+
5.HiveJDBC access
5.1 start the hiveserver2 service
[root@hadoop102 hive]$ bin/hiveserver2
5.2 start beeline
[root@hadoop102 hive]$ bin/beeline
Beeline version 1.2.1 by Apache Hive
beeline>
5.3 connecting the hiveserver2
beeline> !connect jdbc:hive2://Hadoop 102:10000 (enter)

Connecting to jdbc:hive2://hadoop102:10000

Enter username for jdbc:hive2://Hadoop 102:10000: root (enter)

Enter password for jdbc:hive2://Hadoop 102:10000: (enter directly)

Connected to: Apache Hive (version 1.2.1)

Driver: Hive JDBC (version 1.2.1)

Transaction isolation: TRANSACTION_REPEATABLE_READ

0: jdbc:hive2://hadoop102:10000> show databases;

+----------------+--+

| database_name  |

+----------------+--+

| default     |

+----------------+--+
6 Hive common interactive commands
[root@hadoop102 hive]$ bin/hive -help
1. "- e" does not enter the interactive window of hive to execute sql statements
[root@hadoop102 hive]$ bin/hive -e "select id from student;"
2. "- f" executes sql statements in the script
(1) create hivef.sql file in / opt / module / data directory
[root@hadoop102 datas]$ touch hivef.sql
Write the correct sql statement in the file
select *from student;
(2) execute the sql statements in the file
[root@hadoop102 hive]$ bin/hive -f /opt/module/datas/hivef.sql
(3) Execute the sql statements in the file and write the results to the file
[root@hadoop102 hive]$ bin/hive -f /opt/module/datas/hivef.sql > /opt/module/datas/hive_result.txt
7 Hive other command operations
1. Exit hive window:
hive(default)>exit;
hive(default)>quit;
In the new version of hive, there is no difference. In the previous version, there was:
exit: submit data implicitly before exiting;
Quit: quit without submitting data;
2. How to view the hdfs file system in the hive cli command window
hive(default)>dfs -ls /;
3. How to view the local file system in the hive cli command window
hive(default)>! ls /opt/module/datas;
4. View all historical commands entered in hive
(1) enter the root directory / root or / home/root of the current user
(2) view the. Historyfile
[root@hadoop102 ~]$ cat .hivehistory
7.1 Hive data warehouse location configuration
1) the original location of the Default data warehouse is in the: / user/hive/warehouse Path on hdfs.
2) under the warehouse directory, no folder is created for the default database default. If a table belongs to the default database, create a folder directly under the data warehouse directory.
3) modify the original location of the default data warehouse (copy the following configuration information of hive-default.xml.template to hive-site.xml file).
<property>
<name>hive.metastore.warehouse.dir</name>
<value>/user/hive/warehouse</value>
<description>location of default database for the warehouse</description>
</property>
Configure that users in the same group have execution permission
bin/hdfs dfs -chmod g+w /user/hive/warehouse
7.2 information display configuration after query
1) Add the following configuration information to the hive-site.xml file to display the header information of the current database and query table.
<property>
	<name>hive.cli.print.header</name>
	<value>true</value>
</property>

<property>
	<name>hive.cli.print.current.db</name>
	<value>true</value>
</property>
2) restart hive and compare the differences before and after configuration.
Display data warehouse
7.3 Hive operation log information configuration
1. Hive's log is stored in / tmp/root/hive.log directory by default (under the current user name)
2. Modify hive's log and save the log to / opt/module/hive/logs
(1) modify the file name of / opt/module/hive/conf/hive-log4j.properties.template to
hive-log4j.properties
[root@hadoop102 conf]$ pwd

/opt/module/hive/conf

[root@hadoop102 conf]$ mv hive-log4j.properties.template hive-log4j.properties
(2) modify the log storage location in hive-log4j.properties file
hive.log.dir=/opt/module/hive/logs