1, Compose overview
1.Compose is a tool for defining and running multiple containers. Compose allows you to configure containers using YAML files. Then, all services can be created and started from the configuration using one command.
2. Docker Compose container orchestration
YAML is a very intuitive data serialization format in markup language
Document format and preparation precautions:
tab indentation is not supported. Space indentation is required
Usually the beginning is indented by 2 spaces
Indent 1 space after characters, such as colon, comma, bar
Note with # number
If it contains special characters, use single quotation marks
Boolean values must be enclosed in quotation marks
3. Docker compose common fields
build	 ##Rebuild service
ps	     ##List containers
up	     ##Create and launch containers
exec	 ##Execute the command in the container
scale	 ##Specify the number of service container starts
top	     ##Show container processes
logs	 ##View container output
down	 ##Delete containers, networks, data volumes, and mirrors
stop/start/restart	   ##Stop / start / restart service
4. Common fields for docker compose configuration
build dockerfile context	##Specify the Dockerfile file name to build the image. Context path
image	        ##Specify mirror
command	          ##Execute the command to override the default command
container name	  ##Specify the container name. Because the container name is unique, if you specify a custom name, you cannot scale
deploy	          ##Specify the configuration related to deploying and running services, which can only be used in Swarm mode
environment	       ##Add environment variable
networks	##Join the network
ports	    ##Expose the container port, the same as - p, but the port cannot be lower than 60
volumes	      ##Mount the host path or command volume
restart	         ##Restart policy, default no, always, no failure, unless stopped
hostname	   ##Container host name
2, About Consul
1.Consul is an open source tool launched by HashiCorp, which is used to realize service discovery and configuration of distributed systems. Compared with other distributed service registration and discovery schemes, consul's scheme is more "one-stop", with a built-in service registration and discovery framework and the following properties:
Implementation of distributed consistency protocol
Health examination
Key/Value storage
Multi data center solutions,
No longer need to rely on other tools (such as ZooKeeper).
2. Use scenario of consul
Registration and configuration sharing of docker instances
Registration and configuration sharing of coreos instances
Vites cluster
Configuration sharing of SaaS applications
Integrate with the conf D service to dynamically generate nginx and haproxy configuration files
3.2Consul container service update and discovery
consul Server:
①consul template: Define the template through variables; The definition is upstream The address pool is in the form of variables and is dynamically updated when instructions are received web_01 in ng Configuration file for
②consul server: Administration consul template
③consul agent: Mechanism for obtaining service discovery; UI You can also see the newly updated services in the interface
compose:
①consul registrator: monitor; Deployed in server carry carefully
 Process:
set up registrator Monitor and monitor the service port. If a new port is monitored, it will be registered to agent,hand server End, put the real container and ip write in template Within the template, the template is updated to nginx.conf Internally, reload the configuration file to externally identify the newly added service backend node: docker The server
4. Deployment
4.1 experimental environment
host	   operating system	 IP address	         Main software and version
consul	centos7	192.168.189.15	Docker ,Consul,Consul-template
registrator	centos7	192.168.133.16	Docker,registrator
1. Install consumer
[root@dacker-consul ~]# mkdir /root/consul
[root@dacker-consul ~]# cd /root/consul
[root@dacker-consul consul]# rz -E
rz waiting to receive.
[root@dacker-consul consul]# ls
consul_0.9.2_linux_amd64.zip
[root@dacker-consul consul]# unzip consul_0.9.2_linux_amd64.zip
Archive:  consul_0.9.2_linux_amd64.zip
  inflating: consul
[root@dacker-consul consul]# ls
consul  consul_0.9.2_linux_amd64.zip
[root@dacker-consul consul]# mv consul /usr/bin
[root@dacker-consul consul]# consul agent \
> -server \
> -bootstrap \
> -ui \
> -data-dir=/var/lib/consul-data \
> -bind=192.168.189.15 \
> -client=0.0.0.0 \
> -node=consul-server01 &> /var/log/consul.log &
[1] 16681
[root@dacker-consul consul]#
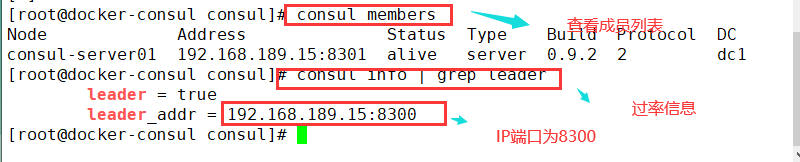
1.2. Viewing cluster information
consul members
consul info | grep leader
 The 8300 port queried here is used for reading, writing and copying data in the cluster
1.3. Obtain cluster information through httpd api
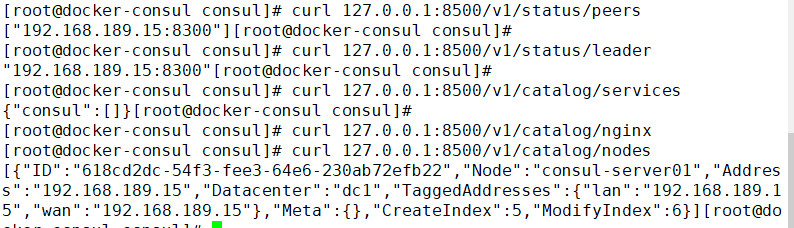
curl 127.0.0.1:8500/v1/status/peers       //View cluster server members
curl 127.0.0.1:8500/v1/status/leader      //Cluster Raf leader
curl 127.0.0.1:8500/v1/catalog/services   //All registered services
curl 127.0.0.1:8500/v1/catalog/nginx      //View nginx service information
curl 127.0.0.1:8500/v1/catalog/nodes      //Cluster node details
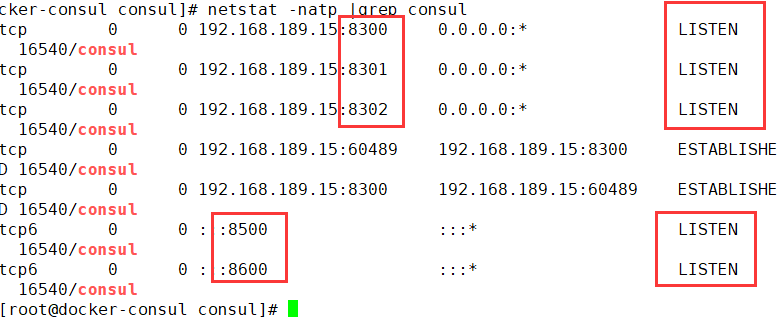
1.4. Port function
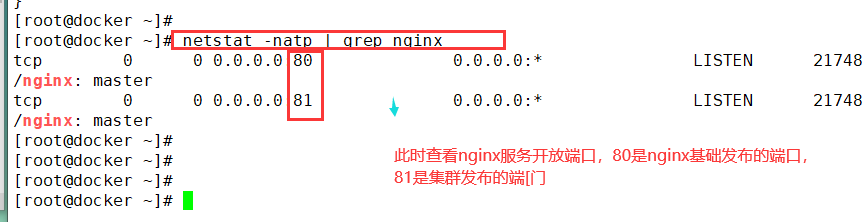
netstat -natp |grep consul
 The functions of these five ports:
8300: Read / write and replication of data in the cluster
8301: Single data center gossip Protocol communication
8302: Cross data center gossip Protocol communication
8500: Provide access to service list, registration service, logout service, etc HTTP Interface; provide UI service
8600: use DNS The protocol provides service discovery
2... Configure client Deployment
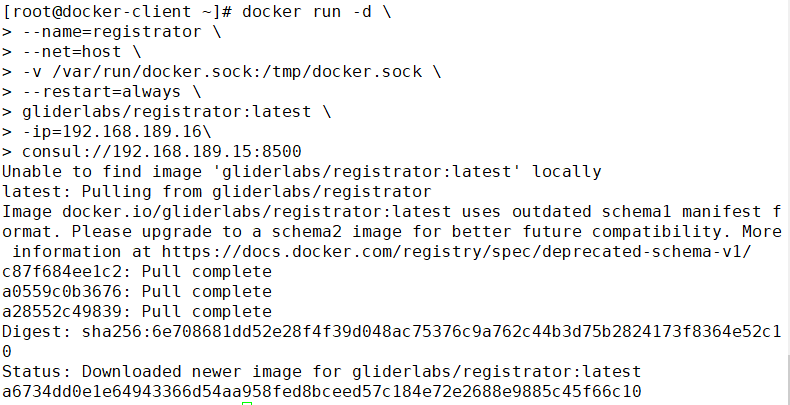
install Gliderlabs/Registrator
docker run -d \
--name=registrator \
--net=host \
-v /var/run/docker.sock:/tmp/docker.sock \
--restart=always \
gliderlabs/registrator:latest \
-ip=192.168.189.16\
consul://192.168.189.15:8500

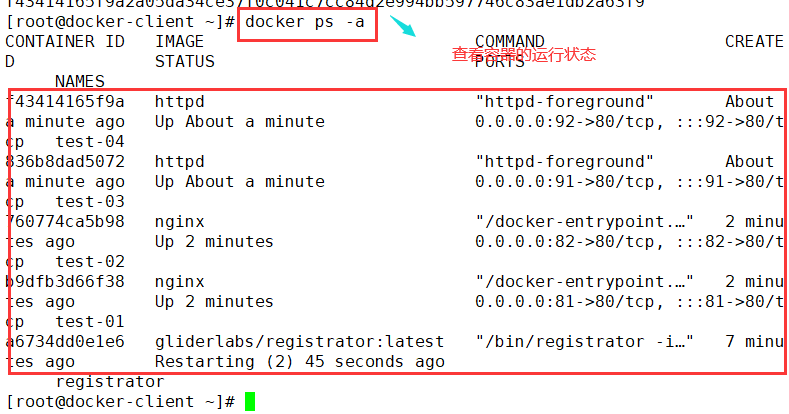
2.2 test whether the service discovery function is normal
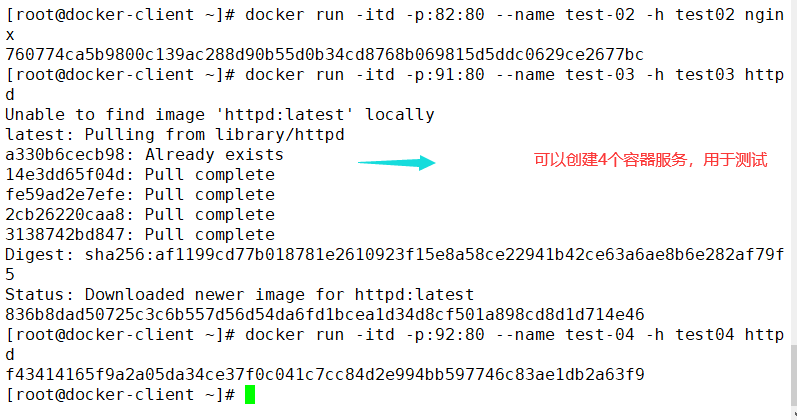
docker run -itd -p:81:80 --name test-01 -h test01 nginx
docker run -itd -p:82:80 --name test-02 -h test02 nginx
docker run -itd -p:91:80 --name test-03 -h test03 httpd
docker run -itd -p:92:80 --name test-04 -h test04 httpd
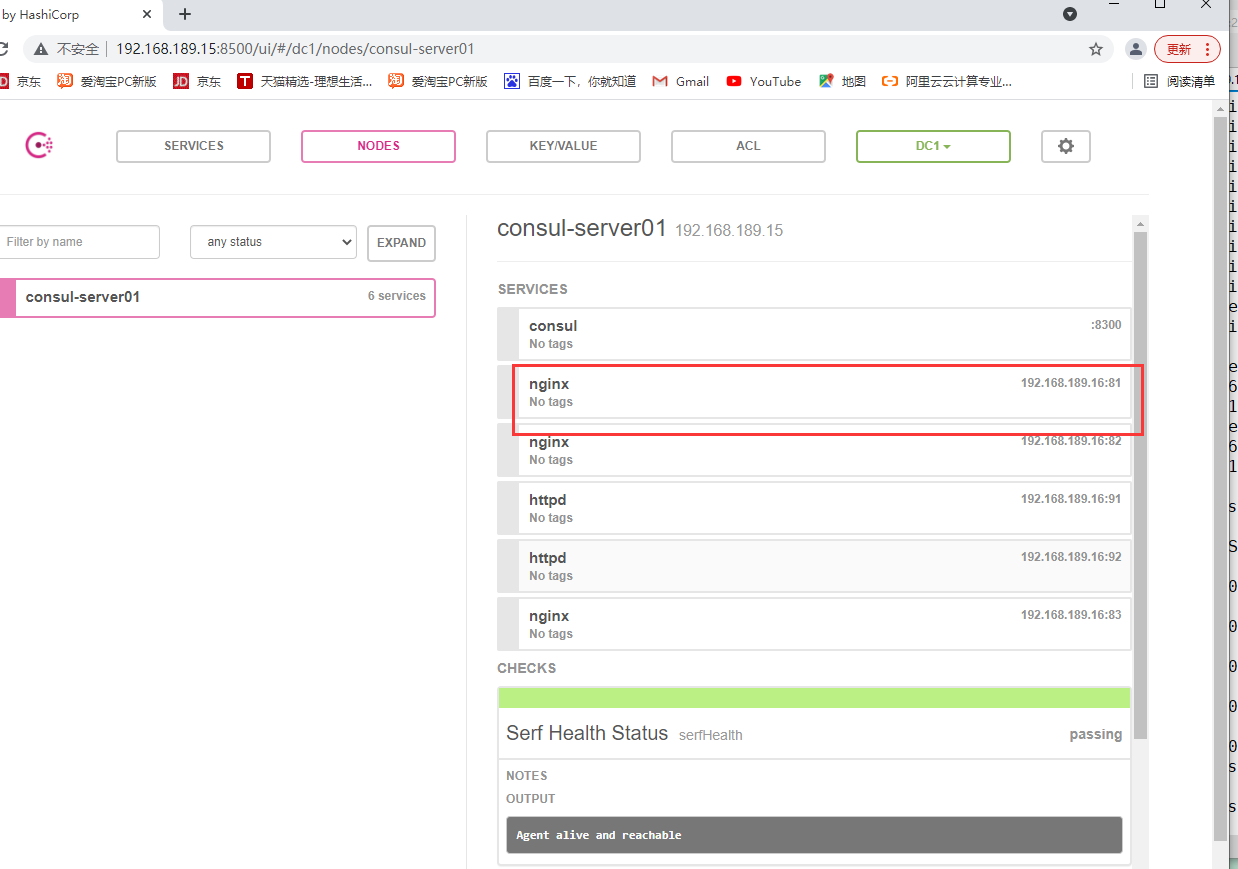
2.3 verify whether http and nginx services are registered with consumer
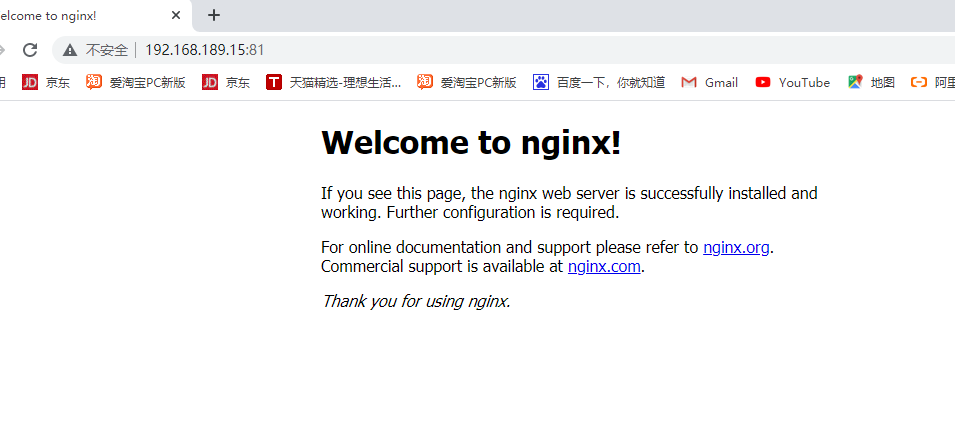
Browser input http://192.168.189.15:8500 , click NODES, and then click consorl-server01,
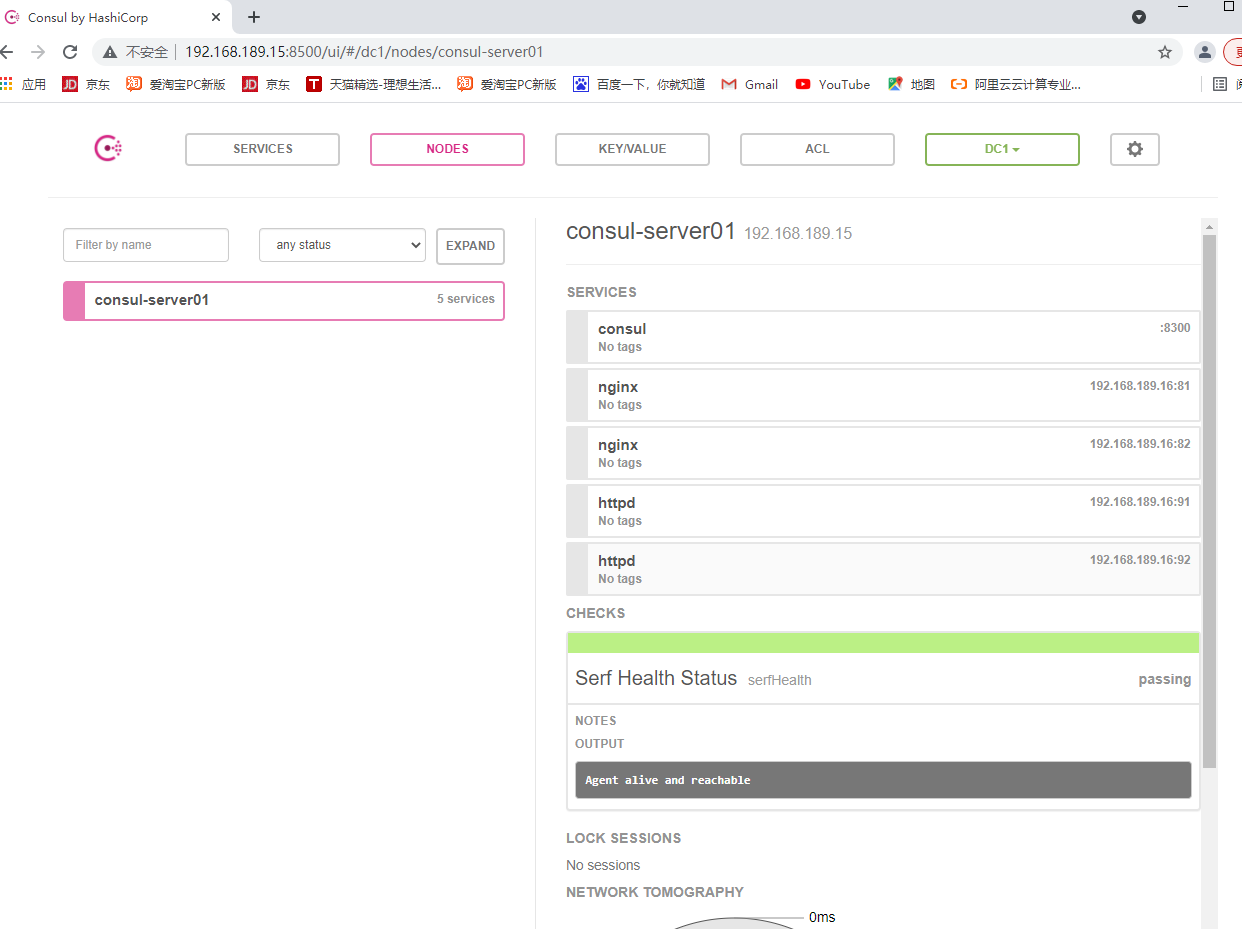
consul:192.168.189.15
curl 127.0.0.1:8500/v1/catalog/services
 #View all registered services, and you can see the httpd and nginx services above

3. Install the consumer template
consul:192.168.189.15
unzip consul-template_0.19.3_linux_amd64.zip
mv consul-template /usr/bin/
#Move the extracted file to the / usr/bin directory
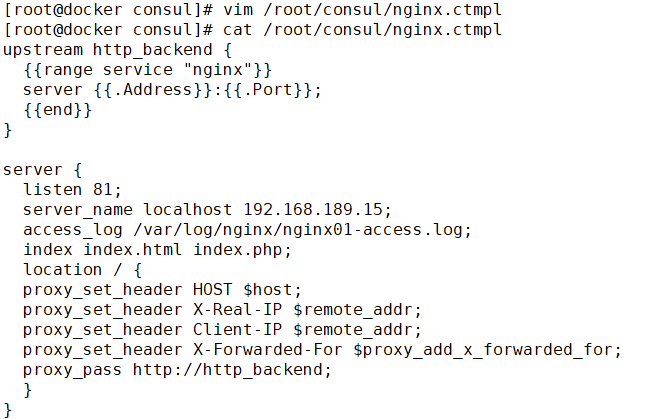
4. Prepare template nginx template file
consul:192.168.189.15
5. Deploy nginx
consul: 192.168.189.15
Compile and install nginx
yum install -y gcc pcre-devel zlib-devel
cd /opt
tar zxvf nginx-1.12.2.tar.gz
cd nginx-1.12.0/
./configure --prefix=/usr/local/nginx
make && make install
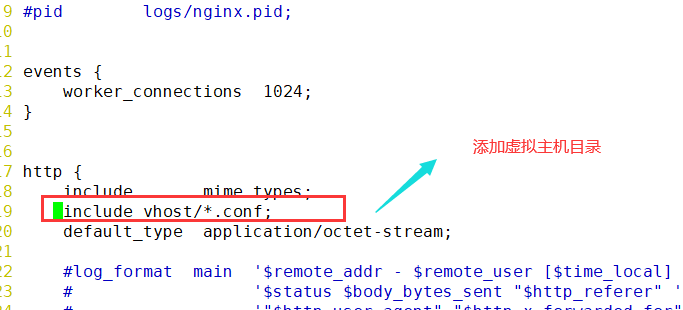
5.1 configuring nginx
vim /usr/local/nginx/conf/nginx.conf
http {
  include    mime.types;
  include vhost/*.conf;  //Add virtual host directory
  default_type application/octet-stream;

//Create virtual host directory
mkdir /usr/local/nginx/conf/vhost
//Create log file directory
mkdir /var/log/nginx

//start nginx
/usr/local/nginx/sbin/nginx

6. Start template
consul:192.168.189.15
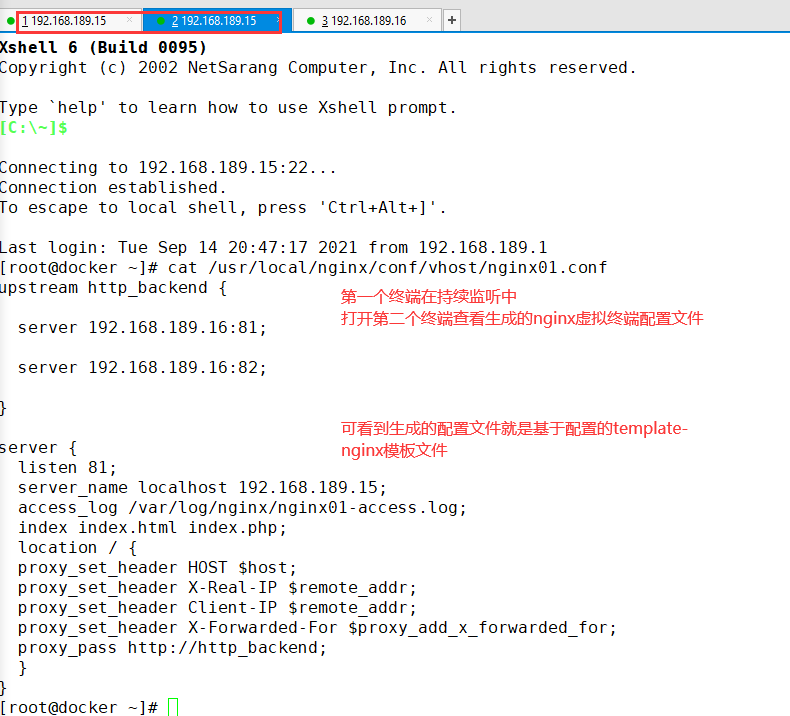
consul-template -consul-addr 192.168.133.10:8500 \
-template "/root/consul/nginx.ctmpl:/usr/local/nginx/conf/vhost/nginx01.conf:/usr/local/nginx/sbin/nginx -s reload" \
--log-level=info
6.1 test reopen a consumer: 192.168.189.15 test
7. Test
Add an nginx container node to test the service discovery and configuration update functions
Client: 192.168.189.16
Register on the Registrar server
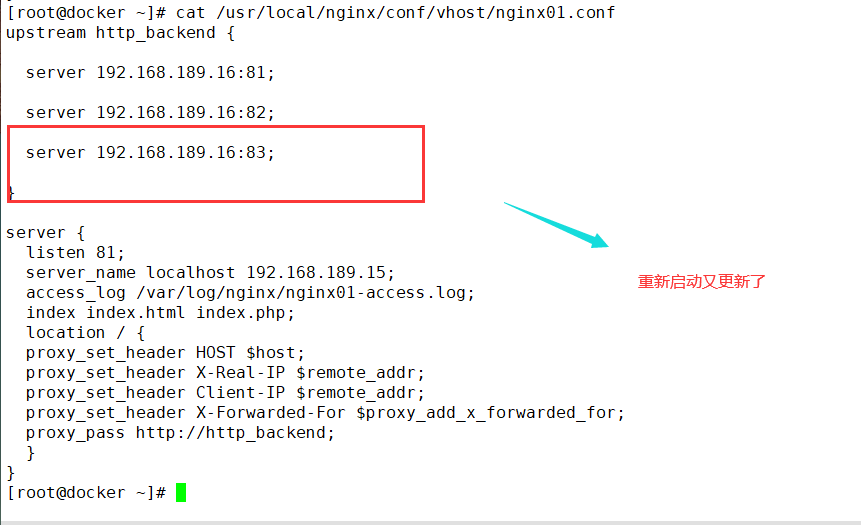
consul: 192.168.189.15
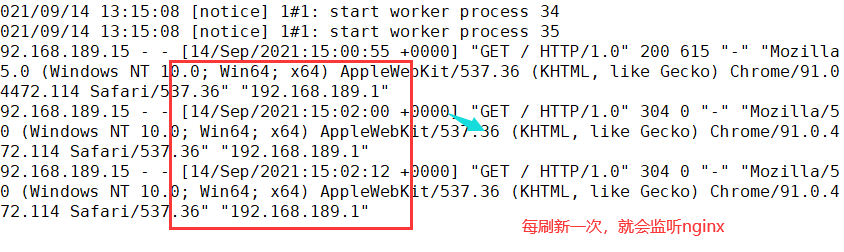
When the consumer server monitors the loading, there will be a prompt for automatic update

Check the logs of the three nginx containers, and the requests fall to each node normally
client: 192.168.189.16
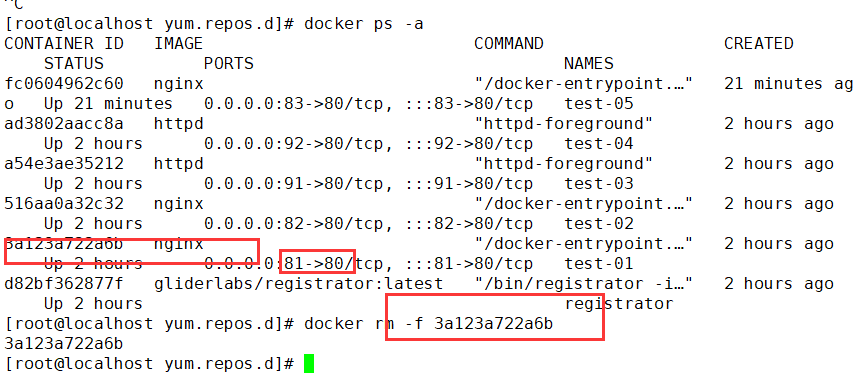
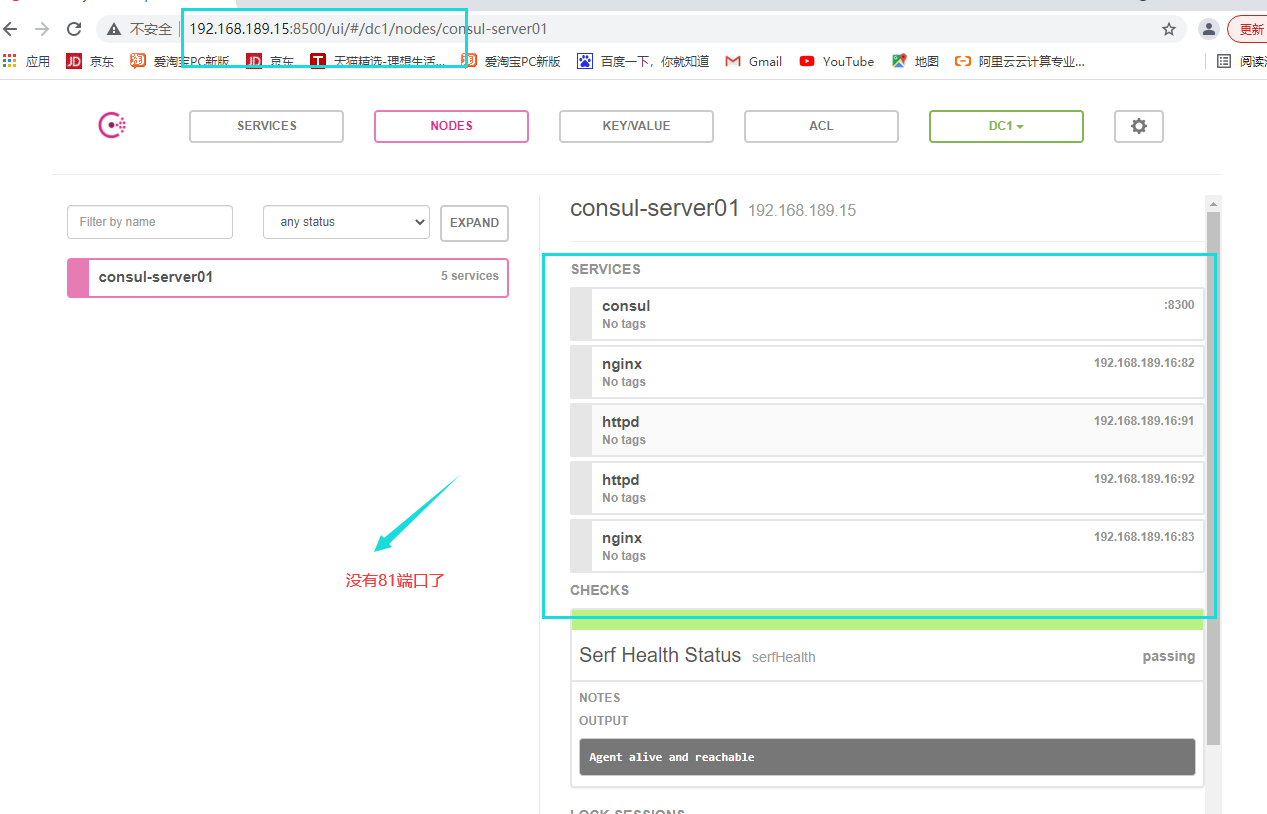
8. Delete node
8.1 original drawing
8.2 delete