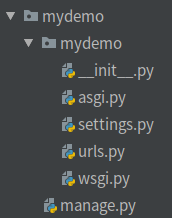
1. Django Project Creation
1. Project structure
1.1. settings.py file
"""
Django settings for mydemo project.

Generated by 'django-admin startproject' using Django 3.1.7.<django Version

For more information on this file, see
https://docs.djangoproject.com/en/3.1/topics/settings/

For the full list of settings and their values, see
https://docs.djangoproject.com/en/3.1/ref/settings/
"""

from pathlib import Path

# Build paths inside the project like this: BASE_DIR / 'subdir'.
BASE_DIR = Path(__file__).resolve().parent.parent """<Show current project root directory"""

# Quick-start development settings - unsuitable for production
# See https://docs.djangoproject.com/en/3.1/howto/deployment/checklist/

# SECURITY WARNING: keep the secret key used in production secret!
SECRET_KEY = 'jb^(bip2g_@%r*5ni-8@#yz%*crzw7sqpq_qcbhw48lgk+ctxo'

# SECURITY WARNING: don't run with debug turned on in production!
DEBUG = True
"""
Debug mode switch, default is True(Debug Mode)
by True When:1.Restart the service immediately after detecting code changes; 2.Show error page
 by False When (Official Start Mode)/Online mode: Be sure to change the project to when it comes online False
"""

ALLOWED_HOSTS = []
"""
Allowed domain names, only the domain names added in the list can access the server, 127 is allowed by default.0.0.1 perhaps localhost Visit
 Set to"*": Indicates that all domain names are allowed access
 Set the domain name in the current LAN for access:
1.Settings at project startup: python manage.py runserver 0.0.0.0:8000
2.Add LAN IP
"""

# Application definition

INSTALLED_APPS = [
    'django.contrib.admin',
    'django.contrib.auth',
    'django.contrib.contenttypes',
    'django.contrib.sessions',
    'django.contrib.messages',
    'django.contrib.staticfiles',
]

MIDDLEWARE = [
    'django.middleware.security.SecurityMiddleware',
    'django.contrib.sessions.middleware.SessionMiddleware',
    'django.middleware.common.CommonMiddleware',
    'django.middleware.csrf.CsrfViewMiddleware',
    'django.contrib.auth.middleware.AuthenticationMiddleware',
    'django.contrib.messages.middleware.MessageMiddleware',
    'django.middleware.clickjacking.XFrameOptionsMiddleware',
]

ROOT_URLCONF = 'mydemo.urls'
"""
Project main route location, defaults to under project folder urls.py
"""

TEMPLATES = [
    {
        'BACKEND': 'django.template.backends.django.DjangoTemplates',
        'DIRS': [],
        'APP_DIRS': True,
        'OPTIONS': {
            'context_processors': [
                'django.template.context_processors.debug',
                'django.template.context_processors.request',
                'django.contrib.auth.context_processors.auth',
                'django.contrib.messages.context_processors.messages',
            ],
        },
    },
]
"""
Template Configuration
"""

WSGI_APPLICATION = 'mydemo.wsgi.application'


# Database
# https://docs.djangoproject.com/en/3.1/ref/settings/#databases

DATABASES = {
    'default': {
        'ENGINE': 'django.db.backends.sqlite3',
        'NAME': BASE_DIR / 'db.sqlite3',
    }
}


# Password validation
# https://docs.djangoproject.com/en/3.1/ref/settings/#auth-password-validators

AUTH_PASSWORD_VALIDATORS = [
    {
        'NAME': 'django.contrib.auth.password_validation.UserAttributeSimilarityValidator',
    },
    {
        'NAME': 'django.contrib.auth.password_validation.MinimumLengthValidator',
    },
    {
        'NAME': 'django.contrib.auth.password_validation.CommonPasswordValidator',
    },
    {
        'NAME': 'django.contrib.auth.password_validation.NumericPasswordValidator',
    },
]

# Internationalization
# https://docs.djangoproject.com/en/3.1/topics/i18n/

LANGUAGE_CODE = 'en-us'
"""
Home page language configuration, can be set to Chinese
LANGUAGE_CODE = 'zh-hans'
"""
TIME_ZONE = 'UTC'
"""
Time zone settings, mainly affecting database time display
TIME_ZONE = 'Asia/shanghai'
"""
USE_I18N = True

USE_L10N = True

USE_TZ = True

# Static files (CSS, JavaScript, Images)
# https://docs.djangoproject.com/en/3.1/howto/static-files/

STATIC_URL = '/static/'
"""
Static File Routing
"""
1.2 URL
-
URL structure: protocol://hostname[:port]/path[?query][#fragment]
- Protocol:
- Http: Access the resource through HTTP in the format: http://
- Https: Access the resource through secure https: format: https://
- File: Access local resources through file, format: file:///
- Hostname (hostname/domain name):
- Domain Name System (DNS) host name, domain name, or IP address of the server where the resource is stored
- Port:
- Optional, use default port for schema when omitted
- Each transport protocol has a default port number http: 80 by default, 443 by default
- Path (routing address):
- A string separated by zero or more'/'symbols, typically used to represent a directory or file address on a host, and the routing address determines how the server handles the request
- Query (query string):
- Optional, with'?' Beginning, used to pass parameters to dynamic Web pages, can pass multiple parameters separated by'&', parameter names and values separated by an equal sign key=value
- Fragment:
- A string, starting with'#', that specifies a fragment in a network resource, similar to a bookmark, to which fragments can be located on the next visit
- Protocol:
-
How Django handles URL requests
- Based on the URL passed from the browser, django follows ROOT_from the configuration file URLCONF finds the main route file; By default, the route file is located in URLs under the same directory name. In PY
- django loads the urlpattern variable in the main route, which is a list of many routes
- Match paths in urlpattern from top to bottom, and then interrupt subsequent matches by matching to the first satisfied path
- Successfully matched, call the corresponding view function to process the request and return the corresponding response
- Match failed, 404 response returned
1.3 View Functions
-
Definition: Function used to receive browser requests (HttpRequest object) and return responses via HttpResponse object
-
Syntax: return must be an HttpResponse object
def demoview(request[,Other parameters]): return HttpResponse('Data to be returned') -
Example:
Create views in a directory with the same name as the project. PYfrom django.http import HttpResponse def page1_view(requet): html = "<h1>hallo world</h1>" return HttpResponse(html)
Add routing url.py
from django.contrib import admin
from django.urls import path
from . import views
urlpatterns = [
    path('admin/', admin.site.urls),
    path('page1/', views.page1_view),
]
1.4 Routing Configuration-path
- path() function
- Import from django.urls import path
- Syntax path(route,views,name=None)
- Parameters:
- route: String type, matching request path
- views:Name of the view processing function corresponding to the specified path
- name: Aliases the address and is used in reverse address resolution in templates
- path converter
- Syntax: <Converter Type: Custom Name>
- Role: If the converter type matches the corresponding type of data, the data is passed to the view function as a keyword argument
- Example: path ('page/<int:page>', views.xxx), if the int type is matched after the page path, the data from the received path is assigned to the variable page, and then passed to the view as a key parameter
-
Converter Type Effect Sample str Matches non-empty strings other than'/' "V1/users/<str:username>"match/v1/users/china, match result is: username=china int Match 0 to any positive integer, return an int "V1/users/<int:num>"match/v1/users/35, match result is: num=35 slug Match any short label with ASCII letters or numbers and hyphens and underscores "V1/users/<slug:sl>"match/v1/users/this_is_django, match result is: sl=this_is_django path Match non-empty fields, including path separators"/" "V1/users/<path:ph>"match/v1/users/goods/a/b/c, match result is: ph=goods/a/b/c
- re_path converter
- Syntax: re_path(reg,view,name=xxx)
- Regular expressions must be named grouping patterns (?P<name>pattern; passed to view functions as keyword arguments after successful matching
- Role: Use regularity for exact matching
- Example: URL (r'^weather/(?P<city>[a-z]+)/(?P<year>\d{4})/$', views. Weather),
- Syntax: re_path(reg,view,name=xxx)
2. Request and Response
2.1. Requests and Responses
2.1. Requests in 1 Django
- The first parameter in the view function is the HttpRequest object
- When django receives a request for the http protocol, it creates an HttpRequest object based on the request datagram
- The HttpRequest object describes all relevant information about the request through attributes
-
HttpRequest property:
Sex Name Explain th_info URL String ethod String representing the Http request method: GET, POST, PUT, etc. ET QueryDict Query Dictionary object, containing all the data for how get is requested POST QueryDict queries the object of the dictionary, containing all the data for how post s are requested ILES Dictionary-like object containing all uploaded file information OOKIES python dictionary with all cookie s, keys and values as strings ession Similar to a dictionary object, representing the current session ody Content of String Request Body cheme Request Protocol (http or https) equest.get_full_path() The full path of the request will take out the query string together equest.META Metadata in Request (Header) equset.META['REMOTE_ADDR'] Client IP Address
-
2.1. Response object in 2 Django
- Constructor:
- HttpResponse (content=responder, content_type=responder data type, status=status code)
- Effect:
- Return the response to the client browser with the response volume
- Parameters:
- Content:Represents the content returned
- status_code: Return HTTP response status code (default is 200)
- content_type: Specifies the MIME type (text/html by default) from which the data will be displayed by the browser
- Common content_type:
- 'text/html': default, HTML file
- 'text/plain': plain text
- 'text/css': CSS file
- 'text/javascript': js file
- 'multipart/form-data': file submission
- 'application/json': JSON transport
- 'application/xml': XML file
- Common content_type:
- HttpResponse subclass
type Effect Status Code HttpResponseRedirect redirect 302 HttpResponseNotModified not changed 304 HttpResponseBadRequest Error Request 400 HttpResponseNotFound No corresponding resources 404 HttpResponseForbidden Request forbidden 403 HttpResponseServerError Server Error 500
2.2 GET and POST requests
- Definition:
- Whether GET or POST, the unification is received by the view function, which determines the request.method distinguishes specific request actions
- Sample
if request.method == 'GET':
	Handle get Business logic at request
elif request.method == 'POST':
	Handle POST Business logic at request
else:
	Logic for handling other requests
- GET Processing
- GET request actions are typically used to obtain data from the server
- Scenarios capable of generating GET requests
- Browser Address Bar After Entering URL
- <a href = "Address? Parameter=Value&Parameter=Value">
- The method in the form is get
- In GET requests, if there is data to pass to the server, it is usually passed by a Query String, taking care not to pass sensitive data
- URL format: XXX? Parameter name 1 = value & parameter name 2 = value (for ex amp le: http://127.0.0.1:8000?a=100&b=200 )
- Server Side Receive Parameters: An example of how to get data submitted by a client requesting a GET
request.GET['Parameter Name'] #Get the value of the parameter name
request.GET.get('Parameter Name','Default value') #Gets the value of the parameter name, and returns the default value if the parameter name does not exist
request.GET.getlist('Parameter Name') #Receive ``` with getlist if multiple return values exist for this parameter name
- POST Processing
- POST request actions are typically used to submit large/private data to the server
- Clients pass data to servers through POST requests such as forms; For example:
<form method='post' action="/login"> #action specifies which route the post request is sent to
	Full name:<input type="text" name="username">
	<input type='submit' value='Land'>
</form>
- Server-side receive parameters: through request.method to determine if it is a post request
- Receiving client data using post
request.POST['Parameter Name'] #Get the value of the parameter name request.POST.get('Parameter Name','Default value') #Gets the value of the parameter name, and returns the default value if the parameter name does not exist request.POST.getlist('Parameter Name') #Receive with getlist if multiple return values exist for this parameter name - Note: django needs to cancel csrf validation when sending POST requests, otherwise django will reject POST requests from clients and report 403 responses
- Cancel csrf validation: comment out settings. MIDDLEWARE for csrfviewsmiddleware in MIDLEWARE in py file
2.3 Django Design Mode (MTV)
- Design Mode: MVC and MTV
- MVC (model-view-controller) Model-View-Controller mode
- M Model Layer, mainly for encapsulation of the database layer
- V View Layer for presenting results to users
- C control layer for processing requests, getting data, and returning results
- Advantages: Reduce coupling between modules
- MTV (model-template-view) Model-template-view mode
- M Model Layer, responsible for interacting with databases
- T Template Layer, responsible for rendering content to browser (html)
- V view layer, responsible for receiving requests, getting data, and returning results
- Advantages: Reduce coupling between modules
- MVC (model-view-controller) Model-View-Controller mode
2.4 Template Layer
-
Template Definition:
- Templates are HTML pages that can change dynamically based on dictionary data
- Templates can dynamically generate HTML pages based on dictionary data passed in the view
-
Template Configuration
- Create Template Folder <Project Name>/templates
- At settings. TEMPLATES Configuration Item in PY
- BACKEND: Engine with specified template
- DIRS: A search directory for templates, which can be one or more
- APP_DIRS: Do you want to search for template files in the templates folder of the sub-application
- OPTIONS: Options for templates
- Parts of the configuration that need to be modified
- Set DIRS -'DIRS': [os.path.join(BASE_DIR,'templates')]
-
How templates are loaded
- Scenario 1: Get the template through loader, respond through HttpResponse, and configure it in the view function as follows
from django.template import loader t = loader.get_template("Template File Name") #Loading a template with loader gives a loader object html = t.render(Dictionary data) #Convert t (loader object) to HTML string return HttpResponse(html) #Return converted String content to browser in response to object - Scenario 2: Use render() to load and respond to templates directly, configure the following in the function view
from django.shortcuts import render
return render(request,'Template File Name',Dictionary data)
- Scenario 1: Get the template through loader, respond through HttpResponse, and configure it in the view function as follows
-
Interaction between view and template layers
- The view function encapsulates the python variable into a dictionary and passes it to the template. Example:
def xxx_view(request): dic = { "Variable 1":"Value 1", "Variable 2":"Value 2", } return render(request,'xxx.html',dic) - In the template, we can use the syntax of {{variable name}} to invoke the variable passed in from the view
- The view function encapsulates the python variable into a dictionary and passes it to the template. Example:
-
Template Layer-Variable
- Types of data that the template layer can receive
Type name Notes str Character string int integer list list tuple tuple dict Dictionaries func Method obj Class Instantiation Object - Using variable syntax in templates
- {{Variable Name}}
- {{Variable Name.index}} #The incoming variable is a list, tuple, etc., available. The index method takes out the elements
- {{Variable Name.key}} #The incoming variable is a dictionary and is available. The key method gets the value of the key
- {{Object.Method}} #Method that calls object
- {{Function Name}} #Call Function
- Template Label
-
What it does: Embed some server-side functionality into templates, such as process control
-
Grammar:
{% Label %} ............ {% End label %} #Most tags in django need to be sealed with an end tag -
IF Label
- grammar
{% if Conditional expression 1 %} ...... {% elif Conditional expression 2 %} ...... {% else %} ...... {% endif %} #You must end with an endif tag - Be careful:
- An example if conditional expression can use operators==,!=,<,>,<=,>=, In. Not in, is, is not, not, and, or;
- Using actual parentheses in if tags is invalid syntax, and if they are required to indicate priority, a nested if tag should be used
- In an if statement, variables or constants cannot be adjacent to each other on either side of an operator; they must be separated by spaces
- Syntax reference for if tags Official Documents
- Sample
<form action='/text' method="post">
    <input type="text" name="x" value='{{ x }}'>
    <select name="op">
        <option value="add" {%if op == 'add' %}selected{%endif%}> +plus</option>
        <option value="sub" {%if op == 'sub' %}selected{%endif%}> -reduce</option>
        <option value="mul" {%if op == 'mul' %}selected{%endif%}> *ride</option>
        <option value="div" {%if op == 'div' %}selected{%endif%}> /except</option>
    </select>
    <input type="text" name="y" value='{{ y }}'> = <span>{{ result }}</span>
    <div><input type="submit" value="Start calculation">
    </div>
</form>
- grammar
-
for tag
- Grammar:
{% for variable in Iterable Objects %} ...... Loop statement {% empty %} ...... Statements displayed when the Iterable object is empty {% endfor %} - Delivery of Iterable Objects from View Functions to Template Files as a dictionary requires that the Iterable Object Name in the Template File be the same as the key name defined in View Functions <h3>{% for I in X%}{{forloop.counter}} this is in for {{i} {%endfor%}</h3> # x to be passed in by View Functions
- Syntax reference for the for tag Official Documents
- Grammar:
-
Built-in variable - forloop
variable describe forloop.counter Returns the index of the current loop (index from 1) forloop.counter0 Returns the index of the current loop (index from 0) forloop.revcounter Returns the index of the current loop (inverted from the start of the index counter value) forloop.revcounter0 Returns the index of the current loop (inverting counter values from 0) forloop.first Returns True if the current loop is the first forloop.last Returns True if the current loop is the last forloop.parentloop If it is a nested loop, parentloop represents an outer loop
-
- Template filter
-
Definition: Processing the value of a variable when it is output
-
Role: You can change the output display of variables by using filters
-
Syntax: {{Variable|Filter1:'Parameter Value 1'|Filter2:'Parameter Value 2'}}
-
Syntax reference for filters Official Documents
-
Common filters:
Filter Explain lower Convert strings to all lowercase upper Convert strings to all uppercase safe Disable escape and tell the template that this variable is safe and can explain execution add:"n" Increase the value of value by n default:'default' Returns the default value if the variable does not exist truncatechars:'n' If the string has more than the specified number of characters, it will be truncated, and the truncated string will end with a translatable sequence of ellipsis ('...')
-
- Inheritance of templates
- Definition: Inheritance of a template reuses the contents of a parent template, while a child template directly inherits all the contents of the parent template and overrides the corresponding blocks in the parent template
- In Grammar-Parent Template:
- Define block Label in Parent Template
- Identify which submodules are allowed to be modified (block tag inheritance can be modified)
- block tag: Defined in parent template and overridden in child template
- In Grammar-Subtemplate:
- Inherit the template extends tag (written on the first line of the template file)
- For example, {% extends'base.html'%}#inherits the parent template base. HTML
- Subtemplate Overrides Content Block in Parent Template
{% block block_name %}
Subtemplate blocks are used to override parent templates block_name Content of block
{% endblock block_name %} #block_name can be omitted
- Inherit the template extends tag (written on the first line of the template file)
- Override rules overridden:
- Do not override, will be displayed as the parent template effect
- Rewrite, then display as rewrite effect
- Note: When a template inherits, dynamic content on the server side cannot be inherited, for example, variables passed by the view to the parent template cannot be obtained in the child template
- Example: in parent template
In sub-template{% block block_name %} <h4>this is in parent</h4> {% endblock %}{% extends 'test_html.html' %} {% block block_name %} <h3> this is in base.html </h3> {% endblock %} - Syntax reference for filters Official Documents
2.5 URL Reverse Resolution
- URL:
- Locations where URL s often appear in code:
- Template [in HTML]:
- <a href='url'>Hyperlink</a> #After clicking the page jumps to URL
- <form action='URL'method='post'> #form Data in form Submit value URL using post method
- View Function - 302 Jump HttpResponseRedirect('url') #Jump the address in the user's address bar to the URL
- Template [in HTML]:
- Specification for URL writing in code:
- Absolute address: http://127.0.0.1:8000/page1 (Write out all protocols, domain names, ports, path s)
- Relative Address:
- '/page/1': relative address at the beginning of'/', the browser adds the protocol, IP, port in the current address bar as the final access address. For example: http://127.0.0.1:8000 +/page/1
- 'page/1': without a relative address at the beginning of'/', the browser adds this path as the last access address based on what precedes the last'/'of the current URL. For example: http://127.0.0.1:8000/topic/detail , plus the relative address, the access address is: http://127.0.0.1:8000/topic/page/1
- URL Reverse Resolution
- Definition: URL reverse resolution refers to dynamically finding or calculating the corresponding route in a view or template using the name defined by path
- Grammar:
- path(route,views,name='alias')
- Example: path('page', views.page_view,name ='page_url')
- The URL is given a unique name based on the name keyword passed to it in the path, which can be used to infer this URL information backwards in a template or view
- Template - Reverse address resolution via URL Tags
- {% url'Alias'%}
- {%url'Alias''parameter value 1''parameter value 2'%}, parameter value 1: parameter passed into the route
- example
{%url'page1''100'%} #Resolves the route for name=page1 and passes in parameter 100
{% URL'page2'key1='1' key2='2'%} #parse name=page2's route, and the keyword passes key1, key2 notices that the parameters passed during route parsing are all string passed in
- In View Functions - reverse Resolution by Calling the Reversee Method in django
from django.urls import reverse
reverse('alias', args=[ ], kwargs={ })
#Example:
reverse('page1',args=[100]) #Resolves the route with name=page1 and passes in parameter 100
reverse('page2',kwargs={key1=1,key2=2})
- Locations where URL s often appear in code:
3. Static Files
- Definition: css, pictures, js, audio, video, etc. in the project
- Static File Configuration
- Static file usage-configuration (settings.py):
- Configure the access path to the static file, which exists by default when the project is created
- Static files can be found at that URL address
- STATIC_URL = '/static/'
- Description: Specify whether static files need to be accessed via/static/xxx or http://127.0.0.1:8000/static/xxx Where XXX represents the specific static resource location
- Configure Storage Path for Static Files STATICFILES_DIRS, STATICFILES_DIRS saves the location where static files are stored on the server
#file:settings.py
STATICFILES_DIRS = (
os.path.join(BASE_DIR,'static'),
)
- Static File Access
- Access static files through templates, for example:
<img src="http://127.0. 0.1:8000/static/image1. Jpg "width=" 200 "height=" 200 "> #absolute path access
<img src="static/image2.jpg" width="200" height="200" > #Relative Path Access
- Accessing static files through the {% static%} tag is recommended for static file loading
- Load static - {% load static%}
- Use static resources - {% static'static resource path'%}
- Example: <img src='{% static'images/lena.jpg'%}' > Access Lena in the images folder under the static folder. Jpg
- Configure the access path to the static file, which exists by default when the project is created
- Static file usage-configuration (settings.py):
4. Application and Routing
- Application:
- Definition: is a separate business module in a django project that can contain its own routing, views, templates, models
- Create an application:
- Use manage. Subcommand startapp in py to create application folder
python manage.py startapp app_name #subapplication name cannot be duplicated with python keyword
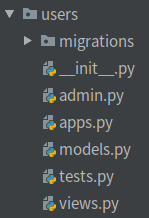
- At settings. INSTALLED_in py file Configure installing this application in the APPS list
- Example:
INSTALLED_APPS = [
#......
'app1_name', #Application Name
'app2_name',
]
- Use manage. Subcommand startapp in py to create application folder
- Distributed Routing
The main route profile (urls.py) in django does not handle user-specific routes, and the main route profile does request distribution (distributed request processing). Specific requests can be handled by their respective applications.- Distributed routing configuration:
- Invoke include function in main route
- Syntax: include('app_name.url module name')
- Role: The urlpatterns used to transfer the current route to the application's routing profile for distributed processing
- with http://127.0.0.1:8000/users/index take as an example
from django.urls import psth,include
from . import views

urlpatterns = [
path('admin/',admin.site.urls),
path('users/',include('users.urls')) #URLs distributed to child application users. PY
]
- Configure URLs under Application. PY
- Manually create URLs under the application folder. Py, the content structure is exactly the same as the primary route
from django.urls import path
from . import views
urlpatterns = [
#http://127.0.0.1:8000/users/index
path('index',views.index_view)
]
- Manually create URLs under the application folder. Py, the content structure is exactly the same as the primary route
- Invoke include function in main route
- Distributed routing configuration:
- Templates Under Application
- Template directories can also be configured internally by:
- Create templates folder manually under application
- At settings. Open application template function in PY
- INSTALLED_ 'APP_in APPS Configuration Item DIRS'value is True
- Note: django's Find Templates rule applies when both templates and external templates exist:
- Find templates in the outer templates directory first
- If no matching template is found in the outer templates directory, press INSTALLED_ Application order under APPS configuration is found layer by layer from top to bottom
- To avoid duplicate template file names in sub-applications - > Solution: Create a folder with the same name as the sub-application in the templates directory under the sub-application, place the template file under the folder with the same name, and change the path to insert the template into the view function to the sub-application name. Template File Name
Example:from django.shortcuts import render # Create your views here. def index_view(request): return render(request,'news/index.html')
- Template directories can also be configured internally by:
5. ORM Model
5.1 Database
- Model Layer - Responsible for communicating with databases
- django Configure MySQL
- Use mysqlclient [version mysqlclient 1.3.13 and above]
- Verify that ubuntu has python3-dev and default-libmysqlclient-dev installed before installation
- Use the command to check if sudo apt list --installed|grep-E'libmysqlclient-dev|python3-dev'is installed if there is no command output
- Installation command: sudo apt-get install python3-dev default-libmysqlclient-dev
- Install mysqlclient: sudo pip install mysqlclient
- If the following error occurs: unable to execute'x86_64-linux-gnu-gcc': No such file or directory requires sudo apt-get install gcc on the Linux terminal
- Using pymysql
- Install pymysql using pip install pymysql
- Contrast: mysqlclient is a C extension class, which is cumbersome to install and fast to run. pymysql is a pure python implementation that is easy to install and runs faster than mysqlclient
- Create a database for the project
- Enter the mysql database to execute:
- Create database database name default charset utf8 #create database set default encoding format is utf8
- Usually the database name is the same as the project name
- At settings. Configuring databases in py files
- Modify the contents of the DATABASES configuration item to change sqlite3 to mysql
ENGINE: Other common engines are:DATABASES = { 'default': { 'ENGINE': 'django.db.backends.mysql', #Specify the storage engine for the database 'NAME': 'mysql_demo', #Specify the name of the database to connect to 'USER': 'root', #Specify the user name to log on to the database 'PASSWORD': 'mysql', #Database login password 'HOST': '127.0.0.1', #IP to connect to database 'PORT': '3306', #Port to connect to database } }
'django.db.backends.mysql'
'django.db.backends.sqllite3'
'django.db.backends.oracle'
'django.db.backends.postgresql'
- Modify the contents of the DATABASES configuration item to change sqlite3 to mysql
- Enter the mysql database to execute:
5.2 Model Class
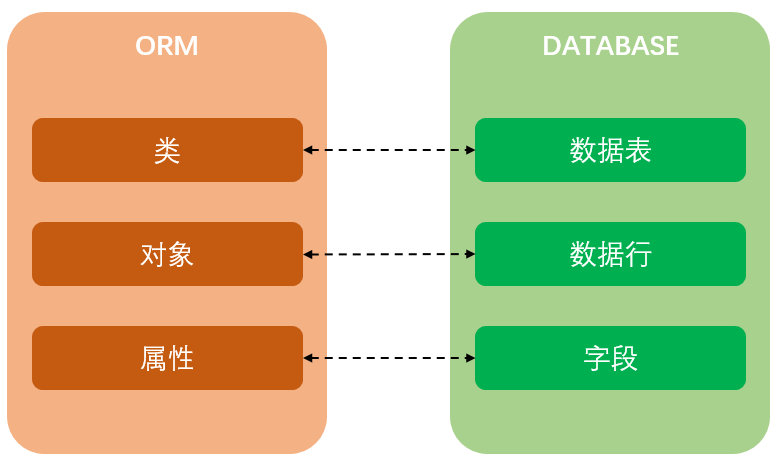
- Model
- Definition: is a python class, which is defined by django. Db. Models. Subclass derived from Model (that is, it must inherit to django.db.models.Model)
- A model class represents a data table of a database
- Each class attribute in a model class represents a field in the database
- A model is an interface for database interaction and a way to represent and manipulate a database
5.3 ORM Framework
- Definition: ORM(object relational mapping) object relational mapping, a procedural technology that allows the use of classes and objects to operate on databases, avoiding the use of sql statements to operate on databases
- Effect:
- Establishing correspondence between model classes and tables allows us to manipulate databases in an object-oriented manner
- Generate tables in the database based on the model classes designed
- You can switch databases with a simple configuration (switch the name of the database configured in the settings.py file)
- Advantage:
- Only object-oriented programming is required, no database-oriented coding is required
- Operations on the database are converted to operations on class properties and methods
- You do not need to write sql statements for various databases
- The decoupling between data model and database is implemented, which shields the difference between different database operations.
- Databases not in focus are internal details of databases such as mysql, oracle...
- With a simple configuration, you can easily change the database without having to modify the code
- Only object-oriented programming is required, no database-oriented coding is required
- Disadvantages:
- For complex businesses, the cost is high (for businesses with complex queries, you need to learn how to use ORM)
- Converting to sql statements based on the operation of the object and to objects based on the results of the query can result in performance loss during mapping
- ORM Map
- Model example:
- Adding model classes and fields to model classes in sub-applications
from django.db import models # Create your models here. class Book(models.Model): book_name = models.CharField(verbose_name='Title',max_length=50,default='') price = models.DecimalField(verbose_name='Price',max_digits=7,decimal_places=2) - Database Migration
- Migration is how django synchronizes changes made to the model (adding fields, deleting models, etc.) to the database
- Generate migration file - execute Python management. Py makemigrations will apply the models under. The py file generates an intermediate file and saves it in the migrations folder
- Execute the migration script program - python manage.py migrate executes the Migrator for migration, synchronizing intermediate files in the migrations directory under each application to the database
- The name of the database table generated by the migration is: application name_ Model Class Class Name
- Migration is how django synchronizes changes made to the model (adding fields, deleting models, etc.) to the database
- Summary of process for creating model classes
- Create an application
- Models under application. Writing model classes in py files
from django.db import models
class ModelName(models.Model):
	FieldName = models.FieldType(field-options)
	"""
	FieldName:Field name, which corresponds to the field name in the data table after migration
	FieldType: Field type
	field-options: field option
	"""
- Migrate synchronous makemigrations&migrate
Note: Any modifications to the table structure must be made to the corresponding model class. Default values need to be set when adding fields to the model class.
- Field type
| Field type | Database type | Effect | parameter |
|---|---|---|---|
| BooleanField() | tinyint(1) | Use True or False to represent values | - |
| CharField() | varchar | - | max_length: Maximum length of character (required parameter) |
| DateField() | date | Indicates the date | auto_now: Every time you save an object, Automatically set the field to the current time (True/False); auto_now_add: Set the current time (True/False) automatically when the object is first created; Default: Set the current default time (take value: string format time, such as'2021-7-1') * Only one of the above three parameters can be selected |
| DateTimeField() | datetime(6) | Represents the date and time | Parameter Pass DateField |
| FloatField() | double | Use decimals to represent values | - |
| DecimalField() | decimal(x,y) | Use decimals to represent values | max_digits: Total length of digits, Includes the number of digits after the decimal point, The value must be greater than or equal to decimal_places; decimal_places: The length of the number after the decimal point (that is, the number of decimal places) * Required for the above two parameters |
| EmailField() | varchar | Represents a mailbox | - |
| IntegerField() | int | Represents an integer | - |
| ImageField() | varchar(100) | Path to save pictures in the database | - |
| TextField() | longtext | Character data representing variable lengths | - |
Note: Reference for more field type descriptions Official Documents
- field option
- The field option specifies additional information to create the column; Allow multiple field options separated by commas
| field option | Description |
|---|---|
| primary_key | If set to True, the column is the primary key, and if a field is specified as the primary key, the database will not create an id field |
| blank | When set to True, the field can be empty (when editing data in the management background), and when set to False, it must be filled in |
| null | When set to True, this means that the column value is allowed to be empty and the default is False. If this is False, it is recommended to add the default option to set the default value. |
| default | Set the default value for the column you are in, if the field null=false suggests adding this item |
| db_index | When set to True, an index is added to the column |
| unique | When set to True, this means that the field's value in the database must be unique and cannot be repeated |
| db_column | Specify the name of the column or, if not specified, the class attribute name as the column name |
| verbose_name | Sets the name of the field to be displayed in the admin interface, or defaults to the class property name if not set |
Note: More field options explanation reference Official Documents
-
Model class - Meta class (control table related properties)
- Definition: An internal Meta class is used to assign attributes to a model. There are many built-in class attributes under the Meta class that allow you to do some control over the model class
- Built-in properties of common Meta classes:
attribute Effect db_table='Datasheet Name' Modify the name of the table used in the model and update the synchronization database as soon as the setup is complete verbose_name='singular name' Give the model an easy-to-understand name (singular number) to display in the / admin management interface verbose_name_plural='plural' The plural name of the object, used to display in the / admin management interface -
#file:models.py
from django.db import models
class Books(models.Model):
	class Meta:
		db_table = 'book' #Change the table name corresponding to the current model class to book
- ORM basic operations include database add-delete check (add: Create, read: Read, update: Update, delete: Delete)
- ORM CRUD Core->Model Class. Manager Object
- Manager object: each inherits from models.Model's model classes all have an object inherited from them, which is called a manager object
class MyModel(models.Model):
	···
MyModel.objects.create(···) #Objects are manager objects
-
Create Data - > Create each record in the data by creating a data object
- Option 1: MyModel. Objects. Create (attribute 1 = value 1, attribute 2 = value 2)
- Success: Return the created data
- Failure: throw exception
- Scenario 2: Create MyModel instance object and call save() to save
obj = MyModel()
obj.Attribute 1 = Value 1
obj.Attribute 2 = Value 2
obj.save()  #Data will not be submitted to the database until save() is executed
- django shell: An interactive operation project is provided in django to submit a django shell, which can execute the corresponding operation with the code of the project project in the interactive mode. The django shell can be used instead of the view code for direct operation Note: When the project code changes, you need to re-enter the django shell; Entry mode: python manage.py shell
- Option 1: MyModel. Objects. Create (attribute 1 = value 1, attribute 2 = value 2)
-
Query Data - > Queries to databases also require the use of Manager objects (QuerySet objects can be used to display query methods that ORM converts to SQL statements using QuerySet objects.query)
-
Through MyModel.objects manager method calls query method
| Method | usage | Function | Return value |
|---|---|---|---|
| all() | MyModel.objects.all() | Query all data in the MyModel table, equal to select * from table | QuerySet container object, holding MyModel instances internally <QuerySet [<Book: Book object (1)>, <Book: Book object (3)>]> |
| values ('Column 1', 'Column 2') | MyModel.objects.values() | Query and return data for some columns, equivalent to select column 1, column 2 from table | QuerySet container object that holds dictionaries inside, each representing one piece of data; The format is {'Column 1': Value 1,'Column 2': Value 2} |
| values_list ('Column 1', 'Column 2') | MyModel.objects.values_list() | Returns a query result in tuple form, equivalent to select Column 1, column 2 from xxx | QuerySet container object, which stores tuples internally, encapsulates the queried data into tuples and then encapsulates it into a query set QuerySet. If you need to extract query results, you need to use an index to get values |
| order_by ('Column 1', 'Column 2') | MyModel.objects.order_by() | Unlike the all() method, it uses the ORDER BY clause of the SQL statement to selectively sort the query results based on a field. By default, it sorts in ascending order, and descending order requires adding'-'before the column | QuerySet container object, which holds MyModel instances internally and sorts them by the specified field (equivalent to MyModel.objects.all()). Order_ By ('Column 1') |
| Filter (condition) | MyModel. Objects. Filter (attribute 1 = value 1, attribute 2 = value 2) is a relationship when multiple attributes are together | Returns all datasets containing this condition | QuerySet container object, holding MyModel instances internally |
| Exclude (condition) | MyModel. Objects. Exclude (condition) when multiple attributes are together "and" relationship" | Returns all datasets that do not contain this condition | QuerySet container object, holding MyModel instances internally |
| Get (condition) | MyModel. Objects. Get (condition) | Returns the only data that meets the criteria, and throws the Model if there is one more data in the query result. MultipleObjectsReturned exception, query result throws Model if no data. DoesNotExist exception | QuerySet container object, holding MyModel instances internally |
- query predicate
- Definition: Query predicates are required for more flexible conditional queries
- Description: Each query predicate is a separate query function
- Syntax: Class attribute_u query predicate
| query predicate | Explain | Example |
|---|---|---|
| __exact | Equivalent Matching | Author.objects.filter(id__exact==1) Equivalent to select * from author where id = 1 |
| __contains | Contains the specified value | Author.objects.filter(name__contains='w') Equivalent to select * from author where name like'%w%' |
| __startwith | Start with xxx | Author.objects.filter(name__startwith='w') Equivalent to select * from author where name like'w%' |
| __endwith | End with xxx | Author.objects.filter(name__endwith='w') Equivalent to select * from author where name like'%w' |
| __gt | Greater than specified value | Author.objects.filter(age__gt=50) Equivalent to select * from author where age > 50 |
| __gte | Greater than or equal to the specified value | Author.objects.filter(age__gte=50) Equivalent to select * from author where age >= 50 |
| __lt | Less than specified | Author.objects.filter(age__lt=50) Equivalent to select * from author where age < 50 |
| __lte | Less than or equal to specified value | Author.objects.filter(age__lte=50) Equivalent to select * from author where age <= 50 |
| __in | Find if the data is in the specified range | Author. Objects. Filter (country_u in=['China','Japan','Korea']) Equivalent to select * from author where country in ['China','Japan','Korea'] |
| __range | Finds if the data is within a specified range of intervals | Author.objects.filter(age__range=(30,50)) Equivalent to select * from author where author between 35 and 50 |
-
More Query Predicate References Official Documents
-
ORM Update Operation
- Updating individual data - > Steps to modify certain field values for a single entity
- Check - > get() to modify entity objects
- Change->By Object. Property modifies data
- Save->By Object. save() save data
- Bulk Update Data - >Call QuerySet's update directly (property=value) for bulk modification
#Example
#Price all books with id greater than 3 at 0 yuan
books = Book.objects.filter(id__gt==3)
books.update(price=0)
-
ORM Delete Operation
- Single data deletion:
- Find->Find a data object corresponding to the query result
- Delete - > Call the delete() method of this data object to delete
try:
	auth = Author.objects.get(id=1)
	auth.delete()
except:
	print("Delete failed")
- Bulk Data Deletion
- Find->Find all QuerySet query collection objects that meet the criteria in the query results
- Delete - > Call delete() method of query collection object to delete
#Delete all information older than or equal to 65
auths = Author.objects.filter(age__gt=65)
auths.delete()
- Pseudo Delete
- Usually it is not easy to delete data in the business. Instead, it is fake deletion, that is, adding a Boolean field (is_active, is_delete) to the table, which defaults to True. When deleting, set the (is_active, is_delete) field value to False for the data to be deleted
- Note: When using pseudo deletion, make sure that is_is is added where the data is displayed Active/is_ Filter Query with delete=True
-
F Object
- Definition: An F object represents information about a field of a record in a database
- Effect:
- Typically, you operate on field values in a database without obtaining them
- Used for comparison between class attributes (fields)
- Grammar:
from django.db.models import F
f('Column Name')
-
Q Object
- Role: Used in conditions to implement logical or |, logical not ~, logical and
- Grammar:
from django.db.models import Q
Q(Condition 1) | Q(Condition 2) #Condition 1 or 2 is true
Q(Condition 1) & Q(Condition 2) #Conditions 1 and 2 hold together
Q(Condition 1) &~ Q(Condition 2) #Condition 1 is true and condition 2 is not.
Examples of F and Q objects link
-
Aggregate queries and native database operations
- Aggregate queries
- Definition: Aggregate query refers to a statistical query on part or all of the data of a field in a data table. Querying the average value of a column in a data table, the number of times a value appears in a query, etc. are called aggregate query
- Classification: Aggregate queries are divided into whole table aggregation and group aggregation
- Entire table aggregation: A centralized statistical query that aggregates all data
- Common aggregation functions are Sum,Avg,Count,Max,Min
- Import method: from django.db.models import *
- Syntax: Mymodel. Objects. Aggregate (result variable name = aggregate function ('column'))
- Return results: A Dictionary of result variable names and values in the format: {Result variable name: {Value}
- Grouping aggregation: The aggregation that is generated for each item of a query set by calculating the set of objects associated with each object in the query result (grouped by fields first) to produce a total value (also an average or sum).
- Syntax: QuerySet. Annotate (result variable name = aggregate function ('column'))
- Return result: QuerySet
- Example:
- By first using the query result MyModel.objects.values looks for the column MyModel that the query will group together. Objects. Values ('column 1','column 2')
- QuerySet by returning the result. The annotate method groups and aggregates to get the grouping result QuerySet.annotate (result variable name = aggregate function ('column'))
from books.models import Book
from django.db.models import Count
pub_set = Book.objects.values('pub')
#Pub_ Set = <QuerySet [{pub':'Tsinghua University Press'}, {pub':'Tsinghua University Press'}, {pub':'Tsinghua University Press'}, {pub':'Machine Industry Press'}, {pub':'Machine Industry Press'}, {pub':'Tsinghua University Press'}]>
pub_count_set = pub_set.annotate(mycount=Count('pub'))
#Pub_ Count_ Set = <QuerySet [{'pub':'Tsinghua University Press','mycount': 3}, {'pub':'Machine Industry Press','mycount': 2}]>
- Entire table aggregation: A centralized statistical query that aggregates all data
- Aggregate queries
-
Native database operation - raw():django also supports direct sql statement communication database is not recommended
- Query: Use MyModel.objects.raw() for database query operations
- Syntax: MyModel.objects.raw(sql statement, splicing parameter)
- Return value: RawQuerySet collection object [supports only basic operations, such as looping operations]
books = models.Book.objects.raw('select * from bookstore_book') for book in books: print(book) - SQL injection: Be careful with SQL injection when using native statements
- Definition: Users submit malicious sql statements to the server through data upload for attack effect
- Case 1: User enters'1 or 1 = 1'in the form box to search for friends
s1 = Book.objects.raw('select * from bookstore_book where id = s%'%('1 or 1 = 1')) - Attack Result: All user data can be queried
- SQL Injection Prevention: Use MyModel. Objects. The splicing parameter in raw (sql statement, splicing parameter), which is a list, writes all the values that need to be spliced to the list
- Example:
s1= Book.objects.raw('select * from bookstore_book where id = %s',['1 or 1 = 1'])
-
Native database operation - cursor():django also supports direct sql statement communication with the database
- Operating databases completely across model classes - Query/Update/Delete
- Usage method:
- Import cursor package from django.db import connection
- Create cursor objects with constructors that create cursor classes, then use cursor objects. To ensure that cursor resources are released in case of exceptions, create operations usually with a with statement
from django.db import connection with connection.cursor() as cur: cur.execute('SQL Sentence','Stitching parameters') - Example:
#Change the publisher of a book with id 10 to "xxx Publisher" using SQL statements
from django.db import connection
with connection.cursor() as cur:
	cur.execute('update bookstore_book set pub = "xxx Press" where id = 10;')
Expand knowledge
- Customize the output format in QuerySet:
#Define in the Book model class:
def __str__(self):
	return '%s_%s_%s_%s'%(self.title,self.price,self.pub,self.market_price) #Custom Output Format
#In shell mode, you get the following display
>>> from books.models import Book
>>> a1 = Book.objects.all()
>>> a1
<QuerySet [<Book: python_20.00_tsinghua university press_25.00>, <Book: Django_70.00_tsinghua university press_75.00>, <Book: JQuery_90.00_Machine Industry Press_85.00>, <B Press_65.00>, <Book: HTML5_90.00_tsinghua university press_105.00>]>
Summary of frequently asked questions about database operations
- Question 1: When Python management is executed. Py makemigrations encountered the following migration error
You are trying to add a non-nullable field 'pub' to book without a default; we can't do that (the database needs something to populate existing rows).
Please select a fix:
 1) Provide a one-off default now (will be set on all existing rows with a null value for this column)
 2) Quit, and let me add a default in models.py
Select an option:
- Problem Analysis:
- This error occurs when a new field is added to the model class
- The principle is that after adding a new field, the database does not know how the original data should be assigned to the new field, so when adding a new field, the default default value must be added.
- Problem improvement:
- If you choose option 1) to provide a temporary default value, this default value will be initialized to the migration file and will not be reflected in the model class. Others will have black boxes during code maintenance, causing some phenomena that do not match the code
- Choose Option 2) Exit the process of generating migration files and modify models again. Py, add a new default=xxx default value (the second method is recommended)
- Question 2: Database migration files are messy, django_in database The migrations table records all the records of the migrate. When multiple people collaborate, each person has a different version of the migration file and the migration file is confused when submitting
- Problem analysis: django_in the database The migrations table records all migrate records, and the migrate files in each application of the project should correspond to them
- Problem improvement (only for local testing):
- Delete all 000 in all migrations?_ Xxx. Py (except init.py file)
- Delete database sql>drop database mywebdb;
- Re-create database sql>create datebase mywebdb default charset=utf8;
- Regenerate all 000 in migrations?_ Xxx. Pypython manage. Py makemigrations
- Re-update database Python management. Py migrate
6. admin management background
6.1 admin configuration steps
- Create Background Management Account - This is the highest privileged account to manage the background
- termin switches to the project directory to execute - > Python management. Py createsuperuser
#Command Line Execution
>>>python manage.py createsuperuser
 User name (leave blank to use 'sixstar'): topgh #Enter user name here
 E-mail address: 634890284@qq.com #Enter mailbox here
Password: #Enter your password here (if it's too simple, you'll be prompted that it's too simple)
Password (again): #Enter your password here again
 The password length is too short. The password must contain at least eight characters.
This password is too common.
The password contains only numbers.
Bypass password validation and create user anyway? [y/N]: y #Bypass password validation and create users
Superuser created successfully.
- termin switches to the project directory to execute - > Python management. Py createsuperuser
6.2 Register custom model classes
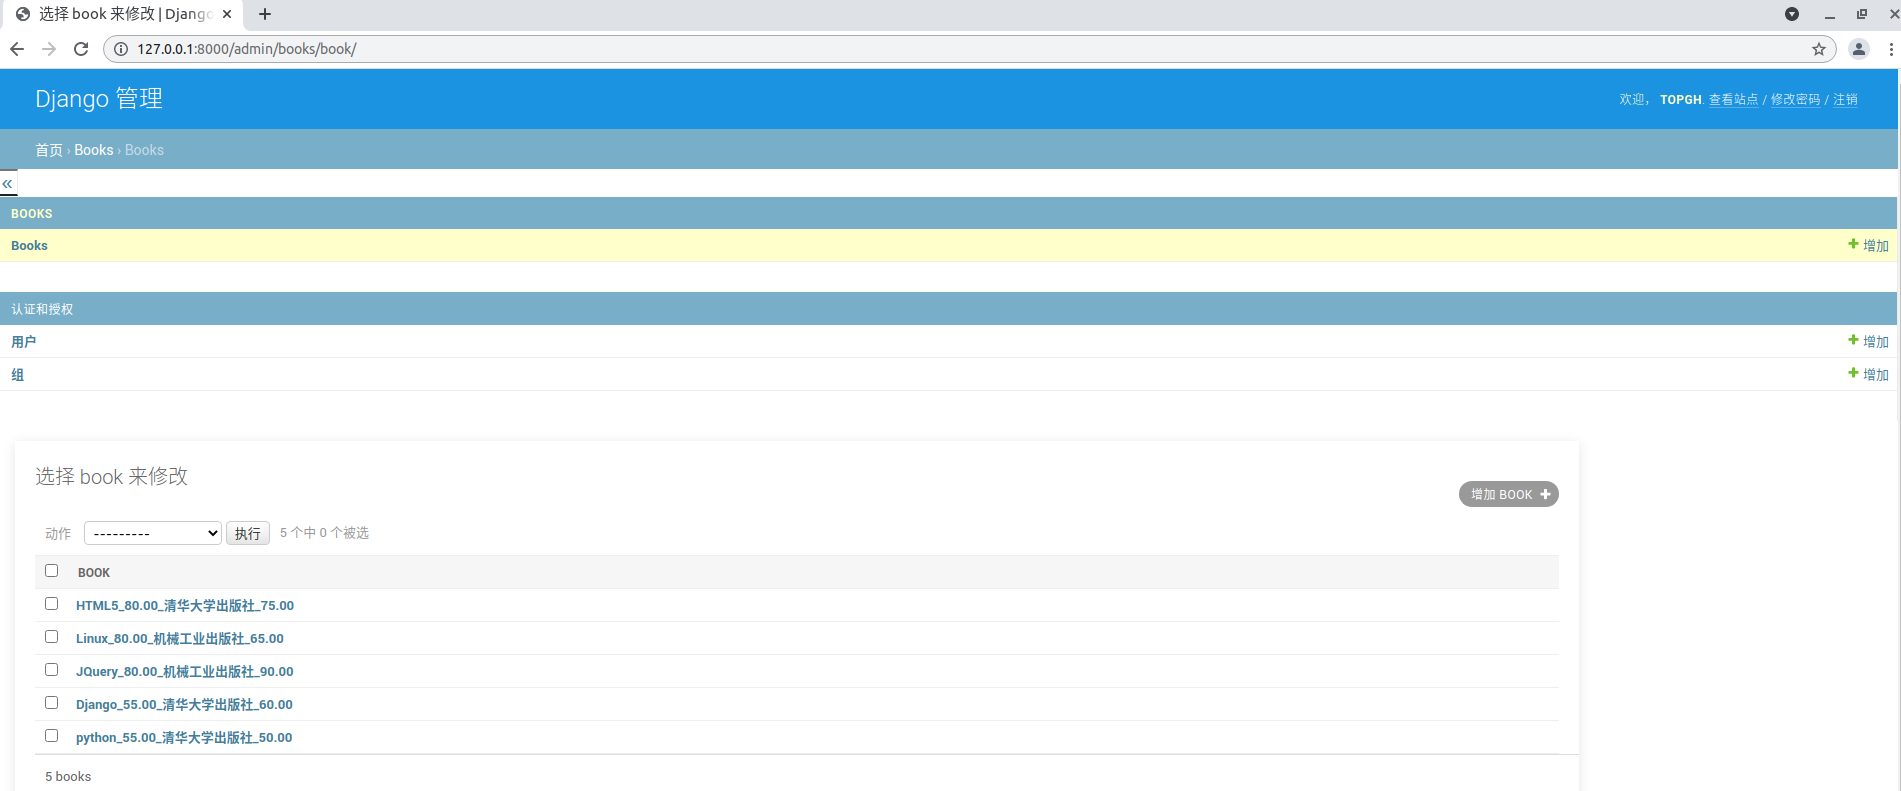
- Registration steps:
- Admin in the subapplication app folder. Import the model classes registered to manage in the PY file, such as from. Models import book
- Call admin. Site. The register method is registered such as admin.site.register (custom model class)
- Registered custom model classes are displayed on the admin home page after registration

- Click on the second Books to enter the book management page, which manages the Book information displayed and the def_u defined when defining the Book model class Str_u Consistent display style in (self) method
- Model Manager Class
-
What it does: Add new, easy-to-use features to the back-end management interface
-
Description: Background Manager inherits from django. Contrib. ModelAdmin class in admin
-
Usage: 1. Admin under subapplication app. The model manager class is defined in the PY file. The name of the model manager class can be customized and generally corresponds to one model.
class XXXXManager(admin.ModelAdmin):
	"Custom Model Class Properties"
-
Binding Register Model Manager and Model Class:
from django.contrib import admin
from .models import *
admin.site.register(YYYY,XXXXManager) #Binding YYYY Model Class to Manager Class XXXManger
-
Class properties of common model manager classes
Class Properties Explain Example list_display=[field1,field2...] Used to control which fields will appear in Admin's modification list page list_display = ['id','title','pub','price'] list_display_links=[field1] Control list_ Fields in the display, which can be linked to the modification page, and link is added to id by default list_display_links = ['title'] list_filter=[field1,field2...] Add a filter (the specified field is used as the filter condition) and the filter will appear on the right side of the page list_filter = ['pub'] search_fields=[field1,field2...] Add a search box (the specified field can be used for fuzzy queries) search_fields = ['title'] list_editable=[field1,field2...] To add fields that can be edited on the list page, the fields must be added in list_ Displaying, and the field cannot be in list_display_ In links list_display = ['id','title','pub','price'] -
example
#file:books/admin.py
from django.contrib import admin
from django.contrib import admin
from .models import Book, Author

admin.site.register(Book) #Register Book Model Class

class AuthorManager(admin.ModelAdmin): #Custom author model manager class
    list_display = ['id','name','age'] #Modify List Page Display Field in admin Background
    list_editable = ['age'] #age field can be edited on the list page
    class Meta:
        verbose_name = 'author' #Model class name shown in admin
        verbose_name_plural = verbose_name #Simple and Complex Numbers with Same Name
admin.site.register(Author,AuthorManager) #Bind model class to model manager class and register
More reference on class properties of the Model Manager class Official Documents
-
6.3 Relationship Mapping
- Definition: In relational databases, not all data is usually placed in the same table and is not easy to expand
- Common relationship mappings are:
- One-to-one mapping: one ID card for one person
- One-to-many mapping: a class can have more than one student
- Many-to-many mapping: one student can sign up for more than one course, and one course can have more than one student to learn
-
One-to-one [Create Table]:
- Definition: One-to-one represents a one-to-one correspondence between real things
- Creation syntax: OneaToOneField (class name, on_delete=xxx)
class A(model.Model):
	......
class B(model.Model):
	attribute = models.OneToOneField(A, ondelete=xxx)
- on_delete - Foreign key deletion method
- models.CASCADE: Cascade deletion; Django simulates the behavior of the SQL constraint ON DELETE CASCADE and deletes the object containing ForeignKey.
- models.PROTECT: Protected mode; Throw ProtectedError to prevent deletion of referenced objects; [equivalent to mysql's default RESTRICT]
- SET_NULL: Null mode, when deleted, the foreign key field is set to null, provided blank=True, null=True, which is allowed to be null when the field is defined
- SET_DEFAULT: Sets the default value. When deleted, the foreign key field is set to the default value, so you must add a default value when defining the foreign key.
More Foreign Key Deletion References Official Documents
- Example:
from django.db import models class Author(models.Model): name = models.CharField(verbose_name='author',max_length=11) class AuthorWife(models.Model): name = models.CharField(verbose_name='Wife',max_length=11) author = models.OneToOneField(Author,verbose_name='Wife's husband',on_delete=models.CASCADE) #Typically, foreign key attributes are called associated model class names in lowercase. In databases, foreign key field names differ from class attribute names. By default, class attribute names +''+ id as field name- The foreign key class attribute name is usually lower case for the associated model class name. Key field names are also different from class attribute names in databases, defaulting to class attribute name +''+ id
-
One-to-one [Create data]
- Model class creation data without foreign keys
- author1 = Author.objects.create(name ='Mr. Wang')
- Model class creation data with foreign keys
- wife1 = AuthorWife.objects.create(name='Mrs. Wang', author=author1) #Create data with class attribute name, must pass in instance object with associated foreign key
- wife1 = AuthorWife.objects.create(name='Mrs. Wang', author_id=1) #Use foreign key field name directly, must pass in the primary key value corresponding to the associated object
- Model class creation data without foreign keys
-
One-to-one [Query Data]
- Forward Query: Query directly through foreign key attributes [Query tables without foreign keys through tables with foreign keys]
#Find author through wife
from .models import AuthorWife
wife = Wife.objects.get(name='Mrs. Wang')
print(wife.name,'Your husband is',wife.author.name) #wife.author returns the author object associated with the wife, calling the name property of the author object to get the corresponding value
- Reverse Query: One party without foreign key attributes can invoke the reverse attribute (model class name with foreign key) to query the other side of the association. The reverse association attribute is an instance object. Reference class name (lowercase), for example: Author's reverse reference is an Author object. wife'; An exception is triggered when a reverse reference does not exist
author1 = Author.objects.get(name='Mr. Wang')
author1.wife.name
- Forward Query: Query directly through foreign key attributes [Query tables without foreign keys through tables with foreign keys]
-
One-to-many [create table]
- Definition: Indicates that there is a one-to-many correspondence between things (e.g., one school corresponds to multiple classes, one class corresponds to multiple students); one-to-many needs to clarify specific roles and set foreign keys on multiple tables
- Grammar:
- When a Class A object associates multiple Class B objects; Foreignkey must specify on_delete mode
class A(models.Model): #one ··· class B(models.Model): #many attribute = models.Foreignkey("one"Model class,on_delete=xxx) #on_delete indicates how the corresponding field of table B is handled when deleting A- Example
#file:otm/models.py
from django.db import models
class Publisher(models.Model):
    """Press [1]"""
    name = models.CharField('Name',max_length=50,unique=True)
class Book(models.Model):
    """Books"""
    title = models.CharField('Title',max_length=50)
    publisher = models.ForeignKey(Publisher,on_delete=models.CASCADE)
-
One-to-many [Create data]
- Create'one'before'many'
from .models import *
pub1 = Publisher.objects.create(name="tsinghua university press")
Book.objects.create(title="C++",publisher=pub1) #Creating data with class property names requires passing in objects with associated foreign keys
Book.objects.create(titel="python",publisher_id=1) #Creating key data by field name requires passing in the primary key value of the associated object
- Create'one'before'many'
-
One-to-many [query data]
-
Forward Query: Query directly through foreign key attributes [Query tables without foreign keys through tables with foreign keys]
#Query publisher through Book
abook = Book.objects.get(id=1)
print(abook.title,'The publisher is',abook.publisher.name) #abook.publisher returns the publisher object associated with abook, calling the name property of the publisher object directly
-
Reverse Query: A party without a foreign key property can invoke the reverse property (model class name with a foreign key (lowercase)_ set) Query to the other side of the Association
pub1 = Publisher.objects.get(name='tsinghua university press')
books = pub1.book_set.all() #Through book_set Gets multiple Book data objects corresponding to pub1, pub.book_set gets the RelatedManager Association Manager object
#books = Book.objects.filter(Publisher=pub1) #It can also be obtained in this way
print("The books published by Tsinghua University Press are:")
for book in books:
	print(book.title)
-
-
Many-to-many [create table]
- Definition: Many-to-many complex relationships among many-to-many objects, such as: one student can sign up for more than one course, and one course can correspond to more than one student
- Implementation:
- Creating many-to-many in MySQL depends on the third table
- django does not need to create a third table manually, django does it automatically
- Syntax: Add a many-to-many attribute to any of the two associated classes (for easy memory, the attribute name can be in the plural form of lowercase of the associated model class)
Property name= models.ManyToManyField(MyModel) #MyModel: Many-to-Many Associated Model Class- Example
#Create a book for multiple writers, and a writer for multiple books
class Author(models.Model):
	"""Author Model Class"""
	name = models.CharField('writer',max_length=20)
	def __str__(self):
		return self.name
class Book(models.Model):
	"""Book Model Class"""
	title = models.CharField('Title',max_length=20)
	authors = models.ManyToManyField(Author) #Set many-to-many properties in any model class
	def __str__(self):
		return self.title
- Example
-
Many-to-many [creating data]
- Scenario 1: First create a table with no many-to-many attributes, then create a table with many-to-many attributes in association, and use the reverse attributes to create a table with many-to-many attributes
author1 = Author.objects.create(name='Mr. Wang')
author2 = Author.objects.create(name='Miss Li')
#Mr. Wang and Mr. Li wrote a Book together, python
book1 = author1.book_set.create(title='python')
author2.book_set.add(book1)  #add an obj
- Scenario 2: Create tables with many-to-many attributes and associate tables without many-to-many attributes
book = Book.objects.create(title='python1')
#Both Mr. Guo and Mr. Li participated in the creation of python1
author3 = book.authors.create(name='Mr. Guo')
book.authors.add(author1)
- Scenario 1: First create a table with no many-to-many attributes, then create a table with many-to-many attributes in association, and use the reverse attributes to create a table with many-to-many attributes
-
Many-to-many [query data]
- Forward Query: An object with many-to-many attributes queries the other side, where many-to-many attributes are equivalent to objects
book.authors.all() -> Obtain book Corresponding to all author Information
book.authors.filter(age__gt=80) -> Obtain book Corresponding author information for authors older than 80 years
- Reverse Query: Object queries without many-to-many attributes have one side of many-to-many attributes, and class names with many-to-many attributes (lowercase) using reverse attributes set
author.book_set.all()
author.book_set.filter()
- Forward Query: An object with many-to-many attributes queries the other side, where many-to-many attributes are equivalent to objects
Seven. Session Maintenance
- Conversation
- Definition: From opening a browser to visiting a website to closing the browser to ending the visit, it is called a session
- The HTTP protocol is stateless, making it difficult to maintain session state
- Cookies and Session are two storage technologies that were born to maintain session state
7.1 Cookies
- cookies definition: is to save storage space on the client browser
- Cookies features
- cookies are stored as key-value pairs on browsers, and keys and values are stored as ASCII strings (not Chinese strings)
- Stored data has a life cycle
- Data in cookies is isolated by domain storage and is not accessible between different domains
- The internal data of the cookies will be brought to the server every time you visit this web address. If the cookies are too large, the response will be slowed down.
- Use-Storage of Cookies
- Syntax: HttpResponse.set_cookie(key,value='',max_age=None,expires=None)
- Name of key:cookie
- Value:value of cookie
- max_age:cookie lifetime in seconds
- expires: specific expiration time
- When max_is not specified Age and expires invalidate this data when browser is closed
- Create a cookie example:
#Add key to browser as my_var1, value 123, expiration time 1 hour cookie response = HttpReponse('Name added my_var1 Of cookie') response.set_cookie('may_var1','123',3600) return response - Modify cookie example:
#Add key to browser as my_var1 with a modified value of 456 and an expiration time of 2 hours
response = HttpResponse('Modified name my_var1 Of cookie')
response.set_cookie('may_var1','456',3600*2)
return response
- Syntax: HttpResponse.set_cookie(key,value='',max_age=None,expires=None)
- cookies use-delete-get
- Delete cookies: via HttpResponse.delete_cookie(key)
- Deletes the cookie for the specified key, and nothing happens if the key does not exist
- Get cookies: via request.COOKIES bound dictionary (dict) to obtain COKIES data from the client; value = request.COOKIES.get('cookies name','default')# can be obtained by get() method or by index
7.2 session
-
Definition: session is important data that opens up a space on the server to preserve Browser-Server interaction
-
Implementation:
- Using session requires cookies to be started on the browser client and session IDs stored in the cookies
- Each client can have a separate session on the server side
- Note: This data will not be shared between different requesters, one-to-one correspondence with requesters
-
Settings. Configuring session in py (automatically configured by default)
- To INSTALLED_ Add'django'to the APPS list. Contrib. Sessions'
- Add ``` to the MIDDLEWARE list
- SESSION_COOKIE_AGE: Specifies how long the sessionid will be saved in cookies (default is 2 weeks)
- SESSION_EXPIRE_AT_BROWSER_CLOSE =True: Set the session to expire when the browser is closed, defaulting to False
- Note: session data in Django is stored in the database, so you need to make sure that migrate has been executed before using session. Django stores sessions in the django_database Session table
- session issues in django:
- Django_ The session form is a form design and the amount of data continues to grow [the browser deliberately deleted the session id, but the data in the database was not deleted]
- You can execute Python management. Py clearsessions to delete outdated session data
-
Use of session s
- The session object is a dictionary-like object of type EssionStore that can be manipulated in a dictionary-like manner
- Sessions can be stored as strings, integers, dictionaries, lists, and so on
- Add session to server request.session['KEY']:VALUE
- Get the value of session: value = request.session['KEY'];value = request.session.get('KEY', default)
- Delete session:del request.session['KEY']
-
Cookies versus Session
type Storage Location Security purpose Cookies Browser Relatively unsafe Commonly used to store long-term data session The server Relative Security Typically used to store short-term data
7.3 Cache
-
cache
- Definition: Cache is a general term for a class of media that can read data faster. It also refers to other storage methods that can speed up data reading. It is generally used to store temporary data. Common media are memory that reads quickly.
- Significance: View rendering has a certain cost, frequent queries in the database are too high; So for pages with low frequency changes, you can consider using caching technology to reduce the actual rendering times and the time cost for users to get a response is lower.
- Case Study:
from django.shortcuts import render
def index(request):
	#Rendering with extremely high time complexity
	book_list = Book.objects.all() #->This assumes a time of 2s
	return render(request,'index.html',local()) #Page rendering here will occur in book_list query is not executed until the result
- Optimize thought: ( Go to Official Website)
given a URL, try finding that page in the cache if the page is in the cache: return the cached page else: generate the page save the generated page in the cache (for next time) return the generated page - Cache scenarios:
- Blog List Page
- E-commerce Merchandise Detail Page
- Scene features: where cached, data changes less frequently
-
Setting cache-database cache in django
- Store cached data in a database
- Note: Although the stored media is not replaced, when the results of one responsible query are stored directly in another table, such as filtered query results under multiple conditions, complex queries can be avoided and efficiency can be improved.
- settings.py, add CACHES configuration
CACHES = { 'default':{ 'BACKEND':'django.core.cache.backends.db.DatabaseCache', #engine 'LOCATION':'my_cache_table',#Set the data table used by the cache to be named my_cache_table 'TIMEOUT':300 #Set cache save time in seconds, default is 300 'OPTIONS':{ 'MAX_ENTRIES':300, #Maximum number of data bars cached 'CULL_FREQUENCY':2 #Delete 1/X of cache entries when the maximum number of caches is reached } } } - Note: The data tables used in the database cache need to be created manually, and python management is executed in the django shell. Py createcachetable, table name set inside CACHES
- My_is automatically generated in the database after database migration Cache_ Table data table, field in data table:
- cache_key:Cached key
- Value:Cached value
- expires: Cache expiration time
-
Set Cache-Local Memory Cache in django
- Data cached in server memory
- Configuration sample:
CACHES = {
    'default': {
        'BACKEND': 'django.core.cache.backends.locmem.LocMemCache',
        'LOCATION': 'unique-snowflake',  #Memory addressing - using the snowflake algorithm
    }
}
-
Setting cache-file system cache in django
- Store cached data in a local file
- Configuration sample:
CACHES = {
    'default': {
        'BACKEND': 'django.core.cache.backends.filebased.FileBasedCache',
        'LOCATION': '/var/tmp/django_cache',  #Path to Cache Folder
        # 'LOCATION': 'c:\test\cache',  #Example under windows
    }
}
-
Using Cache-Whole Cache Strategy in django
- In view functions: Cache the entire view function in the database, and if you need to add cache to a view, use cache_directly on that view Page decorator
from django.views.decorators.cache import cache_page
@cache_page(30) -> Company s,Current View Cache Validity Period
def my_view(request):
	···
- Logic: The entire response of the view is stored in the cache on the first request, and the next request checks if there is a response needed in the cache, and if there is one, it is no longer processed in the view function.
- In routing: Increase the cache at the location of the view call that needs to increase the cache
from django.views.decorators.cache import cache_page urlpatterns = [ path('page/',cache_page(60)(my_view)),#Logic is the same as trying functions ] - Disadvantages: 1. When the entire view function is cached, the next time a request is made, the cache does not expire and the requested data goes directly to the cache, if the view function has the relevant permissions to check, No validation is possible (e.g. blog sites, bloggers will access private blogs and public blogs together into the cache after visiting, visitors will not go to the view function to authenticate and access the private blog of the blog if they visit directly); 2. Deleting the cache is too costly to know the key of the cache and can not delete it actively, which can easily lead to inconsistencies between old and new data. (Edited data cannot be updated to the cache in time)
- In view functions: Cache the entire view function in the database, and if you need to add cache to a view, use cache_directly on that view Page decorator
-
Using Cache-Local Cache in django
-
Introducing using caching API s
- Mode 1: Import specific objects using caches ['CACHE configuration key']
from django.core.cache import caches
cache1 = caches['default'] #Key name of CACHHES configured in default -> settings file
cache2 = caches['myalias']
- Mode 2: Import the'default'item from the CACHES configuration item directly: from django.core.cache import cache
-
Caching API related methods:
Effect parameter Return value cache.set(key,value,timeout) Storage Cache Key: cached key, string type
Value: Python object
TIMEOUT: Cache storage time (s), defaults to TIMEOUT value in CACHEScache.get(key) Get Cache Key: cached key, string type cache.add(key, value) Storage cache, effective only if key does not exist Key: cached key, string type
Value: Python objectcache.get_or_set(key,value,timeout) set if no data is available Key: cached key, string type
Value: Python object
TIMEOUT: Cache storage time (s), defaults to TIMEOUT value in CACHEScache.set_many(dict,timeout) Bulk Storage Cache dict: Dictionary of cached key s and value s
timeout: cache time (s)cache.get_many(key_list) Bulk Get Cache key_list: List containing keys cache.delete(key) Delete cache data for key Key: cached key, string type cache.delete_many(key) Bulk Delete Cache key_list: List containing keys
-
-
Browser Cache Policy
- Strong cache: no requests are sent to the server, read resources directly from the cache
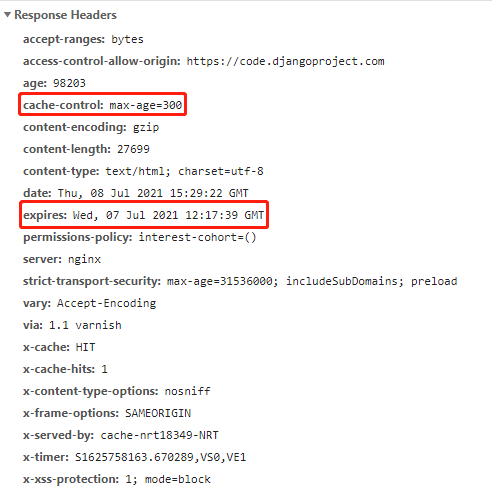
- Response Header - Expires
- Definition: Cache expiration time, which specifies when a resource will expire, is a specific time point on the server side
- Example: Expires: Thu, 02 Apr 2030 05:14:08 GMT
- Response Header - Cache-Control
- Role: In HTTP/1.1, Cache-Control is mainly used to control web page caching, such as when Cache-Control:max-age=120 represents 120 seconds after the request creation time, the cache fails
- Note: Currently the server will respond to the browser with both headers. The browser prefers Cache-Control
- Response Header - Expires
- Negotiate Cache - > Derived from Strong Cache
- Once the data in a strong cache expires, it also needs to communicate with the server to get the latest data. When the strongly cached data is bandwidth-intensive and difficult-to-change data such as static files, large pictures, etc., the browser will negotiate with the server if the current cache is available. If available, the server does not have to return the data. The browser will continue to use the previously cached data, and if the file is not available, it will return the latest data.
- Response headers: Last-Modified and If-Modifield-Since request headers
- Explain:
- Last-Modified is the latest modification time of the file. When the browser first requests a static file, the server returns the Last-Modified response header, which represents the cache that the resource needs to negotiate
- When the cache expires, the browser uses the Last-Modified value obtained as the value of the request header If-Modifield-Since, negotiates with the server to send the request, and the server returns 304 response codes [empty response body], indicating that the cache continues to be used, and 200 response codes indicating that the cache is not available [the response body is the latest resource]
- Disadvantages: Not accurate enough, Last-Modified is based on the modification time to determine whether the cache can continue to be used in seconds; Last-Modified cannot find that a file has changed if it has been modified for a very short time
- Response Header ETag Response Header and If-None-Match Request Header
- Explain:
- ETag is a unique identifier (generated by the server) that returns the current resource file when the server responds to a request and is regenerated (uniquely identified as a hash value) whenever the resource changes.
- When the cache expires, the browser sends a request to the server for negotiation using the value of the ETag response header as the value of the If-None-Match request header. When the server receives the request header, it compares the file identities, considers the resources unavailable if inconsistent, returns 200 response codes to indicate that the cache is unavailable [the response body is the latest resource], and returns 304 response codes if available
- Disadvantages: Hash values are computed on files when requested, which can consume computing resources
- Strong cache: no requests are sent to the server, read resources directly from the cache
8. Middleware
Definition of 8.1 Middleware
- Definition: Middleware is the hook framework for django request/response processing. It is a lightweight, low-level plug-in system used to change django input or output globally
- Middleware is represented as a class
- Each middleware component is responsible for some specific functionality, such as django having a middleware component, AuthenticationMiddleware, that uses sessions to associate users with requests
8.2 Middleware Use
-
Write middleware:
- Middleware class must inherit from django.utils.deprecation.MiddlewareMixin class
- A middleware class must implement one or more of the following five methods
- process_request(self,request):
- Role: Dropped before primary route execution, called on each request, returns None (request pass) or HttpResponse object (request fail)
- Purpose: Filter requests
- process_view(self,request,callback,callback_args,callback_kwargs):
- Role: callback: is a view function; callback_args: The position parameter of the view function, callback_kwargs: the keyword parameter of the view function; Called before calling the view, on each request, returns None (request passed) or HttpResponse object (request failed)
- Purpose: For code-level substitution and filtering, this method gives you the parameters of the view function
- process_response(self,request,response):
- Role: response: is the response object of the view function; Called before all responses are returned to the browser, on each request, returning the HttpResponse object
- process_exception(self,request,exception):
- Role: Called when an exception is thrown during processing, returning an HttpResponse object
- Purpose: Usually used to catch and mail exceptions that occur to developers
- process_template_response(self,request,response):
- Role: Called when the view function is executed and the render method is included in the object returned by the view function; The method needs to return a response object that implements the render method
- process_request(self,request):
- Note: Most methods in the middleware return None ignoring the current operation and entering the next event, and return the HttpResponse object to end the request and return it directly to the client
-
Register Middleware:
- At settings. Register in py file
#file:settings.py
MIDDLEWARE= [
	···
	'MyMiddleWare',
]
- Note: Configured as a list, when the middleware is called, it executes from top to bottom before the request view is processed. After the request view is processed, the middleware executes from bottom to top
- At settings. Register in py file
-
Example:
- Add Filter Request Number Middleware
#file:mymiddleware.py from django.http import HttpResponse from django.utils.deprecation import MiddlewareMixin import re class MWare(MiddlewareMixin): count_dict = {} #Create a dictionary for counting times def process_request(self,request): request_ip = request.META['REMOTE_ADDR'] #Get Request IP request_url = request.path_info #Get Request URL if re.match(r'^/test',request_url): #Does the match request start with/test times = self.count_dict.get(request_ip,0) #Number of requests to query current IP, default 0 self.count_dict[request_ip]= times + 1 #Number of requests + 1 if times < 5: #If the number of requests is less than 5, the request passes normally return else: #If the number of requests is greater than 5, return HttpResponse to block the request return HttpResponse("More than 5 visits, request failed") else: #If it does not start with / test, it passes directly and normally return - Register Middleware
#file:settings.py
MIDDLEWARE = [
    'django.middleware.security.SecurityMiddleware',
    'django.contrib.sessions.middleware.SessionMiddleware',
    'django.middleware.common.CommonMiddleware',
    'django.middleware.csrf.CsrfViewMiddleware',
    'django.contrib.auth.middleware.AuthenticationMiddleware',
    'django.contrib.messages.middleware.MessageMiddleware',
    'django.middleware.clickjacking.XFrameOptionsMiddleware',
    'middleware.mymiddleware.MWare',
]
- Add Filter Request Number Middleware
With django request flowchart
8.3 CSRF - Cross-Station Forgery Request Attack
- Definition: Some malicious websites contain links, form buttons, or JavaScript that attempt to do something on your website using the authentication information of the logged-in user in the browser. This is cross-site Request Forgery (CSRF:Cross-Site-Request-Forgey)
- CSRF prevention:
- django uses a comparison'code'mechanism to guard against attacks
- Principle:
- Cookies store the code 1, the form in the template contains the code 2. Users only submit data under this website, the code 2 will submit to the server as the form submits, django compares the two codes, if the comparison is successful, then it is considered a legitimate request, otherwise it is an illegal request - 403 response code
- Configuration steps:
- At settings. Confirm Django in MIDDLEWARE in py file. Middleware. Csrf. Is CsrfViewMiddleware Open
- Add the following label {% csrf_token%} under the form tag in the template
- Example:
<!DOCTYPE html>
<html lang="en">
<head>
    <meta charset="UTF-8">
    <title>CSRF-TEXT</title>
</head>
<body>
<form action="/test_csrf" method="post">
    {% csrf_token %}
    <input type="text" name="test">
    <input type="submit" value="Submit" name="key">
</form>
</body>
</html>
- Special instructions (locally open csrf):
- If a view does not require django for csrf protection, you can use an ornament to turn off checking for this view
- Example:
from django.views.decorators.csrf import csrf_exempt
@csrf_exempt #Use the decorator to close csrf's check for this attempt
def my_view(request):
	return HttpResponse('hello world')
9. Paging function of web pages
- Paging Definition
- Definition: Paging means that there is a large amount of data to display on a web page, and only part of the data is displayed on each page for easy reading.
- Advantages: Easy to read, less data extraction, less server pressure
- django implementation:
- django provides the Paginator class for easy paging
- The Paginator class is located at: django. Core. In the Paginator module
- Paginator object
- Function: responsible for the overall management of paging data
- Syntax: Paginator = Paginator (object_list, per_page)
- Parameters:
- object_list: A list of objects (or QuerySet objects) that require paging data
- per_page: number of data bars per page
- Return value:
- Objects of Paginator
- Parameters:
- Properties of the Paginator object:
- count: total number of objects that require paging data
- num_pages: total number of pages after paging
- page_range: A range object from 1 that records the current number of pages
- per_page: the number of data displayed per page
- Methods for Paginator objects
- paginator object. page(number):
- Parameter number is page number information (from 1)
- Returns the page information corresponding to the current number page
- Throw an InvalidPage exception if the provided page does not exist
- InvalidPage exception
- The total exception base class, which contains the following two exception subclasses
- PageNotAnInteger: thrown when the number passed into page() is not an integer value
- EmptyPage: thrown when the number passed into page() is a valid value but there are no objects on that page
- The total exception base class, which contains the following two exception subclasses
- paginator object. page(number):
- page object
- Definition: Responsible for the management of data on a specific page
- Syntax: The page() method of the paginator object returns the page object
- Page = paginator. Page (page number)
- Attributes:
- object_list: List of all data objects on the current page
- number: number of the current page, starting at 1
- paginator: The paginator object associated with the current page object (see which paginator object generated the page object)
- has_next(): Return to True if there is a next page
- has_previous(): If there is a previous page, return to True
- has_other_pages(): Return to True if there is a previous or next page
- next_page_number(): Returns the page number of the next page, throws an InvalidPage exception if the next page does not exist
- previous_page_number(): Returns the page number of the previous page, throws an InvalidPage exception if the previous page does not exist
- Example
#file:urls.py
from django.urls import path
from . import views
urlpatterns = [
    path('test_page', views.test_page), #Create Routes
]
#file:views.py def test_page(request): #Request Page Number from URL p = request.GET.get('page',1) data_list = [str(i) for i in range(20)] #Generate List Data #Create Paginator Object paginator = Paginator(data_list,per_page=2) #Create page object page = paginator.page(int(p)) return render(request,'test_page.html',locals())<!--file:text_page.html--> <!DOCTYPE html> <html lang="en"> <head> <meta charset="UTF-8"> <title>Paging Display</title> </head> <body> {% for p in page.object_list %} <!--from page Get data for current page in object--> {{ p }} {% endfor %} {% if page.has_previous %} <a href="/test_page?page={{ page.previous_page_number }}"> Previous page</a> {% else %} <p>Previous page</p> {% endif %} {% for pg in paginator.page_range %} {% if pg == page.number %} {{ pg }} {% else %} <a href="test_page?page={{ pg }}">{{ pg }}</a> {% endif %} {% endfor %} {% if page.has_next %} <a href="/test_page?page={{ page.next_page_number }}"> next page</a> {% else %} <p>next page</p> {% endif %} </body> </html>
10. Generating CSV files
- csv file definition:
- Definition: Comman-Separated values, sometimes referred to as character split values, because split characters can also be non-comma, and their files store tabular data (numbers and text) in plain text
- Description: Can be read directly by common tabulating tools such as Excel
- Generating csv files in Python
- Python provides a built-in library, csv; csv files can be manipulated directly from this library
- Examples are as follows:
import csv
with open('eggs.csv','w',newline='') as csvfile:
	writer = csv.writer(csvfile) #Create a writer object
	writer.writerow(['a','b','c']) #Write data in rows,
- Implementation in django
- Download csv files on the website, note the following
- The response type Content-Type type needs to be modified to text/csv, which tells the browser that the document is a CSV file, not an HTML file (the response type is modified in the HttpResponse object)
- The response will get an additional Content-Disposition header with the name of the csv file, which will be used by the browser to open the Save As @ dialog box
- Case:
import csv
from django.http import HttpResponse
from django.shortcuts import render
from books.models import Book
def make_csv_view(request):
    response = HttpResponse(content_type = 'text/csv') #Modify content-type
    response['Content-Disposition'] = 'attachment;filename="mybook.csv"'
    all_book = Book.objects.all()
    writer = csv.writer(response)
    writer.writerow(['id','title'])
    for b in all_book:
        writer.writerow([b.id,b.book_name])
    return response
- Download csv files on the website, note the following
11. User Authentication System
-
Definition: django comes with a user authentication system for handling user accounts, groups, permissions, and cookie-Based user sessions
-
Users can use django's own user table directly
-
Details Reference Official Documents
-
Base field: Model location: from django.contrib.auth.models import User
Field Type Null Key Default Extra info id int(11) NO PRI NULL auto_increment id password varchar(128) NO NULL Password last_login datetime(6) YES NULL Last landing time is_superuser tinyint(1) NO NULL Is it an administrator account (/admin) username varchar(150) NO UNI NULL User name first_name varchar(150) NO NULL name last_name varchar(150) NO NULL surname email varchar(254) NO NULL mailbox is_staff tinyint(1) NO NULL Can I access admin management interface is_active tinyint(1) NO NULL Is it an active user, defaulting to True,
Normally, instead of deleting the user, the user's is_active set to Falsedate_joined datetime(6) NO NULL Time User Created -
Model Operation - Create User
- Create Ordinary User
from django.contrib.auth.models import User
user = User.objects.create_user(username, email, password) #username, password are required
- Create Super User
from django.contrib.auth.models import User
user = User.objects.create_superuser(username, email, password) #username, password are required
- Create Ordinary User
-
Model Operation - Delete User
- Use pseudo delete operation: will be_ Change the value of active to False
from django.contrib.auth.models import User
try:
	user = User.objects.get(username='User name')
	user.is_active = False
	user.save()
	print("Successfully deleted normal user")
except:
	print("Failed to delete normal user")
- Use pseudo delete operation: will be_ Change the value of active to False
-
Model Operation-Check Password
- Call authenticate in auth
from django.contrib.auth import authenticate
user = authenticate(username=username,password=password)
- Description: Returns the corresponding user object if the username and password validation succeeds, otherwise returns None
- Call authenticate in auth
-
Model Operation - Modify Password
from django.contrib.auth.models import User try: user = User.objects.get(username='User name') user.set_password('654321') user.save() return HttpResponse("Password modified successfully!") except: return HttpResponse("Password modification failed!") -
Model Operation - Logon Stay
- Call login in auth to log on
from django.contrib.auth import login
def login_view(request):
	user = authenticate(username=username,password=password) #Return the checked user object
	login(request,user) #Incoming request and checked user object
- Call login in auth to log on
-
Model Operation-Logon Status Check
- Call login_in decorators Required, add an ornament to the view that needs to be checked using the ornament method
- If you need to configure jump pages where login checks are unsuccessful, you need to set tings. Configuration in py file: LOGIN_URL ='Jump url'
from django.contrib.auth.decorators import login_required
@login_required #Decorated views must be logged on for users to access
def index_view(request):
	login_user = request.user #Get the current logged on user
	···
-
Model Operation - Logon Status Cancel
from django.contrib.auth import logout
def logout_view(request):
	logout(request) #Pass in request directly
-
Extend the fields of the built-in user table
- Scenario 1: Map 1-to-1 with built-in tables by creating new tables
- Scenario 2: Inherit the built-in Abstract User model class, override class properties
- Scenario 2 implementation steps:
- Add a new application
- Definition model class inherits from AbstractUser
- At settings. AUTH_is indicated in the PY file USER_ MODEL ='Application name. Class Name'
- Note: This is done before the first migrate execution
- Example:
from django.db import models
from django.contrib.auth.models import AbstractUser
class UserInfo(AbstractUser): #Inherited from AbstractUser
	phone = models.CharField(max_length = 11,default = '') #New fields added
Add users (same as the original User)#file:settings.py AUTH_USER_MODEL = 'user.UserInfo'
from user.models import UserInfo
UserInfo.onjects.create_user(username='xxx',password='123456',phone='13344445555')
12. File upload function
- Definition: Users can upload files such as pictures to websites through a browser
- Scene: Users upload avatars, process files [PDF, TXT, etc].
- Upload Rule - Front End [HTML]
- File upload must be submitted for POST
- File upload in form <form>must have enctype="multipart/form-data" to include file content data
- Upload files with <input type="file" name="xxx">tag in the form
- Upload Rule-Backend [django]
- Get the contents of the uploaded file: Use request in the view function. FILES Gets the Content of a File Box
- Syntax: file = request.FILES['XXX']
- Explain:
- name value of file box in FILES key corresponding page
- File: is a bound file stream object
- file.name: get the file name
- file.file: Byte stream data for the file
- The text box content in the form is still requested. POST Delete
- Access and Storage Paths for Profiles
- At settings. Set MEDIA-related configuration in py; django collectively refers to user-uploaded files as media resources
#file:settings.py
MEDIA_URL = '/media/' #Configure the access path to the upload file
MEDIA_ROOT = os.path.join(BASE_DIR,'media') #Profile Storage Path
- Manually Bind MEDIA_ URLs and MEDIA_ROOT
- Add Route to Main Route
from django.conf import settings
from django.conf.urls.static import static
urlpatterns += static(settings.MEDIA_URL,document_root = settings.MEDIA_ROOT)
- Description: Use static to make MEDIA_URL and MEDIA_ROOT binds, django receives MEDIA_ After routing requests that start with the URL, go to MEDIA_ROOT Path Finding Resources
- At settings. Set MEDIA-related configuration in py; django collectively refers to user-uploaded files as media resources
- File Writing Scheme 1: Traditional open Method
@csrf_exmpt #Cancel csrf's validation of the following view functions def upload_view(request): if request.method == 'GET': return render(request,'test_upload.html') elif request.methof == 'POST': a_file = request.FILES['myfile'] #Get the file stream object for the uploaded file print("The uploaded file name is:",a_file.name) filename = os.path.join(settings.MEDIA_ROOT,a_file.name) #j Splice the uploaded file name with the file storage path with open(filename,'w') as f: data = a_file.file.read() #Using the read() method to a_file.file Byte Stream Data Read Out f.write(data) #Write read data return HttpResponse("Receive files:",a_file.name + "Success") - File Writing Scheme 2:diango Implementation-With ORM
- Usage: With the help of FileField(upload='subdirectory name') in the model class; This field stores the relative path of the file, and django automatically renames the file if the file name already exists
@csrf_exempt
def upload_view_dj(request):
	if request.method == 'GET':
		return render(request,'test_upload.html')
	elif request.method == 'POST':
		title = request.POST['title']
		a_file = request.FILES['myfile']
		Content.objects.create(desc=title,myfile=a_file) #desc, myfile are field names in the Content model class
		return HttpResponse("----upload is ok----")
- Usage: With the help of FileField(upload='subdirectory name') in the model class; This field stores the relative path of the file, and django automatically renames the file if the file name already exists
- Upload example:
# 1.file:settings.py, configure MEDIA_ URLs and MEDIA_ROOT
MEDIA_URL = '/media/'
MEDIA_ROOT = os.path.join(BASE_DIR,'media') #Create a media folder in the project root directory to hold the uploaded files
# 2.file:urls.py, bind the routing and storage directory of uploaded files
from django.conf.urls.static import static
from django.urls import path
from test_upload import views
from django.conf import settings
urlpatterns = [
    path('test_upload',views.upload_view)
]
urlpatterns += static(settings.MEDIA_URL,document_root = settings.MEDIA_ROOT)
# 3.file:models.py, create model class
from django.db import models
class test_upload(models.Model):
    title = models.CharField(verbose_name='Title',max_length=20)
    mfile = models.FileField(verbose_name='media')
# 4.file:views.py, create view function
from django.http import HttpResponse
from django.shortcuts import render
from django.views.decorators.csrf import csrf_exempt
from .models import test_upload
@csrf_exempt
def upload_view(request):
    if request.method == 'GET':
        return render(request,'test_upload.html')
    elif request.method == 'POST':
        title = request.POST['title']
        m_file = request.FILES['myfile']
        test_upload.objects.create(title=title,mfile=m_file)
        return HttpResponse('----File uploaded successfully----')
<!--5. file:test_upload.html , Configuration Template File--> <!DOCTYPE html> <html lang="en"> <head> <meta charset="UTF-8"> <title>File Upload</title> </head> <body> <form action="test_upload" method="post" enctype="multipart/form-data"> <input type="text" name="title"> <input type="submit" value="Submit"> <input type="file" name="myfile"> </form> </body> </html>
13. Sending Mail
- Business Scenarios
- Business warnings (traceback.format_exc()) can be used to catch exceptions), mailbox validation, password retrieval
- Mail related agreements
- SMTP
- The full name is "simple mail transfer protocol", which is Simple Mail Transfer Protocol (port 25)
- Function: It is a set of specifications for transporting mail from source address to destination address. It controls the forwarding of mail - > belongs to push protocol
- IMAP
- The full name is Internet mail Access protocol, or Interactive Mail Access Protocol, which is an application layer protocol (port 143)
- Function: Used to access mail from local mail clients (Outlook express, Foxmail, etc.) on remote servers - > is a pull protocol
- POP3
- The full name is Post office protocol 3, the third version of the post office protocol, and is a member of the TCP/IP protocol family (port 110)
- Features: Mainly used to support the use of client-side remote management of e-mail on the server - > is a pull protocol
- IMAP VS POP3: Both are pull-down protocols responsible for downloading mail from mail servers
- IMAP has summary browsing to preview part of the summary and download the entire message
- IMAP is a two-way protocol, client actions can be fed back to the server
- POP3 must download all mail, no summary function
- POP3 is a one-way protocol and client operations cannot be synchronized to the server
- SMTP
- django Send Mail
- Configure mail function in django, mainly for SMTP protocol, responsible for sending mail
- Principle:
- Grant django a mailbox
- django uses this mailbox to send mail to the recipient
- django.core.mail encapsulates the automatic sending SMTP protocol for e-mail
- Authorization steps:
- Log on to the mailbox used to send mail
- Obtain mailbox authorization numbers for sending mail (IMAP/SMTP, POP3/SMTP are all available)
- Configuration in django:
#file:settings.py send mail related configuration
EMAIL_BACKEND = 'django.core.mail.backends.smtp.EmailBackend' # Engine for sending mail
EMAIL_HOST = 'smtp.qq.com' # SMTP Server Address for Sending Mail
EMAIL_PORT = 25 #Port number of SMTP service
EMAIL_HOST_USER = 'XXXXXXXX@QQ.COM' #Mailbox account for sending mail
EAMIL_HOST_PASSWORD = '********' #Authorization number for third party login mailbox
EMAIL_USE_TLS = False #Whether to start TLS links (secure links) when communicating with SMTP servers defaults to False
- function call
from django.core import mail
mail.send_mail(
				subject,  #Mail Subject
				message,  #Mail Content
				from_email,  #Sender [Currently configured mailbox]
				recipient_list=['xxxxx@qq.com','xxxxx@163.com'],#List of mail recipients
				)
14. Project Deployment
- Basic concepts: Project deployment refers to the actual installation of software running on a development machine onto a server for long-term operation after software development is complete
- Deployment Steps
- Install and configure the same version of the environment (Python, database, etc.) on the installation machine
- django project migration
Sudo scp/home/path1 mysite1 root@xx.xx.xx.xx:/home/root/path2path1 is the local project path, path2 is the path stored in the migration to the server - Replace Python management with uWSGI. Py runserver method to start server
- Configure nginx reverse proxy server
- Configure static file path with nginx to solve static file path problem
- uWSGI
-
Definition: is one of WSGI. It implements http protocol, WSGI protocol and uwsgi protocol. UWSGI is fully functional and supports many protocols, mainly learning configuration
-
uWSGI installation: ubuntu performs sudo PIP install uWSGI==2.0. 18-i https://pypi.tuna.tsinghua.edu.cn/simple/
- Check if the installation was successful: sudo PIP freeze | grep-i'uwsgi'If successfully installed, the corresponding version will be displayed
-
Configure uWSGI
- Add profile: project folder with the same name / uwsgi.ini; mysite1/mysite1/uwsgi.ini; This profile is usually named the same as the project name when you are working on a formal project. ini
#file:uwsgi.ini
[uwsgi] #The first line at the beginning of the file must write this
socket = 127.0.0.1:8000 #IP address for socket mode: port number, this mode must have nginx
http = 127.0.0.1:8000 #IP address for http communication: port number
chdir = /home/···/my_project #Project Current Working Directory
wsgi-file = my_project/wsgi.py #WSGI in the project. The directory of the PY file, relative to the current working directory; my_project is a folder with the same name under the project directory
process = 4 #Number of processes
threads = 2 #Number of threads per process
pidfile = uwsgi.pid #pid->ID of the main process. When uwsgi is started, pid is written into a file. The pidfile indicates the location of the file. After starting, a uwsgi is generated in the boot directory. pid file
daemonize = uwsgi.log #The location of the service log file, which starts in the background, and outputs the log file to uwsgi in the boot directory. Log
master = True #Open the main city management mode
- Special note: settings in django. Py needs to be configured as follows
- Modify DEBUG = True to DEBUG = False #Avoid exporting error information to users
- Will ALLOWED_HOST = [] Change to ALLOWED_HOSTS = ['Public domain name'] or ['IP address for service monitoring']
- Add profile: project folder with the same name / uwsgi.ini; mysite1/mysite1/uwsgi.ini; This profile is usually named the same as the project name when you are working on a formal project. ini
-
Start uwsgi: Switch to the directory where the uWSGI configuration file is located to execute uwsgi --ini uwsgi.ini'-ini'is to initialize uwsgi
-
Stop uwsgi: Switch to the directory where the uWSGI configuration file is located to execute uwsgi --stop uwsgi.pid
-
Check to see if the startup was successful: PS aux|grep'uwsgi'Check to see if a process is started, whether it is started or closed, this command needs to be executed to confirm that it is as expected
-
Note: After successful startup, the process executes in the background, and all logs are output to uwsgi in the directory where the configuration file is located. Log; Any code changes in Django require restarting uwsgi
-
uWSGI FAQ Summary
problem Reason Solution Start failed Port occupied, other processes occupied uWSGI started port Execute sudo lsof -i: port number to query the specific process; Execute sudo kill -9 port number, kill process, restart uWSGI Stop Failed Repeated uWSGI startup results in process number misalignment in pid file ps out uWSGI process, kill manually
-
- Nginx
-
Definition: nginx is a lightweight, high-performance web server that provides a range of important features such as http proxy and reverse proxy, load balancing, and so on. Write in c language, high efficiency
-
Effect:
- Load balancing, multiple servers take turns processing requests
- Reverse proxy: nginx reverse proxy can forward to uWSGI using uwsgi protocol and http protocol
- Introduction of Forward and Reverse Proxies
- Forward Proxy: The object of the proxy is the client, hiding the real client, the server does not know who the real client is
- Reverse proxy: the object of the proxy is the server, hiding the real server, the client does not know who the real server is
- Load balancing: nginx balances requests and distributes them across multiple servers for processing
- Introduction of Forward and Reverse Proxies
-
Principle: Client requests nginx and nginx forwards the request to django running uWSGI
-
Installation: sudo apt install nginx (change domestic source: vim/etc/apt/sources.list change domestic source sudo apt-get update) ->After installation, entering nginx-v in the ubuntu terminal will display the corresponding version number of nginx; After installation, nginx will start automatically and occupy 80 ports
-
Configuration: Modify the configuration file of nginx: /etc/nginx/sites-enabled/default; Sudo VIM default
server{ location / { # First attempt to serve request as file, then # as directory, then fall back to displaying a 404. # try_files $uri $uri/ =404; # nginx can automatically find HTML files by request routing. The default directory for finding HTML files is root/var/www/html, and 404 errors will be reported if not found uwsgi_pass 127.0.0.1:8000; #All routes starting with'/'are redirected to 127.0. Port 8000 of 0.1, include /etc/nginx/uwsgi_params; #If you want to use the uwsgi protocol, you must transfer all parameters to uwsgi } } -
Start/Stop nginx
- Sudo/etc/init. D/nginx/start|stop|restart|status or
- sudo service nginx start|stop|restart|status
- start:Start, stop:Stop, restart:Restart
- The nginx configuration needs to be restarted whenever it is modified, otherwise the configuration will not take effect
-
UWSGI modification configuration: nginx is responsible for receiving requests and forwarding them to subsequent uWSGIs, in which uWSGI needs to be started in socket mode;
#file:uwsgi.ini
[uwsgi] #The first line at the beginning of the file must write this
socket = 127.0.0.1:8000 #IP address for socket mode: port number, this mode must have nginx
# http = 127.0.0.1:8000 #IP address for http communication: port number
-
Frequently asked questions:
- Check logs:
- nginx log location:
- Exception log: /var/log/nginx/error.log
- Normal access information: /var/log/nginx/access.log
- Uwsgi log location: project directory under the same name / uwsgi.log
- nginx log location:
- Access 127.0. 0.1:80 address, return 502 response; Analysis 502 response represented nginx reverse proxy configuration success, but corresponding uWSGI did not start
- Access 127.0.0.1:80/url, return 404 response: 1. Routing is indeed not in the django configuration; 2. nginx configuration error, try_not forbidden Files
- Check logs:
-
Static File Configuration
- Reason: With the nginx reverse proxy, django no longer performs static file management.
- Create a new path to hold all django's static files/home//////project name_ Static/
- Settings in django. Add a new configuration to PY
#file:settings.py
#Once configured, django will collect static files in the project name_ Automatically create a new static folder under the static folder to collect static files
STATIC_ROOT = '/home/···/Project Name_static/static'
- Go to the project root directory and execute Python management. After py collectstatic executes this command, django will collect all static files in the project to STATIC_ROOT, including django built-in static files
- Add a new configuration to nginx configuration
#file:/etc/nginx/site-enabled/default
# Add the localization/static routing configuration and redirect to the static file storage directory
location /static {
                root /home/···/day04_static;
        }
- Add a new configuration to nginx configuration
- Customize 404/500 pages
- Add 404 to the template folder. HTML template, which is automatically displayed when the view triggers an Http404 exception; 404.html only works in the release (that is, DEBUG=False in settings.py), jumping to the 404 interface when an Http404 exception is triggered to the handler
- Mailbox Alarm Configuration
- Role: Error tracing information can be sent to the specified mailbox when there are errors in the code running on the official server
- At settings.py - After authorizing the underlying mailbox, add the following configuration
DEBUG = False #Turn off debugging mode ADMINS = [('Recipient Name','Recipient Mailbox'),('Recipient 2 Name','Recipient 2 Mailbox')] #Error Report Receiver SERVER_EMAIL = 'email Configured Mailbox' #Send error report mail to sender, default is root@localhost Account, most mail servers reject this message - Filter sensitive information: Error traces, such as password s, are displayed in error messages. django has modified the sensitive information filtering in the configuration file to multiple asterisks, but user-defined view functions require users to filter sensitive information manually. The following information can be filtered (local variables, POST submission data)
- Filtering local variables
from django.views.decorators.debug import sensitive_variables @sensitive_variables('user','pw','cc') #Using the decorator, you pass the filtered fields as parameters to the decorator def process_info(user): pw = user.password cc = user.credit_card_number name = user.name - Explain
- If the value of a local variable, such as user,pw,cc, is involved in an error message, it will be replaced by **** and the name variable will show its true value
- Multiple decorators need to be placed on top
- Filter the values of all local variables without passing parameters
- Filtering POST data
from django.views.decorators.debug import sensitive_post_parameters
@sensitive_post_parameters('password','username')
def index(request):
	s = request.POST['username'] + request.POST['abcd']
	# abcd does not exist, causing an error
	#Values of username and password in POST will be replaced by ****
-