preface
This article briefly introduces the BOM object and DOM object of JavaScript, as well as the related methods and usage.
catalogue
2.2. Event monitoring mechanism
Case: automatic jump to home page
4, Introduction to DOM objects
4.2 the W3C DOM standard is divided into three different parts:
4.2.1 core DOM - standard model for any structured document
4.2.2 XML DOM - standard model for XML documents
4.2.3 HTML DOM - standard model for HTML documents
1, DOM object simple learning
Function of DOM object: control the content of HTML document
Get page label (Element) object: Element
document.getElementById("id value"): get the element object through the id of the element
How to manipulate Element objects:
1. Modify attribute value:
1. Specify which object to get?
2. Check the API documentation to find out which properties can be set
2. Modify label body content:
* attribute: innerHTML
1. Get element object
2. Use the innerHTML attribute to modify the content of the tag body
Code example
        <!--
*@packageName
*@className DOM Simple learning
*@author wang
*@date 2022/2/10 13:55
*@Description
-->
<!DOCTYPE html>
<html lang="en">
<head>
    <meta charset="UTF-8">
    <title>DOM object</title>
</head>


<img id="light" src="img/off.gif">
<h1 id="title">First title</h1>
<script>
    /* Function: control the content of html document
     * Get page label (Element) object: Element
     * document.getElementById("id Value "): get the element object by the id of the element

     * Operation Element object:
     1. Modify attribute value:
     1. Specify which object to get?
     2. Check the API documentation to find out which properties can be set
     2. Modify label body content:
     * Attribute: innerHTML
     1. Get element object
     2. Use the innerHTML attribute to modify the content of the tag body
     */
    //
    // var s = document.getElementById("light");
    // // alert(s);
    // alert("click OK to replace the picture");
    // s.src = "img/on.gif";

    var t = document.getElementById("title");
    alert("Click OK to change the title");
    t.innerHTML = "Second title";
</script>

</body>
</html>
The above content is a simple understanding of DOM objects in order to better learn BOM objects. For details, please refer to:
w3school online tutorial The website
2, Events
2.1 simple learning of events
Function: after some operations are performed on some components, the execution of some codes is triggered.
How to bind events
1. Directly on the html tag, specify the attribute (operation) of the event, and the attribute value is js code
1. Event: onclick --- click event
2. Get the element object through js, specify the event attribute and set a function
Code example
      <!--
*@packageName
*@className Event learning
*@author wang
*@date 2022/2/10 14:56
*@Description
-->
<!DOCTYPE html>
<html lang="en">
<head>
    <meta charset="UTF-8">
    <title>event</title>
</head>
<body>

<!--Mode 1-->
<img id="light" src="img/on.gif" onclick="f();">
<!--//Mode 2 -- >
<img id="light2" src="img/on.gif">
<script>
    /*Function: after some operations are performed on some components, the execution of some codes is triggered.
    * Make a sentence: xxx is xxx, I will xxx
        * After our crystal was destroyed, I blamed my friend.
        * After the enemy crystal was destroyed, I praised myself.

* How to bind events
    1. Directly on the html tag, specify the attribute (operation) of the event, and the attribute value is js code
        1. Event: onclick --- click event

    2. Get the element object through js, specify the event attribute and set a function
*/
    function f() {
        alert("I was ordered");
    }

    function f2() {
        alert("I was ordered 2");
    }

    //Get element object
    var light2 = document.getElementById("light2");
    //Specify a function
    light2.onclick = f2;

</script>
</body>
</html>
2.2. Event monitoring mechanism
Concept: after some operations are performed on some components, the execution of some codes is triggered.
* events: some operations. For example: click, double-click, press the keyboard and move the mouse
* event source: component. For example: button text input box
* listener: code.
* registered listening: combine event, event source and listener. When an event occurs on the event source, it triggers the execution of a listener code.
Common events:
1. Click event:
1. onclick: click the event
2. Ondbllick: double click the event
2. focal event
1. onblur: lose focus
2. onfocus: element gets focus.
3. Load event:
1. onload: a page or an image is loaded.
4. Mouse events:
1. onmousedown the mouse button is pressed.
2. onmouseup# the mouse button is released.
3. onmousemove the mouse is moved.
4. onmouseover: move the mouse over an element.
5. onmouseout: move the mouse away from an element.
5. Keyboard events:
1. onkeydown: a keyboard key is pressed.
2. onkeyup: a keyboard key is released.
3. onkeypress: a keyboard key is pressed and released.
6. Selection and change
1. The content of the onchange} field is changed.
2. onselect text is selected.
7. Form event:
1. The onsubmit confirmation button is clicked.
2. The onreset button is clicked.
Case: bulb switch:
Picture data


	<!--
*@packageName
*@className Case - bulb switch
*@author wang
*@date 2022/2/10 15:13
*@Description
-->
<!DOCTYPE html>
<html lang="en">
<head>
    <meta charset="UTF-8">
    <title>Bulb switch</title>
</head>
<body>
<img id="light" src="img/off.gif">

<script>
    //Get img object
    var light = document.getElementById("light");
    //Specify stand-alone events
    light.onclick = fun;

    //Define a tag for judging
    var flag = true;

    function fun() {

        if (flag) {
            //If the flag is true, it means that the light is not turned on. Turn on the light
            light.src = "img/on.gif";
            flag = false;
        } else {
            //If the light is on, turn it off
            light.src = "img/off.gif";
            flag = true;
        }
    }
</script>


</body>
</html>
3, BOM object
3.1. BOM object concept:
Browser Object Model
Encapsulate the components of the browser into objects.
3.2 composition
1.* Window: window object
1. establish
You can also use window Method name
2. method
1. Methods related to pop ups:
alert() displays a warning box with a message and a confirmation button.
confirm() displays a dialog box with a message and a confirm button and a cancel button.
* if the user clicks the OK button, the method returns true
* if the user clicks the Cancel button, the method returns false
prompt() displays a dialog box that prompts the user for input.
* return value: get the value entered by the user
Code demonstration
   <!--
*@packageName
*@className BOM-window Object Popup
*@author wang
*@date 2022/2/10 15:54
*@Description
-->
<!DOCTYPE html>
<html lang="en">
<head>
    <meta charset="UTF-8">
    <title>window object</title>
</head>
<body>

<script>
    /* 1. Methods related to pop ups:
            alert()    Displays a warning message and a confirmation box with a segment.
            confirm()    Displays a dialog box with a message and confirm and Cancel buttons.
                * If the user clicks the OK button, the method returns true
                * If the user clicks the Cancel button, the method returns false
            prompt()    Displays a dialog box that prompts the user for input.
                * Return value: get the value entered by the user*/

    // var flag = confirm("are you sure you want to exit?");
    // if (flag) {
    // alert("you have successfully exited!");
    // }else {
    // alert("welcome to continue!");
    // }


    var s = prompt("Please enter user name:");
    alert(s);

</script>
</body>
</html>
2.* Navigator: Browser Object
3.* Screen: display screen object
4.* History: history object
1. Create (get):
1. window.history
2. history
2. method:
* back() loads the previous URL in the history list.
* forward() loads the next URL in the history list.
* go (parameter) loads a specific page in the history list.
* parameters:
* positive: Several Historical Records
* negative number: back several history records
3. Properties:
* length returns the number of URL s in the current window history list.
5.* Location: address bar object
1. Create (get):
1. window.location
2. location
2. method:
* reload() reloads the current document. Refresh
3. attribute
* href set or return the full URL.
Case: automatic jump to home page
<!--
*@packageName
*@className Case - automatic jump hand
*@author wang
*@date 2022/2/11 9:59
*@Description
-->
<!DOCTYPE html>
<html lang="en">
<head>
    <meta charset="UTF-8">
    <title>Auto jump to home page</title>

    <style>
        p {
            text-align: center;
        }

        span {
            color: red;
        }
    </style>
</head>
<body>
<p>
    <span id="time">5</span>Automatically jump to Baidu after seconds....
</p>

<script>

    //Get span label object
    var time = document.getElementById("time");

    var second = 5;

    //Define a method to reduce the number of seconds

    function setTime() {
        second--;

        //When the second reading is over, jump to Baidu website
        if (second <= 0) {
            location.href = "https://www.baidu.com"
        }
        time.innerHTML = second + "";

    }

    //Define a timer that executes the method every second
    setInterval(setTime, 1000);


</script>
</body>
</html>
4, Introduction to DOM objects
4.1 basic concepts:
Document Object Model
Encapsulate the components of markup language documents as objects. These objects can be used to perform CRUD dynamic operations on markup language documents
The HTML DOM model is structured as an object tree
Object's HTML DOM tree
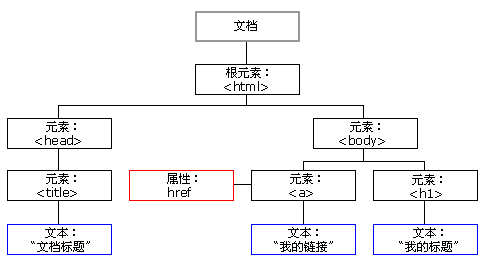
Through this object model, JavaScript gets all the power to create dynamic HTML:
- JavaScript can change all HTML elements in a page
- JavaScript can change all HTML attributes in a page
- JavaScript can change all CSS styles in a page
- JavaScript can delete existing HTML elements and attributes
- JavaScript can add new HTML elements and attributes
- JavaScript can respond to all existing HTML events in the page
- JavaScript can create new HTML events in the page
4.2 the W3C DOM standard is divided into three different parts:
4.2.1 core DOM - standard model for any structured document
1. * Document: document object
1. Create (get): in the html dom model, you can use the window object to get
1. window.document
2. document
2. method:
1. Get Element object:
1. getElementById(): get the element object according to the id attribute value. The id attribute value is generally unique
2. getElementsByTagName(): get the element objects according to the element name. The return value is an array
3. getElementsByClassName(): get the element objects according to the Class attribute value. The return value is an array
4. getElementsByName(): get the element objects according to the value of the name attribute. The return value is an array
2. Create additional DOM objects:
createAttribute(name)
createComment()
createElement()
createTextNode()
Code demonstration
    <!--
*@packageName
*@className DOM-document object
*@author wang
*@date 2022/2/11 16:30
*@Description
-->
<!DOCTYPE html>
<html lang="en">
<head>
    <meta charset="UTF-8">
    <title>document</title>
</head>
<body>
<div id="div1">div1</div>
<div id="div2">div2</div>
<div id="div3">div3</div>
<div class="cla1">cla1</div>
<div class="cla1">cla2</div>
<input type="text" name="username">

<hr>

<script>
    /* method:
            1. Get Element object:
                1. getElementById()    :  Get the element object according to the id attribute value. The id attribute value is generally unique
                2. getElementsByTagName(): Get the element objects according to the element name. The return value is an array
                3. getElementsByClassName():Get the element objects according to the Class attribute value. The return value is an array
                4. getElementsByName(): Get the element objects according to the value of the name attribute. The return value is an array*/

    var divs = document.getElementsByTagName("div");
    for (var i = 0; i < divs.length; i++) {
        document.write(divs[i] + "<br>");
    }

    document.write("<hr>");
    var clas = document.getElementsByClassName("cla1");
    for (var i = 0; i < clas.length; i++) {
        document.write(clas[i] + "<br>");
    }
    document.write("<hr>");

    var usernames = document.getElementsByName("username");
    for (var i = 0; i < usernames.length; i++) {
        document.write(usernames[i] + "<br>");
    }
    document.write("<hr>");


</script>
</body>
</html>
2.* Element: element object
1. Get / create: get and create through document
2. method:
1. removeAttribute(): deletes an attribute
2. setAttribute(): set attribute
Code example
   <!--
*@packageName
*@className DOM-element Element object
*@author wang
*@date 2022/2/11 16:49
*@Description
-->
<!DOCTYPE html>
<html lang="en">
<head>
    <meta charset="UTF-8">
    <title>element</title>
</head>
<body>
<a>Click jump</a>
<input type="button" id="set" value="Click Set Baidu link">
<input type="button" id="remove" value="Click the remove link">

<script>
    // Element: element object
    // 1. Obtain / create: obtain and create through document
    // 2. Method:
    //         1. removeAttribute(): deletes an attribute
    var element = document.getElementsByTagName("a")[0];
    //Get remove button
    var removeB = document.getElementById("remove");
    removeB.onclick = function () {
        element.removeAttribute("href");

    }


    // 2. setAttribute(): set attribute
    //Get settings button
    var setButton = document.getElementById("set");
    setButton.onclick = function () {

        element.setAttribute("href", "https://www.baidu.com");
    }

</script>
</body>
</html>
3.* Attribute: attribute object
4.* Text: text object
5.* Comment: comment object
6.Node: node object, the parent object of the other five
* features: all dom objects can be considered as a node
* method:
* CRUD dom tree:
* appendChild(): adds a new child node to the end of the child node list of the node.
* removeChild(): deletes (and returns) the specified child node of the current node.
* replaceChild(): replace a child node with a new node.
* attributes:
* parentNode returns the parent node of the node.
Expand
Hyperlink function
1. It can be clicked and has a style
2. Click to jump to the URL specified by href
At present, our requirement is to retain the 1 function and remove the 2 function. Then use the fixed writing method: javascript:void(0)
Code demonstration
<!--
*@packageName
*@className DOM-node object
*@author wang
*@date 2022/2/15 12:13
*@Description
-->
<!DOCTYPE html>
<html lang="en">
<head>
    <meta charset="UTF-8">
    <title>node object</title>
    <style>
        div {
            border: red solid 1px;
        }

        #div1 {
            width: 200px;
            height: 200px;
        }

        #div2 {
            width: 100px;
            height: 100px;
        }

        #div3 {
            width: 100px;
            height: 100px;
        }
    </style>
</head>
<body>


<div id="div1">div1
    <div id="div2">div2</div>
</div>

<!--<a href="" id="del">Delete node 2</a>-->

<!--<input id="del" type="button" value="Delete node 2">-->

<a href="javascript:void(0)" id="del">Delete node 2</a>
<a href="javascript:void(0)" id="add">Add node 3</a>

<!--Hyperlink function
       1.It can be clicked and has a style
        2.Click to jump to href designated URL

        At present, our requirement is to retain 1 function and remove 2 functions. Then use the fixed writing method: javascript:void(0)-->
<script>
    /*
    * Node: Node object, parent of the other 5
		* Features: all dom objects can be considered as a node
		* method:
			* CRUD dom Tree:
				* appendChild(): Adds a new child node to the end of the node's child node list.
				* removeChild()	: Deletes (and returns) the specified child node of the current node.
				* replaceChild(): Replace a child node with a new node.
		* Properties:
                * parentNode Returns the parent node of the node.*/
    //Get a tag
    var element_a = document.getElementById("del");

    //Set the click event of a tag
    element_a.onclick = function () {
        //Get node 1 and node 2 and delete node 2
        var div1 = document.getElementById("div1");
        var div2 = document.getElementById("div2");
        div1.removeChild(div2);
    }


    //Add new node
    //Get a tag
    var element_add = document.getElementById("add");

    //Set the click event of a tag
    element_add.onclick = function () {
        //Get node 1 and create a new node 3
        var div1 = document.getElementById("div1");

        //Create a new node
        var div3 = document.createElement("div");

        //Set the ID attribute of div3 to css selector style
        div3.setAttribute("id", "div3");

        div1.appendChild(div3);
    }

</script>
</body>
</html>
4.2.2 XML DOM - standard model for XML documents
4.2.3 HTML DOM - standard model for HTML documents
1. Tag body setting and acquisition: innerHTML
2. Use attributes of html element objects
3. Control element style
1. Use the style attribute of the element to set
For example:
/ / modify style mode 1
div1.style.border = "1px solid red";
div1.style.width = "200px";
//font-size--> fontSize
div1.style.fontSize = "20px";
2. Define the style of the class selector in advance, and set its class attribute value through the className attribute of the element.
Code demonstration
<!--
*@packageName
*@className Control style
*@author wang
*@date 2022/2/21 16:26
*@Description
-->
<!DOCTYPE html>
<html lang="en">
<head>
    <meta charset="UTF-8">
    <title>Style control</title>
</head>
<style>
    .d1 {
        border: blue 10px solid;
        width: 50%;
    }

    .d2 {
        border: green 5px solid;
        width: 50%;
    }
</style>
<body>

<div id="div1">
    div1
</div>

<div id="div2">
    div2
</div>


<script>


    var div1 = document.getElementById("div1");
    div1.onclick = function () {
        //To change the style, you can use the style attribute of the element
        div1.style.border = "2px solid red";
        div1.style.width = "20%";
    }

    var div2 = document.getElementById("div2");
    //You can also use the className attribute of the element, which requires css to set the element style in advance
    div2.onclick = function () {
        div2.className = "d2";
    }


</script>

</body>
</html>
Case: dynamic table
Case effect
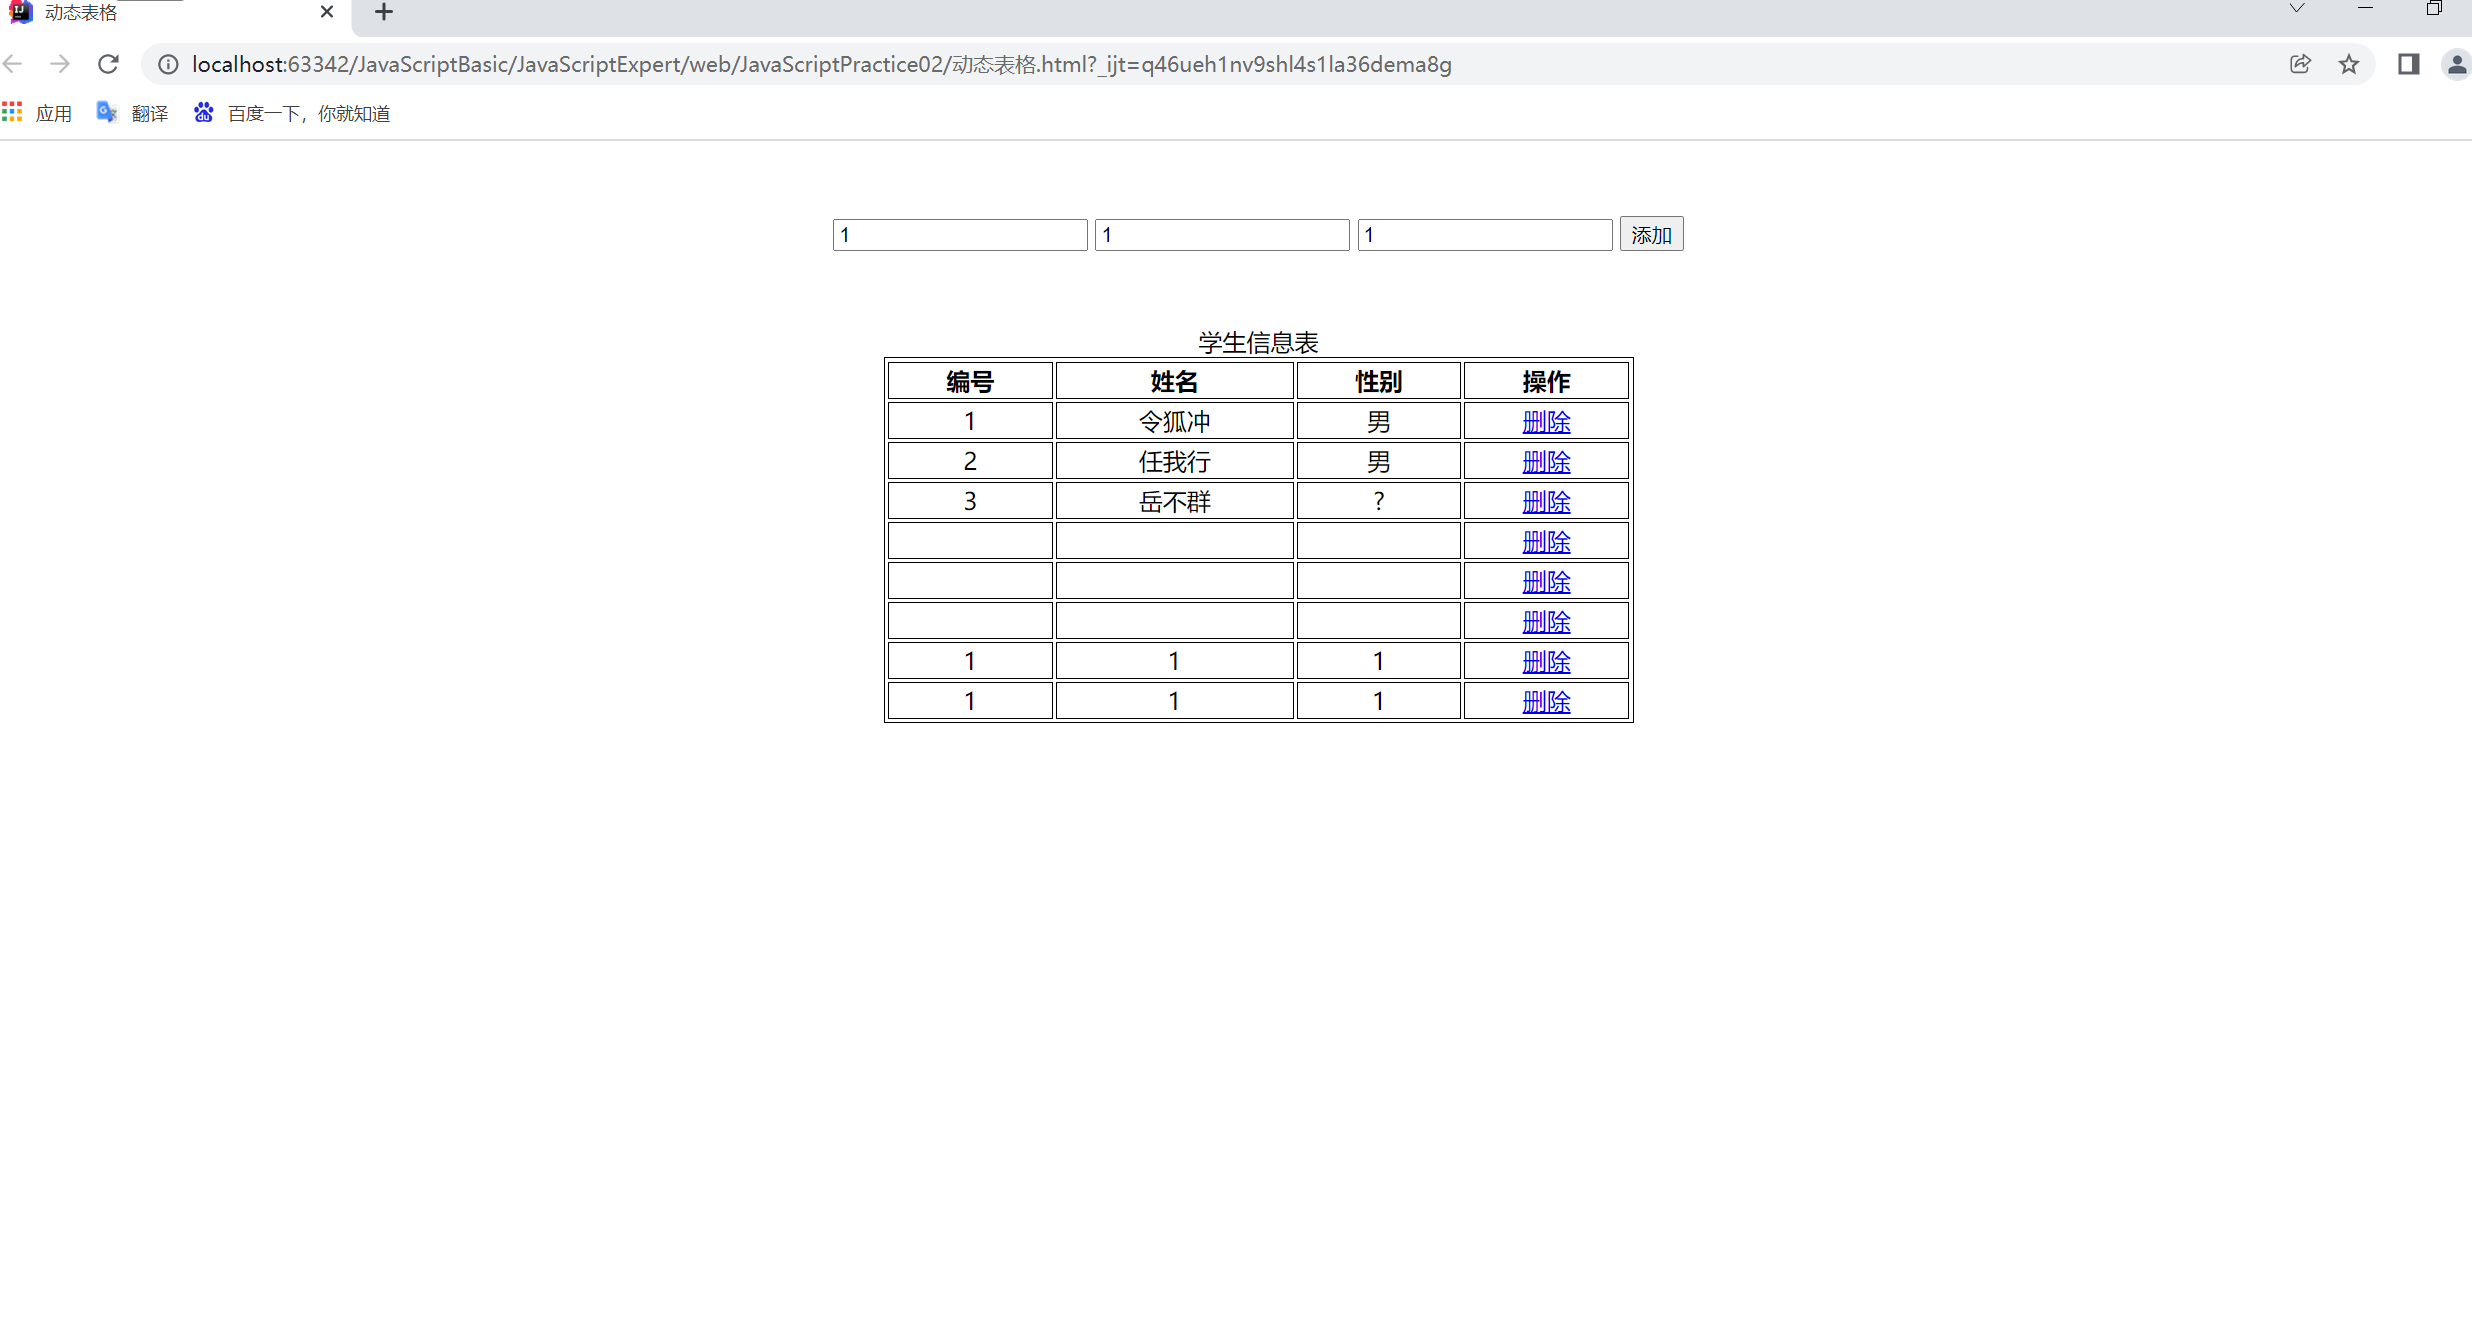
Can be added or deleted
Code:
<!DOCTYPE html>
<html lang="en">
<head>
    <meta charset="UTF-8">
    <title>Dynamic table</title>

    <style>
        table {
            border: 1px solid;
            margin: auto;
            width: 500px;
        }

        td, th {
            text-align: center;
            border: 1px solid;
        }

        div {
            text-align: center;
            margin: 50px;
        }
    </style>

</head>
<body>

<div>
    <input type="text" id="id" placeholder="Please enter the number">
    <input type="text" id="name" placeholder="Please enter your name">
    <input type="text" id="gender" placeholder="Please enter gender">
    <input type="button" value="add to" id="btn_add">

</div>


<table>
    <caption>Student information form</caption>
    <tr>
        <th>number</th>
        <th>full name</th>
        <th>Gender</th>
        <th>operation</th>
    </tr>

    <tr>
        <td>1</td>
        <td>linghu chong</td>
        <td>male</td>
        <td><a href="javaScript:void(0);" onclick="delTr(this);">delete</a></td>
    </tr>

    <tr>
        <td>2</td>
        <td>ren woxing</td>
        <td>male</td>
        <td><a href="javaScript:void(0);" onclick="delTr(this);">delete</a></td>
    </tr>

    <tr>
        <td>3</td>
        <td>yue buqun</td>
        <td>?</td>
        <td><a href="javaScript:void(0);" onclick="delTr(this);">delete</a></td>
    </tr>


</table>


<script>

    /*
    *   1.Bind click event to add button
    *   2.Get text box input
    *   3.Create TD and set the text content of td to the content of text box
    *   4.Create tr,
    *   5.Add td to tr
    *   6.Get the table and add tr to the table
    *
    *   */


    //Method 1: object-oriented method
    /*document.getElementById("btn_add").onclick = function () {

        //2.Get text box input
        var id = document.getElementById("id").value;
        var name = document.getElementById("name").value;
        var gender = document.getElementById("gender").value;


        // 3.Create TD and set the text content of td to the content of text box
        var td_id = document.createElement("td");
        var text_id = document.createTextNode(id);
        td_id.appendChild(text_id);

        var td_name = document.createElement("td");
        var text_name = document.createTextNode(name);
        td_name.appendChild(text_name);


        var td_gender = document.createElement("td");
        var text_gender = document.createTextNode(gender);
        td_gender.appendChild(text_gender);

        //Set the properties and text of the hyperlink
        var a_cre = document.createElement("a");
        a_cre.setAttribute("href", "javaScript:void(0);");
        a_cre.setAttribute("onclick", "delTr(this);");
        var td_a = document.createElement("td");
        var text_a = document.createTextNode("Delete "");
        a_cre.appendChild(text_a);
        td_a.appendChild(a_cre);

// 4.Create tr,
        // *   5.Add td to tr
        var tr = document.createElement("tr");
        tr.appendChild(td_id);
        tr.appendChild(td_name);
        tr.appendChild(td_gender);
        tr.appendChild(td_a);


        //    6.Get the table and add tr to the table
        var table = document.getElementsByTagName("table")[0];
        table.appendChild(tr);
    }
    */


    //Method 2: innerHTML method

    document.getElementById("btn_add").onclick = function () {

        //2. Get the input content of the text box
        var id = document.getElementById("id").value;
        var name = document.getElementById("name").value;
        var gender = document.getElementById("gender").value;

        var table = document.getElementsByTagName("table")[0];

        table.innerHTML += "<tr>\n" +
            "        <td>" + id + "</td>\n" +
            "        <td>" + name + "</td>\n" +
            "        <td>" + gender + "</td>\n" +
            "        <td><a href=\"javaScript:void(0);\" onclick=\"delTr(this);\">delete</a></td>\n" +
            "    </tr>"


    }


    //Method of deletion
    function delTr(obj) {
        //Get the table node, obj is the hyperlink node, the parent node of the hyperlink node is TD, the parent node of TD is tr, and the parent node of TR is table
        //Here, the parent node obtained three times with the hyperlink node is the table node
        var table = obj.parentNode.parentNode.parentNode;
        //Because what we want to delete is the row of data that specifies the hyperlink, delete tr
        var tr = obj.parentNode.parentNode;


        //Use the removeChild() method to delete the child nodes of the table node we found
        table.removeChild(tr);
    }

</script>
</body>
</html>