The daily development of the front end is inseparable from the support of all kinds of lint, but some people just don't like it. The code writing method is arbitrary and capricious, so we don't force it. In fact, the definition of specifications mainly depends on the habits of open source project authors or the coding habits of the company team. Even the code specifications written by two front-end experts will be different. The original intention of ESLint is to allow programmers to create their own detection rules. All the rules of ESLint are designed to be pluggable. The default rules of ESLint are no different from other plug-ins. The rules themselves and tests can rely on the same pattern. In order to make it easy for people to use, ESLint has some built-in rules. Of course, you can customize the rules in the process of use.
Today, we mainly explore the working principle of ESLint from the source code.
Why use ESLint
Many people may have seen the next picture, which can well describe the role of ESLint:
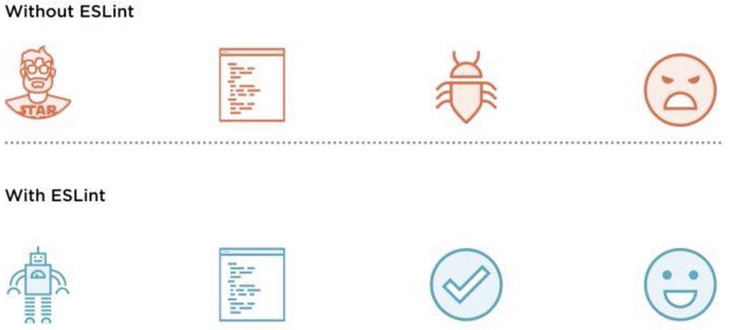
- If you don't use ESLint, your code needs to be checked manually, and the format may be diverse. Naturally, bug s can't be avoided, and other developers who see your code are also in a bad mood.
- If you use ESLint and check your code from all aspects, there will naturally be fewer problems running, and other students will be very satisfied with reading it.
Overall, ESLint is a static code analysis tool that identifies problematic patterns found in JavaScript code. It can not only reduce bug s, but also help us unify our coding style, making it easier for many people to maintain our code and projects for a long time.
Do you think I will talk about how to install, configure and use ESlint? NO... Don't talk much, walk up ~
Eslint execution process
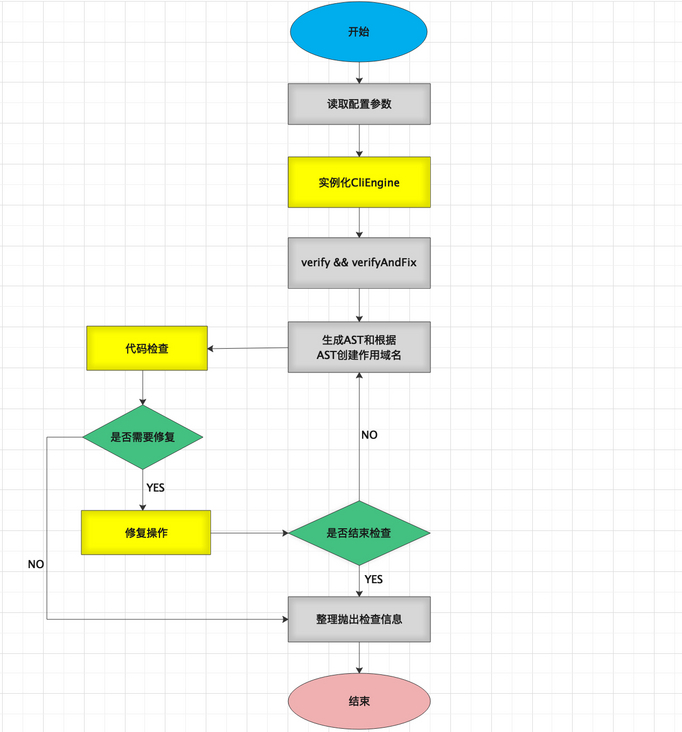
If you need to use Eslint better, you must know the working principle and code structure of Eslint to better understand Eslint. Next, we will explain the execution process of Eslint. The following figure is the overall execution process of Eslint.
First, let's look at two classes linter and CliEngine
- CLIEngine this class is the brain of Eslint and controls the execution process of Eslint. Generally, when calling api, you only need to operate CLIEngine
- Linter is the CEO of Eslint, which controls the loading, verification and repair of configuration files
start
We first found the entry file of the Eslint command Eslint.js
(async function main() {
    process.on("uncaughtException", onFatalError);
    process.on("unhandledRejection", onFatalError);

    // Call the config initializer if `--init` is present.
    if (process.argv.includes("--init")) {
        await require("../lib/init/config-initializer").initializeConfig();
        return;
    }

    // Otherwise, call the CLI.
    process.exitCode = await require("../lib/cli").execute(
        process.argv,
        process.argv.includes("--stdin") ? await readStdin() : null
    );
}()).catch(onFatalError);
We can see from the code that the cli file is referenced and the execute method is executed.
instantiation
Eslint instantiation is mainly in cli-engine.js The CLIEngine does it. Let's take a look at what work it does:
- Merge configuration parameters and default parameters
- Instantiate object, in Linter Linter A Rules object will be instantiated in the constructor of class. When instantiating Rules, it will be read in the constructor lib/rules All the files (all the inspection rules) are stored in the map with the file name as the key and the absolute path as the value
const linter = new Linter({ cwd: options.cwd });constructor({ cwd } = {}) {
internalSlotsMap.set(this, {
cwd: normalizeCwd(cwd),
lastConfigArray: null,
lastSourceCode: null,
parserMap: new Map([["espree", espree]]),
ruleMap: new Rules()
});
this.version = pkg.version;
}- If rules is configured, check whether each item of rules is legal
- Instantiate Config, which stores all inspection rules and plug-ins
A will be returned after the instantiation of CLIEngine is completed CLIEngine Object, you can call the executeOnFiles (check multiple files) or executeOnText (check text) of the object to check the code.
verify && verifyAndFix
In fact, Eslint provides two code checking interfaces, executeOnFiles and executeOnText
executeOnFiles(patterns) {
    ...
    // Do lint.
    const result = verifyText({
        text: fs.readFileSync(filePath, "utf8"),
        filePath,
        config,
        cwd,
        fix,
        allowInlineConfig,
        reportUnusedDisableDirectives,
        fileEnumerator,
        linter
    });

    results.push(result);

    if (lintResultCache) {
        lintResultCache.setCachedLintResults(filePath, config, result);
    }

    if (lintResultCache) {
        lintResultCache.reconcile();
    }

    debug(`Linting complete in: ${Date.now() - startTime}ms`);
    let usedDeprecatedRules;

    return {
        results,
        ...calculateStatsPerRun(results),

        get usedDeprecatedRules() {
            if (!usedDeprecatedRules) {
                usedDeprecatedRules = Array.from(
                    iterateRuleDeprecationWarnings(lastConfigArrays)
                );
            }
            return usedDeprecatedRules;
        }
    };
}
From the code, we can see that executeOnFiles is executed verifyText Method. In the verifyText method, we see that the verifyAndFix method of linter is called, and then the result of the verifyAndFix method is encapsulated and returned directly to result, so we find the result of linter verifyAndFix method
verifyAndFix(text, config, options) {
    let messages = [],
        fixedResult,
        fixed = false,
        passNumber = 0,
        currentText = text;
    const debugTextDescription = options && options.filename || `${text.slice(0, 10)}...`;
    const shouldFix = options && typeof options.fix !== "undefined" ? options.fix : true;
    do {
        passNumber++;

        debug(`Linting code for ${debugTextDescription} (pass ${passNumber})`);
        messages = this.verify(currentText, config, options);

        debug(`Generating fixed text for ${debugTextDescription} (pass ${passNumber})`);
        //Perform the repair if necessary
        fixedResult = SourceCodeFixer.applyFixes(currentText, messages, shouldFix);

        if (messages.length === 1 && messages[0].fatal) {
            break;
        }

        // keep track if any fixes were ever applied - important for return value
        fixed = fixed || fixedResult.fixed;

        // update to use the fixed output instead of the original text
        currentText = fixedResult.output;

    } while (
        fixedResult.fixed &&
        passNumber < MAX_AUTOFIX_PASSES
    );

    if (fixedResult.fixed) {
        fixedResult.messages = this.verify(currentText, config, options);
    }

    // ensure the last result properly reflects if fixes were done
    fixedResult.fixed = fixed;
    fixedResult.output = currentText;

    return fixedResult;
}
Call directly if you need to repair SourceCodeFixer.applyFixes Method to repair the source code, and finally return a repaired result.
AST generation and creation
Now we can have a look runRules Method. In runRules, I see traverser Traverse method is to create an ast parser to parse ast objects.
Traverser.traverse(sourceCode.ast, {
    enter(node, parent) {
        node.parent = parent;
        nodeQueue.push({ isEntering: true, node });
    },
    leave(node) {
        nodeQueue.push({ isEntering: false, node });
    },
    visitorKeys: sourceCode.visitorKeys
});
In_ traverse Method, we can see that it is actually recursively traversing the nodes of our ast.
The abstract syntax tree is as follows: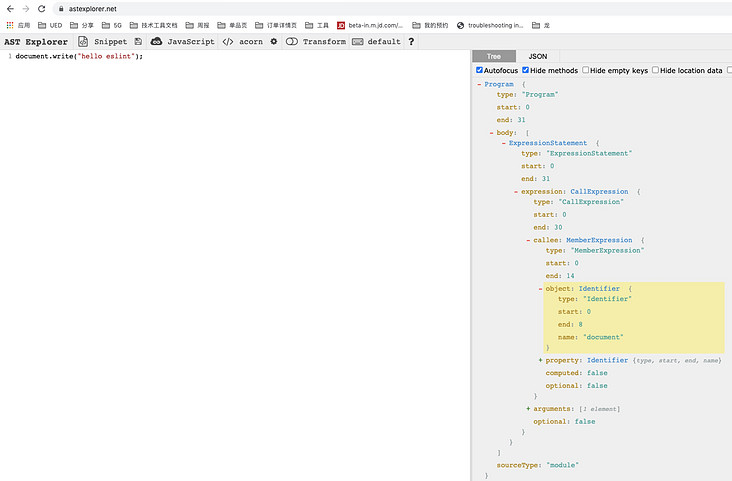
So how does traverser know which fields to traverse? Look at the attribute of type on the right side of the figure. The value of type is "program". In_ In the traserve method, I see this Code:
if (!this._skipped && !this._broken) {
    const keys = getVisitorKeys(this._visitorKeys, node);
    if (keys.length >= 1) {
        this._parents.push(node);
        for (let i = 0; i < keys.length && !this._broken; ++i) {
            const child = node[keys[i]];

            if (Array.isArray(child)) {
                for (let j = 0; j < child.length && !this._broken; ++j) {
                    this._traverse(child[j], node);
                }
            } else {
                this._traverse(child, node);
            }
        }
        this._parents.pop();
    }
}
So where do the keys come from? Find such a file
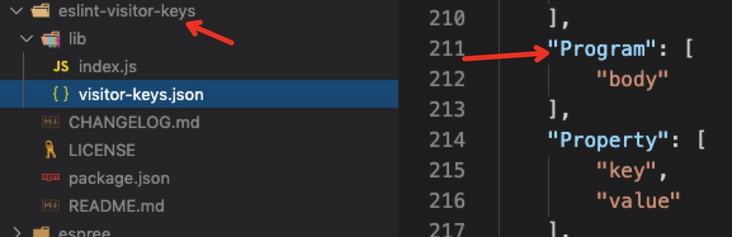
If the type of the current node is "Program", it will traverse the body value, and then repeat the recursion until the end.
Code check
After parsing the text into AST and creating the scope, Linter's runRules method will be called to call each rule check; First, the ast tree will be put into the queue to facilitate subsequent operations, and then all rules will be cycled. If the rule is open, the rule will be taken out of the cache. If the rule does not exist in the cache, the rule will be loaded (the default rule of eslint will be loaded into memory here). After obtaining the inspection rule, the rule will be registered, After all the rules are registered, traverse the ast nodes just put into the queue. When traversing each node, the corresponding check items will be triggered according to the type of the node. If there are errors, they will be saved in the context. After all the nodes are traversed, the check will end.
Code repair
Eslint's code fix is in the file source code fixer JS, implemented in SourceCodeFixer First, filter out the data without fix in the message to get the information to be repaired. In each repair message, there is a fix object, which is generated when checking in the corresponding rules. The fix object has two fields: range array and text, and range is a number with a length of 2, The first value represents the position from the previous repair condition to the repair condition, the second value represents the position of the next repair condition, and text represents the replacement content.
After knowing the message and repair rules, the next step is to describe the repair process. Eslint will create an empty output to store the repaired code and execute the repair conditions circularly. When the first repair condition executes the repair, intercept the content of the first value of the source code from 0 to range, append it to the output, and append the text of the repair content to the output, Then move the pointer from 0 to the second value end of the range. The next repair condition intercepts the source code from the previous end, and so on. Finally, add the remaining source code to the output to get a repaired source code; In order to realize the repair function more reliably, eslint converts the repaired source code into AST analysis and inspection again. If there is no repair content or it has been repaired for 10 times, it means that it cannot be further repaired, and the repair is over.
have a look attemptFix method:
function attemptFix(problem) {
    const fix = problem.fix;
    const start = fix.range[0];
    const end = fix.range[1];

    // Remain it as a problem if it's overlapped or it's a negative range
    if (lastPos >= start || start > end) {
        remainingMessages.push(problem);
        return false;
    }

    // Remove BOM.
    if ((start < 0 && end >= 0) || (start === 0 && fix.text.startsWith(BOM))) {
        output = "";
    }

    // Make output to this fix.
    output += text.slice(Math.max(0, lastPos), Math.max(0, start));
    output += fix.text;
    lastPos = end;
    return true;
}
The above is the implementation principle of the whole Eslint source code. Next, we will briefly talk about how to configure it.
to configure
You can configure ESLint in the following ways:
- Generally used Eslintrc's configuration file is configured. If it is placed in the root directory of the project, it will work on the whole project. If it is also included in the subdirectory of the project Eslintrc file, the configuration in the root directory will be ignored in the inspection of files in the subdirectory, and the configuration in the subdirectory will be directly adopted, which can apply different inspection rules in different directory ranges, which is more flexible. ESLint adopts the method of searching up step by step Eslintrc file, when the configuration item with "root": true is found When the eslintrc file is, it will stop looking up.
- In package Add eslintConfig configuration block to JSON;
Here's the Example and explanation of eslintrc file:
// .eslintrc.js
module.exports = {
    // Parse ES6
    'parser': 'babel-eslint',
    'parserOptions': {
        // Enable ES8 syntax support
        'ecmaVersion': 2017,
        // Module represents ECMAScript module
        'sourceType': 'module',
        // Use additional language features
        'ecmaFeatures': {
            'experimentalObjectRestSpread': true,
            'jsx': true,
            'modules': true,
        }
    },
    // These environments are not mutually exclusive, so you can define multiple environments at the same time
    'env': {
        'browser': true,
        'jquery': true,
        'node': true,
        'commonjs': true,
        'es6': true,
    },
    'root': true,
    // The no undef rule warns when accessing variables that are not defined in the current source file
    // So you need to define these additional global variables
    'globals': {
        'OnlySVG': true,
        'monitor': true,
        'CanvasRender': true,
        'Vue': true,
        'VueRouter': true
    },
    'rules': {
        // Variables must be assigned at the time of definition
        // @It is common for off to be defined before assignment
        'init-declarations': 0,
        // In jsx syntax, the value of an attribute must be in double quotation marks
        'jsx-quotes': [2, 'prefer-double'],
        // Rules for the use of spaces before and after colons in object literals
        // @off doesn't care
        'key-spacing': 0,
        // There must be a space before and after the keyword
        'keyword-spacing': 2,
        // Rules for use of line breaks
        // @off doesn't care
        'linebreak-style': 0,
        // Must a single line comment be written on the previous line or at the end of the line
        // @No limit off
        'line-comment-position': 0,
        // Do you want to leave a line blank before and after the comment
        // @off unlimited
        'lines-around-comment': 0,
        // The maximum block nesting depth is 5 layers
        'max-depth': [2, 5],
        // A defined variable name must not be used in a catch
        'no-catch-shadow': 2,
        // The class name defined by class must not be the same as other variables
        'no-class-assign': 2,
        // The ASCII representation of the Ctrl key, i.e., / \ x1f, is prohibited in regular expressions/
        'no-control-regex': 2,
        // Do not use eval
        'no-eval': 2,
        // Useless expressions are prohibited
        'no-unused-expressions': [2,
            {
                'allowShortCircuit': true, // A () | B or a & & B () is allowed
                'allowTernary': true, // Allow ternary operators in expressions
                'allowTaggedTemplates': true, // Allow tag Template Strings
            }
        ],
        // It is forbidden to define label s that are not used
        'no-unused-labels': 2,
        // It is forbidden to define variables that are not used
        'no-unused-vars': [2,
            {
                'vars': 'all', // Variable definitions must be used
                'args': 'none', // No detection for function parameters
                'ignoreRestSiblings': true, // Ignore the remaining children fn(...args), {a, B,... Coords}
                'caughtErrors': 'none', // Ignore the parameter usage of catch statement
            }
        ],
        // It is forbidden to use a variable before it is defined
        'no-use-before-define': [2,
            {
                'functions': false, // Allow functions to be called before definition
                'classes': false, // Allow classes to be referenced before definition
            }
        ],
        // The judgment condition of Yoda format is prohibited, such as if (true === a). if (a === true) should be used
        'yoda': 2,
    }
};
Specific configuration documents:- configuring
Specific rule documents:- rules
In addition to specifying rules in the configuration file, you can also specify rules in the code. The rules configured with comments in the code file will override the rules in the configuration file, that is, the priority should be higher. We usually use eslint disable next line
/* eslint-disable-next-line no-alert */
alert('foo');
summary
The whole Eslint source code simply follows the flow chart. The content may be limited. If you study it in depth, you will gain more,
It's meaningful for us to read the source code before using any framework or tool. I hope you can give me more advice on what's wrong.