Imagine a scenario where you have been working on your Web project for several months, which is likely to be a Web application and, more specifically, a "single page application". But now it's time to deliver and publish your application to millions of users and... Search engines. In order for your application to succeed, it must be indexed by the search engine, that is, you need to add SEO support!
We can put Angular Universal Universal is Angular for the Headless Web
You no longer need a browser container (also known as WebView) to run Angular. Because it has nothing to do with DOM, Angular can run anywhere there is a JavaScript runtime, such as node js.
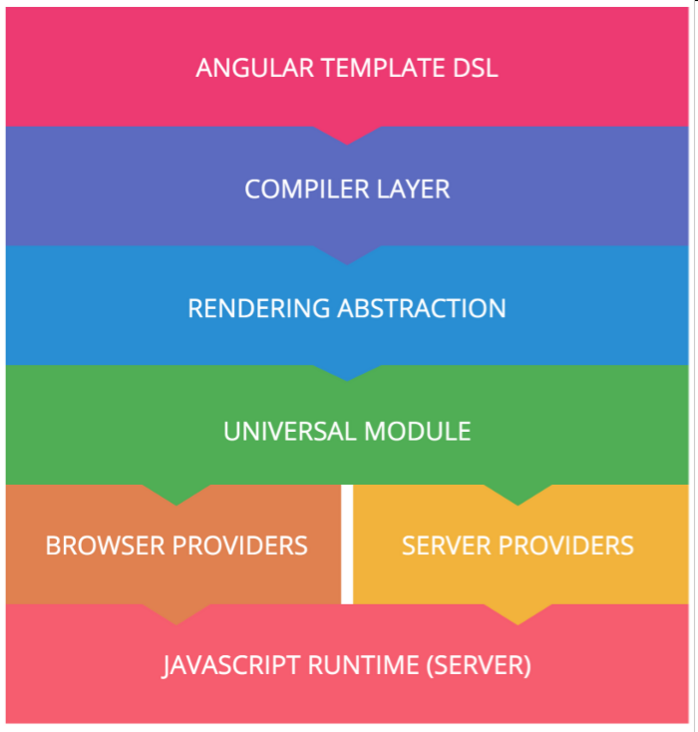
This figure illustrates Universal's ability to run a typical Angular Web application outside the browser. Obviously, we need a JavaScript runtime, which is our default support for node JS (supported by V8 engine). Of course, more and more other server-side technologies have emerged, such as PHP, Java, Python, Go
With Angular Universal, your application can be interpreted outside the browser -- let's take the server as an example -- the client requesting your SPA will receive a static full rendering page of the requested route / URL. This page contains all relevant resources, namely images, style sheets, Fonts... And even data passed in through the Angular service.
Universal can reconnect some of the default Angular provider implementations so that they can work on the target platform. When the client receives the rendered page, it will also receive the original Angular application - Angular Universal, which makes the application look almost instantly loaded in the browser. After loading, the Angular client application will handle the rest.
In fact, Universal and preboot JS libraries are bundled together, and their only role is to ensure that the two states are synchronized. Preboot. What JS does behind the scenes is simply and intelligently record events that occurred before the Angular boot program; And replay these events after Angular completes loading.
Universal is possible because of angular's rendering abstraction. In fact, when you write application code, this logic is parsed into ast by angular's compiler -- we really simplify things here. AST is then used by angular's rendering layer, which uses an abstract renderer that does not depend on DOM. Angular allows you to use different renderers. By default, angular comes with DOMRenderer, so your application can be rendered in the browser, which may be 95% of the use case.
This is where universal comes in. Universal comes with a bunch of pre renderers for all major technologies and build tools.
Dependency Injection and Providers
Another highlight of Angular is its DI system. In fact, Angular is the only front-end framework to implement this design pattern, which allows so many great tasks (such as control inversion) to be done easily. Thanks to DI, you can exchange two different implementations at run time, for example, which is widely used in testing.
At universal, we use this DI system to provide you with many target platform specific services. For Node, we provide a custom ServerModule, which implements the Node's server specific API, such as request, rather than the browser's XHR. Universal also comes with a Node specific custom renderer. Of course, we provide you with a bunch of pre renderers -- we call them -- such as the Express renderer or Webpack renderer for your Node back-end technology. For other non JavaScript technologies, such as NetCore or Java, you should also expect other pre renderers.
The good news is that the Universal Application is no different from the classic Angular application. The application logic actually remains the same.

Whenever possible, think twice before touching DOM directly. Each time you want to interact with the browser's DOM, make sure to use Angular Renderer or render abstractions.
The following figure shows the Angular Universal Application Structure
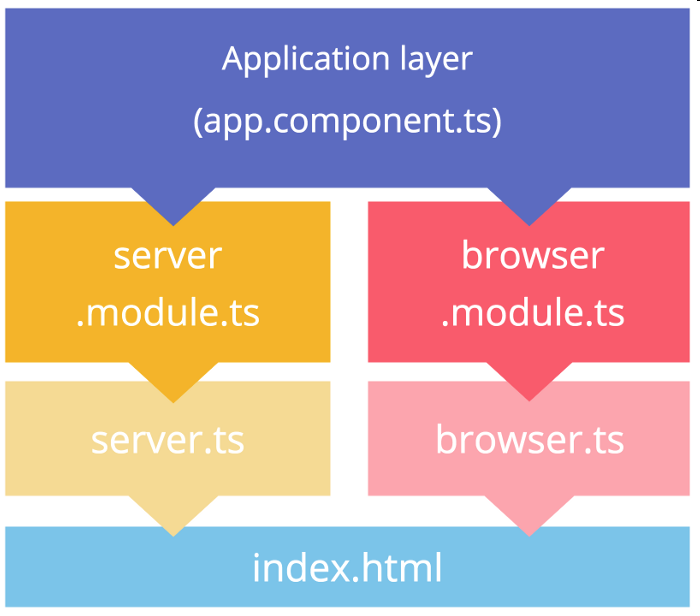
browser.module.ts
import { NgModule } from '@angular/core';
import { BrowserModule } from '@angular/platform-browser';
import { AppComponent } from './index';
@NgModule({
  bootstrap: [ AppComponent ],
  declarations: [ AppComponent ],
  imports: [
    BrowserModule.withServerTransition({appId: 'some-app-id'}),
    ...
  ]
})
export class AppBrowserModule {}
Note that you need to initialize the BrowserModule using the withServerTransition() method. This will ensure that browser based applications will transition from server rendered applications.
server.module.ts
This module is dedicated to your server environment. The ServerModule provides a set of provider s from the @ angular / platform server package
import { NgModule } from '@angular/core';
import { ServerModule } from '@angular/platform-server';
import { AppComponent, AppBrowserModule } from './browser.module';
@NgModule({
  bootstrap: [ AppComponent ],
  declarations: [ AppComponent ],
  imports: [
    ServerModule,
    AppBrowserModule,
    ...
  ]
})
export class AppServerModule {}
In AppServerModule, you should import both ServerModule and AppBrowserModule so that they share the same appId, that is, the transition ID used by AppBrowserModule.
client.ts
This file is responsible for booting your application on the client. There is nothing new here, just the usual boot process (in AOT mode):
import { platformBrowser } from '@angular/platform-browser';
import { AppModuleNgFactory } from './ngfactory/src/app.ngfactory';
import { enableProdMode } from '@angular/core';
enableProdMode();
platformBrowser().bootstrapModuleFactory(AppModuleNgFactory);
server.ts
This file is indeed specific to your server / back-end environment. Here, our goal is node JS, more accurately, the Express framework to handle all client requests and rendering processes. To this end, we are using and registering ngExpressEngine, which represents the Angular Universal rendering engine of Express (see the next paragraph):
import {
  platformServer,
  renderModuleFactory
} from '@angular/platform-server';
import {
  AppServerModuleNgFactory
} from './ngfactory/src/app.server.ngfactory';
import { enableProdMode } from '@angular/core';
import { AppServerModule } from './server.module';
import * as express from 'express';
import {ngExpressEngine} from './express-engine';

enableProdMode();

const app = express();

app.engine('html', ngExpressEngine({
  baseUrl: 'http://localhost:4200',
  bootstrap: [AppServerModuleNgFactory]
}));

app.set('view engine', 'html');
app.set('views', 'src')

app.get('/', (req, res) => {
  res.render('index', {req});
});

app.listen(8200,() => {
  console.log('listening...')
});
Develop a simple renderer for express:
const fs = require('fs');
const path = require('path');
import {renderModuleFactory} from '@angular/platform-server';

export function ngExpressEngine(setupOptions){
  return function(filePath, options, callback){
    renderModuleFactory(setupOptions.bootstrap[0], {
      document: fs.readFileSync(filePath).toString(),
      url: options.req.url
    })
    .then(string => {
      callback(null, string);
    });
  }
}
The only important part here is the renderModuleFactory method. What this method does is basically guide the Angular application into the virtual DOM tree parsed from the document, serialize the resulting DOM state into a string, and then pass it to the Express engine API.
Of course, you can add some caching mechanisms to this renderer to avoid reading from disk on each request. This is a simple example:
const fs = require('fs');
const path = require('path');
import {renderModuleFactory} from '@angular/platform-server';
const cache = new Map();
export function ngExpressEngine(setupOptions){
return function(filePath, options, callback){
if (!cache.has(filePath)){
const content = fs.readFileSync(filePath).toString();
cache.set(filePath, content);
}
renderModuleFactory(setupOptions.bootstrap[0], {
document: cache.get(filePath),
url: options.req.url
})
.then(string => {
callback(null, string);
});
}
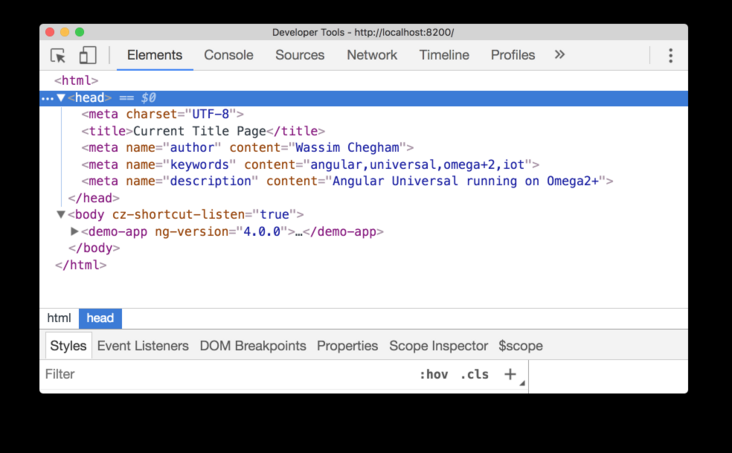
}Because you have complete control over what the server presents, you can easily add any SEO support you want. We can imagine using the Meta and Title provided by @ angular / Platform Browser:
import { Component } from '@angular/core';
import { Meta, Title } from "@angular/platform-browser";
@Component({
  selector: 'home-view',
  template: `<h3>Home View</h3>`
})
export class HomeView {
  constructor(seo: Meta, title: Title) {
    title.setTitle('Current Title Page');
    seo.addTags([
      {name: 'author', content: 'Wassim Chegham'},
      {name: 'keywords', content: 'angular,universal,iot,omega2+'},
      {
        name: 'description',
        content: 'Angular Universal running on Omega2+'
      }
    ]);
  }
}
The final effect is as follows:
More Jerry's original articles are: "Wang Zixi":