1, Preface:
I found that the information about Flowable on the Internet is basically superficial, and there are few instructions on how to build an enterprise level process application, so I wrote a practical series, hoping to be helpful to everyone and myself.
2, Meet Flowable
Flowable is a lightweight business process engine written in Java.
Flowable process engine can be used to deploy BPMN 2.0 process definitions, create process instances of these process definitions, query, and access running or historical process instances and related data.
Flowable is the fork of Activiti, that is, Flowable originates from Activiti. Therefore, we can see that many designs and implementations of Flowable are the same as Activiti.
open source floweable official website: https://www.flowable.com/open...
3, Complete instance
the Flowable official website tutorial has provided a very simple process running example, which is in English.
the following example content is from the official website tutorial. Students who have seen it can skip to the next section.
the example we will build is a simple holiday request process:
- How many days of leave does the employee apply for
- The manager approves or rejects the application
- We will simulate registering the application to an external system and send the result email to the employee
1. Create project
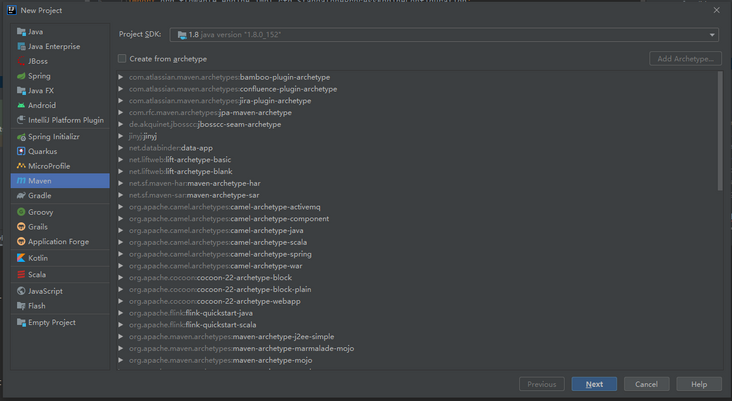
open the IDEA and click file - > New - > Project... - > Maven creates a new Maven project
in the next interface, fill in the project Name, GroupId and ArtifactId by default
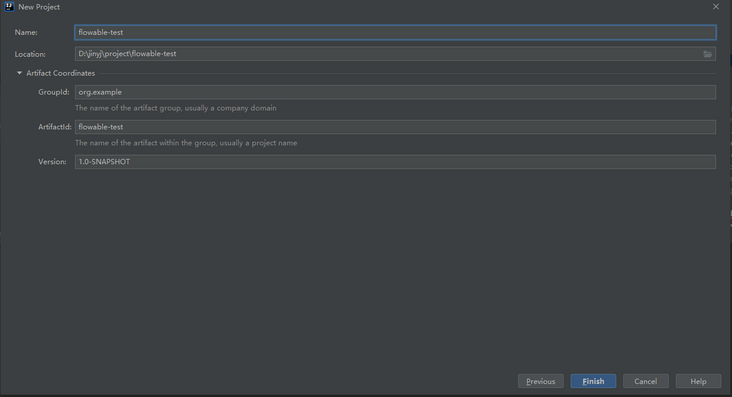
this creates an empty Maven project.
2. Create a process engine
add 3 dependencies to the project:
- Flowable process engine. Enables us to create a ProcessEngine process engine object and access the Flowable API.
- An in memory database. H2 in this example, because the Flowable engine needs to use the database to store execution and historical data when running the process instance.
- Log frame. Flowable uses SLF4J as the internal log framework. In this example, we use log4j as the implementation of SLF4J.
in POM Add the following lines to the XML file:
<dependencies>
  <dependency>
      <groupId>org.flowable</groupId>
      <artifactId>flowable-engine</artifactId>
      <version>6.7.2</version>
    </dependency>
    <dependency>
        <groupId>com.h2database</groupId>
        <artifactId>h2</artifactId>
        <version>1.3.176</version>
    </dependency>
    <dependency>
        <groupId>org.slf4j</groupId>
        <artifactId>slf4j-api</artifactId>
        <version>1.7.21</version>
    </dependency>
    <dependency>
        <groupId>org.slf4j</groupId>
        <artifactId>slf4j-log4j12</artifactId>
        <version>1.7.21</version>
    </dependency>
</dependencies>
Log4j requires a configuration file. Add Log4j. In the src/main/resources folder Properties file and write the following:
log4j.rootLogger=INFO, CA

log4j.appender.CA=org.apache.log4j.ConsoleAppender
log4j.appender.CA.layout=org.apache.log4j.PatternLayout
log4j.appender.CA.layout.ConversionPattern= %d{hh:mm:ss,SSS} [%t] %-5p %c %x - %m%n
Note: regarding the Remote Code Execution Vulnerability of Log4j, the scope of impact is Apache Log4j 2 X < = version 2.14.1, so the above log version is safe.
sometimes, depending on jars cannot be automatically obtained, you can right-click the project and select Maven - > reload project to force manual refresh.
create a new Java class and add the standard Java main method:
public class HolidayRequest {

    public static void main(String[] args) {

    }

}
the first thing to do is to initialize the ProcessEngine process engine instance. Create a ProcessEngineConfiguration instance and configure the database JDBC connection. The ProcessEngine instance is then created by the ProcessEngineConfiguration.
import org.flowable.engine.ProcessEngine;
import org.flowable.engine.ProcessEngineConfiguration;
import org.flowable.engine.impl.cfg.StandaloneProcessEngineConfiguration;

public class HolidayRequest {

    public static void main(String[] args) {

        ProcessEngineConfiguration cfg = new StandaloneProcessEngineConfiguration()
                .setJdbcUrl("jdbc:h2:mem:flowable;DB_CLOSE_DELAY=-1")
                .setJdbcUsername("sa")
                .setJdbcPassword("")
                .setJdbcDriver("org.h2.Driver")
                .setDatabaseSchemaUpdate(ProcessEngineConfiguration.DB_SCHEMA_UPDATE_TRUE);

        ProcessEngine processEngine = cfg.buildProcessEngine();
    }

}
Note: the in memory H2 database will disappear after the JVM restarts. If you need to permanently save data, you need to switch to the persistent database and switch the connection parameters accordingly.
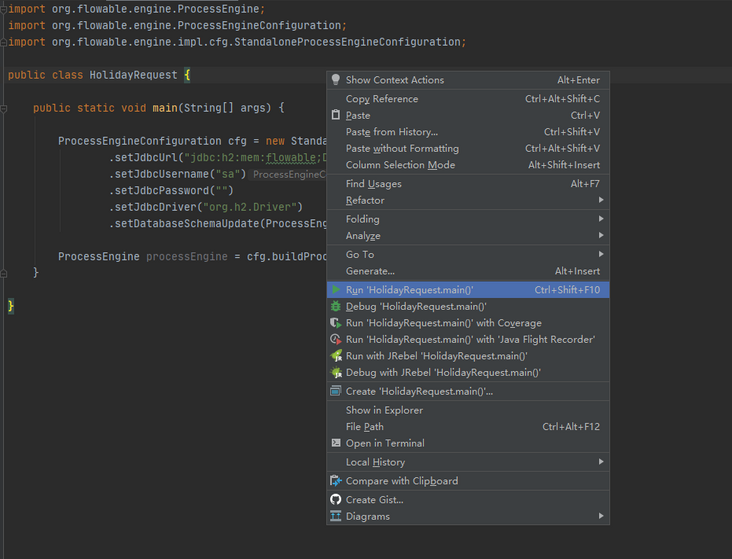
so it can run. The simplest method in IDEA is to right-click the class file and select Run 'holidayrequest main()' :
after running successfully, you should see the prompt log about engine startup and database table structure creation:

this gives you a process engine that can start. Next, provide a process for it!
3. Create a process definition file
the process we want to build is a very simple leave process. In Flowable terms, we call it a process definition. A process definition can start multiple process instances. A process definition can be seen as a blueprint for repeating a process. In this example, the process definition defines each step of asking for leave, and a process instance corresponds to a leave application submitted by an employee.
the process we want to use is defined as:
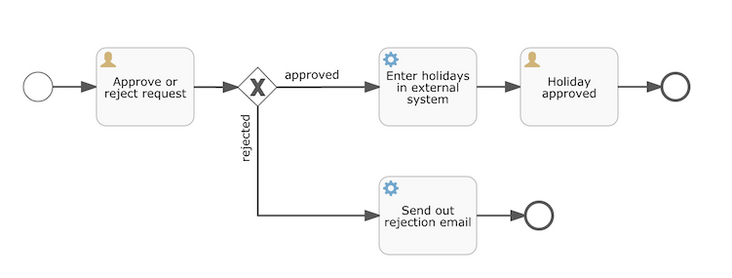
for clarity, explain the following points:
- Starting the process requires some information, such as the employee's name, the length of leave and a description..
- The circle on the left is called start event. This is the starting point for a process instance.
- The first rectangle is a user task. This is the step of human user operation in the process. In this example, the manager needs to approve or reject the application.
- Depending on the manager's decision, the exclusive gateway (diamond with cross) routes the process instance to the approval or rejection path.
- If approved, you need to register the application with an external system and notify the applicant of the manager's decision along with another user task.
- If rejected, an email is sent to the employee to inform him.
Note: Generally speaking, such process definitions are established using visual modeling tools, such as Flowable Designer(Eclipse) or Flowable Web Modeler(Web application). There is no official visualization plug-in in IDEA. The optional plug-in is Flowable BPMN visualizer.
save the following XML in the src/main/resources folder named holiday request bpmn20. XML file.
<?xml version="1.0" encoding="UTF-8"?>
<definitions xmlns="http://www.omg.org/spec/BPMN/20100524/MODEL"
  xmlns:xsi="http://www.w3.org/2001/XMLSchema-instance"
  xmlns:xsd="http://www.w3.org/2001/XMLSchema"
  xmlns:bpmndi="http://www.omg.org/spec/BPMN/20100524/DI"
  xmlns:omgdc="http://www.omg.org/spec/DD/20100524/DC"
  xmlns:omgdi="http://www.omg.org/spec/DD/20100524/DI"
  xmlns:flowable="http://flowable.org/bpmn"
  typeLanguage="http://www.w3.org/2001/XMLSchema"
  expressionLanguage="http://www.w3.org/1999/XPath"
  targetNamespace="http://www.flowable.org/processdef">

  <process id="holidayRequest" name="Holiday Request" isExecutable="true">

    <startEvent id="startEvent"/>
    <sequenceFlow sourceRef="startEvent" targetRef="approveTask"/>

    <userTask id="approveTask" name="Approve or reject request"/>
    <sequenceFlow sourceRef="approveTask" targetRef="decision"/>

    <exclusiveGateway id="decision"/>
    <sequenceFlow sourceRef="decision" targetRef="externalSystemCall">
      <conditionExpression xsi:type="tFormalExpression">
        <![CDATA[
          ${approved}
        ]]>
      </conditionExpression>
    </sequenceFlow>
    <sequenceFlow  sourceRef="decision" targetRef="sendRejectionMail">
      <conditionExpression xsi:type="tFormalExpression">
        <![CDATA[
          ${!approved}
        ]]>
      </conditionExpression>
    </sequenceFlow>

    <serviceTask id="externalSystemCall" name="Enter holidays in external system"
        flowable:class="CallExternalSystemDelegate"/>
    <sequenceFlow sourceRef="externalSystemCall" targetRef="holidayApprovedTask"/>

    <userTask id="holidayApprovedTask" name="Holiday approved"/>
    <sequenceFlow sourceRef="holidayApprovedTask" targetRef="approveEnd"/>

    <serviceTask id="sendRejectionMail" name="Send out rejection email"
        flowable:class="SendRejectionMail"/>
    <sequenceFlow sourceRef="sendRejectionMail" targetRef="rejectEnd"/>

    <endEvent id="approveEnd"/>

    <endEvent id="rejectEnd"/>

  </process>

</definitions>
each step (called activity in BPMN 2.0 terminology) has an id attribute that provides it with a unique identifier in the XML file. All activities can be given a name to improve the readability of the flowchart.
activities are connected through sequence flow, which is a directional arrow in the flowchart. When a process instance is executed, execution flows from the start event to the next activity in a sequential flow.
the sequential flow leaving the exclusive gateway (diamond with X) is very special: conditions are defined in the form of expression. When the execution of the process instance reaches the gateway, the condition is calculated and the first sequential flow that is calculated as true is used. This is the exclusive meaning: choose only one.
the expression used as a condition here is "${approved}", which is short for ${approved == true}. The variable 'approved' is called a process variable.
now that we have the process BPMN 2.0 XML file, we need to 'deploy' it to the engine.
4. Deployment process definition
to deploy the process definition to the Flowable engine, you need to use the repository service, which can be obtained from the ProcessEngine object. Using RepositoryService, you can create a new deployment through the path of the XML file and call the deploy() method to actually execute:
RepositoryService repositoryService = processEngine.getRepositoryService();
Deployment deployment = repositoryService.createDeployment()
  .addClasspathResource("holiday-request.bpmn20.xml")
  .deploy();
we can now verify that the process definition has been deployed in the engine through API query. Implemented through the ProcessDefinitionQuery object created by the repository service.
ProcessDefinition processDefinition = repositoryService.createProcessDefinitionQuery()
  .deploymentId(deployment.getId())
  .singleResult();
System.out.println("Found process definition : " + processDefinition.getName());
5. Start process instance
now that the process definition has been deployed in the process engine, you can use this process definition as a "blueprint" to start the process instance.
to start a process instance, you need to provide some initialization process variables. Generally speaking, these variables can be obtained through the form presented to the user or through the REST API when the process is automatically triggered by other systems. In this example, we simplify to use Java util. The scanner class enters some data on the command line:
Scanner scanner= new Scanner(System.in);

System.out.println("Who are you?");
String employee = scanner.nextLine();

System.out.println("How many holidays do you want to request?");
Integer nrOfHolidays = Integer.valueOf(scanner.nextLine());

System.out.println("Why do you need them?");
String description = scanner.nextLine();
next, we start a process instance using RuntimeService. The collected data is used as a Java util. The map instance is passed, and the key is the identifier used to obtain the variable. This process instance is started with a key. This key is the id attribute set in the BPMN 2.0 XML file. In this example, it is holidayRequest.
<process id="holidayRequest" name="Holiday Request" isExecutable="true">
RuntimeService runtimeService = processEngine.getRuntimeService();

Map<String, Object> variables = new HashMap<String, Object>();
variables.put("employee", employee);
variables.put("nrOfHolidays", nrOfHolidays);
variables.put("description", description);
ProcessInstance processInstance =
  runtimeService.startProcessInstanceByKey("holidayRequest", variables);
after the process instance is started, an execution will be created and placed on the start event. From here, the execution moves along the sequence flow to the user task approved by the manager, and executes the user task behavior. This behavior creates a task in the database that can be found later using a query. The user task is in a wait state. The engine will stop execution and return to the API call.
6. Query and complete tasks
we have not configured a handler for user tasks. We want to assign the first task to the managers group and the second user task to the submitter of the leave application. Therefore, you need to add the candidateGroups attribute for the first task and modify the process xml configuration file:
<userTask id="approveTask" name="Approve or reject request" flowable:candidateGroups="managers"/>
and add the assign attribute for the second task as shown below. Note that instead of using static values like 'managers' above, we use a dynamic assignment of process variables. This process variable is passed when the process instance is started:
<userTask id="holidayApprovedTask" name="Holiday approved" flowable:assignee="${employee}"/>to get the actual task list, you need to create a TaskQuery through TaskService. We configure this query to return only the tasks of the 'managers' group:
TaskService taskService = processEngine.getTaskService();
List<Task> tasks = taskService.createTaskQuery().taskCandidateGroup("managers").list();
System.out.println("You have " + tasks.size() + " tasks:");
for (int i=0; i<tasks.size(); i++) {
  System.out.println((i+1) + ") " + tasks.get(i).getName());
}
you can use the task Id to obtain the variables of a specific process instance and display the actual application on the screen:
System.out.println("Which task would you like to complete?");
int taskIndex = Integer.valueOf(scanner.nextLine());
Task task = tasks.get(taskIndex - 1);
Map<String, Object> processVariables = taskService.getVariables(task.getId());
System.out.println(processVariables.get("employee") + " wants " +
    processVariables.get("nrOfHolidays") + " of holidays. Do you approve this?");
the operation results are as follows:
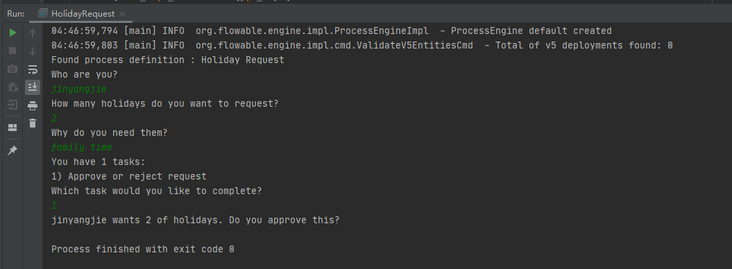
the manager can finish the task now. In reality, this usually means that the user submits a form. The data in the form is passed as process variables. Here, we pass the variable with 'approved' when completing the task (this name is very important because it will be used in the conditions of sequential flow later!) To simulate:
boolean approved = scanner.nextLine().toLowerCase().equals("y");
variables = new HashMap<String, Object>();
variables.put("approved", approved);
taskService.complete(task.getId(), variables);
now the task is completed, and one of the two paths leaving the exclusive gateway will be selected based on the 'approved' process variable.
7. Implement JavaDelegate
one piece of code is missing: we have not implemented the automatic logic executed after the application is passed. In BPMN 2.0 XML, this is a service task:
<serviceTask id="externalSystemCall" name="Enter holidays in external system"
    flowable:class="org.flowable.CallExternalSystemDelegate"/>
in reality, this logic can do anything: launch an HTTP REST service call to a system, or call the legacy code in a system that has been used for decades. We will not implement the actual logic here, but just a simple logging process.
create a new JAVA class with CallExternalSystemDelegate as the class name. Let this class implement org flowable. engine. delegate. Javadelegate interface and implement the execute method:
import org.flowable.engine.delegate.DelegateExecution;
import org.flowable.engine.delegate.JavaDelegate;
public class CallExternalSystemDelegate implements JavaDelegate {
public void execute(DelegateExecution execution) {
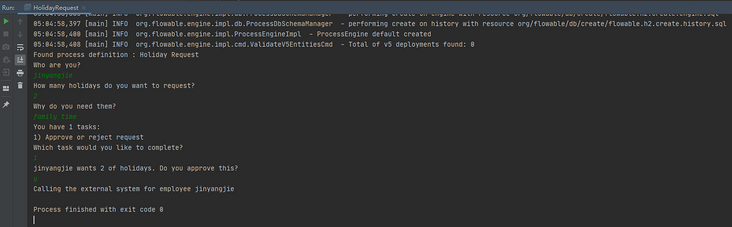
System.out.println("Calling the external system for employee "
+ execution.getVariable("employee"));
}
}when the arrival service task is executed, the class referenced in BPMN 2.0 XML will be initialized and called.
when this example is executed, the log information will be displayed, indicating that the custom logic has been implemented:
Note: if the error "org.flowable.common.engine.api.flowableexception: couldn't instance class CallExternalSystemDelegate" appears, it means that the package path is not specified correctly. In the xml file, modify it according to the actual path of your CallExternalSystemDelegate class:
<serviceTask id="externalSystemCall" name="Enter holidays in external system"
                    flowable:class="CallExternalSystemDelegate"/>
8. Use historical data
Flowable can automatically store the data of all process instances.
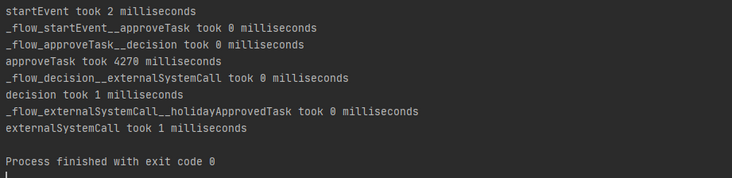
for example, if you want to display the execution time of the process instance, you can obtain the HistoryService from the ProcessEngine and create a query for historical activities. In the following code snippet, we can see that we have added some additional filter conditions:
- Select only one activity for a specific process instance
- Select only completed activities
the results are sorted according to the end time, representing their execution order.
HistoryService historyService = processEngine.getHistoryService();
List<HistoricActivityInstance> activities =
  historyService.createHistoricActivityInstanceQuery()
   .processInstanceId(processInstance.getId())
   .finished()
   .orderByHistoricActivityInstanceEndTime().asc()
   .list();

for (HistoricActivityInstance activity : activities) {
  System.out.println(activity.getActivityId() + " took "
    + activity.getDurationInMillis() + " milliseconds");
}
run the example again, and you can see the following display in the console:
9. Summary
this tutorial introduces many concepts and terms of Flowable and BPMN 2.0, and also shows how to program and use the Flowable API.