git command steps
Programmer A
git init
git add . # Add to staging area
git commit -m "init app" # Submit to local warehouse
# Associate to remote warehouse and alias the address
git remote add origin https://gitee.com / remote warehouse address git
git push origin master # Push local master branch to remote master branch
git checkout -b dev # Create and switch branches
git push origin dev # Push local dev branch to remote dev branch
Programmer B
git clone https://gitee.com / remote warehouse address git
git checkout -b dev origin/dev
git branch
# When programmer A updates the dev branch
git pull origin dev
In fact, all branches of the project have been pulled locally during cloning, but dev branches have not been created locally. Therefore, create a local dev branch according to the remote dev branch.

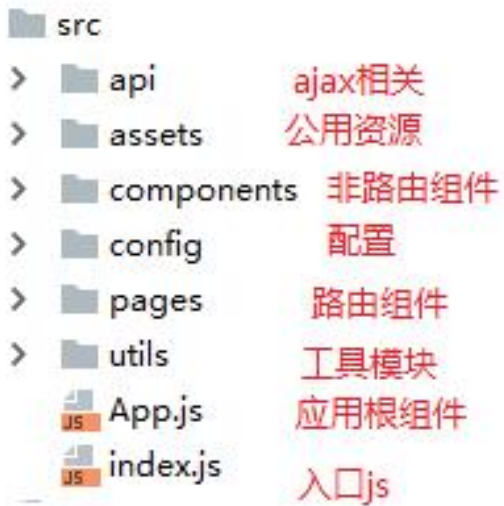
Basic structure
Introducing antd
Custom theme
react family bucket video using antd 3 The theme is introduced and customized on demand in the way of X. except that the less loader version needs to be reduced, others are completed smoothly. This method no longer needs to introduce antd CSS file

This time according to antd 4 The official document of X does not need to be configured and imported on demand, but it should be in index JS import 'antd / dist / antd less'.
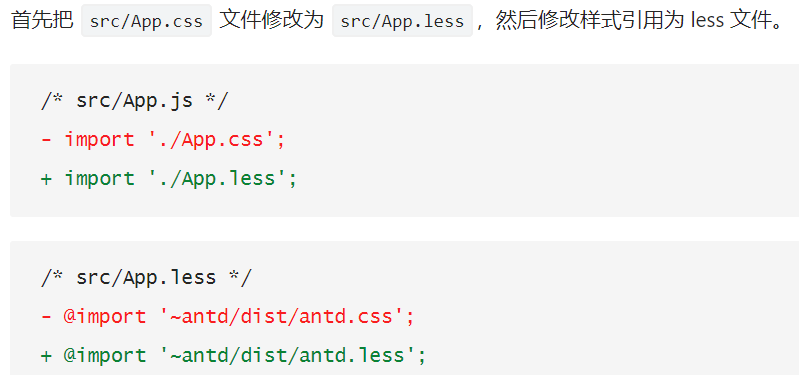
But there was a problem defining the theme:
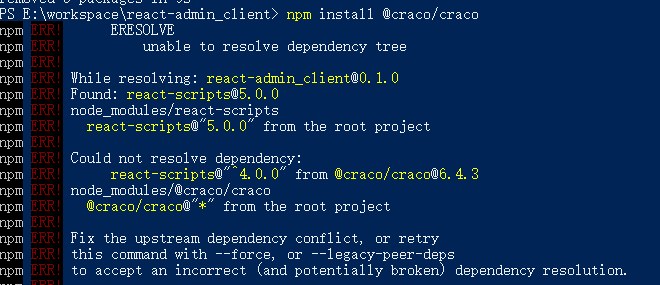
terms of settlement: Article link
NPM I -- legacy peer DEPs @ craco / craco. This method solves dependency conflicts and will not overwrite existing ones
npm i --legacy-peer-deps craco-less
Other articles
I don't know the consequences, but it was realized

Introduction routing
The concept of mapped routing (registered routing) has been forgotten...
The biggest problem is that the react router DOM V6 and v5 (previously learned) vary greatly and can be modified according to the blog. Teacher Zhang Tianyu P127-P141 I also updated the explanation video of v6. I'd better learn it first. Then, the project will first reduce the version ("react router DOM": "^ 5.3.0"), unless it cannot be used.
Version change of v6 , it can be used after modification, but the current level of v6 cannot continue.
<BrowserRouter>
  <Switch> // Only one is matched, otherwise multiple routing components appear
     <Route path='/login' component={Login}></Route>
     <Route path='/' component={Admin}></Route>
  </Switch>
</BrowserRouter>
Login routing component
Note 1:
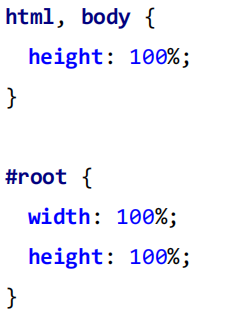
There is no label at the beginning, so the height is 0, which needs to be in reset CSS sets the width and height of the largest box
Note 2:
In the less style file, the image background image: URL ('. / images / BG. JPG') can be introduced in the form of relative path;
It is not allowed in the tag of jsx. The correct operation is: load the image module first, and the logo is a dynamic variable, and then assign it to the tag attribute
import logo from './images/logo.png'
<img src={logo} alt="logo" />
Note 3:
display: Flex -- I didn't learn flex layout, Rookie tutorial, get started quickly
Elements with Flex layout are called Flex containers, or "containers" for short. All its child elements automatically become container members, which are called Flex items, or "items" for short. When set to Flex layout, the float, clear and vertical align attributes of child elements will be invalidated. Therefore, the properties of the container and the properties of the item are involved.
antd - Form
antd3.x and 4 X is still very different, so the document must prevail
- Different form submission events

<Form name="normal_login" className="login-form" initialValues={{remember: true,}} onFinish={onFinish}>
- Icon icon is different
import {Icon} from 'antd'

import { UserOutlined} from '@ant-design/icons';
<Input prefix={<UserOutlined className="site-form-item-icon" />} placeholder="Username" />
Prefix: input with prefix icon. The attribute value is ReactNode (i.e. label structure)
Foreground form verification and data collection
- Different ways to obtain data
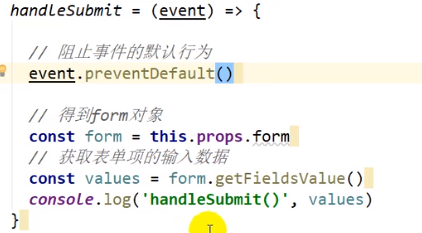
3.x version:
First, wrap the Login component and pass an object, this, to the form component inside props. Form received. There are many methods to get data from the form object.

4.x version
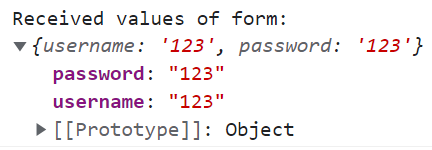
The onFinish attribute of the Form component receives the event handling function, calls the function to automatically transfer the Form data values, and does not trigger the Form submission (page refresh)
onFinish = (values) => {
    console.log('Received values of form: ', values);
};
Extension: 3 X higher order components
Form.create () is a high-level component. Note: This is called the component tag, which is the instantiation of the component. Class login extensions component is called a component.

Extension: 4 X interaction with form data
We recommend using form Useform creates a form data field for control. If it is under class component, you can also get the data field through ref.
formRef = React.createRef();
<Form ref={this.formRef} name="normal_login" onFinish={this.onFinish}>
onFill = () => {
	this.formRef.current.setFieldsValue({
		username: 'admin',
		password: '123456',
	});
};
Of course, forms find data by identifying names.
Form Validation
It is divided into input verification (declarative verification, user-defined verification) and pre submission verification
Form.Item property

solve:

FormInstance

Perform declarative verification according to the built-in verification rules, and add object elements for rules = {[,,]}
Custom form verification rules:
rules={[
	{
      validator: (_, value) =>
      value ? Promise.resolve() : Promise.reject(new Error('Should accept agreement')),
	},
]}

Verification before submission

So you don't need to verify the form in the onFinish callback function, validateFields return example
 onFinish = (values) => {
   this.formRef.current.validateFields().then(values => {
        const { username, password } = values
        console.log('Submit login request', username, password);
    }).catch(error => {
        console.log(error.errorFields)
    })
};
Current login routing component code
Thank you for completing 4 Version x code, At least for reference
import React, { Component } from 'react'
import { Form, Input, Button } from 'antd';
import { UserOutlined, LockOutlined } from '@ant-design/icons';
import './login.less'

import logo from './images/logo.png'

const Item = Form.Item // Cannot be written before import

/*
    Logged in routing component
*/
export default class login extends Component {
    formRef = React.createRef();

    validator = (rule, value) => {
        const pwdReg = /^[a-zA-Z0-9_]+$/
        if (!value) {
            return Promise.reject("Please input your Username")
        } else if (!pwdReg.test(value)) {
            return Promise.reject("has illegal chars")
        } else if (value.length < 5) {
            return Promise.reject("no less than 5 chars")
        } else if (value.length > 12) {
            return Promise.reject("no more than 12 chars")
        } else {
            return Promise.resolve()
        }
    }

    onFinish = (values) => {
        const { username, password } = values;
        console.log('Submit login request', username, password);
    };

    onFinishFailed = (values, errorFields, outOfDate) => {
        values.errorFields.map((x) => {
            return console.log(x.errors);
        });
    };

    onReset = () => {
        this.formRef.current.resetFields();
    };
    onFill = () => {
        this.formRef.current.setFieldsValue({
            username: 'admin',
            password: '123456',
        });
    };

    render() {
        return (
            <div className="login">
                <header className="login-header">
                    <img src={logo} alt="logo" />
                    <h1>React project: Background management system</h1>
                </header>
                <section className="login-content">
                    <h3>User login</h3>
                    <Form
                        name="normal_login"
                        className="login-form"
                        initialValues={{
                            remember: true,
                        }}
                        onFinish={this.onFinish}
                        onFinishFailed={this.onFinishFailed}
                        ref={this.formRef}
                    >
                        <Item
                            name="username"
                            // Declarative validation according to built-in validation rules
                            rules={[
                                { required: true, message: 'Please input your Username!' },
                                { pattern: /^[a-zA-Z0-9_]+$/, message: 'has illegal chars' },
                                { min: 5, message: 'no less than 5 chars' },
                                { max: 12, message: 'no more than 12 chars' },
                            ]}
                            validateFirst="false"
                        >
                            <Input prefix={<UserOutlined className="site-form-item-icon" />} placeholder="Username" />
                        </Item>
                        <Form.Item
                            name="password"
                            rules={[
                                // { required: true, message: 'Please input your Password!' },
                                { validator: this.validator }
                            ]}
                        >
                            <Input
                                prefix={<LockOutlined className="site-form-item-icon" />}
                                type="password"
                                placeholder="Password"
                            />
                        </Form.Item>
                        <Form.Item>
                            <Button type="primary" htmlType="submit" className="login-form-button">
                                Log in
                            </Button>
                            <Button htmlType="button" onClick={this.onReset}>
                                Reset
                            </Button>
                            <Button type="link" htmlType="button" onClick={this.onFill}>
                                Fill form
                            </Button>
                        </Form.Item>
                    </Form>
                </section>
            </div>
        )
    }
}