Based on the Office core technology independently developed by Yongzhong Software Co., Ltd. for more than ten years, Yongzhong cloud service platform provides a variety of Saas services for document processing and processing, and realizes a variety of functions such as document online preview, document online editing, document format conversion and so on.
This blog mainly introduces the basic implementation principle of handwritten signing and approval on online preview documents based on React in Yongzhong online preview products.
First of all, let's experience the signing and approval effect as a whole, as shown in Figure 1 below. The whole signing and approval includes five functions: brush, wireframe, text, signature and seal. This blog takes the signing function as an example. Other functions can be experienced on the official website. Portal: Yongzhong cloud service. 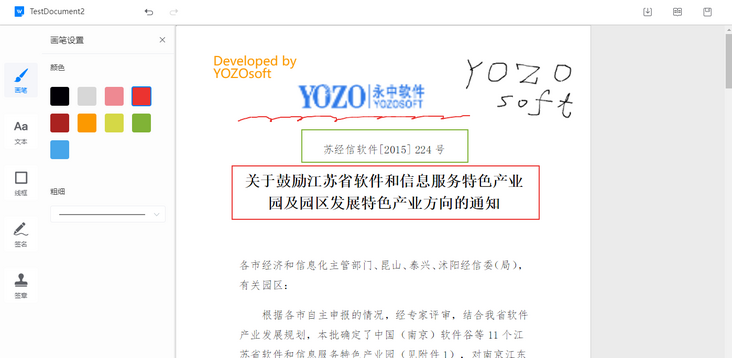
Figure 1 Overall effect display of handwritten endorsement
0. Some thoughts
Maybe you are a front-end boss reading this blog, so it should be a review of React. But if you are still a new comer in the front end, I believe you will feel full of dry goods after reading this blog ~. However, before reading this blog, I still hope you have a certain foundation of React Hooks, Reducer, TypeScript and Canvas. No more nonsense, let's get straight to the point!
1. Introduction
You may be curious about "another collision" in the title. I believe you are no stranger to the modern front-end mainstream framework Vue or React. In essence, they are closer to declarative programming, while the drawing of Canvas is more inclined to imperative programming, that is, you must tell the browser how to draw with the exposed 2D context at each step. After the above analysis, the two seem to belong to different categories, but when you think about it carefully, they actually have combined cases, and the use scenarios have been very extensive in the front-end field (such as large screen and big data display), right! That's ECharts. During the initialization of ecarts, you can specify whether the renderer renderer [1] uses Canvas or SVG for rendering. However, no matter what rendering method is based on, most coder s still focus on the convenience of ecarts out of the box and the call of various rich API s, and few people pay attention to the underlying rendering logic. This blog will take you to appreciate the completely different use scenarios between the above two and ECharts - Document handwritten signing and approval, and explain in detail how the two can be perfectly combined in combination with the underlying rendering and data management logic.
2. Event monitoring
In the whole signing process, the mouse (PC end) and gesture (mobile end) involved are nothing more than three actions: falling, dragging and lifting. The changes of relevant States in signing are also caused by these three actions. Therefore, after creating the canvas, you first need to listen to the events involved in these three actions. The approximate code is as follows:
/* React Functional Component */
export default memo(function CanvasLayer(props: ICanvasLayerProps) {
    // ......
    // Monitor mouse / finger drop
    const canvasRef = useRef({} as HTMLCanvasElement)  // Define an empty ref object and assert it as the Canvas element type
    /* PC Function object corresponding to end event listening */
    const onMouseDown = useCallback(() => {/* do something... */}, [...deps])
    const onMouseMove = useCallback(() => {/* do something... */}, [...deps])
    const onMouseUp = useCallback(() => {/* do something... */}, [...deps])
    /* Function object corresponding to mobile terminal event listening */
    const onTouchStart = useCallback(() => {/* do something... */}, [...deps])
    const onTouchMove = useCallback(() => {/* do something... */}, [...deps])
    const onTouchEnd = useCallback(() => {/* do something... */}, [...deps])
    useEffect(() => {
        if (canvasRef && canvasRef.current) {
            const canvasEl = canvasRef.current  // Get canvas element
            /* Add the event handling functions defined above for the three action events */
            canvasEl.onmousedown = onMouseDown
            canvasEl.onmousemove = onMouseMove
            canvasEl.onmouseup = onMouseUp
            canvasEl.ontouchstart = onTouchStart
            canvasEl.ontouchmove = onTouchMove
            canvasEl.ontouchend = onTouchEnd
        }
    }, [canvasRef, onMouseDown, onMouseMove, onMouseUp, onTouchStart, onTouchMove, onTouchEnd]) // Dependency must be set correctly
    // ......
    return useMemo(() => {
        return (
            // JSX ......
            // Here, the canvasRef object is bound to the canvas element. pageWidth and pageHeight are the width and height of a page to be signed and approved
            <CanvasWrapper ref={canvasRef} width={pageWidth} height={pageHeight} signState={false}  />
        )
    }, [...deps])
})

/* Styled Component */
/* CSS Module or styled component can be used for style definition. The philosophy of the latter follows all in JS, that is, React writes HTML as JSX, while styled component writes CSS as JS, which can be perfectly integrated with React components. Therefore, I use the latter, If you are interested, you can refer to the official website [2] and learn about the new features of ES6's [tag module string], which will not be repeated here */
import styled from 'styled-component'
interface IProps {
  width: number;
  height: number;
}
export const CanvasLayerWrapper = styled.canvas.attrs<IProps>((props) => ({
  width: props.width,
  height: props.height,
}))<{ signState: boolean }>`
  position: absolute;
  top: 0;
  bottom: 0;
  left: 0;
  right: 0;
  // Raise the Canvas level during drawing
  z-index: ${props => props.signState ? '99' : '9'};
`;
It can be seen that once the external state (including the type, color, thickness and size of batch drawing) changes (corresponding to the hook dependency useCallback), the event handling function will also change in response to achieve various drawing effects, which also reflects the advantages of combining modern frameworks.
Of course, you may think that it is unnecessary for the event handler to wrap a layer of useCallback around the periphery. Every time the component is re rendered due to the change of data in state, context, props and redux, doesn't the reference of the event handler object also change? It is true, but the meaning of useCallback is to optimize performance, which will be mentioned later in this blog~
3. Data structure design
A well-designed data structure can minimize the subsequent maintenance cost and improve the overall robustness.
Then, how should the data structure be designed for the handwritten endorsement of the front-end H5 page? First, since all projects use TypeScript, the fields in the data structure should also be type constrained by TypeScript. From the perspective of differentiation, a curve on a plane coordinate axis is actually a point set composed of many (x, y) coordinate points. If you have used Matplotlib in python Pyplot has drawn curves. The simplest demo also needs to define two groups of one-dimensional arrays, namely the coordinate points corresponding to the x-axis and y-axis respectively. More options are similar to curve color, curve thickness and curve type. When you need to draw multiple curves on a coordinate axis, it is best to define two sets of two-dimensional arrays. After careful analysis, handwritten endorsement has many similarities with it:
- Canvas also has its own coordinate axis, which can rotate and translate freely by manipulating ctx;
- You also need to set the fill color fillStyle or thickness lineWidth for drawing in Canvas;
- A single stroke drawn in the batch can be regarded as a curve on the Canvas coordinate axis, but this curve is very irregular, and multiple strokes naturally correspond to multiple curves.
The final data structure is a three-dimensional array in the innermost layer (the lowest dimension) because it needs to implement signing and approval on multiple pages (but for ease of description, the following defaults to a single page), and each page corresponds to multiple strokes, and each stroke corresponds to its own (x, y) point set, Each element is an object (description of each attribute of the drawn point). After the above analysis, I define the interface type of the object as follows:
interface Point {
  x: number;  // x. The Y coordinate value is relative to the coordinates of the upper left corner of the canvas
  y: number;
  t?: number;  // The timestamp (optional) is taken from the event s of the three actions to calculate and determine the speed of drawing
  f?: number;  // Function type (optional), because not all points are recorded during drawing or during dragging, but this blog does not describe dragging. Its essence is to monitor the above three actions
}
In the array corresponding to the outer layer, each element is a stroke. I also define the interface type corresponding to each stroke as follows:
interface Figure {
  initX: number;  // Coordinates of the upper left corner of the smallest circumscribed rectangle enclosed by each point of the stroke
  initY: number;
  initW: number;
  initH: number;
  paintStyle: PaintStyle;  // The default drawing type of this blog is the brush
  points: Point[];  // ***A Point set consisting of points of the above Point type***
  color: string;  // stroke color
  thickness: number; // stroke weight
  active: boolean;  // Whether the box is selected to activate
  timeStamp: number;  // Timestamp when the minimum bounding rectangle is generated
}
Therefore, the data in a single page is stored as Figure [].
4. Status management*
React has its own state management tool: Redux. Generally, in the single page rich application SPA, cross component data and requested data are generally stored in the above state management tool, and the change of state can be tracked by using the browser development tool plug-in. In view of the convenience brought to development, there is no doubt about using it for state management. However, the react framework itself provides a way of cross component data sharing, that is, context (essentially similar to the internal state of the component, but it can be directly shared to sub components and deep components without layer by layer transmission). Therefore, in the community, it has become a major topic about which kind of shared state management to choose. Personally, I think this is determined by the specific business scenario. How to manage the status of handwritten signing and approval can be analyzed as follows:
- Firstly, in order to ensure the smoothness of the drawn curve (note that the use of the throttle function is essentially limited here), the drawing must be drawn frame wise / tick wise, that is, at a real-time rate of about 16ms, which means that the state changes very frequently every time;
- Secondly, the data states stored in Redux are traceable. When and where to switch some UI visual states and other key states during de bug ging are the key to troubleshooting. However, once the above frequent state changes are stored in Redux, it is obvious that the useful state switching records that need to be seen will be overwritten. Moreover, frequent access to Redux itself is not recommended.
Therefore, handwritten endorsement uses context to share data:
/* Sign off component entry */
interface ISignContext {
  paintColor: string;
  paintThickness: number;
  figures: Figure[];
  /* The actual state that needs to be stored is much more than the above */
  paintStyle: -1 as PaintStyle,
  configPanelShown: false,
  paintFontsize: 16,
  paintShape: LineBBoxShape.RECT,
  signNames: [],
  signStamps: [],
  signModalShown: false,
  historyRecords: [],
  historyStages: [],
}
export const SignContext = createContext({} as ISignContext)
export default memo(function PcSign(props: ISignProps) {
    // ...
    return useMemo(() => {
        return (
            <SignContext.Provider value={{ paintColor: xxx, paintThickness: xxx, ...... }}>
                {/* JSX...... */}
            </SignContext.Provider>
        )
    }, [...deps])
}
Although the above process of using context does achieve cross component data sharing, and consumer components can get responsive data. However, there are too many managed status fields to be managed centrally, and the content provided by the provider component is also piled up, which is not conducive to later maintenance.
So, how to keep the use of context and conform to the concept of redux centralized data management? The answer is to use useReducer, another additional hook provided by React that can be used inside the component. The hook needs to pass in a reducer, which defines the action s to be sent to change the managed state, how to change it, whether the change still depends on other states, and the initial value of the state and whether it is lazy initialization (optional). useReducer returns the current value of the status and is used for the dispatcher dispatcher of the mutate status. For specific rules, please refer to the official document [3].
/* in reducer.ts */
/* Is the initial state defined exactly the same as the reducer defined in redux? */
export const initState: ISignState = {
  drawable: false,  // Allow drawn switches
  origin: {} as Point,  // The starting point of a point set in a drawing process
  points: [] as Point[],  // Point set formed by one drawing process
  figureArr: [] as Array<{ points: Point[] }>,  // Corresponding strokes on a single canvas
  /* The fields corresponding to more complex business logic are omitted below */
  // ......
};
/* Ensure that the reducer must be a Pure Function */
export default function reducer(state = initState, action: IAction): ISignState {
  const { payload } = action;  // Get the load carried by the distributed action
  switch (action.type) {
    case actionType.TOGGLE_DRAWABLE:  // Each actionType name is a constant defined in advance
      return { ...state, drawable: payload };  // Trigger react response by shallow copy (can optimize points)
    case actionType.CHANGE_ORIGIN:
      return { ...state, origin: payload };
    case actionType.ADD_POINT:
      return { ...state, points: [...state.points, payload] };
    case actionType.CLEAR_POINTS:
      return { ...state, points: [] };
    case actionType.PUSH_FIGURE:
      return { ...state, figureArr: [...state.figureArr, payload] };
    case actionType.CLEAR_FIGURE:
      return { ...state, figureArr: [] };
    default:
      return state;
  }
}
Since useReducer returns the state of centralized management and takes the powerful state changing dispatcher, why not make a perfect match with the context and pass them in as the provided values of the components? Compared with the large number of fields passed in above, isn't this method wonderful? Combined with object enhanced writing, it is simple to explode! Moreover, because the returned state itself is responsive, and the overall object shared by the context can be changed accordingly, it ensures that the value obtained in the consumer component is always responsive. If you set the hooks dependencies correctly, you can use them safely.
The improvements are as follows:
/* Provider component */
interface ISignContext {
  state: ISignState; // Centrally managed state
  dispatcher: React.Dispatch<IAction>;  // Change the dispatcher of state
}
export const SignContext = createContext({} as ISignContext)
export default memo(function PcSign(props: ISignProps) {
    // ......
    const [state, dispatcher] = useReducer(reducer, initState);
    // ......
    return useMemo(() => {
        return (
            <SignContext.Provider value={{ state, dispatcher }}>
                {/* JSX...... */}
            </SignContext.Provider>
        )
    }, [...deps])
})
/* Consumer component (any deep level) to extract shared data */
const {state, dispatcher} = useContext(SignContext)
const {/*...*/} = state
5. Complete one-time drawing process
Now that the event listening processing function has been added, the data structure has been defined, and the centralized management state and the method to change the state have been obtained, let's see how to realize the complete drawing process in combination with the above contents.
5.1 things to do when mouse down / finger down
First, we need to get the corresponding event object, which is exactly the same as the general processing of click events. We won't repeat it here. Through this event object, we can obtain a lot of valuable information:
const {clientX, clientY} = event  // Relative to the coordinate value of the upper left corner of the screen, the mobile end needs to get the finger to press, touch = event touches[0];  const {clientX, clientY} = touch
const {timeStemp} = event  // The time stamp corresponding to the event, which is used to judge the speed of drawing later
However, it would be a big mistake to draw only based on clientX and clientY. Because they are always coordinate values relative to the upper left corner of the screen. Finally, the coordinates actually drawn should be relative to the origin of the initial coordinate axis of canvas. Well, if you don't understand, go straight to the picture above! As shown in Figure 2 below, taking the y-axis coordinate as an example, the y value of the drawn point should be clientY minus the distance offsetY from the canvas element to the top of the screen (the specific scene may involve more complex calculations, which is just a simple demo here).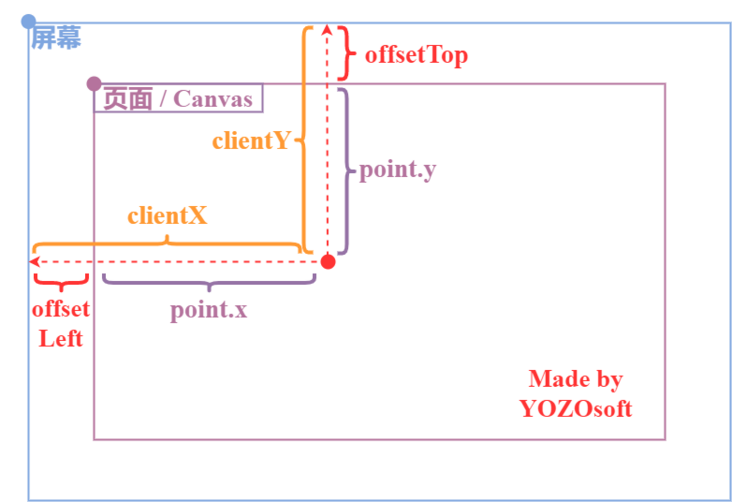
Figure 2 Draw the schematic diagram of coordinate calculation
Finally, the event handling function corresponding to this action is as follows:
const {state, dispatcher} = useContext(SignContext)
const onMouseDown = useCallback(
  (e: any) => {
    const { offsetLeft, offsetTop } = initializePaint(e);  // This encapsulated function is to calculate the distance between the canvas element and the top of the screen
    const origin = {
      x: e.clientX - offsetLeft,
      y: e.clientY - offsetTop,
      t: e.timeStamp.toFixed(0),
    } as Point;  // Determines the starting point of the drawing process
    dispatcher({ type: _actionType.TOGGLE_DRAWABLE, payload: true });  // Change state to paintable state
    dispatcher({ type: _actionType.CHANGE_ORIGIN, payload: origin });  // Record the starting point of drawing
    dispatcher({ type: _actionType.ADD_POINT, payload: origin });  // Add plot points to the cache point set
  },
  [dispatcher, state],
);
After defining the above centralized management status and its dispatcher, you can change the status and directly distribute it in a few lines. Everything becomes so simple!
5.2 things to do when dragging / sliding the mouse / finger
This action is the core of the whole drawing.
const onMouseMove = useCallback(  // It should be noted that every time 1px is moved, the function here will be called back
  (e: any) => {
    if (!paintState.drawable) return;  // If it is not paintable, exit directly
    const { offsetLeft, offsetTop } = initializePaint(e);  // Also get the distance of the canvas element relative to the upper left corner of the screen
    const endInTick = {
      x: e.clientX - offsetLeft,
      y: e.clientY - offsetTop,
      t: e.timeStamp.toFixed(0),
    } as Point;  // Determine the points passed in the drawing process, that is, the points recorded at the end of each frame
    /* Draw the core frame by frame [tick wise painting] */
    const ctx = canvasRef.current.getContext('2d')!;  // Get the 2D rendering context object corresponding to the canvas element
    paint(ctx, state.origin, endInTick);  // Pass in the point at the end of the previous frame and the point at the end of the current frame to draw
    dispatcher({ type: _actionType.ADD_POINT, payload: endInTick });  // Adds a passing point to the cache point set
    dispatcher({ type: _actionType.CHANGE_ORIGIN, payload: endInTick });  // Taking the end point of this frame as the starting point of the next frame (if any) is a differential idea
  },
  [dispatcher, state],
);
/* utils.ts in */
export function paint(  // be careful! This function is called from frame to frame, and the call frequency is very high
  ctx: CanvasRenderingContext2D,
  origin: Point,
  end: Point,
  lineWidth: number = 2,
  color: string = 'black') {
      // ......  Key source code omitted
      ctx.beginPath();  // Path start
      ctx.fillStyle = color;  // Fill color
      for (let i = 0; i <= curve.d; i++) {
        let x = origin.x + (i * (end.x - origin.x)) / curve.d;  // Calculate the next drawing point (circle center)
        let y = origin.y + (i * (end.y - origin.y)) / curve.d;
        ctx.moveTo(x, y);  // Move drawing start point
        ctx.arc(x, y, curve.w, 0, 2 * Math.PI, false);  // Draw small dots with the line width as the radius
      }
      ctx.closePath();  // End of path
      ctx.fill();  // Fill path
}
5.3 things to do when releasing the mouse / lifting the finger
In the event handling function corresponding to this action, the main work is to finish.
const onMouseUp = useCallback(
  (e: any) => {
    dispatcher({
      type: _actionType.PUSH_FIGURE,
      payload: { points: state.points },
    });  // Add the cache point set to the point set of the stroke object to form a stroke
    dispatcher({ type: _actionType.CHANGE_ORIGIN, payload: {} });  // Reset drawing start point
    dispatcher({ type: _actionType.CLEAR_POINTS });  // Clear cache point set
    dispatcher({ type: _actionType.TOGGLE_DRAWABLE, payload: false });  // Change state to non paintable state
  },
  [dispatcher, state],
);
6. Performance optimization
If you see this patiently and carefully, I'm sure you'll find that I always emphasize the correct filling of hooks (including usememo and usecallback) dependencies in this blog. Why do basically all reference data types in the component need to be wrapped with such hooks? The answer is to optimize performance. Of course, when the GPU has strong computing power, that is, the browser has strong redrawing and rendering ability, combined with the support of the V8 engine in the newer version of Chrome, the drawing of handwritten endorsement must be quite smooth and smooth. In this case, there is really no need to do too much performance optimization, which is time-consuming and laborious. However, when users use a PC with a poor core display CPU and only a CPU, and use a lower version of Chrome or even evil IE, there is bound to be a drawn Caton.
In Section 4 status management of this blog, the problem of frequent (frame by frame) status update is mentioned. In React, even if memo is used to wrap functional components, it can not fundamentally avoid the unnecessary re rendering problem caused by different shallow comparisons. If the re rendering of sub components or deeper components is caused by frequent update of state, it is quite fatal for performance. However, by manually adding dependencies for useMemo and useCallback, the coder can specify which responsive objects will change the returned object reference, so as to trigger the re rendering of sub components on demand / deterministically.
In fact, the handwritten endorsement introduced in this blog can be further optimized. For example, in the reducer function, the incoming initState must be changed by shallow copy to trigger the response of React. At present, some excellent libraries in the front-end community, such as immer[4] and immutableJS[5], can speed up the judgment of React on different objects, so as to avoid the performance loss caused by shallow copies of a large number of or large complex objects.
7. Summary
Through the small case of handwritten signature and approval, I believe everyone has more or less a new understanding of Canvas, especially React. Yes, React has higher flexibility than Vue, and can play a lot of tricks by making good use of JSX. But everything is a double-edged sword. The price of high flexibility is a higher threshold, and stronger JS skills are needed to better "control" it. Finally, if there are deficiencies in this blog, please give me more advice~
8. Reference links
- [1] ECharts initialization
- [2] Styled Components
- [3] React-Hooks-useReducer
- [4] Immer
- [5] ImmutableJS