

Mean ambiguity: the values of each element in the convolution kernel are equal and the sum is equal to 1, that is, the pixel value obtained after convolution is the average value of each pixel value in its neighborhood.
Median blur: select the median of all pixels in the neighborhood to replace the original color.
Gaussian blur: the convolution kernel used is called Gaussian kernel, which is a square filter kernel. The calculation of each element is based on the following Gaussian equation:
Among them, σ Is the standard variance (generally 1), and x and y respectively correspond to the integer distance from the current position to the center of the convolution kernel.
Gaussian equation well simulates the influence of each pixel in the neighborhood on the current processing pixel. The closer the distance, the greater the influence. The higher the dimension of Gaussian kernel, the greater the degree of ambiguity.
Using an NxN Gaussian check image for convolution filtering requires NxNxWxH(W and H are the width and height of the image respectively) texture sampling. As the size of N increases, the number of samples becomes very large. We can split this two-dimensional Gaussian function into two one-dimensional functions. In other words, we can use two one-dimensional Gaussian kernels to filter the image successively. The results obtained by them are the same as those obtained by directly using two-dimensional Gaussian kernels, but the sampling times only need 2xNxWxH. We can further observe that the two one-dimensional Gaussian kernels contain many repeated weights. For a one-dimensional Gaussian kernel with a size of 5, we only need to record three weight values.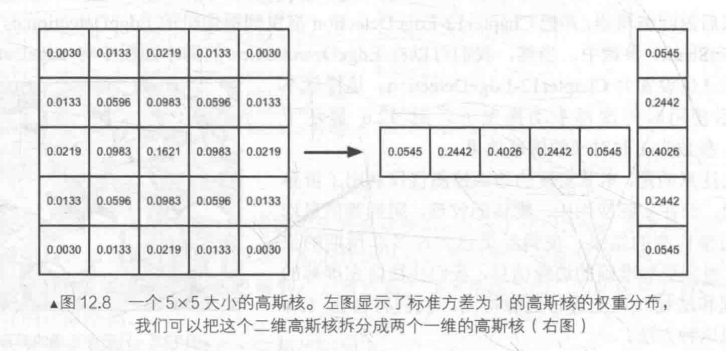
Post processing code:
using UnityEngine;
using System.Collections;

public class GaussianBlur : PostEffectsBase {

	public Shader gaussianBlurShader;
	private Material gaussianBlurMaterial = null;

	public Material material {
		get {
			gaussianBlurMaterial = CheckShaderAndCreateMaterial(gaussianBlurShader, gaussianBlurMaterial);
			return gaussianBlurMaterial;
		}
	}

	// Number of Gaussian fuzzy iterations
	[Range(0, 4)]
	public int iterations = 3;

	// Fuzzy range
	[Range(0.2f, 3.0f)]
	public float blurSpread = 0.6f;

    // Parameters of scaling factor
	[Range(1, 8)]
	public int downSample = 2;

	/// 1st edition: just apply blur
	***

	/// 2nd edition: scale the render texture
    ***

	/// 3rd edition: use iterations for larger blur
    ***
}
Both bluespread and downSample are based on performance considerations. When the dimension of Gaussian kernel remains unchanged_ The larger the BlurSize, the higher the degree of blur, but the number of samples will not be affected, but too large_ BlurSize values can cause ghosting. The larger the downSample is, the fewer pixels need to be processed. At the same time, it can further improve the degree of blur, but too large downSample may make the image pixelated.
(1)1st edition: just apply blur
void OnRenderImage(RenderTexture src, RenderTexture dest) {
		if (material != null) {
			int rtW = src.width;
			int rtH = src.height;
			RenderTexture buffer = RenderTexture.GetTemporary(rtW, rtH, 0);

			// Render the vertical pass
			Graphics.Blit(src, buffer, material, 0);
			// Render the horizontal pass
			Graphics.Blit(buffer, dest, material, 1);

			RenderTexture.ReleaseTemporary(buffer);
		} else {
			Graphics.Blit(src, dest);
		}
	}
Different from the implementation in the previous two sections, we use rendertexture The gettemporary function allocates a buffer of the same size as the screen image. This is because Gaussian blur needs to call two passes. We need to use an intermediate cache to store the blur results obtained after the execution of the first Pass. As the code shows, we first call graphics BLIT (src, buffer, material, 0), uses the first Pass in the Shader (i.e. filtering with one-dimensional Gaussian kernel in the vertical direction) to process src, and stores the results in the buffer. Then, call graphics BLIT (buffer, DeST, material, 1) processes the buffer using the second Pass in the Shader (i.e. filtering with one-dimensional Gaussian kernel in the horizontal direction) and returns the final screen image. Finally, we need to call rendertexture Release temporary to release the previously allocated cache.
(2) Second Edition: scale the render texture downsamples the image by scaling, so as to reduce the number of pixels to be processed and improve the performance
	void OnRenderImage (RenderTexture src, RenderTexture dest) {
		if (material != null) {
			int rtW = src.width/downSample;
			int rtH = src.height/downSample;
			RenderTexture buffer = RenderTexture.GetTemporary(rtW, rtH, 0);
			buffer.filterMode = FilterMode.Bilinear;

			// Render the vertical pass
			Graphics.Blit(src, buffer, material, 0);
			// Render the horizontal pass
			Graphics.Blit(buffer, dest, material, 1);

			RenderTexture.ReleaseTemporary(buffer);
		} else {
			Graphics.Blit(src, dest);
		}
	}
Different from the first version of the code, when we declare the size of the buffer, we use a size smaller than the original screen resolution, and set the filtering mode of the temporarily rendered texture to bilinear (buffer.filterMode = FilterMode.Bilinear). In this way, when calling the first Pass, the number of pixels we need to process is a fraction of the original. Downsampling the image can not only reduce the number of pixels to be processed and improve the performance, but also get better blur effect with appropriate downsampling. Although the higher the downSample value, the better the performance, too large downSample may cause the image to be pixelated.
(3) 3rd edition: use iterations for larger blur
	void OnRenderImage (RenderTexture src, RenderTexture dest) {
		if (material != null) {
			int rtW = src.width/downSample;
			int rtH = src.height/downSample;

			RenderTexture buffer0 = RenderTexture.GetTemporary(rtW, rtH, 0);
			buffer0.filterMode = FilterMode.Bilinear;

			Graphics.Blit(src, buffer0);

			for (int i = 0; i < iterations; i++) {
				material.SetFloat("_BlurSize", 1.0f + i * blurSpread);

				RenderTexture buffer1 = RenderTexture.GetTemporary(rtW, rtH, 0);

				// Render the vertical pass
				Graphics.Blit(buffer0, buffer1, material, 0);

				RenderTexture.ReleaseTemporary(buffer0);
				buffer0 = buffer1;
				buffer1 = RenderTexture.GetTemporary(rtW, rtH, 0);

				// Render the horizontal pass
				Graphics.Blit(buffer0, buffer1, material, 1);

                // Free buffer1 for the next cycle
				RenderTexture.ReleaseTemporary(buffer0);
				buffer0 = buffer1;
			}

			Graphics.Blit(buffer0, dest);
			RenderTexture.ReleaseTemporary(buffer0);
		} else {
			Graphics.Blit(src, dest);
		}
	}
The code above shows how to alternate between iterations using two temporary caches. Before the iteration, we first define the first buffer buffer 0, and store the image in src in buffer 0 after scaling. During the iteration, we define the second buffer buffer 1. When executing the first Pass, the input is buffer0 and the output is buffer1. After that, first release buffer0, then store the result value buffer1 in buffer0, reassign buffer1, and then call the second Pass to repeat the above process. After the iteration, buffer0 will store the final image, and we will use graphics BLIT (buffer 0, DeST) displays the results on the screen and releases the cache.
The shader code is as follows:
Shader "Unity Shaders Book/Chapter 12/Gaussian Blur" {
	Properties {
		_MainTex ("Base (RGB)", 2D) = "white" {}
		_BlurSize ("Blur Size", Float) = 1.0
	}
	SubShader {
		CGINCLUDE

		#include "UnityCG.cginc"

		sampler2D _MainTex;
		half4 _MainTex_TexelSize;    //Used to calculate the offset of texture coordinates of adjacent pixels
		float _BlurSize;

		struct v2f {
			float4 pos : SV_POSITION;
			half2 uv[5]: TEXCOORD0;
		};

		v2f vertBlurVertical(appdata_img v) {
			v2f o;
			o.pos = UnityObjectToClipPos(v.vertex);

			half2 uv = v.texcoord;

			o.uv[0] = uv;
			o.uv[1] = uv + float2(0.0, _MainTex_TexelSize.y * 1.0) * _BlurSize;
			o.uv[2] = uv - float2(0.0, _MainTex_TexelSize.y * 1.0) * _BlurSize;
			o.uv[3] = uv + float2(0.0, _MainTex_TexelSize.y * 2.0) * _BlurSize;
			o.uv[4] = uv - float2(0.0, _MainTex_TexelSize.y * 2.0) * _BlurSize;

			return o;
		}

		v2f vertBlurHorizontal(appdata_img v) {
			v2f o;
			o.pos = UnityObjectToClipPos(v.vertex);

			half2 uv = v.texcoord;

			o.uv[0] = uv;
			o.uv[1] = uv + float2(_MainTex_TexelSize.x * 1.0, 0.0) * _BlurSize;
			o.uv[2] = uv - float2(_MainTex_TexelSize.x * 1.0, 0.0) * _BlurSize;
			o.uv[3] = uv + float2(_MainTex_TexelSize.x * 2.0, 0.0) * _BlurSize;
			o.uv[4] = uv - float2(_MainTex_TexelSize.x * 2.0, 0.0) * _BlurSize;

			return o;
		}

		fixed4 fragBlur(v2f i) : SV_Target {
			float weight[3] = {0.4026, 0.2442, 0.0545};

			fixed3 sum = tex2D(_MainTex, i.uv[0]).rgb * weight[0];

			for (int it = 1; it < 3; it++) {
				sum += tex2D(_MainTex, i.uv[it*2-1]).rgb * weight[it];
				sum += tex2D(_MainTex, i.uv[it*2]).rgb * weight[it];
			}

			return fixed4(sum, 1.0);
		}

		ENDCG

		ZTest Always Cull Off ZWrite Off

		Pass {
			NAME "GAUSSIAN_BLUR_VERTICAL"

			CGPROGRAM

			#pragma vertex vertBlurVertical
			#pragma fragment fragBlur

			ENDCG
		}

		Pass {
			NAME "GAUSSIAN_BLUR_HORIZONTAL"

			CGPROGRAM

			#pragma vertex vertBlurHorizontal
			#pragma fragment fragBlur

			ENDCG
		}
	}
	FallBack "Diffuse"
}
This time, CGINCLUDE is used in SubShader Endcg defines a series of codes that do not need to be included in any Pass semantic block. When using, we only need to directly specify the function names of vertex shader and slice shader in Pass. CGINCLUDE is similar to the function of header file in C + +. Because Gaussian blur needs to define two passes, but they use the same chip shader code. Using CGINCLUDE can avoid us writing two identical frag functions.
We use the NAME semantics to define the NAME for two passes, and define the NAME for Pass, which can be used in other The Pass is used directly by their names in the Shader without having to write code repeatedly.
(this section is so difficult...)