32.OpenCV face detection and recognition - face detection
preface
face detection refers to the process of locating faces in images.
1, Face detection based on Haar
use the Haar cascade classifier provided by OpenCV for face detection. The folder "\ data\haarcascades" in the OpenCV source code contains the trained Haar cascade classifier files:
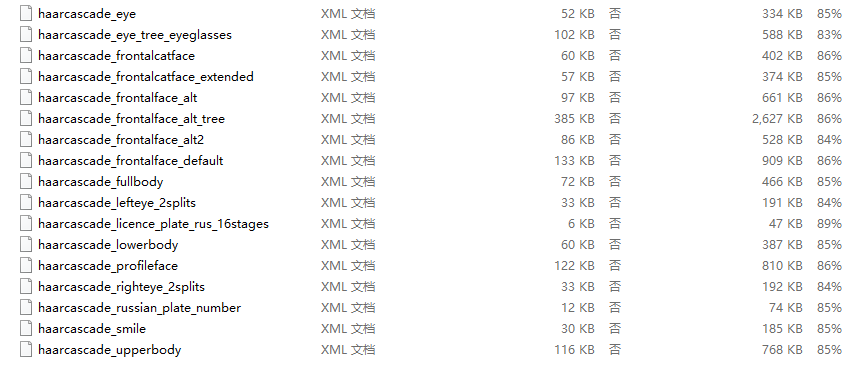
haarcascade_eye.xml: human eye detection
haarcascade_eye_tree_eyeglasses.xml: glasses detection
haarcascade_frontalcatface.xml: cat face detection
haarcascade_frontalface_alt.xml: face detection
haarcascade_frontalface_default.xml: face detection
haarcascade_profileface.xml: side face detection
CV2 in OpenCV The cascadeclassifier() function is used to load the classifier. Its basic format is as follows:
faceClassifier = cv2.CascadeClassifier(filename)

faceClassifier Cascade classifier object returned for
filename File name for cascade classifier
the detectMultiScale() function of cascade classifier object is used to perform detection. Its basic format is as follows:
object = faceClassifier.detectMultiScale(image[, scaleFactor[, minNeighbors[, flags[, minSize[, maxSize]]]]])

object Is the target rectangle returned, Face in rectangle
image Input image for, Usually grayscale image
scaleFactor Scale image
minNeighbors Is the minimum number of adjacent rectangles that make up the target rectangle
flags In lower versions OpenCV 1.x Used in, This parameter is usually omitted in later versions
minSize Is the minimum size of the target rectangle
maxSize Is the maximum size of the target rectangle
1. Face detection using Haar cascade classifier
use haarcascade_frontalface_default.xml and haarcascade_eye.xml classification detector detects faces and eyes in the image.
# Using Haar cascade detector (face eye)
import cv2

img = cv2.imread("heard.jpg")
gray = cv2.cvtColor(img, cv2.COLOR_BGR2GRAY)
cv2.imshow("face", img)

face = cv2.CascadeClassifier("haarcascade_frontalface_default.xml")

eye = cv2.CascadeClassifier("haarcascade_eye.xml")

faces = face.detectMultiScale(gray)
for x, y, w, h in faces:
    cv2.rectangle(img, (x, y), (x + w, y + h),(255, 0, 0), 2)
    roi_eye = gray[y : y + h , x : x + w]
    eyes = eye.detectMultiScale(roi_eye)
    for ex, ey, ew, eh in eyes:
        cv2.circle(img[y : y + h , x : x + w], (int(ex + ew / 2) , int(ey + eh / 2)), int(max(ew, eh) / 2), (0,255,0), 2)

cv2.imshow("face detect", img)
cv2.waitKey(0)
cv2.destroyAllWindows()
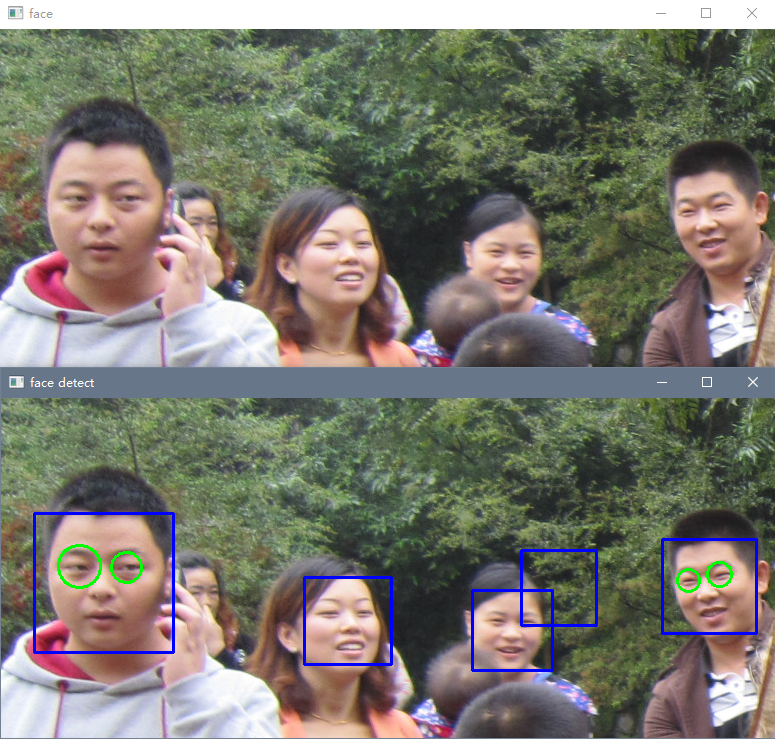
2. Cat face detection using Haar cascade classifier
the following code uses haarcascade_frontalcatface.xml classification detector detects the cat face in the image.
# Using Haar cascade detector (cat face)
import cv2
img = cv2.imread("cat2.jpg")
gray = cv2.cvtColor(img, cv2.COLOR_BGR2GRAY)
cv2.imshow("face_cat", img)

face = cv2.CascadeClassifier("haarcascade_frontalcatface.xml")

faces = face.detectMultiScale(gray)
for x, y, w, h in faces:
    cv2.rectangle(img, (x, y), (x + w, y + h),(255, 0, 0), 2)

cv2.imshow("face_cat detect", img)
cv2.waitKey(0)
cv2.destroyAllWindows()
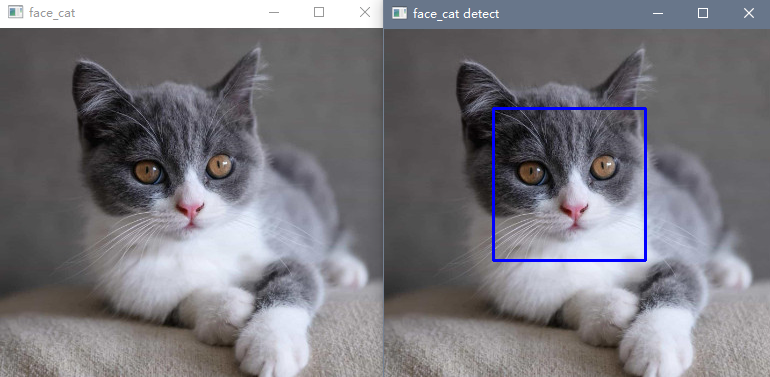
3. Framework program for face detection using Haar cascade classifier
Haar cascade classifier can also be used to run with framework program. The example code is as follows:
import cv2

def plot_rectangle(image, faces):
    for (x, y, w, h) in faces:
        cv2.rectangle(image, (x, y), (x+w, y+h), (255, 255, 0), 5)
    return image

def main():
    image = cv2.imread("2.jpg")
    cv2.imshow("Image",image)
    gray = cv2.cvtColor(image, cv2.COLOR_BGR2GRAY)
    face_alt2 = cv2.CascadeClassifier("haarcascade_frontalface_default.xml")
    face_alt2_detect = face_alt2.detectMultiScale(gray)
    face_alt2_result = plot_rectangle(image.copy(), face_alt2_detect)
    cv2.imshow("face", face_alt2_result)
    cv2.waitKey(0)
    cv2.destroyAllWindows()

if __name__ == '__main__':
    main()
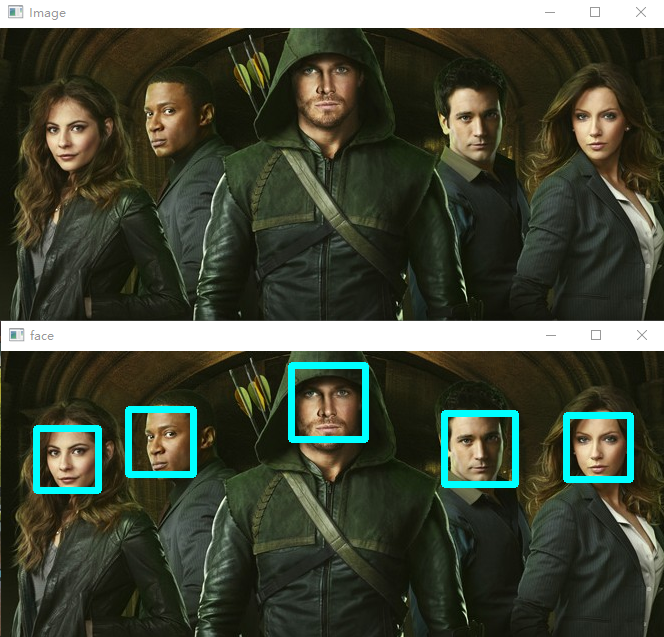
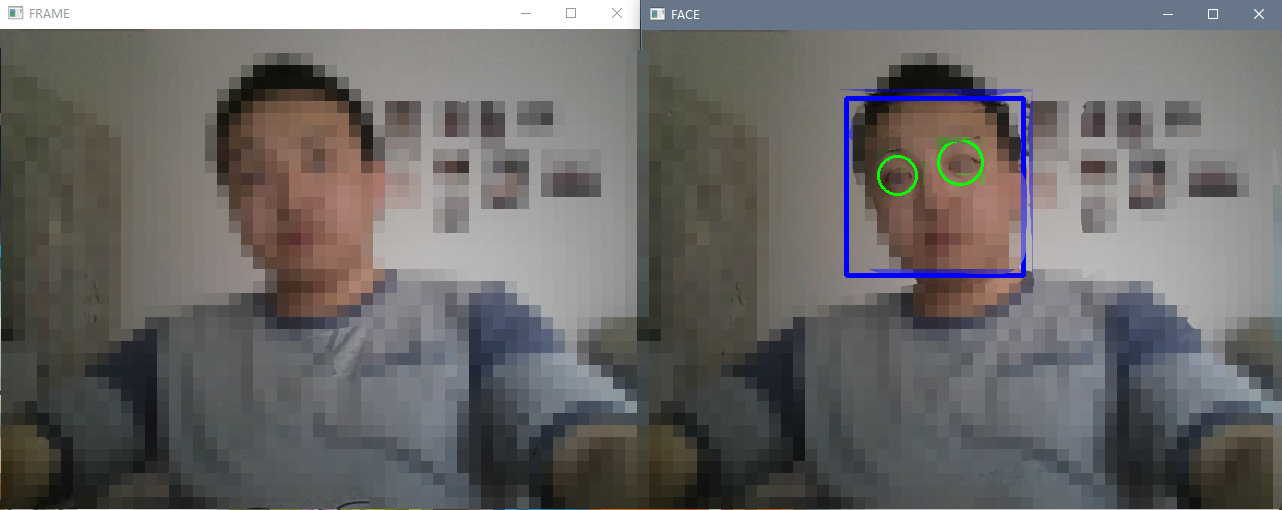
4. Haar cascade classifier is used to detect faces and eyes in camera video
Haar cascade classifier can also be used to detect faces and eyes in video. The example code is as follows:
# Using Haar cascade detector (face eye video)
import cv2

capture = cv2.VideoCapture(0)

frame_width = capture.get(cv2.CAP_PROP_FRAME_WIDTH)
frame_height = capture.get(cv2.CAP_PROP_FRAME_HEIGHT)
fps = capture.get(cv2.CAP_PROP_FPS)

face = cv2.CascadeClassifier("haarcascade_frontalface_default.xml")
eye = cv2.CascadeClassifier("haarcascade_eye.xml")

if capture.isOpened() is False:
    print('CAMERA ERROR !')
    exit(0)

while capture.isOpened():

    ret, frame = capture.read()

    if ret is True:

        cv2.imshow('FRAME', frame)

        gray_frame = cv2.cvtColor(frame, cv2.COLOR_BGR2GRAY)

        faces = face.detectMultiScale(gray_frame)
        for x,y,w,h in faces:
            cv2.rectangle(frame, (x,y),(x+w,y+h),(255,0,0),3)
            roi_eye = gray_frame[y:y*h, x:x+w]
            eyes = eye.detectMultiScale(roi_eye)
            for ex,ey,ew,eh in eyes:
                cv2.circle(frame[y : y + h , x : x + w], (int(ex + ew / 2) , int(ey + eh / 2)), int(max(ew, eh) / 2), (0,255,0), 2)

        cv2.imshow('FACE', frame)
        k = cv2.waitKey(100)
        if k == ord('q'):
            break
    else:
        break
capture.release()
cv2.destroyAllWindows()
2, Face detection based on deep learning
the Deep Neural Network (DNN) module of OpenCV provides a face detector based on deep learning. The popular deep learning framework is used in DNN module, including Caffe, TensorFlow, Torch, Darknet, etc.
OpenCV provides two pre trained face detection models: Caffe and TensorFlow model.
Caffe model needs to load the following two files:
deploy. Prototype XT: a configuration file that defines the structure of the model
res10_300x300_ssd_iter_140000_fp16.caffemodel: a training model file containing actual layer weights
TensorFlow model needs to load the following two files:
opencv_face_detector_uint8.pb: a configuration file that defines the structure of the model
opencv_face_detector.pbtxt: training model file containing actual layer weights
the model configuration file is provided in the folder of "\ samples\dnn\face_detector" of OpenCV source code, but the model training file is not provided. You can run the download in this folder_ models. Py file to download the above two training model files.

face detection using the pre trained model mainly includes the following steps:
(1) Call CV2 dnn. Readnetfromcafe() or CV2 dnn. The readnetfromtensorflow() function loads the model and creates the detector.
(2) Call CV2 dnn. The blobfromimage() function converts the image to be detected into image block data.
(3) Call the setInput() method of the detector to set the image block data as the input data of the model.
(4) Call the forward() method of the detector to perform the calculation and obtain the prediction result.
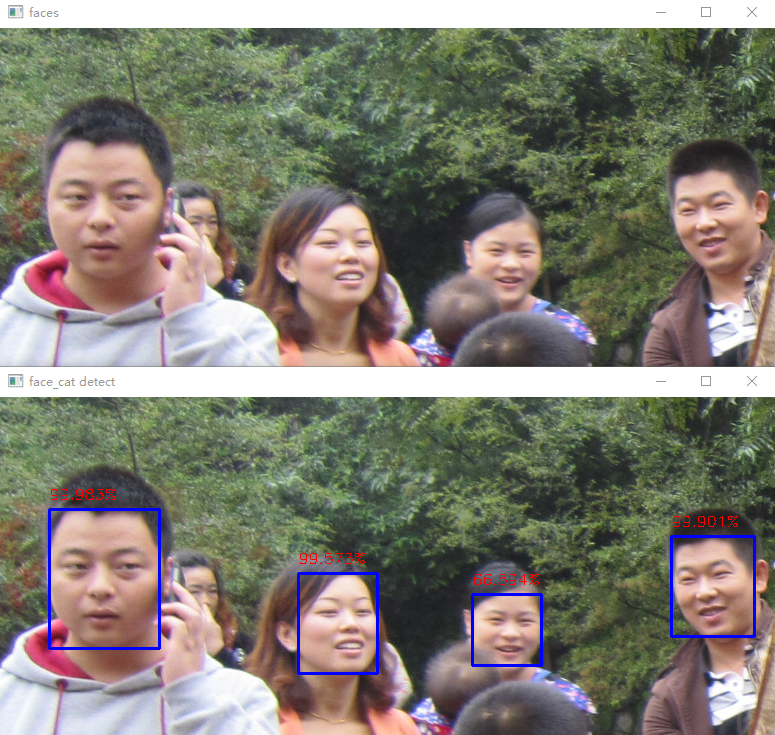
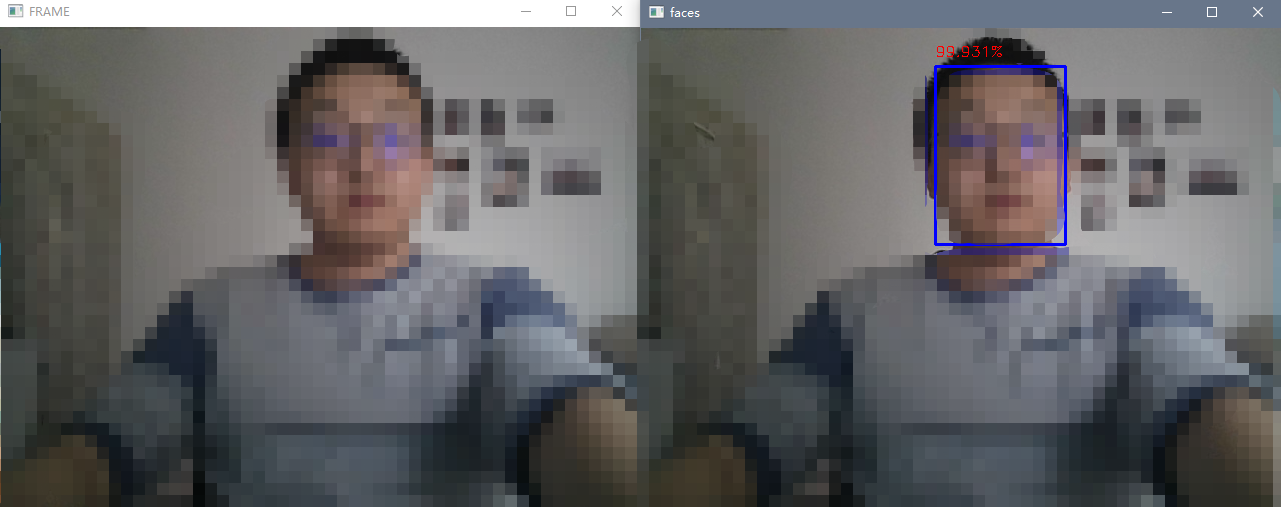
(5) Take the prediction result with the reliability higher than the specified value as the detection result, mark the face in the original image, and output the reliability as a reference.
1. Face detection based on deep learning (picture)
# Face detection based on deep learning (face eye video)
import cv2
import numpy as np
from matplotlib import pyplot as plt

#dnnnet = cv2.dnn.readNetFromCaffe("deploy.prototxt", "res10_300x300_ssd_iter_140000_fp16.caffemodel")
dnnnet = cv2.dnn.readNetFromTensorflow("opencv_face_detector_uint8.pb", "opencv_face_detector.pbtxt")

img = cv2.imread("heard.jpg")
h, w = img.shape[:2]
blobs = cv2.dnn.blobFromImage(img, 1.0, (300, 300), [104., 117., 123.], False, False)
dnnnet.setInput(blobs)
detections = dnnnet.forward()
faces = 0
for i in range(0, detections.shape[2]):
    confidence = detections[0, 0, i, 2]
    if confidence > 0.6:
        faces += 1
        box = detections[0, 0, i, 3:7] * np.array([w, h, w, h])
        x1,y1,x2,y2 = box.astype("int")
        y = y1 - 10 if y1 - 10 > 10 else y1 + 10
        text = "%.3f"%(confidence * 100)+'%'
        cv2.rectangle(img, (x1, y1), (x2, y2), (255, 0, 0), 2)
        cv2.putText(img,text, (x1, y), cv2.FONT_HERSHEY_SIMPLEX, 0.5, (0, 0, 255), 1)
cv2.imshow('faces',img)
cv2.waitKey(0)
cv2.destroyAllWindows()
2. Face detection based on deep learning (video)
import cv2

capture = cv2.VideoCapture(0)
frame_width = capture.get(cv2.CAP_PROP_FRAME_WIDTH)
frame_height = capture.get(cv2.CAP_PROP_FRAME_HEIGHT)
fps = capture.get(cv2.CAP_PROP_FPS)

dnnnet = cv2.dnn.readNetFromTensorflow("opencv_face_detector_uint8.pb", "opencv_face_detector.pbtxt")

if capture.isOpened() is False:
    print('CAMERA ERROR !')
    exit(0)

while capture.isOpened():

    ret, frame = capture.read()

    if ret is True:

        cv2.imshow('FRAME', frame) # Displays captured frames

        h, w = frame.shape[:2]
        blobs = cv2.dnn.blobFromImage(frame, 1.0, (300, 300), [104., 117., 123.], False, False)
        dnnnet.setInput(blobs)
        detections = dnnnet.forward()
        faces = 0
        for i in range(0, detections.shape[2]):
            confidence = detections[0, 0, i, 2]
            if confidence > 0.6:
                faces += 1
                box = detections[0, 0, i, 3:7] * np.array([w, h, w, h])
                x1,y1,x2,y2 = box.astype("int")
                y = y1 - 10 if y1 - 10 > 10 else y1 + 10
                text = "%.3f"%(confidence * 100)+'%'
                cv2.rectangle(frame, (x1, y1), (x2, y2), (255, 0, 0), 2)
                cv2.putText(frame,text, (x1, y), cv2.FONT_HERSHEY_SIMPLEX, 0.5, (0, 0, 255), 1)

        cv2.imshow('faces',frame)
        k = cv2.waitKey(100)
        if k == ord('q'):
            break
    else:
        break
capture.release()
cv2.destroyAllWindows()
3, Opencv Python resource download
Opencv Python test pictures, Chinese official documents, opencv-4.5.4 source code
summary
the above content introduces the face detection of OpenCV Python. Articles on Python, data science and artificial intelligence will be published from time to time. Please pay more attention and connect three times with one button (● '◡' ●).