opencv-python image high-pass filter and low-pass filter
1. High-pass filter
Principle of high-pass filter
High-pass filtering means that the parts with high frequencies pass through and are derived from the image. Generally speaking, the pixels of a picture have high frequencies in the outline and low frequencies in other parts.
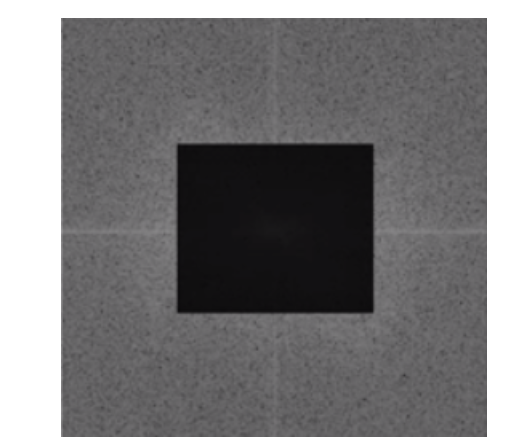
For Fourier transform, it displays the high frequency part of an image in the periphery and the low frequency part in the middle. Therefore, high-pass filtering is to filter the middle part of the spectrum after Fourier transform. The filtering method is to set the low frequency corresponding pixel value of the middle area to 0 and to black. As shown in the diagram:

This black area is what we need to construct, and the dimensions are customized.
Specific code description
1. Construct a high-pass filter range.
def highPassFiltering(img,size):#Transfer parameters are Fourier transform spectrogram and filter size
    h, w = img.shape[0:2]#Getting image properties
    h1,w1 = int(h/2), int(w/2)#Find the center point of the Fourier spectrum
    img[h1-int(size/2):h1+int(size/2), w1-int(size/2):w1+int(size/2)] = 0#Center point plus or minus half of the filter size, forming a filter size that defines the size, then set to 0
    return img
2. Now a gray scale image is Fourier transformed to get the spectrum of the picture, then the high-pass filter function is called to filter, and then the result is viewed through the inverse Fourier transformation.
def cv2_imread(file_path, flag=1):
    # Read Picture Data
    return cv2.imdecode(np.fromfile(file_path, dtype=np.uint8), flag)


gray = cv2_imread("C://Users//Small White 2//Desktop//dd.png", 1)
gray = cv2.cvtColor(gray, cv2.COLOR_BGR2GRAY)
gray = cv2.resize(gray, (640, 420))

# Fourier transform
img_dft = np.fft.fft2(gray)
dft_shift = np.fft.fftshift(img_dft)  # Move frequency domain from upper left to middle

#High pass filter
dft_shift=highPassFiltering(dft_shift,200)
res = np.log(np.abs(dft_shift))


# Inverse Fourier Transform
idft_shift = np.fft.ifftshift(dft_shift)  #Move the frequency domain from the middle to the upper left corner
ifimg = np.fft.ifft2(idft_shift)  # Fourier library function call
ifimg = np.abs(ifimg)
cv2.imshow("ifimg",np.int8(ifimg))
cv2.imshow("gray",gray)


# Draw pictures
plt.subplot(131), plt.imshow(gray, 'gray'), plt.title('Original Image')
plt.axis('off')
plt.subplot(132), plt.imshow(res, 'gray'), plt.title('High pass filter')
plt.axis('off')
plt.subplot(133), plt.imshow(np.int8(ifimg), 'gray'), plt.title('Effect after filtering')
plt.axis('off')
plt.show()
cv2.waitKey(0)
cv2.destroyAllWindows()
Operation effect:

2. Low-pass filter
Principle of low-pass filter
Low-pass filtering, as its name implies, allows low frequencies to filter out high frequencies. For image noise, including salt and pepper noise and Gaussian noise, their frequencies are higher, such as pixel value 255. Low-pass filtering filters these noises, but low-pass filtering does not recognize them. Some areas of the image also have 255 pixels, which is the same. Low-pass filtering also filters it completely, so we can simply think that low-pass filtering actually keeps the center part of the frequency domain map, filters the periphery part, and derives from the image by setting the corresponding pixel value of the high frequency region to 0 (black).
The general idea of its implementation is as follows:

Specific code examples
1. Construct the low-pass filter range
def lowPassFiltering(img,size):#Transfer parameters are Fourier transform spectrogram and filter size
    h, w = img.shape[0:2]#Getting image properties
    h1,w1 = int(h/2), int(w/2)#Find the center point of the Fourier spectrum
    img2 = np.zeros((h, w), np.uint8)#Define a blank black image with the same size as the Fourier Transform Transfer
    img2[h1-int(size/2):h1+int(size/2), w1-int(size/2):w1+int(size/2)] = 1#Center point plus or minus half of the filter size, forming a filter size that defines the size, then set to 1, preserving the low frequency part
    img3=img2*img #A low-pass filter is obtained by multiplying the defined low-pass filter with the incoming Fourier spectrogram one-to-one.
    return img3
2. Read the image to add noise and gray level, invoke the low-pass filter function after Fourier transform, and then observe the image change by inverse Fourier transform restore
def cv2_imread(file_path, flag=1):
    # Read Picture Data
    return cv2.imdecode(np.fromfile(file_path, dtype=np.uint8), flag)


gray = cv2_imread("C://Users//Small White 2//Desktop//dd.png", 1)
gray = cv2.cvtColor(gray, cv2.COLOR_BGR2GRAY)
gray = cv2.resize(gray, (1280, 720))

h,w =gray.shape

for i in range(3000):    #Add 3000 Noise Points
    x = np.random.randint(0, h)
    y = np.random.randint(0, w)
    gray[x,y] = 255

# Fourier transform
img_dft = np.fft.fft2(gray)
dft_shift = np.fft.fftshift(img_dft)  # Move frequency domain from upper left to middle

# Low-pass filter
dft_shift = lowPassFiltering(dft_shift, 200)
res = np.log(np.abs(dft_shift))

# Inverse Fourier Transform
idft_shift = np.fft.ifftshift(dft_shift)  # Move the frequency domain from the middle to the upper left corner
ifimg = np.fft.ifft2(idft_shift)  # Fourier library function call
ifimg = np.abs(ifimg)
cv2.imshow("ifimg", np.int8(ifimg))
cv2.imshow("gray", gray)

# Draw pictures
plt.subplot(131), plt.imshow(gray, 'gray'), plt.title('Original Image')
plt.axis('off')
plt.subplot(132), plt.imshow(res, 'gray'), plt.title('Low-pass filter')
plt.axis('off')
plt.subplot(133), plt.imshow(np.int8(ifimg), 'gray'), plt.title('Effect after filtering')
plt.axis('off')
plt.show()
cv2.waitKey(0)
cv2.destroyAllWindows()
Operation effect:

In other words, the intensity of noise cancellation by low-pass filter depends on the size of the low-pass filter you construct. The larger the size, the poorer the removal and the clearer the image. The smaller the size, the better the removal and the blurrier the image