Get and modify pixel values
For color images, the value of a pixel in opencv represents the values of B, G and R of this pixel.
Get pixel value
import cv2
import numpy as np

# Read picture
img = cv2.imread("../data/image/1.jpeg",cv2.IMREAD_COLOR)
#Get the pixel value (B,G,R) of row 100 and column 100
px = img[100,100]
print(px)
#Get the value of channel 0 in row 100 and column 100
blue = img[100,100,0]
print(blue)
#[ 41 113  83]
#41
Set pixel value
import cv2
import numpy as np

# Read picture
img = cv2.imread("../data/image/1.jpeg",cv2.IMREAD_COLOR)
#Modify the pixel value of row 100 and column 100 white [255255255]
img[100,100] = [255,255,255]
## [255 255 255]
Better way
import cv2
import numpy as np

# Read picture
img = cv2.imread("../data/image/1.jpeg",cv2.IMREAD_COLOR)
#Get the value of the second channel in row 10 and column 10
print(img.item(10,10,2))
#Set the value of the second channel in row 10 and column 10 to 100
img.itemset((10,10,2),100)
print(img.item(10,10,2))
##44
##100
Get image properties
Image attributes include: row, column, channel, image data type, number of pixels, etc.
import cv2
import numpy as np

# Read picture
img = cv2.imread("../data/image/1.jpeg",cv2.IMREAD_COLOR)
print(img.shape)
#(444, 640, 3)
print(img.size)
#852480
print(img.dtype)
#uint8
img.shape can get the shape of the image. Its return value is a tuple of (rows, columns, channels).
img.size returns the number of pixels of the image.
img.dtype returns the data type of the image.
Image ROI
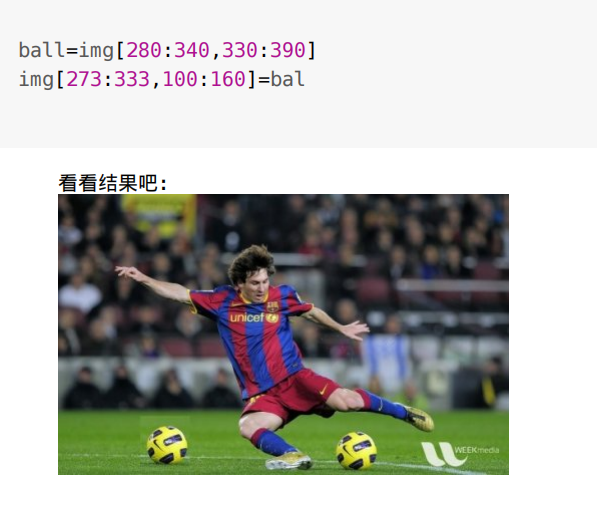
Operate on a specific area in an image. For example, if we want to detect the position of the eyes in an image, we should first find the face in the image and then find the eyes in the area of the face, rather than searching directly in an image. This will improve the accuracy and performance of the program. ROI is also obtained by using Numpy index.
The following is the example in the book. First obtain the positions of lines 280 to 340 and lines 330 to 390 of the image as the value of the ball we obtained, and then assign the values of lines 273 to 333 and columns 100 to 160 of the image to move the ball to other areas. There is a problem here, that is, you need to know exactly which lines and columns the ball occupies in the image, This is not used much in practice.
Split and merge image channels
import cv2
import numpy as np

# Read picture
img = cv2.imread("../data/image/1.jpeg",cv2.IMREAD_COLOR)
#Split b,g,r channels
#Method 1
b,g,r=cv2.split(img)
#Method 2
b = img[0:0:0]
g = img[0:0:1]
g = img[0:0:2]
#Merge b,g,r channels
img=cv2.merge(b,g,r)
Warning: CV2 Split () is a time-consuming operation. Use it only when you really need it. If you can use Numpy index, use it as much as possible.
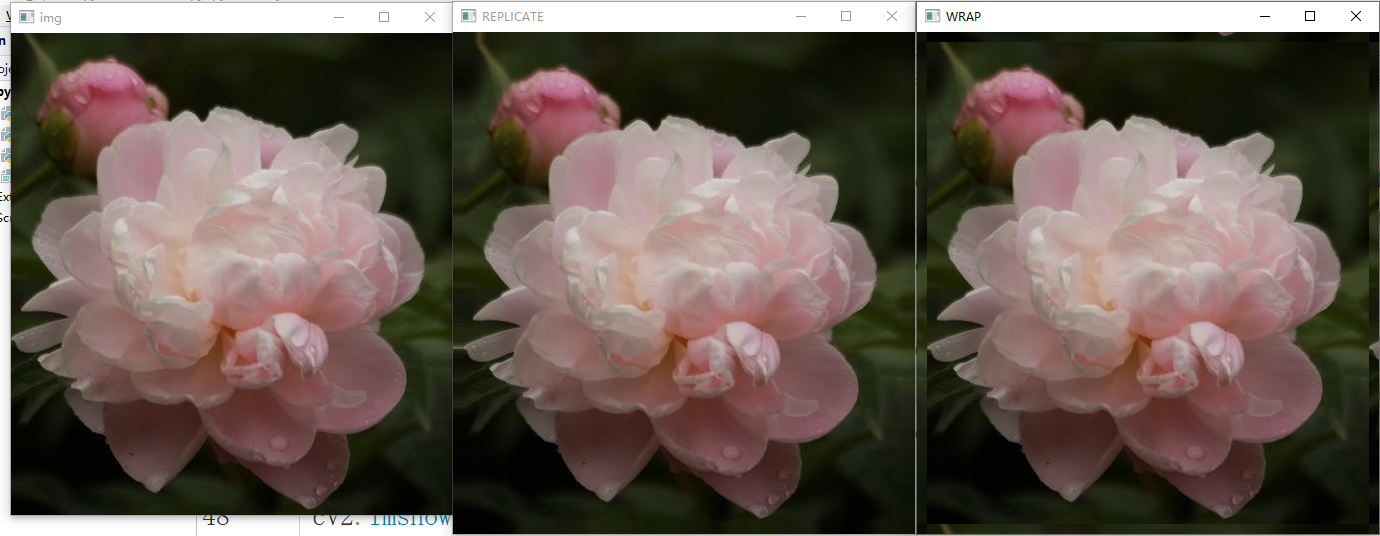
Expand the edge (fill) of the image
If you want to create an edge around the image, like a picture frame, you can use CV2 Copymakeorder() function.
The first parameter represents the input image.
The second parameter represents the number of pixels to be processed on the upper boundary.
The third parameter represents the number of pixels to be processed at the lower boundary.
The fourth parameter represents the number of pixels to be processed on the left boundary.
The fifth parameter represents the number of pixels to be processed on the right boundary.
The sixth parameter indicates the type of boundary treatment.
- cv2.BORDER_CONSTANT adds a constant value boundary with color. The next parameter (value) is also required to represent the color. The size of the added boundary is the second to fourth parameters.
- cv2.BORDER_REFLECT the mirror image of the boundary element.
- cv2.BORDER_REPLICATE repeats the last element.
- cv2.BORDER_WRAP the pixels of the left and right boundaries are reversed, and the pixels of the upper and lower boundaries are reversed
import cv2
import numpy as np

# Read picture
img = cv2.imread("../data/image/2.jpeg",cv2.IMREAD_COLOR)
#Add a blue border with a width of 10 to the top, bottom, left and right
img_1 = cv2.copyMakeBorder(img,10,10,10,10,cv2.BORDER_CONSTANT,value = [255,0,0])
#Add a boundary with a width of 10 to the top, bottom, left and right. Mirror the image with a width of 10 of the original image boundary and fill it into the new boundary
img_2 = cv2.copyMakeBorder(img,10,10,10,10,cv2.BORDER_REFLECT)
#Add a boundary with a width of 10 to the top, bottom, left and right, and repeat the last row of pixels of the original image to fill the new boundary
img_3 = cv2.copyMakeBorder(img,10,10,10,10,cv2.BORDER_REPLICATE)
#Add a boundary with a width of 10 to the top, bottom, left and right, and fill the position with a width of 10 on the upper boundary of the original image to the lower boundary of the new boundary
img_4 = cv2.copyMakeBorder(img,10,10,10,10,cv2.BORDER_WRAP)
cv2.imshow("img",img)
cv2.imshow("CONSTANT",img_1)
cv2.imshow("REFLECT",img_2)
cv2.imshow("REPLICATE",img_3)
cv2.imshow("WRAP",img_4)
cv2.waitKey()