The content shared in this article comes from the book "learning OpenCV 4: Python based algorithm practice", which is as follows:
Chapter 1 OpenCV Quick start;
Chapter 2 image reading and writing module imgcodecs;
Chapter 3 core library module core;
Chapter 4 image processing module imgproc(1) (a);
Chapter 5 image processing module imgproc(2) (a);
Chapter 6 visualization module highgui;
Chapter 7 video processing module videoio;
Chapter 8 video analysis module video;
Chapter 9 photo processing module photo;
Chapter 10 2 D Feature module features2d;
Chapter 11 camera calibration and 3D reconstruction module calib3d;
Chapter 12 traditional target detection module objdetect;
Chapter 13 machine learning module ml;
Chapter 14 deep neural network module dnn
Welcome to the books "deep learning computer vision practice" and "learning OpenCV4: Python based algorithm practice".
Grabcuts is an interactive foreground extraction algorithm. OpenCV allows readers to provide a rectangular box around the image to be segmented. The part outside the rectangular box belongs to the background. At this time, there is no need to specify the foreground. Readers can also use a global mask to divide the pixels of the image into determined foreground, determined background, suspected foreground and suspected background. In this way, the determined region will be used by the algorithm to segment the suspected region.
The function grabCut of Grabcuts algorithm is provided in OpenCV. The function definition is as follows:
mask, bgdModel, fgdModel = grabCut(img, mask, rect, bgdModel, fgdModel, iterCount, mode=None)
The parameters are described as follows:
img, input image;
mask, mask (return value);
rect, including the region of interest of the segmentation object;
bgdModel, temporary array of background model (return value);
fgdModel, temporary array of foreground model (return value);
iterCount, number of algorithm iterations;
mode, processing mode, defined by GrabCutModes.
This case realizes an interactive image segmentation. The left mouse button selects to determine the foreground, the right mouse button selects to determine the background, and the Grabcuts algorithm performs image segmentation according to the determined foreground and determined background.
The image segmentation case code of Grabcuts algorithm is as follows:
import cv2
import numpy as np

#Draw foreground / background marker line
drawing = False

# Define the GrabCut class to set some parameters
class GrabCut:
    def __init__(self, t_img):
        self.img = t_img
        self.img_raw = img.copy()
        self.img_width = img.shape[0]
        self.img_height = img.shape[1]
        self.img_show = self.img.copy()
        self.img_gc = self.img.copy()
        self.img_gc = cv2.GaussianBlur(self.img_gc, (3, 3), 0)
        self.lb_up = False
        self.rb_up = False
        self.lb_down = False
        self.rb_down = False
        self.mask = np.full(self.img.shape[:2], 2, dtype=np.uint8)
        self.firt_choose = True

# Callback function of mouse operation
def mouse_event(event, x, y, flags, param):
    global drawing, last_point, start_point
    # Press the left key to start identifying the foreground
    if event == cv2.EVENT_LBUTTONDOWN:
        drawing = True
        # Set the starting point of mouse press
        last_point = (x, y)
        start_point = last_point
        param.lb_down = True
    # Right click to start identifying the background
    elif event == cv2.EVENT_RBUTTONDOWN:
        # Readers please mark the foreground first, otherwise it cannot be divided
        if param.firt_choose:
            print("Please select foreground first!")
            return
        drawing = True
        last_point = (x, y)
        start_point = last_point
        param.rb_down = True
    # Move the mouse to draw lines identifying the foreground and background
    elif event == cv2.EVENT_MOUSEMOVE:
        if drawing:
            # Drawing by pressing the left mouse button
            if param.lb_down:
                cv2.line(param.img_show, last_point, (x,y), (0, 0, 255), 2, -1)
                cv2.rectangle(param.mask, last_point, (x, y), 1, -1, 4)
            # Right click drawing
            if param.rb_down:
                cv2.line(param.img_show, last_point, (x, y), (255, 0, 0), 2, -1)
                cv2.rectangle(param.mask, last_point, (x, y), 0, -1, 4)
            last_point = (x, y)
    # Left click release to end the identification foreground
    elif event == cv2.EVENT_LBUTTONUP:
        drawing = False
        param.lb_up = True
        param.lb_down = False
        cv2.line(param.img_show, last_point, (x,y), (0, 0, 255), 2, -1)
        # If it is identified for the first time, switch the state
        if param.firt_choose:
            param.firt_choose = False
        cv2.rectangle(param.mask, last_point, (x,y), 1, -1, 4)
    # Right click to release and end the identification background
    elif event == cv2.EVENT_RBUTTONUP:
        # If the background is identified first, it will not be processed
        if param.firt_choose:
            return
        drawing = False
        param.rb_up = True
        param.rb_down = False
        cv2.line(param.img_show, last_point, (x,y), (255, 0, 0), 2, -1)
        cv2.rectangle(param.mask, last_point, (x,y), 0, -1, 4)

#Perform operations
def process(img):
    if img is None:
        print('Can not read image correct!')
        return
    g_img = GrabCut(img)

    cv2.namedWindow('image')
    # Define the callback function of the mouse
    cv2.setMouseCallback('image', mouse_event, g_img)
    while (True):
        cv2.imshow('image', g_img.img_show)
        # When the left or right mouse button is lifted, the Grabcut algorithm is executed according to the identification
        if g_img.lb_up or g_img.rb_up:
            g_img.lb_up = False
            g_img.rb_up = False
            # Background model
            bgdModel = np.zeros((1, 65), np.float64)
            # Foreground model
            fgdModel = np.zeros((1, 65), np.float64)

            rect = (1, 1, g_img.img.shape[1], g_img.img.shape[0])
            mask = g_img.mask
            g_img.img_gc = g_img.img.copy()
            #Execute Grabcut algorithm
            cv2.grabCut(g_img.img_gc, mask, rect, bgdModel, fgdModel, 5, cv2.GC_INIT_WITH_MASK)
            # 0 and 2 as background
            mask2 = np.where((mask == 2) | (mask == 0), 0, 1).astype('uint8')
            # Use the mask to get the foreground area
            g_img.img_gc = g_img.img_gc * mask2[:, :, np.newaxis]
            cv2.imshow('Grabcut_result', g_img.img_gc)

        # Press ESC to exit
        if cv2.waitKey(20) == 27:
            break

if __name__ == '__main__':
    img = cv2.imread("./src.jpg")
    process(img)
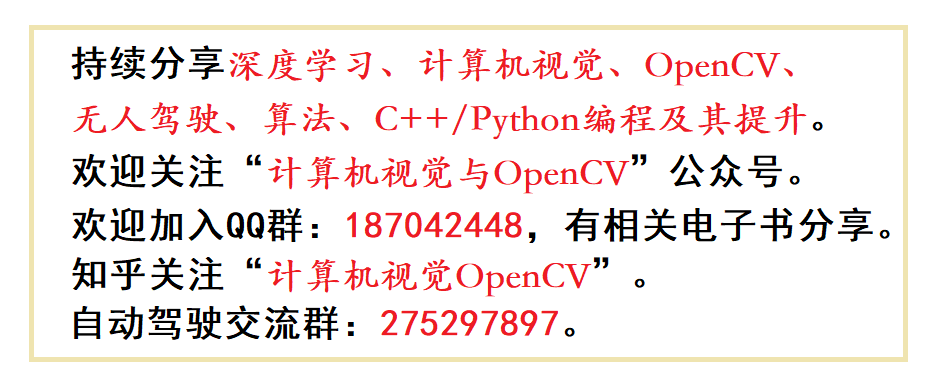
As shown in Figure 5.30, the operation of selecting the foreground for the first time.
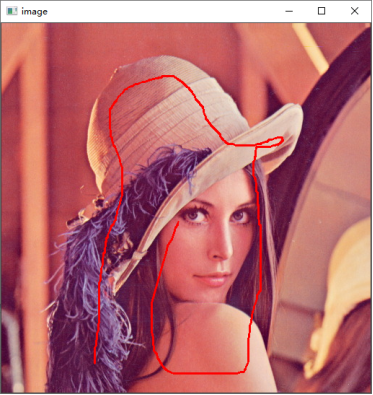
Figure 5.30
As shown in Figure 5.31, the result of segmentation is that the characters in the figure are effectively extracted.
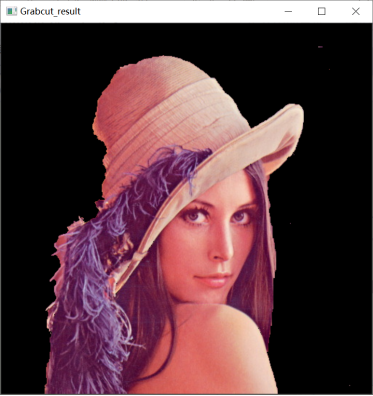
Figure 5.31
Continue to right-click to select the background area, as shown in Figure 5.32.
Figure 5.32
The result of picking up the portrait is shown in Figure 5.33.
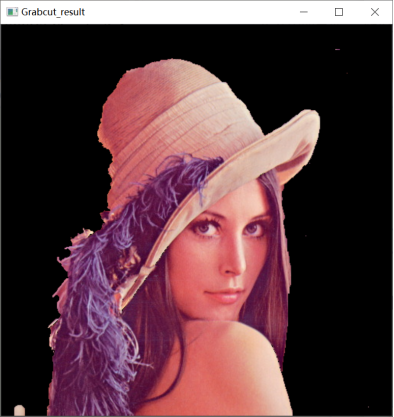
Figure 5.33
If the segmentation effect is not good, readers can continue to select the foreground or background and iterate for more refined segmentation.