1, Create project
-
Using React CLI to build a project: NPX create react app geek PC
-
Enter the project root directory: CD geek PC
-
Start project: npm run start
-
Adjust the project directory structure:
/src
/ assets # Project resource files, such as, pictures, etc
/ components # General components
/ pages # page
/ utils # Tools, such as token, axios encapsulation, etc
/ api # Encapsulation interface
App.js # Root component
index.css # Global style
index.js # Project entrance
index.js
import ReactDOM from 'react-dom'

import './index.css'
import App from './App'
ReactDOM.render(

    <App />
,
  document.getElementById('root')
)
index.css
* {
  margin: 0;
  padding: 0;
  list-style: none;
}

#root,
.app {
  height: 100%;
}
1.1 create components and configure basic routes
|-src
|-pages
|- Layout/index.jsx # Layout page
|- Login/index.jsx # Landing page
|- NotFound/index.jsx # 404 pages
The contents are as follows:
Create two pages in the pages directory: Login and Layout
src/pages/Layout/index.js
const Layout = () => {
  return <div>Layout</div>
}
export default Layout
src/pages/Login/index.js
const Login = () => {
  return <div>Login page</div>
}
export default Login
1.1.1 import routing component and configure routing
In the App component:
-
Import routing components
-
Import page components
-
Configure routing rules
import React from 'react'
import { BrowserRouter as Router, Route, Switch } from 'react-router-dom'
import Login from './pages/Login'
import Layout from './pages/Layout'
import NotFound from './pages/NotFound'
export default function App() {
  return (
    <Router>
      <div className="app">
        <Switch>
          <Route path="/login" component={Login}></Route>
          <Route path="/layout" component={Layout}></Route>
          {/* Add a 404 */}
          <Route component={NotFound}></Route>
        </Switch>
      </div>
    </Router>
  )
}
Component library - antd
target
Understand the basic use of antd and be able to render buttons with Button components
antd
antd is a React UI component library based on Ant Design system, which is mainly used to develop enterprise level middle and back office products.
antd PC component library document
install
npm i antd
Use steps
Import the style file of antd in index.js
// 1. Import the style file of antd in index.js
import 'antd/dist/antd.css'
Introduce use in other components
// 2 in the Login page component, use the Button component of antd
import { Button } from 'antd'

const Login = () => (
  <div>
    <Button type="primary">Button</Button>
  </div>
)
vscode identifies @ path and gives path prompt
target
Enable vscode to recognize @ path and give path prompt
step
-
Create the jsconfig.json configuration file in the project root directory
-
Add the following configuration to the configuration file
In jsconfig.json:
{
  "compilerOptions": {
    "baseUrl": "./",
    "paths": {
      "@/*": ["src/*"]
    }
  }
}
Summary
vscode will automatically read the configuration in jsconfig.json to let vscode know that @ is the src directory
Configure path aliases with craco
target
Configure @ path aliases so that scaffolding tools can recognize them@
background
CRA (create react APP) hides all engineering configurations in the react scripts package. Therefore, no configuration information or configuration files can be seen in the project.
If you want to modify the default configuration of CRA, there are several schemes:
-
[recommended] modify through a third-party library, such as @ craco/craco
-
Release all the configurations in react scripts into the project by executing the "yarn eject" command (Note: this operation is irreversible!!!)
What is craco
Create React App Configuration Override, an easy and comprehensible configuration layer for create-react-app
craco is a tool for custom configuration of create react app.
-
Install the package. npm i -D @craco/craco
-
In the project root directory, create the configuration file: craco.config.js. You can make custom modifications in the configuration file.
craco.config.js
Configure path alias
const path = require('path')
module.exports = {
  webpack: {
    alias: {
      '@': path.join(__dirname, 'src')
    }
  }
}
3. Modify the script command in package.json
In package.json:
// Change the three commands start/build/test to craco mode

"scripts": {
  "start": "craco start",
  "build": "craco build",
  "test": "craco test",
  "eject": "react-scripts eject"
},
4. In the code, you can use @ to represent the absolute path of the src directory
5. Restart the project to make the configuration effective
Encapsulating axios tool functions
target
Install axios and make basic configuration
Installing axios
npm i axios
Configure base address;
Configure basic request interceptors and response interceptors
import axios from 'axios'

const instance = axios.create({
  baseURL: 'http://geek.itheima.net/v1_0/',
  timeout: 5000,
})

// request interceptor
instance.interceptors.request.use(
  function (config) {
    return config
  },
  function (error) {
	// If there is no network,
    if(!err.response) {
    	alert('Network failure')
    	return Promise.reject(err)
    }
    return Promise.reject(error)
  }
)

// Response interceptor
instance.interceptors.response.use(
  function (response) {
    return response.data
  },
  function (error) {
    return Promise.reject(error)
  }
)

export default instance
test
Write down the button and click event anywhere and use it in the callback
import request from 'utils/request.js'

test = () => {
  request({url: '/channels'})
}
Use of sass
Sass is already configured in the react scaffold, so you only need to install the dependent package of SASS to use sass directly
-
Install sass dependency package
npm i sass -D
Change index.css to index.scss
-
Import the index.scss file
Note: if scss is used, the absolute path of the picture in scss needs to be added~
background-image: url(~assets/login.png);
css style pollution
target
Understand the phenomenon and causes of style pollution;
Understand css in js solutions
Problem introduction
Add a style in index.scss of the Login component
.root {font-size: 100px;}
Add the. Root class to the root element of both Login and Layout components
It is found that the style in the Layout component has also changed.
reason
When configuring routing, both Layout and Login components are imported into the project, and the style of the component is imported into the project. If the selectors between components are repeated, the styles in one component will also take effect in another component, resulting in the problem of overlapping styles between components.
Solution
-
Manual processing (from different class names)
-
CSS IN JS: handle CSS IN JS mode. The idea is to make css have the distinction of local scope and global scope
CSS IN JS
-
CSS IN JS: it is a general term for writing CSS using JavaScript to solve problems such as CSS style conflict and coverage
-
CSS IN JS There are more than 50 specific implementations, such as CSS Modules styled-components etc.
-
Recommended: CSS Modules (React scaffold has been integrated and can be used directly)
css modules - basic usage
target
Master the basic use of css modules.
step
-
Change the style file name. From xx.scss - > xx.module.scss (agreement in React scaffold, distinguished from ordinary CSS)
-
Introduction and use.
-
Import the style file into the component (pay attention to the syntax)
-
import styles from './index.module.scss'
2. Access the style name in the object through the styles object to set the style
<div className={styles.css Class name}></div>Example
original
-
Define style index.css
.root {font-size: 100px;}-
Use style
import 'index.css'
<div className="root">div Content of</div>
Now?
Modify the file name: index.css ----- > index.module.css. Internal invariance
Use style
import styles from './index.module.css'

<div className={styles.root}>div Content of</div>
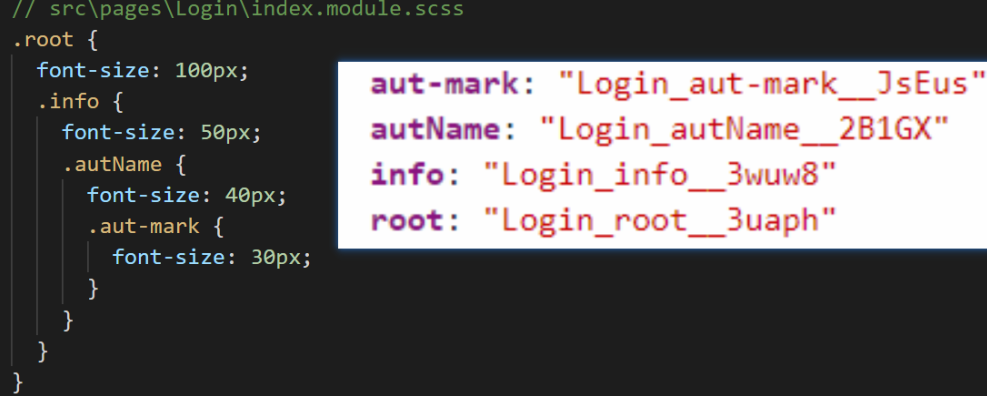
principle
CSS Modules automatically supplement the CSS class name to ensure the uniqueness of the class name, so as to avoid the problem of style conflict.
// Login.jsx
import styles from './index.module.css'
console.log(styles)

Considerations for css module
It is best to use hump naming for class names, because the final class name will generate an attribute of styles
.tabBar {} ---> styles.tabBarIf you use the middle dashed name, you need to use [] syntax
.tab-bar {} ---> styles['tab-bar']CssModules - maintain class name
target
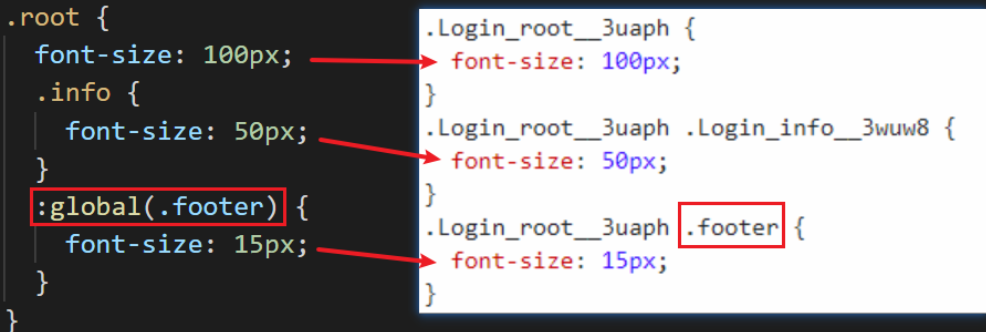
Master: the usage of global keyword, and can use it to maintain the original class name

In xxx.module.scss, if you want to maintain the class name, you can use the format:
: global(. Class name)
Example
/*In this way, css modules will not modify the class name. a. It is equivalent to writing in index.css */
:global(.a) {   }
/* In this way, css modules will not modify the class name. a, but. aa will still be modified */
.aa :golbal(.a) { }application
Override styles for third-party components
:global(.ant-btn) {
  color: red !important;
}
css modules - Best Practices
-
The root node of each component uses the class name in the form of CSSModules (class name of the root element: root)
-
All other child nodes use the common CSS class name: global
index.module.scss
// index.module.scss
.root {
  display: 'block';
  position: 'absolute';
  // Here, use global to wrap the class names of other child nodes. At this time, these class names will not be processed. When used in JSX, you can use the class name in string form
  // If you do not add: global, you must add styles.title to all class names
  :global {
    .title {
      .text {
      }
      span {
      }
    }
    .login-form { ... }
  }
}
assembly
import styles from './index.module.scss'
const assembly = () => {
  return (
    {/* (1) The root node uses the class name in the form of CSSModules (class name of the root element: ` root ')*/}
  	<div className={styles.root}>
      {/* (2) All child nodes use ordinary CSS class names*/}
    	<h1 className="title">
      	<span className="text">Sign in</span>
      	<span>Sign in</span>
      </h1>
			<form className="login-form"></form>
    </div>
  )
}
Introduce ESlint
target
Install and configure eslint, configure the vscode shortcut key, and ctrl + s to save the format.
How can I install and use it on a new project until it runs normally? You can watch another blog of mine
 https://blog.csdn.net/Wy_so_serious/article/details/121339990?spm=1001.2014.3001.5501