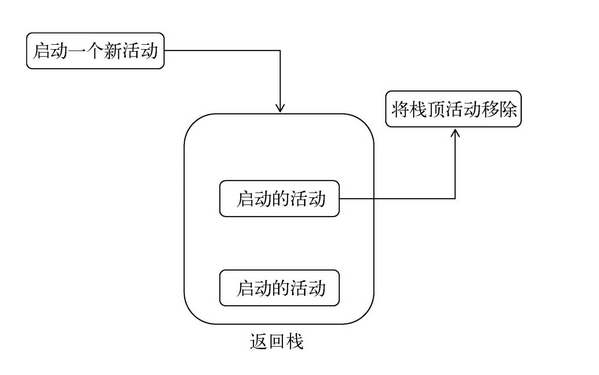
Return stack
Activities in Android can be stacked.
Every time we start a new activity, it will overwrite the original activity, and then click the Back key to destroy the top activity, and the next activity will be displayed again.
In fact, Android uses tasks to manage activities. A Task is a collection of activities stored in the stack, which is also called the Back Stack.
Stack is a last in first out data structure. By default, whenever we start a new activity, it will be put on the return stack and at the top of the stack.
Whenever we press the Back key or call the finish() method to destroy an activity, the activity at the top of the stack will be out of the stack, and the previous activity on the stack will be at the top of the stack again.
The system will always show the activity at the top of the stack to the user.
Active state
Each activity may have up to four states in its lifecycle.
1. Operation status
When an activity is at the top of the return stack, the activity is running.
The last thing the system wants to recycle is the running activity, because it will bring a very poor user experience.
2. Suspended status
When an activity is no longer at the top of the stack but is still visible, the activity enters a suspended state.
You may think that since the activity is no longer at the top of the stack, how can it be visible?
This is because not every activity will occupy the whole screen. For example, activities in the form of dialog box will only occupy part of the middle area of the screen. You will see this activity in the back soon.
The activity in the suspended state is still completely alive, and the system is unwilling to recycle this activity (because it is still visible, and recycling visible things will have a bad impact on the user experience). The system will consider recycling this activity only when the memory is very low.
3. Stop status
When an activity is no longer at the top of the stack and is completely invisible, it enters the stop state.
The system will still save the corresponding state and member variables for this activity, but this is not completely reliable. When memory is needed elsewhere, activities in the stopped state may be recycled by the system.
4. Destruction status
When an activity is removed from the return stack, it becomes destroyed.
The system will most tend to recycle the activities in this state, so as to ensure that the phone has enough memory.
Lifetime of activity
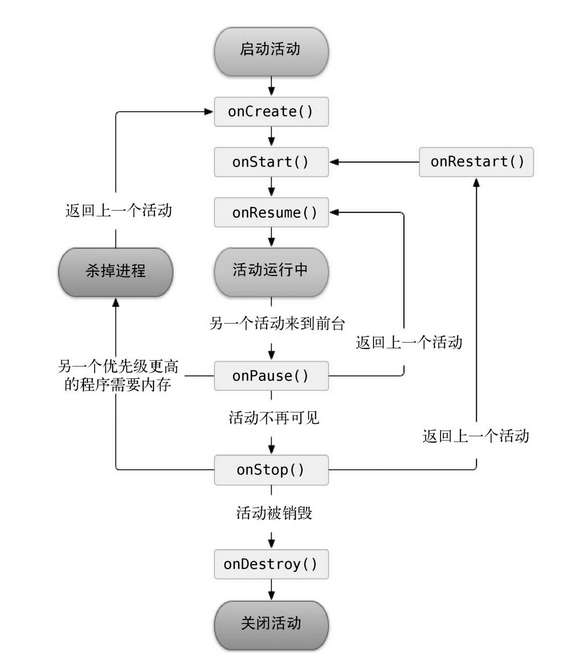
Seven callback methods are defined in the Activity class, covering every link of the Activity life cycle:
onCreate(). You have seen this method many times. In each activity, we have rewritten this method, which will be called when the activity is created for the first time. You should initialize activities in this method, such as loading layout, binding events, etc.
onStart(). This method is called when the activity changes from invisible to visible.
onResume(). This method is called when the activity is ready to interact with the user. At this time, the activity must be at the top of the return stack and in running state.
onPause(). This method is called when the system is ready to start or resume another activity. We usually release some CPU consuming resources and save some key data in this method, but the execution speed of this method must be fast, otherwise it will affect the use of new stack top activities.
onStop(). This method is called when the activity is completely invisible. The main difference between it and onPause() method is that if the new activity started is a dialog activity, onPause() method will be executed, while onstop () method will not be executed.
onDestroy(). This method is called before the activity is destroyed, and then the state of the activity will be destroyed.
onRestart(). This method is called before the activity changes from stop state to running state, that is, the activity is restarted.
Among the above seven methods, except onRestart() method, the others are relative, so the activities can be divided into three survival periods.
Complete survival
What an activity goes through between the onCreate() method and the onDestroy() method is the full lifetime. Generally, an activity will complete various initialization operations in the onCreate() method and free memory in the onDestroy() method.
Visible survival
What an activity goes through between the onStart() method and the onStop() method is the visible lifetime. During the visible lifetime, activities are always visible to users, even if they may not be able to interact with users. Through these two methods, we can reasonably manage the resources visible to users. For example, the resources are loaded in the onStart() method and released in the onStop() method, so as to ensure that the activities in the stopped state will not occupy too much memory.
Foreground lifetime
What an activity goes through between the onResume() method and the onPause() method is the foreground lifetime. During the lifetime of the foreground, activities are always in the running state. At this time, activities can interact with users. We usually see and contact the most activities in this state.
Life cycle of experience activities
1. Create a new ActivityLifeCycleTest project
2. Right click com example. Activitylifecycle test package → New → Activity → EmptyActivity,
Create a new normal activity and name the layout normal_layout.
Then create DialogActivity in the same way, and the layout is called dialog_layout.
3. Edit normal_layout.xml file
<LinearLayout xmlns:android="http://schemas.android.com/apk/res/android"
    android:orientation="vertical"
    android:layout_width="match_parent"
    android:layout_height="match_parent">
    <TextView
        android:layout_width="match_parent"
        android:layout_height="wrap_content"
        android:text="This is a normal activity"
        />


</LinearLayout>
4. Edit dialog_layout.xml file
<LinearLayout xmlns:android="http://schemas.android.com/apk/res/android"
    android:orientation="vertical"
    android:layout_width="match_parent"
    android:layout_height="match_parent">
    <TextView
        android:layout_width="match_parent"
        android:layout_height="wrap_content"
        android:text="This is a dialog activity"
        />


</LinearLayout>
5. Modify androidmanifest XML tag configuration
<?xml version="1.0" encoding="utf-8"?>
<manifest xmlns:android="http://schemas.android.com/apk/res/android"
    package="com.example.activitylifecycletest">

    <application
        android:allowBackup="true"
        android:icon="@mipmap/ic_launcher"
        android:label="@string/app_name"
        android:roundIcon="@mipmap/ic_launcher_round"
        android:supportsRtl="true"
        android:theme="@style/AppTheme">
        <activity android:name=".DialogActivity"
            android:theme="@style/Theme.AppCompat.Dialog"></activity>
        <activity android:name=".Normal_Activity" />
        <activity android:name=".MainActivity">
            <intent-filter>
                <action android:name="android.intent.action.MAIN" />

                <category android:name="android.intent.category.LAUNCHER" />
            </intent-filter>
        </activity>
    </application>

</manifest>
6. Modify activity_main.xml
<LinearLayout xmlns:android="http://schemas.android.com/apk/res/android"
    android:orientation="vertical"
    android:layout_width="match_parent"
    android:layout_height="match_parent"
    >
    <Button
        android:id="@+id/start_normal_activity"
        android:layout_width="match_parent"
        android:layout_height="wrap_content"
        android:text="Start NormalActivity"/>
    <Button
        android:id="@+id/start_dialog_activity"
        android:layout_width="match_parent"
        android:layout_height="wrap_content"
        android:text="Start DialogActivity"/>

</LinearLayout>
We added two buttons in LinearLayout, one for starting NormalActivity and the other for starting DialogActivity.
7. Modify the code in MainActivity:
package com.example.activitylifecycletest;

import androidx.annotation.Nullable;
import androidx.appcompat.app.AppCompatActivity;

import android.content.Intent;
import android.os.Bundle;
import android.os.PersistableBundle;
import android.util.Log;
import android.view.View;
import android.widget.Button;

public class MainActivity extends AppCompatActivity {

    private static final String TAG = "MainActivity";

    @Override
    protected void onCreate(Bundle savedInstanceState) {
        super.onCreate(savedInstanceState);
        Log.d(TAG,"onCreate");

        setContentView(R.layout.activity_main);
        Button startNormalActivity=(Button)findViewById(R.id.start_normal_activity);
        Button startDialogActivity=(Button)findViewById(R.id.start_dialog_activity);
        startNormalActivity.setOnClickListener(new View.OnClickListener() {
            @Override
            public void onClick(View view) {
                Intent intent=new Intent(MainActivity.this,Normal_Activity.class);
                startActivity(intent);
            }
        });
        startDialogActivity.setOnClickListener(new View.OnClickListener() {
            @Override
            public void onClick(View view) {
                Intent intent=new Intent(MainActivity.this,DialogActivity.class);
                startActivity(intent);
            }
        });
    }

    @Override
    protected void onStart() {
        super.onStart();
        Log.d(TAG,"onStart");
    }

    @Override
    protected void onStop() {
        super.onStop();
        Log.d(TAG,"onStop");
    }

    @Override
    public void onCreate(@Nullable Bundle savedInstanceState, @Nullable PersistableBundle persistentState) {
        super.onCreate(savedInstanceState, persistentState);
        Log.d(TAG,"onCreate");
    }

    @Override
    protected void onRestart() {
        super.onRestart();
        Log.d(TAG,"onRestart");
    }

    @Override
    protected void onDestroy() {
        super.onDestroy();
        Log.d(TAG,"onDestroy");
    }

    @Override
    protected void onPause() {
        super.onPause();
        Log.d(TAG,"onPause");
    }

    @Override
    protected void onResume() {
        super.onResume();
        Log.d(TAG,"onResume");
    }
}
In the onCreate() method, we registered click events for the two buttons respectively. Clicking the first button will start NormalActivity and clicking the second button will start DialogActivity. Then, one sentence is printed in each of the seven callback methods of the Activity, so that you can more intuitively understand the life cycle of the Activity by observing the log.

Print log when starting the program

You can see that when the MainActivity is created for the first time, the onCreate(), onStart() and onResume() methods will be executed successively.
Then click the first button to start NormalActivity

Since the NormalActivity has completely covered the MainActivity, the onPause() and onStop() methods will be executed.
Then press the Back key to return to MainActivity
 Since the MainActivity has entered the stop state before, the onRestart() method will be executed, and then the onStart() and onResume() methods will be executed in turn. Note that the onCreate() method will not be executed at this time because the MainActivity has not been recreated.
Then click the second button to start DialogActivity
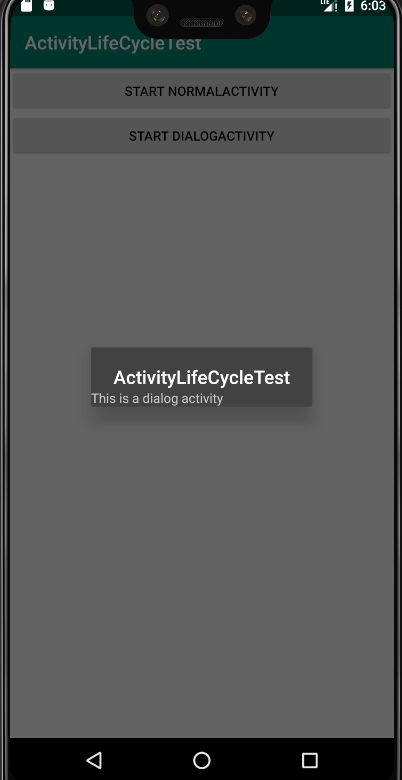

It can be seen that only onPause() method is executed, but onStop() method is not executed. This is because DialogActivity does not completely cover MainActivity. At this time, MainActivity just enters the pause state, not the stop state.
Accordingly, press the Back key to return to MainActivity. Only onResume() method should be executed

Finally, press the Back key in MainActivity to exit the program

The onPause(), onStop() and onDestroy() methods will be executed in turn, and finally the MainActivity will be destroyed.
Reference: the first line of code: Android