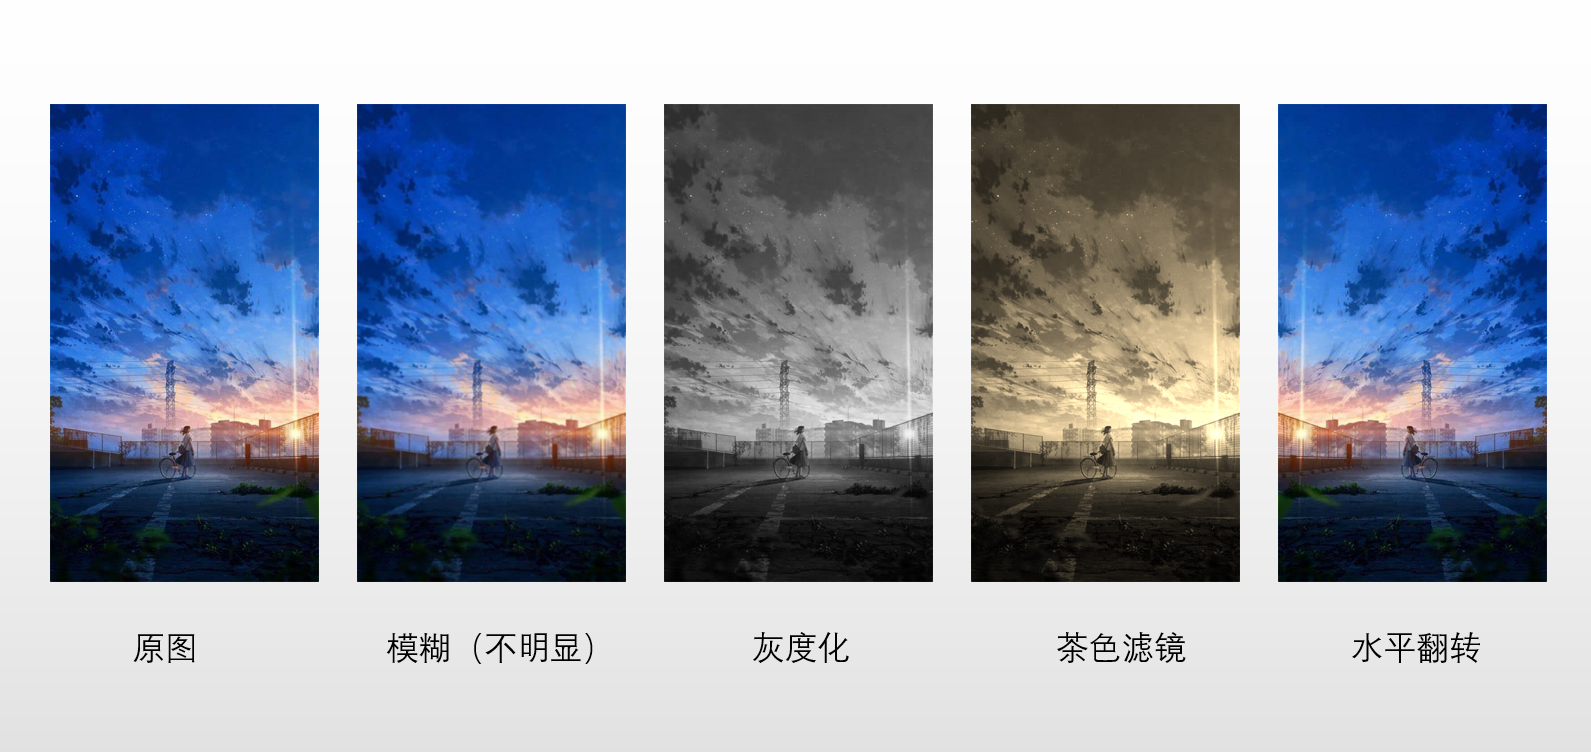
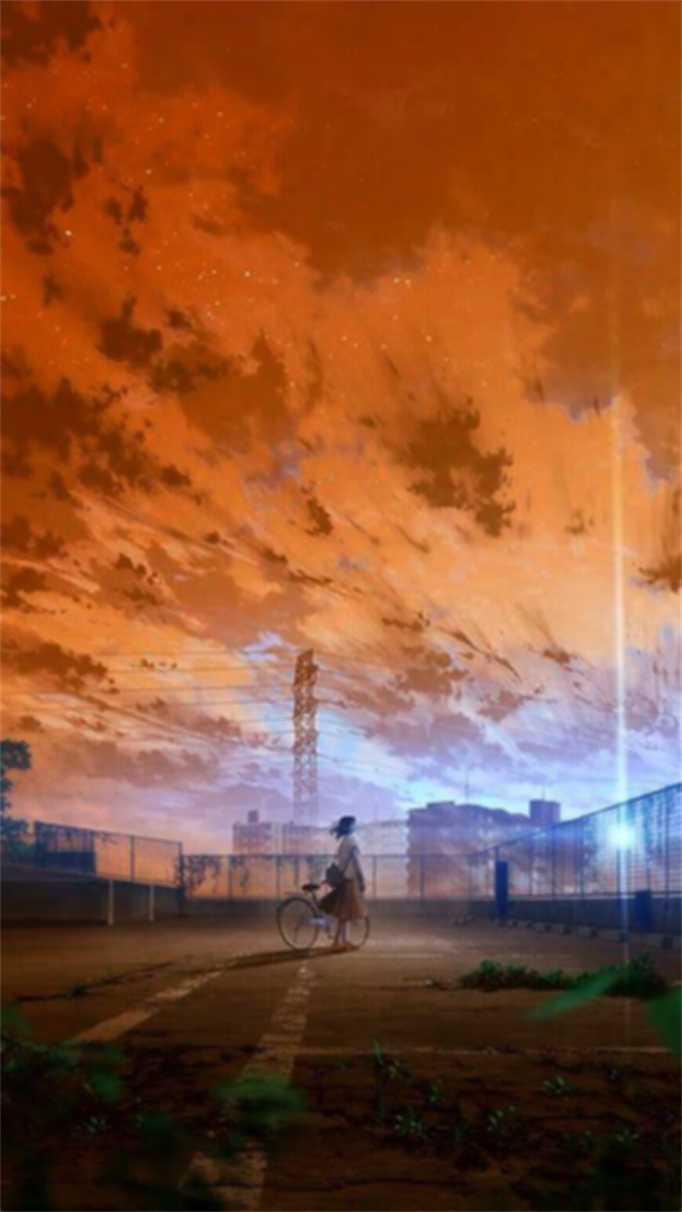
Problem: there is an existing bmp picture. It is required to read it into the program and perform one of the four effects of graying, horizontal flip, blur and Tan filter, and output a new picture, as shown below:
Command line input:

Of which:
Parameter 1: - b/g/s/r, indicating blur, gray, sepia and row reverse successively
Parameter 2: source file name
Parameter 3: new file name
When I first came into contact with this problem, I had no way to start. But after consulting a lot of materials, I successfully realized the function of opening, modifying and saving bmp files only in C + + all day!
catalogue
1. Basic information of BMP file
3. Define related classes and structures
Memory alignment and #pragma pack
Message header BmpFileInfoHeader
(2) Preparation for reading documents
(3) . read file header and data header
(4) . read image color information
1. Basic information of BMP file
(1) Type of. BMP file

Open the drawing software provided by Windows and find that bmp has several storage formats.
- Monochrome bitmap: there are only black and white colors, and each pixel occupies 1 bit (1 / 8 byte)
- 16 color bitmap: 4 bits per pixel (1 / 2 byte)
- 256 color bitmap: 8 bits per pixel (1 byte)
- 24 bit bitmap (true color): each pixel occupies 24 bits (3 bytes), and each byte stores one of the three color values of R/G/B (0 ~ 255)
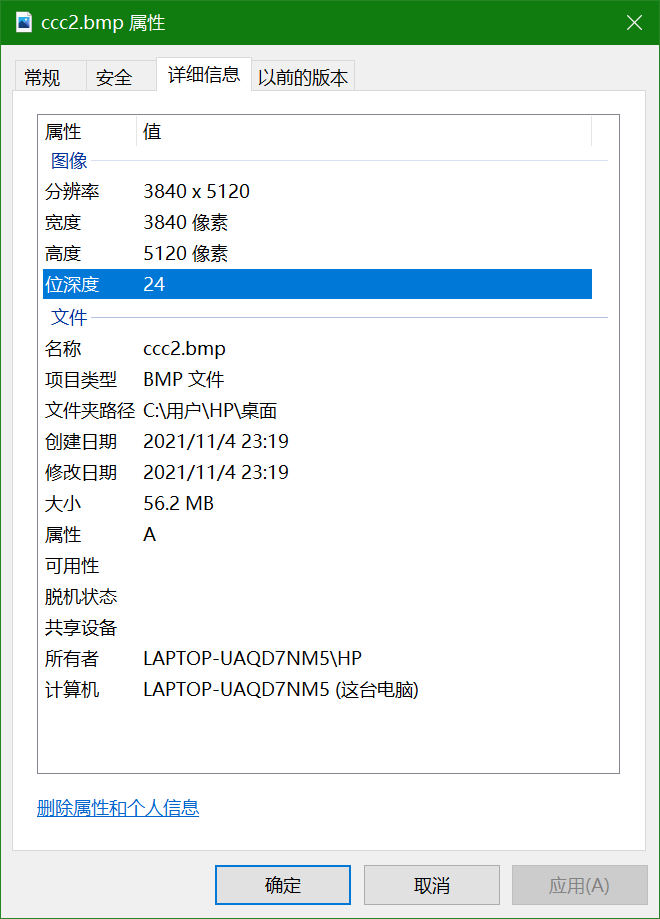
The number of bits occupied by each pixel is called bit depth (biBitCount, which will be used later), which can be viewed in the picture properties - > details.
(2).bmp file structure (key)
bmp file data consists of four parts:
- File header
- File header
- Palette (24 bit bitmap none)
- Image color information
Only the 24 bit bitmap, that is, true color, is discussed here, and other types of bmp files are not discussed.
Release the picture first:
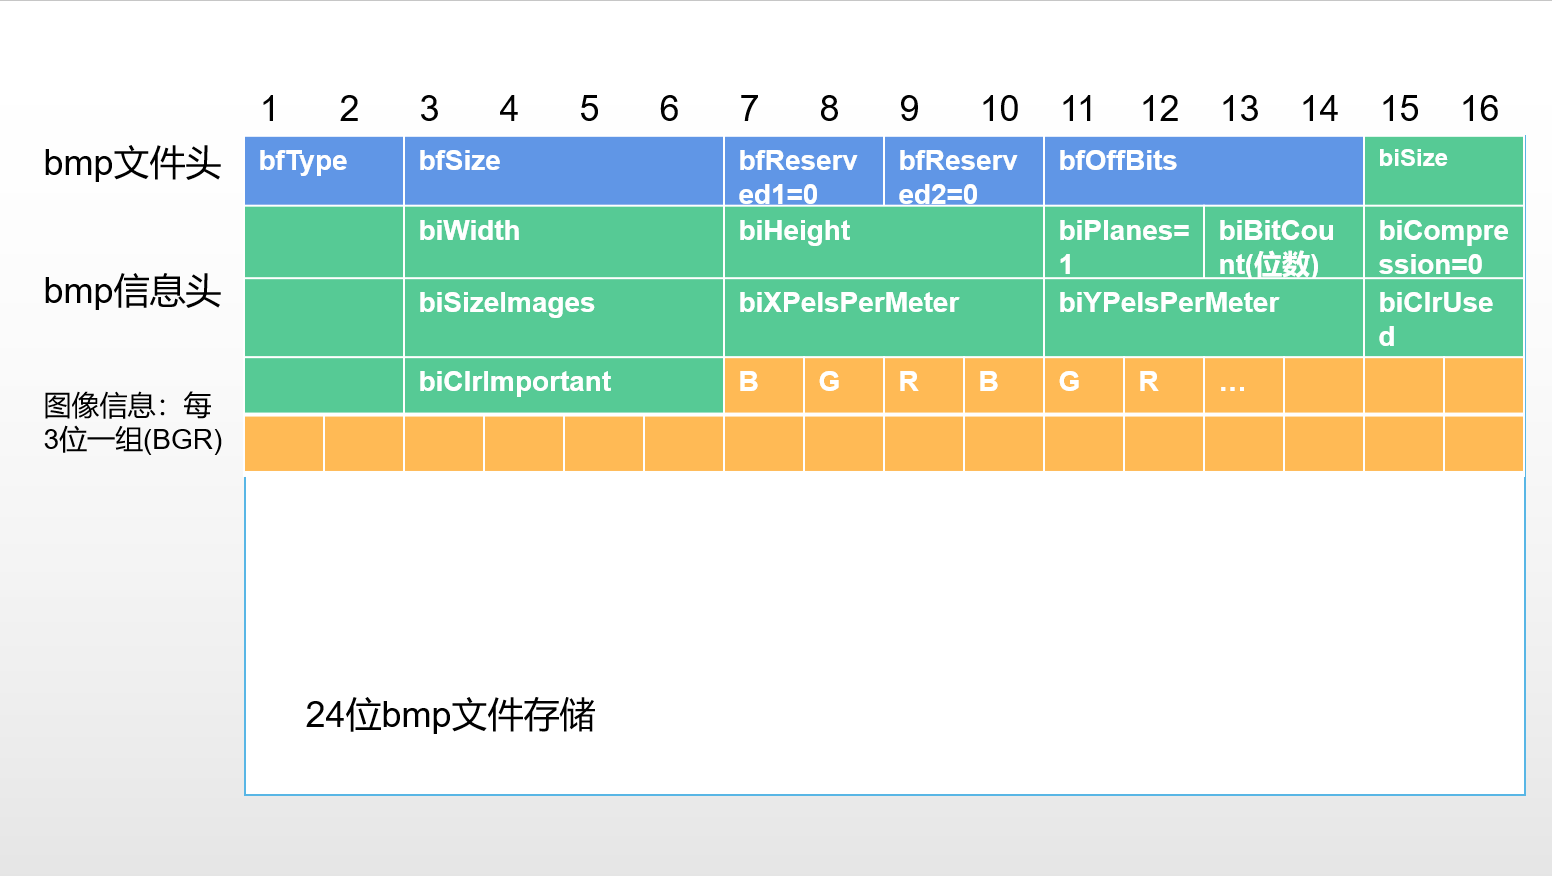
1> File header
| bfType | If it is a bmp file, the value is "BM", and the corresponding decimal system is 19778 |
| bfSize | Total file size |
| bfReserved1 | Reserved word 1, usually 0 |
| bfReserved2 | Reserved word 2, generally 0 |
| bfOffBits | The distance from the starting position of the file to the real image information |
2> Message header
| biSize | Header size, 24, 40 in bitmap |
| biWidth | Image width (px), that is, the number of pixels in the horizontal direction |
| biHeight | Image height (px), that is, the number of pixels in the vertical direction |
| biPlanes | Generally 1 |
| biBitCount | Bit depth, important, determines the type of bmp |
| biCompression | Whether to compress, usually 0 |
| biSizeImages | The actual number of bytes occupied by image color information, including 0 required for alignment |
| biXPelsPerMeter | Horizontal resolution |
| biYPelsPerMeter | Vertical resolution |
| biClrUsed | Generally 0 |
| biClrImportant | Generally 0 |
Note: we may find biWidth*3*biHeight is different from biSizeImages. Why? I'll explain next.
3> Palette (not discussed)
4> Image color information
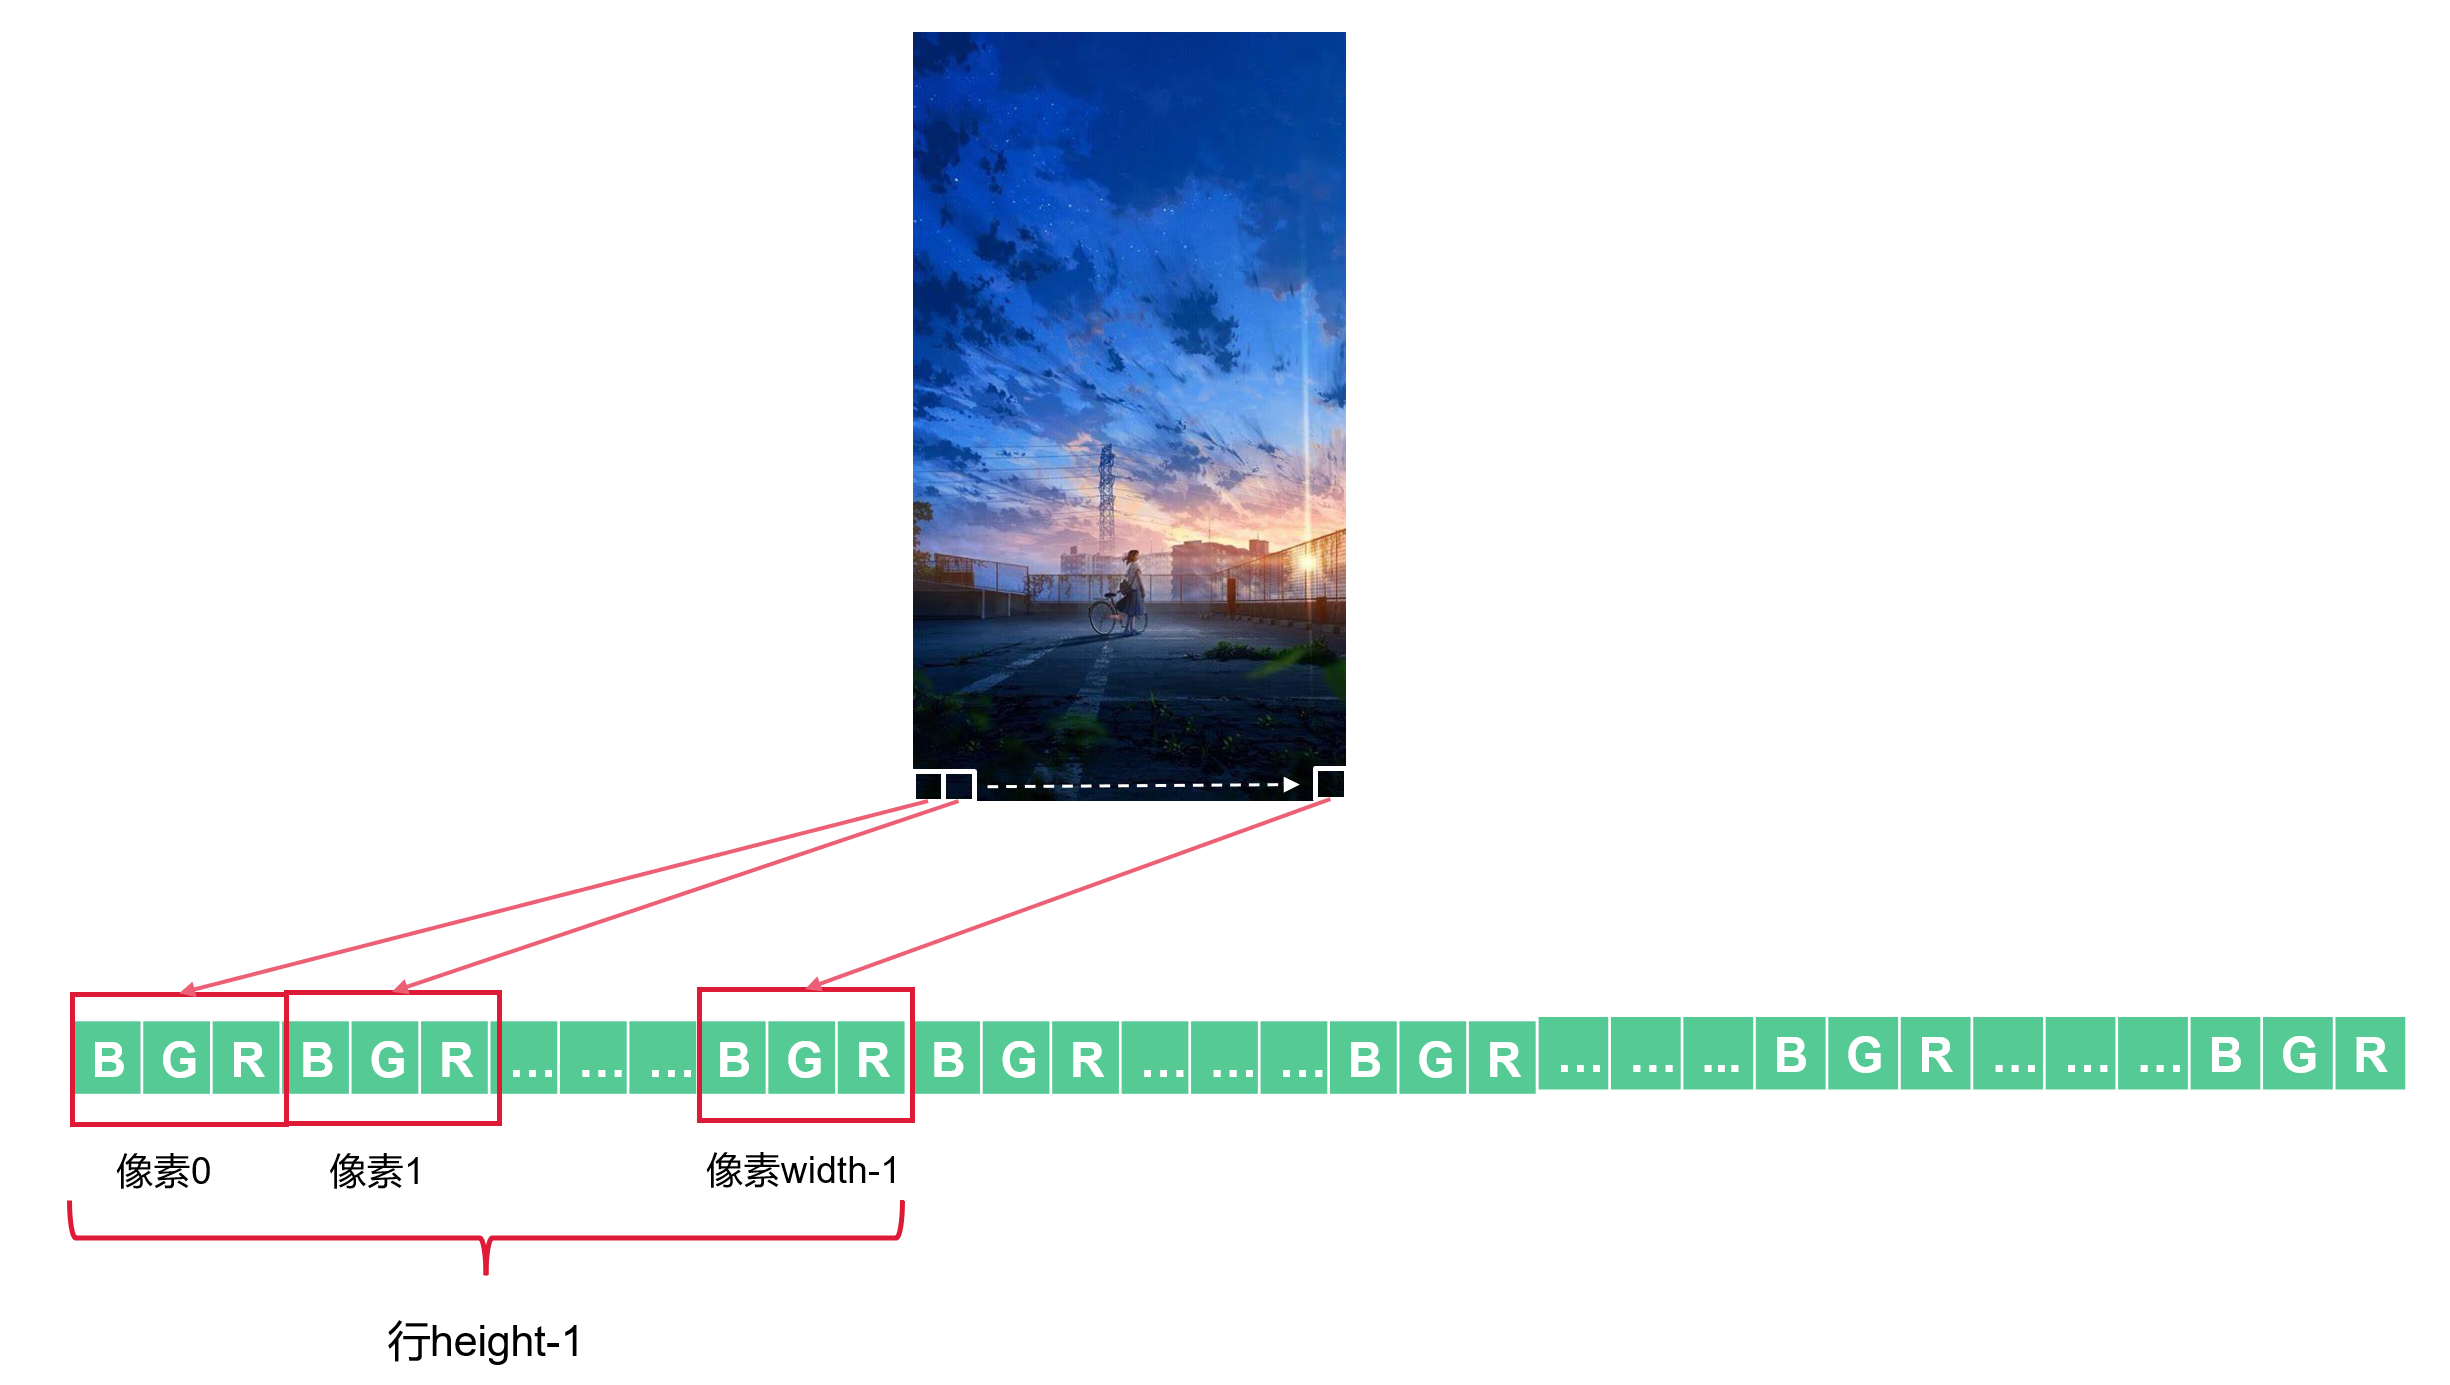
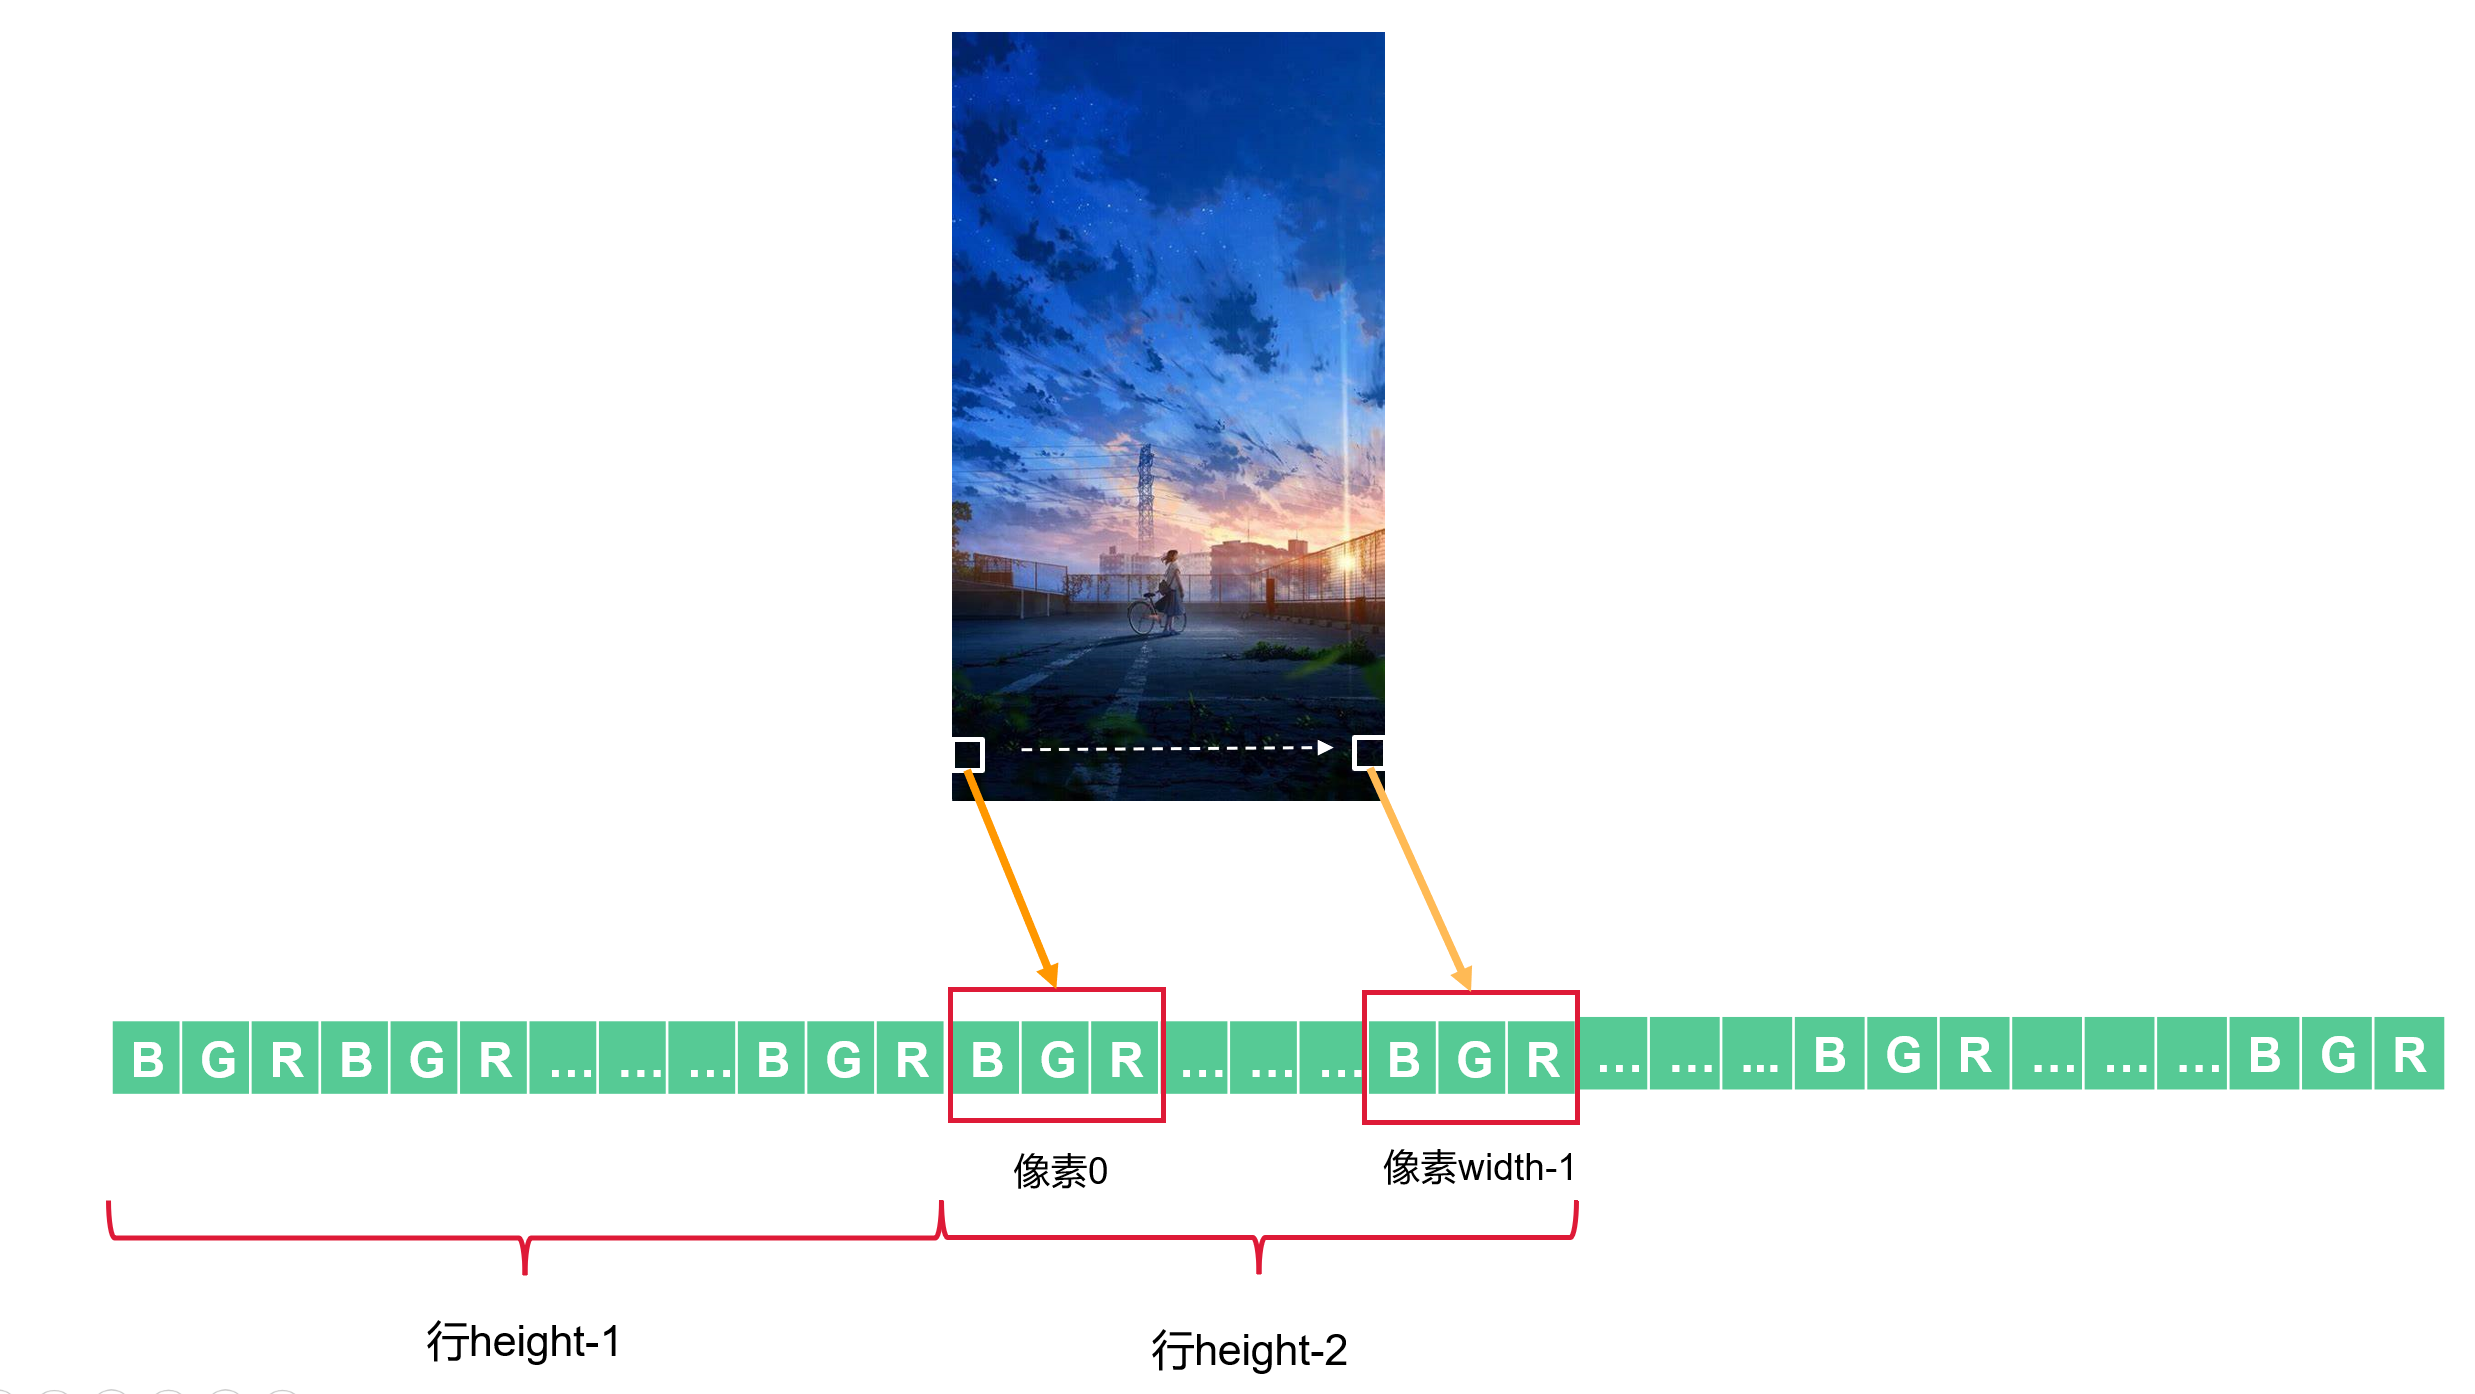
- The storage order of pixels is from bottom to top, from left to right, and is stored linearly in a file similar to a one-dimensional array.
- The color information of each pixel is set every 3 bytes and stored in BGR order.
- Only one color value is stored in each byte. The color value range is 0 ~ 255, which is stored in unsigned char type.
Three figures can illustrate the problem:
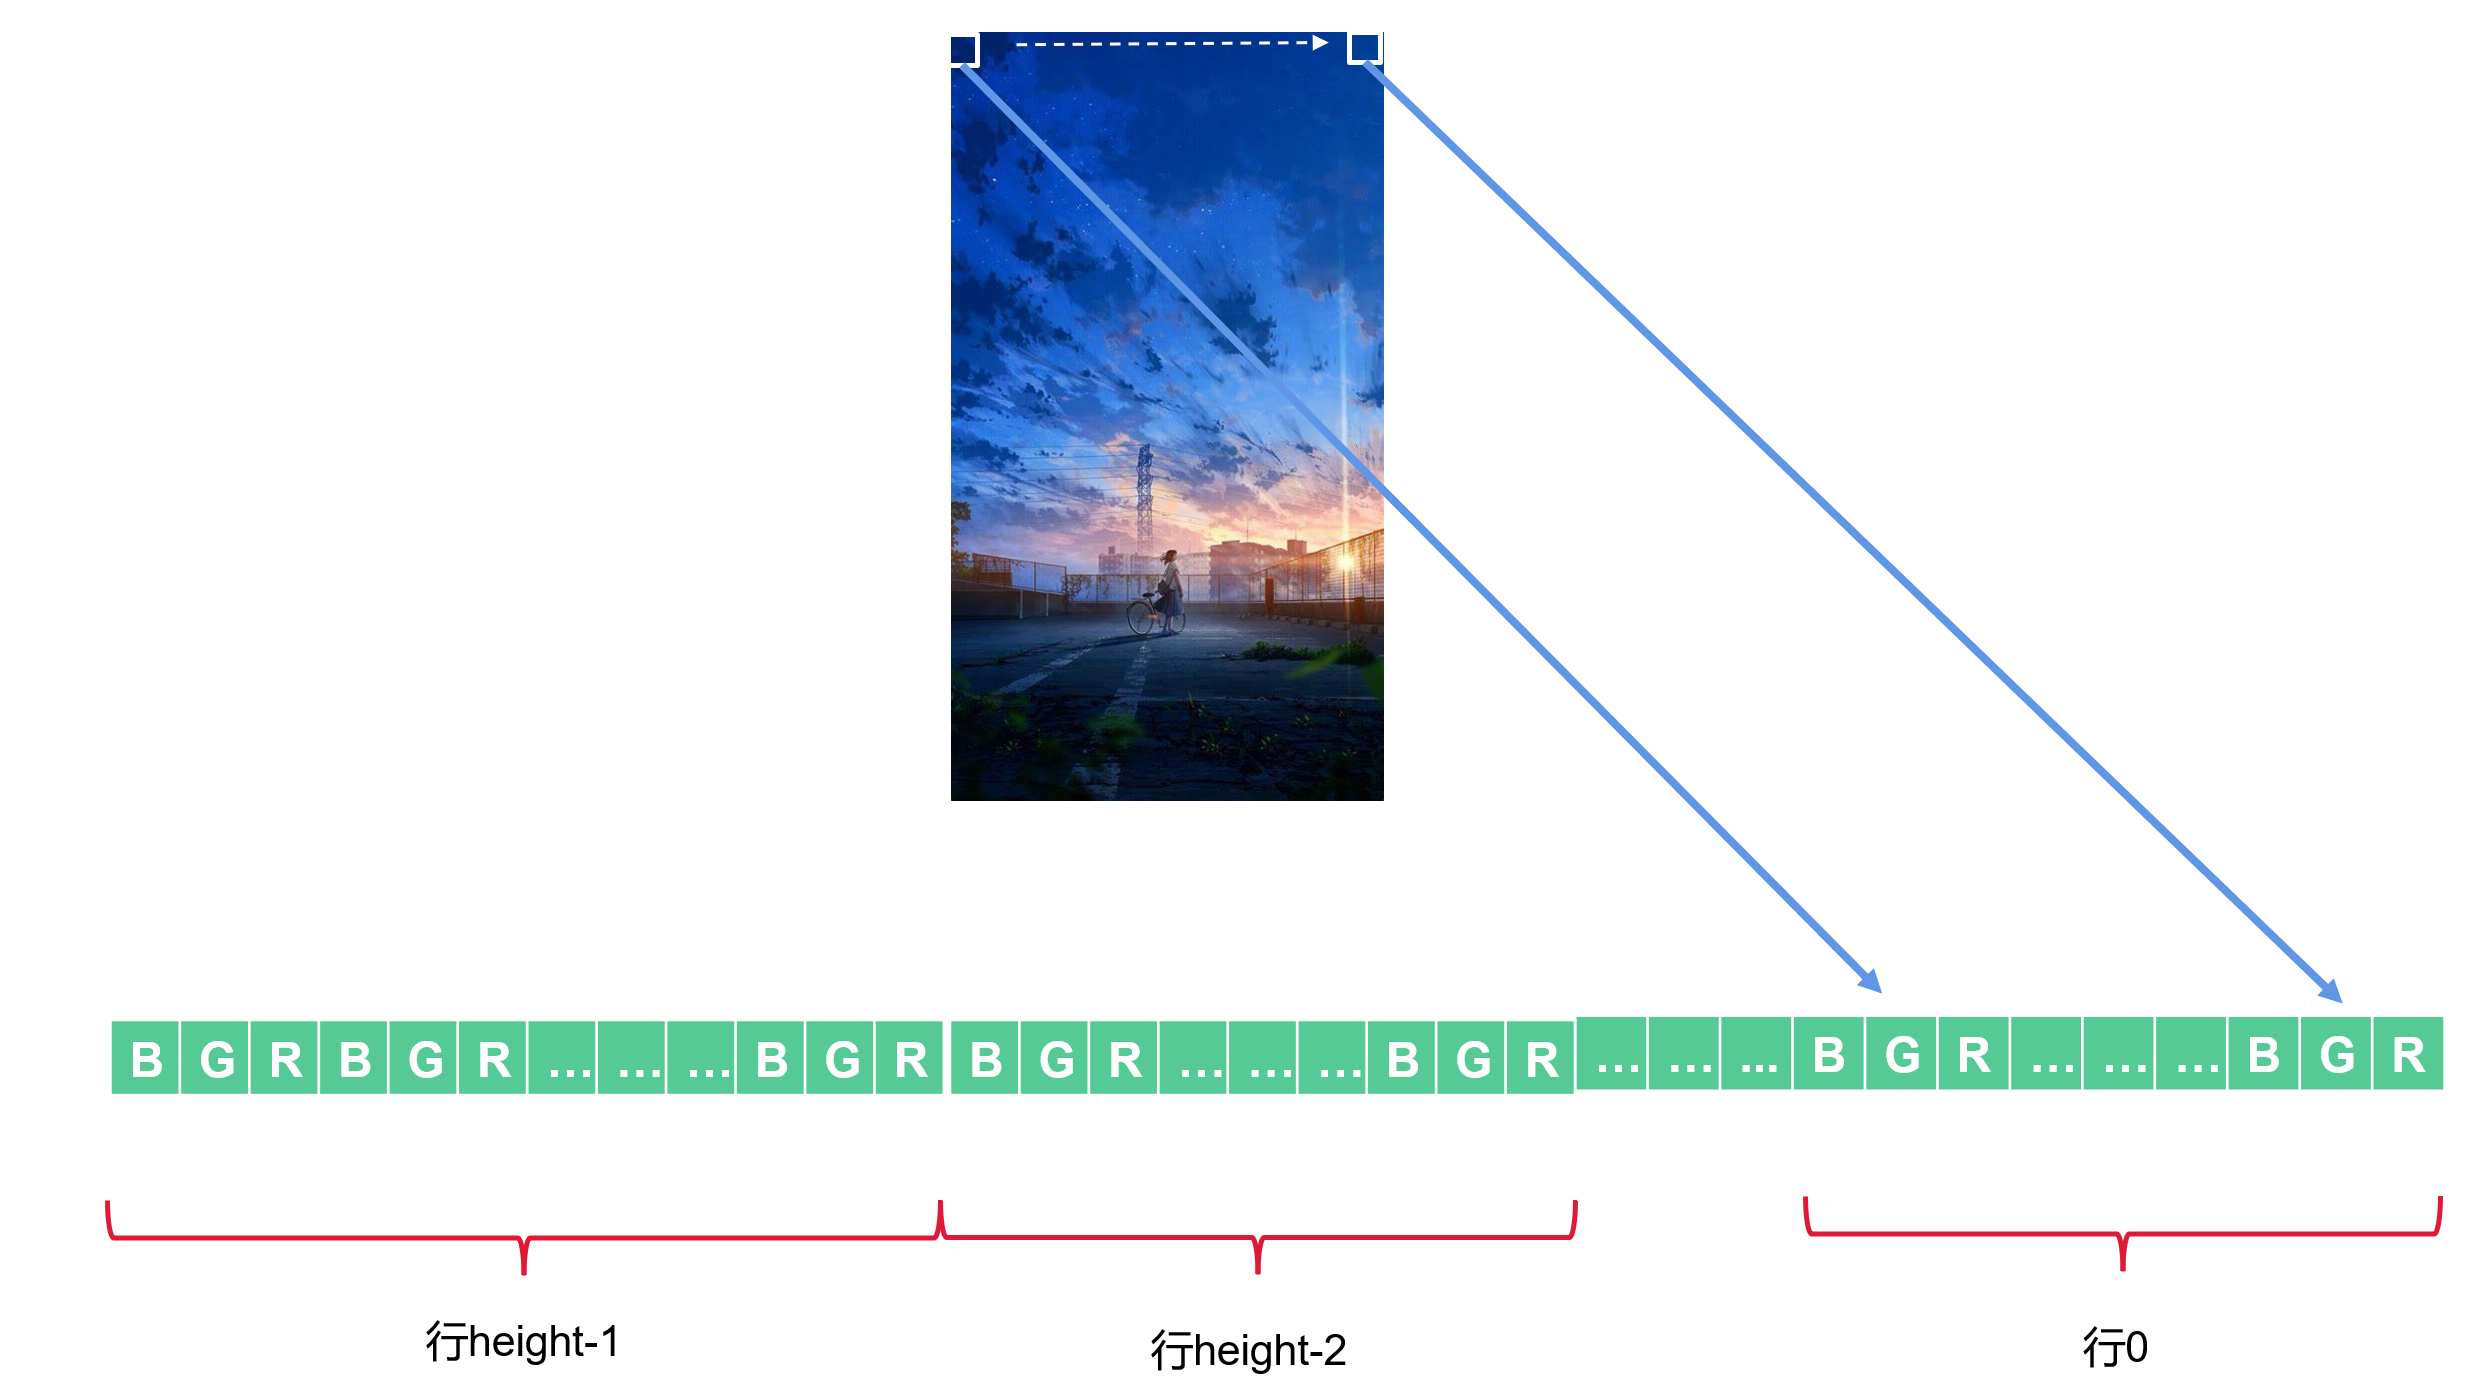
But are these data really arranged so closely?
This is true for pictures with a multiple of 4 in width (e.g. 1024px). After the pixel data of each row is saved, the pixel data of the next row is stored next to each other, and there is no gap between the data of rows.
However, for pictures whose width is not a multiple of 4 (e.g. 474px), after the pixel data of each line is stored, several bytes will be automatically vacated until the number of bytes in this line is a multiple of 4.
Submit the picture directly:

When biWidth=4: very good. There is no need to supplement any 0, because 4 * 3 = 12 is already a multiple of 4
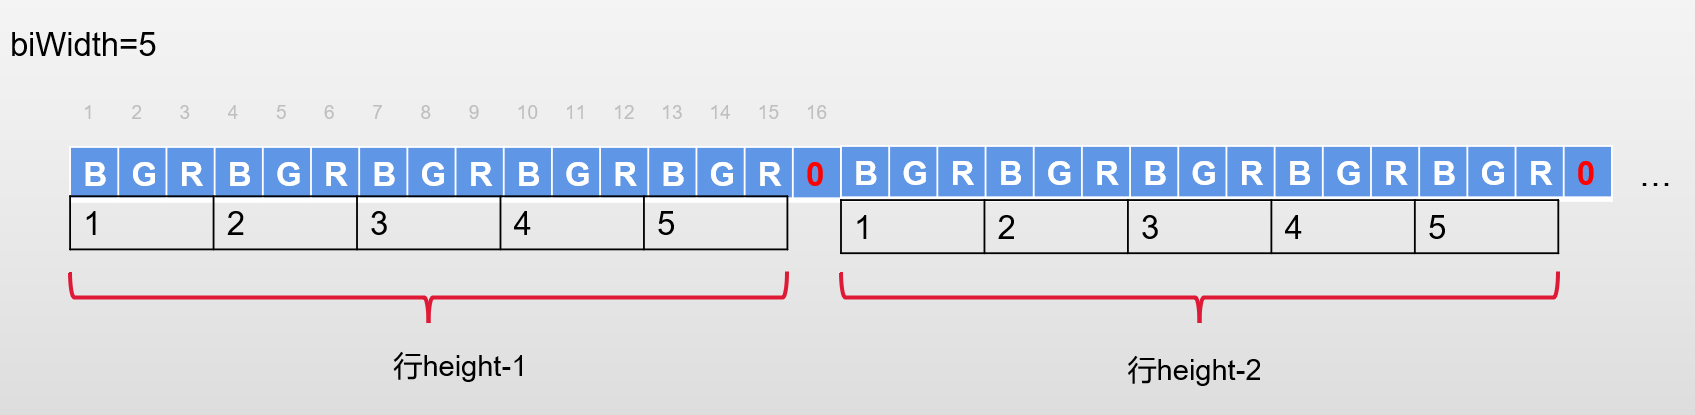
When biWidth=5: bad, 5 * 3 = 15 is not a multiple of 4. You have to fill in a 0 to be a multiple of 4
Therefore, when reading a picture whose width is not a multiple of 4, after reading the data of one line, it is necessary to skip a few bytes to read the data of the next line. Skip the number of bytes. I call it offset. Its calculation method is as follows:
offset = (fileInFoHeader.biWidth * 3) % 4;
if (offset != 0) {
    offset = 4 - offset;
}
Now I can explain the problem mentioned at the end of 2 >.
Example: now there is a picture with a width of 474px and a height of 842px.
When offset is not considered:
474*3*842=1197324(Byte)
When considering:
(474*3)%4=2
offset=4-2=2(Byte)
Bytes per line: 474*3+2=1424(Byte)
Total bytes of image data: 1424*842=1199008(Byte)
Who is right and who is wrong? Just look at the picture.
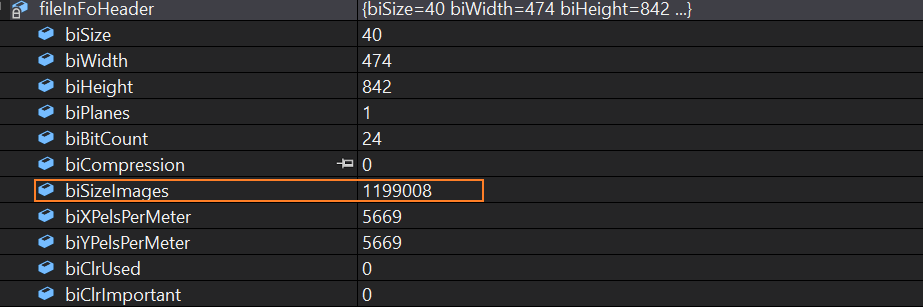
Their difference: 1199008-1197324= 1684(Byte), and 1684 = 842 * 2. Because there is a 2-byte gap at the end of each line, the gap in 842 lines accumulates to exactly 1684 bytes.
The debug results show that the offset is considered for the actual number of bytes occupied by the image data. There is a gap when these data are stored. Therefore, we should deliberately write the gap when writing the file, otherwise the system cannot read the new image we generate. This is the key behind!
2. Implementation ideas
First, read the bmp file. From the above analysis, the file header, information header and image data of bmp should be read separately.
Then a new bmp file is generated. File header, information header and image data should be written in turn.
Finally, the image processing function is realized. These functions for image processing are encapsulated in a separate header file. When used, you can pass in the function pointer.
3. Define related classes and structures
Define the structure of file header and information header (because they do not require any function), which stores the attributes related to the file. The size of each attribute refers to the bmp file structure diagram at the beginning. 2 bytes are generally defined as unsigned short and 4 bytes are generally defined as unsigned int
Define bmp class (because it needs to define functions). The most important thing is an array of "color" structure objects, which is used to receive the read image color data. There is also an offset of int type, a file header structure object and a data header structure object. Define two functions: read file and write file.
Naturally, you need a "color" structure object, which has three attributes B/G/R.
Note: in the structure, the definition order of all attributes must be consistent with the information stored in the file, otherwise the data obtained when reading the file will be confused! That is, it must be defined according to the bmp file structure!
File header BmpFileHeader
#pragma pack(2) / / note here
struct BmpFileHeader {
    unsigned short bfType;
    unsigned int bfSize;
    unsigned short bfReserved1;
    unsigned short bfReserved2;
    unsigned int bfOffBits;
};
Pay special attention to #pragma pack(2). Without this line, the space occupied by this structure is not the sum of all attribute sizes. In other words, it clears the "empty" memory between attributes. Understanding this is extremely important for file reading operations!
Memory alignment and #pragma pack
Let's briefly talk about memory alignment. The code for testing is as follows:
#include <iostream>

using namespace std;

struct BmpFileHeader {
    unsigned short bfType;
    unsigned int bfSize;
    unsigned short bfReserved1;
    unsigned short bfReserved2;
    unsigned int bfOffBits;
};

int main()
{
    cout << sizeof(BmpFileHeader)<< endl;//16
    return 0;
}
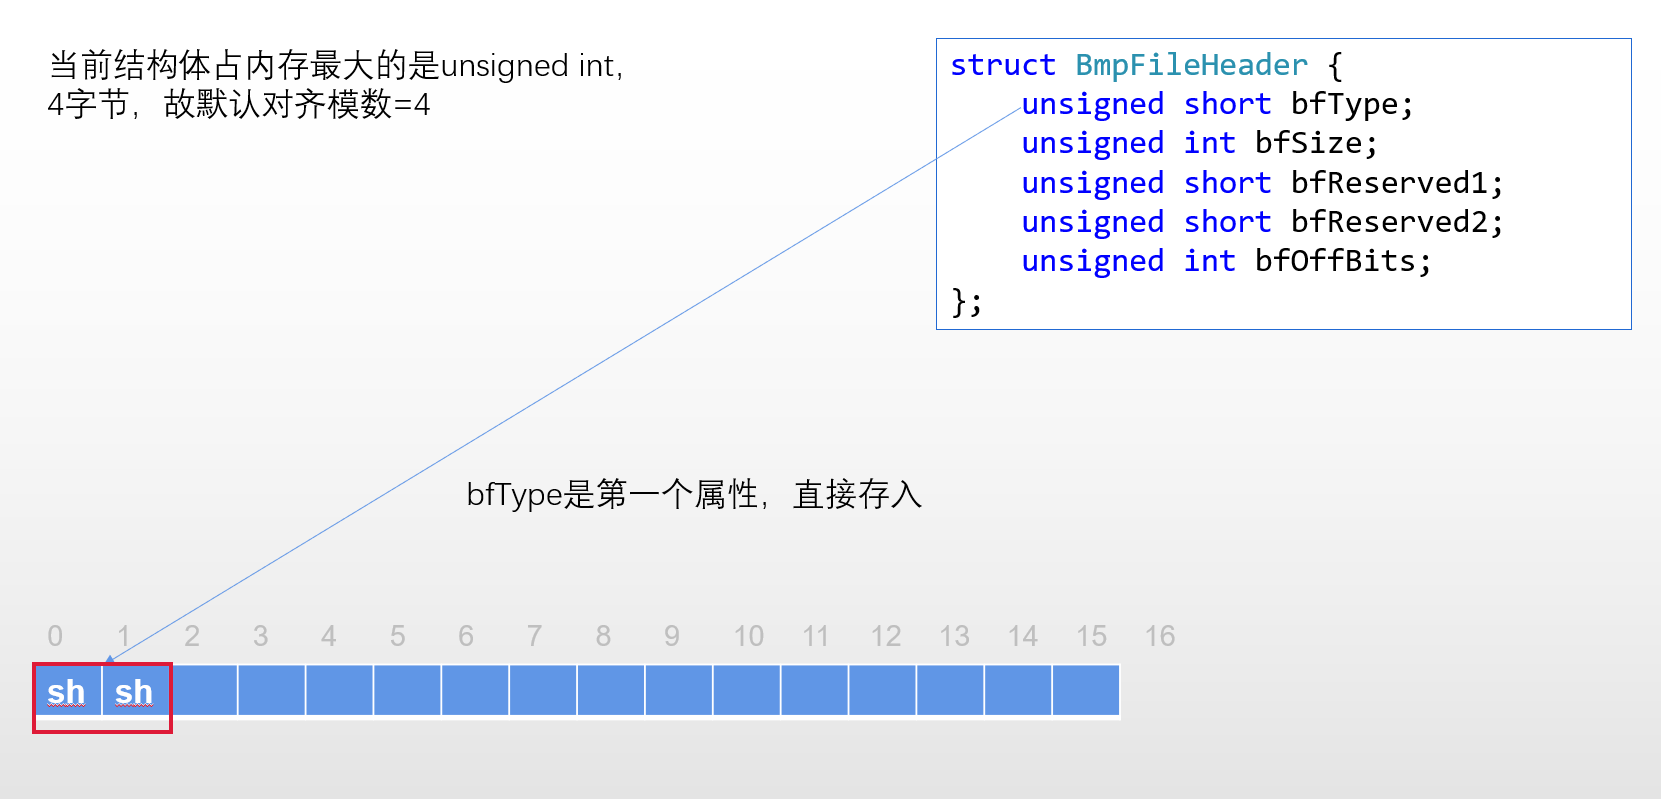
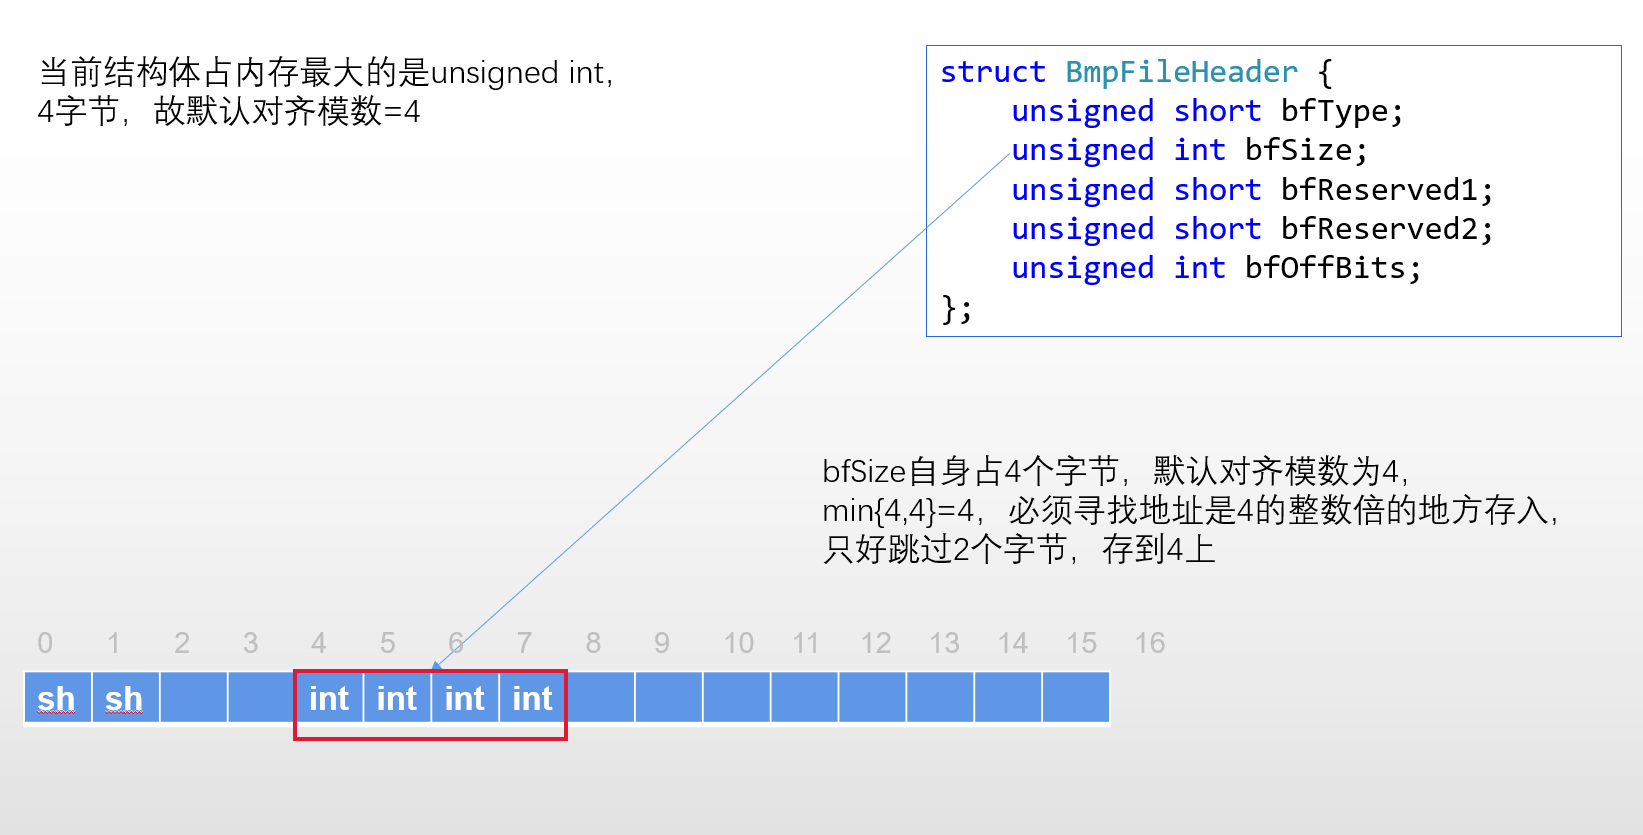
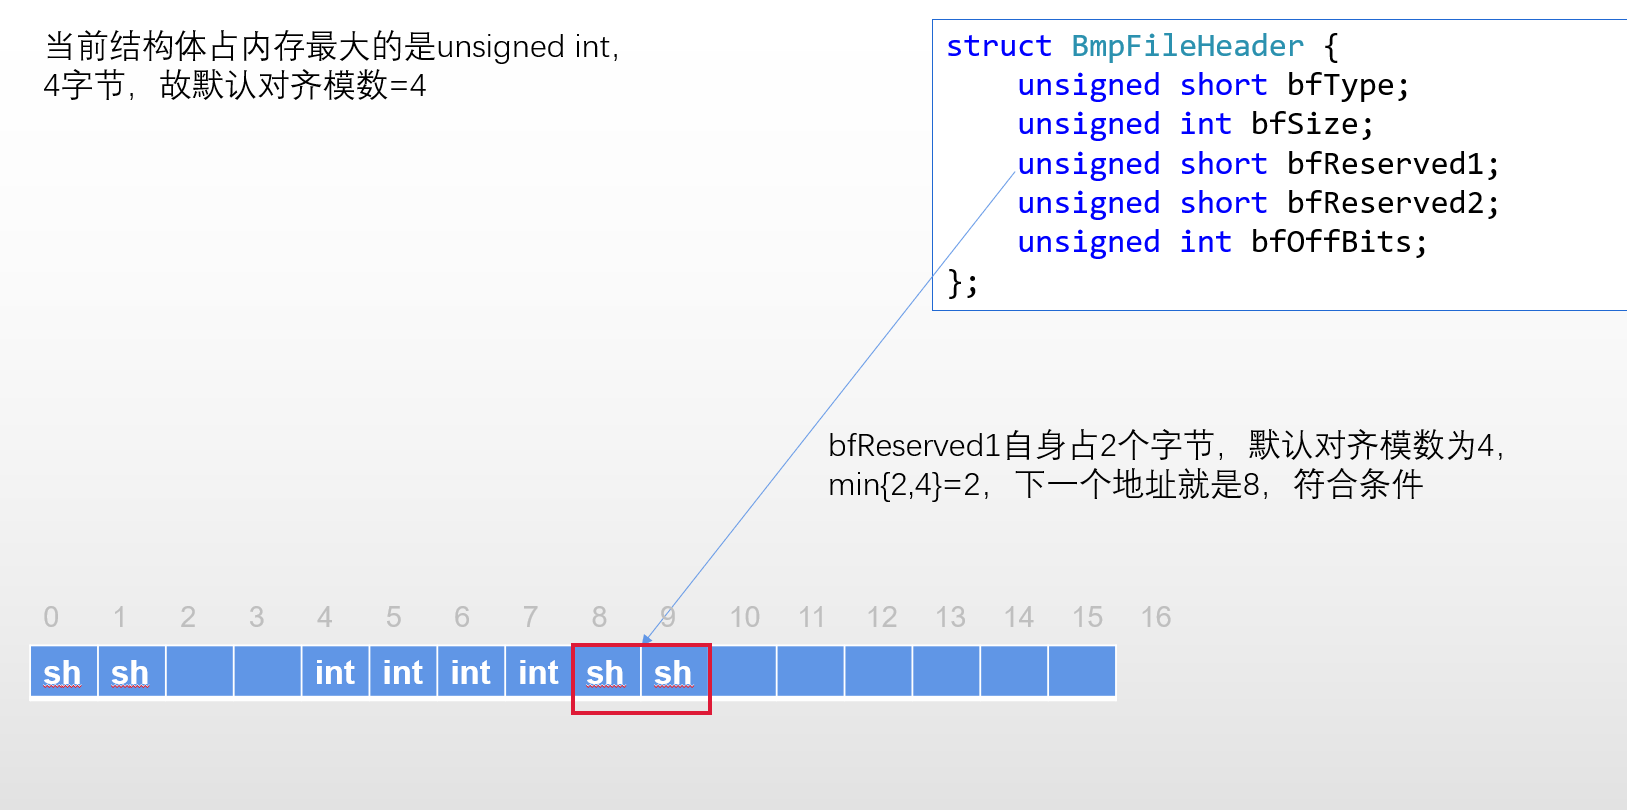
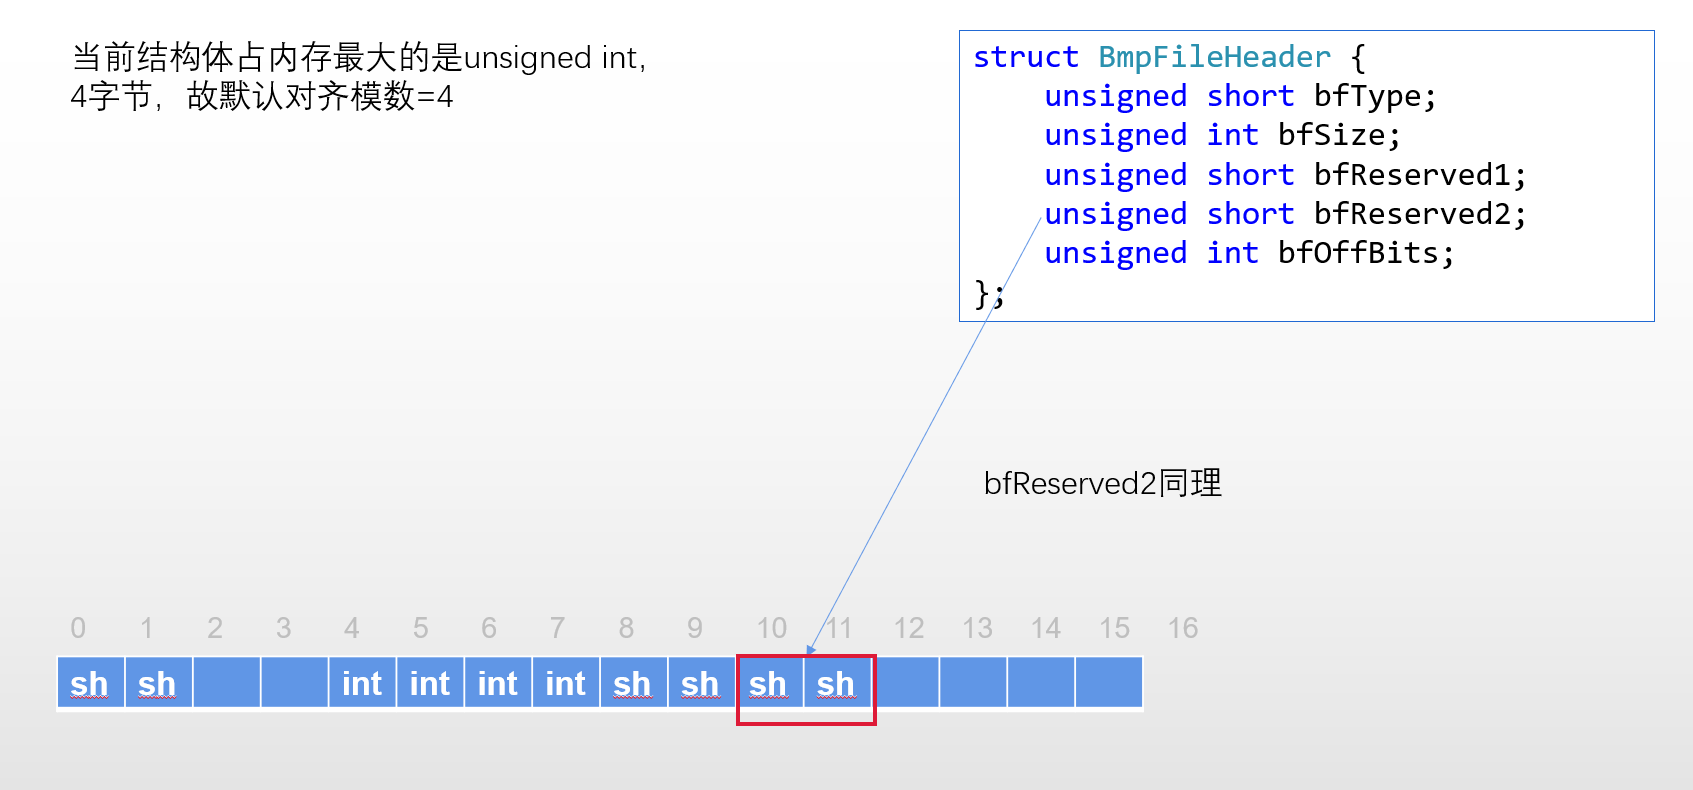
However, the space occupied by these data is logically 2+4+2+2+4=14(Byte). Why is 16 output?
First put the principle:
The attributes of a structure are stored in the defined order.
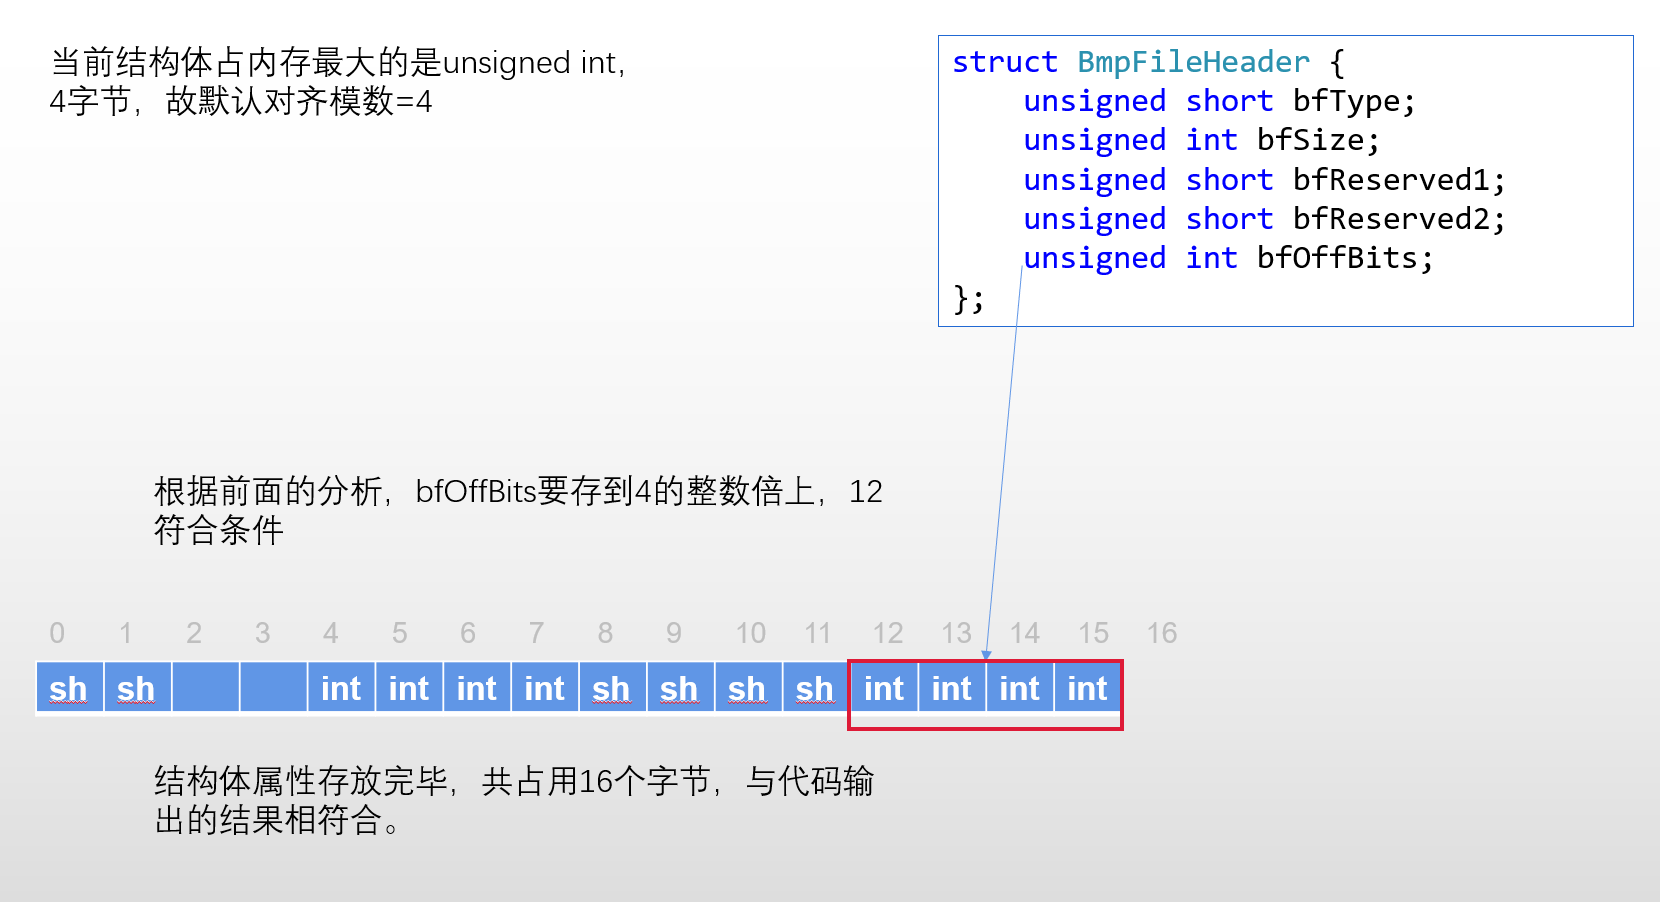
Structures generally have many attributes. Take the one that occupies the largest memory, and the number of bytes it occupies is the default alignment modulus.
Assuming that the storage address of the first attribute is 0, when storing the subsequent data, take the minimum value min of its own data size and alignment modulus, find the address nearest to itself and an integer multiple of min, and store the data there.
There are a lot of words and it's hard to understand, isn't it? It's still the old rule to draw pictures:
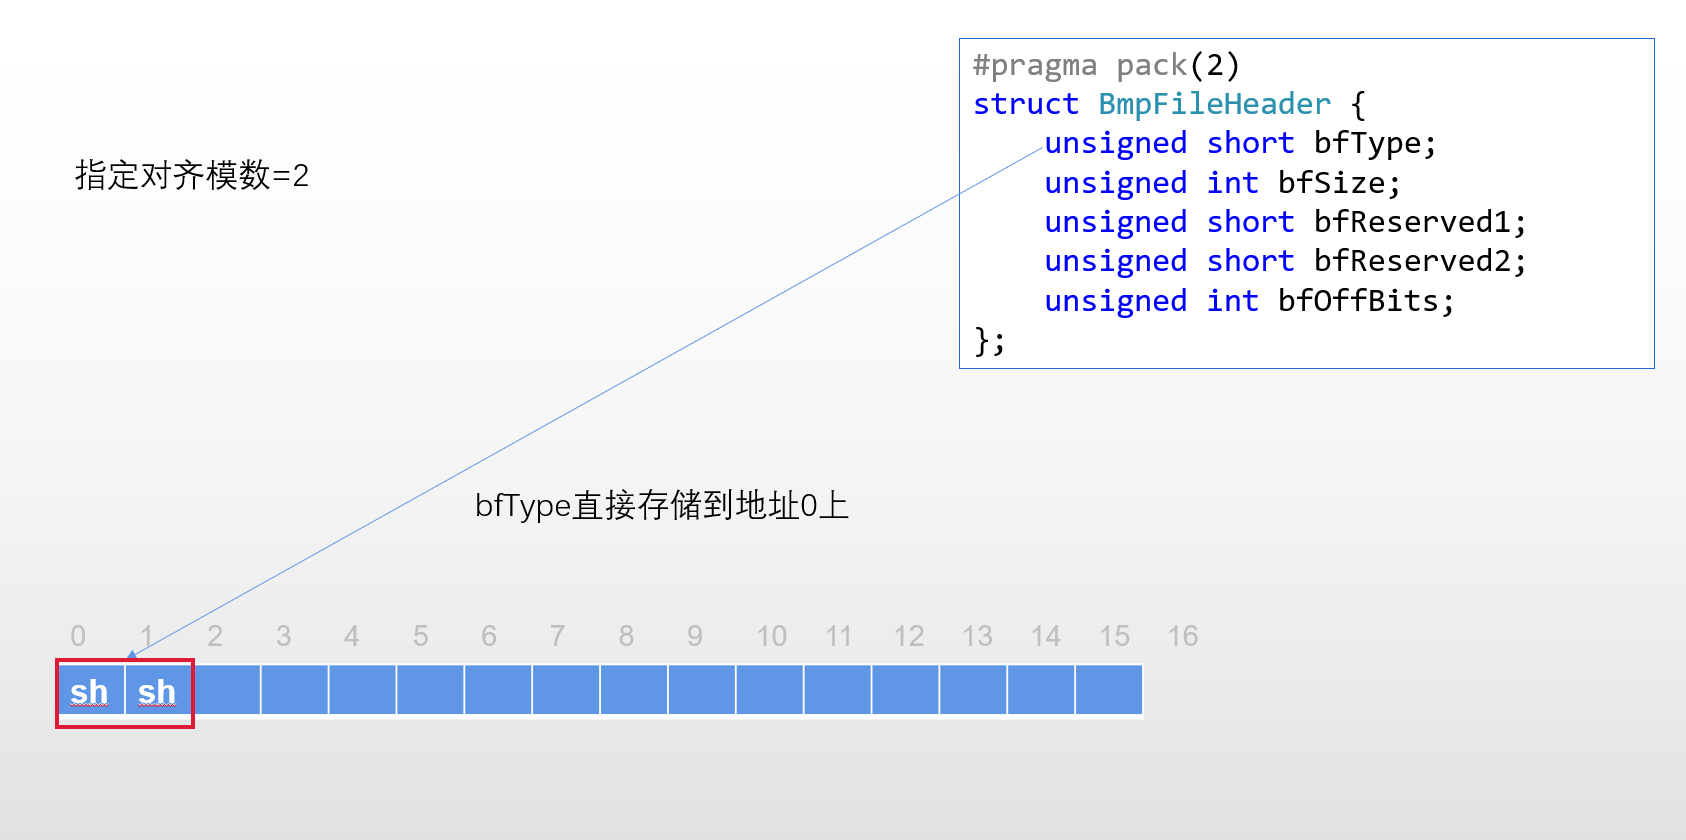
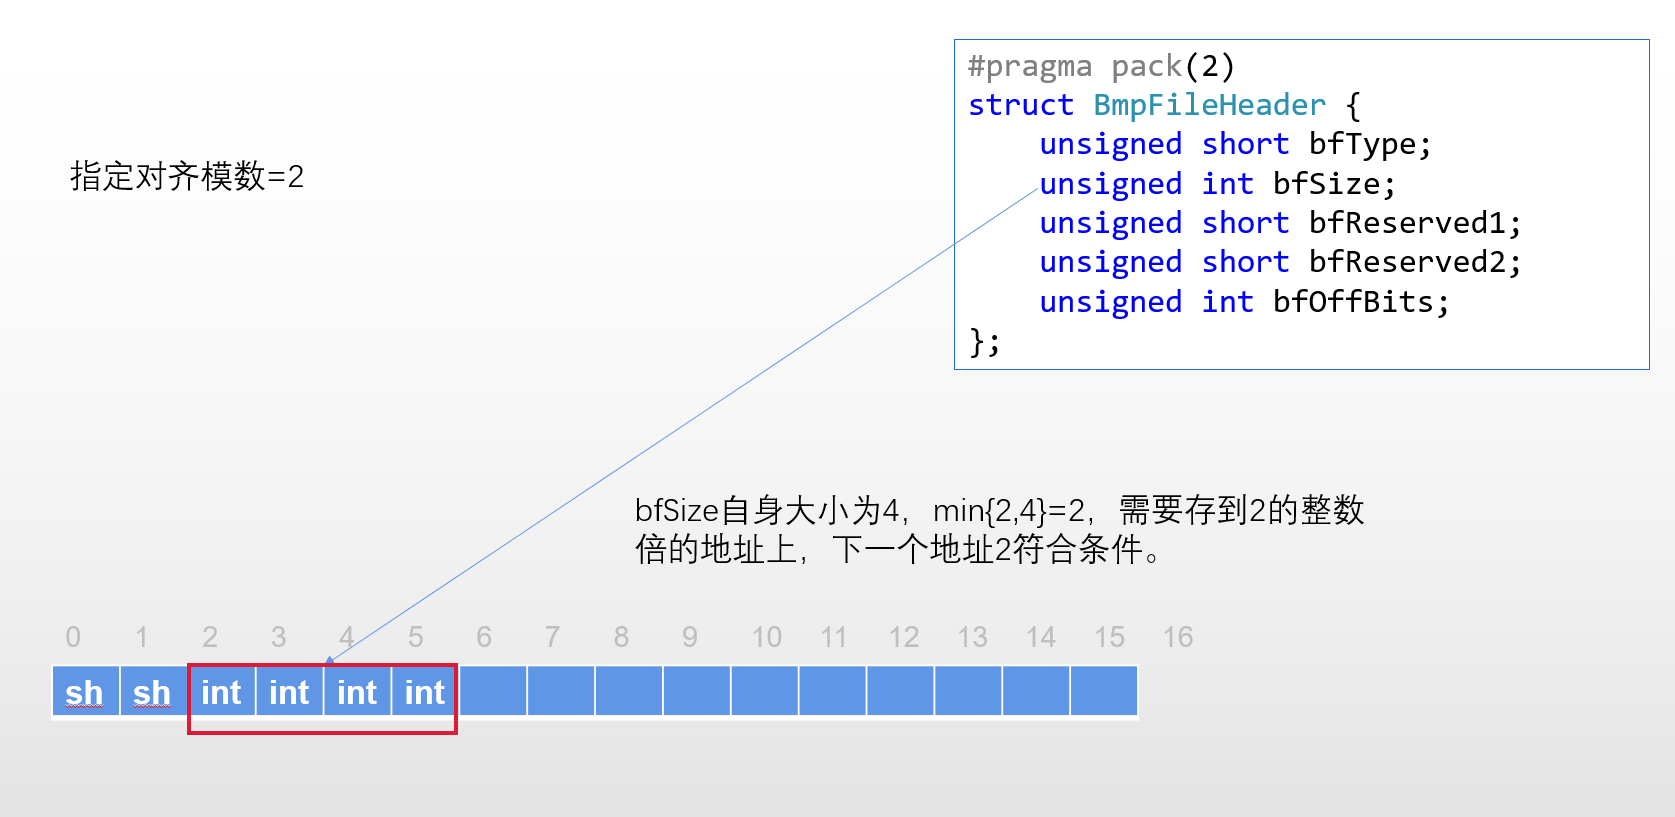
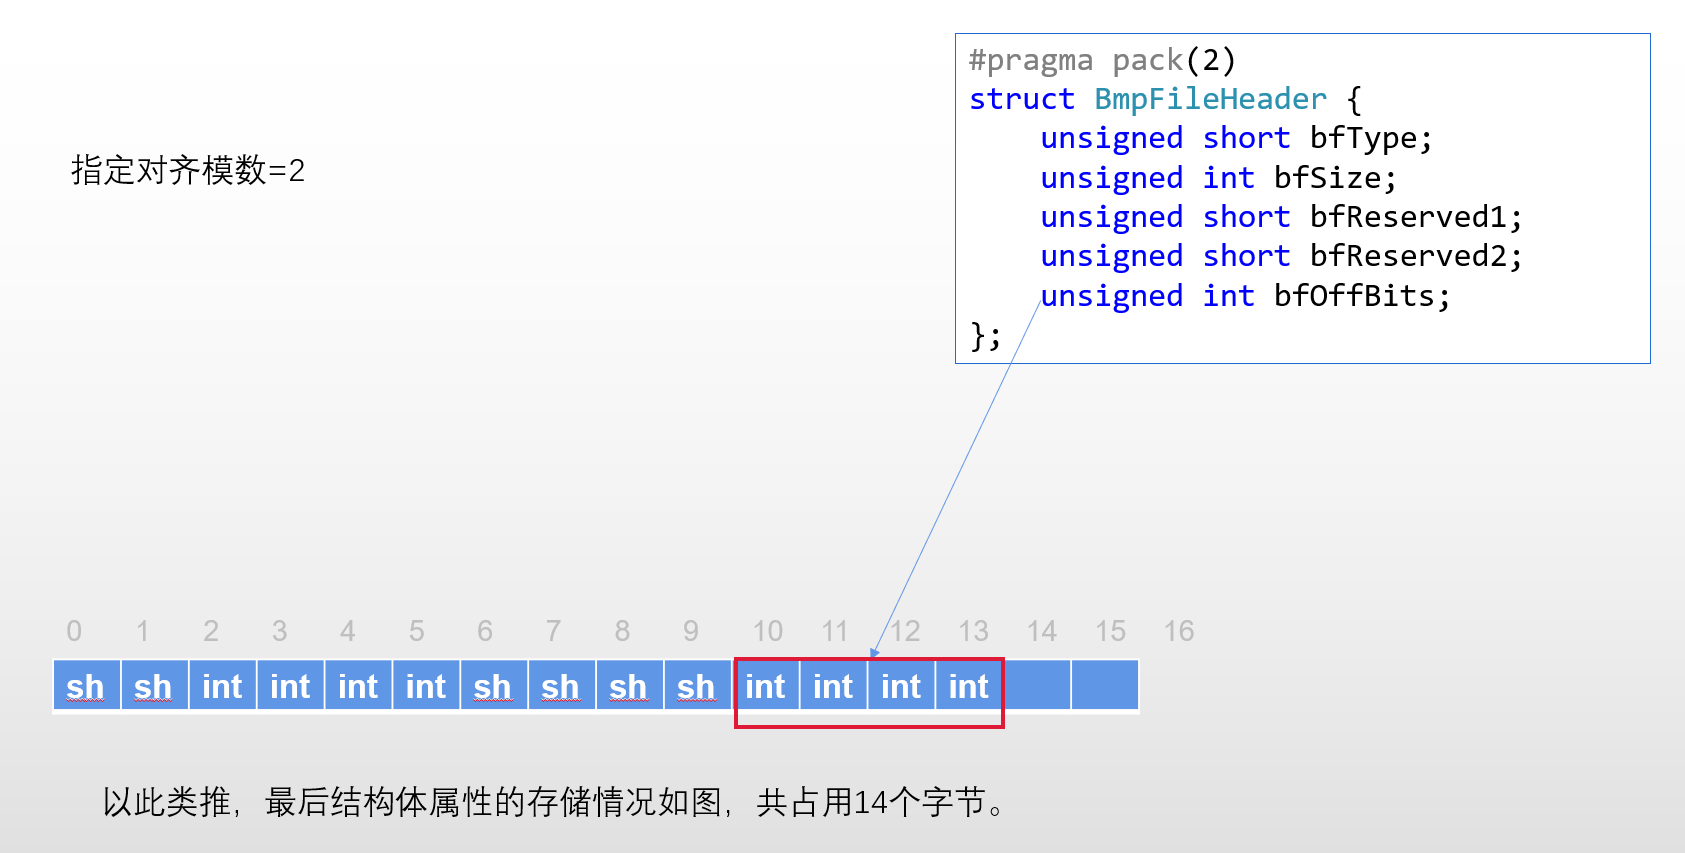
What happens if you assign #pragma pack(2) to this structure?
#include <iostream>

using namespace std;

#pragma pack(2)
struct BmpFileHeader {
    unsigned short bfType;
    unsigned int bfSize;
    unsigned short bfReserved1;
    unsigned short bfReserved2;
    unsigned int bfOffBits;
};

int main()
{
    cout << sizeof(BmpFileHeader)<< endl;//14
    return 0;
}
Output 14, which is consistent with our previous expectation.
#pragma pack(n): specifies a new alignment modulus n for the current structure.
Message header BmpFileInfoHeader
struct BmpFileInFoHeader {
    unsigned int biSize;
    int biWidth = 0, biHeight = 0;
    unsigned short biPlanes;
    unsigned short biBitCount;
    unsigned int biCompression, biSizeImages;
    int biXPelsPerMeter, biYPelsPerMeter;
    unsigned int biClrUsed, biClrImportant;
};
The reason for not adding #pragma pack() here is that these attributes can be stored without gaps according to the default alignment modulus of 4. Please verify by yourself.
Color structure RGBTriple
It is placed in a separate header file (RGB triple. H). Pay attention to the #pragma once in it to prevent repeated inclusion of header files.
It should also be noted that the definition order of attributes is different from the custom. It can only be BGR, so that the data is stored in the correct order during reading.
#pragma once

struct RGBTriple {
    unsigned char blue;
    unsigned char green;
    unsigned char red;
};
Picture bmp
class bmp {
private:
    int offset;//Gap at the end of a line
    RGBTriple* surface;//An array of image color data
    BmpFileHeader fileHeader;//File header
    BmpFileInFoHeader fileInFoHeader;//Data header

public:
    void readPic(const char* fileName);//read file
    void writePic(void (*myMethod)(int,int,RGBTriple*), const char* outFileName);//Write file
};
surface is a pointer to an array of RGB triple structure objects in the heap. That array will be created when reading the file and retained until the end of the program.
The two methods of reading and writing a file can receive a string as the file name. The method of writing a file can also receive a function pointer to specify the modification of the picture before writing the file.
The file header structure, information header structure and picture class are defined in the same header file (bmpFile.h). The complete code is as follows:
#pragma once
#include<fstream>
#include<iostream>
#include"RGBTriple.h"
#define BMPTYPE 19778

using namespace std;

#pragma pack(2)
struct BmpFileHeader {
    unsigned short bfType;
    unsigned int bfSize;
    unsigned short bfReserved1;
    unsigned short bfReserved2;
    unsigned int bfOffBits;
};

struct BmpFileInFoHeader {
    unsigned int biSize;
    int biWidth = 0, biHeight = 0;
    unsigned short biPlanes;
    unsigned short biBitCount;
    unsigned int biCompression, biSizeImages;
    int biXPelsPerMeter, biYPelsPerMeter;
    unsigned int biClrUsed, biClrImportant;
};


class bmp {
private:
    int offset;
    RGBTriple* surface;
    BmpFileHeader fileHeader;
    BmpFileInFoHeader fileInFoHeader;

public:
    void readPic(const char* fileName);
    void writePic(void (*myMethod)(int,int,RGBTriple*), const char* outFileName);
};
4. Reading documents
(1) 1. Basic knowledge
The fsstream header file of C + + provides file input stream i fstream and file output stream ofstream.
The two flow objects have some of the same steps when used:
- Create flow object
- Open file: open("file path", opening method)
- (optional) check whether the file is open: is_open()
- Close flow after use: close()
Common opening methods:
| ios::in | read file |
| ios::out | Write file |
| ios::app | When you open a file, the cursor is at the end of the file |
| ios::trunc | If a file with the same name exists, delete it and create a new file |
| ios::binary | Read / write files in binary mode |
Several different opening modes can be connected by | (single vertical line), indicating that this opening mode has two meanings at the same time.
A complete example of using ifstream:
#include<fstream>
#include<iostream>

using namespace std;

int main(){
    ifstream ifs;
    ifs.open("aaa.bmp",ios::in | ios::binary);

    if(!ifs.is_open()){
        cout<<"File not opened!"<<endl;
    }

    //Read

    ifs.close();
}
The unique method of ifstream: read(); the unique method of ofstream: write(); their function prototypes are as follows:
basic_istream& __CLR_OR_THIS_CALL read(_Elem* _Str, streamsize _Count);
Parameter 1: char * type, indicating the "destination" of the data to be read in
Parameter 2: total number of bytes of data read in at one time
basic_ostream& __CLR_OR_THIS_CALL write(const _Elem* _Str, streamsize _Count);
Parameter 1: char * type, indicating the source of data to be written
Parameter 2: total number of bytes written at one time
(2) Preparation for reading documents
Create a new bmp file.cpp file and write the empty implementation of the two functions of bmp class.
#include"bmpFile.h"


void bmp::readPic(const char* fileName) {

}

void bmp::writePic(void (*myMethod)(int,int,RGBTriple*),const char* outFileName) {

}
Note that the header file fsteram has been introduced into BMP file. H, so you can directly use its structure.
#include"bmpFile.h"


void bmp::readPic(const char* fileName) {

    ifstream ifs;
    ifs.open(fileName, ios::in|ios::binary);

    if (!ifs.is_open()) {
        cout << "Can't open the file." << endl;
        return;
    }

    //do something


    ifs.close();
}

void bmp::writePic(void (*myMethod)(int,int,RGBTriple*),const char* outFileName) {

}
Note that ios::binary specifies to read the file in binary mode. If it is missing, the program will not make an error, but the output picture is black (pro test).
(3) . read file header and data header
According to the previous idea, read the file header first, then the data header, and the rest is the image information.
ifs.read((char*)&fileHeader,sizeof(BmpFileHeader));
Note the forced type conversion. The reason why the address of fileHeader structure object is converted to char * is that the read() function only receives char * addresses.
After reading the file header, there is a question: what if the file read in is not of bmp type at all? Won't the subsequent operations be meaningless?
Therefore, we will add an IF statement to judge whether the bmp type is being read. If not, we will end the whole function. According to the bmp file header structure, if the bfType is not 19778, the file is not bmp type. 19778 has been defined as the macro constant BMPTYPE in bmp file. H.
if(fileHeader.bfType!=BMPTYPE){
    cout<<"Incorrect file type!"<<endl;
    return;
}
Then read the data header. The same problem is the same. What if the bmp file is not 24 bits? We can't deal with non 24 bit bmp. We can only add a judgment. If it is not 24 bits, the whole function will be ended.
ifs.read((char*)&fileInFoHeader, sizeof(BmpFileInFoHeader));

if (fileInFoHeader.biBitCount != 24) {
    cout << "invalid!" << endl;
    return;
}
(4) . read image color information
Now we can finally start reading the image color information! But before that, we need to solve the gap problem. After reading the data header, we get the image width biWidth, and then we can calculate the offset size.
offset = (fileInFoHeader.biWidth * 3) % 4;
if (offset != 0) {
    offset = 4 - offset;
}
Another problem to consider: we must use an array of RGB triple objects to store the color information of the whole picture.
This problem can be broken down into two small problems:
Q1: does it exist in the stack or in the heap?
The answer is obvious. There are not a few pictures with a length and width of more than 1000px. If they exist in the stack, the stack is likely to overflow.
Q2: define one-dimensional array or two-dimensional array?
We naturally want to use a two-dimensional array, because pictures are stored in rows and columns. But in fact, it doesn't work, because although new allocates memory dynamically, the second dimension of the two-dimensional array must still be a constant, otherwise new doesn't know what type of row pointer to return (for this knowledge, please refer to other articles) , compilation will report errors. We can solve this problem by using a "dimension reduction" method, that is, new is an ultra long one-dimensional array, and its length is the length of the picture (length * width).
The array surface used to store image color data is an RGB triple pointer. We new a new one-dimensional array and assign the first address of the array to the surface.
surface = new RGBTriple[fileInFoHeader.biHeight * fileInFoHeader.biWidth];
So far, we can finally start reading the most important information in bmp files!
Remember? The pixel storage order of bmp file: from bottom to top, from left to right. Therefore, if we want to store pixel data in the normal order on the surface (from top to bottom, from left to right), we should pay attention to when saving data to the surface. The pixel data read out first should be stored later.
Three bytes (BGR) are read at a time and stored in an element of the surface (i.e. an RGB triple object).
As an aside, I have encountered such a problem: at the beginning, I defined parameterless and parameterless constructors for RGBTriple. I can create new RGBTriple objects with B, G and R parameters. Then I wrote these codes:
for (int i = fileInFoHeader.biHeight-1;i >=0;i--) {

        int ured=0,ublue=0,ugreen=0;
        for (int j = 0;j < fileInFoHeader.biWidth;j++) {

            ifs.read((char*)(&ured), sizeof(char));

            ifs.read((char*)(&ugreen), sizeof(char));

            ifs.read((char*)(&ublue), sizeof(char));

            RGBTriple rgb(ublue,ugreen,ured);

            *(surface+(fileInFoHeader.biWidth * i + j))=rgb;

        }

        if (offset != 0) {
            char ign;
            for (int k = 0;k < offset;k++) {
                ifs.read(&ign,sizeof(char));
            }
        }

    }
This is a difficult error to find. Careful friends may have seen that the reading order of red and blue is reversed. This leads to some deviation in the overall color of the output picture, like this (I can actually call it a work of art?):
The digression ends
We directly read three bytes from the file at one time and store them in an element of the surface array.
    for (int i = fileInFoHeader.biHeight-1;i >=0;i--) {
        for (int j = 0;j < fileInFoHeader.biWidth;j++) {

            ifs.read((char*)(surface+(fileInFoHeader.biWidth * i + j)), sizeof(RGBTriple));

        }

        if (offset != 0) {
            char ign;
            for (int k = 0;k < offset;k++) {
                ifs.read(&ign,sizeof(char));
            }
        }

    }
The end of the inner for loop means that a row of pixels has been read. At this time, pay attention to the gap problem. When there is a gap, the gap must be skipped. How to skip the gap? Define a temporary variable ign (short for ignore), read the offset characters into ign circularly, and finally ign is discarded. In this way, the 0 used for complement is read away. When reading the next line, the pointer to the read file has pointed to the real data.
The complete code is as follows:
void bmp::readPic(const char* fileName) {

    ifstream ifs;
    ifs.open(fileName, ios::in|ios::binary);

    if (!ifs.is_open()) {
        cout << "Can't open the file." << endl;
        return;
    }

    ifs.read((char*)&fileHeader, sizeof(BmpFileHeader));

    if (fileHeader.bfType != BMPTYPE) {
        cout << "type error!" << endl;
        return;
    }

    ifs.read((char*)&fileInFoHeader, sizeof(BmpFileInFoHeader));

    if (fileInFoHeader.biBitCount != 24) {
        cout << "invalid!" << endl;
        return;
    }

    offset = (fileInFoHeader.biWidth * 3) % 4;
    if (offset != 0) {
        offset = 4 - offset;
    }


    surface = new RGBTriple[fileInFoHeader.biHeight * fileInFoHeader.biWidth];

    for (int i = fileInFoHeader.biHeight-1;i >=0;i--) {
        for (int j = 0;j < fileInFoHeader.biWidth;j++) {

            ifs.read((char*)(surface+(fileInFoHeader.biWidth * i + j)), sizeof(RGBTriple));

        }

        if (offset != 0) {
            char ign;
            for (int k = 0;k < offset;k++) {
                ifs.read(&ign,sizeof(char));
            }
        }

    }

    ifs.close();
}
5. Writing documents
Writing files is easier than reading files. You need to use the write() function of ofstream object.
The function (myMethod) used for image decoration is passed in by the function pointer. The type of the function pointer is: return value void; Parameter list: int height,int width,RGBTriple * (essentially the first address of the array).
The following operations are roughly the same as reading files, except for several points of attention:
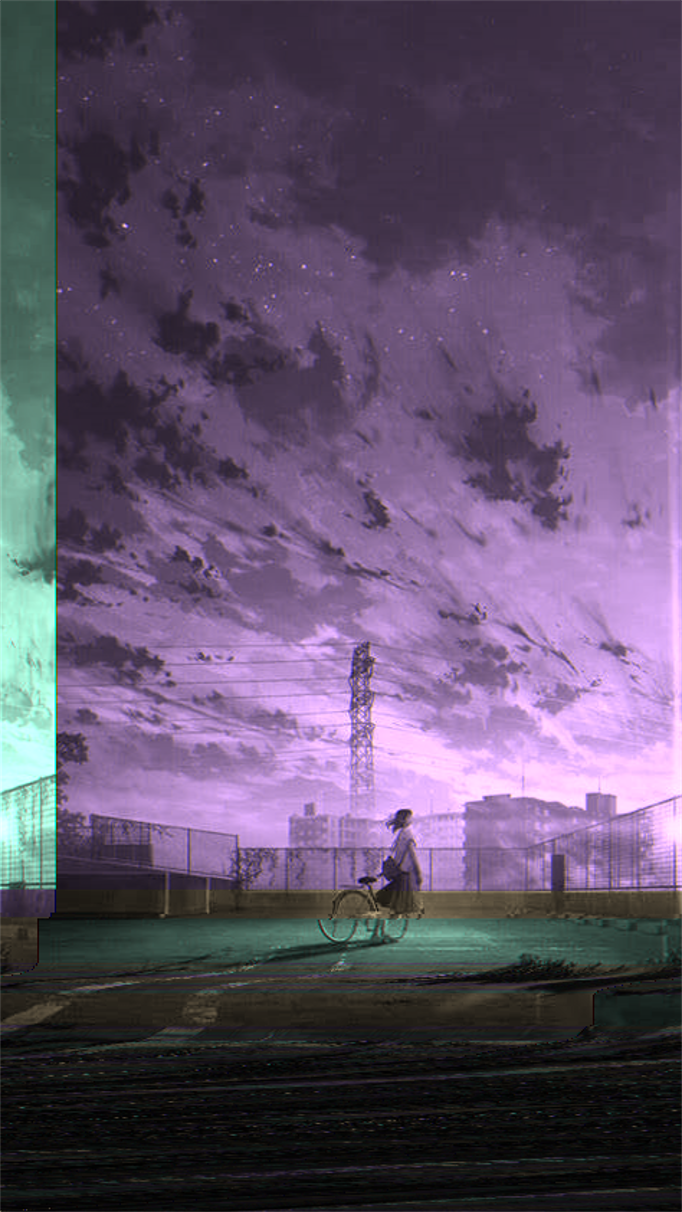
- ios::binary must be written when opening(), otherwise an error will be generated. This error is different from reading files. It is not to output dark pictures, but to have a different color filter effect. Put out the picture (I have to say, it's quite artistic?):
- Data is fetched from the height-1 index of the surface for writing. Because when we read the file, height-1 stores the pixels in the lower left corner. We should also start writing from the pixels in the lower left corner to output positive pictures.
- After writing the file, the surface array completes its mission and should be deleted. Because new is an array, delete [] should be used to completely free memory.
The complete code is as follows:
void bmp::writePic(void (*myMethod)(int,int,RGBTriple*),const char* outFileName) {
    //modify
    myMethod(fileInFoHeader.biHeight, fileInFoHeader.biWidth, surface);

    //create a new bmp
    ofstream ofs;
    ofs.open(outFileName, ios::out|ios::binary);

    ofs.write((char*)&fileHeader, sizeof(BmpFileHeader));
    ofs.write((char*)&fileInFoHeader, sizeof(BmpFileInFoHeader));

    //rewrite
    for (int i = fileInFoHeader.biHeight - 1;i >= 0;i--) {
        for (int j = 0;j < fileInFoHeader.biWidth;j++) {
            ofs.write((char*)(surface + (i*fileInFoHeader.biWidth+j)), sizeof(RGBTriple));
        }

        if (offset != 0) {
            char ign=0;
            for (int k = 0;k < offset;k++) {
                ofs.write(&ign, sizeof(char));
            }
        }

    }

    delete[] surface;
    ofs.close();
}
6. Decorate the picture
In essence, it is to modify the surface array in the current object in place.
Create a new header file helpers.h, which gives the declarations of four functions. Create a new source program file helpers.cpp to provide function implementation.
Structure of helpers.h:
#pragma once
#include<iostream>
#include"RGBTriple.h"

using namespace std;

void makeGray(int height , int width , RGBTriple* image);
void makeSpeia(int height, int width, RGBTriple* image);
void rowReverse(int height, int width, RGBTriple* image);
void makeBlur(int height, int width, RGBTriple* image);
Structure of helpers.cpp:
#include"helpers.h"

using namespace std;

void makeGray(int height, int width, RGBTriple* image) {

}
void makeSpeia(int height, int width, RGBTriple* image) {

}
void rowReverse(int height, int width, RGBTriple* image) {

}

void makeBlur(int height, int width, RGBTriple* image) {

}
(1) . graying
Principle: take out the RGB value of each pixel, average the three values, and then assign the average to RGB respectively.
void makeGray(int height, int width, RGBTriple* image) {
	for (int i = 0;i < height;i++) {
		for (int j = 0;j < width;j++) {
			int aver = ((image+(i * width + j))->blue+ (image + (i * width + j))->green+ (image + (i * width + j))->red)/3;
			(image + (i * width + j))->blue = (image + (i * width + j))->green = (image + (i * width + j))->red = aver;
		}
	}
}
This function is relatively easy to implement.
(2) . Brown filter effect
Principle: Formula
New Red = original Red*0.393 + original Green*0.769 + original Blue*0.189;
New Green = original Red*0.349 + original Green*0.686 + original Blue*0.168;
New Blue = original Red*0.272 + original Green*0.534 + original Blue*0.131;
Here, there is a big bug hidden!
We found that if you operate on a white pixel (255255255), you will get (344306238). Two of the three color values have overflowed!
Therefore, a logic is needed: when overflow of the calculated color value is detected, it is reset to 255
void makeSpeia(int height, int width, RGBTriple* image) {
	int ured = 0 , ugreen=0 , ublue=0;
	for (int i = 0;i < height;i++) {
		for (int j = 0;j < width;j++) {
			ured = ((image + (i * width + j))->red) * 0.393 + ((image + (i * width + j))->green) * 0.769 + ((image + (i * width + j))->blue) * 0.189;
			ugreen = ((image + (i * width + j))->red) * 0.349 + ((image + (i * width + j))->green) * 0.686 + ((image + (i * width + j))->blue) * 0.168;
			ublue = ((image + (i * width + j))->red) * 0.272 + ((image + (i * width + j))->green) * 0.534 + ((image + (i * width + j))->blue) * 0.131;

			if (ured > 255) {
				ured = 255;
			}
			if (ugreen > 255) {
				ugreen = 255;
			}
			if (ublue > 255) {
				ublue = 255;
			}

			(image + (i * width + j))->red = ured;
			(image + (i * width + j))->green = ugreen;
			(image + (i * width + j))->blue = ublue;

			ured = ugreen = ublue = 0;
		}
	}
}
(3) . flip horizontally
Principle: the outer layer for traverses each line, and the inner layer for defines two count variables at the beginning and end of the line. These two variables move to the center of the line at the same time until they are equal or "missed". During each movement, the R, G and B values of the pixels corresponding to the two variables are exchanged.
void rowReverse(int height, int width, RGBTriple* image) {
	int ured = 0, ugreen = 0, ublue = 0;
	for (int i = 0;i < height;i++) {
		for (int j = 0,k=width-1;j < k;j++,k--) {
			ured = (image + (i * width + j))->red;
			(image + (i * width + j))->red = (image + (i * width + k))->red;
			(image + (i * width + k))->red = ured;

			ugreen = (image + (i * width + j))->green;
			(image + (i * width + j))->green = (image + (i * width + k))->green;
			(image + (i * width + k))->green = ugreen;

			ublue = (image + (i * width + j))->blue;
			(image + (i * width + j))->blue = (image + (i * width + k))->blue;
			(image + (i * width + k))->blue = ublue;
		}
	}
}
(4) . fuzzy
Principle:
 After we do this for each pixel, each pixel corresponds to its own new RGB color value. After all the new color values are obtained, they are used to overwrite the original image data in turn.
The final processed pictures are as follows:

Several difficulties in implementation:
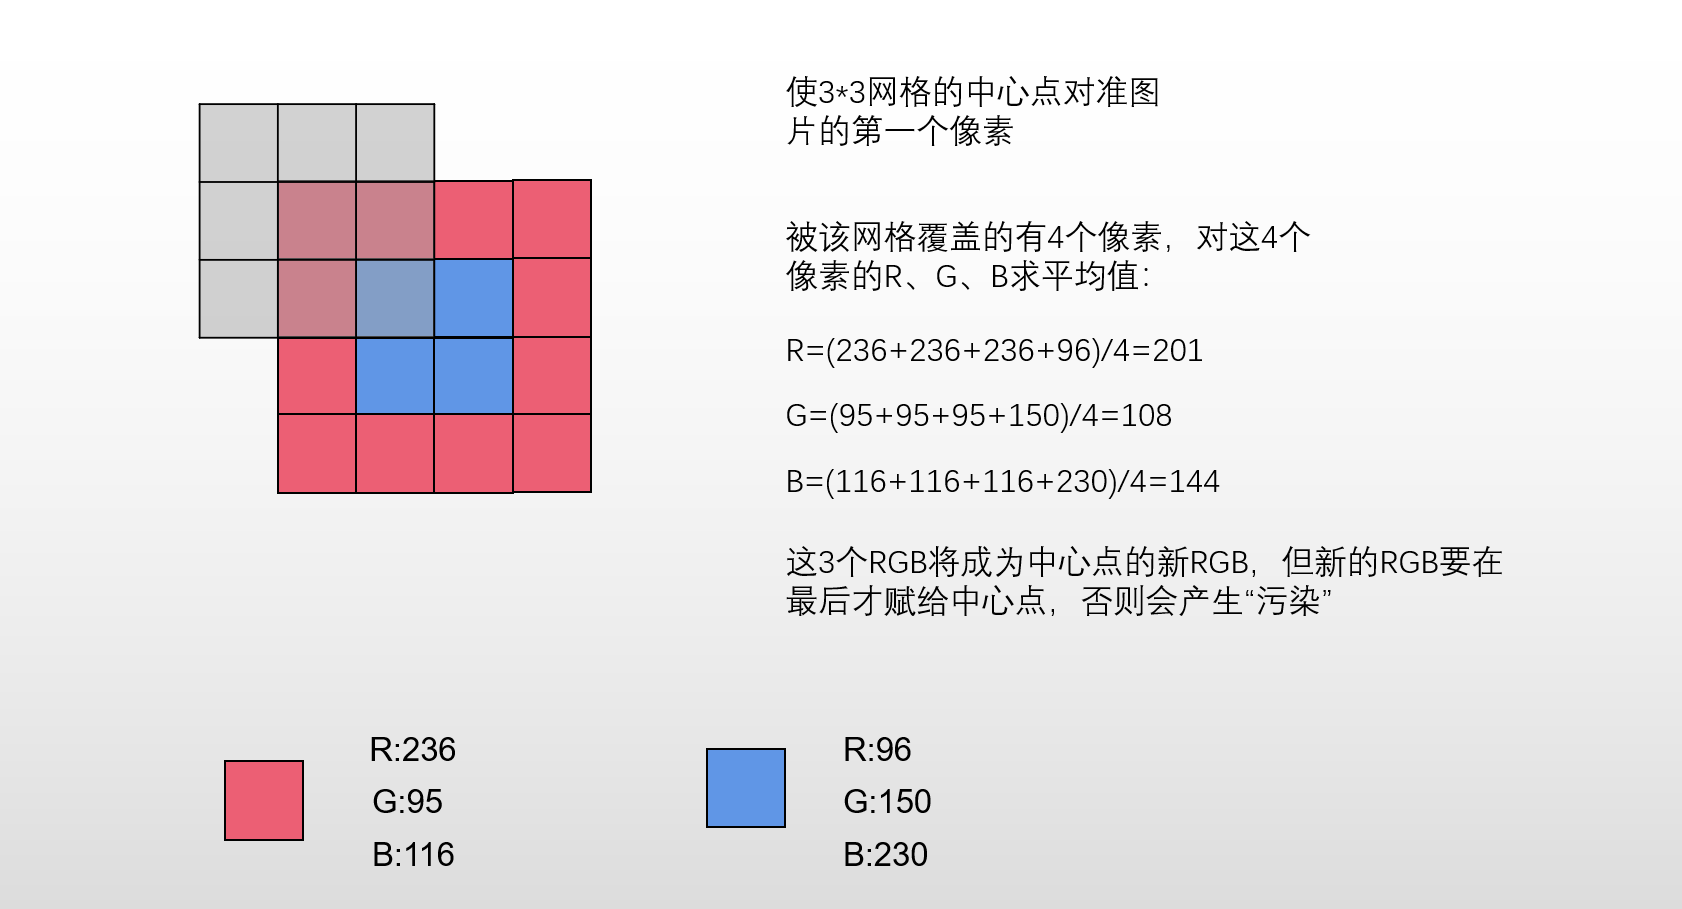
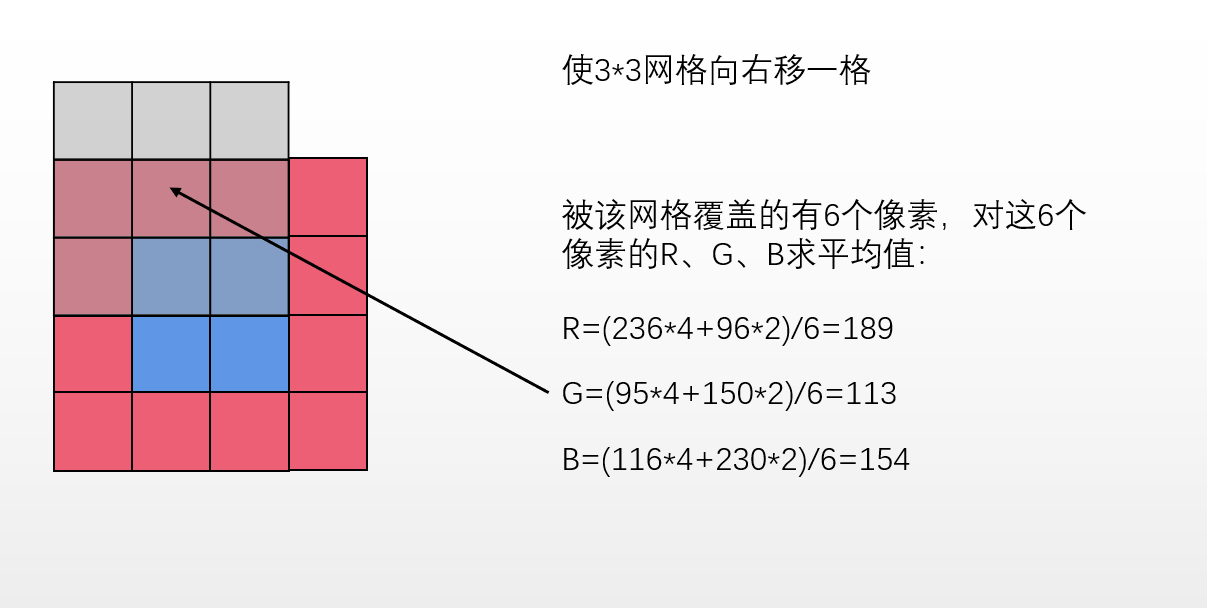
- You must save the new color values with a temporary array (it must be in the heap, or it won't fit). After all pixels are calculated, you can assign the values in the temporary array to the original array. Otherwise, the input of new color value will affect the operation of several adjacent pixels and produce "pollution". After the unified assignment, remember to delete the temporary array.
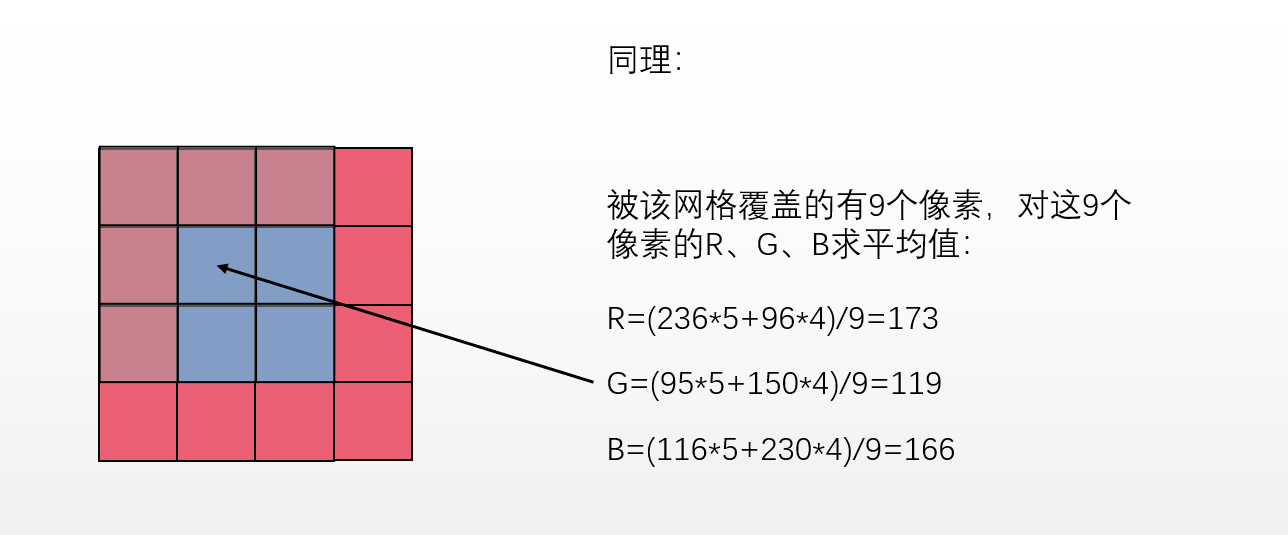
- How to determine how many pixels are covered by the 3 * 3 grid? First focus on the upper left corner of the central grid, i.e. image[i-1][j-1], and then see if i-1 and j-1 cross the boundary. In essence, the two-layer for loop scans 9 grids including the central grid, and counts the number of effective grids (within the picture range).
The following is the complete code:
void makeBlur(int height, int width, RGBTriple* image) {
	RGBTriple* temp = new RGBTriple[height * width]();
	int ured = 0, ugreen=0, ublue = 0;

	for (int i = 0;i < height;i++) {
		for (int j = 0;j < width;j++) {

            //Calculate the number of pixels actually covered
			int total = 0;
			for (int y = i - 1, myCount = 0;myCount < 3;y++,myCount++) {
				if (y >= 0 && y < height) {
					for (int x = j - 1, myCount1 = 0;myCount1 < 3;x++, myCount1++) {
						if (x >= 0 && x < width) {
							ured+= (image + (y * width + x))->red;
							ugreen += (image + (y * width + x))->green;
							ublue += (image + (y * width + x))->blue;

							total++;
						}
					}
				}
			}

			(temp + (i * width + j))->red=(ured/total);
			(temp + (i * width + j))->green = (ugreen / total);
			(temp + (i * width + j))->blue = (ublue / total);

			ured = ugreen = ublue = 0;

		}
	}

	for (int i = 0;i < height;i++) {
		for (int j = 0;j < width;j++) {
			(image + (i * width + j))->blue = (temp + (i * width + j))->blue;
			(image + (i * width + j))->green = (temp + (i * width + j))->green;
			(image + (i * width + j))->red = (temp + (i * width + j))->red;
		}
	}

	delete[] temp;
}
7.main function
Let's finally return to the command line window at the beginning:
It can be seen that the main function receives three parameters: the modification method of the picture, the original file name and the new file name
Command line parameters
int main(int argc,char* argv[]){
    //do something
}
argc: total number of parameters
argv: an array of strings separated by any white space character
argv[0] cannot be read directly. The real parameters are stored backward from argv[1].
Concrete implementation
#include <iostream>
#include<cstring>
#include"bmpFile.h"
#include"helpers.h"

using namespace std;

int main(int argc,const char* argv[])
{

    for (int i = 1;i < argc;i++) {
        cout << argv[i]<<" ";
    }

    bmp mybmp;
    mybmp.readPic(argv[2]);

    if (!strcmp(argv[1],"-g")) {
        mybmp.writePic(makeGray,argv[3]);
    }
    else if (!strcmp(argv[1], "-s")) {
        mybmp.writePic(makeSpeia, argv[3]);
    }
    else if (!strcmp(argv[1], "-b")) {
        mybmp.writePic(makeBlur, argv[3]);
    }
    else if (!strcmp(argv[1], "-r")) {
        mybmp.writePic(rowReverse, argv[3]);
    }
    else {
        cout << "failed to write!" << endl;
    }


    return 0;
}
Several points for attention:
- Because main.cpp contains both helpers.h and BMP file. H, and both of them contain RGB triple. H, you must add #pragma once to RGB triple. H, otherwise the link will make an error;
- Do not use = = to judge whether two strings are equal, because this will only compare the address value. Here, you must use the strcmp() function.
Summary:
Ha, finally finished! This case can help us review many learned knowledge points, such as pointer operation, file stream operation, function pointer, command line parameter transmission, etc. it also helps me understand many new knowledge, such as bmp file format and internal storage mode, memory alignment, fstream read() and write() methods, etc.
Come on, coder!
Some references are from:
bmp format details_ Tut CSDN blog_ bmp format
BMP file format_ mjiansun's column - CSDN blog_ BMP file format