Python generates character video
1, Foreword
The video output of the Caton command line is not very good, but the effect of using the Caton command line is not good. So I intend to directly generate an mp4 character video. The general idea is the same as before: Python 20 lines of code to realize video character.
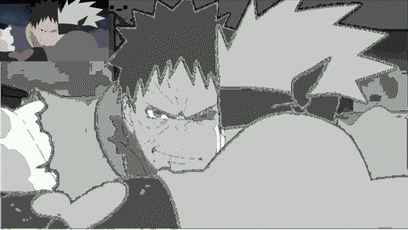
Let's take a look at an effect picture:
2, Operation image of OpenCV
Let's first look at some basic operations. First, we need to install OpenCV and execute the following statement:
pip install opencv-python
Then you can use it.
2.1 reading and display
Let's look directly at the code:
import cv2
# Read picture
img = cv2.imread("1.jpg")
# display picture
cv2.imshow("img", img)
cv2.waitKey()
cv2.destroyAllWindows()
waitKey is a function waiting for input. Because it is displayed for a moment after imshow, we need to call it. destroyAllWindows is the release window.
2.2 gray conversion
Gray conversion is to convert the picture into black-and-white picture (gray), which is convenient for us to process pixels. The code is as follows:
import cv2
img = cv2.imread("1.jpg")
# Gray conversion
gray = cv2.cvtColor(img, cv2.COLOR_BGR2GRAY)
We can also directly read in grayscale form:
import cv2
# Read in as grayscale
img = cv2.imread("1.jpg", 0)
2.4. Obtain the picture size and modify the size
Let's look directly at the code:
import cv2
img = cv2.imread("1.jpg", 0)
# Get the height and width of the picture
h, w = img.shape
# Zoom picture
res = cv2.resize(img, (w//2, h//2))
Because the shape attribute of img is a tuple, we can unpack it directly and automatically.
Then call cv2.. Resize function, the first parameter is passed into the picture, and the second parameter is passed into the modified size.
2.5. Draw text
To draw text, we need to call CV2 Puttext function, the code is as follows:
import cv2
img = cv2.imread('1.jpg')
# Draw text
cv2.putText(
    # Back drawn picture
    img,
    # Text to draw
    'Hello',
    # Coordinates of the lower left corner of the text
    (100, 500),
    # typeface
    cv2.FONT_HERSHEY_SIMPLEX,
    # Font size scaling
    20,
    # Text color
    (0, 0, 0),
    # Text thickness
    10
)
We just need to pay attention to these parameters.
2.6. Read video
The operation of reading video is generally general, and the code is as follows:
import cv2
# Read video
cap = cv2.VideoCapture('1.mp4')
# Gets the frame rate of the video
fps = cap.get(cv2.CAP_PROP_FPS)
# Cycle through each frame of the picture
while True:
    # Read next frame
    ret, frame = cap.read()
    if not ret:
        break
    else:
        pass
cap.release()
We need to use the frames of the video we obtained above when writing the video.
2.7. Write video
The operation of writing video is also a regular code:
import cv2
fourcc = cv2.VideoWriter_fourcc(*'mp4v')
writer = cv2.VideoWriter('11.mp4', fourcc, fps, (w, h))
# Write video
writer.write(frame)
***
write.release()
With this knowledge, we can start the next step.
3, Mapping pixels to characters
For a picture with only one channel, we can think of it as a rectangle. The smallest unit of this rectangle is one pixel. The process of characterization is the process of replacing pixels with characters. So we have to traverse every pixel of the image, but what characters should we replace?
We have a color reference table, and opencv cuts this parameter table into 256 copies, representing different degrees. We can also make a reference table, but the content in the table is not color, but characters.

The above figure shows the color table. We can establish a mapping relationship between the color table and the character table. If the character table is as follows:
mqpka89045321@#$%^&*()_=||||}
We can get the following formula: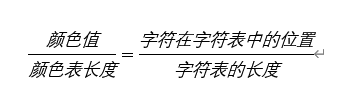
After transformation, the characters in the character table corresponding to the corresponding color can be obtained:

It doesn't matter if you don't understand this formula. You just need to be able to use it. Here is our code for converting pixels to characters:
def pixel2char(pixel):
    char_list = "@#$%&erytuioplkszxcv=+---.     "
    index = int(pixel / 256 * len(char_list))
    return char_list[index]
This character table can be defined by itself.
4, Generate character picture
Now we just need to convert pixels into characters one by one. The code is as follows:
def get_char_img(img, scale=4, font_size=5):
    # size pictures
    h, w = img.shape
    re_im = cv2.resize(img, (w//scale, h//scale))
    # Create a picture to fill in characters
    char_img = np.ones((h//scale*font_size, w//scale*font_size), dtype=np.uint8)*255
    font = cv2.FONT_HERSHEY_SIMPLEX
    # Traverse picture pixels
    for y in range(0, re_im.shape[0]):
        for x in range(0, re_im.shape[1]):
            char_pixel = pixel2char(re_im[y][x])
            cv2.putText(char_img, char_pixel, (x*font_size, y*font_size), font, 0.5, (0, 0, 0))
    return char_img
Here we use an NP The ones function, whose function we understand as generating a black picture.
How can we multiply the generated size by font instead of scale_ size. Scale is the reduction of the original image. Because there are many pixels, we need to reduce the image first. In order to make our font display clearer, we need to enlarge the generated character image.
Therefore, it should be noted that although the image we generated looks monotonous, when font_ When the size is set to 5, the image obtained is already relatively large. Therefore, when you generate long-time videos, it will take more time and generate large videos.
Let's test the above function:
import cv2
import numpy as np


def pixel2char(pixel):
    char_list = "@#$%&erytuioplkszxcv=+---.     "
    index = int(pixel / 256 * len(char_list))
    return char_list[index]


def get_char_img(img, scale=4, font_size=5):
    # size pictures
    h, w = img.shape
    re_im = cv2.resize(img, (w//scale, h//scale))
    # Create a picture to fill in characters
    char_img = np.ones((h//scale*font_size, w//scale*font_size), dtype=np.uint8)*255
    font = cv2.FONT_HERSHEY_SIMPLEX
    # Traverse picture pixels
    for y in range(0, re_im.shape[0]):
        for x in range(0, re_im.shape[1]):
            char_pixel = pixel2char(re_im[y][x])
            cv2.putText(char_img, char_pixel, (x*font_size, y*font_size), font, 0.5, (0, 0, 0))
    return char_img


if __name__ == '__main__':
    img = cv2.imread('dl.jpg', 0)
    res = get_char_img(img)
    cv2.imwrite('d.jpg', res)
The effect is as follows:
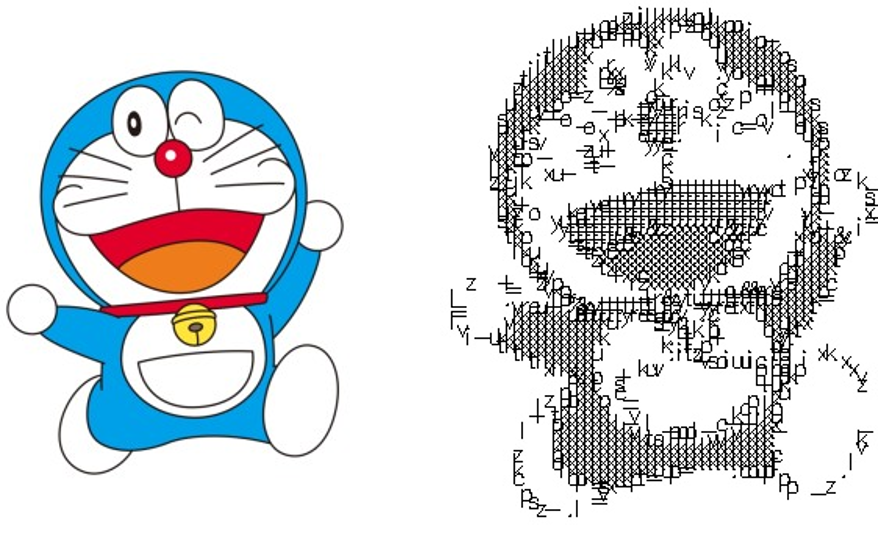
You can see that the effect is still very good.
5, Generate character video
With the above code, we can convert the whole video. The code for converting video into character video is as follows:
def generate(input_video, output_video):
    # 1. Read video
    cap = cv2.VideoCapture(input_video)

    # 2. Get video frame rate
    fps = cap.get(cv2.CAP_PROP_FPS)

    # Read the first frame and obtain the size of the picture converted into characters
    ret, frame = cap.read()
    char_img = get_char_img(cv2.cvtColor(frame, cv2.COLOR_BGR2GRAY), 4)

    # Create a VideoWriter to save videos
    fourcc = cv2.VideoWriter_fourcc(*'mp4v')
    writer = cv2.VideoWriter(output_video, fourcc, fps, (char_img.shape[1], char_img.shape[0]))
    while ret:
        # Read the current frame of the video. If not, jump out of the loop
        ret, frame = cap.read()
        if not ret:
            break
        # Convert the current frame into a character graph
        gray = cv2.cvtColor(frame, cv2.COLOR_BGR2GRAY)
        char_img = get_char_img(gray, 4)

        # Convert to BGR mode for easy video writing
        char_img = cv2.cvtColor(char_img, cv2.COLOR_GRAY2BGR)
        writer.write(char_img)
    writer.release()
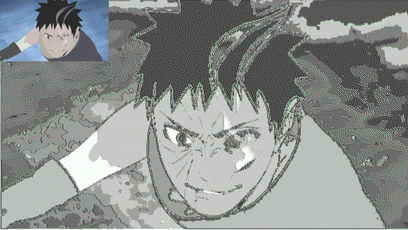
The following is a character video clip of the classic battle of Kakashi:
The complete code is as follows:
import cv2
import numpy as np


def pixel2char(pixel):
    char_list = "@#$%&erytuioplkszxcv=+---.     "
    index = int(pixel / 256 * len(char_list))
    return char_list[index]


def get_char_img(img, scale=4, font_size=5):
    # size pictures
    h, w = img.shape
    re_im = cv2.resize(img, (w//scale, h//scale))
    # Create a picture to fill in characters
    char_img = np.ones((h//scale*font_size, w//scale*font_size), dtype=np.uint8)*255
    font = cv2.FONT_HERSHEY_SIMPLEX
    # Traverse picture pixels
    for y in range(0, re_im.shape[0]):
        for x in range(0, re_im.shape[1]):
            char_pixel = pixel2char(re_im[y][x])
            cv2.putText(char_img, char_pixel, (x*font_size, y*font_size), font, 0.5, (0, 0, 0))
    return char_img


def generate(input_video, output_video):
    # 1. Read video
    cap = cv2.VideoCapture(input_video)

    # 2. Get video frame rate
    fps = cap.get(cv2.CAP_PROP_FPS)

    # Read the first frame and obtain the size of the picture converted into characters
    ret, frame = cap.read()
    char_img = get_char_img(cv2.cvtColor(frame, cv2.COLOR_BGR2GRAY), 4)

    # Create a VideoWriter to save videos
    fourcc = cv2.VideoWriter_fourcc(*'mp4v')
    writer = cv2.VideoWriter(output_video, fourcc, fps, (char_img.shape[1], char_img.shape[0]))
    while ret:
        # Read the current frame of the video. If not, jump out of the loop
        ret, frame = cap.read()
        if not ret:
            break
        # Convert the current frame into a character graph
        gray = cv2.cvtColor(frame, cv2.COLOR_BGR2GRAY)
        char_img = get_char_img(gray, 4)

        # Convert to BGR mode for easy video writing
        char_img = cv2.cvtColor(char_img, cv2.COLOR_GRAY2BGR)
        writer.write(char_img)
    writer.release()


if __name__ == '__main__':
    generate('in.mp4', 'out.mp4')
We just need to modify the parameters of generate. The full effect video is as follows:
Python generated character video - Kakashi VS tape