Is it necessary to learn Zuul?
1, What is API gateway
Before we begin to explain the Spring Cloud GateWay, it is necessary to explain what an API gateway is. The word gateway first appeared in network devices, such as network devices with routing function, isolation function and security verification function between two isolated LANs. It is usually called "gateway".
In terms of software development, gateway is usually used to isolate software applications between client and server, which is usually called API gateway.
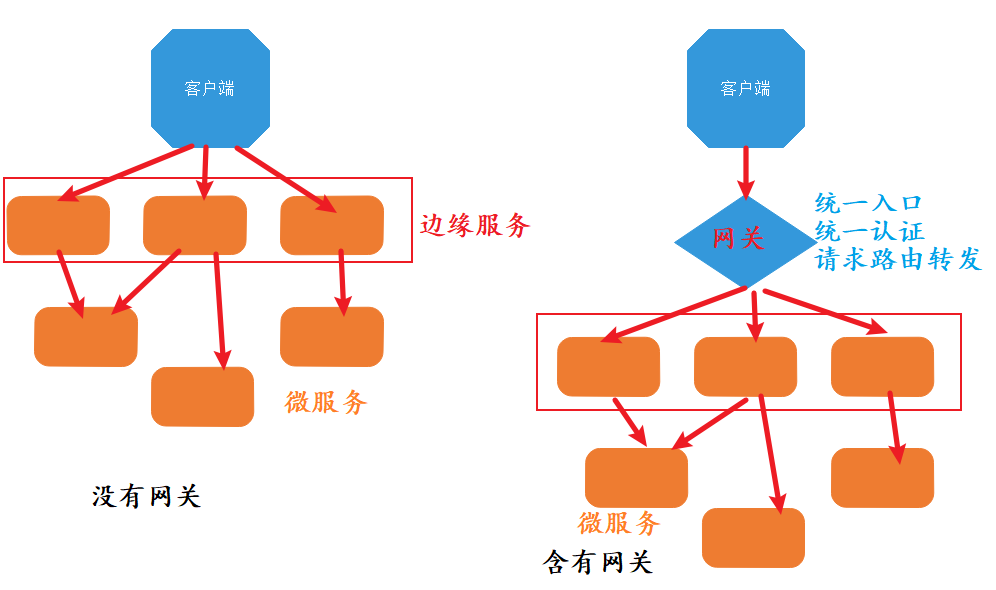
So the benefits of using API are:
- The front-end developers are more friendly, and the front-end developers have fewer entrances for maintenance
- The authentication of service access is more convenient and can be done uniformly in the API gateway. Avoid development and maintenance costs caused by dispersion.
- Public services such as access log and flow restriction can also be completed centrally on the gateway. Avoid development and maintenance costs caused by dispersion.
Having said so many advantages of API gateway, are there any disadvantages? Yes, and it's very important.
- When you use the API gateway, all requests must be forwarded again, resulting in a certain extension of the response time
- When you use the API gateway, it means that the gateway, as a traffic portal, needs to bear more traffic load than microservices. Therefore, the architecture performance and stability of the gateway itself are very important.
Although we can add a layer of load balancer such as nginx or haproxy in front of the gateway, it is still difficult to change the traffic concentration of the gateway to a certain extent.
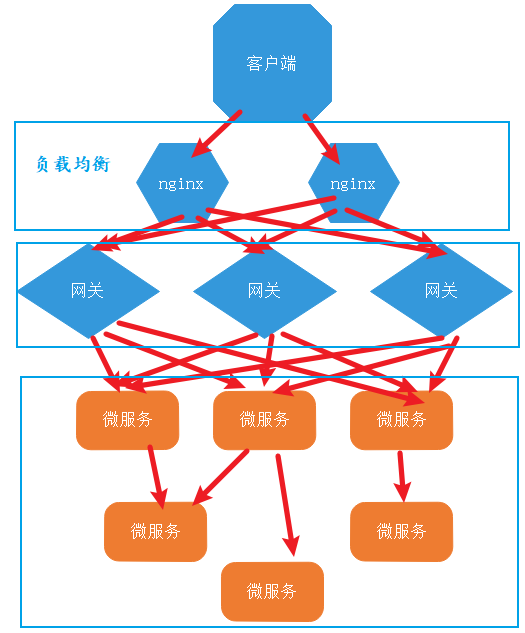
Therefore, the author appeals on many occasions not to abuse the microservice gateway. You have to weigh whether your current architecture really needs a gateway. Measure the relationship between performance, stability and maintenance cost to decide whether to use service gateway.
2, Talk about Zuul
As the author said, the architecture, performance and stability of the gateway itself are very important. However, performance is Zuul's weakness, because it is developed based on the servlet blocking IO model (in the next section, I will specifically introduce the differences between Zuul and Spring Cloud GateWay IO models).
- Zuul 1.0 has entered the maintenance stage officially in netflix, and netflix's support for the Spring Cloud community has basically been in the state of "88, you ah"
- Although Netflix has long claimed to upgrade zuul, that is, Zuul 2.0, its integration with Spring Cloud is also in a difficult state
- For the above reasons, the spring community has developed the Spring Cloud gateWay itself. It adopts the official responsive non blocking framework weblux of spring. The performance of the official website is 1.6 times that of Zuul.
To sum up: I think Zuul has no need to learn at present.
Introduction and non blocking asynchronous IO model
1, Introduction
Spring Cloud GateWay is an API service gateway developed by spring's official community. It uses the new responsive non blocking IO framework of Spring WebFlux in the new generation of development technology. Compared with zuul, the first generation gateway component of Spring Cloud, the performance has made great progress (it is claimed that the performance is improved by 1.6 times). The bottom layer of WebFlux is based on the high-performance non blocking IO communication framework Netty.
Core functional features
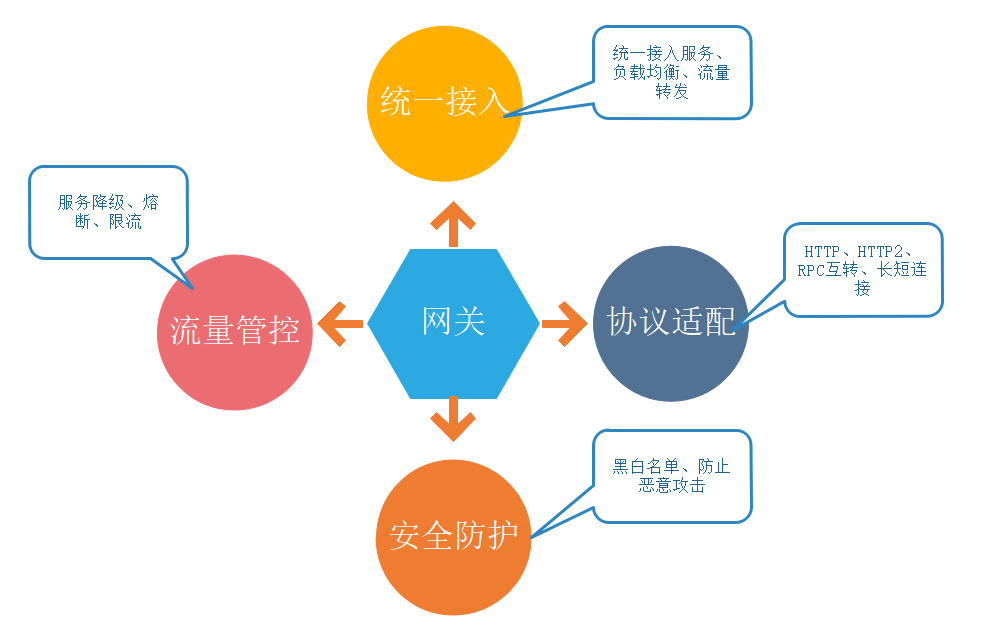
In the previous section, the author introduced to you that API service gateway has three main functions:
- Unified traffic inlet, more friendly towards the front end. Reduce the decentralized portal configuration and reduce the coupling between the client and the server.
- Unified authentication and authentication can avoid the increase of maintenance and development cost caused by decentralized authentication of multiple services
- Public services such as access log, flow restriction, filtering, caching and monitoring can also be completed centrally on the gateway. Avoid development and maintenance costs caused by dispersion
2, Difference between blocking IO and asynchronous non blocking IO
The author uses relatively popular words to explain the difference between blocking IO and non blocking io. Let's make an analogy with the way the software development team works. As software developers, we must know the basic process of software development:
- Project initiation and feasibility study
- Demand analysis and design
- Code development
- Iterative testing
- Online and configuration management, operation and maintenance
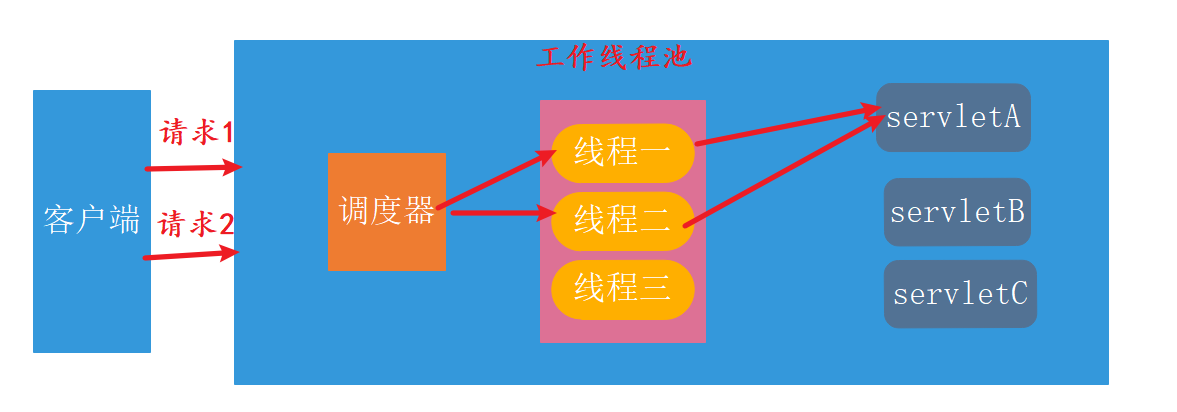
Frameworks represented by Spring MVC or struct are all based on sevlet s, and their underlying IO model is blocking IO model. This model is like you are a developer of the company, and all the above five tasks are completed by yourself. If the company has 10 people, it can only carry out 10 needs at most at the same time. There's nothing we can do when customer demand increases. We can only let them wait. As shown in the following figure: a request occupies a thread. When all the threads in the thread pool are occupied, the new request can only wait.
In order to solve the performance bottleneck of Spring MVC's blocking model in high concurrency scenarios, spring community launched Spring WebFlux. The underlying implementation of WebFlux is a tested netty non blocking IO communication framework. The interaction diagram between request processing and threads of the framework is as follows:
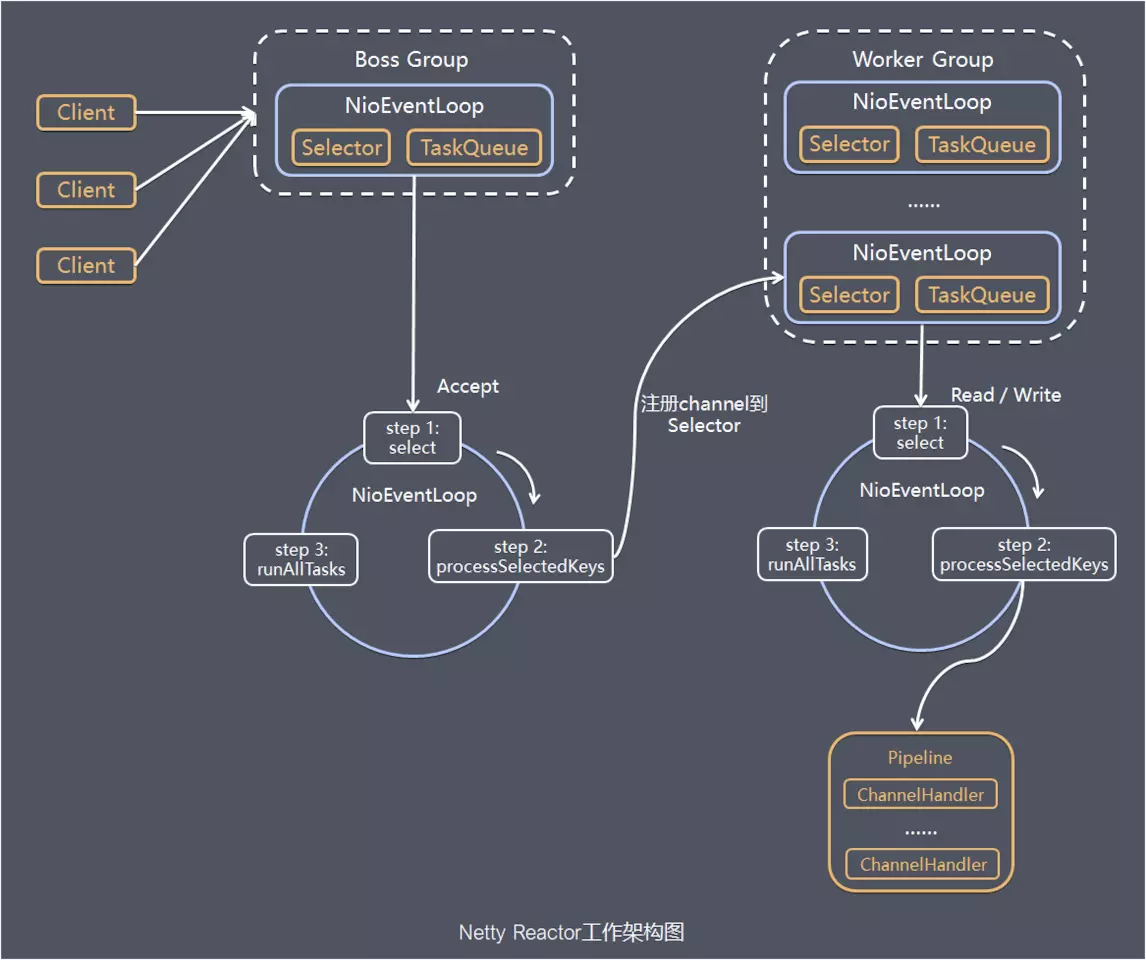
boosGroup is used to establish Accetpt connection events and distribute requests. workerGroup is used to handle I/O read-write events and business logic
The tasks performed by each Boss NioEventLoop loop loop include three steps:
- 1 poll accept event
- 2 handle the accept I/O event, establish a connection with the Client, generate the NioSocketChannel, and register the NioSocketChannel with the Selector of a Worker NioEventLoop
- 3. Process the tasks in the task queue, runAllTasks. The tasks in the task queue include the user calling eventloop Tasks executed by execute or schedule, or tasks submitted to the eventloop by other threads.
The tasks performed by each Worker NioEventLoop loop loop include three steps:
- 1. Poll read and write events;
- Two I/O events, i.e. read and write events, are processed when NioSocketChannel readable and writable events occur
- 3. Process the tasks in the task queue, runAllTasks.
If the combination of each task pool and thread pool in the figure above is popularly compared to a software development company, then:
- The project initiation and feasibility study shall be completed by the company's project manager and consultant
- Requirements analysis and design are completed by product managers and architects
- Code development is completed by developers led by the project manager
- Iterative testing, which is completed by the test team
- The launch, configuration management and operation and maintenance may be completed by a special devops team
In this way, when all people in a company complete the division of labor, they can contact more customers, talk about more needs, reasonably allocate human resources and maximize the concurrent processing capacity under the condition of limited resources. Compared with the most professional person, it is more professional and responsible for the project.
This reasonable utilization and organization of human resources is similar to the non blocking IO model. The core purpose of asynchronous non blocking IO is to reasonably classify request processing threads and tasks, reasonably use the memory and CPU resources of the system, and maximize the processing capacity per unit time!
Therefore, the core significance of non blocking IO model is to improve the concurrent processing ability of service requests under limited resources, rather than shorten the response time of a single service request. Because the API service gateway centrally carries the traffic in the microservice system for forwarding, its concurrent processing ability is very important, which is also the fundamental reason why netflix Zuul was eliminated!
GateWay concept and process
1, Processing flow of Spring Cloud Gateway
The working principle of Spring Cloud is as follows:
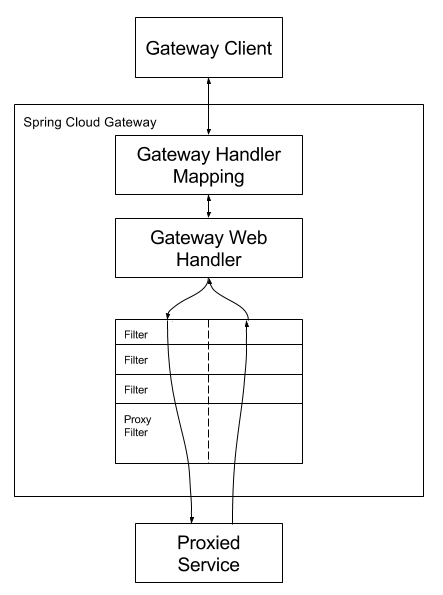
- The client sends a request to the Spring Cloud Gateway when the requested path matches the routing mapping rules defined by the gateway. The request will be sent to the Web Handler of the gateway for processing and executing a specific filter chain.
- Notice the dotted line in the figure. The left side of the dotted line represents the execution logic (Pre filter) before request processing, and the right side of the dotted line represents the execution logic (post filter) after request processing
2, Core concept
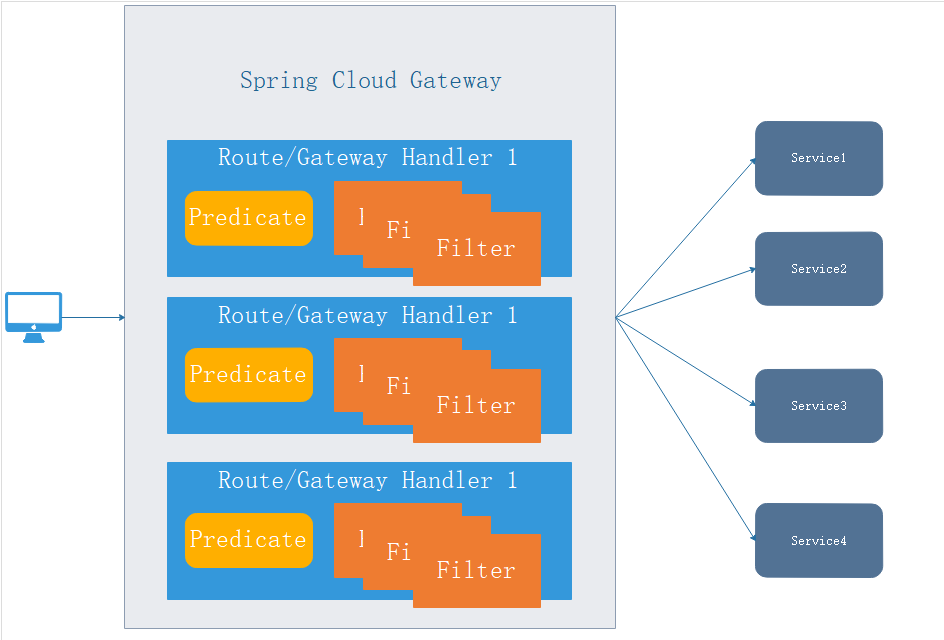
- Route: the basic element of the real gateway, which is composed of id, target url, predicate and filter. When the request passes through the gateway, the Gateway Handler Mapping determines whether it matches the route through predicate. When predicate=true, it matches the corresponding route.
- predicate logic: a function provided in Java 8 that allows developers to match requests according to its defined rules. For example, the route is matched according to the request header and request parameters. It can be considered as a definition of matching conditions.
Many people in China translate this into "assertion". In fact, as a noun, this word means "predicate", and as a verb, it means assertion. On the official website, this word is a noun.
- filter: perform unified business processing before and after request processing, such as authentication, audit, log, access duration statistics, etc.
Create a new GateWay project
1, Gateway gateway construction
Introducing gateway dependency
<dependency>
   <groupId>org.springframework.cloud</groupId>
   <artifactId>spring-cloud-starter-gateway</artifactId>
</dependency>
Because the spring cloud starter gateway contains spring boot starter weblux, the maven coordinates of spring boot starter weblux in the project can be deleted from the pom file.

If it is a new sub module, make the module configuration relationship in the pom file of the parent-child project.
The usage of the project configuration file is still the same as before
server:
  port: 8777

spring:
  application:
    name: zimug-server-gateway
  cloud:
    gateway:
      routes:
        - id: dhy           # Route ID, unique
          uri: http://baidu.com / # destination URI, the address of the route to the microservice
          predicates:              # Request forwarding judgment condition
            - Path=/baidu/**    # Match the request of the corresponding URL, and append the matched request after the target URI
- Routes refers to configuring routing forwarding rules. Multiple routes can be configured
- Each route has an id that identifies the uniqueness of the route
- uri refers to the destination of the request forwarding
- Predictions are the judgment conditions of request forwarding. Our example uses the Path condition to judge
The above routing configuration means that when we visit: http: / / < gateway IP >: 8777 / Baidu /, the request is forwarded to http://baidu.com/baidu/ Where * * matches any character.
2, Points needing attention
Although the spring cloud gateway (DHY server gateway) project we built is a web project, the bottom layer has used spring boot starter weblux instead of spring boot starter web. Therefore, do not introduce the following coordinates into the gateway project, and an error will be reported!
<dependency>
   <groupId>org.springframework.boot</groupId>
   <artifactId>spring-boot-starter-web</artifactId>
</dependency>
And the code integration work previously done under the spring boot starter web system will change on the basis of spring boot starter weblux, which we will talk about again.
3, Route forwarding test
In the above configuration file, we have completed a simple routing and forwarding configuration. It means that when we visit: http: / / < gateway IP >: 8777 / Baidu /, the request is forwarded to http://baidu.com/baidu/ Where * * matches any character.
Now let's do an experiment. We start the gateway project on this machine, and then the browser visits the following website.
http://localhost:8777/baidu/course
The request is then forwarded to the following website:
http://baidu.com/baidu/course
Use of universal Predicate
1, Introduction to predict routing judgment conditions
Predicate comes from Java 8 and is a function introduced in Java 8. Predicate accepts an input parameter and returns a boolean result. The interface contains a variety of default methods to combine predict into other complex logic (such as and, or, not).
The Spring gateway implements the matching of various conditional route parameters in the Spring gateway.
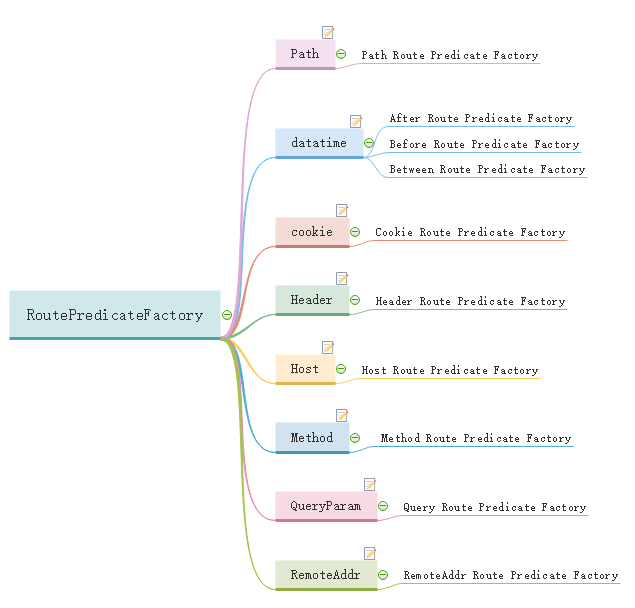
To put it bluntly, predict is to implement a set of matching rules to facilitate the request to find the corresponding Route for processing. Next, let's take over the use of several built-in predictions in Spring Cloud GateWay.
2, Usage of predict route judgment conditions
In the examples in the previous chapters, we have introduced that the matching conditions of path predict determine the forwarding rules of the route. Now let's introduce the matching conditions of other predictions!
2.1. Match by date time criteria
After route predict factory uses time as the matching rule. The route will match the request as long as the current time is greater than the set time. The following after rule configuration: after 2020-05-17T16:31:47 in East Zone 8, all requests are forwarded to DHY com.
spring:
  cloud:
    gateway:
      routes:
      - id: after_route
        uri: http://www.dhy.com
        predicates:
        - After=2020-05-17T16:31:47.789+08:00
Before route predict factory also uses time as the matching rule. The route will match the request as long as the current time is less than the set time. The following before rule configuration: all requests will be forwarded to DHY before 2020-05-17T19:53:42 in East Zone 8 com.
spring:
  cloud:
    gateway:
      routes:
      - id: before_route
        uri: http://www.dhy.com
        predicates:
        - Before=2020-05-17T19:53:42.789+08:00
Between route predict factory also uses two times as the matching rule. The route will match the request as long as the current time is greater than the first set time and less than the second set time. The following between rule configuration: after 2020-05-17T16:31:47 in East Zone 8 and before 2020-05-17T19:53:42, all requests are forwarded to DHY com.
spring:
  cloud:
    gateway:
      routes:
      - id: between_route
        uri: http://www.dhy.com
        predicates:
        - Between=2020-05-17T16:31:47.789+08:00, 2020-05-17T19:53:42.789+08:00
2.2. Match via Cookie
Cookie Route Predicate can receive two parameters, one is Cookie name and the other is regular expression Cookie value. The routing rule will match by obtaining the corresponding Cookie name value and regular expression. If there is a match, the route will be executed, and if there is no match, it will not be executed.
spring:
  cloud:
    gateway:
      routes:
      - id: cookie_route
        uri: http://www.dhy.com
        predicates:
        - Cookie=cookiename, cookievalue
Using curl test, enter curl on the command line http://localhost:8777 --The cookie "cookie name = cookie value" will return zimug Com page code. That is, when our request carries the specified cookie key value pair, the request will be forwarded to the correct uri address.
2.3. Match through Header attribute
Like Cookie Route Predicate, Header Route Predicate also receives two parameters: the attribute name in a header and a regular expression value. Route forwarding is carried out only when the attribute value matches the regular expression value.
spring:
  cloud:
    gateway:
      routes:
      - id: header_route
        uri: http://www.dhy.com
        predicates:
        - Header=X-Request-Id, \d+
The above configuration rule indicates that there is a request with a header named X-Request-Id and a number in the routing match, and the request is forwarded to DHY com.
Using curl test, enter curl on the command line http://localhost:8777 -H "X-Request-Id:88", the page code is returned to prove that the matching is successful. Change the parameter - H "X-Request-Id:88" to - H "X-Request-Id:somestr". When executing again, 404 is returned to prove that there is no match.
2.4. Match via Host
Host Route Predicate receives a set of parameters and a list of matching domain names. This template is an ant style template with commas as as separators. It uses the host address in the parameter as the matching rule.
spring:
  cloud:
    gateway:
      routes:
      - id: host_route
        uri: http://www.dhy.com
        predicates:
        - Host=**.somehost.org,**.anotherhost.org
The route will match the Host of Http, such as www.somehost Org or beta somehost. Org or www.otherhost.com Org.
2.5. Match by requesting Method
The methods of HTTP are POST, GET, PUT, DELETE and other different request methods to route.
spring:
  cloud:
    gateway:
      routes:
      - id: method_route
        uri: http://www.dhy.com
        predicates:
        - Method=GET
The above rules determine that the route will match all GET method requests, and other HTTP methods will not match.
Using curl test, enter from the command line:
- curl requests by default in the form of GET http://localhost:8777 , the test returns the page code to prove that it matches the route predicate rule
- Specify curl to send the request using the POST method, curl -X POST http://localhost:8777 , the return 404 is not found, proving that there is no match
2.6. Match by request parameters
Query Route Predicate supports passing in two parameters, one is the attribute name and the other is the attribute value. The attribute value can be a regular expression.
spring:
  cloud:
    gateway:
      routes:
      - id: query_route
        uri: http://www.dhy.com
        predicates:
        - Query=foo, ba.
The route will match all that contain foo, and the content of foo is ba compliant, such as bar or baz Regular rule request.
Using curl test, enter curl localhost: 8777? The foo = Bax test can return the page code. Change the property value of foo to bazx. If you visit it again, you will report 404, which proves that the route needs to match the regular expression before routing.
2.7. Match by requesting an ip address
Predict also supports routing only by setting the request of an IP interval number segment. Remoteaddr route predict accepts the list of cidr symbols (IPv4 or IPv6) strings (the minimum size is 1), such as 192.168.0.1/16 (where 192.168.0.1 is the IP address and 16 is the subnet mask).
spring:
  cloud:
    gateway:
      routes:
      - id: remoteaddr_route
        uri: https://www.dhy.org
        predicates:
        - RemoteAddr=192.168.1.1/24
You can set this address to the local ip (192.168.1.4) address for testing. curl localhost:8080, then this route will match.
2.8. Matching by weight shunting
The predicate matched by weight shunting has two parameters: group and weight (an int). Weights are calculated by group. The following example configures weighted routing predicates:
spring:
  cloud:
    gateway:
      routes:
      - id: weight_high
        uri: https://weighthigh.org
        predicates:
        - Weight=group1, 8
      - id: weight_low
        uri: https://weightlow.org
        predicates:
        - Weight=group1, 2
This route will forward about 80% of the traffic to weighthigh.org, And about 20% of the flow forward to weightlow.org.
2.9. Combined use
spring:
  cloud:
    gateway:
      routes:
        - id: multi-predicate
          uri: https://www.dhy.com
          order: 0
          predicates:
            - Host=**.foo.org
            - Path=/headers
            - Method=GET
            - Header=X-Request-Id, \d+
            - Query=foo, ba.
            - Query=baz
            - Cookie=chocolate, ch.p
When various predictions exist in the same route at the same time, the request must meet all conditions at the same time to be matched by this route.
Customize PredicateFactory
1, Customize predict factory
Although the government has provided us with many predict factories (described in the previous section), which can meet most of our scene needs. However, it is not excluded that in some cases, the predicted route matching conditions are complex, so we need to define and implement them ourselves.
Requirements:
In this section, we implement a simple requirement through customization. All Http requests with Path beginning with "/ sysuser", "sysorg", "sysrole", "sysmenu", "sysdict" and "/ sysapi" are forwarded to the local server http://localhost:8401/ Aservice RBAC service provided by.
Implementation steps
- The custom route predicate factory needs to inherit the AbstractRoutePredicateFactory class and override the logic of the apply method.
- In the apply method, you can use exchange Getrequest () gets the ServerHttpRequest object, so you can get the request parameters, request method, request header and other information.
@Component
public class RbacAuthRoutePredicateFactory
        extends AbstractRoutePredicateFactory<RbacAuthRoutePredicateFactory.Config> {


  public RbacAuthRoutePredicateFactory() {
    super(Config.class);
  }

  @Override
  public Predicate<ServerWebExchange> apply(Config config) {
    return exchange -> {
      String requestURI = exchange.getRequest().getURI().getPath();
      if (config.getFlag().equals("rbac")
        &&(requestURI.startsWith("/sysuser")
          ||requestURI.startsWith("/sysorg")
          ||requestURI.startsWith("/sysrole")
          ||requestURI.startsWith("/sysmenu")
          ||requestURI.startsWith("/sysdict")
          ||requestURI.startsWith("/sysapi"))) {

        return true;  //Indicates that the match was successful
      }
      return false;   //Indicates that the match failed
    };
  }
  //Custom parameter args configuration class
  public static class Config {
    private String flag; //This parameter corresponds to args of the configuration file

    public String getFlag() {
      return flag;
    }

    public void setFlag(String flag) {
      this.flag = flag;
    }
  }
}
- The name of the class needs to end with routepredictefactory, such as RbacAuthRoutePredicateFactory. When using this predicate in the configuration file, RbacAuth is the name of the route predicate factory.
- We can also pass parameters for the apply method. For example, the config and flag fields in the code correspond to the args field names in the configuration file one by one.
spring:
  application:
    name: zimug-server-gateway
  cloud:
    gateway:
      routes:
        - id: rbsc-service
          uri: http://localhost:8401/
          predicates:
            - name: RbacAuth
              args:
                flag: rbac
2, Test it
Premise: start the native aservice RBAC service and other public Spring Cloud components related to it
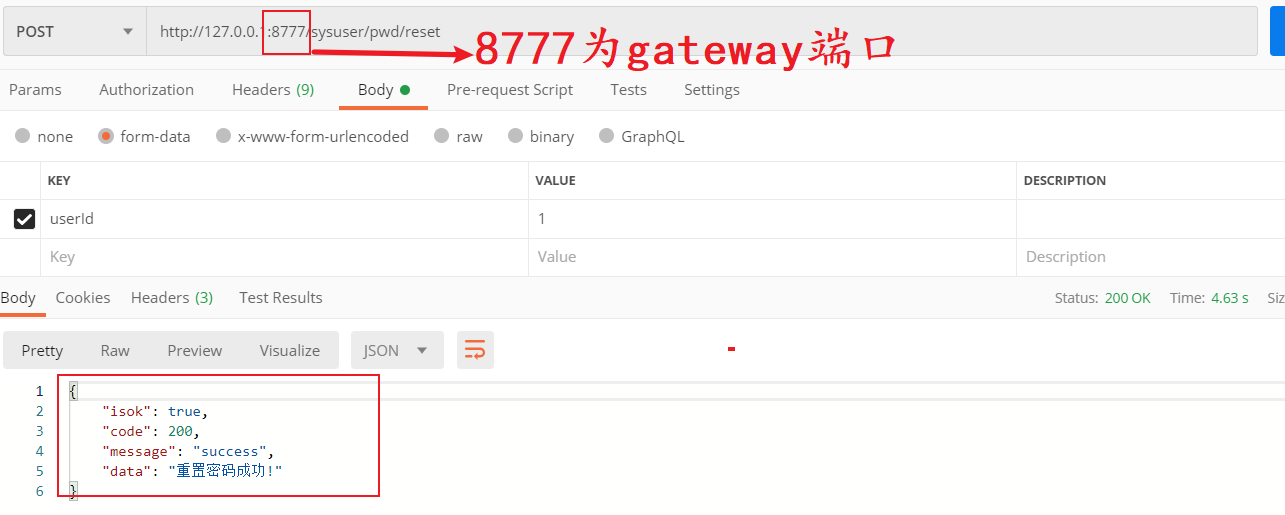
visit http://127.0.0.1:8777/sysuser/pwd/reset , the request is correctly received by the gateway and forwarded to the local aservice RBAC service according to our customized routing rules.
Constructing static routing by encoding
1, Review the configuration file
server:
  port: 8777

spring:
  application:
    name: dhy-server-gateway
  cloud:
    gateway:
      routes:
        - id: dhy           # Route ID, unique
          uri: http://baidu.com / # destination URI, the address of the route to the microservice
          predicates:              # Request forwarding judgment condition
            - Path=/baidu/**    # Match the request of the corresponding URL, and append the matched request after the target URI
- Routes refers to configuring routing forwarding rules. Multiple routes can be configured
- Each route has an id that identifies the uniqueness of the route
- uri refers to the destination of the request forwarding
- Predictions are the judgment conditions of request forwarding. Our example uses the Path condition to judge
The above routing configuration means that when we visit: http: / / < gateway IP >: 8777 / Baidu / * * the request is forwarded to http://www.baidu.com/baidu/ **Where * * matches any character.
2, Coding method to realize routing
The following code can achieve the same effect as the configuration file. RouteLocatorBuilder has corresponding api functions to provide implementation methods for all predictions matching rules that can be implemented in the configuration file.
@Bean
public RouteLocator customRouteLocator(RouteLocatorBuilder builder) {
   return builder.routes()
         .route("dhy", r -> r.path("/baidu/**")
         .uri("http://baidu.com"))
         .build();
}
The first parameter of the route method is the route id, and the second parameter is a Function (functional programming). The matching rule is determined by passing in a lambda expression.

The implementation of predict routing matching rules by coding is more cumbersome than that by configuration files, but it is not good for nothing! The combination of multiple predicates in the configuration file mode can only express the relationship of "and", while the coding mode can also express the relationship of "or or". As shown in the figure below:

However, the author seldom uses coding to realize routing configuration in general work, because coding represents "write dead", that is, static. We hope that the configuration can be updated dynamically. The way of configuration file combined with nacos can realize the dynamic update of routing configuration. We will introduce it in the following chapters!
Introduction and use of Filter
1, Filter introduction
Microservice gateway often needs to perform some filtering operations on the request, such as adding Header to carry token after authentication. In the filter, you can
- Add request header, request parameters, response header and other functions for the request
- Common service operations such as authentication, recording audit log, and counting request response time
There are many services in the microservice system. We don't want to develop common service operations on each service, such as authentication, recording audit logs, and counting the response time of requests. Therefore, for such repeated development or inheritance work, it is best to do it uniformly on the gateway.
2, Life cycle of Filter
The Filter life cycle of Spring Cloud Gateway is very simple, with only two: "pre" and "post".
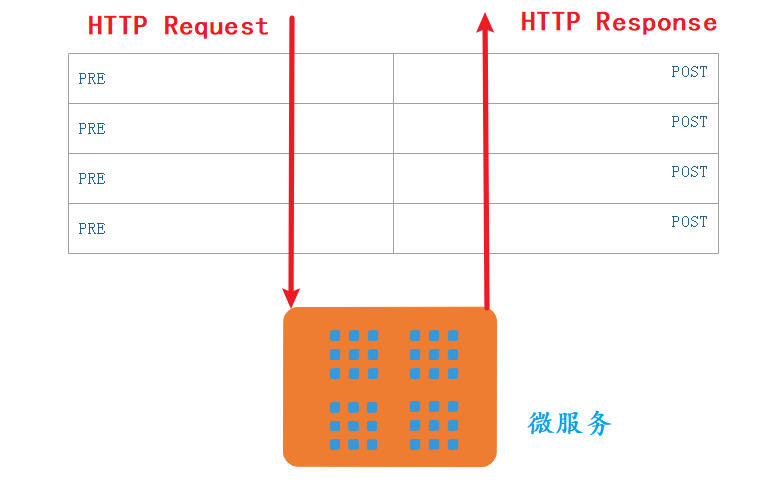
- PRE: this filter is called before the request is routed. We can use this filter to realize authentication, select the requested micro service in the cluster, record debugging information, etc.
- POST: this filter is executed after routing to the microservice. This filter can be used to add standard HTTP headers for responses, collect statistics and indicators, send responses from microservices to clients, and so on.
3, Classification of Filter
The Filter of Spring Cloud Gateway can be divided into:
- Gateway filter: applied to a single route or a packet route.
- GlobalFilter: applies to all routes
I don't suggest you spend a lot of time learning how to use the following filters, which I have hardly used. As I have already introduced, the function of Filter is to modify the HTTP request header, path, parameters, etc. in some demand scenarios. As long as you are familiar with the HTTP protocol, you can customize and implement all Filter requirements, which is often more flexible than using the built-in Filter.
3.1.Gateway filter
| Filter factory | effect | parameter |
|---|---|---|
| AddRequestHeader | Add Header for original request | Name and value of Header |
| AddRequestParameter | Add request parameters to the original request | Parameter name and value |
| AddResponseHeader | Add Header for original response | Name and value of Header |
| DedupeResponseHeader | Eliminate duplicate values in response headers | Header name and de duplication policy that need to be de duplicated |
| Hystrix | Introduce circuit breaker protection of Hystrix for routing | The name of the HystrixCommand |
| FallbackHeaders | Add specific exception information to the request header of fallbackUri | The name of the Header |
| PrefixPath | Prefix the original request path | prefix path |
| PreserveHostHeader | Add a property of preserveHostHeader=true to the request, and the routing filter will check this property to decide whether to send the original Host | nothing |
| RequestRateLimiter | It is used to limit the current of requests. The current limiting algorithm is token bucket | keyResolver,rateLimiter,statusCode,denyEmptyKey,emptyKeyStatus |
| RedirectTo | Redirect the original request to the specified URL | http status code and redirected url |
| RemoveHopByHopHeadersFilter | Delete a series of headers specified by IETF organization for the original request | It will be enabled by default. You can specify which headers to delete only through configuration |
| RemoveRequestHeader | Delete a Header for the original request | Header name |
| RemoveResponseHeader | Delete a Header for the original response | Header name |
| RewritePath | Rewrite the original request path | Regular expressions of original path and rewritten path |
| RewriteResponseHeader | Override a Header in the original response | Header name, regular expression of value, rewritten value |
| SaveSession | Force the WebSession::save operation before forwarding the request | nothing |
| SecureHeaders | Add a series of security response headers to the original response | None. It supports modifying the values of these security response headers |
| SetPath | Modify the original request path | Modified path |
| SetResponseHeader | Modify the value of a Header in the original response | Header name, modified value |
| SetStatus | Modify the status code of the original response | HTTP status code, which can be a number or a string |
| StripPrefix | The path used to truncate the original request | Use a number to indicate the number of paths to truncate |
| Retry | Retry for different responses | retries,statuses,methods,series |
| RequestSize | Sets the size of the maximum request packet allowed to be received. If the requested packet size exceeds the set value, 413 Payload Too Large is returned | The size of the request packet, in bytes. The default value is 5M |
| ModifyRequestBody | Modify the content of the original request body before forwarding the request | Modified request body content |
| ModifyResponseBody | Modify the content of the original response body | Modified response body content |
| Default | Add filters for all routes | Filter factory name and value |
Each filter factory corresponds to an implementation class, and the names of these classes must end with GatewayFilterFactory, which is a convention of Spring Cloud Gateway. For example, the implementation class corresponding to AddRequestHeader is AddRequestHeaderGatewayFilterFactory. Small partners interested in the source code can splice specific class names according to this law to find the implementation code of these built-in filter factories
Filter is not as commonly used as predict. More often, we need to customize filter, so we won't introduce the official built-in filter one by one. Let's choose two examples to illustrate:
- AddRequestHeader GatewayFilter Factory
spring:
  cloud:
    gateway:
      routes:
      - id: add_request_header_route
        uri: http://httpbin.org:80/get
        filters:
        - AddRequestHeader=X-Request-Foo, Bar
        predicates:
        - Method=GET
The filter factory will add a Header with the name of X-Request-Foo and the value of Bar to the matching HTTP request.
- RewritePath GatewayFilter Factory
A very powerful function in Nginx service startup is to rewrite the path, which is also provided by Spring Cloud Gateway by default.
spring:
  cloud:
    gateway:
      routes:
      - id: rewritepath_route
        uri: http://httpbin.org
        predicates:
        - Path=/foo/**
        filters:
        - RewritePath=/foo/(?<segment>.*), /$\{segment}
Eliminate the definitions of predictions, and all paths starting from / foo / * * will hit the route.
Request gateway path http://httpbin.org/foo/get , the gateway rewrites the path through the filter and forwards the request to http://httpbin.org/get .
3.2.Global filter
The GlobalFilter built in the Spring Cloud Gateway framework is as follows:
| Global filter | effect |
|---|---|
| Forward Routing Filter | It is used for local forward, that is, forward the request in the Gateway service instead of forwarding to the downstream service |
| LoadBalancerClient Filter | Consolidate Ribbon for load balancing |
| Netty Routing Filter | Forward http and https requests using Netty's HttpClient |
| Netty Write Response Filter | Write the proxy response back to the client side of the gateway |
| RouteToRequestUrl Filter | Convert the original url obtained from the request into the url used by the Gateway for request forwarding |
| Websocket Routing Filter | Using Spring Web Socket will forward the Websocket request |
| Gateway Metrics Filter | Integrate relevant monitoring and provide monitoring indicators |
The use of each Global filter requires specific analysis of specific problems. In special cases, the built-in Global filter can not meet our needs. You can also customize the GlobalFilter. In the next section, we will explain.
Custom filterfilter
1, Custom global filter - Statistics interface api response time
We use a common requirement: the calculation of response time of api interface service. The implementation of this requirement is of great significance to the optimization of request access link. See the following code and notes for specific implementation:
@Configuration
public class GlobalGatewayFilterConfig
{
    @Bean
    @Order(-100)
    public GlobalFilter apiGlobalFilter()
    {
        return (exchange, chain) -> {
            //Gets the time before the request is processed
            Long startTime = System.currentTimeMillis();
            //After the request is processed
            return chain.filter(exchange).then().then(Mono.fromRunnable(() -> {
                //Gets the time after the request was processed
                Long endTime = System.currentTimeMillis();
                //Here, the results can be stored persistently, and we can print them simply for the time being
                System.out.println(
                    exchange.getRequest().getURI().getRawPath() +
                            ", cost time : "
                            + (endTime - startTime) + "ms");
            }));
        };
    }
}
- @The smaller the Order annotation value, the higher the priority of filter execution
Let's use the same test case in the section "customize PredicateFactory" to test. The background printing results of DHY server gateway are as follows:

Through the above method, you can write multiple functions in a configuration class, and each function represents a global filter.
2, Write the global filter as a class
In the above method, when the implementation content of the filter function is complex, it will lead to too many lines of code of a single class. We can write a filter for each class.
@Component
public class ApiGlobalFilter implements GlobalFilter, Ordered {

    @Override
    public int getOrder() {
        return -100;
    }

    @Override
    public Mono<Void> filter(ServerWebExchange exchange, GatewayFilterChain chain) {
        //Gets the time before the request is processed
        Long startTime = System.currentTimeMillis();
        //After the request is processed
        return chain.filter(exchange).then().then(Mono.fromRunnable(() -> {
            //Gets the time after the request was processed
            Long endTime = System.currentTimeMillis();
            //Here, the results can be stored persistently, and we can print them simply for the time being
            System.out.println(
                exchange.getRequest().getURI().getRawPath() +
                        ", cost time : "
                        + (endTime - startTime) + "ms");
        }));
    }
}
3, Custom local filter - specify IP access
In our system, there may be several functions that are specially used by system administrators and are not widely open. We assume such a requirement: only one IP (the IP of the PC operated by the administrator) client can access the aservice RBAC privilege management service, and other IPS cannot.
- A custom Filter factory needs to inherit the AbstractGatewayFilterFactory class and override the logic of the apply method.
- In the apply method, you can use exchange Getrequest () gets the ServerHttpRequest object, so you can get the request parameters, request method, request header and other information.
- In the apply method, the filter chain can be operated through the chain
@Component
@Order(99)
public class IPForbidGatewayFilterFactory
    extends AbstractGatewayFilterFactory<IPForbidGatewayFilterFactory.Config> {

    public IPForbidGatewayFilterFactory()
    {
        super(Config.class);
    }

    @Override
    public List<String> shortcutFieldOrder()
    {
        return Arrays.asList("permitIp");  //Parameters corresponding to config class
    }

    @Override
    public GatewayFilter apply(Config config)
    {
        return (exchange, chain) -> {
            //Get client ip access services
            String ip = exchange.getRequest().getRemoteAddress().getAddress().getHostAddress();
            if (config.getPermitIp().equals(ip)) {
                //If the client ip=permitIp, continue to execute the filter chain to allow continued access
                return chain.filter(exchange);
            }
            //Otherwise, return and reject the request
            exchange.getResponse().setStatusCode(HttpStatus.FORBIDDEN);
            return exchange.getResponse().setComplete();
        };
    }

    static public class Config
    {
        private String permitIp;

        public String getPermitIp() {
            return permitIp;
        }

        public void setPermitIp(String permitIp) {
            this.permitIp = permitIp;
        }
    }
}
- The name of the class needs to end with GatewayFilterFactory, such as IPForbidGatewayFilterFactory. IPForbid is the name of the Filter factory when the Filter is used in the configuration file.
- The Config class can define one or more attributes. To override the List shortcutFieldOrder() method, specify the attribute name.
Because there is only one parameter in the configuration file, 192.168.1.6 in the following figure will be assigned to the unique parameter of config class: permitIp
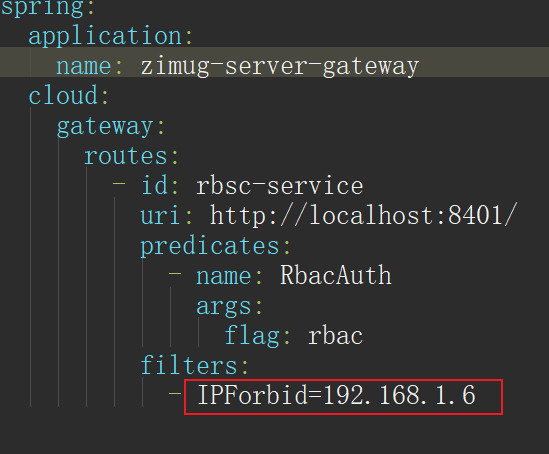
If we conduct the interface access test from a client ip other than 192.168.1.6, we will get the following results:

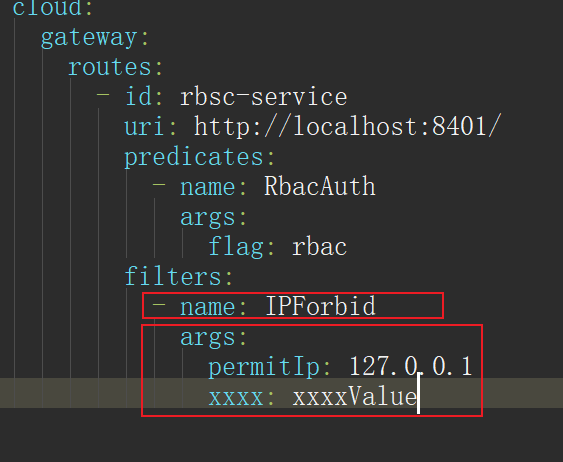
How to configure multiple parameters for GatewayFilterFactory?
Firstly, Config should have multiple member variables, such as permitIp and xxxx. Secondly, configure the configuration file as follows
Gateway request forwarding load balancing
1, Request forwarding load balancing
In the examples we implemented in all previous chapters, the uri definition of routing rules is written in the form of HTTP address, such as: http://localhost:8401 After receiving the request, the gateway forwards the request to the corresponding service according to the routing rules.
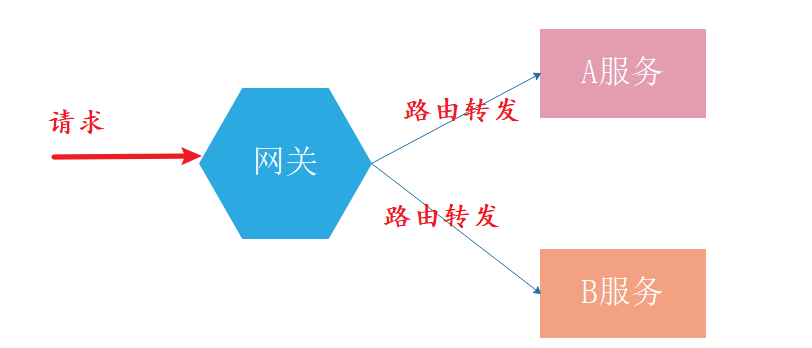
However, in our microservice system, one service usually starts multiple instances, as shown in the following figure:
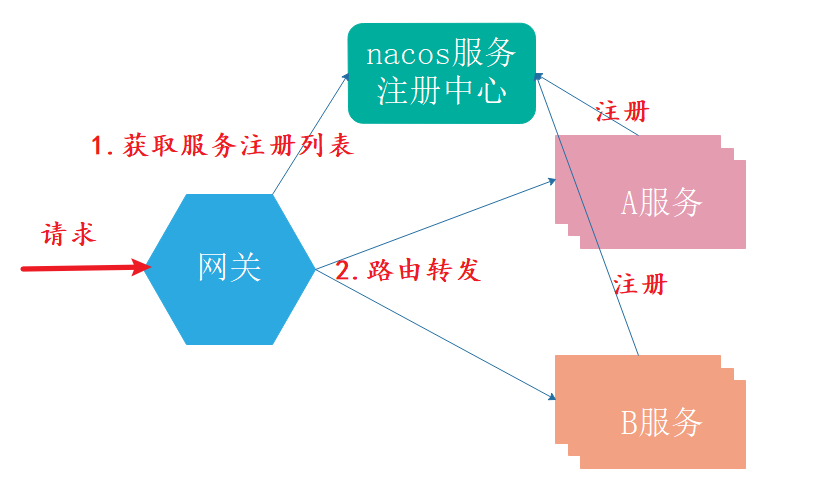
In order to ensure that the requests received by the gateway can be forwarded to each instance of microservice in a load balanced manner, we register the microservice gateway with the "service registry", such as nacos. So:
- After receiving the request, the gateway first obtains the access address of each micro service instance from the service registry
- Then the gateway selects one of many instances as the request forwarding object according to the rules of client load balancing.
Simply put, it is to register the gateway as a "service caller" in the nacos service registry to realize client load balancing.
2, Integrated nacos service registration client
How to integrate the nacos service registry client on the microservice side (mentioned in the chapter of nacos) and how to integrate nacos on the gateway application.
- Introducing the client jar package of nacos service registry through macen coordinates
<dependency>
   <groupId>com.alibaba.cloud</groupId>
   <artifactId>spring-cloud-starter-alibaba-nacos-discovery</artifactId>
</dependency>
- Add the annotation of startup service registration and discovery on the project startup class
@EnableDiscoveryClient
- Configure the address of the nacos service
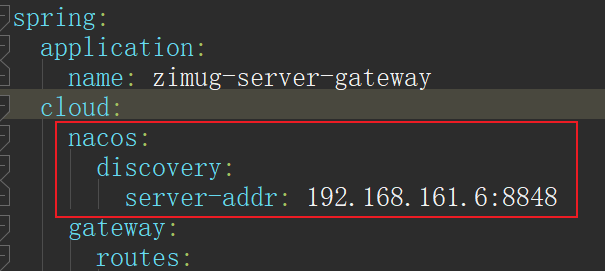
- Start the gateway project (zimug server gateway), and you can see that the registration has been successful on the nacos console.

3, Modify Gateway routing configuration
The above steps only integrate the nacos client into the gateway project (zimug server gateway). If we want to achieve the effect of load balancing of request instance forwarding, we also need to configure the gateway project:
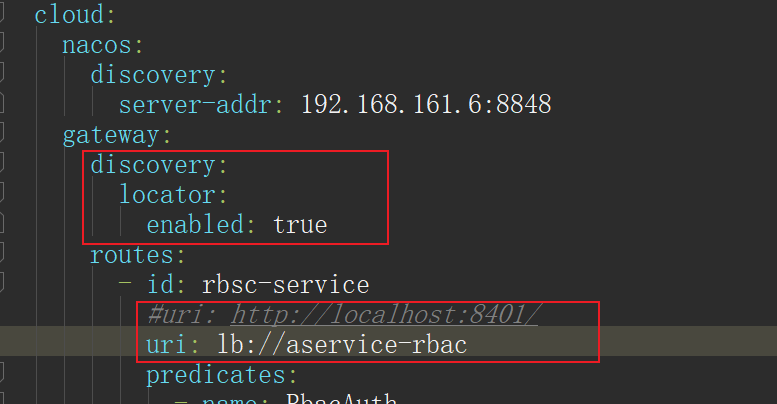
- Change the uri from the dead http access address to lb: / / < service registration name >. gateway will go to nacos to request the service access address list of mu lt iple instances through < service registration name >, and select an instance from the address list to forward the request. lb is the abbreviation of LoadBalance!
4, Testing
We start two aservice RBAC service instances (native port 8401 and native port 8411) and test its access through the gateway (port 8777).
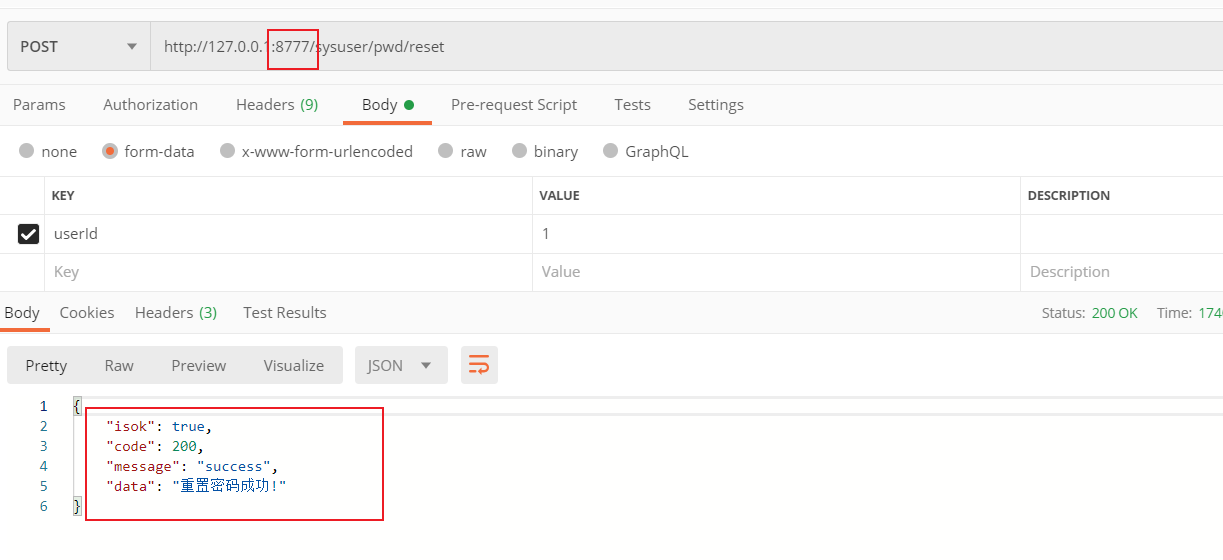
By observing the log, it shows that the load balancing effect of our gateway request forwarding has achieved:
- The first request was forwarded to the aservice RBAC service instance of the local 8401
- The second request was forwarded to the aservice RBAC service instance of native 8411
Dynamic routing configuration with nacos
Why centralized management of gateway configuration?
- We can start multiple gateway gateway instances to achieve the effect of traffic load diversion. Multiple gateway instances can use the same configuration file in nacos.
- Modifying the routing configuration item in the configuration file will affect all gateway gateway instances without modifying one instance by one.
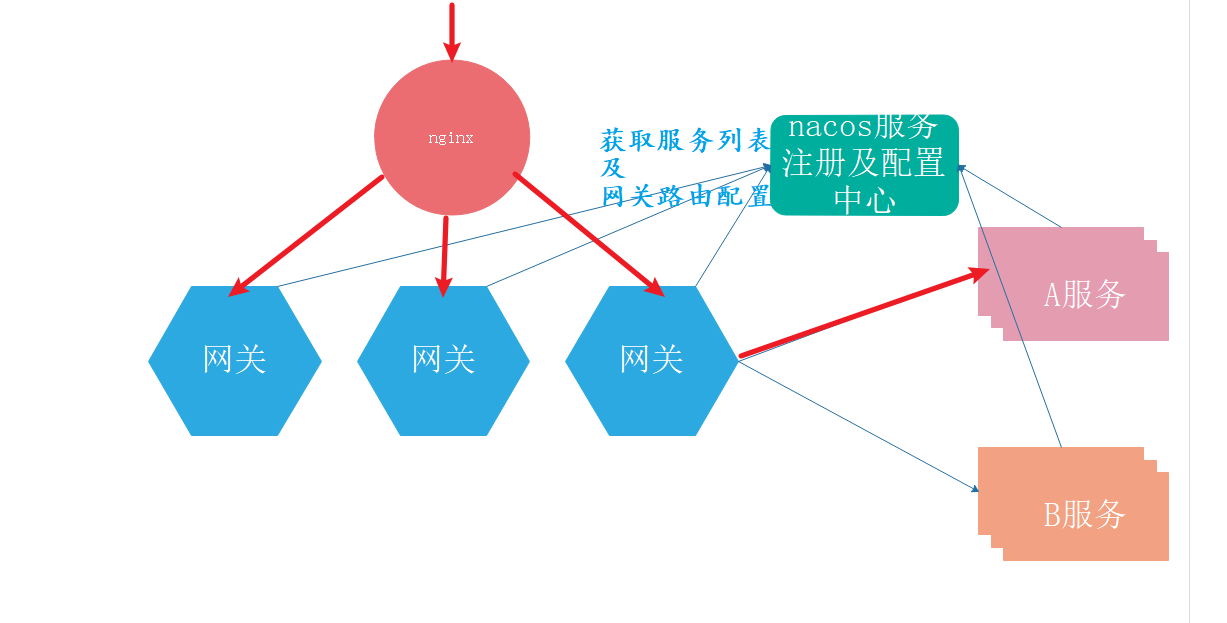
1, Load routing configuration from nacos at startup
When the Spring Cloud Gateway is started, the routing configuration and rules in the yml configuration file are loaded into memory and managed by InMemoryRouteDefinitionRepository. The contents of the configuration file can be put into nacos for unified management.
We regard the gateway as an ordinary service. We will configure the gateway according to the service configuration in the chapter of Alibaba Nacos.
- Configure the client by introducing the nacos service through maven
<dependency>
   <groupId>com.alibaba.cloud</groupId>
   <artifactId>spring-cloud-starter-alibaba-nacos-config</artifactId>
</dependency>
Divide the configuration file into two parts:
- Create a new project local bootstrap YML configures the basic information of the application, port, name, and nacos discovery and config information.
- New on cozig-gateway.com Yaml configuration file and put the configuration information related to gateway routing into it. This part is configured in the centralized management of nacos.
Local bootstrap yml
server:
  port: 8777

spring:
  application:
    name: zimug-server-gateway
  cloud:
    nacos:
      discovery:
        server-addr: 192.168.161.6:8848
      config:
        server-addr: ${spring.cloud.nacos.discovery.server-addr}
        file-extension: yaml
        group: ZIMUG_GROUP  #Configure grouping. The default grouping is DEFAULT_GROUP
Zimug server gateway on Nacos Yaml configuration
spring:
  cloud:
    gateway:
      discovery:
        locator:
          enabled: true
      routes:
        - id: rbsc-service
          uri: lb://aservice-rbac
          predicates:
            - name: RbacAuth
              args:
                flag: rbac
          filters:
            - name: IPForbid
              args:
                permitIp: 127.0.0.1
The routing configuration still contains the Filter: IPForbid we configured before. We start the gateway gateway and aservice RBAC services locally. When ipbid is 1.0.0, we can access it normally. If it is another ip, our access fails (403 forbidden). It shows that the routing configuration of our gateway project has been put into centralized management by nacos and has taken effect!
2, Dynamic update of routing configuration
Do not restart the zimug Server Gateway project, and then we go to nacos to add a routing configuration for the gateway, as follows:
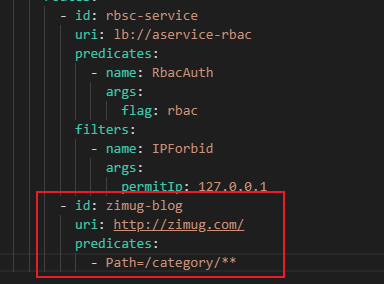
Then the browser visits the following website.
http://localhost:8777/category/course
The request is then forwarded to the following website:
http://www.zimug.com/category/course
It shows that the nacos of the current version of Spring Cloud alibaba used by the author fits perfectly with the spring Cloud gateway (the choice of the two versions "Spring Boot and Cloud selection compatibility"), and can realize the dynamic update of the configuration. In the future, we want to update the configuration of all gateway instances, so we don't need to restart the gateway project anymore, which can take effect in real time!
It should be noted that the contents of many articles on the Internet are based on older versions, so you need to implement the monitoring of nacos dynamic routing loading by yourself. For example: https://article.itxueyuan.com/EX3pLq , you can have a look, but there's no need to do so. The official new version can support the dynamic update of network management routing configuration by default, and there is no need to restart the gateway application!
https://www.cnblogs.com/jian0110/p/12862569.html
#Integrate Sentinel to realize resource flow restrictionSpring Cloud Gateway provides us with a current limiting method by default: RequestRateLimiterGatewayFilterFactory. However, this method can not be used in production, can not dynamically change the current limiting parameters with the change of persistent data, and can not change the traffic threshold according to the traffic in real time. This article will not introduce RequestRateLimiterGatewayFilterFactory, but directly introduce the current limiting function of Spring Cloud Gateway combined with sentinel, which is most commonly used in production.
Sentinel has provided the adaptation module of Spring Cloud Gateway since version 1.6.0, which can provide flow restriction of two resource dimensions:
- Route dimension: the route entry configured in the Spring configuration file. The resource name is the corresponding routeId
- Custom API dimension: users can use the API provided by Sentinel to customize some API groups
1, Gateway gateway integration sentinel
Add sentinel client in the micro service module zimug server gateway through maven coordinates
<dependency>
    <groupId>com.alibaba.cloud</groupId>
    <artifactId>spring-cloud-starter-alibaba-sentinel</artifactId>
</dependency>
Add sentinel configuration to the project configuration file. Because I use nacos, I go to the nacos configuration center to modify the configuration file. If your service does not use the configuration center, use the local application Just configure it in YML.
spring:
  cloud:
    sentinel:
      transport:
        port: 8719
        dashboard: 192.168.161.3:8774
2, Test it
Zimug Server Gateway project has the following two gateway routes in the configuration file of nacos
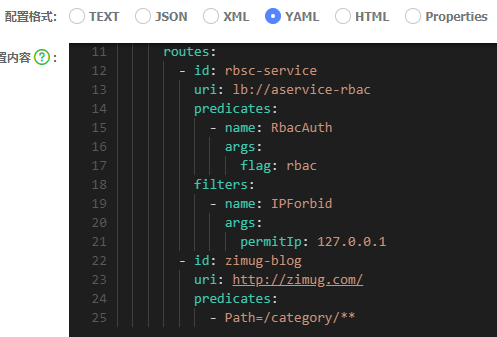
Let's first access these two routes (which have been written many times in the previous sections of this chapter), then log in to the sentinel console and see the following information, which shows that our gateway route has been correctly managed by sentinel. We can configure the flow control and downgrade of route resources.

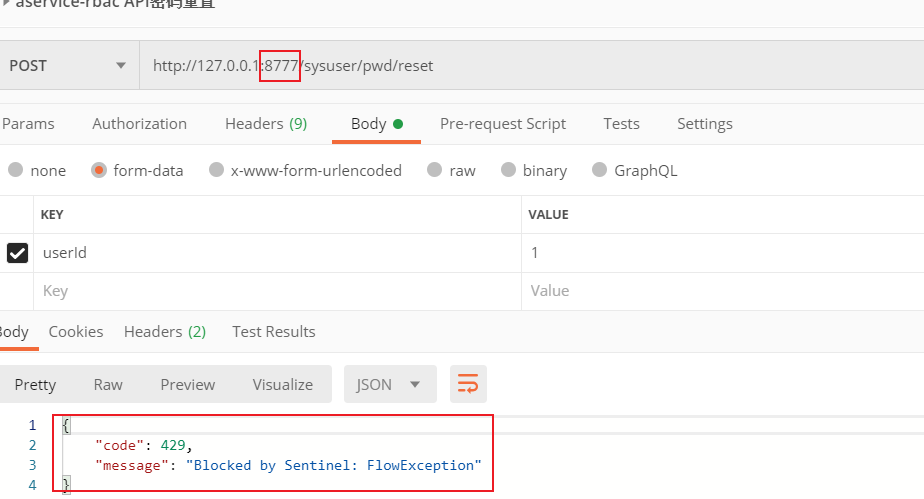
We set the flow control limit of QPS=1 for the routing resources represented by "/ sysuser/pwd/reset" (the maximum number of requests per second is 1)

Then we quickly click to http://127.0.0.1:8777/sysuser/pwd/reset Send the request and get the following results, indicating that the access to the routing resource is blocked at the gateway level.
3, In depth analysis
The above flow control callback information is defined and implemented by default in the DefaultBlockRequestHandler. When the flow is limited, an error message similar to the following will be returned: Blocked by Sentinel: FlowException.

If you want to customize the information response for current limit (it's not necessary), you can register the callback custom BlockHandler in WebFluxCallbackManager:

The custom BlockHandler code is as follows: the implementation interface returns a custom current limit information return value: "the system is busy, please try again later!". Mono is one of the methods to use the return value in the weblux programming scenario.
public class MySentinelBlockHandler implements BlockRequestHandler {

  @Override
  public Mono<ServerResponse> handleRequest(ServerWebExchange exchange, Throwable t) {
    ErrorResult errorResult = new MySentinelBlockHandler.ErrorResult(
            HttpStatus.TOO_MANY_REQUESTS.value(),
            "The system is busy, please try again later!");
    // JSON result by default.
    return ServerResponse.status(HttpStatus.TOO_MANY_REQUESTS)
            .contentType(MediaType.APPLICATION_JSON_UTF8)
            .body(fromObject(errorResult));
  }


  private static class ErrorResult {
    private final int code;
    private final String message;

    ErrorResult(int code, String message) {
      this.code = code;
      this.message = message;
    }

    public int getCode() {
      return code;
    }

    public String getMessage() {
      return message;
    }
  }
}
Imitate the test method in the second section of this article. After one test, the returned results are as follows:

Cross domain access configuration
1, Solution of cross domain access problem
First of all, you need to know what is homology strategy and what is cross domain access. I won't talk about these basic knowledge in detail. Simply put: for security reasons, the browser does not allow cross domain access to requests with inconsistent domain names (ip), ports and protocols. For example, you cannot access the localhost:8201 domain (back-end service) from the localhost:8080 domain (front-end).

Solution: go to the back-end service and configure the domain and HTTP protocol methods that allow cross domain access.
2, Gateway gateway configuration cross domain
Suppose my current front-end application is localhost:8080. All services pass through the gateway. We need to configure cors for the gateway.
spring:
  cloud:
    gateway:
      globalcors:
        cors-configurations:
          '[/**]':
            allowCredentials: true
            exposedHeaders: "*"
            allowedHeaders: "*"
            allowedOrigins: "http://localhost:8080"
            allowedMethods:
            - GET
            - POST
The format of properties is configured as follows
spring.cloud.gateway.globalcors.corsConfigurations.[/**].allowedOrigins=http://localhost:8080
spring.cloud.gateway.globalcors.corsConfigurations.[/**].allowedHeaders[0]=*
spring.cloud.gateway.globalcors.corsConfigurations.[/**].allowedMethods[0]=GET
spring.cloud.gateway.globalcors.corsConfigurations.[/**].allowedMethods[1]=POST
In the example configured above, all GET or POST requests from localhost:8080 are allowed to cross domains, and the browser side will not report an error.
3, Code configuration mode
Although the above configuration is officially recommended, it does not take effect after my configuration is completed. Then I found the following comments in the source code:

In other words, the Configuration method through the Configuration file is still TODO at present. Some people say it can take effect, while others say it will not take effect. The result of my test is that it does not take effect, so the above methods may not take effect due to different versions. So we provide another Configuration method: write code, and the effect is the same. Add code Configuration in the Configuration class or gateway application entry.
@Bean
public CorsWebFilter corsFilter() {
    CorsConfiguration config = new CorsConfiguration();
    config.setAllowedMethods(Arrays.asList(
            HttpMethod.POST.name(),
            HttpMethod.GET.name()
    ));
    config.addAllowedOrigin("Http://localhost:8080");
    config.addAllowedHeader("*");

    UrlBasedCorsConfigurationSource source
            = new UrlBasedCorsConfigurationSource(new PathPatternParser());
    source.registerCorsConfiguration("/**", config);

    return new CorsWebFilter(source);
}
If you don't want to write the configuration content in the code level, you can still use the configuration properties in nacos to automatically assemble GlobalCorsProperties and CorsWebFilter, and make the cross domain configuration in yml in the second section effective. The code is as follows:
@Configuration
@AutoConfigureAfter(GlobalCorsProperties.class)
public class CorsConfig {

  @Resource
  private  GlobalCorsProperties globalCorsProperties;

  @Bean
  public CorsWebFilter corsFilter() {
    UrlBasedCorsConfigurationSource source
            = new UrlBasedCorsConfigurationSource(new PathPatternParser());
    globalCorsProperties.getCorsConfigurations()
            .forEach(source::registerCorsConfiguration);
    return new CorsWebFilter(source);
  }

}
4, It should be noted that
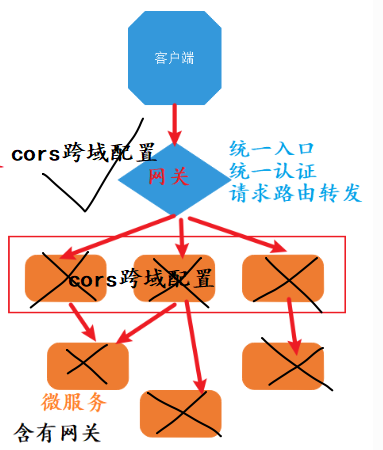
The unified cross domain CORS configuration is carried out on the gateway, and the microservice should not open CORS cross domain access. If you paint a snake and add feet, you will make mistakes!
Gateway level global exception handling
1, Why do you need global exception handling at the gateway level
The following figure shows the processing flow of a request that forwards the micro service through the gateway and operates the database by the micro service. There are 5 places where exceptions may occur during request processing
- The request arrives at the gateway, and the gateway handles the request abnormally
- The gateway forwards the request to the micro service. During the forwarding process, the service finds an exception or network exception
- The microservice processed the request. An exception occurred during the request processing
- Microservice calls to operate the database, and the database operation is abnormal
- Network or other exceptions occurred in the database itself

For exceptions of categories 3, 4 and 5, the microservice handles global exceptions through ControllerAdvice + ExceptionHandler and returns the global general request response data structure.
If global exception handling is not carried out, Spring Boot will respond to a WhiteLabel Error Page by default. Such response results are very unfriendly.

If we do not handle exceptions of class 1 and 2 uniformly, the default response method is the same as Spring Boot, which is very unfriendly. Therefore, it is also necessary to carry out global exception handling at the gateway level, so as to give users a more friendly data response result for the exceptions of the gateway itself and the request forwarding process, and have a reasonable log record for the exception information itself.
2, Source code analysis
How can we implement global exception handling at the GateWay level? Don't be in a hurry. Let's take a look at how GateWay handles by default. Let's first look at exceptionhandling webhandler
public class ExceptionHandlingWebHandler extends WebHandlerDecorator {

   //WebExceptionHandler with several
   private final List<WebExceptionHandler> exceptionHandlers;


   public ExceptionHandlingWebHandler(WebHandler delegate, List<WebExceptionHandler> handlers) {
      super(delegate);
      this.exceptionHandlers = Collections.unmodifiableList(new ArrayList<>(handlers));
   }

   public List<WebExceptionHandler> getExceptionHandlers() {
      return this.exceptionHandlers;
   }

   @Override
   public Mono<Void> handle(ServerWebExchange exchange) {

      Mono<Void> completion;
      try {
         completion = super.handle(exchange);
      }catch (Throwable ex) {
         completion = Mono.error(ex);
      }
      //When an exception occurs, onErrorResume uses WebExceptionHandler to handle the exception
      for (WebExceptionHandler handler : this.exceptionHandlers) {
         completion = completion.onErrorResume(ex -> handler.handle(exchange, ex));
      }

      return completion;
   }
}
Through the above code, we know that WebExceptionHandler is an exception handling class. Let's take a look at its code
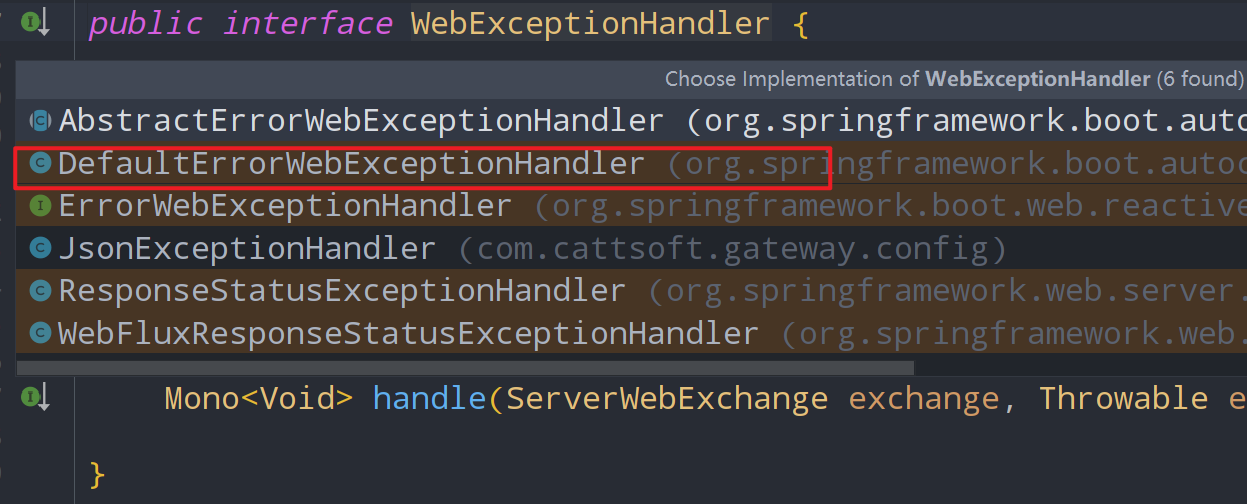
WebExceptionHandler is an interface. Its default effective implementation class is DefaultErrorWebExceptionHandler, and its default processing is rendering as error html page.
@Override
protected RouterFunction<ServerResponse> getRoutingFunction(
      ErrorAttributes errorAttributes) {
   return route(acceptsTextHtml(), this::renderErrorView).andRoute(all(),
         this::renderErrorResponse);
}
3, Custom global exception handling
Through the above analysis, we know that if we want to conduct global exception handling at the gateway level, we can implement the WebExceptionHandler interface.
But in practice, we usually implement ErrorWebExceptionHandler, which inherits from WebExceptionHandler.
package org.springframework.boot.web.reactive.error;
import org.springframework.web.server.WebExceptionHandler;

@FunctionalInterface
public interface ErrorWebExceptionHandler extends WebExceptionHandler {

}
ErrorWebExceptionHandler is a functional interface. We only need to implement its handle method to realize global exception handling.
@Slf4j
@Order(-1)
@Component
@RequiredArgsConstructor
public class JsonExceptionHandler implements ErrorWebExceptionHandler {

    @Override
    public Mono<Void> handle(ServerWebExchange exchange, Throwable ex) {

        ServerHttpResponse response = exchange.getResponse();
        if (response.isCommitted()) {
            //For a response that has been committed, you can no longer use this response to write anything to the buffer
            return Mono.error(ex);
        }

        // header set responds to JSON type data and unifies the response data structure (applicable to the front and back end separated JSON data exchange system)
        response.getHeaders().setContentType(MediaType.APPLICATION_JSON);

        // The translation processing is carried out according to the exception type, and the translation result is easy for the front end to understand
        String message;
        if (ex instanceof NotFoundException) {
            response.setStatusCode(HttpStatus.NOT_FOUND);
            message = "The service you requested does not exist";
        } else if (ex instanceof ResponseStatusException) {
            ResponseStatusException responseStatusException = (ResponseStatusException) ex;
            response.setStatusCode(responseStatusException.getStatus());
            message = responseStatusException.getMessage();
        } else if (ex instanceof GateWayException) {
            response.setStatusCode(HttpStatus.FORBIDDEN);
            message = ex.getMessage();
        } else {
            response.setStatusCode(HttpStatus.INTERNAL_SERVER_ERROR);
            message = "Server internal error";
        }

        //Global general response data structure, which can be customized. It usually contains the request result code, message and data
        AjaxResponse result = AjaxResponse.error(
                response.getStatusCode().value(),
                message);

        writeLog(exchange, ex);

        return response.writeWith(Mono.fromSupplier(() -> {
            DataBufferFactory bufferFactory = response.bufferFactory();
            return bufferFactory.wrap(JSON.toJSONBytes(result));
        }));

    }

    //Record the error information in the form of log
    private void writeLog(ServerWebExchange exchange, Throwable ex) {
        ServerHttpRequest request = exchange.getRequest();
        URI uri = request.getURI();
        String host = uri.getHost();
        int port = uri.getPort();
        log.error("[gateway]-host:{} ,port:{},url:{},  errormessage:",
                host,
                port,
                request.getPath(),
                ex);
    }
}