ECMAScript6
1. ES6 introduction
1.1 what is ES6
ECMAScript 6.0 (hereinafter referred to as ES6) is the next generation standard of JavaScript language, which has been officially released in June 2015. Its goal is to make JavaScript language can be used to write complex large-scale applications and become an enterprise development language.
1.2 relationship between ECMAScript and JavaScript
A common question is, what is the relationship between ECMAScript and JavaScript?
To clarify this issue, we need to review history. In November 1996, Netscape, the creator of JavaScript, decided to submit JavaScript to the standardization organization ECMA, hoping that this language can become an international standard. The next year, ECMA released the first version of standard document No. 262 (ECMA-262), which stipulated the standard of browser scripting language and called this language ECMAScript. This version is version 1.0. The standard was formulated for the JavaScript language from the beginning, but it is not called JavaScript for two reasons. First, trademark. Java is a trademark of Sun company. According to the license agreement, only Netscape company can legally use the name JavaScript, and JavaScript itself has been registered as a trademark by Netscape company. The second is to reflect that the language is formulated by ECMA, not Netscape, which is conducive to ensuring the openness and neutrality of the language. Therefore, the relationship between ECMAScript and JavaScript is that the former is the specification of the latter and the latter is an implementation of the former (other ECMAScript dialects include JScript and ActionScript). In everyday situations, the two words are interchangeable.
1.3 why learn ES6?
This question can be converted into a question, that is, what kind of convenience will it bring to our development after learning ES6? chrome explains that the JavaScript engine is called V8. Someone transferred the V8 engine to the server, so the server can also write JavaScript. This JS language running on the server is node js. Node. Once JS came out, its superior performance was demonstrated. Many web frameworks based on nodejs also came into being. Express is one of them, followed by the full stack mean, mogodb, express and Vue js,Node.js development, JavaScript is more and more used in every corner of the web field, and JS can do more and more things. Babel is a widely used ES6 transcoder, which can convert ES6 code into ES5 code for execution in the existing environment. This means that you can write programs in ES6 without worrying about whether the existing environment supports it. Nodejs is a development trend, Vue JS is a development trend, and the popularity of ES6 is also a trend. At present, some front-end frameworks are using ES6 syntax, such as Vue, React, D3, etc., so ES6 is also the basis for learning the front-end framework well.
2. ES6 environment construction
Because some lower versions of browsers do not support ES6 syntax, you need to convert ES6 syntax to ES5 syntax without using the framework.
2.1 preliminary preparation
First create a project with two folders, src and dist, and an html file
src: put the written ES6 js file into this folder (here is the index.js file)
dist: put the ES5 js file compiled by Babel into this file (here is the index.js file)
HTML: Note: the compiled file in dist is introduced into the HTML file instead of the js file in src
<!DOCTYPE html>
<html lang="en">
<head>
	<meta charset="UTF-8">
	<title>Document</title>
	<script src="./dist/index.js"></script>
</head>
<body>
	Hello ES6
</body>
</html>
2.2. ES6 environment construction
Step 1:
In the src directory, create a new index JS file. This file is very simple. We only declare an a variable and use console Log () is printed.
let a = 1;
console.log(a);
Step 2:
Initialize the project in the root directory of the project and generate package JSON file (can be modified according to your own needs)
cnpm init -y
{
    "name": "es6",
    "version": "1.0.0",
    "description": "",
    "main": "index.js",
    "scripts": {
        "test": "echo \"Error: no test specified\" && exit 1"
     },
    "keywords": [],
    "author": "",
    "license": "ISC"
}
Step 3:
Install Babel plug-in (convert ES6 syntax to ES5)
cnpm install -g babel-cli
Step 4:
Of course, the conversion is not normal yet, and a package required for ES5 needs to be installed
cnpm install --save-dev babel-preset-es2015 babel-cli After installation, package.json Will change
{
    "name": "es6",
     "version": "1.0.0",
    "description": "",
    "main": "index.js",
    "scripts": {
        "test": "echo \"Error: no test specified\" && exit 1"
    },
    "keywords": [],
    "author": "",
    "license": "ISC",
    "devDependencies": {
    "babel-cli": "^6.26.0",
    "babel-preset-es2015": "^6.24.1"
    }
}
Step 5:
Add a in the root directory of the project babelrc file and add content
{
    "presets":[
        "es2015"
    ],
    "plugins": []
}
Create in windows system Method of babelrc file
Method 1: create ". babelrc." under the root directory Just the file name! (two points in total)
Method 2: cmd enter the root directory, enter "type null >. Babelrc", and press enter!
Step 6:
After the installation is completed, we can convert through the command
babel src/index.js -o dist/index.js
Step 7:
The command can be simplified (configured by package.json)
"scripts": {
    "test": "echo "Error: no test specified" && exit 1"
},
Amend to read:
{
  	"name": "es6",
  	"version": "1.0.0",
  	"description": "",
  	"main": "index.js",
  	"scripts": {
        "test": "babel src/index.js -o dist/index.js"
  	},
  	"keywords": [],
  	"author": "",
  	"license": "ISC",
  	"devDependencies": {
		"babel-cli": "^6.26.0",
		"babel-preset-es2015": "^6.24.1"
  	}
}
Then we can escape the code through the following command:
npm run test
3. let and const
ES2015(ES6) adds two important JavaScript Keywords: let and const.
Let declared variables are only valid in the code block where the let command is located. const declares a read-only constant. Once declared, the value of the constant cannot be changed.
3.1. let command
The let command has the following features:
(1) Valid within code block
ES2015(ES6) adds two important JavaScript Keywords: let and const. Let declared variables are only valid in the code block where the let command is located. Const declares a read-only constant. Once declared, the value of the constant cannot be changed.
{
    let a = 1;
    var b = 2;
    console.log(a);//Output 1
    console.log(b);//Output 2
}
console.log(a);//Error ReferenceError: a is not defined
console.log(b);//Output 2
(2) Declaration cannot be repeated
let can only be declared once. var can be declared multiple times:
let a = 1;
let a = 2;//Error Identifier 'a' has already been declared
var b = 3;
var b = 4;
console.log(a);
console.log(b);//Output 4
The for loop counter is very suitable for let
for (var i = 0; i < 10; i++) {
  setTimeout(function(){
    console.log(i);
  })
}
// Output ten 10
for (let j = 0; j < 10; j++) {
  setTimeout(function(){
    console.log(j);
  })
}
// Output 0123456789
The variable i is declared with var and is valid in the global range, so there is only one variable i in the global. In each cycle, i in the setTimeout timer refers to the global variable i, and the ten settimeouts in the cycle are executed after the end of the cycle, so i at this time is 10.
The variable J is declared with let. The current j is only valid in this cycle. In fact, j in each cycle is a new variable. Therefore, j in the setTimeout timer is actually a different variable, that is, the final output is 12345. (if the variable J of each loop is redeclared, how do you know the value of the previous loop? This is because the JavaScript engine will remember the value of the previous loop.).
(3) There is no variable promotion
let does not exist variable promotion, var will promote variable:
console.log(a);  //ReferenceError: a is not defined
let a = "apple";

console.log(b);  //undefined
var b = "banana";
Variable b is declared to have variable promotion with var, so when the script starts running, b already exists, but has not been assigned, so it will output undefined. Variable a uses let to declare that there is no variable promotion. Before declaring variable a, a does not exist, so an error will be reported.
(4) Temporary dead zone
As long as the let command exists in the block level scope, the variables declared by it will "bind" this area and will no longer be affected by the outside.
var tmp = 123;

if (true) {
  tmp = 'abc'; // ReferenceError
  let tmp;
}
In the above code, there is a global variable tmp, but the let in the block level scope declares a local variable tmp, which causes the latter to bind the block level scope. Therefore, an error will be reported when assigning a value to tmp before the let declares the variable.
ES6 clearly stipulates that if there are let and const commands in the block, the variables declared by the block for these commands form a closed scope from the beginning. If these variables are used before declaration, an error will be reported.
In short, within a code block, a variable is not available until it is declared using the let command. Syntactically, this is called "temporary dead zone" (TDZ).
if (true) {
  // TDZ start
  tmp = 'abc'; // ReferenceError
  console.log(tmp); // ReferenceError

  let tmp; // TDZ end
  console.log(tmp); // undefined

  tmp = 123;
  console.log(tmp); // 123
}
In the above code, before the let command declares the variable tmp, it belongs to the "dead zone" of the variable tmp.
"Temporary deadband" also means that typeof is no longer a 100% safe operation.
typeof x; // ReferenceError
let x;
In addition, the following code will also report an error, which is different from the behavior of var.
// No error reporting
var x = x;

// report errors
let x = x;
// ReferenceError: x is not defined
The error in the above code is also due to the temporary dead zone. When using let to declare a variable, an error will be reported as long as the variable is used before the declaration is completed. This is the case in the above line. Before the declaration statement of variable x is completed, it takes the value of X, resulting in the error "x undefined".
ES6 specifies that temporary deadband and let and const statements do not have variable promotion, mainly to reduce runtime errors and prevent the use of this variable before variable declaration, resulting in unexpected behavior. Such errors are common in ES5. With this provision, it is easy to avoid such errors.
In short, the essence of temporary deadband is that as soon as you enter the current scope, the variable to be used already exists, but it cannot be obtained. You can obtain and use the variable only when the line of code declaring the variable appears.
3.2 const command
const declares a read-only variable and cannot be changed after declaration. It means that once declared, it must be initialized, otherwise an error will be reported.
Basic usage:
const PI = "3.1415926";
PI  // 3.1415926

const MY_AGE;  // SyntaxError: Missing initializer in const declaration
The variable declared by const must not change its value, which means that once const declares the variable, it must be initialized immediately and cannot be assigned later.
const foo;
// SyntaxError: Missing initializer in const declaration
The above code indicates that for const, if it only declares that it does not assign a value, an error will be reported. Const has the same scope as the let command: it is valid only within the block level scope where the declaration is located.
if (true) {
  const MAX = 5;
}

MAX // Uncaught ReferenceError: MAX is not defined
The constant declared by const command is not promoted, and there is also a temporary dead zone, which can only be used after the declared position.
if (true) {
  console.log(MAX); // ReferenceError
  const MAX = 5;
}
The above code is called before the constant MAX declaration, and the result is an error. const is a constant declared. Like let, it cannot be declared repeatedly.
var message = "Hello!";
let age = 25;

// The following two lines will report errors
const message = "Goodbye!";
const age = 30;
Temporary deadband:
var PI = "a";
if(true){
  console.log(PI);  //Error ReferenceError: PI is not defined
  const PI = "3.1415926";
}
ES6 clearly stipulates that if there is a let or const in the code block, the code block will form a closed scope for the variables declared by these commands from the beginning of the block. In the code block, using the variable PI before declaring it will report an error.
Key points for attention
How does const prevent variables from changing after declaration initialization? In fact, const does not guarantee that the value of the variable remains unchanged, but that the data stored at the memory address pointed to by the variable cannot be changed. At this point, you may have thought that simple types and composite types save values differently. Yes, for simple types (numeric number, string, boolean), the value is stored at the memory address pointed to by the variable, so the simple type variable declared by const is equivalent to a constant. For complex types (object, array, function), the memory address pointed to by variables actually stores a pointer to the actual data, so const can only ensure that the pointer is fixed. As for the data structure pointed to by the pointer, it cannot be controlled. Therefore, be careful when using const to declare complex type objects.
4. ES6 deconstruction assignment
4.1 overview of deconstruction assignment
Deconstruction assignment is an extension of the assignment operator.
It is a method of pattern matching for arrays or objects, and then assigning values to variables in them. The code is concise and easy to read, and the semantics is clearer; It also facilitates the acquisition of data fields in complex objects.
4.2 deconstruction model
ES6 allows you to extract values from arrays and objects and assign values to variables according to a certain pattern, which is called deconstructing.
In deconstruction, the following two parts are involved:
The source of deconstruction, deconstructing the right part of the assignment expression;
Deconstruct the target, deconstruct the left part of the assignment expression;
In ES5, you can only directly specify the value of a variable when assigning a value to a variable:
let a = 1;
let b = 2;
In ES6, variable assignment is allowed to be written as:
let [a,b,c] = [1,2,3];
console.log(a); // Output 1
console.log(b); // Output 2
console.log(c); // Output 3
The face code indicates that the value can be extracted from the array and assigned to the variable according to the corresponding position.
In essence, this writing belongs to "pattern matching". As long as the patterns on both sides of the equal sign are the same, the variables on the left will be given corresponding values.
4.3 deconstruction and assignment of array
Basic Usage
let [a, b, c] = [1, 2, 3];
// a = 1
// b = 2
// c = 3
Nested
let [a, b, c] = [1, 2, 3];
// a = 1
// b = 2
// c = 3
Negligible
let [a, , b] = [1, 2, 3];
// a = 1
// b = 3
Incomplete deconstruction
let [a = 1, b] = []; // a = 1, b = undefined
If the deconstruction is unsuccessful, the value of the variable is equal to undefined.
let [foo] = [];
let [bar, foo] = [1];
In both cases, the deconstruction is unsuccessful, and the value of foo will be equal to undefined.
Another case is incomplete deconstruction, that is, the pattern to the left of the equal sign matches only part of the array to the right of the equal sign. In this case, deconstruction can still succeed.
let [x, y] = [1, 2, 3];
x // 1
y // 2

let [a, [b], d] = [1, [2, 3], 4];
a // 1
b // 2
d // 4
The above two examples belong to incomplete deconstruction, but they can be successful.
If the right side of the equal sign is not an array (or strictly speaking, not an ergodic structure), an error will be reported.
// Error report let [foo] = 1;let [foo] = false;let [foo] = NaN;let [foo] = undefined;let [foo] = null;let [foo] = {};
The above statements will report errors, because the value to the right of the equal sign either does not have the Iterator interface (the first five expressions) after being converted to an object, or does not have the Iterator interface (the last expression).
Residual operator
let [a, ...b] = [1, 2, 3];//a = 1//b = [2, 3]
character string
In the deconstruction of an array, if the target of deconstruction is a traversable object, it can be deconstructed and assigned. Traversable objects are the data that implements the Iterator interface.
let [a, b, c, d, e] = 'hello';// a = 'h'// b = 'e'// c = 'l'// d = 'l'// e = 'o'
Deconstruction default
Deconstruction assignment allows default values to be specified.
let [foo = true] = [];foo // truelet [x, y = 'b'] = ['a']; // x='a', y='b'let [x, y = 'b'] = ['a', undefined]; // x='a', y='b'
When the deconstruction pattern has a matching result and the matching result is undefined, the default value will be triggered as the return result.
let [a = 2] = [undefined]; // a = 2
Note that ES6 uses the strict equality operator (= = =) internally to judge whether a position has a value. Therefore, the default value will take effect only when an array member is strictly equal to undefined.
let [x = 1] = [undefined];x // 1let [x = 1] = [null];x // null
In the above code, if an array member is null, the default value will not take effect, because null is not strictly equal to undefined.
If the default value is an expression, the expression is evaluated lazily, that is, it will be evaluated only when it is used.
function f() { console.log('aaa');}let [x = f()] = [1];
In the above code, because x can get the value, function f will not execute at all. The above code is actually equivalent to the following code.
let x;if ([1][0] === undefined) { x = f();} else { x = [1][0];}
The default value can refer to other variables assigned by deconstruction, but the variable must have been declared.
let [a = 3, b = a] = []; // a = 3, b = 3let [a = 3, b = a] = [1];// a = 1, b = 1let [a = 3, b = a] = [1, 2]; // a = 1, b = 2let [a = b, b = 1] = []; // ReferenceError: y is not defined
Explanation of the above code:
- The matching result of a and B is undefined, and the trigger default value is a = 3; b = a =3;
- A normal deconstruction assignment, matching result: a = 1, b matching result: undefined, trigger default value: b = a =1;
- Normal deconstruction assignment of a and b, matching results: a = 1, b = 2;
- The reason why the last expression above reports an error is that when x uses y as the default value, y has not been declared.
4.4 deconstruction and assignment of objects
(1) Basic usage
Deconstruction can be used not only for arrays, but also for objects.
let { foo, bar } = { foo: 'aaa', bar: 'bbb' };foo // "aaa"bar // "bbb"
There is an important difference between the deconstruction of objects and arrays. The elements of the array are arranged in order, and the value of the variable is determined by its position; The attributes of the object have no order, and the variable must have the same name as the attribute in order to get the correct value.
let { bar, foo } = { foo: 'aaa', bar: 'bbb' };foo // "aaa"bar // "bbb"let { baz } = { foo: 'aaa', bar: 'bbb' };baz // undefined
In the first example of the above code, the order of the two variables on the left of the equal sign is inconsistent with the order of the two attributes with the same name on the right of the equal sign, but it has no effect on the value. The variable of the second example does not have a corresponding attribute with the same name, so the value cannot be obtained. Finally, it is equal to undefined.
If the deconstruction fails, the value of the variable is equal to undefined.
let {foo} = {bar: 'baz'};foo // undefined
In the above code, the object to the right of the equal sign has no foo attribute, so the variable foo cannot get a value, so it is equal to undefined.
Object deconstruction assignment can easily assign the methods of existing objects to a variable.
// Example 1 let {log, sin, cos} = math// Example 2 const {log} = console; log('hello') // hello
Example 1 of the above code assigns the logarithm, sine and cosine of the Math object to the corresponding variables, which will be much more convenient to use. In example 2, the console Log is assigned to the log variable.
If the variable name is inconsistent with the property name, it must be written as follows.
let { foo: baz } = { foo: 'aaa', bar: 'bbb' };baz // "aaa"let obj = { first: 'hello', last: 'world' };let { first: f, last: l } = obj;f // 'hello'l // 'world'
This actually shows that the deconstruction assignment of an object is a short form of the following form.
let { foo: foo, bar: bar } = { foo: 'aaa', bar: 'bbb' };
In other words, the internal mechanism of object deconstruction assignment is to find the attribute with the same name first, and then assign it to the corresponding variable. What is really assigned is the latter, not the former.
let { foo: baz } = { foo: 'aaa', bar: 'bbb' };baz // "aaa"foo // error: foo is not defined
In the above code, foo is the matching pattern and baz is the variable. What is really assigned is the variable baz, not the pattern foo.
(2) Deconstruction assignment of nested objects
Like arrays, deconstruction can also be used for nested objects.
let obj = { p: [ 'Hello', { y: 'World' } ]};let { p: [x, { y }] } = obj;x // "Hello"y // "World"
Note that p is a pattern, not a variable, so it will not be assigned. If p is also assigned as a variable, it can be written as follows.
let obj = { p: [ 'Hello', { y: 'World' } ]};let { p, p: [x, { y }] } = obj;x // "Hello"y // "World"p // ["Hello", {y: "World"}]
Here is another example.
4.5. Precautions for deconstruction assignment
(1) If you want to use a declared variable for deconstruction assignment, you must be very careful.
// Wrong writing let x;{x} = {x: 1};// SyntaxError: syntax error
The above code will report an error because the JavaScript engine will interpret {x} as a code block, resulting in syntax errors. This problem can only be solved by not writing curly braces at the beginning of the line and avoiding JavaScript interpreting them as code blocks.
// Correct writing let x;({x} = {x: 1});
The above code puts the entire deconstruction assignment statement in a parenthesis, which can be executed correctly. See below for the relationship between parentheses and deconstruction assignment.
(2) Deconstruction assignment allows no variable name to be placed in the pattern to the left of the equal sign. Therefore, you can write very strange assignment expressions.
({} = [true, false]);({} = 'abc');({} = []);
Although the above expression is meaningless, the syntax is legal and can be executed.
(3) Because arrays are special objects in nature, they can be deconstructed.
let arr = [1, 2, 3];let {0 : first, [arr.length - 1] : last} = arr;first // 1last // 3
The above code deconstructs the array object. The value corresponding to the 0 key of array arr is 1, [arr.length - 1] is the 2 key, and the corresponding value is 3. The writing of square brackets belongs to "attribute name expression".
4.6 purpose of deconstruction assignment
The deconstruction and assignment of variables are used for many purposes.
(1) Exchange values of variables
let x = 1;let y = 2;[x, y] = [y, x];
The above code exchanges the values of variables x and y, which is not only concise, but also easy to read and has very clear semantics.
(2) Returns multiple values from a function
Function can only return one value. If you want to return multiple values, you can only return them in an array or object. With deconstruction assignment, it is very convenient to take out these values.
// Return an array function example() {return [1, 2, 3];} let [a, b, c] = example();// Return an object function example() {return {foo: 1, bar: 2};} let { foo, bar } = example();
(3) Definition of function parameters
Deconstruction assignment can easily correspond a set of parameters to variable names.
// Parameters are a set of ordered values function f ([x, y, Z]) {...} f([1, 2, 3]);// Parameters are a set of unordered values function f ({x, y, Z}) {...} f({z: 3, y: 2, x: 1});
(4) Extract JSON data
Deconstruction assignment is particularly useful for extracting data from JSON objects.
let jsonData = { id: 42, status: "OK", data: [867, 5309]};let { id, status, data: number } = jsonData;console.log(id, status, number);// 42, "OK", [867, 5309]
The above code can quickly extract the value of JSON data.
(5) Default values for function parameters
jQuery.ajax = function (url, { async = true, beforeSend = function () {}, cache = true, complete = function () {}, crossDomain = false, global = true, // ... more config} = {}) { // ... do stuff};
Specifying the default value of the parameter avoids writing var foo = config. In the function body foo || ‘default foo’; Such a statement.
(6) Traverse Map structure
Any object with the Iterator interface deployed can be traversed by a for... Of loop. The Map structure natively supports the Iterator interface. It is very convenient to obtain the key name and value in conjunction with the deconstruction and assignment of variables.
const map = new Map();map.set('first', 'hello');map.set('second', 'world');for (let [key, value] of map) { console.log(key + " is " + value);}// first is hello// second is world
If you only want to get the key name or the key value, you can write it as follows.
// Get key name for (let [key] of map) {/ /...}// Get key value for (let [,value] of map) {/ /...}
(7) Specifying method of input module
When loading a module, you often need to specify which methods to input. Deconstruction assignment makes the input statement very clear.
const { SourceMapConsumer, SourceNode } = require("source-map");
5. Extension of string, function, array and object
5.1 template string
In the traditional JavaScript language, the output template is usually written like this (jQuery method is used below).
$('#result').append( 'There are <b>' + basket.count + '</b> ' + 'items in your basket, ' + '<em>' + basket.onSale + '</em> are on sale!');
The above method is quite cumbersome and inconvenient. ES6 introduces template string to solve this problem.
$('#result').append(` There are <b>${basket.count}</b> items in your basket, <em>${basket.onSale}</em> are on sale!`);
The template string is an enhanced version of the string, which is identified by backquotes (`). It can be used as an ordinary string, can also be used to define a multi line string, or embed variables in the string.
// Normal string ` in JavaScript '\ n' is a line feed`// Multiline string ` in JavaScript this is not legal` console. log(`string text line 1string text line 2`);// Embed variables let name = "Bob", time = "today" in the string` Hello ${name}, how are you ${time}?`
The template strings in the above code are represented by backquotes.
Escape symbol
If you need to use backquotes in the template string, you should escape it with a backslash.
let greeting = `\`Yo\` World!`;
Multiline string
If you use a template string to represent a multiline string, all spaces and indents are retained in the output.
$('#list').html(`<ul> <li>first</li> <li>second</li></ul>`);
In the above code, the spaces and newlines of all template strings are reserved. For example, there will be a newline in front of the < UL > tag. If you don't want this newline, you can use the trim method to eliminate it.
$('#list').html(`<ul> <li>first</li> <li>second</li></ul>`.trim());
Insert variable
Variables are embedded in the template string, and the variable name needs to be written in ${}.
function authorize(user, action) { if (!user.hasPrivilege(action)) { throw new Error( // The traditional writing is / / 'user' / / + user name // + ' is not authorized to do ' // + action // + '.' ` User ${user.name} is not authorized to do ${action}.`); }}
Insert expression
Arbitrary JavaScript expressions can be placed inside braces, which can perform operations and reference object properties.
let x = 1;let y = 2;`${x} + ${y} = ${x + y}`// "1 + 2 = 3"`${x} + ${y * 2} = ${x + y * 2}`// "1 + 4 = 5"let obj = {x: 1, y: 2};`${obj.x + obj.y}`// "3"
Call function
Functions can also be called in the template string.
function fn() { return "Hello World";}`foo ${fn()} bar`// foo Hello World bar
If the value in braces is not a string, it will be converted to a string according to the general rules. For example, if there is an object in braces, the toString method of the object will be called by default.
If the variable in the template string is not declared, an error will be reported.
// The variable place does not declare let msg = `Hello, ${place} `// report errors
Because the inside of the braces of the template string is to execute JavaScript code, if the inside of the braces is a string, it will be output as it is.
`Hello ${'World'}`// "Hello World"
Key points for attention
Newlines and spaces in the template string are preserved
innerHtml = `<ul> <li>menu</li> <li>mine</li></ul>`;console.log(innerHtml);// Output < UL > < li > menu < / Li > < li > mine < / Li > < / UL >
5.2 string extension method
(1) Substring identification
Before ES6, judge whether the string contains substrings and use the indexOf method. ES6 adds a substring identification method.
- includes(): returns a Boolean value to judge whether a parameter string is found.
- startsWith(): returns a Boolean value to judge whether the parameter string is at the head of the original string.
- endsWith(): returns a Boolean value to judge whether the parameter string is at the end of the original string.
The above three methods can accept two parameters, the string to be searched, and the optional search start index.
let s = 'Hello world!';s.startsWith('Hello') // trues.endsWith('!') // trues.includes('o') // true
All three methods support the second parameter, which indicates where to start the search.
let s = 'Hello world!';s.startsWith('world', 6) // trues.endsWith('Hello', 5) // trues.includes('Hello', 6) // false
The above code shows that the behavior of endsWith is different from the other two methods when the second parameter n is used. It targets the first n characters, while the other two methods target from the nth position to the end of the string.
Note:
- These three methods only return Boolean values. If you need to know the position of the substring, you still have to use indexOf and lastIndexOf.
- These three methods will throw an error if a regular expression is passed in instead of a string. The indexOf and lastIndexOf methods convert a regular expression into a string and search for it.
(2) Duplicate string
repeat(): returns a new string, indicating that the string is repeated a specified number of times.
'x'.repeat(3) // "xxx"'hello'.repeat(2) // "hellohello"'na'.repeat(0) // ""
If the parameter is a decimal, it will be rounded down.
'na'.repeat(2.9) // "nana"
If the parameter of repeat is negative or Infinity, an error will be reported.
'na'.repeat(Infinity)// RangeError'na'.repeat(-1)// RangeError
However, if the parameter is a decimal between 0 and - 1, it is equivalent to 0 because the rounding operation will be performed first. The decimal between 0 and - 1 is equal to - 0 after rounding, and repeat is regarded as 0.
'na'.repeat(-0.9) // ""
Parameter NaN is equal to 0.
'na'.repeat(NaN) // ""
If the parameter of repeat is a string, it will be converted to a number first.
'na'.repeat('na') // ""'na'.repeat('3') // "nanana"
(3) String completion
ES2017 introduces the function of string completion length. If a string is not long enough, it will be completed at the head or tail.
- padStart: returns a new string, indicating that the parameter string is used to complete the original string from the header (left).
- padEnd: returns a new string, indicating that the parameter string is used to complete the original string from the tail (right).
The above two methods accept two parameters. The first parameter specifies the minimum length of the generated string, and the second parameter is the string used to complete. If the second parameter is not specified, it is filled with spaces by default.
console.log("h".padStart(5,"o")); // "ooooh"console.log("h".padEnd(5,"o")); // "hoooo"console.log("h".padStart(5)); // " h"console.log('x'.padStart(5, 'ab')); // 'ababx'console.log('x'.padStart(4, 'ab')); // 'abax'console.log('x'.padEnd(5, 'ab')); // 'xabab'console.log('x'.padEnd(4, 'ab')); // 'xaba'
In the above code, padStart() and padEnd() accept two parameters. The first parameter is the maximum length of string completion, and the second parameter is the string used to complete.
If the specified length is less than or equal to the length of the original string, the original string is returned:
console.log("hello".padStart(5,"A")); // "hello"
If the length of the original string plus the completion string is greater than the specified length, the completion string exceeding the digits will be truncated:
console.log("hello".padEnd(10,",world!")); // "hello,worl"
If the second parameter is omitted, the default is to use spaces to complete the length.
console.log('x'.padStart(4)); // ' x'console.log('x'.padEnd(4)); // 'x '
A common use of padStart() is to specify the number of digits for numeric completion. The following code generates a 10 bit numeric string.
console.log('1'.padStart(10, '0')); // "0000000001"console.log('12'.padStart(10, '0')); // "0000000012"console.log('123456'.padStart(10, '0')); // "0000123456"
Another use is prompt string format.
console.log('12'.padStart(10, 'YYYY-MM-DD')); // "YYYY-MM-12"console.log('09-12'.padStart(10, 'YYYY-MM-DD')); // "YYYY-09-12"
(4) Eliminate spaces
ES6 adds trimstart () and trimend () methods to string instances. Their behavior is consistent with trim(), trimStart() eliminates spaces at the beginning of the string, and trimEnd() eliminates spaces at the end. They return a new string and do not modify the original string.
const s = ' abc ';s.trim() // "abc"s.trimStart() // "abc "s.trimEnd() // " abc"
In the above code, trimStart() only eliminates the spaces in the head and retains the spaces in the tail. trimEnd() behaves similarly.
In addition to the space bar, these two methods are also effective for invisible white space symbols such as tab at the beginning (or end) of the string and line feed.
The browser also deploys two additional methods. trimLeft() is the alias of trimStart() and trimlight() is the alias of trimEnd().
5.3. Function extension
(1) Default value
Before ES6, you cannot directly specify default values for function parameters. You can only use flexible methods.
function log(x, y) { y = y || 'World'; console.log(x, y);}log('Hello') // Hello Worldlog('Hello', 'China') // Hello Chinalog('Hello', '') // Hello World
The above code checks whether the parameter y of the function log is assigned. If not, specify the default value as World. The disadvantage of this writing method is that if the parameter y is assigned, but the corresponding Boolean value is false, the assignment does not work. As in the last line of the above code, the parameter y is equal to the null character, and the result is changed to the default value.
To avoid this problem, you usually need to judge whether the parameter y is assigned, and if not, it is equal to the default value.
if (typeof y === 'undefined') { y = 'World';}
ES6 allows you to set default values for function parameters, that is, write them directly after the parameter definition.
function log(x, y = 'World') { console.log(x, y);}log('Hello') // Hello Worldlog('Hello', 'China') // Hello Chinalog('Hello', '') // Hello
It can be seen that the writing method of ES6 is much simpler than that of ES5, and it is very natural. Here is another example.
function Point(x = 0, y = 0) { this.x = x; this.y = y;}const p = new Point();p // { x: 0, y: 0 }
In addition to brevity, the writing method of ES6 has two advantages: first, people who read the code can immediately realize which parameters can be omitted without looking at the function body or documents; Secondly, it is conducive to future code optimization. Even if this parameter is completely removed in the external interface of the future version, the previous code will not be unable to run.
Parameter variables are declared by default, so they cannot be declared again with let or const.
function foo(x = 5) { let x = 1; // error const x = 2; // error}
In the above code, the parameter variable x is declared by default. In the function body, it cannot be declared again with let or const, otherwise an error will be reported.
When using parameter defaults, a function cannot have parameters with the same name.
// No error function foo(x, x, y) {/ /...}// Error reporting function foo (x, x, y = 1) {/ /...}// SyntaxError: Duplicate parameter name not allowed in this context
In addition, it is easy to ignore that the default value of the parameter is not passed, but the value of the default value expression is recalculated every time. That is, the default value of the parameter is evaluated lazily.
let x = 99;function foo(p = x + 1) { console.log(p);}foo() // 100x = 100;foo() // 101
In the above code, the default value of parameter p is x + 1. At this time, every time the function foo is called, x + 1 will be recalculated instead of the default P equal to 100.
(2) Indefinite parameter
Indefinite parameters are used to represent the number of indefinite parameters, such as... Variable name, which is composed of... Plus a named parameter identifier. Named parameters can only be placed at the end of the parameter group, and there is only one indefinite parameter.
Basic Usage
function f(...values){ console.log(values.length);}f(1,2); //2f(1,2,3,4); //4
(3) Arrow function
Arrow functions provide a more concise way to write functions. The basic syntax is:
parameter => Function body
Basic usage:
var f = v => v;//Equivalent to var f = function (a) {return a;} f(1); // one
When the arrow function has no parameters or has multiple parameters, it should be enclosed with ().
var f = (a,b) => a+b;f(6,2); //8
When the arrow function body has multiple lines of statements, it is wrapped with {} to represent the code block. When there is only one line of statements and the result needs to be returned, you can omit {} and the result will be returned automatically.
var f = (a,b) => { let result = a+b; return result;}f(6,2); // 8
When the arrow function returns an object, in order to distinguish it from the code block, wrap the object with ()
// Error var f = (ID, name) = > {ID: ID, name: name}; f(6,2); // Syntax error: unexpected token: / / no error is reported. Var f = (ID, name) = > ({ID: ID, name: name}); f(6,2); // {id: 6, name: 2}
Note: there are no this, super, arguments, and new Target binding.
var func = () => { // There is no this object in the arrow function. / / this is the outer this object, that is, window console log(this)}func(55) // Window var func = () => { console.log(arguments)}func(55); // ReferenceError: arguments is not defined
The this object in the arrow function body is the object when defining the function, not the object when using the function.
function fn(){ setTimeout(()=>{ // When defining, this is bound to the this object console in fn log(this.a); }, 0)}var a = 20;// fn's this object is {A: 19} fn call({a: 18}); // eighteen
It cannot be used as a constructor, that is, the new command cannot be used, otherwise an error will be reported
5.4. Array expansion
(1) Extension operator
The spread operator is three dots (...). It is like the inverse operation of rest parameters, turning an array into a comma separated sequence of parameters.
console.log(...[1, 2, 3])// 1 2 3console.log(1, ...[2, 3, 4], 5)// 1 2 3 4 5[...document.querySelectorAll('div')]// [<div>, <div>, <div>]
This operator is mainly used for function calls.
function push(array, ...items) { array.push(...items);}function add(x, y) { return x + y;}const numbers = [4, 38];add(...numbers) // 42
In the above code, array Push (... Items) and add(...numbers) are both function calls, and they both use the extension operator. This operator changes an array into a sequence of parameters.
(2) Application of extension operator
Copy array
Array is a composite data type. If it is copied directly, it only copies the pointer to the underlying data structure, rather than cloning a new array.
const a1 = [1, 2];const a2 = a1;a2[0] = 2;a1 // [2, 2]
In the above code, a2 is not a clone of a1, but another pointer to the same data. Modifying a2 will directly lead to the change of a1.
ES5 can only copy arrays with workarounds.
const a1 = [1, 2];const a2 = a1.concat();a2[0] = 2;a1 // [1, 2]
In the above code, a1 will return the clone of the original array, and modifying a2 will not affect a1.
The extension operator provides a convenient way to copy an array.
const a1 = [1, 2];// Writing method 1 const a2 = [...a1]// Writing method 2 const [...a2] = a1;
In the above two ways, a2 is a clone of a1.
Merge array
The extension operator provides a new way to write array merging.
const arr1 = ['a', 'b'];const arr2 = ['c'];const arr3 = ['d', 'e'];// ES5 merge array Arr1 concat(arr2, arr3);// ['a', 'B', 'C','d ',' e '] / / merged array of ES6 [... Arr1,... Arr2,... Arr3] / / [' a ',' B ',' C ','d', 'e']
However, both methods are shallow copies, which should be paid attention to when using.
const a1 = [{ foo: 1 }];const a2 = [{ bar: 2 }];const a3 = a1.concat(a2);const a4 = [...a1, ...a2];a3[0] === a1[0] // truea4[0] === a1[0] // true
In the above code, a3 and a4 are new arrays combined by two different methods, but their members are references to the original array members, which is a shallow copy. If you modify the members of the original array, it will be synchronously reflected to the new array.
(3) find() and findIndex() of array instances
The find method of the array instance is used to find the first qualified array member. Its parameter is a callback function. All array members execute the callback function in turn until the first member whose return value is true is found, and then the member is returned. If there are no qualified members, undefined is returned.
[1, 4, -5, 10].find((n) => n < 0)// -5
The above code finds the first member less than 0 in the array.
[1, 5, 10, 15].find(function(value, index, arr) { return value > 9;}) // 10
In the above code, the callback function of the find method can accept three parameters, namely, the current value, the current position and the original array.
The findIndex method of an array instance is very similar to the find method. It returns the position of the first qualified array member. If all members do not meet the conditions, it returns - 1.
[1, 5, 10, 15].findIndex(function(value, index, arr) { return value > 9;}) // 2
5.5. Object extension
ES6 allows you to write variables and functions directly in braces as object properties and methods. Such writing is more concise.
const foo = 'bar';const baz = {foo};baz // {foo: "bar"} / / equivalent to const baz = {foo: foo};
In addition to attribute shorthand, methods can also be shorthand.
const o = { method() { return "Hello!"; }};// Equivalent to const o ={ method: function() { return "Hello!"; }};
New method of object
Object.assign(target, source_1, ···)
Used to copy all enumerable properties of the source object to the target object.
Basic Usage
let target = {a: 1}; let object2 = {b: 2}; let object3 = {c: 3}; Object.assign(target,object2,object3); // The first parameter is the target object, and the following parameter is the source object target// {a: 1, b: 2, c: 3}
6. Class basic usage and inheritance
6.1 origin of class
In the JavaScript language, the traditional method of generating instance objects is through constructors. Here is an example.
function Point(x, y) { this.x = x; this.y = y;}Point.prototype.toString = function () { return '(' + this.x + ', ' + this.y + ')';};var p = new Point(1, 2);
The above writing method is very different from the traditional object-oriented languages (such as C + + and Java), which is easy to confuse the programmers who are new to the language.
ES6 provides a writing method closer to the traditional language, and introduces the concept of class as the template of objects. You can define a class by using the class keyword.
Basically, the class of ES6 can be regarded as just a syntax sugar. ES5 can do most of its functions. The new class writing method only makes the writing method of object prototype clearer and more like the syntax of object-oriented programming. The above code is rewritten with the class of ES6, which is as follows.
class Point { constructor(x, y) { this.x = x; this.y = y; } toString() { return '(' + this.x + ', ' + this.y + ')'; }}
The above code defines a "class". You can see that there is a constructor method, which is the constructor method, and the this keyword represents the instance object. That is, the Point constructor of ES5 corresponds to the construction method of the Point class of ES6.
In addition to constructing methods, the Point class also defines a toString method. Note that when defining a "class" method, you don't need to add the keyword function in front of it. Just put the function definition in it. In addition, there is no comma separation between methods, and an error will be reported if it is added.
6.2. constructor method
The constructor method is the default method of the class. It is called automatically when an object instance is generated by the new command. A class must have a constructor method. If it is not explicitly defined, an empty constructor method will be added by default.
class Point {}// Equivalent to class point {constructor() {}}
In the above code, an empty class Point is defined, and the JavaScript engine will automatically add an empty constructor method to it.
6.3 instance of class
The writing method of the instance of the generated Class is exactly the same as that of ES5. It also uses the new command. As mentioned earlier, if you forget to add new and call Class like a function, an error will be reported.
class Point { // ...}// Error var point = Point(2, 3)// Correct var point = new Point(2, 3);
6.4 class inheritance
Class can inherit through the extends keyword, which is much clearer and more convenient than that of ES5 by modifying the prototype chain.
class Point {}class ColorPoint extends Point {}
super keyword
The keyword super can be used as either a function or an object. In these two cases, its usage is completely different.
In the first case, when super is called as a function, it represents the constructor of the parent class. ES6 requires that the constructor of a subclass must execute the super function once.
class A {}class B extends A { constructor() { super(); }}
In the above code, super() in the constructor of subclass B represents calling the constructor of the parent class. This is necessary, otherwise the JavaScript engine will report an error.
In the second case, when super is used as an object, in the normal method, it points to the prototype object of the parent class; In a static method, point to the parent class.
class A { p() { return 2; }}class B extends A { constructor() { super(); console.log(super.p()); // 2 }}let b = new B();
In the above code, super in subclass B P () is to use super as an object. At this time, super points to A.prototype in the common method, so super P () is equivalent to A.prototype p().
6.5 static method
Class is equivalent to the prototype of an instance. All methods defined in the class will be inherited by the instance. If you add the static keyword before a method, it means that the method will not be inherited by the instance, but will be called directly through the class, which is called "static method".
class Foo { static classMethod() { return 'hello'; }}Foo.classMethod() // 'hello'var foo = new Foo();foo.classMethod()// TypeError: foo.classMethod is not a function
In the above code, there is a static keyword before the classMethod method of Foo class, indicating that the method is a static method and can be called directly on the Foo class (Foo.classMethod()), rather than on the instance of Foo class. If a static method is called on an instance, an error is thrown indicating that the method does not exist.
6.6 static attributes
Static attributes refer to the attributes of Class itself, that is, Class Propname, not the property defined on the instance object (this).
class Foo {}Foo.prop = 1;Foo.prop // 1
The above method defines a static attribute prop for the Foo class.
At present, only this writing method is feasible, because ES6 clearly stipulates that Class has only static methods and no static attributes. Now there is one proposal Provides the static attribute of the class. It is written by adding the static keyword in front of the instance attribute.
class MyClass { static myStaticProp = 42; constructor() { console.log(MyClass.myStaticProp); // 42 }}
This new method greatly facilitates the expression of static attributes.
// Old style class foo {/ /...} Foo. prop = 1;// New writing class foo {static prop = 1;}
In the above code, the static attribute of the old writing method is defined outside the class. After the entire class is generated, static attributes are generated. This makes it easy to ignore this static attribute and does not comply with the code organization principle that relevant code should be put together. In addition, the new writing method is explicit declaration rather than assignment processing, which has better semantics.
7. Set and Map data structures
7.1,Set
ES6 provides a new data structure Set. It is similar to an array, but the values of members are unique and there are no duplicate values.
Basic usage:
let mySet = new Set(); mySet.add(1); // Set(1) {1}mySet.add(5); // Set(2) {1, 5}mySet.add(5); // Set(2) {1, 5} here reflects the uniqueness of the value myset add("some text"); // Set (3) {1,5, "some text"} here reflects the diversity of types. var o = {a: 1, b: 2}; mySet.add(o);mySet.add({a: 1, b: 2}); // Set(5) {1, 5, "some text", {...}, {...}} / / this shows that references between objects are different and unequal. Set can store even if the values are the same
The above code adds members to the Set structure through the add() method. The results show that the Set structure will not add duplicate values.
The Set function can accept an array (or other data structures with iterable interface) as a parameter for initialization.
// Example 1 const set = new Set([1, 2, 3, 4, 4]);[...set]// [1, 2, 3, 4] / / example 2 const items = new set ([1, 2, 3, 4, 5, 5, 5]); items. size // 5
Data type conversion
Array and Set type conversion
// Array to Setvar mySet = new Set(["value1", "value2", "value3"])// With Operator, convert set to arrayvar myArray = [... Myset]// Array. The from method can convert a set structure into an array. const items = new Set([1, 2, 3, 4, 5]);const array = Array.from(items);
String and Set type conversion
// String to setvar myset = new set ('Hello ')// Set (4) {"H", "e", "L", "O"} / / Note: the toString method in set cannot convert set to string
Set instance properties
- Set.prototype.constructor: constructor, which is set function by default.
- Set.prototype.size: returns the total number of members of the set instance.
Operation method of Set instance
- Set.prototype.add(value): adds a value and returns the set structure itself.
- Set.prototype.delete(value): deletes a value and returns a Boolean value indicating whether the deletion is successful.
- Set.prototype.has(value): returns a Boolean value indicating whether the value is a member of set.
- Set.prototype.clear(): clear all members without return value.
Code example:
s.add(1).add(2).add(2);// Note that 2 is added twice to s.size / / 2S has(1) // trues. has(2) // trues. has(3) // falses. delete(2); s.has(2) // false
Traversal method of Set instance
- Set.prototype.keys(): the iterator that returns the key name
- Set.prototype.values(): the iterator that returns the key value
- Set.prototype.entries(): returns the traversal of key value pairs
- Set.prototype.forEach(): use the callback function to traverse each member
It should be noted that the traversal order of Set is the insertion order. This feature is sometimes very useful. For example, using Set to save a list of callback functions can ensure that they are called in the order of addition.
Code example:
The keys method, values method and entries method all return ergodic objects (see Chapter Iterator object for details). Since the Set structure has no key name and only key value (or the key name and key value are the same value), the behaviors of the keys method and the values method are exactly the same.
let set = new Set(['red', 'green', 'blue']);for (let item of set.keys()) { console.log(item);}// red// green// bluefor (let item of set.values()) { console.log(item);}// red// green// bluefor (let item of set.entries()) { console.log(item);}// ["red", "red"]// ["green", "green"]// ["blue", "blue"]
forEach() code example:
let set = new Set([1, 4, 9]);set.forEach((value, key) => console.log(key + ' : ' + value))// 1 : 1// 4 : 4// 9 : 9
Application of traversal
(1) Array de duplication
var mySet = new Set([1, 2, 3, 4, 4]);[...mySet]; // [1, 2, 3, 4]
(2) Union
var a = new Set([1, 2, 3]);var b = new Set([4, 3, 2]);var union = new Set([...a, ...b]); // {1, 2, 3, 4}
(3) Intersection
var a = new Set([1, 2, 3]);var b = new Set([4, 3, 2]);var intersect = new Set([...a].filter(x => b.has(x))); // {2, 3}
(4) Difference set
var a = new Set([1, 2, 3]);var b = new Set([4, 3, 2]);var difference = new Set([...a].filter(x => !b.has(x))); // {1}
7.2,Map
The Map object holds key value pairs. Any value (object or original value) can be used as a key or a value.
Basic usage:
const m = new Map();const o = {p: 'Hello World'};m.set(o, 'content')m.get(o) // "content"m.has(o) // truem.delete(o) // truem.has(o) // false
key in Map
key is a string
var myMap = new Map();var keyString = "a string"; myMap.set(keyString, "And key'a string'Associated value"); myMap.get(keyString); // "Value associated with key 'a string'" mymap get("a string"); // "Value associated with key 'a string' / / because keyString === 'a string'
key is an object
var myMap = new Map();var keyObj = {}, myMap.set(keyObj, "And key keyObj Associated value");myMap.get(keyObj); // "Value associated with key keyObj" mymap get({}); // Undefined, because keyObj== {}
key is a function
var myMap = new Map();var keyFunc = function () {}, // Function mymap Set (keyfunc, "value associated with key keyfunc"); myMap.get(keyFunc); // "Value associated with key keyfunc" mymap Get (function() {}) / / undefined, because keyfunc== function () {}
Traversal of Map
Traverse the Map, including the following two most advanced levels.
(1)for...of
var myMap = new Map();myMap.set(0, "zero");myMap.set(1, "one"); // Two logs will be displayed. One is "0 = zero" and the other is "1 = one" for (VaR [key, value] of mymap) {console.log (Key + "=" + value);} for (var [key, value] of myMap.entries()) { console.log(key + " = " + value);}/* This entries method returns a new Iterator object, which contains the [key, value] array of each element in the Map object in the insertion order. * /// Two logs will be displayed. One is "0" and the other is "1" for (VaR key of mymap. Keys()) {console.log (key);}/* The keys method returns a new Iterator object that contains the keys of each element in the Map object in the insertion order. * /// Two logs will be displayed. One is "zero" and the other is "one" for (VaR value of mymap. Values()) {console. Log (value);}/* The values method returns a new Iterator object that contains the values of each element in the Map object in the insertion order*/
(2)forEach()
var myMap = new Map();myMap.set(0, "zero");myMap.set(1, "one"); // Two logs will be displayed. One is "0 = zero" and the other is "1 = one" mymap forEach(function(value, key) { console.log(key + " = " + value);}, myMap)
8. Promise object
8.1 Promise overview
Is a solution to asynchronous programming.
Syntactically speaking, Promise is an object from which you can get the message of asynchronous operation.
Basic usage:
const promise = new Promise(function(resolve, reject) { // ... Some code if (/ * asynchronous operation succeeded * /) {resolve (value);} else { reject(error); }}); promise. then(function(value) { // success}, function(error) { // failure});
The Promise constructor accepts a function as an argument. The two parameters of the function are resolve and reject. They are two functions provided by the JavaScript engine and do not need to be deployed by themselves.
The resolve function is used to change the state of the Promise object from "incomplete" to "successful" (i.e. from pending to resolved), call it when the asynchronous operation is successful, and pass the result of the asynchronous operation as a parameter; The reject function is used to change the state of the Promise object from incomplete to failed (that is, from pending to rejected), call it when the asynchronous operation fails, and pass the error reported by the asynchronous operation as a parameter.
After the Promise instance is generated, you can use the then method to specify the callback functions in the resolved state and the rejected state respectively.
The then method can accept two callback functions as parameters. The first callback function is called when the state of the Promise object changes to resolved, and the second callback function is called when the state of the Promise object changes to rejected. The second function is optional and does not have to be provided. Both functions accept the value passed out by the Promise object as an argument.
8.2 characteristics of Promise status
Promise asynchronous operations have three states: pending, completed, and rejected. No operation other than the result of an asynchronous operation can change this state.
The Promise object has only state changes from pending to fully and from pending to rejected. As long as it is fully and rejected, the status will not change, that is, resolved.
const p1 = new Promise(function(resolve,reject){ resolve('success1'); resolve('success2');}); const p2 = new Promise(function(resolve,reject){ resolve('success3'); reject('reject');});p1.then(function(value){ console.log(value); // success1});p2.then(function(value){ console.log(value); // success3});
Disadvantages of state
Promise cannot be cancelled. Once it is created, it will be executed immediately. It cannot be cancelled halfway.
If the callback function is not set, the error thrown by Promise will not be reflected to the outside.
When it is in the pending state, it is impossible to know which stage it has reached (just started or about to be completed).
8.3 Promise method
then() method
The then method receives two functions as parameters. The first parameter is the callback when Promise is executed successfully, and the second parameter is the callback when Promise fails. Only one of the two functions will be called.
The callback function will never be called until the current run of the JavaScript event queue is completed.
const p = new Promise(function(resolve,reject){ resolve('success');}); p.then(function(value){ console.log(value);}); console.log('first');// first// success
catch() method
Promise. prototype. The catch method is then(null, rejection) or An alias for then(undefined, rejection), which specifies the callback function when an error occurs.
getJSON('/posts.json').then(function(posts) { // ...}). catch(function(error) {/ / handle the error console.log('error! ', error);}) that occurs when getJSON and the previous callback function are running;
In the above code, the getJSON method returns a Promise object. If the state of the object changes to resolved, the callback function specified by the then method will be called; If the asynchronous operation throws an error, the status will change to rejected, and the callback function specified by the catch method will be called to handle the error. In addition, if the callback function specified by the then method throws an error during operation, it will also be caught by the catch method.
p.then((val) => console.log('fulfilled:', val)) .catch((err) => console.log('rejected', err));// Equivalent to p.then ((VAL) = > console log('fulfilled:', val)) . then(null, (err) => console. log("rejected:", err));
all() method
Promise. The all () method is used to wrap multiple promise instances into a new promise instance.
const p = Promise.all([p1, p2, p3]);
In the above code, Promise The all () method accepts an array as a parameter. p1, p2 and p3 are Promise instances. If they are not, the Promise described below will be called first Resolve method, convert the parameter to Promise instance, and then conduct further processing. In addition, Promise The parameter of the all () method can not be an array, but it must have an Iterator interface, and each member returned is a Promise instance.
The state of p is determined by p1, p2 and p3, which can be divided into two cases.
(1) Only when the states of p1, p2 and p3 become fully, the state of p will become fully. At this time, the return values of p1, p2 and p3 form an array and are passed to the callback function of p.
(2) As long as one of p1, p2 and p3 is rejected, the status of p becomes rejected. At this time, the return value of the first rejected instance will be passed to p's callback function.
Here is a specific example.
// Generate an array of promise objects const promises = [2, 3, 5, 7, 11, 13] map(function (id) { return getJSON('/post/' + id + ".json");}); Promise. all(promises). then(function (posts) { // ...}). catch(function(reason){ // ...});
In the above code, promises is an array containing six promise instances. Promise will be called only when the state of these six instances becomes fully or one of them becomes rejected Callback function after the all method.
9. async function
9.1 concept
ES2017 standard introduces async function, which makes asynchronous operation more convenient.
What is the async function? In a word, it is the syntax of the Generator function
9.2 basic usage
The async function returns a Promise object. You can use the then method to add a callback function. When the function is executed, once await is encountered, it will return first, wait until the asynchronous operation is completed, and then execute the following statements in the function body.
Here is an example.
async function getStockPriceByName(name) { const symbol = await getStockSymbol(name); const stockPrice = await getStockPrice(symbol); return stockPrice;}getStockPriceByName('goog').then(function (result) { console.log(result);});
The above code is a function to obtain stock quotes. The async keyword in front of the function indicates that there are asynchronous operations inside the function. When this function is called, a Promise object is returned immediately.
9.3 grammar
The async function returns a Promise object.
The value returned by the return statement inside the async function will become a parameter of the then method callback function.
async function f() { return 'hello world';}f().then(v => console.log(v))// "hello world"
In the above code, the value returned by the return command inside the function f will be received by the then method callback function.
An error is thrown inside the async function, which will cause the returned Promise object to change to the reject state. The error object thrown will be received by the catch method callback function.
async function f() { throw new Error('Error ');}f().then( v => console.log(v), e => console.log(e))// Error: an error occurred
Introduction to React Basics
1. About React
1.1 introduction to React
React originated from Facebook's internal project. Because the company was not satisfied with all JavaScript MVC frameworks on the market, it decided to write one for Instagram website. After making it, I found this set of things very easy to use, so I opened it in May 2013.
1.2. Install with React scaffold
1.cnpm install -g create-react-app
2. Replace the source npm config set registry https://registry.npm.taobao.org
npm config set registry https://registry.npm.taobao.org -- after configuration, you can verify whether it is successful through the following methods npm config get registry -- if the above address is displayed, the replacement is successful
3. Create todolist create react app todolist
4. Enter the cd todolist directory
5. Start project npm start
1.3 simplification of scaffold code
Description of project directory:
node_ Modules = = > related dependencies of NPM Download
package. JSON = = = > the node package file includes some descriptions of the project and related file versions
public folder:
index. HTML = = > the first page of the project
favico. ICO = = > item icon
mainfest. JSON = = > define web page shortcuts
src folder:
index. JS = = > entry file of the whole project
registerServiceWorker. JS = = > offline cache
Code engineering simplification
Save only app. In src directory JS and index JS file
index.js is the entry file. The simplified code is as follows:
import React from 'react';import ReactDOM from 'react-dom';import App from './App';ReactDOM.render(<App />, document.getElementById('root'));
App. The simplified code of JS file is as follows:
import React from 'react';function App() { return ( <div> hello React... </div> );}export default App;
2. React basic syntax
2.1. JSX syntax Basics
React uses JSX instead of regular JavaScript.
JSX is a JavaScript syntax extension according to the XML syntax specification.
JSX has the following advantages:
- JSX executes faster because it is optimized after compiling into JavaScript code;
- It is type safe, and errors can be found during compilation;
- Writing templates using JSX is easier and faster.
**Essence of JSX syntax: * * instead of directly rendering JSX to the page, it is internally converted to the form of createElement and then rendered.
**JSX comment: * * it is recommended to use {/ * this is the comment * /};
**Add class name to JSX: * * you need to use className instead of class; htmlFor replaces the for attribute of label;
When JSX creates DOM, all nodes must have unique root elements to wrap;
In JSX syntax, tags must appear in pairs. If they are single tags, they must be self closing and self closing;
Code example:
const mydiv = <div>This is a Div label</div>;ReactDOM.render(mydiv, document.getElementById('root'));
Examples of developing code using componentization:
App.js component file code
import React from 'react';class App extends React.Component{ render(){ return ( <div> {1+1} <hr/> Hello,Reactjs!! </div> ); }}export default App;
Use JSX syntax to reference components in other files:
import React from 'react';import ReactDOM from 'react-dom';import App from './App';ReactDOM.render(<App />, document.getElementById('root'));
Render digital
import React from 'react';import ReactDOM from 'react-dom';let a = 10;ReactDOM.render( <div>{a}</div>, document.getElementById('root'));
Render string
import React from 'react';import ReactDOM from 'react-dom';let str = 'hello react';ReactDOM.render( <div>{str}</div>, document.getElementById('root'));
Render boolean type
import React from 'react';import ReactDOM from 'react-dom';let rel = true;ReactDOM.render( <div>{rel ? 'The result is true' : 'The result is false'}</div>, document.getElementById('root'));
Render attribute values
import React from 'react';import ReactDOM from 'react-dom';let title = "this is a div";ReactDOM.render( <div title={title}>Hello React</div>, document.getElementById('root'));
Render label objects
import React from 'react';import ReactDOM from 'react-dom';const h1 = <h1>Hello React!</h1>;ReactDOM.render( <div> {h1} </div>, document.getElementById('root'));
Render array
import React from 'react';import ReactDOM from 'react-dom';const arr = [ <h1>Line 1</h1>, <h2>Line 2</h2>,];ReactDOM.render( <div> {arr} </div>, document.getElementById('root'));
Convert the normal array to JSX array and render it to the page
Solving Warning: Each child in a list should have a unique "key" prop
Method 1:
import React from 'react';import ReactDOM from 'react-dom';//Original array const arr = ['html','css','vue']// New array const newarr = []// The foreach() method has no return value arr.foreach ((item, index) = > {const temp = < H2 key = {index} > {item} < / H2 > newarr push(temp);}); ReactDOM. render( <div> {newArr} </div>, document.getElementById('root'));
Method 2:
import React from 'react';import ReactDOM from 'react-dom';import TodoList from './TodoList';import './style.css';//Original array const arr = ['html ',' CSS', 'Vue']; ReactDOM. render( <div> The {/ * map() method has a return value * /} {arr.map ((item, index) = > {return < H2 key = {index} > {item} < / H2 >})} < / div >, document getElementById('root'));
2.2. React component
Component concept
React applications are built on components.
As the core content of React, component is an important part of View. Each View page is composed of one or more components. It can be said that component is the cornerstone of React application. In the component composition of React, it can be divided into stateful components and stateless components according to the state.
Characteristics of components
The concept of componentization has existed in the back end for many years, but in recent years, with the development of the front end, this concept has been frequently mentioned in the front end, especially in the framework of MV *.
The word "componentization" in the front end usually refers to "tagging" in the UI layer, that is, dividing a large business interface into several small pieces and then assembling them.
In a narrow sense, componentization is generally indicator signing, that is, a mechanism with user-defined tags (user-defined attributes) as the core.
In a broad sense, componentization includes combing the business of data logic layer to form capability encapsulation at different levels.
-
Standardization
Any component should comply with a set of standards, which can enable developers in different regions to develop a set of standardized components.
-
Combination
Components should be composable before. We know that the display of front-end pages is a combination of HTML and DOM, and the final form of components can also be understood as HTML fragments. Therefore, the composition of a complete interface display must depend on the combination, nesting and communication between different components.
-
reusability
Any component should be an independent individual that can be applied in different scenarios.
-
Maintainability
Any component should have its own complete and stable functions, including only its own logic independent of other components, so as to make it easier to understand and understand, and greatly reduce the probability of bug s.
Function component
The stateless functional component is formally represented as a component class with only one render() method, which is created in the form of function or ES6 arrow function, and the component is stateless. The specific creation form is as follows
import React from 'react';//Define a React component function app() {return (< div > Hello React... < / div >);} export default App;
class component
React.Component creates react components in the form of ES6, which is a highly recommended way to create stateful components. The form is changed to react The form of component is as follows
import React from 'react';//Define a React component class app extensions React Component{ render(){ return ( <div> Hello,Reactjs!! </div> ); }} export default App;
Reference components in other files
import React from 'react';import ReactDOM from 'react-dom';//App component. The component must start with a capital letter. Import app from '/ App'; ReactDOM. render(<App />, document.getElementById('root'));
Difference between function component and class component
The component created by constructor is called "stateless component";
The component created with the class keyword is called "stateful component";
The essential difference between stateful and stateless components is whether there is a state attribute.
be careful:
Components created with the class keyword have their own private data (this.state) and life cycle functions;
The components created with function only have props, and do not have their own private data and life cycle functions;
Of course, there are differences between function components and class components, and the performance of function components is higher than that of class components, because class components need to be instantiated when used, and function components can directly execute functions to get the returned results. To improve performance, try to use function components
| difference | Function component | class component |
|---|---|---|
| Is there this | No, | have |
| Is there a life cycle | No, | have |
| Is there a state | No, | have |
3. React core properties
3.1.1 props attribute
The one-way data flow value in react refers to props. According to this feature, it also plays a role: communication between components. Props itself is immutable, but there is a situation that seems to be changeable, that is, the state of the parent component is taken as the props of the child component. When the state of the parent component changes, the props of the child component also changes. In fact, it still follows this certain law: props cannot be changed.
Characteristics of props attribute:
1. Each component object will have props (short for properties) attribute
2. All attributes of the component tag are saved in props
3. Read an attribute value internally: this props. propertyName
4. Function: transfer data from the external component to the internal component through the tag attribute (read only)
5. Limit the type and necessity of attribute values in props
Code example
Use function components:
import React from 'react';import ReactDOM from 'react-dom';//Use the function component function User(props) {/ / to obtain the props property value in the component Return < div > {props. Name}, {props. Age} < / div >} / / define data const person = {Name: 'Zhang San', age: 20, sex: 'male'} reactdom render( <User {...person}></User>, document.getElementById('root'));
Use class components:
import React from 'react';import ReactDOM from 'react-dom';//Use the class component class user extensions react Component{ render(){ return ( <div>{this.props.name}--{this.props.age}</div> ); }}// Data const person = {Name: 'Zhang San', age: 20, sex: 'male'} reactdom render( <User {...person}></User>, document.getElementById('root'));
3.1.2. state attribute
React regards a component as a state machine. Through interaction with users, different states are realized, and then the UI is rendered to keep the user interface and data consistent.
In React, you only need to update the state of the component, and then re render the user interface according to the new state (do not operate the DOM).
Code example:
import React from 'react';import ReactDOM from 'react-dom';class Person extends React.Component{ //Constructor() {super(); this. State = {Name: 'Tom'}} render() {/ / state attribute is modifiable. This. State. Name = 'Jack'; return (< H1 > {this. State. Name} < / H1 >);}} ReactDOM. render(<Person />, document.getElementById('root'));
Setting state: setState
setState(object nextState[, function callback])
This. Cannot be passed inside a component State modifies the state because it is replaced after calling setState().
setState() does not immediately change this State, but create a state to be processed. setState() is not necessarily synchronized. In order to improve performance, React will perform state and DOM rendering in batches.
setState() will always trigger a component redraw unless some conditional rendering logic is implemented in shouldComponentUpdate()
3.1.3 differences between props and state attributes
- The data in props is transmitted from the outside;
- The data in state is private to the component; (the data obtained through Ajax is generally private data)
- The data in props is read-only and cannot be re assigned;
- The data in state is readable and writable;
- Subcomponents can only transfer data through props;
3.1.4 refs attribute
In the React data stream, the only way for parent-child components to communicate is through props attribute; If you want to modify a child component, update the value of the child component props property by modifying the parent component's properties, and re render the component to achieve the view update. However, some scenes need to get a real DOM element to interact, such as focusing text boxes, triggering forced animation, etc
- Add a ref attribute to the DOM element
- Add ref attribute to class component
Code example:
import React from 'react';import ReactDOM from 'react-dom';class Person extends React.Component{ constructor(){ super(); this.handleClick = this.handleClick.bind(this); } //Click the event handleClick() {/ / use the native DOM API to get the focus this. Refs. Myinput. Focus();} Render() {return (< div > < input type = "text" ref = "myinput" / > < input type = "button" value = "click my input box to get focus" onclick = {this. Handleclick} / > < / div >);}} ReactDOM. render(<Person />, document.getElementById('root'));
4. Component lifecycle
4.1 three stages of component life cycle
- Mounting (loading phase)
- Updating
- Unmounting (unloading phase)
4.2 old life cycle
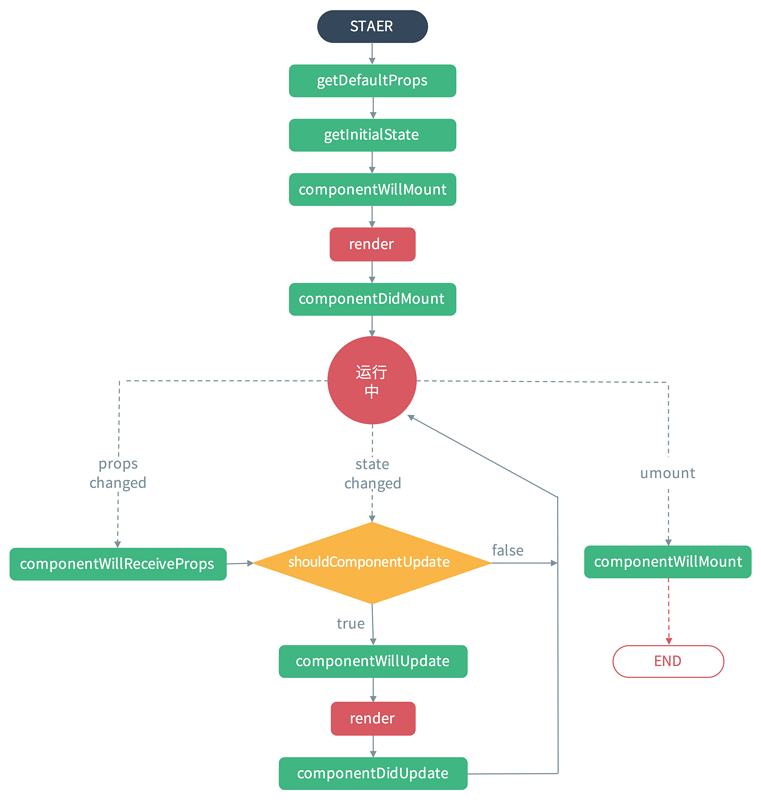
Mounting (loading phase: involving 6 hook functions)
constructor()
It is called once during loading and can be initialized state
getDefaultProps()
Set default props,It can also be used dufaultProps Set the default properties of the component.
getInitialState()
initialization state,Can be directly in constructor Defined in this.state
componentWillMount()
When a component is loaded, it will only be called. Later, it will not be called when the component is updated. It will only be called once in the whole life cycle. At this time, it can be modified state
render()
react The most important step is to create a virtual machine dom,conduct diff Algorithms, updating dom All the trees are here
componentDidMount()
After the component is rendered, it is called only once.
Updating (update phase: involving 5 hook functions)
componentWillReceivePorps(nextProps)
When the component is loaded, it is not called, and the component accepts a new one props Time call
shouldComponentUpdate(nextProps, nextState)
Component received new props perhaps state When called, return true Will update dom(use diff Algorithm update), return false Can prevent updates (not called) render)
componentWillUpdata(nextProps, nextState)
It is not called when the component is loaded. It is only called when the component is about to be updated. At this time, it can be modified state
render()
react The most important step is to create a virtual machine dom,conduct diff Algorithms, updating dom All the trees are here
componentDidUpdate()
Components are not invoked when loaded, and the components are updated after completion.
Unmounting (unloading phase: involving 1 hook function)
componentWillUnmount()
After the component is rendered, it is called only once.
Basic writing of components
import React, { Component } from 'react'export default class OldReactComponent extends Component { constructor(props) { super(props) // getDefaultProps: receive initial props / / getinitialstate: initialize state} state = {} componentwillmount() {/ / trigger} render() {return (< H2 > old react. Component < / H2 >)} componentdidmount() {/ / trigger} componentWillReceivePorps(nextProps) after component mounting {/ / trigger when new props are received} shouldComponentUpdate(nextProps, nextState) {/ / trigger when component props or state change, true: update, false: do not update, return true} componentwillupdate (nextprops, nextstate) {/ / trigger before component update} componentDidUpdate() {/ / trigger after component update} componentWillUnmount()) {/ / triggered when the component is unloaded}}
4.3 new life cycle
Mounting (loading phase: involving 4 hook functions)
constructor()
It is called once during loading and can be initialized state
static getDerivedStateFromProps(props, state)
Each time the component is rerender When, including after the component is built(fictitious dom After that, the actual dom Before mounting),Every time you get a new props or state After; Every time you receive a new props After that, an object will be returned as a new object state,return null Indicates that no update is required state;coordination componentDidUpdate,Can cover componentWillReceiveProps All uses of
render()
react The most important step is to create a virtual machine dom,conduct diff Algorithms, updating dom All the trees are here
componentDidMount()
After the component is rendered, it is called only once.
Updating (update phase: involving 5 hook functions)
static getDerivedStateFromProps(props, state)
Each time the component is rerender When, including after the component is built(fictitious dom After that, the actual dom Before mounting),Every time you get a new props or state After; Every time you receive a new props After that, an object will be returned as a new object state,return null Indicates that no update is required state;coordination componentDidUpdate,Can cover componentWillReceiveProps All uses of
shouldComponentUpdate(nextProps, nextState)
Component received new props perhaps state When called, return true Will update dom(use diff Algorithm update), return false Can prevent updates (not called) render)
render()
react The most important step is to create a virtual machine dom,conduct diff Algorithms, updating dom All the trees are here
getSnapshotBeforeUpdate(prevProps, prevState)
Trigger time: update When it happened, in render After that, in the component dom Before rendering; Returns a value as componentDidUpdate The third parameter of; coordination componentDidUpdate, Can cover componentWillUpdate All uses of
componentDidUpdate()
Components are not invoked when loaded, and the components are updated after completion.
Unmounting (unloading phase: involving 1 hook function)
After the component is rendered, it is called only once.
Error handling
componentDidCatch(error,info)
Anywhere javascript Error reporting will trigger
Basic writing of components
import React, { Component } from 'react'export default class NewReactComponent extends Component { constructor(props) { super(props) // getDefaultProps: receive initial props / / getinitialstate: initialize state} state = {} static getderivedstatefromprops (props, state) {/ / every time a component is re rendered, including after the component is built (after the virtual dom and before the actual dom is mounted) , after obtaining new props or state each time;; Each time a new props is received, an object will be returned as a new state, If null is returned, the state does not need to be updated. Return state} componentdidcatch (error, info) {/ / javascript error} render() {return (< H2 > New react. Component < / H2 >)} componentdidmount() {/ / after mounting} shouldComponentUpdate(nextProps, nextState) {/ / triggered when the component props or state changes, true: update, false: do not update, return true} getsnapshotbeforeupdate (prevprops, prevstate) {/ / triggered} componentDidUpdate() {/ / triggered after component update} componentWillUnmount() {/ / triggered during component uninstall}}
4.4 summary
Old life cycle
[external chain picture transfer failed. The source station may have anti-theft chain mechanism. It is recommended to save the picture and upload it directly (IMG nkmybufb-1627370097219)( https://segmentfault.com/img/bVbhRvE?w=720&h=333 )]
New life cycle
[external chain picture transfer failed. The source station may have anti-theft chain mechanism. It is recommended to save the picture and upload it directly (img-taj8mzzv-1627370097223)( https://segmentfault.com/img/bVbhRvx?w=720&h=394 )]
- The new life cycle of React16 discards componentWillMount, componentWillReceivePorps and componentWillUpdate
- getDerivedStateFromProps and getSnapshotBeforeUpdate are added to replace the three discarded hook functions (componentWillMount, componentWillReceivePorps and componentWillUpdate)
- React16 does not delete these three hook functions, but it cannot be mixed with the newly added hook functions (getDerivedStateFromProps and getSnapshotBeforeUpdate). React17 will delete componentWillMount, componentWillReceivePorps and componentWillUpdate
- Added error handling (componentDidCatch)
5. Parent child component value transfer
5.1.1. Value transfer from parent component to child component
When referring to a sub component, passing is equivalent to an attribute, for example, through porps Param gets the value of this param.
The parent component passes values to the child component, and the state of the parent component is passed to the child component through props.
Parent component code snippet:
constructor(props){ super(props) this.state={ message:"i am from parent" } } render(){ return( <Child txt={this.state.message}/> ) }}
Sub component code snippet:
render(){ return( <p>{this.props.txt}</p> )}
Complete example
Create parent component index js
import React from 'react';import ReactDOM from 'react-dom';import User from './User';//Import sub component / / define data const person = {Name: 'Tom', age: 20} reactdom Render (/ / render the subcomponent and pass the name,age attribute < user name = {person. Name} age = {person. Age} > < / user >, document. Getelementbyid ('root ');
Create subcomponent user js
import React from 'react';class User extends React.Component{ render(){ return ( // Use the props attribute to receive the parameters passed from the parent component (< div > {this. Props. Name}, {this. Props. Age} < / div >);}} export default User;
You can use the expand operator in the parent component Transfer object
index.js file
ReactDOM.render( //Render the subcomponent and pass the name and age attributes < user {... Person} > < / user >, document getElementById('root'));
User.js file
render(){ return ( // Use the props attribute to receive the parameters passed from the parent component (< div > {this. Props. Name}, {this. Props. Age} < / div >);}
5.1.2. Value transfer from child component to parent component
A child component passes a message to the parent component by calling the method passed from the parent component to the child component.
Complete case
Sub assembly son JS file code example:
import React from 'react';class Son extends React.Component { //Constructor() {super(); this.state = {inputvalue: ''}} / / click the event handleClick() {/ / get the GetData method of the parent component through props property and pass this.state value to this.props.getdata(this.state.inputValue);}// Input box event for this State assignment handlechange (E) {this. Setstate ({inputvalue: e.target. Value});} Render() {return (< react. Fragment > < input onchange = {this. Handlechange. Bind (this)} > < / input > < button onclick = {this. Handleclick. Bind (this)} > Click to get data < / button > < / react Fragment> ); }} export default Son;
Parent component JS file code example:
import React from 'react';import Son from './Son';class Parent extends React.Component { //Constructor() {super(); this. State = {MES: '' / / initialize the MES attribute}} / / used to receive the value passing method of the sub component, The parameter is the value passed by the subcomponent GetData (MSG) {/ / assign the value passed by the subcomponent to the property this.setstate ({MES: MSG});} Render () {return (<React.Fragment> {/ * render sub components, set up the method of sub component access, GetData attribute is called parent component name in the subcomponent * /} <Son getdata={this.getDatas.bind (this)}></Son> <div> display data: {this.state.mess}</div> < / React. Fragment> ); }} export default Parent;
Entry file index JS sample code:
import React from 'react';import ReactDOM from 'react-dom';import Parent from './Parent';ReactDOM.render(<Parent></Parent>, document.getElementById('root'));
5.1.3 value transfer of sibling components
The value transfer between sibling components is performed through the parent component. The process is as follows:
Component A - value transfer -- > parent component - value transfer -- > component B
Code example:
Create ACLS JS component, which is used to provide data
import React from 'react';class Acls extends React.Component { //Click the event button to the parent component PCLS JS value passing handleclick() {this. Props. Data ("hello... React...);} Render() {return (< button onclick = {this. Handleclick. Bind (this)} > get data from ACLS component < / button >);}} export default Acls;
Create parent component PCLS JS is used to transfer data
import React from 'react';import Acls from './Acls';import Bcls from './Bcls';class Pcls extends React.Component { //Constructor () {super (); this. State = {MES: ''}} // Add ACLS to the subcomponent JS. The parameter is the value GetData (data) {this. Setstate ({MES: Data});} Render() {return (< react. Fragment > PCLS component displays buttons and passes values: < ACLS data = {this. GetData. Bind (this)} > < / ACLS > < BCLS MES = {this. State. MES} > < / BCLS > < / react Fragment> ); }} export default Pcls;
Create subcomponent BCLS JS is used to show from ACLS Data generated in JS component
import React from 'react';class Bcls extends React.Component { render(){ return ( <div>stay Bcls Data displayed in component:{this.props.mess}</div> ); }}export default Bcls;
6. TodoList case
6.1. Create todolist JS component
import React from 'react';class TodoList extends React.Component{ //Constructor (props) {super (props); this. State = {list: ['learn HTML', 'learn CSS',' learn react ',' learn Vue ']} / / click the event method handlebtnclick() {this. Setstate ({list: [... this.state.list,' hello world '] //... To expand the operator, set this state. Put the list content into the current list});} Render() {return (< div > < div > < input type = "text" > < / input > < button onclick = {this. Handlebtnclick. Bind (this)} > Add < / button > < / div > < UL > {/ * key attribute is the unique value. Without this attribute, the browser will report a warning and a bug will appear when adding * /} {this.state.list. Map ((item, index) => <li key={index}>{item}</li>)} </ul> </div> ); }} export default TodoList;
Reference component
import React from 'react';import ReactDOM from 'react-dom';import TodoList from './TodoList';ReactDOM.render(<TodoList />, document.getElementById('root'));
6.2. Add list item function
Code example:
import React from 'react';class TodoList extends React.Component{ //Constructor (props) {super (props); this. State = {list: [], / / display the list inputValue: '' / / record the value of the input box}} click the event method handlebtnclick() {this. Setstate ({list: [... this.state.list, this. State. inputValue] , //... To expand the operator, set this state. Put the list content into the current list inputValue: '' / / click Add to clear the input box});}// Input the event method handleinputchange (E) {this. Setstate ({inputValue: e.target. Value});} Render() {return (< div > < div > < input value = {this. State. inputValue} onchange = {this. Handleinputchange. Bind (this)} > < / input > < button onclick = {this. Handlebtnclick. Bind (this)} > Add < / button > < / div > < UL > {this.state.list. Map ((item, index) = > < Li key = {index} > {item} </li>)} </ul> </div> ); }} export default TodoList;
6.3. Delete list element
Delete list element code:
import React from 'react';class TodoList extends React.Component{ //Constructor (props) {super (props); this. State = {list: [], / / display the list inputValue: '' / / record the value of the input box}} click the event method handlebtnclick() {this. Setstate ({list: [... this.state.list, this. State. inputValue] , //... To expand the operator, set this state. Put the list content into the current list inputValue: '' / / click Add to clear the input box});}// Input the event method handleinputchange (E) {this. Setstate ({inputValue: e.target. Value});}// Click the display list event method to delete the display element handleitemclick (index) {const list = [... this.state.list]; list. Splice (index, 1); this. Setstate ({list: List});} Render() {return (< div > < div > < input value = {this. State. inputValue} onchange = {this. Handleinputchange. Bind (this)} > < / input > < button onclick = {this. Handlebtnclick. Bind (this)} > Add < / button > < / div > < UL > {this.state.list. Map ((item, index) = > {return < Li onclick= {this.handleItemClick.bind(this,index)} key={index}> {item} </li> })} </ul> </div> ); }} export default TodoList;
6.4. Use componentization to realize deletion function
Create the subcomponent todoitem js
import React from 'react';class TodoItem extends React.Component{ //Click the method of element deletion. / / if the child component wants to communicate with the parent component, the child component needs to call the method handleDelete() {/ / call the method of the parent component and pass the value this.props.delete (this. Props. Index);} Render() {return (< div onclick = {this. Handledelete. Bind (this)} > {/ * the child component receives the parameters passed by the parent component through props * /} {this. Props. Content} < / div >);}} export default TodoItem;
In the parent component todolist Calling sub components in JS
import React from 'react';import TodoItem from './TodoItem';class TodoList extends React.Component{ //Constructor (props) {super (props); this. State = {list: [], / / display the list inputValue: '' / / record the value of the input box}} click the event method handlebtnclick() {this. Setstate ({list: [... this.state.list, this. State. inputValue] , //... To expand the operator, set this state. Put the list content into the current list inputValue: '' / / click Add to clear the input box});}// Input the event method handleinputchange (E) {this. Setstate ({inputValue: e.target. Value});}// Click the method of element deletion, which is used to receive the passed value handeldeleteitem (index) {const list = [... this.state.list]; list. Splice (index, 1); this. Setstate ({list: List});} Render() {return (< div > < div > < input value = {this. State. inputValue} onchange = {this. Handleinputchange. Bind (this)} > < / input > < button onclick = {this. Handlebtnclick. Bind (this)} > Add < / button > < / div > < UL > {this.state.list. Map ((item, index) = > {/ / the parent component passes the parameter return < todoitem to the child component in the form of an attribute delete={this.handelDeleteItem.bind(this)} key={index} content={item} index={index}> </ TodoItem> })} </ul> </div> ); }} export default TodoList;
6.5. Code optimization
TodoItem.js code optimization:
import React from 'react';class TodoItem extends React.Component{ //Constructor (props) {super (props); this.handledelete = this.handledelete.bind (this);}// Click the method of element deletion. / / if the child component wants to communicate with the parent component, the child component needs to call the method handledelete() {const {handeldelete, index} = this props; // Call the method of the parent component and pass the value handeldelete (index) to the parent component;} render(){ const { content } = this. props; return ( <div onClick={this.handleDelete}>{content}</div> ); }} export default TodoItem;
TodoList.js code optimization:
import React from 'react';import TodoItem from './TodoItem';class TodoList extends React.Component{ //Constructor (props) {super (props); this. State = {list: [], / / display the list inputValue: '' / / record the value of the input box} this handleInputChange = this. handleInputChange. bind(this); this. handleBtnClick = this. handleBtnClick. bind(this); this. handelDeleteItem = this. handelDeleteItem. bind(this); } Click the button to click the event method handlebtnclick() {this. Setstate ({list: [... This. State. List, this. State. inputValue], / /... As the expansion operator, put the content of this.state.list into the current list inputValue: '' / / click the Add button to empty the input box});}// Input the event method handleinputchange (E) {this. Setstate ({inputValue: e.target. Value});}// Click the method of element deletion, which is used to receive the passed value handeldeleteitem (index) {const list = [... This. State. List]; list. Splice (index, 1); this. Setstate ({list: List});}// Traverse the method gettodoitems() {return (this. State. List. Map ((item, index) = > {/ / the parent component passes the parameter return < todoitem handeldelete = {this. Handeldeleteitem} key = {index} content = {item} index = {index} / >} to the child component in the form of attribute);} Render() {return (< div > < div > < input value = {this. State. inputValue} onchange = {this. Handleinputchange} > < / input > < button onclick = {this. Handlebtnclick} > Add < / button > < / div > < UL > {this. Gettodoitems()} < / UL > < / div >);}} export default TodoList;
6.6. Decorate with CSS Styles
Method 1: use style attribute
Code example:
<button style={{background:'blue',color:'#fff'}} onClick={this.handleBtnClick}> Add < / button >
Method 2: use the className attribute
Create style CSS file
.red-btn{ background-color: red; color: #ffffff;}
In index Import css into JS entry file
import './style.css';
Using the className property in a component
<button className='red-btn' onClick={this.handleBtnClick}>add to</button>
6.7.JSX code optimization
The JSX code of render() method return needs to use a label package on the outermost layer. If you don't want to display the label on the outermost layer in the page, you can use < react Fragment > tag substitution, code example:
render(){ return ( <React.Fragment> <div> <input /> <button>add to</button> </div> <ul> {this.getTodoItems()} </ul> </React.Fragment> ); }
You can also directly introduce classes when introducing components, so you don't need to call React when using them
introduce
import React,{Component,Fragment} from 'react';class TodoList extends Component{render(){ return ( <Fragment> <div> <input /> <button>add to</button> </div> <ul> {this.getTodoItems()} </ul> </Fragment> ); }}export default TodoList;
React routing
1. Introduction to React routing
1.1. Single page application
Features of a single page: you only need to load the main page once, and you can jump or switch pages through local refresh
Advantages: fast loading speed and good user experience
Disadvantages:
- The first load is a little slower than the traditional load
- Unfavorable seo
- The page is relatively complex
- Return key
1.2. Install react router DOM
On the project command line, execute
cnpm install react-router-dom -S
Download to the dependencies of the production environment.
In the component, the built-in component of react router DOM is obtained through object deconstruction. In the component, the built-in component is introduced as needed and used in the page:
- HashRouter represents the root container of a route. In the future, all routing related things should be wrapped in HashRouter, and HashRouter only needs to be used once in a website;
- Route represents a routing rule. On the route, there are two important attributes, path and component
- Link indicates the link of a route. The attribute is to
import {HashRouter,Route,Link} from 'react-router-dom'
Code example:
render(){ return ( <HashRouter> <div> <h1>This is the root directory of the website</h1> <hr /> <Link to="/home">home page</Link> <Link to="/movie/">film</Link> <Link to="/about">about</Link> <hr /> <Route path="/home" component={Home} ></Route><hr/> <Route path="/movie" component={Movie} exact></Route><hr/> <Route path="/about" component={About}></Route><hr/> </div> </HashRouter> ); }
After using the HashRouter to wrap the elements of the APP root component, the website has enabled routing. In a HashRouter, there can only be one root element. In a website, you only need to use < HashRouter > < / HashRouter > once.
The label created by route is the routing rule, where path represents the route to be matched and component represents the component to be displayed. Route has two identities: 1 It is a route matching rule; 2. It is a placeholder, indicating that all matched components will be placed in this position in the future
Points needing attention
- The path address of the Route component starts with /. Configure the component attribute, which is the displayed component. This attribute cannot be capitalized
- The Route component can be used with single label and double label. The single label needs / end, and the double label cannot write anything else in the middle
- The address of the Link to attribute also starts with / and the Link renders the a tag on the page
2. Routing value
2.1. Real router DOM routing
By configuring the address of the route, when the Link jumps
-
Route path: id (key)
-
Link to path / top/10 (value)
Received value:
-
class component, this props. match. params. Attribute name
-
Function components: formal parameters match.params. Attribute name
Code example:
render(){ return ( <HashRouter> <div> <h1>This is the root directory of the website</h1> <hr /> <Link to="/movie/top/10">film</Link> <hr /> <Route path="/movie/:type/:id" component={Movie} exact></Route> </div> </HashRouter> ); }
In the Route built-in component, configure the path address:
<Route path="/movie/:type/:id" component={Movie} exact></Route>
In the Link built-in component, configure the to property to jump:
<Link to="/movie/top/10">film</Link>
Class components are received through the life cycle, this Props carries the data passed through the route:
render(){ console.log(this); return ( <div> film--{this.props.match.params.type}--{this.props.match.params.id} </div> ); }
After code optimization:
class Movie extends React.Component{ constructor(props){ super(); this.state = { routeParams:props.match.params } } render(){ console.log(this); return ( <div> film--{this.state.routeParams.type}--{this.state.routeParams.id} </div> ); }}
Function components receive the passed values through formal parameters. props formal parameters. Function components are routing components. props is the passed object, which carries the data passed through the route
import React from 'react'export default function home(props) { return ( <div> {props.match.params.id} </div> )}
2.2 nested routing
Nested Routing: in the routing component, use Link and Route to configure sub routes to realize jump and switching;
The following is the level-1 routing. In the level-1 routing, Home is the routing component
<Route path="/home" component={ Home }></Route>
Continue to use Link and Route to nest routes in the Home component. Note that the routing address is the first level routing address, followed by the corresponding path of the second level routing
render() { return ( <div> <ul> <li><Link to="/home/a">recommend</Link></li> <li><Link to="/home/b">New era</Link></li> <li><Link to="/home/c">comic</Link></li> </ul> <Route path="/home/a" component={ A }></Route> <Route path="/home/b" component={ B }></Route> <Route path="/home/c" component={ C }></Route> </div> )}
2.3. JS realizes route jump
Introducing BrowserRouter module
import {BrowserRouter,HashRouter,Route,Link} from 'react-router-dom'
Use BrowserRouter as the root container
//Jump click event jump() {window. Location. Href = "/ news"} render() {return (< browserouter > < div > < H1 > this is the root directory of the website < / H1 > < HR / > < button onclick = {() = > {this. Jump()}} > News < / button > < HR / > < route path = "/ news" component = {news} ></Route> </div> </BrowserRouter> );}
In the render method, write a button with the name js to jump route. Define an onClick method. The arrow function solves the problem of this pointing. At the same level as render, define a jump method. Execute a sentence of code in the jump method to jump route. Use window location. Href = "address of route" implements route jump.
3. React router DOM built-in component
First, import on demand. You need to import any built-in components
import { BrowserRouter, Link, Route,Redirect,NavLink,Switch } from 'react-router-dom'
3.1. Using NavLink in components
NavLink has the selected activeClassName. If the route is active, the active class style will be displayed.
On the basis of our previous cases, we found the Link component. We have learned the role of the Link component. We can jump the route and jump the corresponding path address through the to attribute.
<ul> <li> <Link to="/home">home page</Link> </li> <li> <Link to="/video">Good video</Link> </li></ul>
Replace all links in the components with NavLink components
<li> <NavLink activeClassName="red" to="/home">home page</NavLink></li><li> <NavLink activeClassName="red" to="/video">Good video</NavLink></li>
We will find that the route jump can be performed normally before changing to NavLink, and the normal jump can still be performed. It proves that the jump of components can also be realized by using NavLink. Then the problem comes, what is the use of NavLink, why is NavLink encapsulated, and each NavLink is added to an activeClassName attribute and bound to a class style. At this time, when NavLink is triggered, The corresponding style will be triggered, which has a switching effect.
3.2. Use the Redirect built-in component in the component
Redirect redirection has the to attribute and can directly jump to the specified route.
In the render method, the built-in component is used, and the to attribute is used in the Redirect built-in component. When the built-in tag is executed, the to jump route will be carried out. The corresponding routing component can be matched according to the address followed by to.
<Redirect to="/home/c"></Redirect>
3.3. Use Switch built-in components in components
Switch es are exclusive
Use the Switch tag to wrap all routes in the component. At this time, the Route is equivalent to that each path is accurately matched to display the corresponding components. The last Route is a routing path without an address. If the Link points to a nonexistent address and there is no accurate matching to the address, the C404 Route will be displayed, and only one component will be displayed by using Switch, Match until.
<Switch> <Route path="/home" component={ Home }></Route> <Route path="/video" component={ Home1 }></Route> <Route path="/book" component={ Home2 }></Route> <Route path="/renwu" component={ Home3 }></Route> <Route path="/user" component={ Home4 }></Route> <Route component={ C404 }></Route></Switch>
Redux
1. What is Redux
Redux is an important part of React ecology. Many people say that simple applications can not use this tool. But I personally think that small and medium-sized applications can make the file structure more standardized and the code more readable. Because React proposes the idea of separating presentation components from container components, the coupling between React and Redux is reduced.
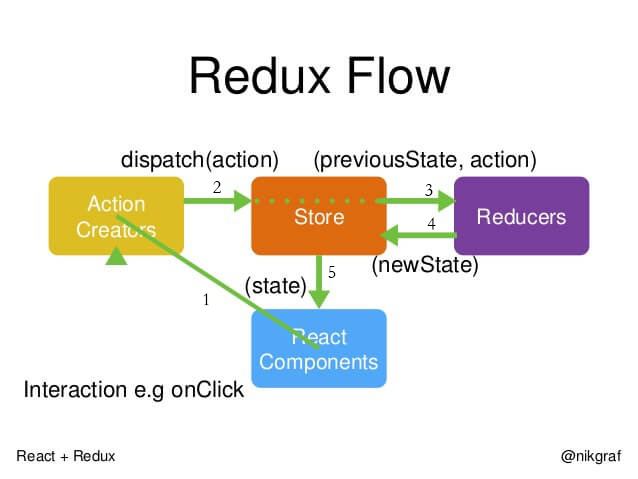
Redux is a popular JavaScript framework that provides a predictable state container for applications. Redux is based on a simplified version of the Flux framework, which is a framework developed by Facebook. In the standard MVC framework, data can flow in both directions between UI components and storage, while Redux strictly restricts data to flow in only one direction. See the figure below:
[the external chain picture transfer fails. The source station may have an anti-theft chain mechanism. It is recommended to save the picture and upload it directly (img-4q8sszzw-1627370097229)( https://segmentfault.com/img/bVWi0h?w=687&h=330 )]
In Redux, all data (such as state) is stored in a container called store → there can only be one in an application. Store is essentially a state tree that stores the state of all objects. Any UI component can access the state of a specific object directly from the store. To change the state through a local or remote component, you need to distribute an action. Distribution here means sending executable information to the store. When a store receives an action, it will proxy the action to the relevant reducer. Reducer is a pure function that can view the previous state, execute an action and return a new state.
Operating principle of Redux
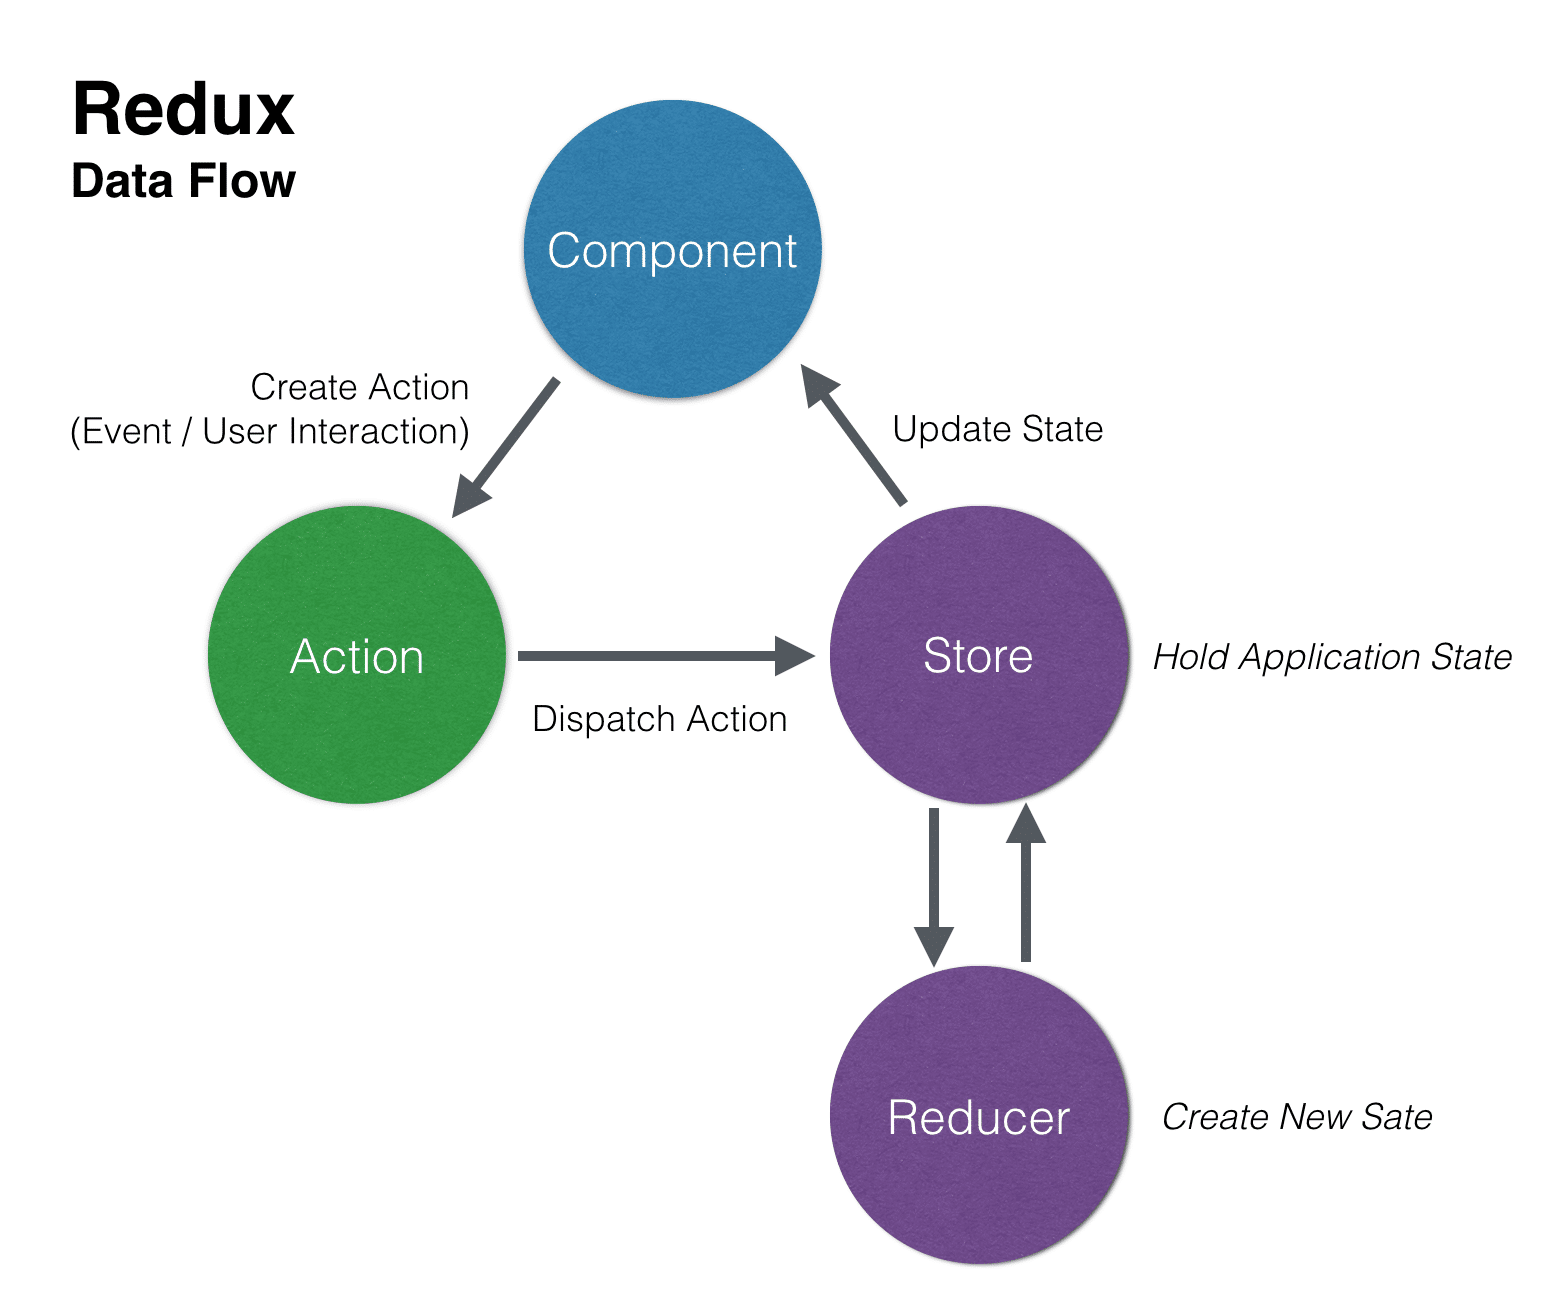
Important methods in store
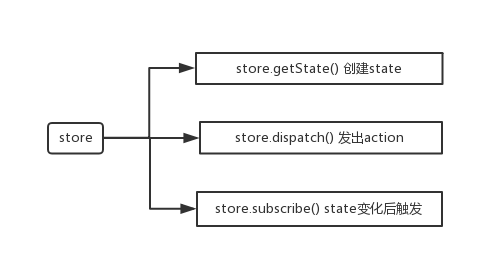
2. Configure Redux
The quickest way to configure the Redux development environment is to use the create react app tool. Before you start, make sure nodejs, npm, is installed and updated.
npm install redux
Create a store directory and create a new index JS file, type the following:
import {createStore} from 'redux';import reducer from './reducer';const store = createStore(reducer);export default store;
Create a reducer in the store directory JS file, type the following:
const defaultState = { inputValue:'', list:[]}//reducer can receive state, but cannot modify stateexport default (state = defaultstate, action) = > {return state;}
The data of the store can be used in the component
import React,{Component} from 'react';import store from './store/index';class TodoList extends Component{ constructor(props){ super(props); this.state = store.getState(); this.handleStoreChange = this.handleStoreChange.bind(this); store.subscribe(this.handleStoreChange); } handleStoreChange(){ this.setState(store.getState()); } render(){ return ( <div> <input type='text' value={this.state.inputValue}/> <button onClick={this.handleClick}>Submit</button> <ul> {this.state.list.map((item,index)=>{ return ( <li key={index}>{item}</li> ); })} </ul> </div> ); }}export default TodoList;
3. TodoList case
TodoList.js
import React,{Component} from 'react';import store from './store/index';import {DELETE_TODO_ITEM,CHANGE_INPUT_VALUE,ADD_TODO_ITEM} from './store/actionType'class TodoList extends Component{ constructor(props){ super(props); this.state = store.getState(); this.handleChange = this.handleChange.bind(this); this.handleStoreChange = this.handleStoreChange.bind(this); this.handleClick = this.handleClick.bind(this); store.subscribe(this.handleStoreChange); } handleChange(e){ const action = { type:CHANGE_INPUT_VALUE, value:e.target.value } store.dispatch(action); } handleStoreChange(){ this.setState(store.getState()); } handleClick(){ const action = { type:ADD_TODO_ITEM } store.dispatch(action); } handleClickItem(index){ const action = { type:DELETE_TODO_ITEM, index:index } store.dispatch(action); } render(){ return ( <div> <input type='text' value={this.state.inputValue} onChange={this.handleChange} /> <button onClick={this.handleClick}>Submit</button> <ul> {this.state.list.map((item,index)=>{ return ( <li key={index} onClick={this.handleClickItem.bind(this,index)}>{item}</li> ); })} </ul> </div> ); }}export default TodoList;
store/index.js
import {createStore} from 'redux';import reducer from './reducer';const store = createStore(reducer);export default store;
store/reducer.js
import {DELETE_TODO_ITEM,CHANGE_INPUT_VALUE,ADD_TODO_ITEM} from './actionType'const defaultState = { inputValue:'', list:[]}//reducer can receive state, but cannot modify stateexport default (state = defaultstate, action) = > {console.log (state, action); if (action. Type = = = change_input_value) {const newstate = state; newstate.inputvalue = action.value; return newstate;} if(action.type === ADD_TODO_ITEM){ const newState = state; newState.list.push(newState.inputValue); newState.inputValue = ''; return newState; } if(action.type === DELETE_TODO_ITEM){ const newState = state; newState.list.splice(action.index,1); return newState; } return state;}
store/actionType.js
export const CHANGE_INPUT_VALUE = 'change_input_value'export const ADD_TODO_ITEM = 'add_todo_item'export const DELETE_TODO_ITEM = 'delete_todo_item'
**Reference article: https://segmentfault.com/a/1190000011474522 **
Core API:
- createStore create store
- store.dispatch sends action and uploads the data to the Store
- store.getState gets all the data contents in the store, but the component will not know when the data in the store changes
- store.subscribe listens for data changes in the Store. Once the data in the Store changes, this method will be executed
4. Redux thunk Middleware
Step 1: install the Redux thunk Middleware
npm install redux-thunk
The second step is to introduce the thunk component into the store
import {createStore,applyMiddleware } from 'redux';import Reducer from './Reducer';import thunk from 'redux-thunk';const store = createStore(Reducer,applyMiddleware(thunk));export default store;
Step 3 encapsulate the asynchronous request method
In todolist JS component, encapsulating the method of asynchronously obtaining the request:
import React, { Component } from 'react'import Store from './Store'import axios from 'axios'export class TodoList extends Component { constructor(props){ super(props); this.state = Store.getState(); this.handleStoreChange = this.handleStoreChange.bind(this); Store.subscribe(this.handleStoreChange); } //Call the asynchronous method componentDidMount () {Store.dispatch (this.getTodoListDatas ()) in the lifecycle function;} / / Get the requested method gettodolistdata() {return (dispatch) = > {Axios. Get ("/ data. JSON"). Then (resp = > {const action = {type: 'axios_getdata', data: resp. Data} dispatch (action)})}} handlestorechange() { this.setState(Store.getState()); } Render() {return (< div > < input type ='text 'value = {this. State. Inputvalue} > < / input > < button > Add < / button > < HR > < / HR > < UL > {this. State. List. Map ((item, index) = > {return (< Li key = {index} > {item} </li> ); })} </ ul> </div> ) }}export default TodoList
Step 4: receive the action information in the reducer
const defaultState = { inputValue:'', list:[]}export default (state = defaultState,action) => { if(action.type === 'axios_getdata'){ const newState = state; newState.list = action.data; return newState; } return state}
5. Implementation principle of Redux Middleware
Redux thunk middleware enables us to process such asynchronous requests or complex logic into action s. Redux thunk is a middleware of redux. Why is it called middleware
When we talk about middleware, it must be between who and who. Then, who and who does redux middleware refer to?
[the external chain image transfer fails. The source station may have an anti-theft chain mechanism. It is recommended to save the image and upload it directly (img-8a1mptam-1627370097233) (C: \ users \ MAC \ appdata \ roaming \ typora \ typora user images \ 1581401374679. PNG)]
As shown in the figure. The view will send an action in redux. The action is sent to the store through the store's dispatch method. The store receives the action and transmits it to the reducer together with the previous state. The reducer returns a new data to the store, and the store changes itself to the state. This is a standard process of Redux, so we say that the middleware of Redux refers to the relationship between who and who. We must remember that * * Redux middleware refers to the relationship between action and store. Previously, we said that action can only be an object, so action is an object directly sent to the store** But now, when we use Redux thunk, action can be a function.
Why can it be a function? Look at this picture. The action is passed to the store through the dispatch method. Who is between the action and the store? Is it the dispatch method? * * in fact, what do we mean by the middleware? It is a package of the dispatch method, or an upgrade of the dispatch method. After receiving an object, the original dispatch method, This object will be passed to the store, which is a case of view middleware** After we upgrade dispath, for example, we use Redux thunk middleware to upgrade dispath. At this time, when you call the dispatch method and the parameter passed to the dispatch is an object, the dispatch will directly pass this object to the store. There is no difference from writing an object and calling dispatch to pass it to the store. But at this time, assuming that the dispatch method is a function, the dispatch method has been upgraded at this time. He knows that if you pass in a function, he won't pass this function directly to the store. What would he do?
He will let you execute this function first, and then when you need to call store after execution, this function will call store again. So the dispatch does something. It will perform different things according to different parameters. If your parameter is an object, I will pass it directly to the store. If your argument is a function, end the execution of the function. So when it comes to this, you should know
**The principle of redux middleware is very simple. It upgrades the store to the dispatch method. Previously, the dispatch method could only receive one object. Now after the upgrade, you can receive objects and functions** Of course, what is used here to upgrade him? He was upgraded with redux thunk. Of course, redux thunk is not the only middleware. In fact, there are many redux middleware. For example, the redux log can record the log of each action distribution. How can he record it? In fact, it is also very simple. Each time an action is called, it will be passed to the store through the dispatch. Then I can upgrade the dispatch. The dispatch not only passes the action to the store, but also passes it through the console before each delivery Log, print out the action. In this way, a redux log middleware is written. He can print the action in the console every time he distributes it.
In addition to the popular Redux middleware, such as Redux thunk and Redux log, there is also a middleware called Redux saga. Its application scope is also very wide. Redux saga is also a middleware to solve the asynchronous problem of redux. Different from Redux thunk. Redux thunk is to put asynchronous operations in action. The design idea adopted by Redux saga is to separate an asynchronous logic and manage it in an asynchronous file. After basically mastering the design ideas of Redux thunk and Redux saga, you can understand how to split the asynchronous logic or complex logic in redux.
6,react-redux
Step 1: install react Redux
npm install react-redux
Step 2: create a store and reducer
store.js file
import {createStore } from 'redux';import reducer from './reducer';const store = createStore(reducer);export default store;
reducer.js file
const defaultState = { inputValue:'hello', list:['a','b','c']}export default (state = defaultState,action) => { return state}
The third step is in index JS entry file is introduced into the Provider component
import React from 'react';import ReactDOM from 'react-dom';import TodoList from './reactredux/TodoList'import {Provider} from 'react-redux'import store from './reactredux/store'const APP = ( <Provider store={store}> <TodoList></TodoList> </Provider>);ReactDOM.render(APP , document.getElementById('root'));
The fourth step is in todolist JS component
import React, { Component } from 'react'import {connect} from 'react-redux'export class TodoList extends Component { render() { return ( <div> <input type='text' value={this.props.inputValue} onChange={this.props.changeInputValue}></input> <button onClick={this.props.addClick.bind(this)}>add to</button> <hr></hr> <ul> {this.props.list.map((item,index)=>{ return ( <li key={index}>{item}</li> ); })} </ul> </div> ) }}const mapStateToProps = (state) =>{ return { inputValue: state.inputValue, list:state.list }}const mapDispatchToProps = (dispatch) =>{ return { changeInputValue(e){ const action = { type:"change_inputvalue", inputValue:e.target.value } dispatch(action); }, addClick(){ const action = { type:"add_list", value:this.props.inputValue } dispatch(action); } }}export default connect(mapStateToProps,mapDispatchToProps)(TodoList);
Step 5: receive the action value in the reducer
const defaultState = { inputValue:'hello', list:['a','b','c']}export default (state = defaultState,action) => { if(action.type === 'change_inputvalue'){ const newState = JSON.parse(JSON.stringify(state)); newState.inputValue = action.inputValue; return newState; } if(action.type === 'add_list'){ const newState = JSON.parse(JSON.stringify(state)); newState.list.push(action.value); newState.inputValue = ""; return newState; } return state}
React UI component library
1. Common React UI components
1.1 introduction to react material UI
React components are used for faster and easier web development. You can also build your own design system, or start with Material Design.
Material UI is an open source project using MIT license. Probably because of these excellent backers, this project is constantly developing
1.2 introduction to react bootstrap
React bootstrap is a reusable front-end component library. The style component depends on bootstrap. Consistent with the appearance and feel of Twitter Bootstrap, but through Facebook's react JS framework for cleaner code
1.3 introduction to Ant Design
Ant Design ant framework (Ant Design)
antd is a React UI component library based on Ant Design system, which is mainly used to develop enterprise level middle and back office products
Features: high quality React components out of the box.
2. Ant design installation and on-demand use
2.1 ant design installation
- Installation depends on cnpm install antd -S
- Import {Button} from 'antd' as needed. You can use the Button component
- import 'antd / dist / antd css’
- In the component render method, use the Button
<Button size="small" disabled href="#123" onClick={()=>{this.click()}} type="danger">button</Button>
Add corresponding functions according to the api, such as click events, size, and href as a link, and adjust the color by type.
2.2. Antd Design icon
import { Button,Icon } from 'antd'<Icon spin twoToneColor="blue" style={{fontSize:"30px",color:"red"}} type="aliwangwang" />
2.3 introduction of Tag tag
The first step is to introduce component styles and deconstruct Tag tags
import { Tag } from 'antd';import 'antd/dist/antd.css'
Understand how tag tags are used through the API used.
2.4. Automatically generate different color label cases
Write a small case through the api, define six colors, and there is a start button on the page. When you click the start button, the page randomly generates a Tag tag, and the color of the Tag is also the corresponding Tag. Define a state in the constructor, write several random colors, and define an empty array colorarr.
<Button onClick={()=>{this.click()}}>start</Button>{ this.state.colorarr.map((item)=>{ return ( <Tag color={item}>{item}</Tag> ) })}
When the onClick method is triggered, the click method is triggered
click() { // Create a timer this Time = setinterval (() = > {/ / randomly generate a number 0-5 let count = math. Round (math. Random() * 5) console.log (count) / / get the color from the array, and use the generated number let str = this.state.color[count] / / put the obtained color into colorarr this. State. Colorarr. Push (STR) this. Setstate( {colorarr:this.state.colorarr}) },100)}
2.5 basic usage of Rate score
The Rate component in antd is introduced as needed. In the render method, jsx renders the Rate component
import { Rate } from 'antd';
ReactDOM.render(, mountNode);
A value value is defined in the State. The default value is 0
constructor() { super() this.state = { value:0 }}
In the render method, define a button for adding stars circularly, and add a loop method. According to the Rate scoring component api, automatically obtain the intersection point, autoFocus onKeyDown, the total number of keyboard events, mouse hover trigger events, and the current number of stars
render() { return ( <div> <h3>rate</h3> <button onClick={()=>{this.loop()}}>Cyclic plus star</button> <Rate autoFocus onKeyDown={(e)=>{this.kd(e)}} count="20" onHoverChange={(e)=>{this.change(e)}} value={this.state.value} allowHalf></Rate> </div> )}
When the mouse hovers, the event will be triggered. The number of stars on the page will be as many as the number of stars hovered
change(e) { console.log(e) this.setState({value:e})}
When the start button is clicked, the loop event will be triggered, and the component will be added to a periodic timer to automatically add one star every 0.2 seconds. When the number of stars is 20, the number of stars will change to 0, and the stars will be added repeatedly
loop() { this.time = setInterval(()=>{ if(this.state.value == 20){ this.state.value = 0 } this.state.value ++ this.setState({value:this.state.value}) },200)}
When the kd method is triggered, it is a mouse press event. When the right mouse button is pressed, the keyboard code 39 is triggered. The number of stars pressed once is half a star long. When the left button is pressed, the keyboard code 37 is triggered, and each key is reduced by half a star
kd(e) { if(e.keyCode == 39){ this.state.value +=0.5 } if(e.keyCode == 37){ this.state.value -=0.5 } this.setState({ value:this.state.value })}