1 understanding of react
Advantages:
- Efficient and flexible
- Declarative design, easy to use
- Component development to improve code reuse rate
- One way response data flow is safer and faster than two-way binding
2 real dom and virtual dom
jsx:
-
JSX is actually a syntax sugar, which will be compiled and converted into JS code by babel during use, which is equivalent to react Createelement() method.
-
ReactDOM.render() is used to insert the created virtual DOM node into a real node and render it to the page.
difference:
- Virtual DOM will not rearrange and redraw, while real DOM will rearrange and redraw frequently;
- The total loss of virtual DOM is "virtual DOM addition, deletion and modification + real DOM difference addition, deletion and modification + typesetting and redrawing", and the total loss of real DOM is "real DOM complete addition, deletion and modification + typesetting and redrawing".
3 life cycle
New edition:

Old version:
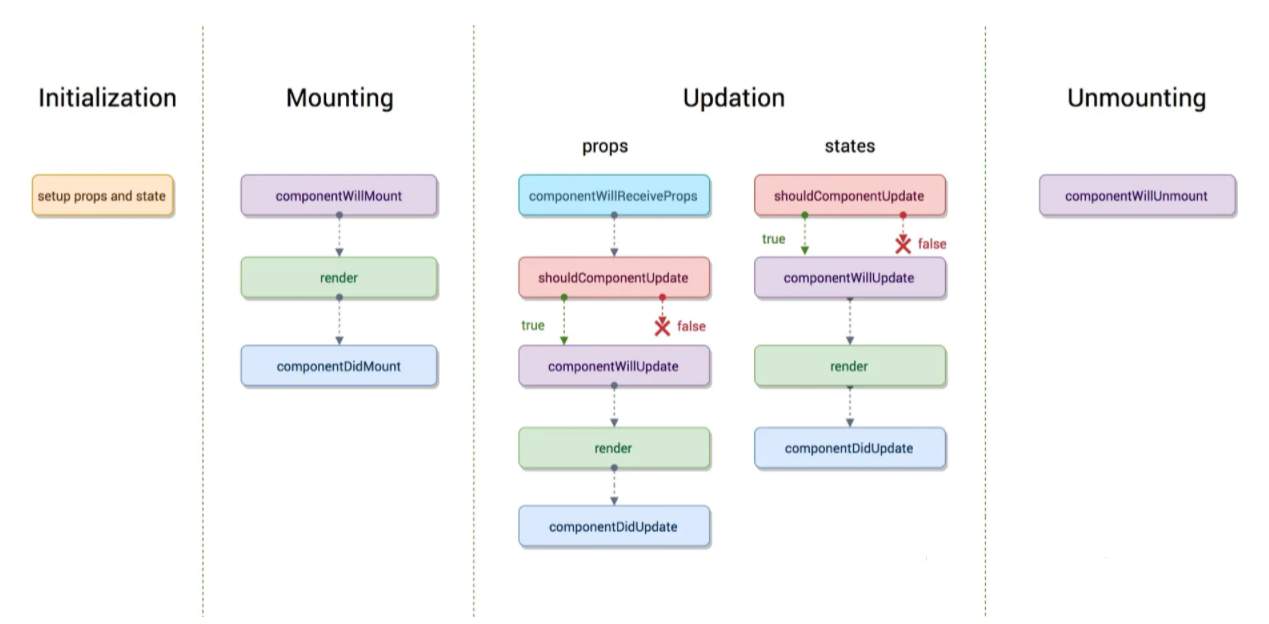
Creation phase:
constructor:
-
The method automatically called during the instance process obtains props from the parent component through the super keyword inside the method
-
In this method, the usual operation is to initialize the state state or mount the method on this
componentWillMount:
- Only once, the component is invoked before being rendered to the real dom for the first time, and render will be called once the execution is completed.
render:
-
Class component must implement the method, which is used to render the DOM structure, and can access the component state and prop properties
-
Note: do not set state in render, otherwise it will trigger an endless loop and cause memory crash
componentDidMount:
-
The component is executed after it is mounted to the real DOM node, which is executed after the render method
-
This method is mostly used to perform some operations such as data acquisition and event listening
Update phase:
shouldComponentUpdate:
-
It is used to tell the component whether it needs to re render the component based on the current props and state. By default, it returns true
-
Execution timing: it will be called when a new props or state is reached. It will tell whether the component is updated or not by returning true or false
-
Generally, it is not recommended to make deep comparison in this periodic method, which will affect the efficiency
-
At the same time, setState cannot be called, otherwise it will cause infinite loop call update
Unloading phase:
componentWillUnmount:
-
This method is used to clean up some registration events, listen to events, or unsubscribe network requests before component unloading
-
Once a component instance is uninstalled, it will not be mounted again, but can only be recreated
4 state and props
Similarities:
- Both are JavaScript objects
- Both are used to save information
- Both props and state can trigger rendering updates
difference:
- props is passed externally to the component, while state is managed by the component itself in the component, which is generally initialized in the constructor
- props cannot be modified inside the component, but state can be modified inside the component
- state is changeable and can be modified
Class component, super(props) binds this to the sub component, and then you can use this Props access; In the function component, you can directly function Page(props).
setState() asynchronous synchronous execution
5 component communication
(1) Parent component = > child component
Pass the parameters in the child component label, and the child component can receive the parameters passed by the parent component through the props attribute
function EmailInput(props) {
  return (
    <label>
      Email: <input value={props.email} />
    </label>
  );
}

const element = <EmailInput email="123124132@163.com" />;
(2) Child component = > parent component
The parent component passes a function to the child component, and then gets the value passed by the child component through the callback of this function
The corresponding codes of parent components are as follows:
class Parents extends Component {
  constructor() {
    super();
    this.state = {
      price: 0
    };
  }

  getItemPrice(e) {
    this.setState({
      price: e
    });
  }

  render() {
    return (
      <div>
        <div>price: {this.state.price}</div>
        {/* Pass a function into the subcomponent  */}
        <Child getPrice={this.getItemPrice.bind(this)} />
      </div>
    );
  }
}
The corresponding codes of sub components are as follows:
class Child extends Component {
  clickGoods(e) {
    // Pass in a value in this function
    this.props.getPrice(e);
  }

  render() {
    return (
      <div>
        <button onClick={this.clickGoods.bind(this, 100)}>goods1</button>
        <button onClick={this.clickGoods.bind(this, 1000)}>goods2</button>
      </div>
    );
  }
}
(3) Communication between sibling components
The parent component is used as the middle layer to realize data interworking, which is transmitted by using the parent component
class Parent extends React.Component {
  constructor(props) {
    super(props)
    this.state = {count: 0}
  }
  setCount = () => {
    this.setState({count: this.state.count + 1})
  }
  render() {
    return (
      <div>
        <SiblingA
          count={this.state.count}
        />
        <SiblingB
          onClick={this.setCount}
        />
      </div>
    );
  }
}
(4) Transfer from parent component to descendant component
It is the most common thing for a parent component to transfer data to a descendant component, just like global data
Using context provides a way of communication between components, which can share data, and other data can read the corresponding data
By using react Createcontext creates a context
const PriceContext = React.createContext('price')
After the context is created successfully, the Provider component is used to create the data source and the Consumer component is used to receive the data. The use examples are as follows:
The Provider component is used to pass data to descendant components through the value attribute:
<PriceContext.Provider value={100}>
</PriceContext.Provider>
If you want to get the data passed by the Provider, you can receive it through the Consumer component or by using the contextType attribute. The corresponding are as follows:
class MyClass extends React.Component {
  static contextType = PriceContext;
  render() {
    let price = this.context;
    /* Render based on this value */
  }
}
Consumer component:
<PriceContext.Consumer>
    { /*Here is a function*/ }
    {
        price => <div>price: {price}</div>
    }
</PriceContext.Consumer>
(5) Non relational component delivery
If the relationship types between components are complex, it is recommended to conduct a global resource management for the data to realize communication, such as redux.
6 events
The execution order of events (synthetic events & native events) e.preventDefault() prevents event bubbling
To solve the problem of outputting this correctly, common binding methods are as follows:
- Use bind in render method
- Use arrow function in render method
- bind in constructor
- Arrow function binding is used in the definition phase (in common use, it is recommended that both function components and class components be written in this way)
7 components
Common component creation methods:
- Functional creation
- Through react Createclass method creation
- Inherit react Component creation
Controlled and uncontrolled components:
-
Controlled components generally need an initial state (such as value) and a state update event function (such as onChange)
-
Most of the time, it is recommended to use the controlled component to implement the form, because in the controlled component, the form data is processed by the React component
-
If the uncontrolled component is selected, the control ability is weak, and the form data is processed by the DOM itself, but it is more convenient and faster with less code
8 react refs
Refs in React provides a way to access DOM nodes or React elements created in the render method.
The essence is reactdom Render() returns the component instance. If it is a rendering component, it returns the component instance. If it is a rendering dom, it returns the specific dom node.
use
- Incoming string
- Incoming object
- Incoming function
- Incoming hook, useRef()
Application scenario
-
When updating components, props and state are generally used, because excessive use of refs will expose the instance or DOM structure of components and violate the principle of component encapsulation.
-
In some scenarios, ref is generally used:
-
Control of DOM element focus, content selection or media playback;
-
Trigger animation effects by controlling DOM elements;
-
Through the integration of third-party DOM libraries.
-
React.forwardRef() and higher-order components
this.myRef = React.createRef(); // establish
const node = this.myRef.current; // visit
Some knowledge points
(1) Add a ref to the dom element
Access the DOM node through "current"
class CustomTextInput extends React.Component {
  constructor(props) {
    super(props);
    // Create a ref to store the DOM element of textInput
    this.textInput = React.createRef();
    this.focusTextInput = this.focusTextInput.bind(this);
  }

  focusTextInput() {
    // Use the native API directly to focus the text input box
    // Note: we access the DOM node through "current"
    this.textInput.current.focus();
  }

  render() {
    // Tell React that we want to associate < input > ref to
    // On the 'textInput' created in the constructor
    return (
      <div>
        <input
          type="text"
          ref={this.textInput} />
        <input
          type="button"
          value="Focus the text input"
          onClick={this.focusTextInput}
        />
      </div>
    );
  }
}
(2) Add ref to class component
class AutoFocusTextInput extends React.Component {
  constructor(props) {
    super(props);
    // Create a ref pointing to the CustomTextInput component instance
    this.textInput = React.createRef();
  }

  componentDidMount() {
    // Call the subcomponent focusTextInput method to trigger the internal text box of the subcomponent to obtain the focus event
    this.textInput.current.focusTextInput();
  }

  render() {
    return (
      <CustomTextInput ref={this.textInput} />
    );
  }
}
When the ref attribute is used to customize a class component, the ref object receives the mounted instance of the component as its current attribute.
(3) Function components and ref
By default, the ref attribute cannot be used on function components because they have no instances;
However, you can use the ref attribute inside a function component as long as it points to a DOM element or class component.
function CustomTextInput(props) {
  // textInput must be declared here so that ref can reference it
  const textInput = useRef(null);

  function handleClick() {
    textInput.current.focus();
  }

  return (
    <div>
      <input
        type="text"
        ref={textInput} />
      <input
        type="button"
        value="Focus the text input"
        onClick={handleClick}
      />
    </div>
  );
}
(4) ref forwarding: get the dom node of the sub component
You can access props, state, refs and instance methods (not inherited methods) of the sub component instance through the ref of the sub component.
Access to sub components using ref:
- Access a specific dom node of a sub component to complete some logic through this refs. childComponentRefName. refs. Somedomrefname, for example How does the React parent component get the ref value of the child component?.
- You can access the public instance method of the sub component to complete a write logic. For example, the child component defines a reset method to reset the form element value of the child component. In this case, the parent component can use this refs. childComponentRefName. Reset () to reset the form elements of the subcomponent.
(5) Callback refs
Pass a function. This function accepts React component instances or HTML DOM elements as parameters so that they can be stored and accessed elsewhere.
// Use the ref callback function to store a reference to the DOM node in the properties of the instance
class CustomTextInput extends React.Component {
  constructor(props) {
    super(props);

    this.textInput = null;

    this.setTextInputRef = element => {
      this.textInput = element;
    };

    this.focusTextInput = () => {
      // Use the native DOM API to focus the text input box
      if (this.textInput) this.textInput.focus();
    };
  }

  componentDidMount() {
    // After the component is mounted, let the text box automatically get the focus
    this.focusTextInput();
  }

  render() {
    // Use the callback function of 'ref' to store the reference of the DOM node of the text input box in React
    // Instance (such as this.textInput)
    return (
      <div>
        <input
          type="text"
          ref={this.setTextInputRef}
        />
        <input
          type="button"
          value="Focus the text input"
          onClick={this.focusTextInput}
        />
      </div>
    );
  }
}
React will call the ref callback function and pass in the DOM element when the component is mounted, and call it and pass in null when the component is unloaded. Before componentDidMount or componentDidUpdate is triggered, react will ensure that refs must be up-to-date.
refs in the form of callback can be passed between components.
9 context
Context provides a method to transfer data between component trees without manually adding props for each layer of components.
Context is designed to share data that is "global" to a component tree, such as currently authenticated users, topics, or preferred languages.
use
// Context allows us to pass values into the component tree without explicitly passing them through each component.
// Create a context for the current theme ("light" is the default).
const ThemeContext = React.createContext('light');      // Key points
class App extends React.Component {
  render() {
    // Use a Provider to pass the current theme to the following component tree.
    // No matter how deep, any component can read this value.
    // In this example, we pass "dark" as the current value.
    return (
      <ThemeContext.Provider value="dark">      // Key points
        <Toolbar />
      </ThemeContext.Provider>
    );
  }
}

// The middle component no longer has to indicate that the theme is passed down.
function Toolbar() {
  return (
    <div>
      <ThemedButton />
    </div>
  );
}

class ThemedButton extends React.Component {
  // Specify contextType to read the current theme context.
  // React will go up to find the nearest theme Provider and use its value.
  // In this example, the current theme value is "dark".
  static contextType = ThemeContext;      // Key points
  render() {
    return <Button theme={this.context} />;    // Use this Context to consume the value on the latest context
  }
}
The main application scenario of Context is that many components at different levels need to access the same data.
API
React.createContext:
const MyContext = React.createContext(defaultValue);
When React renders a component subscribed to the context object, the component will read the current context value from the matching Provider closest to itself in the component tree.
Context.Provider:
<MyContext.Provider value={/* A value */}>
The Provider receives a value attribute and passes it to the consumer component.
When the value value of the Provider changes, all its internal consumer components will be re rendered.
Class.contextType:
class MyClass extends React.Component {
  componentDidMount() {
    let value = this.context;   // Key points
    /* After the component is mounted, use the value of the MyContext component to perform some operations with side effects */
  }
  componentDidUpdate() {
    let value = this.context;
    /* ... */
  }
  componentWillUnmount() {
    let value = this.context;
    /* ... */
  }
  render() {
    let value = this.context;
    /* Render based on the value of the MyContext component */
  }
}
MyClass.contextType = MyContext;
The contextType attribute mounted on the class will be reassigned to a React.createContext() Create a new context object. This allows you to use this Context to consume the value on the latest context.
Context.Consumer:
<MyContext.Consumer>
  {value => /* Rendering based on context value*/}
</MyContext.Consumer>
Context.displayName:
const MyContext = React.createContext(/* some value */);
MyContext.displayName = 'MyDisplayName';

<MyContext.Provider> // "MyDisplayName.Provider" is in DevTools
<MyContext.Consumer> // "MyDisplayName.Consumer" is in DevTools
The context object accepts a property named displayName of type string. React DevTools uses this string to determine what the context will display.
application
Dynamic context
Update context in nested components
Pass a function through the context to make the consumers component update the context.
Consume multiple context s
10 typeScript
Definition and use of interfaces
Union type|
Type assertion??? Type inference
Optional attribute: attribute name is followed by a?
Index signature: defines the data structure of key (propName) and value in the object. As long as the key and value meet the limit of index signature, it doesn't matter how many there are
interface FullName{
    firstName:string
    lastName:string
    middleName?:string // optional attribute
    [propName:string]:any // Index signature
}
? Operator:
- Optional parameters
// there? Indicates that this parameter field is an optional parameter
function getUser(user: string, field?: string) {
}
- member
// there? Indicates that the name attribute may not exist
class A {
  name?: string
}

interface B {
  name?: string
}
- Security chain call
// Here, the stack defined by the Error object is an optional parameter. If it is written in this way, the compiler will prompt
// Error ts2532: object is probably 'undefined'
return new Error().stack.split('\n');

// Can we add? Operator, when the stack attribute exists, call stack split.
// If stack does not exist, null is returned
return new Error().stack?.split('\n');

// The above code is equivalent to the following code. Thank @ dingyanhe for his supervision
const err = new Error();
return err.stack && err.stack.split('\n');
! Operator:
- Unary operator
// !  Is to reverse the subsequent results, such as:
// Returns False when isNumber(input) is True;
// Returns True when isNumber(input) is False
const a = !isNumber(input);
- member
// Because the name in interface B is defined as a nullable value, but the actual situation is not empty,
// Then we can use it in class!, Re emphasize that name is not null
class A implemented B {
  name!: string
}

interface B {
  name?: string
}
Here you can refer to ts more stringent class attribute checking
Typescript 2.7 introduces a new strict control tag - strictPropertyInitialization, which is set in tsconfig Configuration in TS
"strictNullChecks": true
"strictPropertyInitialization": true
effect
- Using this tag ensures that each instance property of the class is assigned in the constructor or using the property initializer.
- It explicitly checks the assignment from the variable to the instance property of the class
give an example
class C {
  foo: number;
  bar = "hello";
  baz: boolean;
  constructor() {
    this.foo = 42;
  }
}
For the above code, the editor will first report an error: the attribute "baz" has no initialization expression and is not explicitly assigned in the constructor. ts(2564).
Secondly, an error is reported during compilation: error ts2564: property 'Baz' has no initializer and is not definitively assigned in the constructor
Both tell developers that they should assign a value to baz display, but in some cases, we don't want to assign a value during initialization. We expect it to be undefined, and then assign a value. At this time!: It comes in handy.
Add! Before the attribute baz colon in the above code, So you won't report an error
class C {
  foo: number;
  bar = "hello";
  baz!: boolean;
  constructor() {
    this.foo = 42;
  }
}
- Force chain call
// Here, the stack defined by the Error object is an optional parameter. If it is written in this way, the compiler will prompt
// Error ts2532: object is probably 'undefined'
new Error().stack.split('\n');

// If we are sure that this field appears 100%, we can add it!, Emphasize that this field must exist
new Error().stack!.split('\n');
Type Asserts
11 redux
Core concept
State
state is a collection of data.
action
The change of State will lead to the change of View. However, users can't touch the State, they can only touch the View. Therefore, the change of State must be caused by View.
action is the instruction to change the state. There will be as many actions as there are actions to operate the state.
reducer
After the action sends the command, put the state into the reucer processing function and return the new state.
store
let store = createStore(reducers);
Store is the object that connects them. Store has the following responsibilities:
Maintain application state;
provide getState() Method acquisition state;
provide dispatch(action) Method update state;
adopt subscribe(listener) Register listener;
adopt unsubscribe(listener) The returned function unregisters the listener.
We can use store Getstate() to understand the status of goods in the factory, using store Dispatch() sends the action instruction.
example:
import { createStore } from 'redux'

// The reducer processing function accepts two parameters, state and action, and action has a type attribute
const reducer = (state = {count: 0}, action) => {
  switch (action.type){
    case 'INCREASE': return {count: state.count + 1};
    case 'DECREASE': return {count: state.count - 1};
    default: return state;
  }
}

const actions = {
  increase: () => ({type: 'INCREASE'}),
  decrease: () => ({type: 'DECREASE'})
}

// Create store
const store = createStore(reducer);

// monitor
store.subscribe(() =>
  console.log(store.getState())
);

// Send the action instruction to update the state
store.dispatch(actions.increase()) // {count: 1}
store.dispatch(actions.increase()) // {count: 2}
store.dispatch(actions.increase()) // {count: 3}
react-redux
core
- < Provider store>
- connect([mapStateToProps], [mapDispatchToProps], [mergeProps], [options])
If any component in the Provider (such as Comp here) needs to use the data in the state, it must be a "connected" component - the product of packaging the "component you write (MyComp)" using the connect method.
This function allows us to bind the data in the store to the component as props.

The connect method in react Redux wraps the getState and dispatch on the store into props of the component.
example
// ****************************** root.js ******************************

// Create a store to manage state and action globally
const store = createStore(reducer);

// The Provider has a layer outside the root component < App >, and all sub components of the App can get the store by default and pass it through the props of the component
export default class Root extends Component {
    render() {
        return (
            <Provider store={store}>           // Key points
                <App/>
            </Provider>
        )
    }
}


// ****************************** app.js ******************************

// view provides UI components
class Counter extends Component {
  render() {
    // The state of View comes from props, which passes the state in the store
    const { value, onIncreaseClick } = this.props           // Key points
    return (
      <div>
        <span>{value}</span>
        <button onClick={onIncreaseClick}>Increase</button>
      </div>
    )
  }
}

// Connect the UI component to the container component
const App = connect(                             // Key points
 state =>({
    value: state.count   //Enter the state in the store through props
 }),
 dispatch =>({    // Output, bind the action to the View as props, and distribute the user operation type here
    onIncreaseClick: () => dispatch(increaseAction.increase())
  })
)(Counter)

export default App


// ****************************** increaseAction.js ******************************

// Define the type of action
export const INCREMENT = 'INCREMENT';

// The action creation function simply returns an action
export function increase(params) {
    return {
        type: INCREMENT,
        data:data
        };
}


// ****************************** counterReducer.js ******************************

// Provide an initial state
initState={
 count: 0
}

// By judging the type of Action, return the state object after new data changes. Even if there is no change in state, return an object
export default function counter(state = initState, action) {
  const count = state.count
  switch (action.type) {
    case INCREMENT:
      return { count: count + 1 }
    default:
      return state
  }
}
rematch
Step 1: Init
init is used to configure your reducers, devtools & store.
// ****************************** index.js *****************************
import { init } from '@rematch/core'
import * as models from './models'

const store = init({
  models,
  //plugins: [selectPlugin(), persistPlugin, trackPlugin],
  //redux: {
  //  devtoolOptions: {
  //    disabled: !__DEV__
  //  }
  //}
})

export default store
Step 2: Models
The model enables state, reducers, async actions and action creators to be placed in the same place.
// ****************************** models.js *****************************
import { createModel } from '@rematch/core';

const model = {
  state: 0, // initial state
  reducers: {
    // handle state changes with pure functions
    increment(state, payload) {
      return state + payload
    }
  },
  effects: {
    // handle state changes with impure functions.
    // use async/await for async actions
    async incrementAsync(payload, rootState) {
      await new Promise(resolve => setTimeout(resolve, 1000))
      this.increment(payload)
    }
  }
}

export default createModel(model);
Step 3: Dispatch
Dispatch is how we trigger reducers and effects in your model. Dispatch standardizes your actions without writing action types or action creators.
import { dispatch } from '@rematch/core'
                                                  // state = { count: 0 }
// reducers
dispatch({ type: 'model/increment', payload: 1 }) // state = { count: 1 }
dispatch.model.increment(1)                       // state = { count: 2 }

// effects
dispatch({ type: 'model/incrementAsync', payload: 1 }) // state = { count: 3 } after delay
dispatch.model.incrementAsync(1)                       // state = { count: 4 } after delay
Dispatch can be called directly or abbreviated as dispatch[model][action](payload).
Step 4: View
Provider and connect. The connect method wraps the getState and dispatch on the store into props of the component.
import React from 'react'
import ReactDOM from 'react-dom'
import { Provider, connect } from 'react-redux'
import store from './index'

const Count = props => (
  <div>
    The count is {props.count}       // Through props XXX access
    <button onClick={props.increment}>increment</button>
    <button onClick={props.incrementAsync}>incrementAsync</button>
  </div>
)

const mapState = state => ({
  count: state.model
})

const mapDispatch = ({ count: { increment, incrementAsync }}) => ({
  increment: () => increment(1),
  incrementAsync: () => incrementAsync(1)
})

const CountContainer = connect(mapState, mapDispatch)(Count)

ReactDOM.render(
  <Provider store={store}>
    <CountContainer />
  </Provider>,
  document.getElementById('root')
)
After using Rematch, we can use store dispatch. model. Xxx() to execute an Action operation, and store The type of dispatch is automatically calculated by TS and does not need to be manually defined by the developer.
export type Dispatch = typeof store.dispatch;

export default connect(null, (dispatch: Dispatch) => ({
  showTip: dispatch.bbsMainTab.showTip,
  hideTip: dispatch.bbsMainTab.hideTip
}))(MainTab);
RematchRootState,createModel
Pay attention to the usage of typeof in ts
Xxx<typeof {name:'Golden hair', age:9}>

// This is equivalent to:

Xxx<typeof {name:string, age:number}>
-
[modelKey in keyof M] cycle all the key values in the m object. Each cycle is named modelKey.
-
M[modelKey] is to take out the corresponding value, which specifically refers to the type value in ts.