1. React event handling
The difference between React and DOM event handling:
(1) The name of React event is small hump, and the name of DOM is lowercase. For example: DOM naming: onclick, React naming: onclick.
(2) Event handlers are assigned as objects, not strings. For example: DOM in string mode: onclick = "handleClick()", React in object mode: onclick = {handleclick}.
(3) Default events are blocked differently. DOM blocks by returning false: < a href = "www.baidu. Com" onclick = "javascript: return false;" > Baidu < / a >, React needs to explicitly call e.preventDefault to prevent it.
2 event handling function in react
2.1 arrow function using ES6
1. Use the arrow function in the render function
Example code: click the button to output 0 at the terminal
    <div id="root"></div>
    <script type="text/babel">
        // Get div
        let root = document.getElementById("root");
        // Create class component
        class MyComponent extends React.Component {
            constructor(props) {
                super(props);
                this.state = { // Define state machine
                    number: 0
                }
            }
            render() {
                return (
                    <div>
                        {/* this Points to an instance of the current component */}
                        <button onClick={(event) => console.log(this.state.number)}>click</button>
                    </div>
                )
            }
        }
        // Render
        ReactDOM.render(<MyComponent />, root);
    </script>
Advantage: you don't need to bind this in the constructor
Disadvantages: when the logic of the function is complex, render is bloated, unable to intuitively see the UI structure of the component, and the code readability is poor
2. Use class fields syntax: assign arrow functions to class properties
Example code: click the button to output click on the terminal
    <div id="root"></div>
    <script type="text/babel">
        // Get div
        let root = document.getElementById("root");
        // Create class component
        class MyComponent extends React.Component {
            constructor(props) {
                super(props);
            }
            handleClick = () => {
                console.log("click");
            }
            render() {
                return (
                    <button onClick={this.handleClick}>click</button>
                )
            }
        }
        // Render
        ReactDOM.render(<MyComponent />, root);
    </script>
Advantages: it is not necessary to bind this in the constructor, and call it simple in render function.
2.2 bind in constructor function
Bind in constructor: take the event handler function as the member function of the class
Note: this cannot be recognized when defining the event handler function (that is, this is undefined). This must be bound in the constructor
Example code: click the button to output click on the terminal
    <div id="root"></div>
    <script type="text/babel">
        // Get div
        let root = document.getElementById("root");
        // Create class component
        class MyComponent extends React.Component {
            constructor(props) {
                super(props);
                // Bind the event response function to the instance of the current component
                this.handleClick = this.handleClick.bind(this);
            }
            // Write event response function
            handleClick() {
                console.log("click");
            }
            render() {
                return (
                    // this.handleClick is not followed by (), otherwise it means to call directly without clicking
                    <button onClick={this.handleClick}>click</button>
                )
            }
        }
        // Render
        ReactDOM.render(<MyComponent />, root);
    </script>
Advantage: there is no need to recreate the event handler when the render function is called
Disadvantages: when many events are handled, the constructor is very cumbersome
2.3 bind this in render function
Example code: click the button to output click on the terminal
    <div id="root"></div>
    <script type="text/babel">
        // Get div
        let root = document.getElementById("root");
        // Create class component
        class MyComponent extends React.Component {
            constructor(props) {
                super(props);
            }
            // Write event response function
            handleClick() {
                console.log("click");
            }
            render() {
                return (
                    <button onClick={this.handleClick.bind(this)}>click</button>
                )
            }
        }
        // Render
        ReactDOM.render(<MyComponent />, root);
    </script>
Advantages: it is convenient to pass parameters when calling the event handler function
Disadvantages: rebinding occurs every time the render function is called, resulting in performance degradation
2.4 comparison of several methods
| influence | bind in constroctor function | Using class fields syntax | Using arrow function in render | Using bind in render |
|---|---|---|---|---|
| Generate new function when render | no | no | yes | yes |
| performance | No effect | No effect | influential | influential |
| Parameters can be carried directly | no | no | yes | yes |
| Simplicity | Not good | good | good | good |
3. Parameter transfer in event handling
3.1 direct transfer parameters
1. Bind this to the event handler function in the constructor, and directly pass parameters when calling the event handler function
Note: when calling event handling function in arrow function, there is no need to bind this.
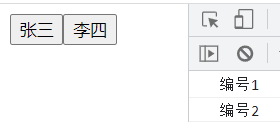
Example code: click "Zhang San" button and the terminal outputs No. 1; click "Li Si" button and the terminal outputs No. 2
    <div id="root"></div>
    <script type="text/babel">
        // Get div
        let root = document.getElementById("root");
        // Create class component
        class MyComponent extends React.Component {
            constructor(props) {
                super(props);
                this.state = {
                    list: [
                        {
                            id: 1,
                            name: "Zhang San"
                        },
                        {
                            id: 2,
                            name: "Li Si"
                        }
                    ]
                }
                // This statement is not required in this example, because this has been bound in the following arrow function
                // this.handleClick = this.handleClick.bind(this);
            }
            handleClick(id) {
                console.log("number" + id)
            }
            render() {
                // Get status attribute value
                const { list } = this.state
                return (
                    <div>
                        {
                            list.map((item) => <button onClick={() => { this.handleClick(item.id) }}>{item.name}</button>)
                        }
                    </div>
                )
            }
        }
        // Render
        ReactDOM.render(<MyComponent />, root);
    </script>
2, bind the this in the render function when calling the event handler.
Example code: click "Zhang San" button and the terminal outputs No. 1; click "Li Si" button and the terminal outputs No. 2
    <div id="root"></div>
    <script type="text/babel">
        // Get div
        let root = document.getElementById("root");
        // Create class component
        class MyComponent extends React.Component {
            constructor(props) {
                super(props);
                this.state = {
                    list: [
                        {
                            id: 1,
                            name: "Zhang San"
                        },
                        {
                            id: 2,
                            name: "Li Si"
                        }
                    ]
                }
                // In this case, the statement can be omitted, because this is not used in the following handleClick() function
                // this.handleClick = this.handleClick.bind(this);
            }
            handleClick(id) {
                console.log("number" + id)
            }
            render() {
                // Get status attribute value
                const { list } = this.state
                return (
                    <div>
                        {
                            list.map((item) => <button onClick={this.handleClick.bind(this, item.id)}>{item.name}</button>)
                        }
                    </div>
                )
            }
        }
        // Render
        ReactDOM.render(<MyComponent />, root);
    </script>
3.2 using data to customize attributes
When defining the UI control, use the data custom attribute, and obtain the data attribute value in the UI control through "e.target.dataset. Attribute name" in the event handler function
Example code: click "Zhang San" button and the terminal outputs No. 1; click "Li Si" button and the terminal outputs No. 2
    <div id="root"></div>
    <script type="text/babel">
        // Get div
        let root = document.getElementById("root");
        // Create class component
        class MyComponent extends React.Component {
            constructor(props) {
                super(props);
                this.state = {
                    list: [
                        {
                            id: 1,
                            name: "Zhang San"
                        },
                        {
                            id: 2,
                            name: "Li Si"
                        }
                    ]
                }
            }
            handleClick(e) {
                // Event handler function, e represents the object that triggers the event
                console.log("number" + e.target.dataset.count)
            }
            render() {
                // Get status attribute value
                const { list } = this.state
                return (
                    <div>
                        {
                            list.map((item) => <button
                                onClick={this.handleClick.bind(this)}
                                data-count={item.id} // The custom attribute of the tag starts with "data -" followed by the custom attribute name
                            >{item.name}</button>)
                        }
                    </div>
                )
            }
        }
        // Render
        ReactDOM.render(<MyComponent />, root);
    </script>
4 event flow
explain:
(1) The event flow of React is bubbling by default
(2) Capture method used in React: the event type is followed by a suffix capture, such as onClickCapture
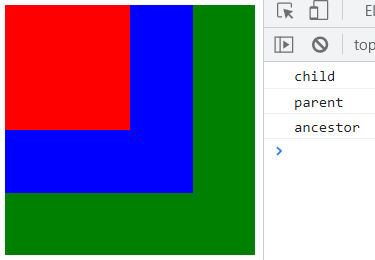
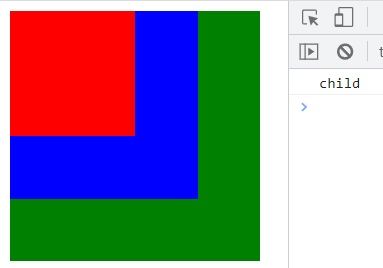
Example: bubbling transfer
    <div id="root"></div>
    <script type="text/babel">
        let root = document.getElementById('root')
        // 1. Define CSS Style
        const style = {
            child: {
                width: '100px',
                height: '100px',
                backgroundColor: 'red'
            },
            parent: {
                width: '150px',
                height: '150px',
                backgroundColor: 'blue'
            },
            ancestor: {
                width: '200px',
                height: '200px',
                backgroundColor: 'green'
            }
        }
        // 2. Define class components
        class App extends React.Component {
            render() {
                return (
                    <div onClick={() => { console.log("ancestor") }} style={style.ancestor}>
                        <div onClick={() => { console.log("parent") }} style={style.parent}>
                            <div onClick={(e) => {
                                console.log("child");
                            }}
                                style={style.child}>
                            </div>
                        </div>
                    </div>
                )
            }
        }
        //3. Rendering
        ReactDOM.render(<App />, root)
    </script>
Click the red area and output it on the terminal in the order of child, parent and ancestor.
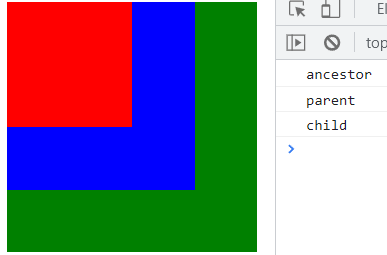
Example: capture mode delivery
        // 2. Define class components
        class App extends React.Component {
            render() {
                return (
                    <div onClickCapture={() => { console.log("ancestor") }} style={style.ancestor}>
                        <div onClickCapture={() => { console.log("parent") }} style={style.parent}>
                            <div onClickCapture={(e) => {
                                console.log("child");
                            }}
                                style={style.child}>
                            </div>
                        </div>
                    </div>
                )
            }
        }
Click the red area and display it on the terminal in the order of ancestor, parent and child.
Delegation event 5
In the composite event system, all events are bound to the document element, that is, although we bind events to a react element, the final events are entrusted to the document to trigger uniformly. In a composite event, only event propagation in the composite event can be blocked.

Example: Based on the case in the previous part, prevent the event from bubbling
        // 2. Define class components
        class App extends React.Component {
            render() {
                return (
                    <div onClick={(e) => { console.log("ancestor") }} style={style.ancestor}>
                        <div onClick={(e) => { console.log("parent") }} style={style.parent}>
                            <div onClick={(e) => {
                                console.log("child");
                                e.stopPropagation(); // Stop bubbling
                            }}
                                style={style.child}>
                            </div>
                        </div>
                    </div>
                )
            }
        }
Click the red area and only output child, which successfully prevents the event from bubbling.
The execution process is as follows:
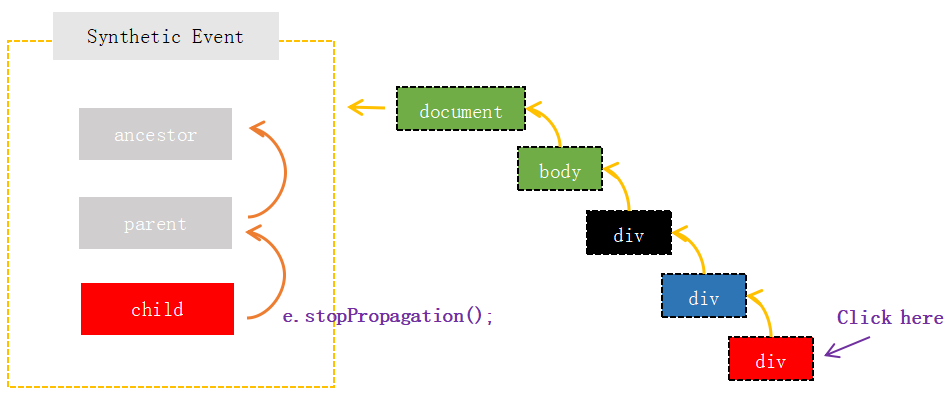
It can be seen that the event flow blocked by react does not prevent the event triggering of the real DOM element. When the red div element is clicked, the real element still passes the event to the superior element layer by layer in the way of bubbling. Finally, the event propagates to the document to trigger the synthesis event. In the synthesis event, when the child triggers, e.stopPropagation(); Called, the event in the composite event is terminated. Therefore, stopPropagation in synthetic events cannot prevent the transmission of events on real elements. It only blocks the flow of events in synthetic events. On the contrary, if we bind a real event on the red div, the composite event will be terminated.
6 event object
Although React events are synthetic events, event objects can be obtained in event processing.
1. In React event processing, there is a global event object: event object. After each event is triggered (after the event handler function is called), the event object will be cleared, and the object will be retrieved when the next event is triggered. This object is not a native (DOM) event object, but some properties of the native object can be obtained through this object.
Example code:
    <div id="root"></div>
    <script type="text/babel">
        // Get div
        let root = document.getElementById("root");
        // 1. Define style rules
        const style = {
            "mydiv": {
                width: '150px',
                height: '150px',
                backgroundColor: 'red'
            }
        }
        // 2. Define class components
        class App extends React.Component {
            constructor(props) {
                super(props)
                this.state = {
                    x: 0,
                    y: 0
                }
            }
            render() {
                return (
                    <div>
                        <div style={style['mydiv']}  //Style as an array
                            onClick={(event) => { //The 'event' object is not a native event, but you can get some properties of the native event object through event
                                console.log(event);
                            }}>
                            X: {this.state.x},Y: {this.state.y}
                        </div>
                    </div>
                )
            }
        }
        // 3. Rendering
        ReactDOM.render(<App />, root)
    </script>
Example code: display the coordinates when the user clicks in the div element
    <div id="root"></div>
    <script type="text/babel">
        // Get div
        let root = document.getElementById("root");
        //1. Define style rules
        const style = {
            "mydiv": {
                width: '150px',
                height: '150px',
                backgroundColor: 'red'
            }
        }
        //2. Define class components
        class App extends React.Component {
            constructor(props) {
                super(props)
                this.state = {
                    x: 0,
                    y: 0
                }
            }
            render() {
                return (
                    <div>
                        <div style={style["mydiv"]}  //Style as an array
                            onClick={(event) => { //The 'event' object is not a native event, but you can get some properties of the native event object through event
                                this.setState({
                                    x: event.clientX,
                                    y: event.clientY
                                })
                            }}>
                            X: {this.state.x},Y: {this.state.y}
                        </div>
                    </div>
                )
            }
        }
        //3. Rendering
        ReactDOM.render(<App />, root)
    </script>
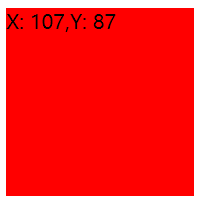
The event object in the composite event is not a native event, just that we can get the native event object through it_ Some properties on, such as clientX and clientY in the above example. Moreover, for this event object, in the whole composite event, only one is shared globally, that is, after this event call is completed, the event object will be cleared and wait for the next event to trigger. Therefore, we cannot get the event in asynchronous operation.
2. Get event in asynchronous operation.
Example code: modify according to the above example
            render() {
                return (
                    <div>
                        <div style={style["mydiv"]}
                            onClick={(event) => {
                                setTimeout(() => {
                                    this.setState({
                                        x: event.clientX,
                                        y: event.clientY
                                    })
                                }, 1000);
                            }}>
                            X: {this.state.x},Y: {this.state.y}
                        </div>
                    </div>
                )
            }
        }
When the user clicks div, you can see that the console throws an error after one second:

Problem: after the event is triggered and the response is completed, the event object will be cleared, but the asynchronous data has not been obtained. If you access the properties of the event object after obtaining the asynchronous data, an error will be reported.
Solution: first save some attribute values of the event object, and then use these attribute values after obtaining asynchronous data
Example code:
            render() {
                return (
                    <div>
                        <div style={style["mydiv"]}
                            onClick={(event) => {
                                const { clientX, clientY } = event;
                                setTimeout(() => {
                                    this.setState({
                                        x: event.clientX,
                                        y: event.clientY
                                    })
                                }, 1000);
                            }}>
                            X: {this.state.x},Y: {this.state.y}
                        </div>
                    </div>
                )
            }
At this time, click div and the coordinate value will be displayed after 1 second.
3. Mixed use of native and synthetic events
React encourages us to use synthetic events. However, in some requirements, we still need to deal with them through native events. At this time, it involves the mixed use of native events and synthetic events.
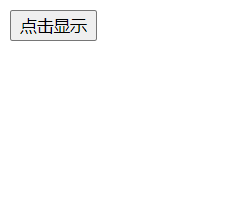
Example: when the user clicks the button, the div is displayed, and clicking other areas of the page hides the Div
    <div id="root"></div>
    <script type="text/babel">
        class App extends React.Component {
            constructor(props) {
                super(props)
                this.state = {
                    isShow: 'none'
                }
            }
            button = React.createRef()  //Created an associated attribute button
            componentDidMount() {
                document.addEventListener('click', e => {  //Native event
                    /*
                        e.target Represents the object that triggers the click event
                        this.button.current Represents the current button
                    */
                    if (e.target != this.button.current) {
                        this.setState({
                            isShow: 'none'
                        })
                    }
                })
            }
            render() {
                return (
                    <div>
                        <button
                            ref={this.button}
                            onClick={() => { // Composite event
                                this.setState({
                                    isShow: 'block'
                                })
                            }}>Click display</button>
                        <br /> <br />
                        <div style={{
                            display: this.state.isShow,
                            width: '100px',
                            height: '100px',
                            backgroundColor: 'red'
                        }}></div>
                    </div>
                )
            }
        }
        //3. Rendering
        ReactDOM.render(<App />, root)
    </script>
Click the button to display div
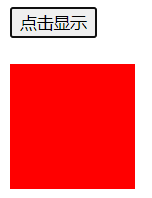
Click the blank space to hide the div