Preface: The last section React Native takes you through scrollable-tab-view (V) Finally, we implemented our scrollable-tab-view as follows:
All we have to do is click on tab and center the specified tab, which means changing the horizontal offset of the srollview, but the offset is controlled to:
(0<=x<=tabcontainer's width-container's width), that is, scrollview to the top and bottom of the judgment, do not understand the friend's own brain to fill the picture is not good, otherwise draw a picture, /silly.
So what we need to get is the width of the TabBarView, the width of the TabBarContainer.
 render() {
        let {containerWidth, tabs, scrollValue}=this.props;
        //An interpolator for the animation passed in
        let tabStyle = {
            width: this.state._widthTabUnderline,
            position: 'absolute',
            bottom: 0,
            left: this.state._leftTabUnderline,
        };
        return (
            <View
                //Obtain tabbarview Width
                onLayout={(e)=>this._measureContainer(e)}
            >
                <ScrollView
                   ....
                >
                    <View
                        //Obtain tab How wide is it really
                        onLayout={(e)=>this._measureTabContainer(e)}
                    >
                       ....
                    </View>
                </ScrollView>
            </View>
        );
    }
 /**
     * Measure Content view
     * @param event
     * @private
     */
    _measureContainer(event) {
        this._containerMeasure = event.nativeEvent.layout;
        this._updateView({value: this.props.scrollValue._value});
    }

    /**
     * Measure tab content view
     * @param event
     * @private
     */
    _measureTabContainer(event) {
        this._tabContainerMeasure = event.nativeEvent.layout;
        if (this.state._tabContainerWidth !== this._tabContainerMeasure.width) {
            this.setState({
                _tabContainerWidth: this._tabContainerMeasure.width,
            }, ()=> {
                this._updateView({value: this.props.scrollValue._value});
            });
        }
    }
Then execute _updateView to update the status of the bottom line view after the measurement is complete.
 /**
     * Change the width of the bottom line to follow the left as scrollview slides
     * @param value
     * @private
     */
    _updateView = ({value = 0}) => {
        //Because the value of value is a [0-1-2-3-4] transformation
        const position = Math.floor(value);
        //Decimal part
        const offset = value % 1;
        const tabCount = this.props.tabs.length;
        const lastTabPosition = tabCount - 1;
        //Direct return without tab|| (bounce effect)
        if (tabCount === 0 || value < 0 || value > lastTabPosition) {
            return;
        }
        if (this._necessarilyMeasurementsCompleted(position, position === tabCount - 1)) {
            this._updateTabLine(position, offset);
            //Controlling pannel movement (scrollview outside tab)
            this._updateTabPanel(position, offset);
        }
    }
If we want the tab page to be centered: 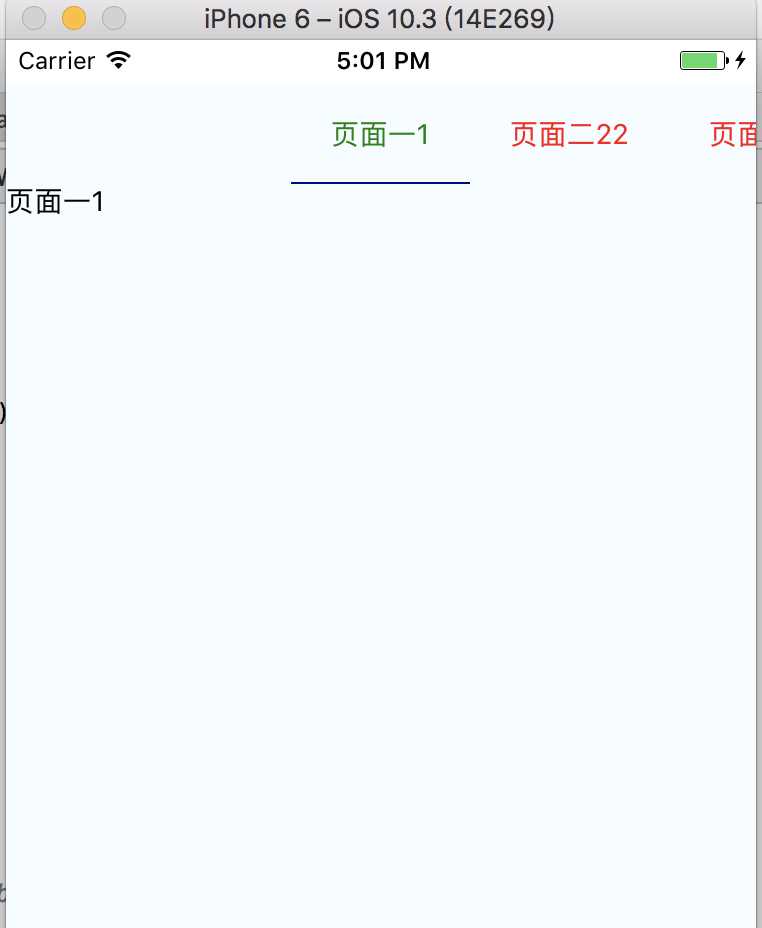
Is the scrollview x-axis offset equal to:?
The x-axis offset of the currently selected tab - (width of the control - (width of the first tab*(1-offset) - (width of the second tab *offset)) / 2
That is:
*The x-axis offset of the currently selected tab - = (containerWidth - (1 - pageOffset) tabWidth - pageOffset * nextTabWidth) / 2;**
The little buddy can take the value with him to see Ha.
Well, after knowing the principle, the first thing we need to get is the offset of the currently selected tab on the x-axis:
 /**
     * Modify scroll offset of tab content view on y axis
     * @private
     */
    _updateTabPanel(position, pageOffset) {
        //Width of parent control
        const containerWidth = this._containerMeasure.width;// width
        //Gets the width of the currently selected tab
        const tabWidth = this._tabsMeasurements[position].width;
        //Gets the measure value of the next tab of the selected tab
        const nextTabMeasurements = this._tabsMeasurements[position + 1];
        //Gets the width of the next tab of the selected tab
        const nextTabWidth = nextTabMeasurements && nextTabMeasurements.width || 0;
        //The x-coordinate of the currently selected tab
        const tabOffset = this._tabsMeasurements[position].left;
        //The offset of the currently selected tab from the next tab (i.e. the width of the bottom line remaining on the current tab)
        const absolutePageOffset = pageOffset * tabWidth;
        //So the current tab's actual offset = (the x-axis coordinate of the current tab + the bottom line offset of the current tab)
        let newScrollX = tabOffset + absolutePageOffset;

        //Calculates how much further the current tab display needs to be in the center of the control (based on the current scrollview offset)
        newScrollX -= (containerWidth - (1 - pageOffset) * tabWidth - pageOffset * nextTabWidth) / 2;
        //Because the maximum width of the contents inside the tabcontainer = (maximum scrollx + width of the control itself),
        //So maximum scrollx = maximum width of content inside tabcontainer - width of control itself
        const rightBoundScroll = this._tabContainerMeasure.width - (this._containerMeasure.width);
        //The critical scrollview x-axis offset value [0, rightBoundScroll] is calculated.
        newScrollX = newScrollX >= 0 ? ( newScrollX > rightBoundScroll ? rightBoundScroll : newScrollX) : 0;
        this._scrollView.scrollTo({x: newScrollX, y: 0, animated: false,});
    }
Then run our code again: 
As you can see, we have basically achieved scrollable-tab-view, in fact, scrollable-tab-view is also perfect step by step, so we can only call it basic implementation, we have to exclamate the author forcefully!!!
In the previous section, when we were working with the left of the bottom line view, we had another bug. Let's look at a picture first:

If our green segment slides from ab to bc, then the left offset of the green segment is equal to
left=oa*(1-offset)+ob*offset;
Ha-ha, if you look at it mathematically well, you will see that, for example, if we want to calculate whether the coordinate of ab's midpoint is equal to (oa*0.5+ob*0.5)? Ha-ha~~~Forgive me for writing this blog during my working hours, I don't know if my leader knows if he will get me, Ha-ha~~~?
To tell the truth, I feel I have also done a lot of development. At first I was ready to do the java background, then I accidentally did andoird, and android has already reached the level of obsession, because the company needs to touch rn, so I am also obsessed (unfortunately a cinder to ~), and then because the company needs to do h5, H5 for half a year, so I jumpSlotted to the current company, continue the RN career, feel like you have experienced a lot, and people around you have changed batches. If you continue to follow the route of Rn and h5, I will go a long way, and will not see any return for a short time, but if you do well, the return will be relatively large, because the previous period in recent years should still maintain a relatively hot state.If you want to continue the android route, it may be a little easier, but you also need to keep learning. Because the android market may not be ideal now after all, to be clear, working in such a big city is all for a little more income, but the income is proportional to the effort, which does not necessarily pay off, but the reverse may not.Founded, Ha-ha~~Forgive me for such a long feeling, I don't know if my little partner has the same troubles as me, it's always good to complain about it, at least tell your own inner thoughts, Okay!!Don't pull it, come back to ~
At this point, this series of articles is about to say goodbye to your little buddies, who have been paying close attention to all the time. Thank you, and welcome to communicate, learn and join the group.