Original address: http://www.html-js.com/article/JS-analysis-of-the-single-row-from-zero-reactjs-source-first-rendering-principle%203154
Front-end development is particularly rapid, experienced jQuery After the era of tool library under the unification of the world, various frameworks are now beginning to contend among hundreds of schools of thought. angular, ember, backbone, vue, avalon, ploymer and reactjs, as a front-end is a little bit careless and feel like they are going to be eliminated, just last year everyone was. AngularJS By this year, fans have been chasing reactjs. Front-end are like the new and hate the old. I don't know who will dominate these frameworks in the end. In a very vulgar way, this is the best time and the worst time. As a front-end, we can only learn more and understand their principles as much as possible.
The code for reactjs is very circuitous, and it seems rather laborious for front-end without background development experience. Actually, the core content of reactjs is not much, mainly the following:
- Virtual dom Object (Virtual DOM)
- diff algorithm for virtual dom
- Data Flow
- Component life cycle
- event processing
Next, we will implement a simple version of reactjs, to achieve the above functions, and finally use this reactjs to make a small application of todolist, read this, or follow the code. I hope you can better understand the operation principle of reactjs.
Start with the simplest
Let's start with rendering hello world.
Let's look at the following code:
<script type="text/javascript">
React.render('hello world',document.getElementById("container"))
</script>

/**
The corresponding html is

<div id="container"></div>


The generated html is:

<div id="container">
    <span data-reactid="0">hello world</span>
</div>

*/
Assuming this line of code, you can use hello The world is rendered into the corresponding div.
Let's see what we need to do about it:
//component class, used to express what text should do when rendering, updating, deleting
function ReactDOMTextComponent(text) {
    //Save the current string
    this._currentElement = '' + text;
    //Used to identify the current component
    this._rootNodeID = null;
}

//dom structure generated by component rendering
ReactDOMTextComponent.prototype.mountComponent = function(rootID) {
    this._rootNodeID = rootID;
    return '<span data-reactid="' + rootID + '">' + this._currentElement + '</span>';
}


//The component factory is used to return a component instance
function instantiateReactComponent(node){
    if(typeof node === 'string' || typeof node === 'number'){
        return new ReactDOMTextComponent(node)
    }
}


React = {
    nextReactRootIndex:0,
    render:function(element,container){

        var componentInstance = instantiateReactComponent(element);
        var markup = componentInstance.mountComponent(React.nextReactRootIndex++);
        $(container).html(markup);
        //Triggering the event that completes mount
        $(document).trigger('mountReady');    }
}
The code is divided into three parts:
- React.render is responsible for invoking rendering as an entry
- We introduce the concept of component class. ReactDOMTextComponent is a component class definition. It defines what should be done when rendering, updating and deleting nodes of this text type. This is only used for rendering, while the other two can be ignored first.
- instantiateReactComponent is used to return an instance of component based on the type of element (there is only one string type now). In fact, it is a kind of factory.
Next ReactRootIndex is used as the identity id of each component, adding 1 continuously to ensure uniqueness. So we can find this element through this logo later.
As you can see, we divide the logic into several parts. The main rendering logic is defined in the concrete component class. React The. render is responsible for scheduling the entire process, where instantiateReactComponent is invoked to generate an instance object corresponding to the component type, and mountComponent of this object is invoked to obtain the generated content. Finally, write to the corresponding Container In the node.
Some people may ask, so p big function, it is necessary to be so complex, don't worry. Look down to appreciate the benefits of this stratification.
Introducing basic elemetnt
We know that the biggest selling point of reactjs is its virtual dom concept. We usually use React.createElement to create a virtual dom element.
There are two kinds of virtual dom elements, one is the basic elements of the browser, such as div p input form, and the other is the self-defined elements.
Here we need to talk about the text node mentioned in the previous section. It is not a virtual dom, but reacjs is to maintain rendering consistency. The text node is wrapped with a span tag outside, and a simplified component (ReactDOMText Component) is added to it.
In this section, we first discuss the basic elements of browsers.
In reactjs, when we want to wrap a div outside hello world with some attributes, or even events, we can write as follows:
//Demonstrate how event monitoring works
function hello(){
    alert('hello')
}


var element = React.createElement('div',{id:'test',onclick:hello},'click me')

React.render(element,document.getElementById("container"))


/**

//The generated html is:

<div data-reactid="0" id="test">
    <span data-reactid="0.0">click me</span>
</div>


//Click on the text to pop up the hello dialog box

*/
Using React.createElement to create a basic element above, let's look at the implementation of the simplified version of React.createElement:
//ReactElement is the concept of virtual dom, with a type attribute representing the current node type and a props attribute of the node.
//For example, a node type like div is div, and props are attributes.
//In addition, the key here can be used to identify this element and to optimize later updates. It's good to know that there is such a thing.
function ReactElement(type,key,props){
  this.type = type;
  this.key = key;
  this.props = props;
}


React = {
    nextReactRootIndex:0,
    createElement:function(type,config,children){
        var props = {},propName;
        config = config || {}
        //See if there is a key that identifies the type of element for efficient updates in the future.
        var key = config.key || null;

        //Copy the content in config to props
        for (propName in config) {
            if (config.hasOwnProperty(propName) && propName !== 'key') {
                props[propName] = config[propName];
            }
        }

        //Handling children, all mounted on the child attribute of props
        //Supports two ways of writing. If there is only one parameter, assign it directly to children, or merge it.
        var childrenLength = arguments.length - 2;
        if (childrenLength === 1) {
            props.children = $.isArray(children) ? children : [children] ;
        } else if (childrenLength > 1) {
            var childArray = Array(childrenLength);
            for (var i = 0; i < childrenLength; i++) {
                childArray[i] = arguments[i + 2];
            }
            props.children = childArray;
        }

        return new ReactElement(type, key,props);

    },
    render:function(element,container){
        var componentInstance = instantiateReactComponent(element);
        var markup = componentInstance.mountComponent(React.nextReactRootIndex++);
        $(container).html(markup);
        //Triggering the event that completes mount
        $(document).trigger('mountReady');
    }
}
createElement is just a simple parameter modification that eventually returns a ReactElement instance object, which is what we call an instance of a virtual element.
Note the definition of key here, mainly to optimize efficiency in future updates, which can be ignored first.
Well, with an element instance, we have to render it. At this point render accepts a ReactElement instead of text. Let's first modify the instantiate ReactComponent:
function instantiateReactComponent(node){
    //The case of text nodes
    if(typeof node === 'string' || typeof node === 'number'){
        return new ReactDOMTextComponent(node);
    }
    //The default node of the browser
    if(typeof node === 'object' && typeof node.type === 'string'){
        //Notice here that a new component is used
        return new ReactDOMComponent(node);

    }
}
We added a judgment so that when render is not text but the basic element of the browser. We use another component to handle what it should return when rendering. This shows the benefits of the factory method instantiate React Component, which is responsible for producing a rendered component instance regardless of the type of node that comes in. In this way, render does not need any modification at all, just a corresponding component type (in this case, ReactDOMComponent) is needed.
So let's focus on the implementation of ReactDOMComponent:
//component class, used to express what text should do when rendering, updating, deleting
function ReactDOMComponent(element){
    //Save the current element object reference
    this._currentElement = element;
    this._rootNodeID = null;
}

//dom structure generated by component rendering
ReactDOMComponent.prototype.mountComponent = function(rootID){
    //Assignment identifier
    this._rootNodeID = rootID;
    var props = this._currentElement.props;
    var tagOpen = '<' + this._currentElement.type;
    var tagClose = '</' + this._currentElement.type + '>';

    //Add the reactid identifier
    tagOpen += ' data-reactid=' + this._rootNodeID;

    //Put together attributes
    for (var propKey in props) {

        //Here we need to do event monitoring, which is to parse the event attributes from the property props and extract the corresponding event monitoring of the event attributes at the beginning of on.
        if (/^on[A-Za-z]/.test(propKey)) {
            var eventType = propKey.replace('on', '');
            //Add event proxy to the current node, using _rootNodeID as the namespace
            $(document).delegate('[data-reactid="' + this._rootNodeID + '"]', eventType + '.' + this._rootNodeID, props[propKey]);
        }

        //String splicing is not required for child attributes and event listening attributes
        //Events are proxied to the global. You can't spell it on the dom or you'll have native event monitoring
        if (props[propKey] && propKey != 'children' && !/^on[A-Za-z]/.test(propKey)) {
            tagOpen += ' ' + propKey + '=' + props[propKey];
        }
    }
    //Get the rendered content of the child node
    var content = '';
    var children = props.children || [];

    var childrenInstances = []; //Compoonet instances used to save all child nodes will be used later
    var that = this;
    $.each(children, function(key, child) {
        //Once again, instantiateReactComponent is called to instantiate the component class of the child node, which is stitched together and returned.
        var childComponentInstance = instantiateReactComponent(child);
        childComponentInstance._mountIndex = key;

        childrenInstances.push(childComponentInstance);
        //The rootId of the child node is the new value of the parent node's rootId combined with the new key, that is, the sequential value.
        var curRootId = that._rootNodeID + '.' + key;
        //Get the rendering content of the child node
        var childMarkup = childComponentInstance.mountComponent(curRootId);
        //Stitching together
        content += ' ' + childMarkup;

    })

    //Leave this side unused for future updates
    this._renderedChildren = childrenInstances;

    //Spell out the whole html content
    return tagOpen + '>' + content + tagClose;
}
We added the definition of virtual dom reactElement and a new component class ReactDOMComponent. In this way, we have realized the function of rendering the basic elements of the browser.
For the rendering logic of virtual dom, it is essentially a recursive rendering thing, and reactElement will recursively render its own child nodes. You can see that we shield the differences of sub-nodes through instantiateReactComponent by using different component classes, so that the rendered content can be guaranteed through mountComponent eventually.
In addition, the events on this side also need to be mentioned. When props are passed in, parameters like {onClick:function(){}} can be passed in, so that events can be added to the current element and proxied to the document. Because reactjs itself is all about js, the transfer of monitored functions becomes particularly simple.
There are many things that are not considered here, such as some special types of input select and so on, and img does not need corresponding tagClose and so on. Here, in order to keep it simple, it is no longer extended. In addition, the event handling of reactjs is very complex, and a set of standard w3c events is implemented. This is where you lazy and use jQuery's event proxy directly to document.
Custom Elements
The basic element content is implemented above, and the function of custom element is implemented below.
With the development of front-end technology, the basic elements of browser can not meet our needs, if you are right. webcomponents With some understanding, you will know that people have been trying to extend some of their own tags.
Reactionjs achieves similar functions through virtual dom. Remember that element.type above is just a simple string, if it is a class? If this class happens to have its own life cycle management, then the scalability is very high.
If you don't understand the concept of life cycle, you can see another piece of my previous article: javascript componentization
Let's see how reactjs uses custom elements:
var HelloMessage = React.createClass({
  getInitialState: function() {
    return {type: 'say:'};
  },
  componentWillMount: function() {
    console.log('I'm about to start rendering...')
  },
  componentDidMount: function() {
    console.log('I've rendered it...')
  },
  render: function() {
    return React.createElement("div", null,this.state.type, "Hello ", this.props.name);
  }
});


React.render(React.createElement(HelloMessage, {name: "John"}), document.getElementById("container"));

/**
The results are as follows:

html:
<div data-reactid="0">
    <span data-reactid="0.0">say:</span>
    <span data-reactid="0.1">Hello </span>
    <span data-reactid="0.2">John</span>
</div>

console:
I'm about to start rendering...
I've rendered it...

*/
React.createElement accepts a class instead of a string.
React.createClass generates a custom tag class with a basic lifecycle:
- getInitialState gets the original attribute value this.state.
- CompoonentWillmount is called when the component is ready to render
- CompoonentDidMount is called after component rendering is complete
If you have a little knowledge of reactjs, you should be able to understand the above usage.
Let's first look at the implementation of React.createClass:
//Define ReactClass classes, all custom super-parent classes
var ReactClass = function(){
}
//Leave subclasses to inherit and override
ReactClass.prototype.render = function(){}


React = {
    nextReactRootIndex:0,
    createClass:function(spec){
        //Generate a subclass
        var Constructor = function (props) {
            this.props = props;
            this.state = this.getInitialState ? this.getInitialState() : null;
        }
        //Prototype inheritance, super parent inheritance
        Constructor.prototype = new ReactClass();
        Constructor.prototype.constructor = Constructor;
        //Mix spec s into prototypes
        $.extend(Constructor.prototype,spec);
        return Constructor;

    },
    createElement:function(type,config,children){
        ...
    },
    render:function(element,container){
        ...
    }
}
You can see that createClass generates a subclass that inherits ReactClass and calls this.getInitialState in the constructor to get the original state.
For the convenience of demonstration, ReactClass on our side is quite simple. In fact, the original code deals with a lot of things, such as the combination inheritance support for mixin s of classes, such as component DidMount, which can be defined many times, need to merge calls and so on. Interesting to flip the source code is not the main purpose of this article, so we will not expand in detail here.
We just returned a definition of inheritance classes, so where are the specific component Willmount life cycle functions called?
Looking at the two types above, we know that it's time to provide a componet class for custom elements, where we instantiate ReactClass and manage the lifecycle, as well as parent-child component dependencies.
Well, our old rule is to transform instantiate React Component first.
function instantiateReactComponent(node){
    //The case of text nodes
    if(typeof node === 'string' || typeof node === 'number'){
        return new ReactDOMTextComponent(node);
    }
    //The default node of the browser
    if(typeof node === 'object' && typeof node.type === 'string'){
        //Notice here that a new component is used
        return new ReactDOMComponent(node);

    }
    //Custom Element Nodes
    if(typeof node === 'object' && typeof node.type === 'function'){
        //Note here, using the new component, specifically for custom elements
        return new ReactCompositeComponent(node);

    }
}
Simply, we added a judgment that uses the new component class to handle custom nodes. Let's look at the implementation of React Composite Component:
function ReactCompositeComponent(element){
    //Store element element element object
    this._currentElement = element;
    //Store Unique Identification
    this._rootNodeID = null;
    //Store instances of the corresponding ReactClass
    this._instance = null;
}

//Used to return what should be returned when the current custom element is rendered
ReactCompositeComponent.prototype.mountComponent = function(rootID){
    this._rootNodeID = rootID;
    //Get the attribute value corresponding to the current element
    var publicProps = this._currentElement.props;
    //Get the corresponding ReactClass
    var ReactClass = this._currentElement.type;
    // Initialize the public class
    var inst = new ReactClass(publicProps);
    this._instance = inst;
    //Keep a reference to the current comonent, which will be used in the updates below
    inst._reactInternalInstance = this;

    if (inst.componentWillMount) {
        inst.componentWillMount();
        //In fact, there is another layer of processing in the original reactjs, that is, component WillMount calls setstate, which does not trigger rerender but automatically merges ahead of time. In order to keep it simple, it is omitted here.
    }
    //Call the render method of the instance of ReactClass to return an element or a text node
    var renderedElement = this._instance.render();
    //Get an instance of component class corresponding to renderedElement
    var renderedComponentInstance = instantiateReactComponent(renderedElement);
    this._renderedComponent = renderedComponentInstance; //Save it for later use

    //Get the rendered string content and pass the current _rootNodeID to the render node
    var renderedMarkup = renderedComponentInstance.mountComponent(this._rootNodeID);

    //Previously, we finally triggered mountReady events in the React.render method, so we can listen here and trigger them when the rendering is complete.
    $(document).on('mountReady', function() {
        //Call inst.componentDidMount
        inst.componentDidMount && inst.componentDidMount();
    });

    return renderedMarkup;
}
It's not difficult to implement. ReactClass render must return a virtual node (including element and text). At this time, we use instantiate ReactComponent to get the instance, and mountComponent to get the result as the result of the current custom element.
It should be said that the custom element itself is not responsible for the specific content, it is more responsible for the life cycle. The specific content is rendered by the virtual node returned by its render method.
Essentially, it is also a recursive process of rendering content. At the same time, because of this recursive feature, the component WillMount of the parent component must be invoked before the component WillMount of a child component, while the component DidMount of the parent component must be after the child component, because listening for mountReady events must be the first listening for the child component.
It is important to note that the custom element does not handle the child nodes we pass in when we create Element, it only processes the node returned by its render as its own child node. However, we can use this.props.children to get those incoming child nodes when render, which can be handled by ourselves. Actually, it's a little like shadow dom in Web components.
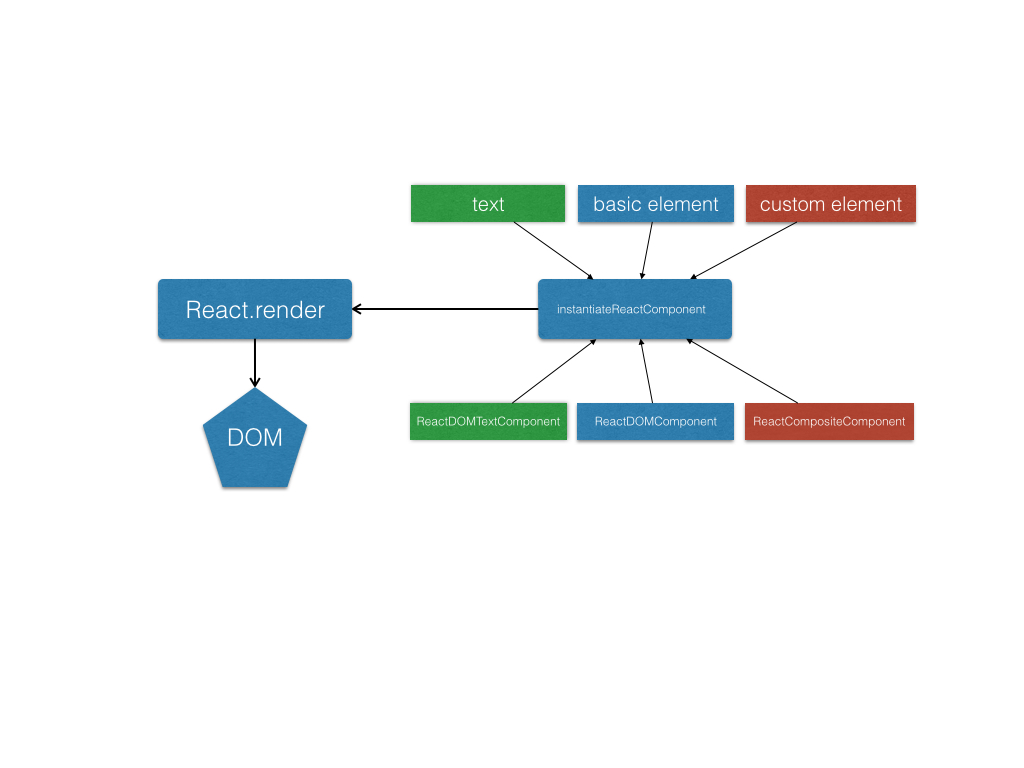
There are three types of elements implemented above. In fact, we find that there is not much difference in essence. They all have their own component classes to handle their own rendering process.
Probably the relationship is as follows.
So we found that the initialization of the rendering process has been completed.
Virtual dom differentiation algorithm (diff algorithm) is the core of reactjs, according to the official statement. He's very fast, very efficient. At present, there are some articles about this algorithm, but they just stay on the surface. Most of Xiaobai can't understand it after reading it. ==. So let's do it by ourselves, and when you're done, you'll find that it's much easier to understand when you look at the introductory articles about text and picture streams.
Implementing update mechanism
Next we discuss the mechanism of updating.
Generally in reactjs, when we need to update, we call setState. Look at the following examples:
var HelloMessage = React.createClass({
  getInitialState: function() {
    return {type: 'say:'};
  },
  changeType:function(){
    this.setState({type:'shout:'})
  },
  render: function() {
    return React.createElement("div", {onclick:this.changeType},this.state.type, "Hello ", this.props.name);
  }
});


React.render(React.createElement(HelloMessage, {name: "John"}), document.getElementById("container"));


/**

//The generated html is:

<div data-reactid="0" id="test">
    <span data-reactid="0.0">hello world</span>
</div>

If you click on the text, say will become shout

*/
Click on the text and call setState to update, so we extend ReactClass to see the implementation of setState:
//Define ReactClass classes
var ReactClass = function(){
}

ReactClass.prototype.render = function(){}

//setState
ReactClass.prototype.setState = function(newState) {

    //Remember that we assign values when mount ing in React Composite Component
    //So here you can get the corresponding instance of React Composite Component _reactInternational Instance
    this._reactInternalInstance.receiveComponent(null, newState);
}
You can see that setState mainly calls the receiveComponent of the corresponding component to implement the update. All mounts and updates should be managed by the corresponding component.
Just as all components implement mountComponent to handle the first rendering, all component classes should implement receiveComponent to handle their own updates.
ReciveComponent for custom elements
So we follow the gourd to implement a receiveComponent method for the corresponding component class (ReactComposite Component) of the custom element:
//To update
ReactCompositeComponent.prototype.receiveComponent = function(nextElement, newState) {

    //If you accept a new one, use the latest element
    this._currentElement = nextElement || this._currentElement

    var inst = this._instance;
    //Merge state
    var nextState = $.extend(inst.state, newState);
    var nextProps = this._currentElement.props;


    //Rewrite state
    inst.state = nextState;


    //If inst has shouldComponentUpdate and returns false. Explain that the component itself decides not to update, and returns directly.
    if (inst.shouldComponentUpdate && (inst.shouldComponentUpdate(nextProps, nextState) === false)) return;

    //Lifecycle management, if there is a component WillUpdate, is called to indicate that updates are starting.
    if (inst.componentWillUpdate) inst.componentWillUpdate(nextProps, nextState);


    var prevComponentInstance = this._renderedComponent;
    var prevRenderedElement = prevComponentInstance._currentElement;
    //Re-execute render to get the corresponding new element;
    var nextRenderedElement = this._instance.render();


    //Judge whether it needs to be updated or re-rendered directly
    //Note that the _shouldUpdate React Component here is different from the one above. Oh, this is the global approach.
    if (_shouldUpdateReactComponent(prevRenderedElement, nextRenderedElement)) {
        //If you need to update, you continue to call the receiveComponent method of the child node and pass in a new element to update the child node.
        prevComponentInstance.receiveComponent(nextRenderedElement);
        //Call componentDidUpdate to indicate that the update is complete
        inst.componentDidUpdate && inst.componentDidUpdate();

    } else {
        //If you find two entirely different element s, you simply re-render them.
        var thisID = this._rootNodeID;
        //Re-create a corresponding component.
        this._renderedComponent = this._instantiateReactComponent(nextRenderedElement);
        //Regenerate the corresponding element content
        var nextMarkup = _renderedComponent.mountComponent(thisID);
        //Replace the entire node
        $('[data-reactid="' + this._rootNodeID + '"]').replaceWith(nextMarkup);

    }

}

//Used to determine whether two element s need to be updated
//The key here is optional when we create Element. Used to identify this element, when we find that the key is different, we can directly re-render it without updating it.
var _shouldUpdateReactComponent = function(prevElement, nextElement){
    if (prevElement != null && nextElement != null) {
    var prevType = typeof prevElement;
    var nextType = typeof nextElement;
    if (prevType === 'string' || prevType === 'number') {
      return nextType === 'string' || nextType === 'number';
    } else {
      return nextType === 'object' && prevElement.type === nextElement.type && prevElement.key === nextElement.key;
    }
  }
  return false;
}
Don't be intimidated by so much code, the process is simple. What does it mainly do? First merge the changes, generate the latest state,props and then compare the elements returned by the previous render with those generated by the latest invocation of render (_shouldUpdate React Component) to see if they need to be updated. If you want to update, just continue to invoke the corresponding receiveComponent of the corresponding component class. In fact, you just dump the palm of your hand and throw things away directly. I did it for my staff. Of course, there is another case, the difference between the two generated elements is too big, it is not a type, it is easy to directly re-generate a new code re-rendering once o.
Essentially, it is the process of recursively calling receiveComponent.
Notice here two functions:
- inst.shouldComponentUpdate is an instance method. When we don't want to update a setState, we can override this method and return false.
- _ Should Update React Component is a global approach, an optimization mechanism for reactjs. It's used to decide whether to replace all of them directly or to make minor changes. When the key s of the children rendered by two renders are different, render them all again directly and replace them. Otherwise, we have to make a recursive update to ensure a minimal update mechanism, so that there won't be too much flicker.
In addition, you can see that an updated lifecycle invocation mechanism is also handled here.
ReciveComponent of Text Node
Let's look at the text node again. It's simpler:
ReactDOMTextComponent.prototype.receiveComponent = function(nextText) {
    var nextStringText = '' + nextText;
    //Comparing with previously saved strings
    if (nextStringText !== this._currentElement) {
        this._currentElement = nextStringText;
        //Replace the entire node
        $('[data-reactid="' + this._rootNodeID + '"]').html(this._currentElement);

    }
}
There's nothing to say. If it's different, just find the corresponding node and update it.
ReciveComponent of element
Finally, we begin to look at the updating mechanism of the more complex basic elements of browsers. Let's look at the following html:
<div id="test" name="hello">
    <span></span>
    <span></span>
</div>
Think about how we can update this html at a minimum cost. It is not difficult to find that there are actually two main parts:
- Updates to attributes, including handling of special attributes such as events
- The updating of sub-nodes, which is complex, needs to be addressed in order to achieve the best efficiency.
- Compare the new sub-node tree with the old one, and find out the difference between them. We call it diff.
- After all the differences are found, they are updated once more. We call it patch.
So update the code structure as follows:
ReactDOMComponent.prototype.receiveComponent = function(nextElement) {
    var lastProps = this._currentElement.props;
    var nextProps = nextElement.props;

    this._currentElement = nextElement;
    //Individual update attributes are required
    this._updateDOMProperties(lastProps, nextProps);
    //Renewal of child nodes
    this._updateDOMChildren(nextElement.props.children);
}
As a whole, it is not complicated. First, it deals with the changes of the attributes of the current node, and then with the changes of the sub-nodes.
Step by step, let's see how the update attributes change.
ReactDOMComponent.prototype._updateDOMProperties = function(lastProps, nextProps) {
    var propKey;
    //Traverse, when an old attribute is not in the new attribute set, it needs to be deleted.

    for (propKey in lastProps) {
        //There are new attributes, or propKey is skipped directly on the prototype. The rest of this is not in the new attribute set. Need to be deleted
        if (nextProps.hasOwnProperty(propKey) || !lastProps.hasOwnProperty(propKey)) {
            continue;
        }
        //For those special attributes, such as event monitoring here, we need to remove listening.
        if (/^on[A-Za-z]/.test(propKey)) {
            var eventType = propKey.replace('on', '');
            //Cancel event broker for current node
            $(document).undelegate('[data-reactid="' + this._rootNodeID + '"]', eventType, lastProps[propKey]);
            continue;
        }

        //Remove unwanted attributes from dom
        $('[data-reactid="' + this._rootNodeID + '"]').removeAttr(propKey)
    }

    //For new attributes, you need to write to the dom node
    for (propKey in nextProps) {
        //We need special handling for the attributes of event monitoring
        if (/^on[A-Za-z]/.test(propKey)) {
            var eventType = propKey.replace('on', '');
            //In the past, if there were already, it means that there was monitoring, which needs to be removed first.
            lastProps[propKey] && $(document).undelegate('[data-reactid="' + this._rootNodeID + '"]', eventType, lastProps[propKey]);
            //Add event proxy to the current node, using _rootNodeID as the namespace
            $(document).delegate('[data-reactid="' + this._rootNodeID + '"]', eventType + '.' + this._rootNodeID, nextProps[propKey]);
            continue;
        }

        if (propKey == 'children') continue;

        //Add new attributes, or update old homonymous attributes
        $('[data-reactid="' + this._rootNodeID + '"]').prop(propKey, nextProps[propKey])
    }

}
The change of attributes is not particularly complicated. The main thing is to find the old and unused attributes, remove them directly, assign new attributes, and pay attention to the special event attributes to make special treatment.
Now let's look at the updating of the sub-nodes, which is also the most complex part.
ReactDOMComponent.prototype.receiveComponent = function(nextElement){
    var lastProps = this._currentElement.props;
    var nextProps = nextElement.props;

    this._currentElement = nextElement;
    //Individual update attributes are required
    this._updateDOMProperties(lastProps,nextProps);
    //Renewal of child nodes
    this._updateDOMChildren(nextProps.children);
}

//Global Update Depth Identification
var updateDepth = 0;
//Global update queue, where all the differences exist
var diffQueue = [];

ReactDOMComponent.prototype._updateDOMChildren = function(nextChildrenElements){
    updateDepth++
    //_ diff is used to recursively identify differences, assemble differences objects, and add them to the update queue diffQueue.
    this._diff(diffQueue,nextChildrenElements);
    updateDepth--
    if(updateDepth == 0){
        //Call patch when needed to perform specific dom operations
        this._patch(diffQueue);
        diffQueue = [];
    }
}
As we said before, updating child nodes consists of two parts. One is to recursively analyze differences and add differences to the queue. Then call _patch at the right time to apply the difference to the dom.
So what is the right time and what is updateDepth for?
It is important to note that receiveComponent of subnodes is also called recursively within _diff, so when a subnode is also a normal browser node, it also takes the step of _update DOMChildren. So updateDepth is used to record the recursive process. Only when the recursive updateDepth is 0, when the whole difference has been analyzed, can we start using patch to process the difference queue.
So the key is to implement _diff and _patch.
Let's first look at the implementation of _diff:
//Several Types of Differential Updating
var UPATE_TYPES = {
    MOVE_EXISTING: 1,
    REMOVE_NODE: 2,
    INSERT_MARKUP: 3
}


//Ordinary children is an array. This method converts it into a map. The key is the key of the element. If the text node or element is created without passing in the key, it is directly used as the index identifier in the array.
function flattenChildren(componentChildren) {
    var child;
    var name;
    var childrenMap = {};
    for (var i = 0; i < componentChildren.length; i++) {
        child = componentChildren[i];
        name = child && child._currentelement && child._currentelement.key ? child._currentelement.key : i.toString(36);
        childrenMap[name] = child;
    }
    return childrenMap;
}


//component Set for Generating elements
//Note here that there is a judgment logic that, if found to be updated, will continue to use the previous component Instance and call the corresponding receiveComponent.
//If it is a new node, a new component Instance is generated.
function generateComponentChildren(prevChildren, nextChildrenElements) {
    var nextChildren = {};
    nextChildrenElements = nextChildrenElements || [];
    $.each(nextChildrenElements, function(index, element) {
        var name = element.key ? element.key : index;
        var prevChild = prevChildren && prevChildren[name];
        var prevElement = prevChild && prevChild._currentElement;
        var nextElement = element;

        //Call _shouldUpdate React Component to determine if it is updated?
        if (_shouldUpdateReactComponent(prevElement, nextElement)) {
            //It would be nice to call the receiveComponent of the child node recursively if it was updated.
            prevChild.receiveComponent(nextElement);
            //Then continue using the old component
            nextChildren[name] = prevChild;
        } else {
            //For those who are not old, add a new one and regenerate a component.
            var nextChildInstance = instantiateReactComponent(nextElement, null);
            //Use the new component
            nextChildren[name] = nextChildInstance;
        }
    })

    return nextChildren;
}


//_ diff is used to recursively identify differences, assemble differences objects, and add them to the update queue diffQueue.
ReactDOMComponent.prototype._diff = function(diffQueue, nextChildrenElements) {
  var self = this;
  //Get a collection of component-type objects of the previous child node, which are assigned at the beginning of the rendering, and can be flipped if you can't remember.
  //_ rendered Children was originally an array. We made a map.
  var prevChildren = flattenChildren(self._renderedChildren);
  //Generate a collection of component objects for new subnodes. Note here that old component objects are reused.
  var nextChildren = generateComponentChildren(prevChildren, nextChildrenElements);
  //Reassign _renderedChildren to use the latest.
  self._renderedChildren = []
  $.each(nextChildren, function(key, instance) {
    self._renderedChildren.push(instance);
  })


  var nextIndex = 0; //index representing the arrival of a new node
  //By comparing the differences between the two sets, assemble the difference nodes and add them to the queue
  for (name in nextChildren) {
    if (!nextChildren.hasOwnProperty(name)) {
      continue;
    }
    var prevChild = prevChildren && prevChildren[name];
    var nextChild = nextChildren[name];
    //In the same way, the instructions are using the same component, so we need to do mobile operations.
    if (prevChild === nextChild) {
      //Add difference objects, type: MOVE_EXISTING
      diffQueue.push({
        parentId: self._rootNodeID,
        parentNode: $('[data-reactid=' + self._rootNodeID + ']'),
        type: UPATE_TYPES.MOVE_EXISTING,
        fromIndex: prevChild._mountIndex,
        toIndex: nextIndex
      })
    } else { //If it is not the same, it means that the new node is added.
      //But if the old one still exists, the element is different, but the component is the same. We need to delete the old element that corresponds to it.
      if (prevChild) {
        //Add difference object, type: REMOVE_NODE
        diffQueue.push({
          parentId: self._rootNodeID,
          parentNode: $('[data-reactid=' + self._rootNodeID + ']'),
          type: UPATE_TYPES.REMOVE_NODE,
          fromIndex: prevChild._mountIndex,
          toIndex: null
        })

        //If you've rendered it before, remember to remove all previous event listeners and empty the namespace.
        if (prevChild._rootNodeID) {
            $(document).undelegate('.' + prevChild._rootNodeID);
        }

      }
      //Additional nodes also assemble differentiated objects into queues
      //Add difference objects, type: INSERT_MARKUP
      diffQueue.push({
        parentId: self._rootNodeID,
        parentNode: $('[data-reactid=' + self._rootNodeID + ']'),
        type: UPATE_TYPES.INSERT_MARKUP,
        fromIndex: null,
        toIndex: nextIndex,
        markup: nextChild.mountComponent() //A new node, with one more attribute, represents the dom content of the new node
      })
    }
    //Update mount's index
    nextChild._mountIndex = nextIndex;
    nextIndex++;
  }


  //For old nodes, those that are not in new nodes are all deleted.
  for (name in prevChildren) {
    if (prevChildren.hasOwnProperty(name) && !(nextChildren && nextChildren.hasOwnProperty(name))) {
      //Add difference object, type: REMOVE_NODE
      diffQueue.push({
        parentId: self._rootNodeID,
        parentNode: $('[data-reactid=' + self._rootNodeID + ']'),
        type: UPATE_TYPES.REMOVE_NODE,
        fromIndex: prevChild._mountIndex,
        toIndex: null
      })
      //If you've rendered it before, remember to remove all previous event monitors.
      if (prevChildren[name]._rootNodeID) {
        $(document).undelegate('.' + prevChildren[name]._rootNodeID);
      }
    }
  }
}
We analyze the above code, how to look at a lot, very complex, not urgent we start from the entrance.
First we get the previous component set, and if it's updated for the first time, it's the value we assign when rendering. Then we call generateComponentChildren to generate the latest component collection. We know that component is used for element ation, one radish and one pit.
Notice that flattenChildren here converts the array set to an object map, identifying it with the key of element, and of course, with index as the identifier for text text or elements that do not pass in the key. With these identifiers, we can judge whether the two component s are the same from the point of view of type.
GeneeComponent Children will try to reuse the previous components, that is, those pits. When it finds that the components can be reused (that is, key s are consistent), it will use the previous ones. It only needs to call its corresponding update method receiveComponent, which will recursively retrieve the different objects of the sub-nodes and put them in the queue. If we find that it is a new node that cannot be reused, we need instantiate React Component to regenerate a new component.
Here flatten Children needs a lot of attention. For example, for a table list, we insert a piece of data at the front. Think about if we create an element without passing in key, all keys are null, so reactjs will default to change one-to-one sub-nodes by index when generating Component Children. The judgment of the corresponding node before and after the change (_shouldUpdate React Component) is actually inappropriate. That is to say, in the case of such a list, we'd better give a unique identifier key, so that reactjs can find the corresponding relationship more easily.
When we generate a new set of component s, we need to make a comparison. Assemble differentiated objects.
Contrast the old set with the new one. We need to identify four scenarios, including three types of changes (UPATE_TYPES):
| type | Situation |
|---|---|
| MOVE_EXISTING | The new component type also exists in the old collection, and element can be updated. We have called receiveComponent in GeneeComponent Children. In this case, prevChild=nextChild, we need to make mobile operations to reuse the previous dom nodes. |
| INSERT_MARKUP | The new component type is not in the old collection, so it's a new node. We need to insert a new node. |
| REMOVE_NODE | The old component type also exists in the new collection, but the corresponding element is different and cannot be directly reused and updated, so we have to delete it. |
| REMOVE_NODE | The old component is not in the new collection. We need to delete it. |
So we identified these three types of differences, assembled them into specific difference objects, and added them to the difference queue.
For example, let's look at the following example, assuming that the following are a collection of child elements of a parent element, which represents the change process from the top to the bottom:
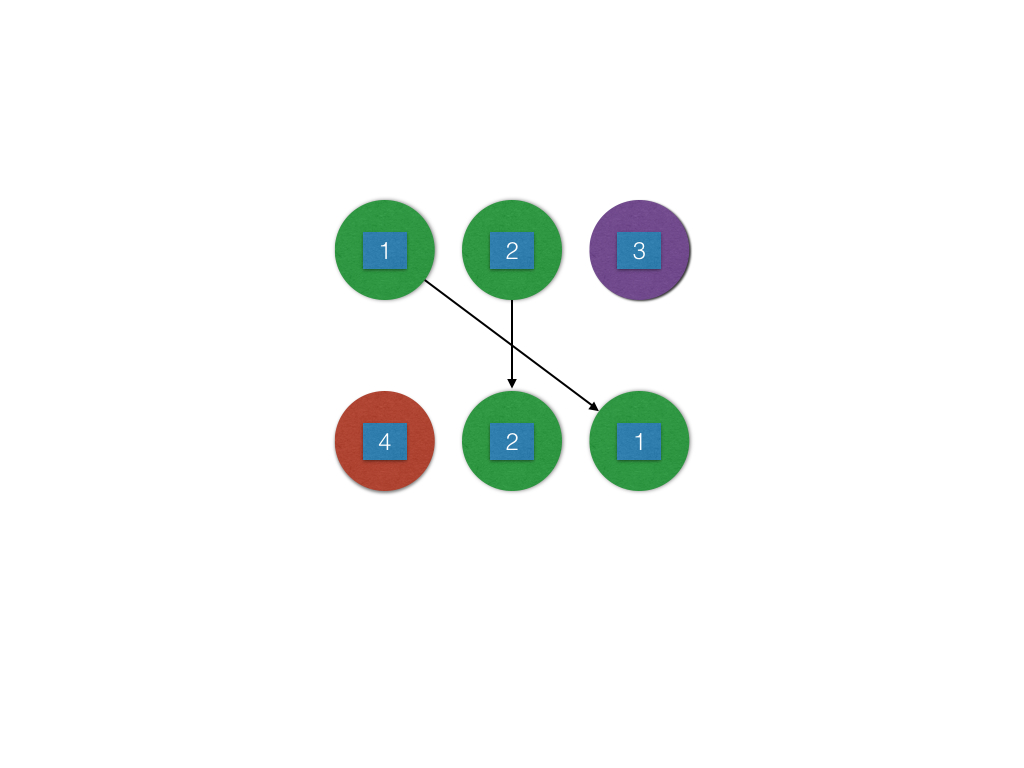
Numbers can be understood as key s to element s.
Squares represent element s. The circle represents the component. Of course, it's also the actual location of the dom node.
From top to bottom, 2 and 1 of our 421 can reuse the previous component s, let them notify their child nodes of updates, and then tell 2 and 1 where they need to move in the new collection (in our case, assemble the different objects and add them to the queue). 3 needs to be deleted and 4 needs to be added.
Well, the whole diff is done, and when the recursion is completed, we need to start doing the patch action, and reflect these different objects to the concrete dom nodes.
Let's look at the implementation of _patch:
//Used to insert child Node into a specified location
function insertChildAt(parentNode, childNode, index) {
    var beforeChild = parentNode.children().get(index);
    beforeChild ? childNode.insertBefore(beforeChild) : childNode.appendTo(parentNode);
}

ReactDOMComponent.prototype._patch = function(updates) {
    var update;
    var initialChildren = {};
    var deleteChildren = [];
    for (var i = 0; i < updates.length; i++) {
        update = updates[i];
        if (update.type === UPATE_TYPES.MOVE_EXISTING || update.type === UPATE_TYPES.REMOVE_NODE) {
            var updatedIndex = update.fromIndex;
            var updatedChild = $(update.parentNode.children().get(updatedIndex));
            var parentID = update.parentID;

            //All nodes that need to be updated are saved for later use.
            initialChildren[parentID] = initialChildren[parentID] || [];
            //Use parentID as a simple namespace
            initialChildren[parentID][updatedIndex] = updatedChild;


            //All the nodes that need to be modified should be deleted first. For move, it can be re-inserted to the correct location later.
            deleteChildren.push(updatedChild)
        }

    }

    //Delete all items that need to be deleted first
    $.each(deleteChildren, function(index, child) {
        $(child).remove();
    })


    //Go through it again, this time to deal with the new nodes, as well as the modified nodes, which also need to be re-inserted here.
    for (var k = 0; k < updates.length; k++) {
        update = updates[k];
        switch (update.type) {
            case UPATE_TYPES.INSERT_MARKUP:
                insertChildAt(update.parentNode, $(update.markup), update.toIndex);
                break;
            case UPATE_TYPES.MOVE_EXISTING:
                insertChildAt(update.parentNode, initialChildren[update.parentID][update.fromIndex], update.toIndex);
                break;
            case UPATE_TYPES.REMOVE_NODE:
                // Nothing needs to be done, because the above has been deleted.
                break;
        }
    }
}
_ patch mainly traverses difference queues one by one, traversing twice, deleting all the nodes that need to be changed for the first time, then inserting new nodes and modifying nodes for the second time. Why can I insert them one by one? The reason is that when we add different nodes to the difference queue in diff phase, it is orderly in itself. That is to say, the order of the new nodes (including move s and inserts) in the queue is the order of the final dom, so we can insert the nodes directly according to the index one by one.
But in fact, you will find that there is a problem that all nodes will be deleted, including reusing the previous component type UPATE_TYPES.MOVE_EXISTING, so the flicker will be very serious. In fact, let's look at the example above. Actually, 2 does not need to record the difference queue. So the latter patch is okay. Think about why?
Let's revamp the code:
//_ diff is used to recursively identify differences, assemble differences objects, and add them to the update queue diffQueue.
ReactDOMComponent.prototype._diff = function(diffQueue, nextChildrenElements){
    . . .
    /**Note the new code**/
    var lastIndex = 0;//Location of an old collection representing the last visit
    var nextIndex = 0;//index representing the arrival of a new node
    //By comparing the differences between the two sets, assemble the difference nodes and add them to the queue
    for (name in nextChildren) {
        if (!nextChildren.hasOwnProperty(name)) {
          continue;
        }
        var prevChild = prevChildren && prevChildren[name];
        var nextChild = nextChildren[name];
        //In the same way, the instructions are using the same component, so we need to do mobile operations.
        if (prevChild === nextChild) {
          //Add difference objects, type: MOVE_EXISTING
          . . . .
          /**Note the new code**/
          prevChild._mountIndex < lastIndex && diffQueue.push({
                parentId:this._rootNodeID,
                parentNode:$('[data-reactid='+this._rootNodeID+']'),
                type: UPATE_TYPES.REMOVE_NODE,
                fromIndex: prevChild._mountIndex,
                toIndex:null
          })
          lastIndex = Math.max(prevChild._mountIndex, lastIndex);
        } else {
          //If it is not the same, it means that it is a newly added node.
          if (prevChild) {
            //But if the old one still exists, the element is different, but the component is the same. We need to delete the old element that corresponds to it.
            //Add difference object, type: REMOVE_NODE
            . . . . .
            /**Note the new code**/
            lastIndex = Math.max(prevChild._mountIndex, lastIndex);
          }
          . . .
        }
        //Update mount's inddex
        nextChild._mountIndex = nextIndex;
        nextIndex++;
      }

      //For old nodes, those that are not in new nodes are all deleted.
      . . .
}
You can see that we added an additional lastIndex, which represents the largest location of the old collection node that was last visited. We added a judgment that only those with _mountIndex less than the last Index would need to join the difference queue. With this judgment, example 2 above does not require move. And the program can also run well, in fact, most of them are 2 cases.
This is a sequential optimization, lastIndex has been updated, representing the elements of the oldest collection currently accessed. Let's assume that the last element is A and update lastIndex after adding it. If we take a new element B at this time, it's more than lastIndex, indicating that the current element is behind the previous A in the old set. So even if this element does not join the difference queue, it will not affect other people, and it will not affect the path insertion node later. Because we know from patch that new collections insert elements from scratch in order, only when new elements are less than lastIndex hours. In fact, as long as you carefully scrutinize the above example, you can understand this optimization method.
This completes the whole update mechanism. Let's briefly review the different reactjs algorithms:
First, all component s implement receiveComponent to take charge of their own updates, and the browser default element updates are the most complex, which is often called diff algorithm.
Reaction has a global shouldUpdate react Component to determine whether to update or re-render based on the key of the element, which is the first difference judgment. For example, in a custom element, this judgment is used, and judgment through this identification becomes particularly efficient.
Each type of element should handle its own updates:
-
The update of custom elements is mainly to update the render node, and to do the corresponding component of the render node to manage the update.
-
Text node updates are simple, updating the text directly.
-
The update of browser basic elements is divided into two parts:
- First is to update the attributes, comparing the different attributes before and after, local updates. And it handles special attributes, such as event binding.
- Next is the updating of sub-nodes. The updating of sub-nodes is mainly to find out the difference objects. The updating of sub-nodes will be judged by using the _shouldUpdate React Component above when finding the difference objects. If updating can be done directly, the updating of sub-nodes will be called recursively. This will also find the difference objects recursively. In this case, lastIndex will be used to optimize the location of some nodes. The dom elements are then manipulated according to the different objects (position changes, deletions, additions, etc.).
This is how the entire reactjs differs from each other. The two core _shouldUpdate React Component and diff,patch algorithm.
A small scalpel
With the simple version of reaactjs above, let's implement a simple todolist.
var TodoList = React.createClass({
  getInitialState: function() {
    return {items: []};
  },
  add:function(){
    var nextItems = this.state.items.concat([this.state.text]);
    this.setState({items: nextItems, text: ''});
  },
  onChange: function(e) {
    this.setState({text: e.target.value});
  },
  render: function() {
    var createItem = function(itemText) {
      return React.createElement("div", null, itemText);
    };

    var lists = this.state.items.map(createItem);
    var input = React.createElement("input", {onkeyup: this.onChange.bind(this),value: this.state.text});
    var button = React.createElement("p", {onclick: this.add.bind(this)}, 'Add#' + (this.state.items.length + 1))
    var children = lists.concat([input,button])

    return React.createElement("div", null,children);
  }
});


React.render(React.createElement(TodoList), document.getElementById("container"));
The results are as follows:
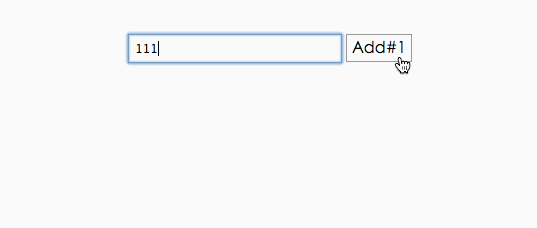
The whole process is as follows:
- When rendering for the first time, we use React Composite Component to render the custom element TodoList, call getInitialState to get the initial value, and then use ReactDOMComponent to render the div base element node returned by render. The basic div element uses ReactDOMComponent layer by layer to render various sub-nodes, including input and p.
- Input box input text triggers onchange event, start calling setState to make changes, directly change the render out of the node, through the difference algorithm, layer by layer down. Finally, change the value.
- Click on the button, trigger add, and then start updating. After the difference algorithm, add a node. Update the text on the button at the same time.
Basically, the whole process is sorted out.
epilogue
It's just a toy, but it realizes the core functions of reactjs, virtual nodes, difference algorithms, one-way data updates are all here. There are many other excellent reactjs that have not been implemented, such as thread pool management of memory when object is generated, batch update mechanism, event optimization, server rendering, immutable data and so on. These things will not be expanded in detail because of the limitation of space.
Reactjs is a solution, the idea of virtual nodes is novel, but individuals still can't accept this awkward way of writing. Using reactjs, we need to use his whole development method, and his core function is actually a difference algorithm, which has been implemented by the relevant libraries.
Finally, the front end of Tucao is really hard, and all kinds of new technologies and new knowledge are not enough. No wonder the front end is always short of people.