Project version introduction
Currently used project node version V14 17.5, NPM version 6.14.14, the template used in reactnative project is combined with the project template architecture of typescript syntax. The installation method is as follows:
npx react-native init xxx(Project name) --template react-native-template-typescript
After completion, you can directly run yarn android or npm run android to start the project.
1. react-native-config
View the web address of the reactNative plug-in js.coach.
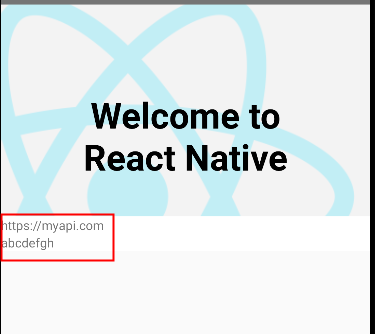
At present, the best way to configure reactNative multi environment variables is to use the plug-in react native config, which can be created in the root directory env file. The content can be tested and configured as follows:
API_URL=https://myapi.com
GOOGLE_MAPS_API_KEY=abcdefgh
On app Add in TSX file:
import Config from 'react-native-config';
<Text>{Config.API_URL}</Text>
<Text>{Config.GOOGLE_MAPS_API_KEY}</Text>
Then follow the steps of jscoach:
I. yarn add react native config
II. Reactnative can be automatically introduced after version 0.60 without connecting to react native link react native config
III. iOS needs to enter the project first, and then (cd ios; pod install)
Four aspects of Android need to be introduced manually
-
android/settings.gradle
include ':react-native-config'
project(':react-native-config').projectDir = new File(rootProject.projectDir, '.../node_modules/react-native-config/android') -
android/app/build.gradle
dependencies {
implementation "com.facebook.react:react-native:+" // From node_modules
implementation project(':react-native-config')
}
Add apply from: project(': react native config') to the last line projectDir.getPath() + “/dotenv.gradle”
After completion, you can directly run yarn android or npm run android to start the project. Check whether there is output content.

2. Absolute path configuration
The project directory is complicated, and configurable paths need to be configured for unified reference. At this time, the download Plug-in Babel plugin module resolver needs to be installed
yarn add -D babel-plugin-module-resolver
Babel. In the project root directory config. Configuring plugins in JS
plugins: [
    [
      'module-resolver',
      {
        root: ['./src'],
        alias: {
          '@': './src',
          '@/utils': './src/utils',
          '@/assets': './src/assets',
          '@/components': './src/components',
          '@/models': './src/models',
          '@/navigator': './src/navigator',
          '@/config': './src/config',
          '@/pages': './src/pages',
        },
      },
    ],
  ],
The reference shown in the figure below will not report an error. In addition, you need to configure tsconfig baseUrl and path attributes in JSON
import {test} from '@/utils';
"baseUrl": "./src",                       /* Base directory to resolve non-absolute module names. */
"paths": {
  "@/assets/*": ["assets/*"],
  "@/components/*": ["components/*"],
  "@/config/*": ["config/*"],
  "@/models/*": ["models/*"],
  "@/navigator/*": ["navigator/*"],
  "@/pages/*": ["pages/*"],
  "@/utils/*": ["utils/*"]
},
3. Install the React Native stack navigator
React Navigation On the official website, you can view the basic stack navigator commonly used by React Native, which is similar to the routing mode and navigation mode of front-end Vue and react methods. Installation mode Reference website
1. Use the yarn command line to install (refer to me here, there is a problem on the official website)
yarn add react-native-reanimated react-native-gesture-handler react-native-screens react-native-safe-area-context @react-native-community/masked-view
2. IOS items corresponding to MacOS users need to be downloaded by pod
cd ios; pod install
3. Use react native screens in android project. The plug-in needs to be configured in some files:
1) In android/app/src/main/java / project name / mainactivity Add code to Java:
@Override
protected void onCreate(Bundle savedInstanceState) {
  super.onCreate(null);
}
2) At the same time, in mainactivity This code is introduced at the top of Java
import android.os.Bundle;
3) Index at the bottom of the project JS file:
import 'react-native-gesture-handler';
4) Download the Stack Navigator plug-in Stack Navigator from the project
yarn add @react-navigation/stack
After the installation, you can run the corresponding native environment on Yahoo Android or Yahoo IOS to try whether there is an error. If so, you can tune it yourself or refer to my Solution collection
Here is the main logic code about routing:
// navigation/index.tsx
import React from 'react';
import {Platform, StyleSheet} from 'react-native';
import {NavigationContainer} from '@react-navigation/native';
import {
  CardStyleInterpolators,
  createStackNavigator,
  HeaderStyleInterpolators,
  StackNavigationProp,
} from '@react-navigation/stack';
import Home from '@/pages/Home';
import Detail from '@/pages/Detail';

export type RootStackParamList = {
  Home: undefined;
  Detail: {
    id: number;
  };
};

export type RootStackNavigation = StackNavigationProp<RootStackParamList>;

let Stack = createStackNavigator<RootStackParamList>();

const MyStackNavigation = () => {
  return (
    // <Text>11</Text>
    <NavigationContainer>
      <Stack.Navigator
        // Configuration of all stack navigation
        screenOptions={{
          // Head navigation center
          headerTitleAlign: 'center',
          // Title bar mode, ios(float): share a title bar android(screen): one title bar per page none the whole title bar disappears
          headerMode: 'float',
          // Animate the head
          headerStyleInterpolator: HeaderStyleInterpolators.forUIKit,
          // Animate the bottom page
          cardStyleInterpolator: CardStyleInterpolators.forHorizontalIOS,
          // android is off by default, so it is set to on by default
          gestureEnabled: true,
          // android default gesture direction is vertical, so set the default horizontal
          gestureDirection: 'horizontal',
          // There is a projection effect between the android header and the page (because android has no shadow effect), so it is set uniformly
          headerStyle: {
            ...Platform.select({
              android: {
                elevation: 0,
                borderBottomWidth: StyleSheet.hairlineWidth,
              },
              // ios: {

              // }
            }),
          },
        }}>
        <Stack.Screen
          options={{headerTitleAlign: 'center', headerTitle: 'home page'}}
          name="Home"
          component={Home}
        />
        <Stack.Screen
          options={{headerTitleAlign: 'center', headerTitle: 'Detail page'}}
          name="Detail"
          component={Detail}
        />
      </Stack.Navigator>
    </NavigationContainer>
  );
};

export default MyStackNavigation;
The comments in the note will explain some parameters and precautions of the route, especially the content of screenOptions
4. About the way of route navigation jump value transmission
It mainly uses the StackNavigationProp module in @ react navigation / stack and RouteProp in @ react navigation / native;
Let's assume that the Home page transmits a value of 100 to the Detail page. Here is the Home page code
import React, {FC} from 'react';
import {View, Text, Button} from 'react-native';
import {RootStackNavigation} from '@/navigator/index';

interface IProps {
  navigation: RootStackNavigation;
}

const Home: FC<IProps> = props => {
  const onPress = () => {
    const {navigation} = props;
    navigation.navigate('Detail', {
      id: 100,
    });
  };

  return (
    <View>
      <Text>Home</Text>
      <Button title="Jump to details page" onPress={onPress} />
    </View>
  );
};

export default Home;
Or Detail page code:
import React, {FC} from 'react';
import {View, Text} from 'react-native';
import {RouteProp} from '@react-navigation/native';
import {RootStackParamList} from '@/navigator/index';

interface IProps {
  route: RouteProp<RootStackParamList, 'Detail'>;
}

const Detail: FC<IProps> = props => {
  const {route} = props;

  return (
    <View>
      <Text>Detail</Text>
      <Text>{route.params.id}</Text>
    </View>
  );
};

export default Detail;
To be continued!