1. MQ introduction
##1.1 why MQ
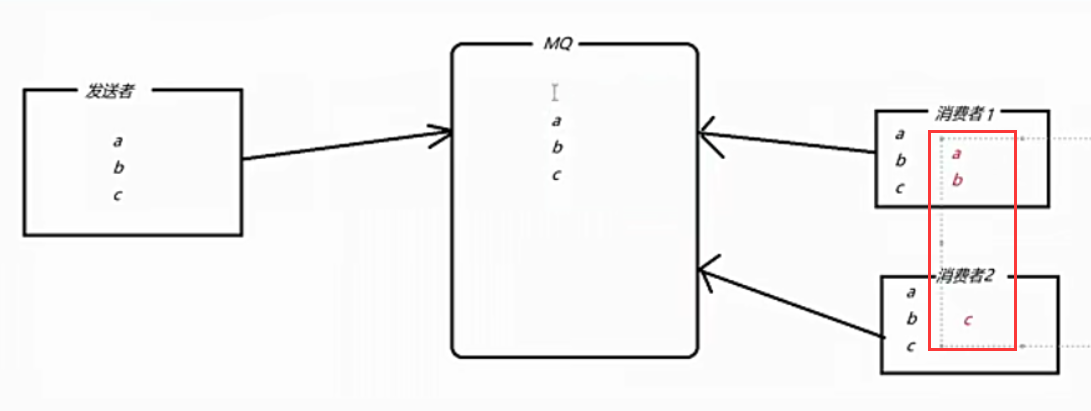
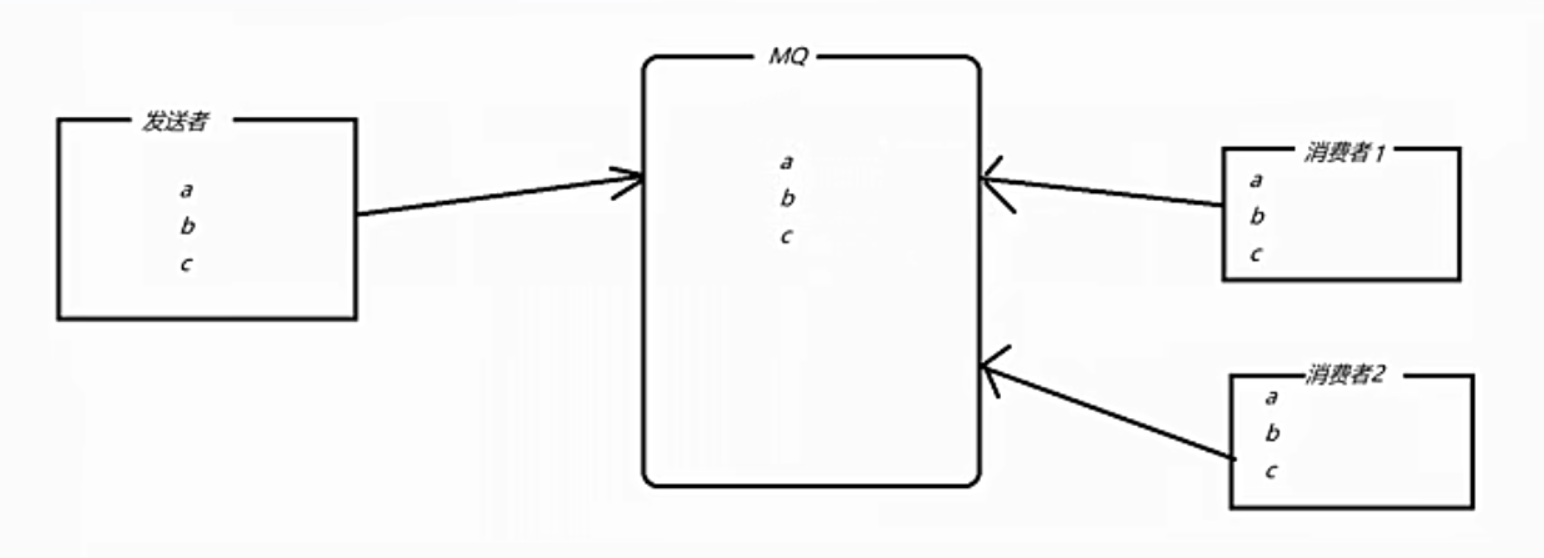
Message queuing is a "first in, first out" data structure

Its application scenario mainly includes the following three aspects
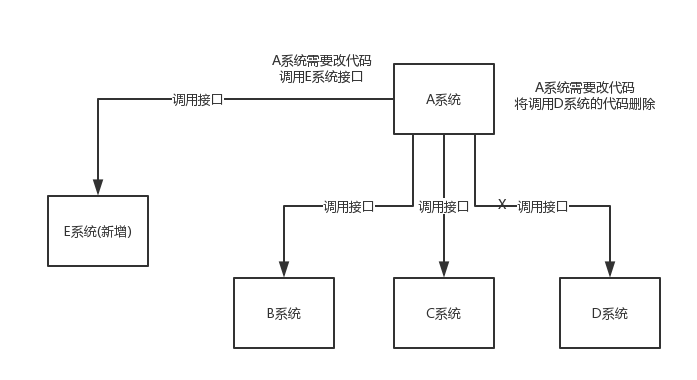
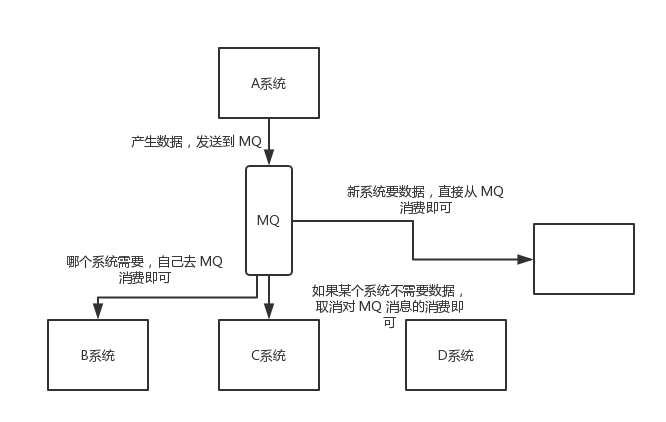
- Application decoupling
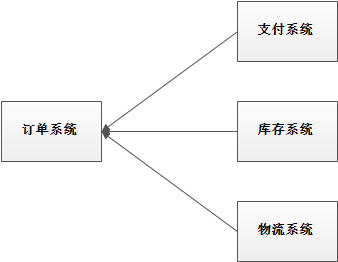
The higher the coupling of the system, the lower the fault tolerance. Taking the e-commerce application as an example, if the user creates an order and calls the inventory system, logistics system and payment system, any subsystem fails or is temporarily unavailable due to upgrading and other reasons, the order placing operation will be abnormal and the user experience will be affected.
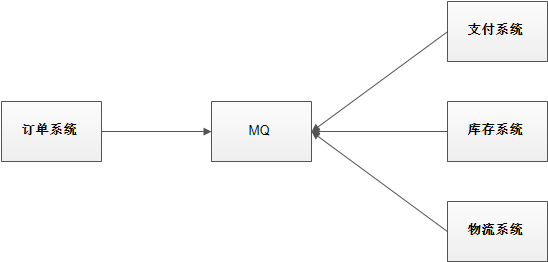
Using message queue decoupling, the coupling of the system will be improved. For example, if the logistics system fails, it takes several minutes to repair. During this time, the data to be processed by the logistics system is cached in the message queue, and the user's order operation is completed normally. After the logistics system replies, it can supplement the order messages in the message queue. The terminal system does not perceive that the logistics system has failed for several minutes.
- Flow peak clipping
If the application system encounters an instant surge in system request traffic, it may crush the system. With message queuing, a large number of requests can be cached and distributed for a long time, which can greatly improve the stability of the system and user experience.
In general, in order to ensure the stability of the system, if the system load exceeds the threshold, the user request will be blocked, which will affect the user experience. If the message queue is used to cache the request and notify the user of the completion of the order after the system is processed, the user can not place the order. The experience is better.
For economic purposes:
If the QPS in the normal period of the business system is 1000 and the peak traffic is 10000, it is obviously not cost-effective to configure high-performance servers to cope with the peak traffic. At this time, you can use message queue to reduce the peak traffic
- Data distribution
Message queuing allows data to flow between multiple systems. The data generator does not need to care who uses the data, but only needs to send the data to the message queue, and the data user can directly obtain the data in the message queue
1.2 advantages and disadvantages of MQ
Advantages: decoupling, peak clipping, data distribution
Disadvantages include the following:
-
Reduced system availability
The more external dependencies the system introduces, the worse the stability of the system. Once MQ goes down, it will have an impact on the business.
How to ensure high availability of MQ?
-
Increased system complexity
The addition of MQ greatly increases the complexity of the system. In the past, synchronous remote calls were made between systems, but now asynchronous calls are made through MQ.
How to ensure that messages are not consumed repeatedly? How to deal with message loss? So how to ensure the order of message delivery?
-
Consistency problem
After processing the business, system A sends message data to systems B, C and D through MQ. If system B and C process successfully, system D process fails.
How to ensure the consistency of message data processing?
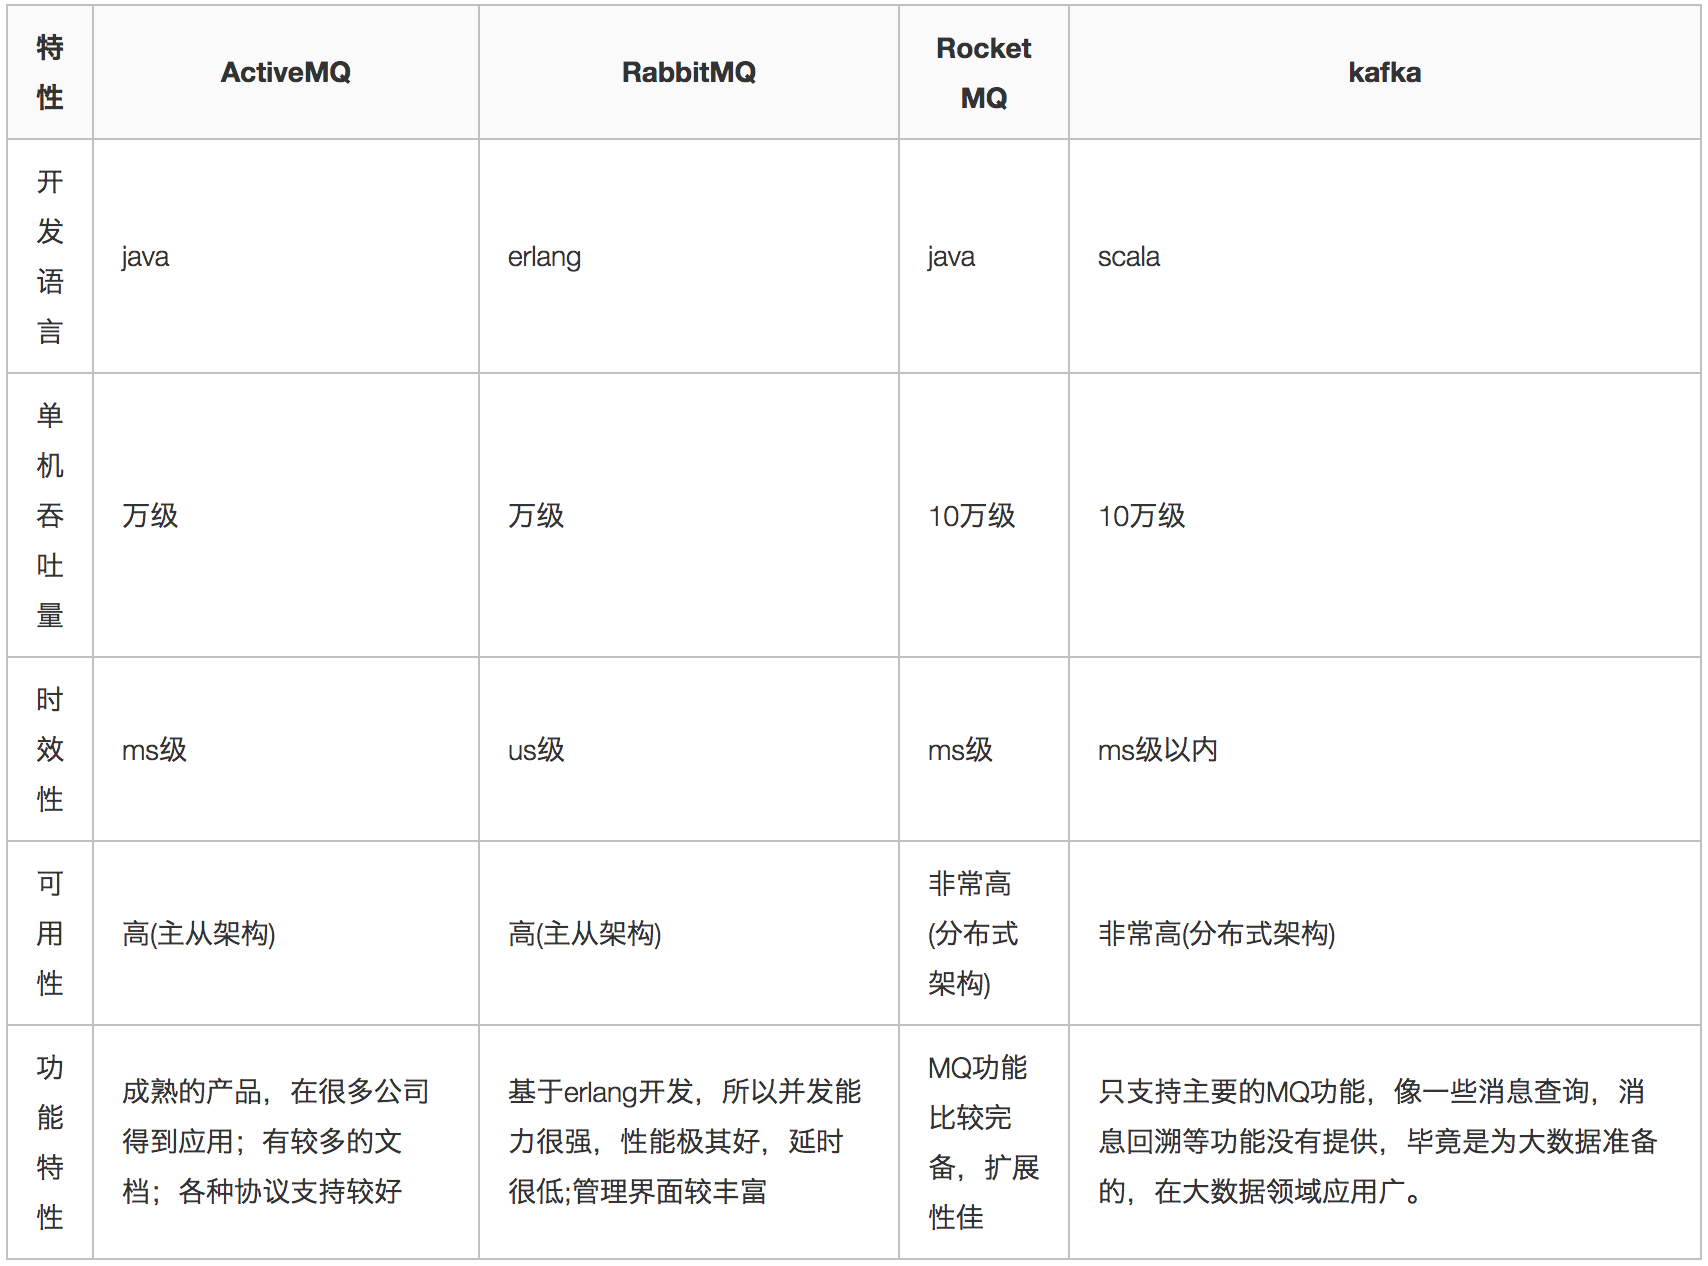
1.3 comparison of various MQ products
Common MQ products include Kafka, ActiveMQ, RabbitMQ and RocketMQ.
2. RocketMQ quick start
RocketMQ is Alibaba's MQ Middleware in 2016. It is developed in Java language. Within Alibaba, RocketMQ undertakes message flow in high concurrency scenarios such as "double 11" and can handle trillions of messages.
2.1 preparation
2.1.1 download RocketMQ
Latest version of RocketMQ: 4.5.1
2.2.2 environmental requirements
-
Linux 64 bit system
-
JDK1.8(64 bit)
-
Maven 3.2.x is required for source code installation
2.2 installing RocketMQ
2.2.1 installation steps
This tutorial is installed as a binary package
- Unzip the installation package
- Enter the installation directory
2.2.2 catalog introduction
- bin: startup script, including shell script and CMD script
- conf: instance configuration file, including broker configuration file, logback configuration file, etc
- lib: depends on jar packages, including Netty, commons Lang, FastJSON, etc
2.3 start RocketMQ
- Start NameServer
# 1. Start NameServer
nohup sh bin/mqnamesrv &
# 2. View the startup log
tail -f ~/logs/rocketmqlogs/namesrv.log
- Start Broker
# 1. Start the Broker
nohup sh bin/mqbroker -n localhost:9876 &
# 2. View the startup log
tail -f ~/logs/rocketmqlogs/broker.log
-
Problem Description:
RocketMQ's default virtual machine memory is large. If starting Broker fails because of insufficient memory, you need to edit the following two configuration files to modify the JVM memory size
# Edit runbroker.sh and runserver.sh to modify the default JVM size
vi runbroker.sh
vi runserver.sh
- Reference settings:
JAVA_OPT="${JAVA_OPT} -server -Xms256m -Xmx256m -Xmn128m -XX:MetaspaceSize=128m -XX:MaxMetaspaceSize=320m"
2.4 testing RocketMQ
2.4.1 sending messages
# 1. Set environment variables
export NAMESRV_ADDR=localhost:9876
# 2. Send a message using the Demo of the installation package
sh bin/tools.sh org.apache.rocketmq.example.quickstart.Producer
2.4.2 receiving messages
# 1. Set environment variables
export NAMESRV_ADDR=localhost:9876
# 2. Receive message
sh bin/tools.sh org.apache.rocketmq.example.quickstart.Consumer
2.5 close RocketMQ
# 1. Close NameServer
sh bin/mqshutdown namesrv
# 2. Close the Broker
sh bin/mqshutdown broker
3. RocketMQ cluster construction
3.1 introduction to each role
- Producer: the sender of the message; Example: sender
- Consumer: message receiver; Example: recipient
- Broker: temporary storage and transmission of messages; Example: Post Office
- NameServer: manage Broker; Example: the management organization of each post office
- Topic: distinguish the types of messages; A sender can send messages to one or more topics; The recipient of a message can subscribe to one or more topic messages
- Message Queue: equivalent to the partition of Topic; Used to send and receive messages in parallel

3.2 cluster construction mode
3.2.1 cluster characteristics
-
NameServer is an almost stateless node that can be deployed in a cluster without any information synchronization between nodes.
-
Broker deployment is relatively complex. Brokers are divided into Master and Slave. A Master can correspond to multiple Slave, but a Slave can only correspond to one Master. The corresponding relationship between Master and Slave is defined by specifying the same broker name and different broker IDs. A broker ID of 0 indicates a Master and a non-0 indicates a Slave. The Master can also deploy multiple. Each broker establishes long-term connections with all nodes in the NameServer cluster and regularly registers Topic information with all nameservers.
-
Producer establishes a long connection with one of the nodes (randomly selected) in the NameServer cluster, periodically obtains Topic routing information from the NameServer, establishes a long connection to the Master providing Topic services, and regularly sends heartbeat to the Master. Producer is completely stateless and can be deployed in a cluster.
-
The Consumer establishes a long connection with one of the nodes (randomly selected) in the NameServer cluster, periodically obtains Topic routing information from the NameServer, establishes a long connection to the Master and Slave providing Topic services, and regularly sends heartbeat to the Master and Slave. Consumers can subscribe to messages from both Master and Slave. The subscription rules are determined by the Broker configuration.
3.2.3 cluster mode
1) Single Master mode
This method is risky. Once the Broker is restarted or down, the whole service will be unavailable. It is not recommended to use in online environment and can be used for local testing.
2) Multi Master mode
A cluster has no Slave but all masters, such as two or three masters. The advantages and disadvantages of this mode are as follows:
- Advantages: the configuration is simple, and the downtime or restart maintenance of a single Master has no impact on the application. When the disk is configured as RAID10, even if the machine downtime is unrecoverable, because the RAID10 disk is very reliable, messages will not be lost (a small number of messages will be lost in asynchronous disk brushing, and none will be lost in synchronous disk brushing), and the performance is the highest;
- Disadvantages: during the downtime of a single machine, messages that are not consumed on this machine cannot be subscribed before the machine is restored, and the real-time performance of messages will be affected.
3) Multi Master multi Slave mode (asynchronous)
Each Master is configured with a Slave. There are multiple pairs of Master Slave. HA adopts asynchronous replication mode, and the active and standby have short message delay (in milliseconds). The advantages and disadvantages of this mode are as follows:
- Advantages: even if the disk is damaged, very few messages are lost, and the real-time performance of messages will not be affected. At the same time, after the Master goes down, consumers can still consume from Slave. Moreover, this process is transparent to applications, does not need manual intervention, and the performance is almost the same as that of multi master mode;
- Disadvantages: when the Master goes down and the disk is damaged, a small number of messages will be lost.
4) Multi Master multi Slave mode (synchronous)
Each Master is configured with a Slave. There are multiple pairs of Master Slave. The HA adopts the synchronous double write mode, that is, it returns success to the application only if the active and standby are successfully written. The advantages and disadvantages of this mode are as follows:
- Advantages: there is no single point of failure in data and services. When the Master goes down, there is no message delay, and the service availability and data availability are very high;
- Disadvantages: the performance is slightly lower than that of asynchronous replication mode (about 10% lower), and the RT for sending a single message will be slightly higher. In the current version, after the primary node goes down, the standby machine cannot automatically switch to the host.
3.3 establishment of dual master and dual slave clusters
3.3.1 overall structure
2m-2s (synchronous double write) mode is adopted for message high availability
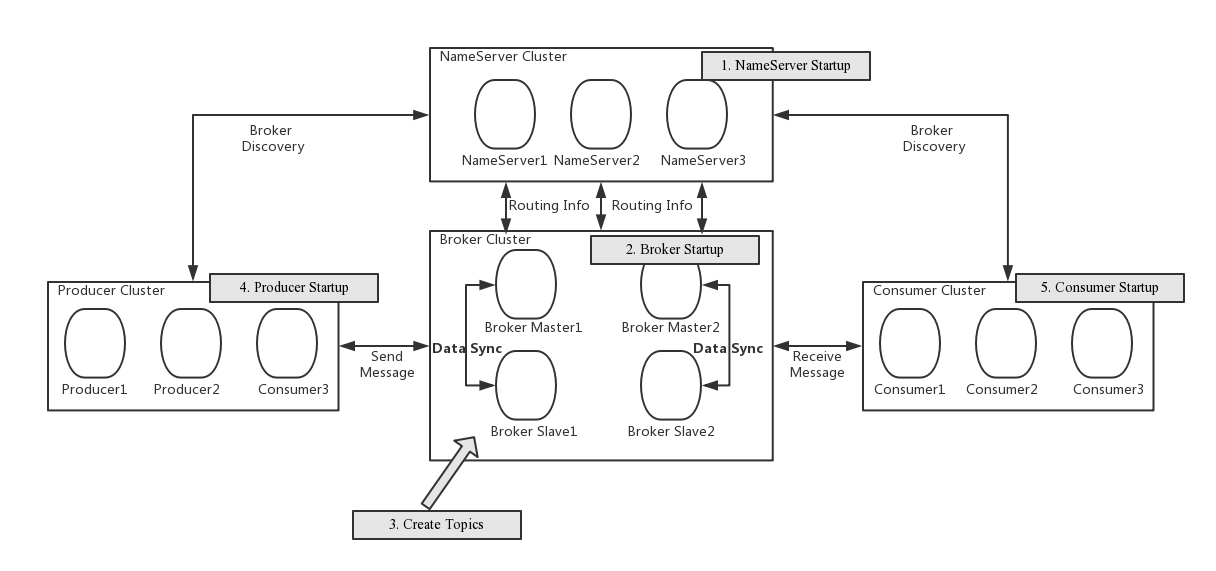
3.3.2 cluster workflow
- Start the NameServer. After the NameServer is up, listen to the port and wait for the Broker, Producer and Consumer to connect. It is equivalent to a routing control center.
- The Broker starts, maintains a long connection with all nameservers, and sends heartbeat packets regularly. The heartbeat packet contains the current Broker information (IP + port, etc.) and all Topic information stored. After successful registration, there is a mapping relationship between Topic and Broker in the NameServer cluster.
- Before sending and receiving messages, create a Topic. When creating a Topic, you need to specify which brokers the Topic will be stored in. You can also create a Topic automatically when sending messages.
- Producer sends a message. When starting, it first establishes a long connection with one of the NameServer clusters, obtains the brokers of the currently sent topics from the NameServer, polls, selects a queue from the queue list, and then establishes a long connection with the Broker where the queue is located, so as to send a message to the Broker.
- Similar to Producer, Consumer establishes a long connection with one of the nameservers, obtains which brokers the current subscription Topic exists on, and then directly establishes a connection channel with the Broker to start consuming messages.
3.3.3 server environment
| Serial number | IP | role | Architecture mode |
|---|---|---|---|
| 1 | 192.168.25.135 | nameserver,brokerserver | Master1,Slave2 |
| 2 | 192.168.25.138 | nameserver,brokerserver | Master2,Slave1 |
3.3.4 adding host information
vim /etc/hosts
The configuration is as follows:
# nameserver
192.168.25.135 rocketmq-nameserver1
192.168.25.138 rocketmq-nameserver2
# broker
192.168.25.135 rocketmq-master1
192.168.25.135 rocketmq-slave2
192.168.25.138 rocketmq-master2
192.168.25.138 rocketmq-slave1
After configuration, restart the network card
systemctl restart network
3.3.5 firewall configuration
The host needs to remotely access the rocketmq service and web service of the virtual machine, and needs to open the relevant port number. The simple and crude way is to directly close the firewall
# Turn off firewall
systemctl stop firewalld.service
# View firewall status
firewall-cmd --state
# Disable firewall startup
systemctl disable firewalld.service
Or for security, only specific port numbers are open. RocketMQ uses three ports by default: 9876, 10911 and 11011. If the firewall is not closed, the firewall must open these ports:
- nameserver uses port 9876 by default
- The master uses port 10911 by default
- The slave uses port 11011 by default
Execute the following command:
# Open the default port of name server
firewall-cmd --remove-port=9876/tcp --permanent
# Open master default port
firewall-cmd --remove-port=10911/tcp --permanent
# Open the default slave port (the current cluster mode may not be enabled)
firewall-cmd --remove-port=11011/tcp --permanent
# service iptables restart
firewall-cmd --reload
3.3.6 environment variable configuration
vim /etc/profile
Add the following command at the end of the profile file
#set rocketmq
ROCKETMQ_HOME=/usr/local/rocketmq/rocketmq-all-4.4.0-bin-release
PATH=$PATH:$ROCKETMQ_HOME/bin
export ROCKETMQ_HOME PATH
Input: wq! Save and exit and make the configuration effective immediately:
source /etc/profile
3.3.7 create message storage path
mkdir /usr/local/rocketmq/store
mkdir /usr/local/rocketmq/store/commitlog
mkdir /usr/local/rocketmq/store/consumequeue
mkdir /usr/local/rocketmq/store/index
3.3.8 broker configuration file
1)master1
Server: 192.168.25.135
vi /usr/soft/rocketmq/conf/2m-2s-sync/broker-a.properties
Modify the configuration as follows:
#Cluster name
brokerClusterName=rocketmq-cluster
#The name of the broker. Note that different configuration files here are filled in differently
brokerName=broker-a
#0 means Master, > 0 means Slave
brokerId=0
#nameServer address, semicolon split
namesrvAddr=rocketmq-nameserver1:9876;rocketmq-nameserver2:9876
#When sending messages, topic s that do not exist in the server are automatically created, and the number of queues created by default
defaultTopicQueueNums=4
#Whether to allow the Broker to automatically create topics. It is recommended to open offline and close online
autoCreateTopicEnable=true
#Whether to allow the Broker to automatically create subscription groups. It is recommended to open offline and close online
autoCreateSubscriptionGroup=true
#Listening port of Broker external service
listenPort=10911
#Delete file time point. The default is 4 a.m
deleteWhen=04
#File retention time, 48 hours by default
fileReservedTime=120
#commitLog the default size of each file is 1G
mapedFileSizeCommitLog=1073741824
#ConsumeQueue stores 30W files by default, which can be adjusted according to business conditions
mapedFileSizeConsumeQueue=300000
#destroyMapedFileIntervalForcibly=120000
#redeleteHangedFileInterval=120000
#Detect physical file disk space
diskMaxUsedSpaceRatio=88
#Storage path
storePathRootDir=/usr/local/rocketmq/store
#commitLog storage path
storePathCommitLog=/usr/local/rocketmq/store/commitlog
#Consumption queue storage path storage path
storePathConsumeQueue=/usr/local/rocketmq/store/consumequeue
#Message index storage path
storePathIndex=/usr/local/rocketmq/store/index
#checkpoint file storage path
storeCheckpoint=/usr/local/rocketmq/store/checkpoint
#abort file storage path
abortFile=/usr/local/rocketmq/store/abort
#Limited message size
maxMessageSize=65536
#flushCommitLogLeastPages=4
#flushConsumeQueueLeastPages=2
#flushCommitLogThoroughInterval=10000
#flushConsumeQueueThoroughInterval=60000
#Role of Broker
#- ASYNC_MASTER asynchronous replication master
#- SYNC_MASTER synchronous double write master
#- SLAVE
brokerRole=SYNC_MASTER
#Disc brushing mode
#- ASYNC_FLUSH asynchronous brush disk
#- SYNC_FLUSH synchronous brush disc
flushDiskType=SYNC_FLUSH
#checkTransactionMessageEnable=false
#Number of messaging thread pools
#sendMessageThreadPoolNums=128
#Number of pull message thread pools
#pullMessageThreadPoolNums=128
2)slave2
Server: 192.168.25.135
vi /usr/soft/rocketmq/conf/2m-2s-sync/broker-b-s.properties
Modify the configuration as follows:
#Cluster name
brokerClusterName=rocketmq-cluster
#The name of the broker. Note that different configuration files here are filled in differently
brokerName=broker-b
#0 means Master, > 0 means Slave
brokerId=1
#nameServer address, semicolon split
namesrvAddr=rocketmq-nameserver1:9876;rocketmq-nameserver2:9876
#When sending messages, topic s that do not exist in the server are automatically created, and the number of queues created by default
defaultTopicQueueNums=4
#Whether to allow the Broker to automatically create topics. It is recommended to open offline and close online
autoCreateTopicEnable=true
#Whether to allow the Broker to automatically create subscription groups. It is recommended to open offline and close online
autoCreateSubscriptionGroup=true
#Listening port of Broker external service
listenPort=11011
#Delete file time point. The default is 4 a.m
deleteWhen=04
#File retention time, 48 hours by default
fileReservedTime=120
#commitLog the default size of each file is 1G
mapedFileSizeCommitLog=1073741824
#ConsumeQueue stores 30W files by default, which can be adjusted according to business conditions
mapedFileSizeConsumeQueue=300000
#destroyMapedFileIntervalForcibly=120000
#redeleteHangedFileInterval=120000
#Detect physical file disk space
diskMaxUsedSpaceRatio=88
#Storage path
storePathRootDir=/usr/local/rocketmq/store
#commitLog storage path
storePathCommitLog=/usr/local/rocketmq/store/commitlog
#Consumption queue storage path storage path
storePathConsumeQueue=/usr/local/rocketmq/store/consumequeue
#Message index storage path
storePathIndex=/usr/local/rocketmq/store/index
#checkpoint file storage path
storeCheckpoint=/usr/local/rocketmq/store/checkpoint
#abort file storage path
abortFile=/usr/local/rocketmq/store/abort
#Limited message size
maxMessageSize=65536
#flushCommitLogLeastPages=4
#flushConsumeQueueLeastPages=2
#flushCommitLogThoroughInterval=10000
#flushConsumeQueueThoroughInterval=60000
#Role of Broker
#- ASYNC_MASTER asynchronous replication master
#- SYNC_MASTER synchronous double write master
#- SLAVE
brokerRole=SLAVE
#Disc brushing mode
#- ASYNC_FLUSH asynchronous brush disk
#- SYNC_FLUSH synchronous brush disc
flushDiskType=ASYNC_FLUSH
#checkTransactionMessageEnable=false
#Number of messaging thread pools
#sendMessageThreadPoolNums=128
#Number of pull message thread pools
#pullMessageThreadPoolNums=128
3)master2
Server: 192.168.25.138
vi /usr/soft/rocketmq/conf/2m-2s-sync/broker-b.properties
Modify the configuration as follows:
#Cluster name
brokerClusterName=rocketmq-cluster
#The name of the broker. Note that different configuration files here are filled in differently
brokerName=broker-b
#0 means Master, > 0 means Slave
brokerId=0
#nameServer address, semicolon split
namesrvAddr=rocketmq-nameserver1:9876;rocketmq-nameserver2:9876
#When sending messages, topic s that do not exist in the server are automatically created, and the number of queues created by default
defaultTopicQueueNums=4
#Whether to allow the Broker to automatically create topics. It is recommended to open offline and close online
autoCreateTopicEnable=true
#Whether to allow the Broker to automatically create subscription groups. It is recommended to open offline and close online
autoCreateSubscriptionGroup=true
#Listening port of Broker external service
listenPort=10911
#Delete file time point. The default is 4 a.m
deleteWhen=04
#File retention time, 48 hours by default
fileReservedTime=120
#commitLog the default size of each file is 1G
mapedFileSizeCommitLog=1073741824
#ConsumeQueue stores 30W files by default, which can be adjusted according to business conditions
mapedFileSizeConsumeQueue=300000
#destroyMapedFileIntervalForcibly=120000
#redeleteHangedFileInterval=120000
#Detect physical file disk space
diskMaxUsedSpaceRatio=88
#Storage path
storePathRootDir=/usr/local/rocketmq/store
#commitLog storage path
storePathCommitLog=/usr/local/rocketmq/store/commitlog
#Consumption queue storage path storage path
storePathConsumeQueue=/usr/local/rocketmq/store/consumequeue
#Message index storage path
storePathIndex=/usr/local/rocketmq/store/index
#checkpoint file storage path
storeCheckpoint=/usr/local/rocketmq/store/checkpoint
#abort file storage path
abortFile=/usr/local/rocketmq/store/abort
#Limited message size
maxMessageSize=65536
#flushCommitLogLeastPages=4
#flushConsumeQueueLeastPages=2
#flushCommitLogThoroughInterval=10000
#flushConsumeQueueThoroughInterval=60000
#Role of Broker
#- ASYNC_MASTER asynchronous replication master
#- SYNC_MASTER synchronous double write master
#- SLAVE
brokerRole=SYNC_MASTER
#Disc brushing mode
#- ASYNC_FLUSH asynchronous brush disk
#- SYNC_FLUSH synchronous brush disc
flushDiskType=SYNC_FLUSH
#checkTransactionMessageEnable=false
#Number of messaging thread pools
#sendMessageThreadPoolNums=128
#Number of pull message thread pools
#pullMessageThreadPoolNums=128
4)slave1
Server: 192.168.25.138
vi /usr/soft/rocketmq/conf/2m-2s-sync/broker-a-s.properties
Modify the configuration as follows:
#Cluster name
brokerClusterName=rocketmq-cluster
#The name of the broker. Note that different configuration files here are filled in differently
brokerName=broker-a
#0 means Master, > 0 means Slave
brokerId=1
#nameServer address, semicolon split
namesrvAddr=rocketmq-nameserver1:9876;rocketmq-nameserver2:9876
#When sending messages, topic s that do not exist in the server are automatically created, and the number of queues created by default
defaultTopicQueueNums=4
#Whether to allow the Broker to automatically create topics. It is recommended to open offline and close online
autoCreateTopicEnable=true
#Whether to allow the Broker to automatically create subscription groups. It is recommended to open offline and close online
autoCreateSubscriptionGroup=true
#Listening port of Broker external service
listenPort=11011
#Delete file time point. The default is 4 a.m
deleteWhen=04
#File retention time, 48 hours by default
fileReservedTime=120
#commitLog the default size of each file is 1G
mapedFileSizeCommitLog=1073741824
#ConsumeQueue stores 30W files by default, which can be adjusted according to business conditions
mapedFileSizeConsumeQueue=300000
#destroyMapedFileIntervalForcibly=120000
#redeleteHangedFileInterval=120000
#Detect physical file disk space
diskMaxUsedSpaceRatio=88
#Storage path
storePathRootDir=/usr/local/rocketmq/store
#commitLog storage path
storePathCommitLog=/usr/local/rocketmq/store/commitlog
#Consumption queue storage path storage path
storePathConsumeQueue=/usr/local/rocketmq/store/consumequeue
#Message index storage path
storePathIndex=/usr/local/rocketmq/store/index
#checkpoint file storage path
storeCheckpoint=/usr/local/rocketmq/store/checkpoint
#abort file storage path
abortFile=/usr/local/rocketmq/store/abort
#Limited message size
maxMessageSize=65536
#flushCommitLogLeastPages=4
#flushConsumeQueueLeastPages=2
#flushCommitLogThoroughInterval=10000
#flushConsumeQueueThoroughInterval=60000
#Role of Broker
#- ASYNC_MASTER asynchronous replication master
#- SYNC_MASTER synchronous double write master
#- SLAVE
brokerRole=SLAVE
#Disc brushing mode
#- ASYNC_FLUSH asynchronous brush disk
#- SYNC_FLUSH synchronous brush disc
flushDiskType=ASYNC_FLUSH
#checkTransactionMessageEnable=false
#Number of messaging thread pools
#sendMessageThreadPoolNums=128
#Number of pull message thread pools
#pullMessageThreadPoolNums=128
3.3.9 modify startup script file
1)runbroker.sh
vi /usr/local/rocketmq/bin/runbroker.sh
The JVM parameters need to be adjusted appropriately according to the memory size:
#===================================================
# Development environment configuration JVM Configuration
JAVA_OPT="${JAVA_OPT} -server -Xms256m -Xmx256m -Xmn128m"
####2)runserver.sh
vim /usr/local/rocketmq/bin/runserver.sh
JAVA_OPT="${JAVA_OPT} -server -Xms256m -Xmx256m -Xmn128m -XX:MetaspaceSize=128m -XX:MaxMetaspaceSize=320m"
3.3.10 service startup
1) Start NameServe cluster
Start NameServer at 192.168.25.135 and 192.168.25.138, respectively
cd /usr/local/rocketmq/bin
nohup sh mqnamesrv &
2) Start the Broker cluster
- Start master1 and slave2 on 192.168.25.135
master1:
cd /usr/local/rocketmq/bin
nohup sh mqbroker -c /usr/local/rocketmq/conf/2m-2s-syncbroker-a.properties &
slave2:
cd /usr/local/rocketmq/bin
nohup sh mqbroker -c /usr/local/rocketmq/conf/2m-2s-sync/broker-b-s.properties &
- Start master2 and slave2 on 192.168.25.138
master2
cd /usr/local/rocketmq/bin
nohup sh mqbroker -c /usr/local/rocketmq/conf/2m-2s-sync/broker-b.properties &
slave1
cd /usr/local/rocketmq/bin
nohup sh mqbroker -c /usr/local/rocketmq/conf/2m-2s-sync/broker-a-s.properties &
3.3.11 viewing process status
After startup, view the startup process through JPS

3.3.12 viewing logs
# Viewing nameServer logs
tail -500f ~/logs/rocketmqlogs/namesrv.log
# View broker logs
tail -500f ~/logs/rocketmqlogs/broker.log
3.4 mqadmin management tool
3.4.1 mode of use
Enter the RocketMQ installation location and execute. / mqadmin {command} {args} in the bin directory
###3.4.2 command introduction
####1) Topic related
| name | meaning | Command options | explain |
| updateTopic | Create or update Topic configuration | -b | The Broker address indicates the Broker where the topic is located. Only a single Broker is supported. The address is ip:port |
| -c | Cluster name, indicating the cluster where topic is located (clusters can be queried through clusterList) | ||
| -h- | Print help | ||
| -n | NameServer service address, format ip:port | ||
| -p | Specify the read / write permission of the new topic (W=2|R=4|WR=6) | ||
| -r | Number of readable queues (8 by default) | ||
| -w | Number of writable queues (8 by default) | ||
| -t | topic name (the name can only use the characters ^ [a-zA-Z0-9_-] + $) | ||
| deleteTopic | Delete Topic | -c | Cluster name, which means deleting a topic under a cluster (clusters can be queried through clusterList) |
| -h | Print help | ||
| -n | NameServer service address, format ip:port | ||
| -t | topic name (the name can only use the characters ^ [a-zA-Z0-9_-] + $) | ||
| topicList | View Topic list information | -h | Print help |
| -c | Do not configure - c to return only the topic list. Add - c to return clustername, topic and consumergroup information, that is, the cluster and subscription relationship of topic, without parameters | ||
| -n | NameServer service address, format ip:port | ||
| topicRoute | View Topic routing information | -t | topic name |
| -h | Print help | ||
| -n | NameServer service address, format ip:port | ||
| topicStatus | View Topic message queue offset | -t | topic name |
| -h | Print help | ||
| -n | NameServer service address, format ip:port | ||
| topicClusterList | View the cluster list of Topic | -t | topic name |
| -h | Print help | ||
| -n | NameServer service address, format ip:port | ||
| updateTopicPerm | Update Topic read and write permissions | -t | topic name |
| -h | Print help | ||
| -n | NameServer service address, format ip:port | ||
| -b | The Broker address indicates the Broker where the topic is located. Only a single Broker is supported. The address is ip:port | ||
| -p | Specify the read / write permission of the new topic (W=2|R=4|WR=6) | ||
| -c | Cluster name, indicating the cluster where topic is located (the cluster can be queried through clusterList), - b takes precedence. If there is no - b, the command will be executed for all brokers in the cluster | ||
| updateOrderConf | Create, delete and obtain the kv configuration of a specific namespace from the NameServer. It is not enabled yet | -h | Print help |
| -n | NameServer service address, format ip:port | ||
| -t | topic, key | ||
| -v | orderConf, value | ||
| -m | method, optional: get, put, delete | ||
| allocateMQ | The average load algorithm is used to calculate the load result of the consumer list load message queue | -t | topic name |
| -h | Print help | ||
| -n | NameServer service address, format ip:port | ||
| -i | ipList, separated by commas, calculates the message queues of these ip payload topics | ||
| statsAll | Print Topic subscription relationship, TPS, accumulation, 24h read / write total and other information | -h | Print help |
| -n | NameServer service address, format ip:port | ||
| -a | Print only active topic s | ||
| -t | Specify topic |
2) Cluster correlation
| name | meaning | Command options | explain |
| clusterList | View cluster information, such as cluster, BrokerName, BrokerId, TPS, etc | -m | Print more information (add the following information #intotalyest, #outtotalyest, #intotaltoday, #outtotaltoday) |
| -h | Print help | ||
| -n | NameServer service address, format ip:port | ||
| -i | Print interval in seconds | ||
| clusterRT | Send a message to detect the RT of each broker in the cluster. The message is sent to ${BrokerName} Topic. | -a | Amount, total number of probes per time, RT = total time / amount |
| -s | Message size in B | ||
| -c | Detect which cluster | ||
| -p | Whether to print the formatted log, split by | and not print by default | ||
| -h | Print help | ||
| -m | Computer room, printing | ||
| -i | Sending interval in seconds | ||
| -n | NameServer service address, format ip:port |
3) Broker related
| name | meaning | Command options | explain |
| updateBrokerConfig | Updating the Broker configuration file will modify Broker.conf | -b | Broker address in the form of ip:port |
| -c | cluster name | ||
| -k | key value | ||
| -v | Value value | ||
| -h | Print help | ||
| -n | NameServer service address, format ip:port | ||
| brokerStatus | View Broker statistics and running status (almost all the information you want is in it) | -b | Broker address, ip:port |
| -h | Print help | ||
| -n | NameServer service address, format ip:port | ||
| brokerConsumeStats | According to the consumption of each consumer in the Broker, consumption offset, Broker Offset, Diff, TImestamp and other information are returned according to the Message Queue dimension | -b | Broker address, ip:port |
| -t | Request timeout | ||
| -l | diff threshold. Print only when the threshold is exceeded | ||
| -o | Whether it is sequential topic, generally false | ||
| -h | Print help | ||
| -n | NameServer service address, format ip:port | ||
| getBrokerConfig | Get Broker configuration | -b | Broker address, ip:port |
| -n | NameServer service address, format ip:port | ||
| wipeWritePerm | Clear Broker write permission from NameServer | -b | Broker address, ip:port |
| -n | NameServer service address, format ip:port | ||
| -h | Print help | ||
| cleanExpiredCQ | Clean up expired consumption queues on the Broker. If you manually reduce the number of pairs of columns, an expired queue may be generated | -n | NameServer service address, format ip:port |
| -h | Print help | ||
| -b | Broker address, ip:port | ||
| -c | Cluster name | ||
| cleanUnusedTopic | Clean up unused topics on the Broker and release the consumption queue of topics from memory. If you delete topics manually, unused topics will be generated | -n | NameServer service address, format ip:port |
| -h | Print help | ||
| -b | Broker address, ip:port | ||
| -c | Cluster name | ||
| sendMsgStatus | Send a message to the Broker and return the sending status and RT | -n | NameServer service address, format ip:port |
| -h | Print help | ||
| -b | Broker name. Note that it is different from the broker address | ||
| -s | Message size in B | ||
| -c | Sending times |
4) Message correlation
| name | meaning | Command options | explain |
| queryMsgById | Query msg according to offsetMsgId. If you use the open source console, you should use offsetMsgId. This command has other parameters. Please read QueryMsgByIdSubCommand for specific functions. | -i | msgId |
| -h | Print help | ||
| -n | NameServer service address, format ip:port | ||
| queryMsgByKey | Query message according to message Key | -k | msgKey |
| -t | Topic name | ||
| -h | Print help | ||
| -n | NameServer service address, format ip:port | ||
| queryMsgByOffset | Query message according to Offset | -b | Broker name, (note that the name of the broker is filled in here, not the address of the broker. The broker name can be found in the clusterList) |
| -i | query queue id | ||
| -o | offset value | ||
| -t | topic name | ||
| -h | Print help | ||
| -n | NameServer service address, format ip:port | ||
| queryMsgByUniqueKey | According to the query of msgId, msgId is different from offsetMsgId. See the common operation and maintenance questions for the difference- g. - d is used together. After finding the message, try to make a specific consumer consume the message and return the consumption result | -h | Print help |
| -n | NameServer service address, format ip:port | ||
| -i | uniqe msg id | ||
| -g | consumerGroup | ||
| -d | clientId | ||
| -t | topic name | ||
| checkMsgSendRT | Detect RT that sends messages to topic. The function is similar to clusterRT | -h | Print help |
| -n | NameServer service address, format ip:port | ||
| -t | topic name | ||
| -a | Detection times | ||
| -s | Message size | ||
| sendMessage | A message can be sent to a specific Message Queue or sent normally according to the configuration. | -h | Print help |
| -n | NameServer service address, format ip:port | ||
| -t | topic name | ||
| -p | Body, message body | ||
| -k | keys | ||
| -c | tags | ||
| -b | BrokerName | ||
| -i | queueId | ||
| consumeMessage | Consumer news. You can consume messages according to offset, start & end timest amp and message queue, and execute different consumption logic according to different configurations. See consummessagecommand for details. | -h | Print help |
| -n | NameServer service address, format ip:port | ||
| -t | topic name | ||
| -b | BrokerName | ||
| -o | Start consumption from offset | ||
| -i | queueId | ||
| -g | Consumer grouping | ||
| -s | Start timestamp. See - h for format | ||
| -d | End timestamp | ||
| -c | How many messages are consumed | ||
| printMsg | Consume and print messages from Broker, optional time period | -h | Print help |
| -n | NameServer service address, format ip:port | ||
| -t | topic name | ||
| -c | Character set, such as UTF-8 | ||
| -s | subExpress, filter expression | ||
| -b | Start timestamp. See - h for format | ||
| -e | End timestamp | ||
| -d | Print message body | ||
| printMsgByQueue | Similar to printMsg, but specify Message Queue | -h | Print help |
| -n | NameServer service address, format ip:port | ||
| -t | topic name | ||
| -i | queueId | ||
| -a | BrokerName | ||
| -c | Character set, such as UTF-8 | ||
| -s | subExpress, filter expression | ||
| -b | Start timestamp. See - h for format | ||
| -e | End timestamp | ||
| -p | Print message | ||
| -d | Print message body | ||
| -f | Count the tag quantity and print it | ||
| resetOffsetByTime | When the offset is reset by timestamp, both Broker and consumer will reset | -h | Print help |
| -n | NameServer service address, format ip:port | ||
| -g | Consumer grouping | ||
| -t | topic name | ||
| -s | Reset the offset corresponding to this timestamp | ||
| -f | Whether to force reset. If false, only backtracking offset is supported. If true, regardless of the relationship between offset and consumeOffset corresponding to timestamp | ||
| -c | Reset c + + client offset |
5) Consumer, consumer group related
| name | meaning | Command options | explain |
| consumerProgress | To view the consumption status of the subscription group, you can view the message accumulation of the specific client IP | -g | Consumer group name |
| -s | Print client IP | ||
| -h | Print help | ||
| -n | NameServer service address, format ip:port | ||
| consumerStatus | Check the status of consumers, including whether there are the same subscriptions in the same group, analyze whether the Process Queue is stacked, and return the jstag result of consumers. For more content, see ConsumerStatusSubCommand | -h | Print help |
| -n | NameServer service address, format ip:port | ||
| -g | consumer group | ||
| -i | clientId | ||
| -s | Execute jstack | ||
| getConsumerStatus | Get Consumer consumption progress | -g | Consumer group name |
| -t | Query subject | ||
| -i | Consumer client ip | ||
| -n | NameServer service address, format ip:port | ||
| -h | Print help | ||
| updateSubGroup | Update or create subscription relationships | -n | NameServer service address, format ip:port |
| -h | Print help | ||
| -b | Broker address | ||
| -c | Cluster name | ||
| -g | Consumer group name | ||
| -s | Is consumption allowed in the group | ||
| -m | Start consumption from the minimum offset | ||
| -d | Is it broadcast mode | ||
| -q | Number of retry queues | ||
| -r | max retries | ||
| -i | It is valid when slaveReadEnable is enabled, and it has not reached the recommended BrokerId to consume from the slave. You can configure the standby id and actively consume from the standby | ||
| -w | If the Broker proposes to consume from a slave, the configuration determines which slave to consume from, and configures the Broker ID, such as 1 | ||
| -a | Are other consumers notified of load balancing when the number of consumers changes | ||
| deleteSubGroup | Delete subscription relationship from Broker | -n | NameServer service address, format ip:port |
| -h | Print help | ||
| -b | Broker address | ||
| -c | Cluster name | ||
| -g | Consumer group name | ||
| cloneGroupOffset | Use the offset of the source group in the target group | -n | NameServer service address, format ip:port |
| -h | Print help | ||
| -s | Source consumer group | ||
| -d | Target consumer group | ||
| -t | topic name | ||
| -o | Not used yet |
6) Connection correlation
| name | meaning | Command options | explain |
| consumerConnec tion | Query the network connection of the Consumer | -g | Consumer group name |
| -n | NameServer service address, format ip:port | ||
| -h | Print help | ||
| producerConnec tion | Query the network connection of Producer | -g | Producer group name |
| -t | Subject name | ||
| -n | NameServer service address, format ip:port | ||
| -h | Print help |
7) NameServer related
| name | meaning | Command options | explain |
| updateKvConfig | Update the kv configuration of NameServer, which is not used yet | -s | Namespace |
| -k | key | ||
| -v | value | ||
| -n | NameServer service address, format ip:port | ||
| -h | Print help | ||
| deleteKvConfig | Delete the kv configuration for NameServer | -s | Namespace |
| -k | key | ||
| -n | NameServer service address, format ip:port | ||
| -h | Print help | ||
| getNamesrvConfig | Get NameServer configuration | -n | NameServer service address, format ip:port |
| -h | Print help | ||
| updateNamesrvConfig | Modify NameServer configuration | -n | NameServer service address, format ip:port |
| -h | Print help | ||
| -k | key | ||
| -v | value |
8) Other
| name | meaning | Command options | explain |
| startMonitoring | Start the monitoring process to monitor the number of messages deleted by mistake, retry queue messages, etc | -n | NameServer service address, format ip:port |
| -h | Print help |
3.4.3 precautions
- Almost all commands need to configure - n to represent the NameServer address in the form of ip:port
- Almost all commands can get help through - h
- If there are both Broker address (- b) configuration items and clusterName (- c) configuration items, the command shall be executed with the Broker address first; If the Broker address is not configured, the command is executed for all hosts in the cluster
3.5 establishment of cluster monitoring platform
3.5.1 general
RocketMQ has an open source project that extends it incubator-rocketmq-externals , there is a sub module in this project called rocketmq console, which is the management console project. First incubator-rocketmq-externals Pull it locally, because we need to compile and package the rocketmq console ourselves.
3.5.2 download, compile and package
git clone https://github.com/apache/rocketmq-externals
cd rocketmq-console
mvn clean package -Dmaven.test.skip=true
Note: before packaging, configure the namesrv cluster address in the rocketmq console:
rocketmq.config.namesrvAddr=192.168.25.135:9876;192.168.25.138:9876
Start rocketmq console:
java -jar rocketmq-console-ng-1.0.0.jar
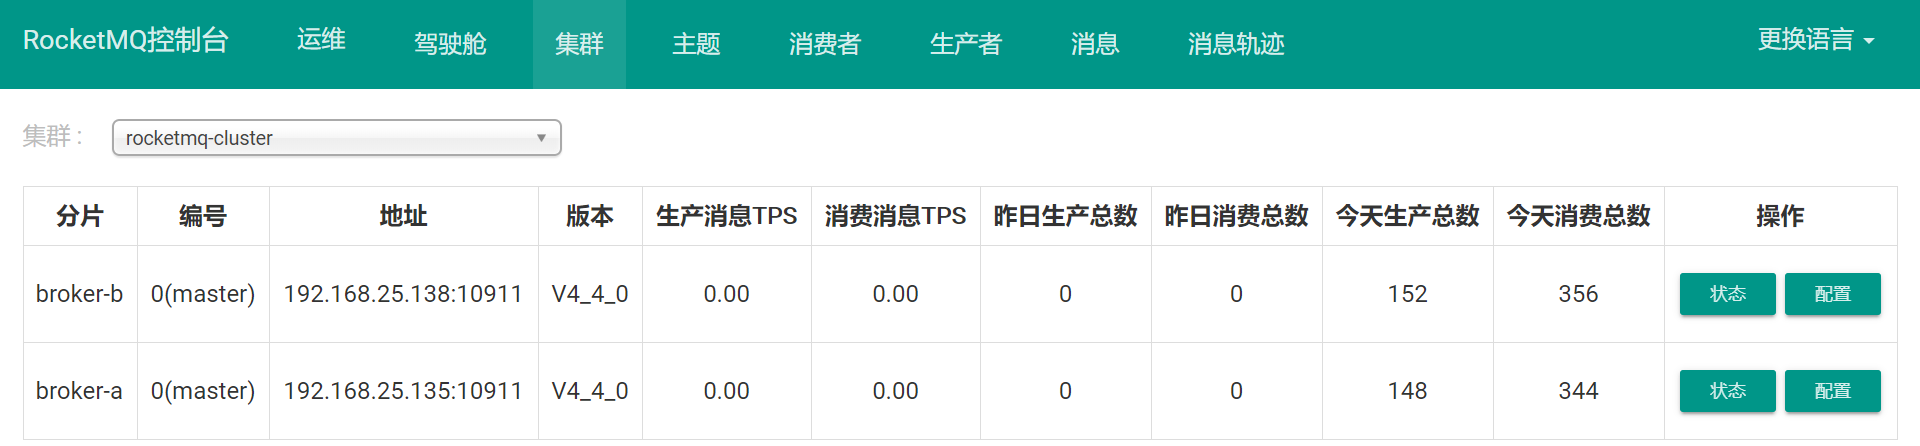
After successful startup, we can access it through the browser http://localhost:8080 Enter the console interface, as shown below:
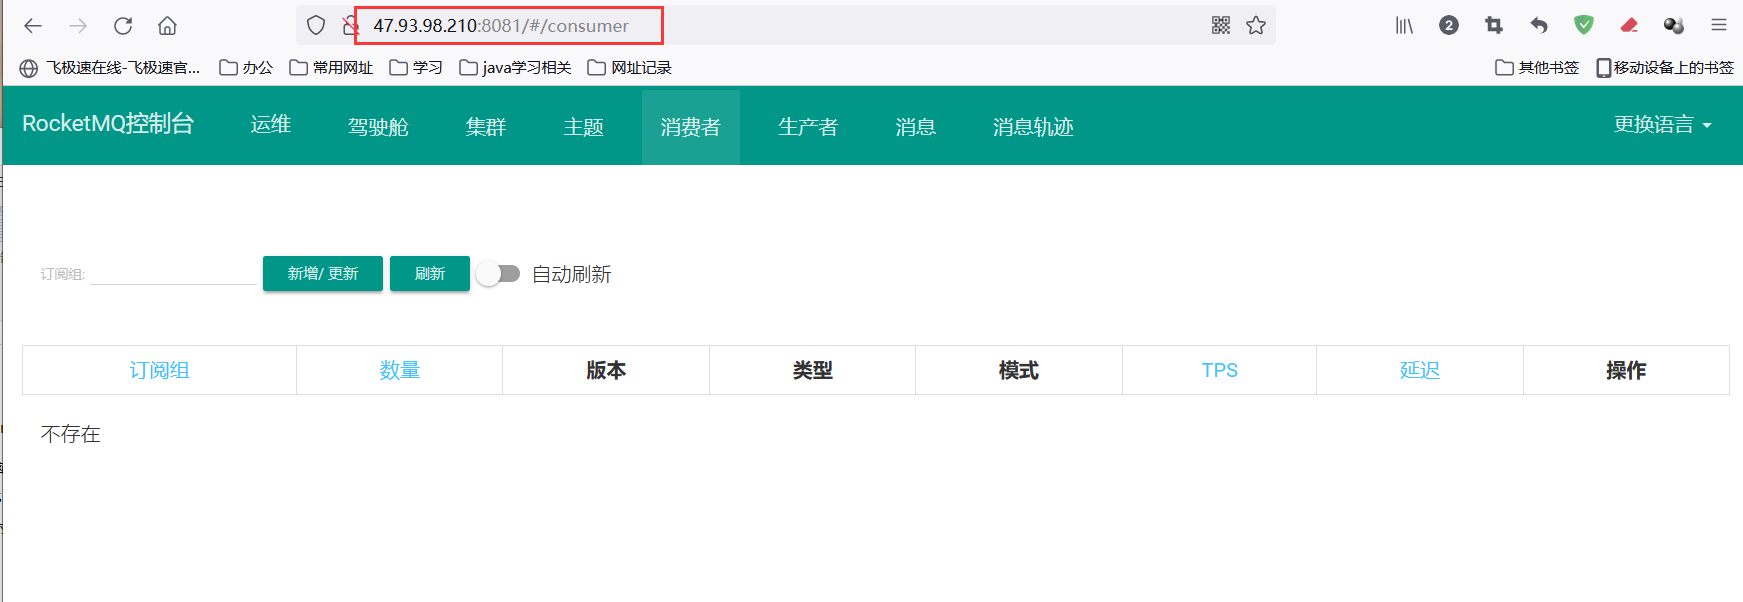
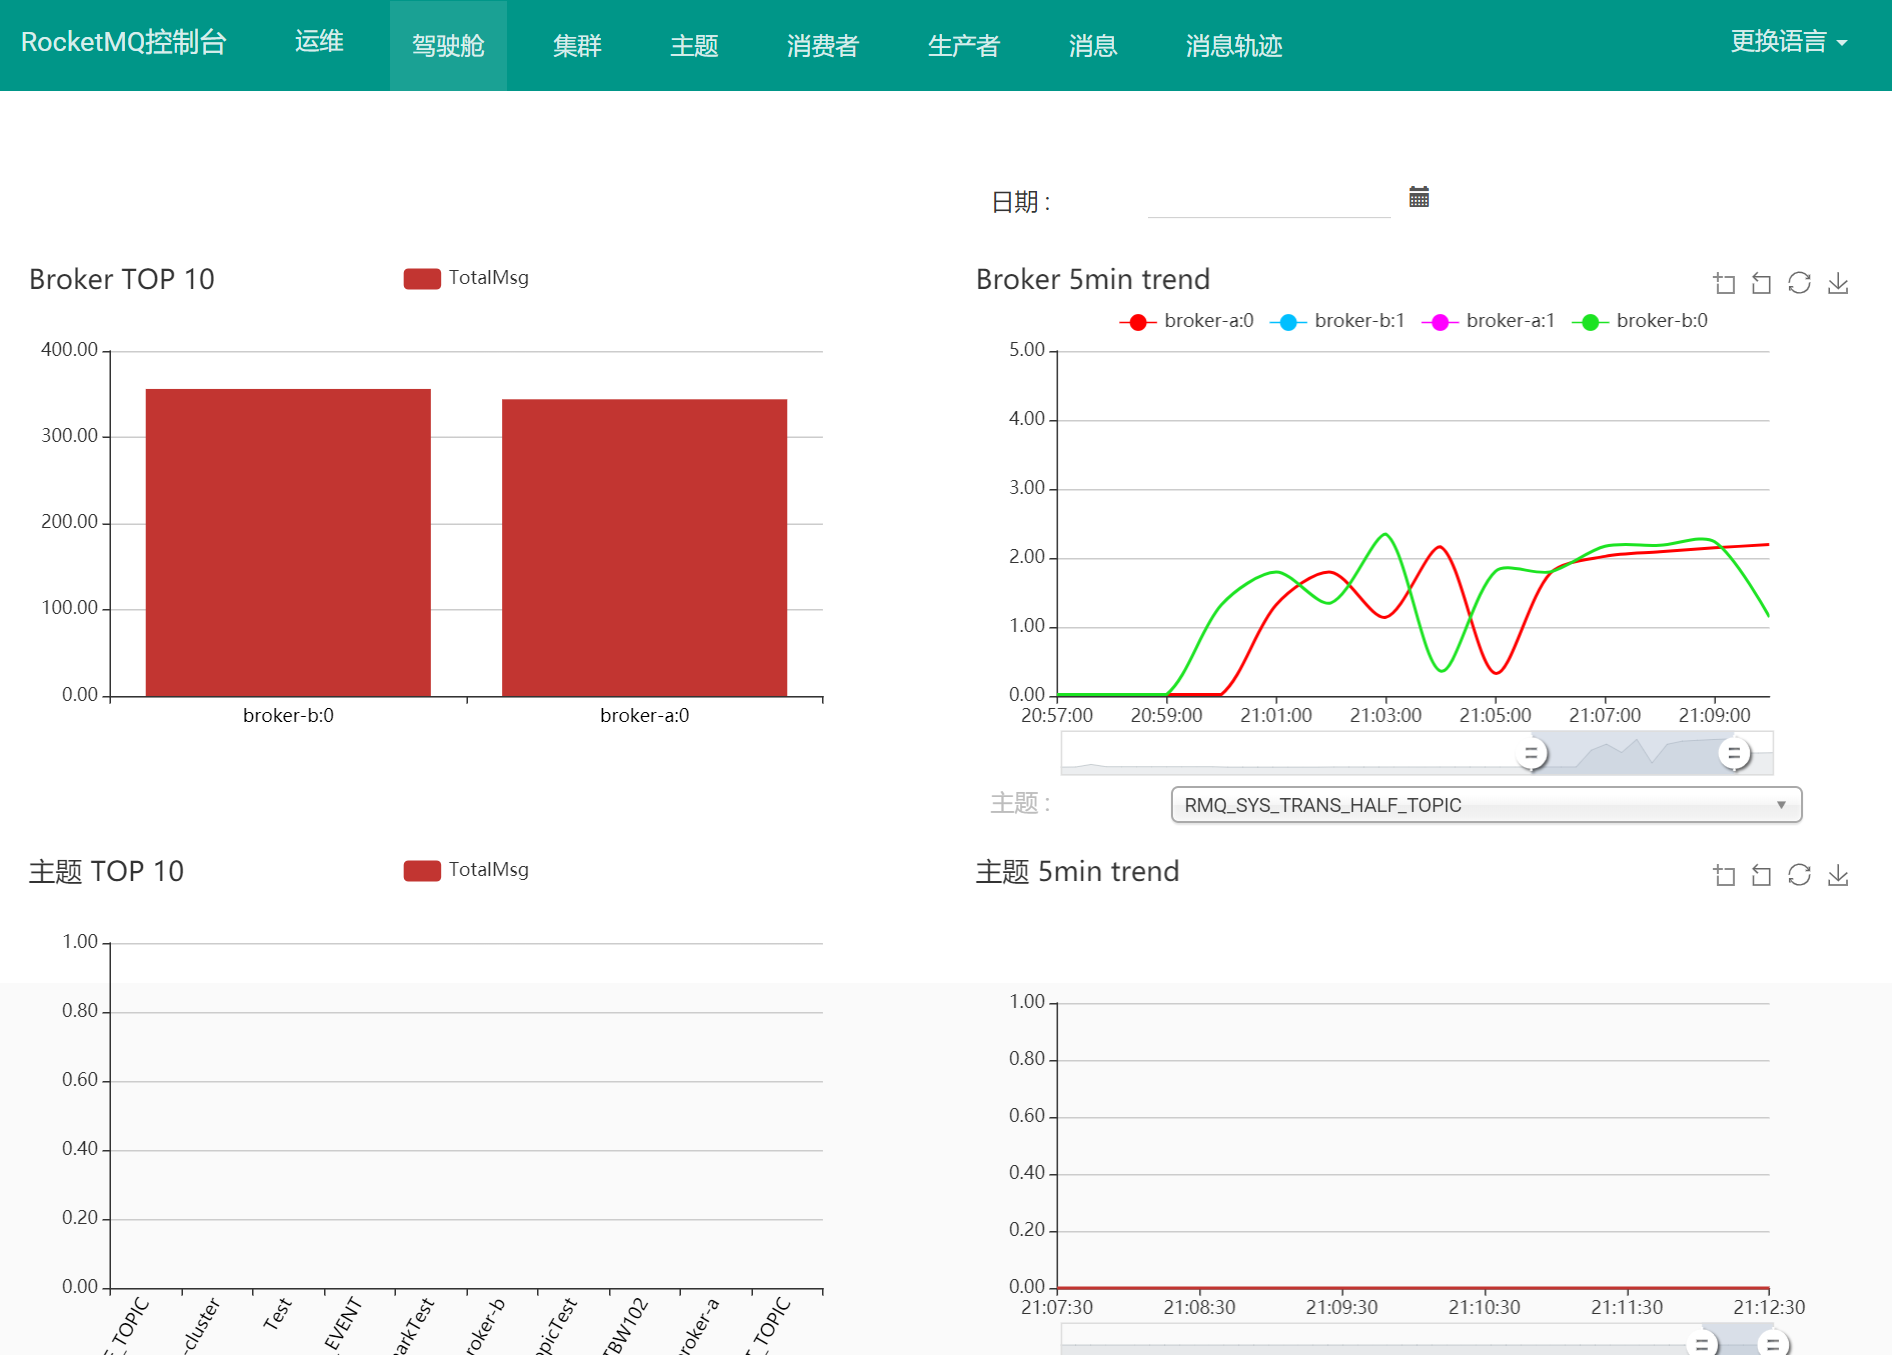
Cluster status:
4. Example of message sending
- Import MQ client dependencies
<dependency>
    <groupId>org.apache.rocketmq</groupId>
    <artifactId>rocketmq-client</artifactId>
    <version>4.4.0</version>
</dependency>
- Message sender step analysis r
1.Create message producer producer,And formulate the producer group name
2.appoint Nameserver address
3.start-up producer
4.Create a message object and specify the subject Topic,Tag And message body
5.send message
6.Close producer producer
- Message consumer step analysis
1.Create consumer Consumer,Develop consumer group name
2.appoint Nameserver address
3.Subscribe to topics Topic and Tag
4.Set callback function to process messages
5.Start consumer consumer
4.1 basic example
4.1.1 message sending
1) Send synchronization message
This reliable synchronous sending method is widely used, such as important message notification and short message notification.
public class SyncProducer {
	public static void main(String[] args) throws Exception {
    	// Instantiate message Producer
        DefaultMQProducer producer = new DefaultMQProducer("please_rename_unique_group_name");
    	// Set the address of the NameServer
    	producer.setNamesrvAddr("localhost:9876");
    	// Start Producer instance
        producer.start();
    	for (int i = 0; i < 100; i++) {
    	    // Create a message and specify Topic, Tag and message body
    	    Message msg = new Message("TopicTest" /* Topic */,
        	"TagA" /* Tag */,
        	("Hello RocketMQ " + i).getBytes(RemotingHelper.DEFAULT_CHARSET) /* Message body */
        	);
        	// Send messages to a Broker
            SendResult sendResult = producer.send(msg);
            // Whether the message was successfully delivered is returned through sendResult
            System.out.printf("%s%n", sendResult);
    	}
    	// If you no longer send messages, close the Producer instance.
    	producer.shutdown();
    }
}
2) Send asynchronous message
Asynchronous messages are usually used in business scenarios that are sensitive to response time, that is, the sender cannot tolerate waiting for a Broker's response for a long time.
public class AsyncProducer {
	public static void main(String[] args) throws Exception {
    	// Instantiate message Producer
        DefaultMQProducer producer = new DefaultMQProducer("please_rename_unique_group_name");
    	// Set the address of the NameServer
        producer.setNamesrvAddr("localhost:9876");
    	// Start Producer instance
        producer.start();
        producer.setRetryTimesWhenSendAsyncFailed(0);
    	for (int i = 0; i < 100; i++) {
                final int index = i;
            	// Create a message and specify Topic, Tag and message body
                Message msg = new Message("TopicTest",
                    "TagA",
                    "OrderID188",
                    "Hello world".getBytes(RemotingHelper.DEFAULT_CHARSET));
                // SendCallback receives a callback that returns results asynchronously
                producer.send(msg, new SendCallback() {
                    @Override
                    public void onSuccess(SendResult sendResult) {
                        System.out.printf("%-10d OK %s %n", index,
                            sendResult.getMsgId());
                    }
                    @Override
                    public void onException(Throwable e) {
      	              System.out.printf("%-10d Exception %s %n", index, e);
      	              e.printStackTrace();
                    }
            	});
    	}
    	// If you no longer send messages, close the Producer instance.
    	producer.shutdown();
    }
}
3) One way send message
This method is mainly used in scenarios that do not particularly care about sending results, such as log sending.
public class OnewayProducer {
	public static void main(String[] args) throws Exception{
    	// Instantiate message Producer
        DefaultMQProducer producer = new DefaultMQProducer("please_rename_unique_group_name");
    	// Set the address of the NameServer
        producer.setNamesrvAddr("localhost:9876");
    	// Start Producer instance
        producer.start();
    	for (int i = 0; i < 100; i++) {
        	// Create a message and specify Topic, Tag and message body
        	Message msg = new Message("TopicTest" /* Topic */,
                "TagA" /* Tag */,
                ("Hello RocketMQ " + i).getBytes(RemotingHelper.DEFAULT_CHARSET) /* Message body */
        	);
        	// Send a one-way message without returning any results
        	producer.sendOneway(msg);

    	}
    	// If you no longer send messages, close the Producer instance.
    	producer.shutdown();
    }
}
4.1.2 consumption message
1) Load balancing mode
Consumers use load balancing to consume messages. Multiple consumers consume queue messages together, and each consumer processes different messages
public static void main(String[] args) throws Exception {
    // Instantiate the message producer and specify the group name
    DefaultMQPushConsumer consumer = new DefaultMQPushConsumer("group1");
    // Specify Namesrv address information
    consumer.setNamesrvAddr("localhost:9876");
    // Subscribe to Topic
    consumer.subscribe("Test", "*");
    //Load balancing mode consumption
    consumer.setMessageModel(MessageModel.CLUSTERING);
    // Register the callback function to process the message
    consumer.registerMessageListener(new MessageListenerConcurrently() {
        @Override
        public ConsumeConcurrentlyStatus consumeMessage(List<MessageExt> msgs,
                                                        ConsumeConcurrentlyContext context) {
            System.out.printf("%s Receive New Messages: %s %n",
                              Thread.currentThread().getName(), msgs);
            return ConsumeConcurrentlyStatus.CONSUME_SUCCESS;
        }
    });
    //Start message sender
    consumer.start();
    System.out.printf("Consumer Started.%n");
}
2) Broadcast mode
Consumers consume messages by broadcasting, and the messages consumed by each consumer are the same
public static void main(String[] args) throws Exception {
    // Instantiate the message producer and specify the group name
    DefaultMQPushConsumer consumer = new DefaultMQPushConsumer("group1");
    // Specify Namesrv address information
    consumer.setNamesrvAddr("localhost:9876");
    // Subscribe to Topic
    consumer.subscribe("Test", "*");
    //Broadcast mode consumption
    consumer.setMessageModel(MessageModel.BROADCASTING);
    // Register the callback function to process the message
    consumer.registerMessageListener(new MessageListenerConcurrently() {
        @Override
        public ConsumeConcurrentlyStatus consumeMessage(List<MessageExt> msgs,
                                                        ConsumeConcurrentlyContext context) {
            System.out.printf("%s Receive New Messages: %s %n",
                              Thread.currentThread().getName(), msgs);
            return ConsumeConcurrentlyStatus.CONSUME_SUCCESS;
        }
    });
    //Start message sender
    consumer.start();
    System.out.printf("Consumer Started.%n");
}
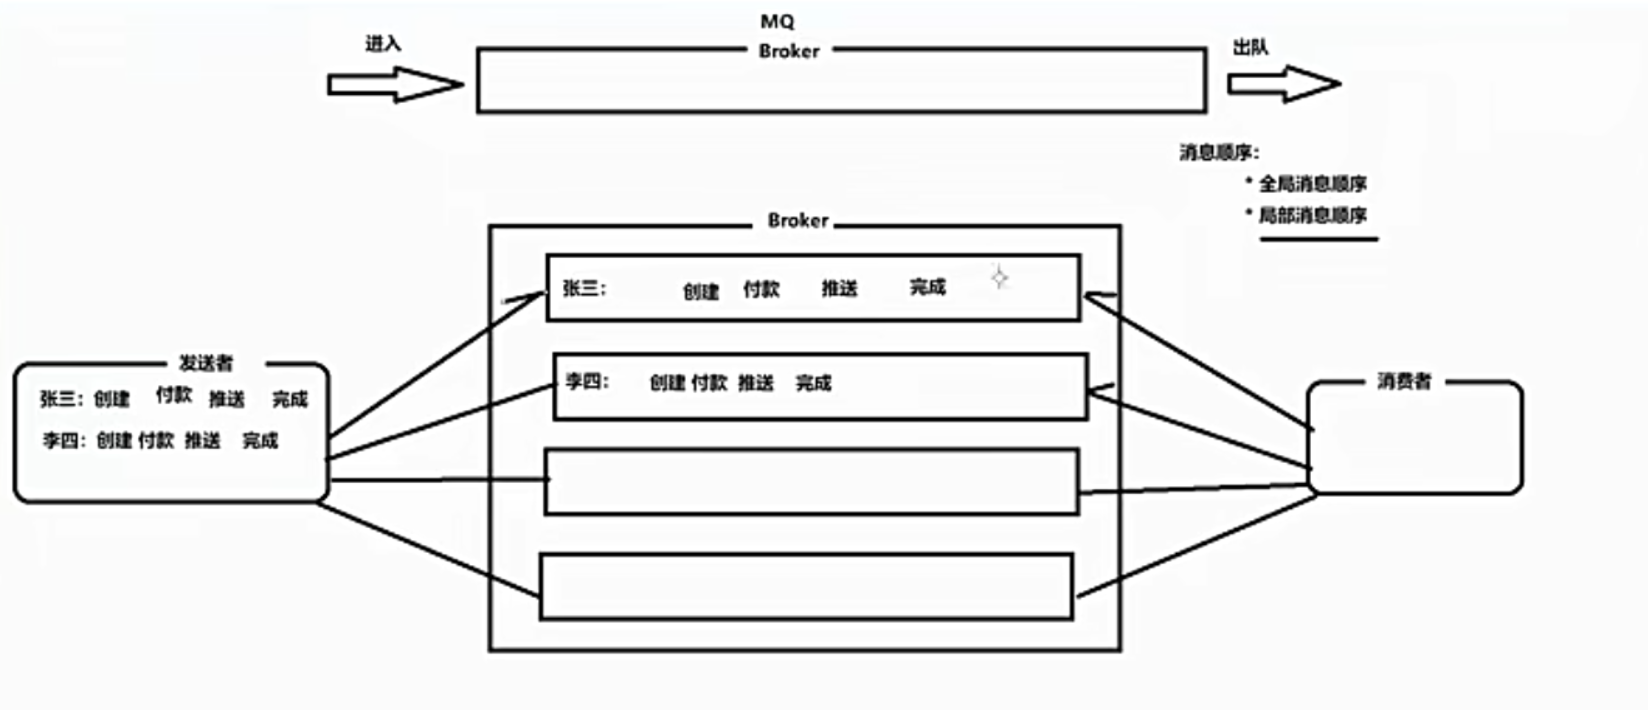
4.2 sequential messages
Message ordering means that messages can be consumed (FIFO) according to the sending order of messages. RocketMQ can strictly guarantee message order, which can be divided into partition order or global order.
The principle of sequential consumption is analyzed. By default, Round Robin polling will be used to send messages to different queues (partition queues); When consuming messages, pull messages from multiple queues. In this case, the order of sending and consumption cannot be guaranteed. However, if the control sending sequence messages are only sent to the same queue in turn, and the consumption is only pulled from this queue in turn, the sequence is guaranteed. When there is only one queue for sending and consuming, it is globally ordered; If multiple queues participate, the partition is ordered, that is, the messages are ordered relative to each queue.
The following is an example of order partitioning. The sequential process of an order is: create, pay, push and complete. Messages with the same order number will be sent to the same queue successively. When consuming, the same OrderId must get the same queue.
Producer: put messages with the same order number into a queue
Consumer: single thread is used to consume each queue
This ensures the sequential execution of messages
4.2.1 sequential message production
/**
* Producer,Send sequence message
*/
public class Producer {

   public static void main(String[] args) throws Exception {
       DefaultMQProducer producer = new DefaultMQProducer("please_rename_unique_group_name");

       producer.setNamesrvAddr("127.0.0.1:9876");

       producer.start();

       String[] tags = new String[]{"TagA", "TagC", "TagD"};

       // Order list
       List<OrderStep> orderList = new Producer().buildOrders();

       Date date = new Date();
       SimpleDateFormat sdf = new SimpleDateFormat("yyyy-MM-dd HH:mm:ss");
       String dateStr = sdf.format(date);
       for (int i = 0; i < 10; i++) {
           // Add a time prefix
           String body = dateStr + " Hello RocketMQ " + orderList.get(i);
           Message msg = new Message("TopicTest", tags[i % tags.length], "KEY" + i, body.getBytes());

           SendResult sendResult = producer.send(msg, new MessageQueueSelector() {
               @Override
               public MessageQueue select(List<MessageQueue> mqs, Message msg, Object arg) {
                   Long id = (Long) arg;  //Select the send queue according to the order id
                   long index = id % mqs.size();
                   return mqs.get((int) index);
               }
           }, orderList.get(i).getOrderId());//Order id

           System.out.println(String.format("SendResult status:%s, queueId:%d, body:%s",
               sendResult.getSendStatus(),
               sendResult.getMessageQueue().getQueueId(),
               body));
       }

       producer.shutdown();
   }

   /**
    * Order steps
    */
   private static class OrderStep {
       private long orderId;
       private String desc;

       public long getOrderId() {
           return orderId;
       }

       public void setOrderId(long orderId) {
           this.orderId = orderId;
       }

       public String getDesc() {
           return desc;
       }

       public void setDesc(String desc) {
           this.desc = desc;
       }

       @Override
       public String toString() {
           return "OrderStep{" +
               "orderId=" + orderId +
               ", desc='" + desc + '\'' +
               '}';
       }
   }

   /**
    * Generate simulated order data
    */
   private List<OrderStep> buildOrders() {
       List<OrderStep> orderList = new ArrayList<OrderStep>();

       OrderStep orderDemo = new OrderStep();
       orderDemo.setOrderId(15103111039L);
       orderDemo.setDesc("establish");
       orderList.add(orderDemo);

       orderDemo = new OrderStep();
       orderDemo.setOrderId(15103111065L);
       orderDemo.setDesc("establish");
       orderList.add(orderDemo);

       orderDemo = new OrderStep();
       orderDemo.setOrderId(15103111039L);
       orderDemo.setDesc("payment");
       orderList.add(orderDemo);

       orderDemo = new OrderStep();
       orderDemo.setOrderId(15103117235L);
       orderDemo.setDesc("establish");
       orderList.add(orderDemo);

       orderDemo = new OrderStep();
       orderDemo.setOrderId(15103111065L);
       orderDemo.setDesc("payment");
       orderList.add(orderDemo);

       orderDemo = new OrderStep();
       orderDemo.setOrderId(15103117235L);
       orderDemo.setDesc("payment");
       orderList.add(orderDemo);

       orderDemo = new OrderStep();
       orderDemo.setOrderId(15103111065L);
       orderDemo.setDesc("complete");
       orderList.add(orderDemo);

       orderDemo = new OrderStep();
       orderDemo.setOrderId(15103111039L);
       orderDemo.setDesc("Push");
       orderList.add(orderDemo);

       orderDemo = new OrderStep();
       orderDemo.setOrderId(15103117235L);
       orderDemo.setDesc("complete");
       orderList.add(orderDemo);

       orderDemo = new OrderStep();
       orderDemo.setOrderId(15103111039L);
       orderDemo.setDesc("complete");
       orderList.add(orderDemo);

       return orderList;
   }
}
4.2.2 sequential consumption message
/**
* Sequential message consumption with transaction mode (the application can control when the Offset is submitted)
*/
public class ConsumerInOrder {

   public static void main(String[] args) throws Exception {
       DefaultMQPushConsumer consumer = new
           DefaultMQPushConsumer("please_rename_unique_group_name_3");
       consumer.setNamesrvAddr("127.0.0.1:9876");
       /**
        * Set whether the Consumer starts consumption at the head of the queue or at the end of the queue for the first time < br >
        * If it is not started for the first time, continue to consume according to the last consumption position
        */
       consumer.setConsumeFromWhere(ConsumeFromWhere.CONSUME_FROM_FIRST_OFFSET);

       consumer.subscribe("TopicTest", "TagA || TagC || TagD");

       consumer.registerMessageListener(new MessageListenerOrderly() {

           Random random = new Random();

           @Override
           public ConsumeOrderlyStatus consumeMessage(List<MessageExt> msgs, ConsumeOrderlyContext context) {
               context.setAutoCommit(true);
               for (MessageExt msg : msgs) {
                   // You can see that each queue has a unique consumer thread to consume, and the orders are ordered for each queue (partition)
                   System.out.println("consumeThread=" + Thread.currentThread().getName() + "queueId=" + msg.getQueueId() + ", content:" + new String(msg.getBody()));
               }

               try {
                   //Simulating business logic processing
                   TimeUnit.SECONDS.sleep(random.nextInt(10));
               } catch (Exception e) {
                   e.printStackTrace();
               }
               return ConsumeOrderlyStatus.SUCCESS;
           }
       });

       consumer.start();

       System.out.println("Consumer Started.");
   }
}
4.3 delay message
For example, in e-commerce, you can send a delay message after submitting an order, check the status of the order after 1h, and cancel the order and release the inventory if it is still unpaid.
4.3.1 start message consumer
public class ScheduledMessageConsumer {
   public static void main(String[] args) throws Exception {
      // Instantiate consumer
      DefaultMQPushConsumer consumer = new DefaultMQPushConsumer("ExampleConsumer");
      // Subscribe to Topics
      consumer.subscribe("TestTopic", "*");
      // Register message listener
      consumer.registerMessageListener(new MessageListenerConcurrently() {
          @Override
          public ConsumeConcurrentlyStatus consumeMessage(List<MessageExt> messages, ConsumeConcurrentlyContext context) {
              for (MessageExt message : messages) {
                  // Print approximate delay time period
                  System.out.println("Receive message[msgId=" + message.getMsgId() + "] " + (System.currentTimeMillis() - message.getStoreTimestamp()) + "ms later");
              }
              return ConsumeConcurrentlyStatus.CONSUME_SUCCESS;
          }
      });
      // Start consumer
      consumer.start();
  }
}
4.3.2 sending delay message
public class ScheduledMessageProducer {
   public static void main(String[] args) throws Exception {
      // Instantiate a producer to generate a delayed message
      DefaultMQProducer producer = new DefaultMQProducer("ExampleProducerGroup");
      // Start producer
      producer.start();
      int totalMessagesToSend = 100;
      for (int i = 0; i < totalMessagesToSend; i++) {
          Message message = new Message("TestTopic", ("Hello scheduled message " + i).getBytes());
          // Set the delay Level 3, and the message will be sent after 10s (now only a few fixed times are supported, see delaytimelevel for details)
          message.setDelayTimeLevel(3);
          // send message
          producer.send(message);
      }
       // Close producer
      producer.shutdown();
  }
}
###4.3.3 verification
You will see that the consumption of the message is 10 seconds later than the storage time
4.3.4 restrictions on use
// org/apache/rocketmq/store/config/MessageStoreConfig.java
private String messageDelayLevel = "1s 5s 10s 30s 1m 2m 3m 4m 5m 6m 7m 8m 9m 10m 20m 30m 1h 2h";
At present, RocketMq does not support any time delay. It is necessary to set several fixed delay levels, from 1s to 2h, corresponding to levels 1 to 18 respectively
4.4 batch messages
Sending messages in bulk can significantly improve the performance of delivering small messages. The limitation is that these batch messages should have the same topic, the same waitStoreMsgOK, and cannot be delayed messages. In addition, the total size of this batch of messages should not exceed 4MB.
4.4.1 sending batch messages
If you only send messages of no more than 4MB at a time, it is easy to use batch processing. An example is as follows:
String topic = "BatchTest";
List<Message> messages = new ArrayList<>();
messages.add(new Message(topic, "TagA", "OrderID001", "Hello world 0".getBytes()));
messages.add(new Message(topic, "TagA", "OrderID002", "Hello world 1".getBytes()));
messages.add(new Message(topic, "TagA", "OrderID003", "Hello world 2".getBytes()));
try {
   producer.send(messages);
} catch (Exception e) {
   e.printStackTrace();
   //Processing error
}
If the total length of the message may be greater than 4MB, it is best to segment the message at this time
public class ListSplitter implements Iterator<List<Message>> {
   private final int SIZE_LIMIT = 1024 * 1024 * 4;
   private final List<Message> messages;
   private int currIndex;
   public ListSplitter(List<Message> messages) {
           this.messages = messages;
   }
    @Override
    public boolean hasNext() {
       return currIndex < messages.size();
   }
   	@Override
    public List<Message> next() {
       int nextIndex = currIndex;
       int totalSize = 0;
       for (; nextIndex < messages.size(); nextIndex++) {
           Message message = messages.get(nextIndex);
           int tmpSize = message.getTopic().length() + message.getBody().length;
           Map<String, String> properties = message.getProperties();
           for (Map.Entry<String, String> entry : properties.entrySet()) {
               tmpSize += entry.getKey().length() + entry.getValue().length();
           }
           tmpSize = tmpSize + 20; // Increase log overhead by 20 bytes
           if (tmpSize > SIZE_LIMIT) {
               //A single message exceeds the maximum limit
               //Ignore, otherwise it will block the split process
               if (nextIndex - currIndex == 0) {
                  //If the next sublist has no elements, add the sublist and exit the loop. Otherwise, just exit the loop
                  nextIndex++;
               }
               break;
           }
           if (tmpSize + totalSize > SIZE_LIMIT) {
               break;
           } else {
               totalSize += tmpSize;
           }

       }
       List<Message> subList = messages.subList(currIndex, nextIndex);
       currIndex = nextIndex;
       return subList;
   }
}
//Split a big message into several small messages
ListSplitter splitter = new ListSplitter(messages);
while (splitter.hasNext()) {
  try {
      List<Message>  listItem = splitter.next();
      producer.send(listItem);
  } catch (Exception e) {
      e.printStackTrace();
      //Processing error
  }
}
4.5 filtering messages
In most cases, TAG is a simple and useful design to select the messages you want. For example:
DefaultMQPushConsumer consumer = new DefaultMQPushConsumer("CID_EXAMPLE");
consumer.subscribe("TOPIC", "TAGA || TAGB || TAGC");
The consumer will receive a message containing TAGA or TAGB or TAGC. However, the limitation is that a message can only have one label, which may not work in complex scenarios. In this case, you can filter messages using SQL expressions. The SQL feature can be calculated by the properties when the message is sent. Under the syntax defined by RocketMQ, you can implement some simple logic. Here is an example:
------------
| message  |
|----------|  a > 5 AND b = 'abc'
| a = 10   |  --------------------> Gotten
| b = 'abc'|
| c = true |
------------
------------
| message  |
|----------|   a > 5 AND b = 'abc'
| a = 1    |  --------------------> Missed
| b = 'abc'|
| c = true |
------------
4.5.1 basic SQL syntax
RocketMQ only defines some basic syntax to support this feature. You can also easily expand it.
- Numerical comparison, such as: >, > =, <, < =, BETWEEN, =;
- Character comparison, such as: =, < >, IN;
- IS NULL or IS NOT NULL;
- Logical symbols AND, OR, NOT;
Constant support types are:
- Value, such as 123, 3.1415;
- Characters, such as' abc ', must be enclosed in single quotation marks;
- NULL, special constant
- Boolean, TRUE or FALSE
Only consumers using push mode can use SQL92 standard sql statements. The interfaces are as follows:
public void subscribe(finalString topic, final MessageSelector messageSelector)
4.5.2 message producer
When sending a message, you can set the properties of the message through putUserProperty
DefaultMQProducer producer = new DefaultMQProducer("please_rename_unique_group_name");
producer.start();
Message msg = new Message("TopicTest",
   tag,
   ("Hello RocketMQ " + i).getBytes(RemotingHelper.DEFAULT_CHARSET)
);
// Set some properties
msg.putUserProperty("a", String.valueOf(i));
SendResult sendResult = producer.send(msg);

producer.shutdown();
4.5.3 message consumers
Use MessageSelector.bySql to filter messages using sql
DefaultMQPushConsumer consumer = new DefaultMQPushConsumer("please_rename_unique_group_name_4");
// Only subscribed messages have this attribute a, a > = 0 and a < = 3
consumer.subscribe("TopicTest", MessageSelector.bySql("a between 0 and 3");
consumer.registerMessageListener(new MessageListenerConcurrently() {
   @Override
   public ConsumeConcurrentlyStatus consumeMessage(List<MessageExt> msgs, ConsumeConcurrentlyContext context) {
       return ConsumeConcurrentlyStatus.CONSUME_SUCCESS;
   }
});
consumer.start();
4.6 transaction messages
4.6.1 process analysis
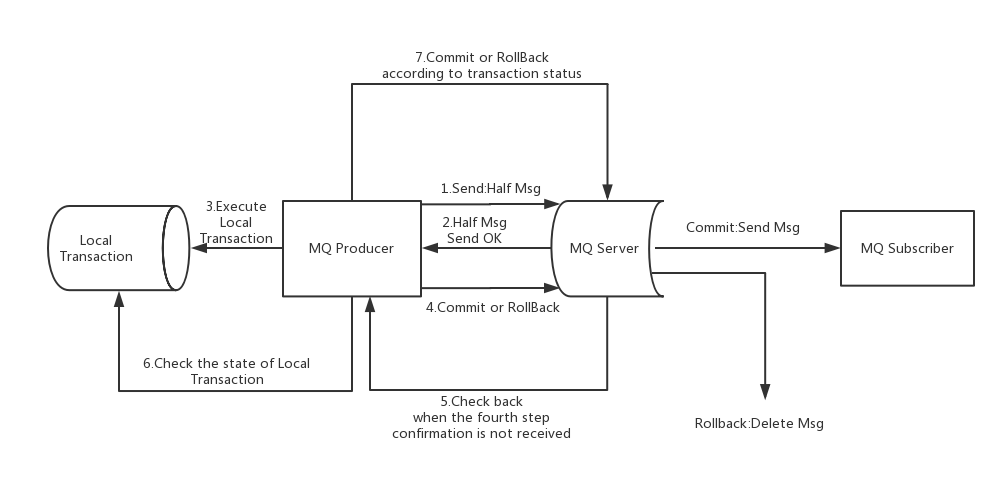
The figure above illustrates the general scheme of transaction messages, which is divided into two processes: sending and submitting normal transaction messages and compensating transaction messages.
####1) Transaction message sending and submission
(1) Send a message (half message).
(2) The server response message writes the result.
(3) Execute the local transaction according to the sending result (if the write fails, the half message is not visible to the business, and the local logic will not execute).
(4) Execute Commit or Rollback according to the local transaction status (the Commit operation generates a message index, and the message is visible to the consumer)
2) Transaction compensation
(1) For transaction messages without Commit/Rollback (messages in pending status), initiate a "backcheck" from the server
(2) The producer receives the callback message and checks the status of the local transaction corresponding to the callback message
(3) Re Commit or Rollback according to the local transaction status
The compensation phase is used to solve the timeout or failure of the message Commit or Rollback.
3) Transaction message status
Transaction messages have three statuses: commit status, rollback status and intermediate status:
- TransactionStatus.CommitTransaction: commit a transaction that allows the consumer to consume this message.
- TransactionStatus.RollbackTransaction: rollback transaction, which means that the message will be deleted and cannot be consumed.
- TransactionStatus.Unknown: intermediate status, which means that the message queue needs to be checked to determine the status.
4.6.1 sending transaction messages
1) Create transactional producer
Using the TransactionMQProducer class to create a producer and specify a unique producer group, you can set up a custom thread pool to process these check requests. After executing a local transaction, you need to reply to the message queue according to the execution result. Please refer to the previous section for the returned transaction status.
public class Producer {
    public static void main(String[] args) throws MQClientException, InterruptedException {
        //Create transaction listener
        TransactionListener transactionListener = new TransactionListenerImpl();
        //Create message producer
        TransactionMQProducer producer = new TransactionMQProducer("group6");
        producer.setNamesrvAddr("192.168.25.135:9876;192.168.25.138:9876");
        //Producer, this is a listener
        producer.setTransactionListener(transactionListener);
        //Start message producer
        producer.start();
        String[] tags = new String[]{"TagA", "TagB", "TagC"};
        for (int i = 0; i < 3; i++) {
            try {
                Message msg = new Message("TransactionTopic", tags[i % tags.length], "KEY" + i,
                        ("Hello RocketMQ " + i).getBytes(RemotingHelper.DEFAULT_CHARSET));
                SendResult sendResult = producer.sendMessageInTransaction(msg, null);
                System.out.printf("%s%n", sendResult);
                TimeUnit.SECONDS.sleep(1);
            } catch (MQClientException | UnsupportedEncodingException e) {
                e.printStackTrace();
            }
        }
        //producer.shutdown();
    }
}
2) Implement the transaction listening interface
When sending a semi successful message, we use the executelocetransaction method to execute the local transaction. It returns one of the three transaction states mentioned in the previous section. The checklocaltransmission method is used to check the local transaction status and respond to the check request of the message queue. It is also one of the three transaction states mentioned in the previous section.
public class TransactionListenerImpl implements TransactionListener {

    @Override
    public LocalTransactionState executeLocalTransaction(Message msg, Object arg) {
        System.out.println("Execute local transactions");
        if (StringUtils.equals("TagA", msg.getTags())) {
            return LocalTransactionState.COMMIT_MESSAGE;
        } else if (StringUtils.equals("TagB", msg.getTags())) {
            return LocalTransactionState.ROLLBACK_MESSAGE;
        } else {
            return LocalTransactionState.UNKNOW;
        }

    }

    @Override
    public LocalTransactionState checkLocalTransaction(MessageExt msg) {
        System.out.println("MQ Check message Tag["+msg.getTags()+"]Local transaction execution results for");
        return LocalTransactionState.COMMIT_MESSAGE;
    }
}
4.6.2 restrictions on use
- Delayed messages and bulk messages are not supported for transaction messages.
- In order to avoid the accumulation of semi queue messages caused by too many times of single message checking, we limit the number of times of single message checking to 15 by default, but users can modify this limit through the transactionCheckMax parameter of the Broker configuration file. If a message has been checked more than N times (N = transactionCheckMax), the Broker will discard the message and print the error log at the same time by default. Users can modify this behavior by overriding the AbstractTransactionCheckListener class.
- The transaction message will be checked after a specific length of time such as the parameter transactionMsgTimeout in the Broker configuration file. When sending a transaction message, the user can also set the user attribute CHECK_IMMUNITY_TIME_IN_SECONDS to change this limit. This parameter takes precedence over the transactionMsgTimeout parameter.
- Transactional messages may be checked or consumed more than once.
- The target topic message submitted to the user may fail. At present, this depends on the log record. Its high availability is guaranteed by RocketMQ's own high availability mechanism. If you want to ensure that transaction messages are not lost and transaction integrity is guaranteed, it is recommended to use synchronous dual write mechanism.
- The producer ID of a transaction message cannot be shared with the producer ID of other types of messages. Unlike other types of messages, transaction messages allow reverse queries, and MQ servers can query consumers through their producer ID.