Abstract:
Time flies quickly, and I'm about to usher in a brand-new and hopeful 2020, which is also the representative of my brand-new start in the new year. I will ask myself to meet a brand-new year with the highest expectation. As procedural apes, we will take performance, safety, concise code as the goal. We will stick to the mentality of not being happy with the material, not being sad. Every day is a new challenge We face unreasonable demands with the most proud passion. Well, the chicken soup has been drunk and the energy should be full. Then fight for the new era! The spring boot framework has been in use for a year; I feel like a sentence; it's all in my mind; I can only experience it by myself. However, I think that the learning of each knowledge is to first figure out the principle from the actual list; so practice is also very important, so I will try my best to integrate the content of each article with what I think and what I experience. I also hope you can ask more questions.
1, Cache (CACHE)
(1) , function
For example, the commodity websites of jd.com and taobao.com, if the commodities I visit go through the database every time, it is certainly not possible; if the cache is used, then when I visit again, I will not query the database, but go through the cache. So the starting point of the cache is to speed up the access to our projects; of course, it will also improve the performance of the projects; this It is also the purpose of cache.
(2) , introduction
At present, there are two major caches (JSR107 and spring cache abstraction) used in cache technology. First, let's look at the following figure of JSR107 cache: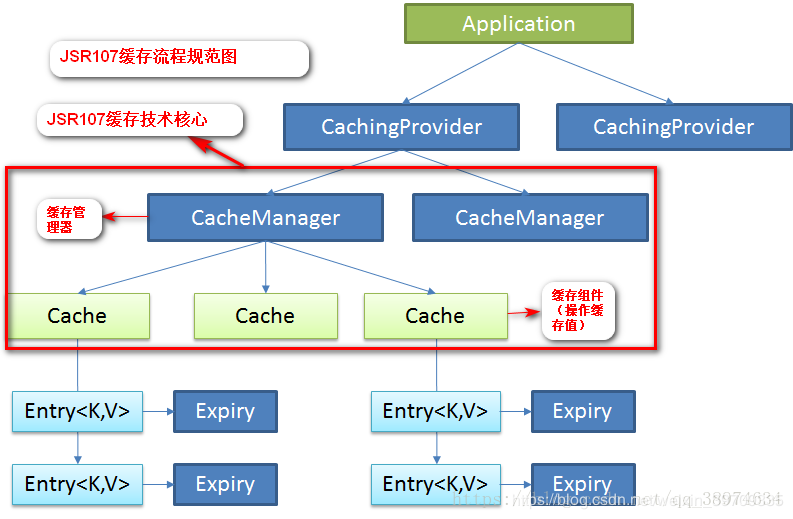
JSR107 is not widely involved; because it is interface oriented programming; the limitation of operation interface makes development more difficult; therefore, we use spring caching abstraction in enterprises; because different caching technologies are unified in spring 3.1; only two interfaces are defined to implement caching; as shown in the figure: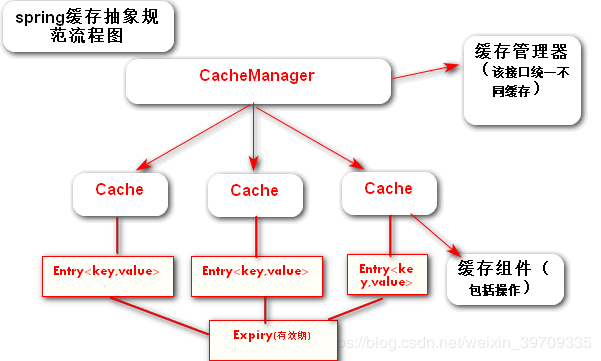
Of course, it also supports JSR 107 annotation development; most of them are for our convenience in system development; regulate several core interfaces of cache; in the spring boot framework; how is cache implemented; and how do we use it in spring boot. Let's formally test it with the spring cache abstraction.
Two, demonstration
Next, I'll show you how to use the code in the spring boot framework. From the above figure, we can learn about the cache manager. Now we start with the autoconfigure auto configuration class of springboot. Use IDEA to create a new project: New - > Project - > spring initializr. Check some frameworks that need to be initialized in the early stage. For example, mybatis and integrated web (check to initialize mvc mode). We will not list them one by one. After the new project is built, I We modify the properties file and add:
server.port=8080 debug=true; then run according to the application startup; check the startup log: we will find that When the springboot is started, the default startup configuration class is SimpleCacheConfiguration. This class is the default cache configuration class. The following is a demonstration of the use of the default ConcurrentMapCacheManager:
First, set up the database table; let me create a dept department table as a demonstration: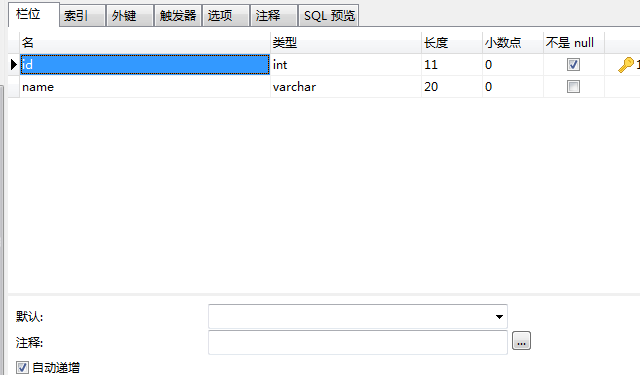 Connect to database:
spring.datasource.driver-class-name=com.mysql.jdbc.Driver
spring.datasource.url=jdbc:mysql://127.0.0.1:3306/lp_implement?useUnicode=true&characterEncoding=UTF-8&serverTimezone=Asia/Shanghai
spring.datasource.username=root
spring.datasource.password=root
Write domain, mapper and controller as follows:
package com.lp.cache.domain;

import lombok.Data;
import lombok.NoArgsConstructor;

@Data  //Using Lombok plug-ins eliminates the need to write set and get methods
@NoArgsConstructor
public class Dept {
    private Integer id;  //Department ID
    private String  name; //Department name
}
package com.lp.cache.mapper;

import com.lp.cache.domain.Dept;
import org.apache.ibatis.annotations.Mapper;
import org.apache.ibatis.annotations.Select;
import org.apache.ibatis.annotations.Update;

/***
 * @author lp
 * @deprecated Department mapper class
 */

@Mapper
public interface DeptMapper {

    /**
     * query
     * @param id
     * @return
     */
    @Select("select * from dept WHERE id=#{id}")
    public Dept selectDept(Integer id);


    /**
     * To update
     * @param dept
     * @return
     */
    @Update("update dept set name=#{name} WHERE id=#{id}")
    public Dept updateDept(Dept dept);

}
package com.lp.cache.controller;


import com.lp.cache.domain.Dept;
import com.lp.cache.service.DeptService;
import org.springframework.beans.factory.annotation.Autowired;
import org.springframework.web.bind.annotation.PathVariable;
import org.springframework.web.bind.annotation.RequestMapping;
import org.springframework.web.bind.annotation.RestController;

@RestController
@RequestMapping("/dept")
public class DeptController {

    @Autowired
    DeptService deptService;

    @RequestMapping("/findById/{id}")
    public Dept findById(@PathVariable("id") Integer id){
        Dept dept = deptService.findDept(id);
        return dept;
    }

}
When we use annotation caching, we need to turn it on:
package com.lp.cache;

import org.mybatis.spring.annotation.MapperScan;
import org.springframework.boot.SpringApplication;
import org.springframework.boot.autoconfigure.SpringBootApplication;
import org.springframework.cache.annotation.EnableCaching;

@SpringBootApplication
@MapperScan("com.lp.cache.mapper")
@EnableCaching/*Enable annotation caching*/
public class CacheDemoApplication {

	public static void main(String[] args) {
		SpringApplication.run(CacheDemoApplication.class, args);
	}

}
Key service layers:
package com.lp.cache.service;

import com.lp.cache.domain.Dept;
import com.lp.cache.mapper.DeptMapper;
import org.springframework.beans.factory.annotation.Autowired;
import org.springframework.cache.annotation.Cacheable;
import org.springframework.stereotype.Service;

@Service
public class DeptService {
    @Autowired
    DeptMapper  deptMapper;

    @Cacheable(cacheNames = "dept") //Cache the method results;
    //The cacheNames attribute is the name of the cache. From the figure, we know that the stored value of the cache component is stored in key value;
    //If the key is not specified, all the parameters of the method are combined by default (I am the id here)
    public Dept findDept(Integer id){

        System.out.println("query dept Of Id: "+id);
        Dept dept = deptMapper.selectDept(id);

        return dept;
    }
}
The following is the startup test result chart: It means that Cache works; now it's Cache operation.
3, Explanation of annotation operation
In JSR 107 specification rules, there are annotation operations, and spring Abstract cache also supports JSR 107 annotation development. It has the following common annotation:
We have used @ Cacheable in the above demonstration; I will not introduce it in detail here; this brother's single introduction annotation is certainly more detailed than me: Spring Boot cache annotation.
4, Integrate Redis
Redis, as a popular cache, will not be introduced in detail. Let me teach you how to integrate steps:
1) Introducing redis starter package
	<!--Introduce Redis Of starter-->
      <dependency>
          <groupId>org.springframework.boot</groupId>
          <artifactId>spring-boot-starter-data-redis</artifactId>
          <version>2.1.3.RELEASE</version>
      </dependency>
Let's start to see the printout log of the console: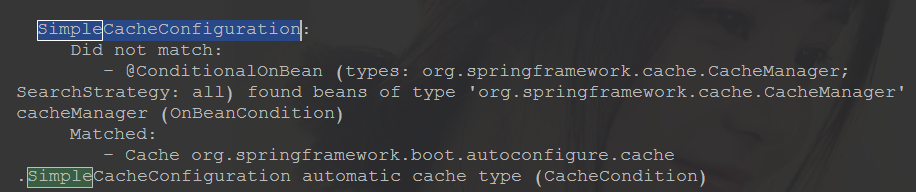 The default cache configuration class no longer matches. Query Redis's:
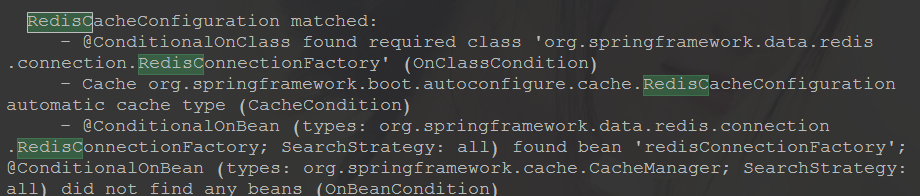 Obviously, Redis type has been replaced. How to connect to the local Redis service? First of all, we need to install Redis service and connection tools like the local installation. Here I offer you: Redis local service link
Extraction code: 51ka
Steps: (1) double click install - window-Redis.bat to install the local Redis service, and start it in the background management service.
(2) Install the Redis operation Desktop interface connection tool.
Connecting to Redis is like connecting to a database. You need to enter host. We open the Redis Desktop interface connection tool. After entering local: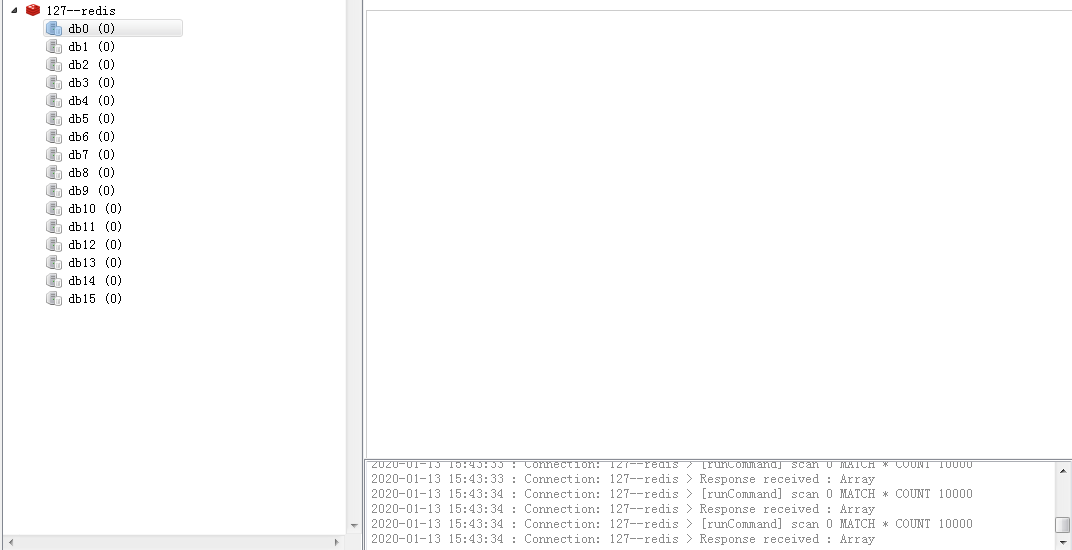
2) , modify the properties file
spring.redis.host=127.0.0.1
In this way, even if you are connected, you can perform CURD (access) of data according to Redis's operation specifications. Then we need to learn Redis's operation rules. First, let's look at Redis's operation objects: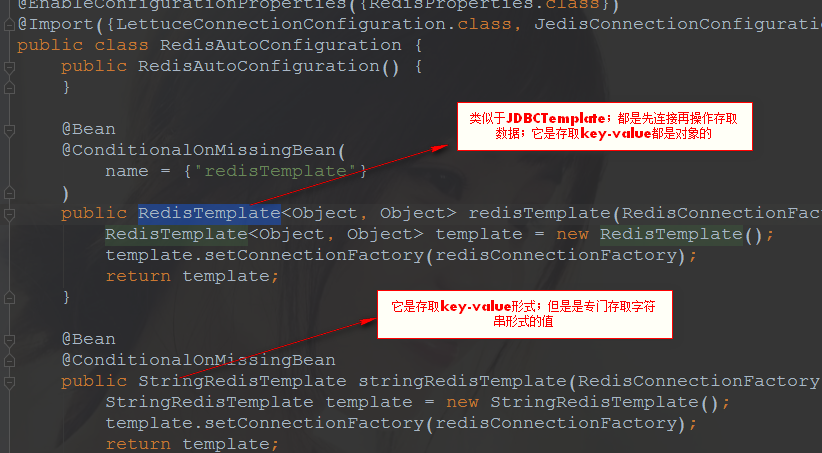
Next, I will modify the original code service layer method:
package com.lp.cache.service;

import com.lp.cache.domain.Dept;
import com.lp.cache.mapper.DeptMapper;
import org.springframework.beans.factory.annotation.Autowired;
import org.springframework.cache.annotation.CacheEvict;
import org.springframework.cache.annotation.CachePut;
import org.springframework.cache.annotation.Cacheable;
import org.springframework.data.redis.core.RedisTemplate;
import org.springframework.stereotype.Service;

@Service
public class DeptService {

    @Autowired
    DeptMapper  deptMapper;

    @Autowired
    RedisTemplate redisTemplate;

    public Dept findDept(Integer id){

        System.out.println("query dept Of Id: "+id);
        Dept dept = deptMapper.selectDept(id);
        redisTemplate.opsForValue().append(dept,"dept");
        return dept;
    }
}
Learn the operation rules of redisTemplate: Operation rules of redisTemplate Here is a more detailed introduction to the operation methods of various redisTemplate. I hope you can learn modestly, ask more, communicate more, and the exchange meeting of cache will be over. I wish you all happiness in the new year, everything you meet, everything you get, and you are happiest in 2020!

