Video source: Power Node springboot Video Tutorial
Why use Spring Boot?
- Using Spring and Spring MVC requires a large number of xml configuration files, configuring various objects, and putting the objects in the Spring container to use them is cumbersome. At the same time, when integrating other frameworks with Spring, you need to understand the configuration rules of other frameworks.
- Spring Boot is like Spring and Spring MVC, which don't require configuration files. They've already configured common frameworks and third-party libraries in advance and can be used directly. It is more efficient and convenient to develop.
Chapter 1 XML and JavaConfig
Spring uses XML as a container configuration file and after 3.0 added JavaConfig, making it possible to use java classes as configuration files.
This is an important technique used by Spring Boot to remove a large number of configuration files from SSM.
1.1 JavaConfig
1.1. 1 Introduction
**JavaConfig:** Using java classes as xml configuration files instead is a pure java method for configuring Spring containers. In this java class, you can create java objects and inject them into the Spring container.
Advantage:
- Avoid tedious xml configuration.
- You can use an object-oriented approach, where one configuration class can inherit from another and methods can be overridden.
1.1.2 XML Configuration Container
1. Create maven projects, add dependencies
<dependencies>
    <dependency>
        <groupId>org.springframework</groupId>
        <artifactId>spring-context</artifactId>
        <version>5.3.1</version>
    </dependency>
    <dependency>
        <groupId>junit</groupId>
        <artifactId>junit</artifactId>
        <version>4.12</version>
        <scope>test</scope>
    </dependency>
</dependencies>
<build>
    <plugins>
        <!-- Compile Plugins -->
        <plugin>
            <artifactId>maven-compiler-plugin</artifactId>
            <!-- Version of plug-in -->
            <version>3.5.1</version>
            <!-- Compile Level -->
            <configuration>
                <source>1.8</source>
                <target>1.8</target>
                <!-- Encoding Format -->
                <encoding>UTF-8</encoding>
            </configuration>
        </plugin>
    </plugins>
</build>
(2) Create data classes
package com.tsccg.pojo;

public class Student {
    private String name;
    private Integer age;
    private String sex;
    //get and set...
    //toString
}
(3) Create Spring's configuration file in the resources directory: beans.xml
Declare a Student object:
<bean id="student" class="com.tsccg.pojo.Student">
    <property name="name" value="Zhang San"/>
    <property name="age" value="20"/>
    <property name="sex" value="male"/>
</bean>
Unit Test:
/**
 * Creating objects using xml
 */
@Test
public void beanTest01() {
    ApplicationContext app = new ClassPathXmlApplicationContext("beans.xml");
    Student student = (Student) app.getBean("student");
    System.out.println("xml How to create objects:"+student);
}
Result:
xml How to create objects: Student{name='Zhang San', age=20, sex='male'}
1.1.3 JavaConfig Configuration Container
Two notes are required:
- @Configuration: Places on a class and declares that the current class is a configuration class.
- @Bean: Place on the method and inject the object returned by the method into the container.
Create a configuration class:
package com.tsccg.javaconfig;

import com.tsccg.pojo.Student;
import org.springframework.context.annotation.Bean;
import org.springframework.context.annotation.Configuration;
import org.springframework.context.annotation.ImportResource;

/**
 * @Author: TSCCG
 * @Date: 2021/12/13 18:12
 */
@Configuration//Declare this class as a configuration class, in which there are many methods whose return values are objects.
public class SpringConfig {
    /**
     * Create Student object and return
     * Inject objects into containers via @Bean annotations with the default object id being the method name
     */
    @Bean
    public Student createStudent() {
        Student student = new Student();
        student.setName("Li Si");
        student.setAge(22);
        student.setSex("female");
        return student;
    }

    /**
     * Custom Bean Object id
     */
    @Bean(name = "liSiStudent")
    public Student createStudent2() {
        Student student = new Student();
        student.setName("Li Si");
        student.setAge(22);
        student.setSex("female");
        return student;
    }
}
Unit Test:
/**
 * Creating Student Objects with javaConfig
 */
@Test
public void beanTest02() {
    ApplicationContext app = new AnnotationConfigApplicationContext(SpringConfig.class);
    Student student = (Student) app.getBean("createStudent");
    System.out.println("javaConfig How to create objects:"+student);
}

/**
     * Custom bean object id
     */
@Test
public void beanTest03() {
    ApplicationContext app = new AnnotationConfigApplicationContext(SpringConfig.class);
    Student student = (Student) app.getBean("liSiStudent");
    System.out.println("custom id: "+student);
}
Result:
javaConfig How to create objects: Student{name='Li Si', age=22, sex='female'}
custom id: Student{name='Li Si', age=22, sex='female'}
1.2 @ImporResource
@ImporResource imports other xml configuration files in the configuration class, which is equivalent to xml configuration
<import resource="classpath:xxx.xml"/>
Usage:
In beans. Declare a Student object in an XML file
<bean id="wangWuStudent" class="com.tsccg.pojo.Student">
    <property name="name" value="King Five"/>
    <property name="age" value="18"/>
    <property name="sex" value="female"/>
</bean>
(2) Add the @ImporResource annotation on the configuration class and import beans.xml file
@Configuration
@ImportResource(value="classpath:beans.xml")//Import beans.xml configuration file, specifying import from class path
public class SpringConfig {
    ...
}
(3) Unit testing
/**
     * Configuration Class Import xml Configuration File
     */
@Test
public void beanTest04() {
    ApplicationContext app = new AnnotationConfigApplicationContext(SpringConfig.class);
    Student student = (Student) app.getBean("wangWuStudent");
    System.out.println("JavaConfig Import xml Profile:"+student);
}
Result:
JavaConfig Import xml Profile: Student{name='King Five', age=18, sex='female'}
(4) Importing multiple configuration files
@Configuration
@ImportResource(value={"classpath:beans.xml","classpath:applicationContext.xml"})
public class SpringConfig {
    ...
}
1.3 @PropertySource
@PropertySource is used to read the properties property configuration file in the configuration class, which is the same as in the xml configuration:
<context:property-placeholder location="classpath:xxx.properties"/>
Usage:
(1) Create a property profile config in the resources directory. Properties
dog.name=Xiao Ha
dog.type=Siberian Husky
dog.age=1
(2) Create data classes
Create objects using the @Component annotation and place them in containers, read data from configuration files using the @Value annotation and inject object properties
package com.tsccg.pojo;

import org.springframework.beans.factory.annotation.Value;
import org.springframework.stereotype.Component;

/**
 * @Author: TSCCG
 * @Date: 2021/12/13 19:59
 */
@Component("myDog")//Create objects and inject them into containers
public class Dog {
    @Value("${dog.name}")//Read data from property configuration file and inject into object properties
    private String name;
    @Value("${dog.type}")
    private String type;
    @Value("${dog.age}")
    private Integer age;

    @Override
    public String toString() {
        return "Dog{" +
                "name='" + name + '\'' +
                ", type='" + type + '\'' +
                ", age=" + age +
                '}';
    }
}
(3) Modify configuration classes
1) Read the property profile using the @PropertySource annotation
2) Scan data classes using the @ComponentScan annotation, equivalent to <context:component-scan base-package="com.tsccg.pojo"/>
@Configuration//Declare this class as a configuration class.
@PropertySource(value="classpath:config.properties")//Read Property Profile
@ComponentScan(basePackages = "com.tsccg.pojo")//Component Scanner
public class SpringConfig {
    ...
}
(4) Unit testing
/**
 * @PropertySource Read Property Profile
 */
@Test
public void beanTest05() {
    ApplicationContext app = new AnnotationConfigApplicationContext(SpringConfig.class);
    Dog myDog = (Dog) app.getBean("myDog");
    System.out.println("External property profile injection:"+myDog);
}
Result:
External property profile injection: Dog{name='Xiao Ha', type='Siberian Husky', age=1}
Chapter 2 Introduction to Spring Boot
2.1 Introduction
Spring Boot is a member of the Spring family and simplifies the use of Spring and Spring MVC. Core or IOC container.
Characteristic:
- Create stand-alone Spring applications
- Embed Tomcat, Jetty or Undertow directly (no need to deploy WAR files)
- Provide opinionated 'starter' dependencies to simplify your build configuration
- Automatically configure Spring and 3rd party libraries whenever possible
- Provide production-ready features such as metrics, health checks, and externalized configuration
- Absolutely no code generation and no requirement for XML configuration
Translation:
- You can create a single Spring application
- Embedded with Tomcat, Jetty, or Undertow (without deploying WAR files), you can launch a web application separately.
- Starter initial dependencies are provided to simplify the project's build configuration. For example, in an ssm project, integrating the MyBatis framework requires configuring MyBatis objects in the Spring configuration file: DataSource data sources, SqlSessionFactory, and Dao proxy objects. In the Spring Boot project, in pom. Add a mybatis-spring-boot-starter dependency to the xml.
- Automatically configure Spring and third-party libraries whenever possible. This means creating both Spring and objects in third-party libraries and placing them in containers that developers can use directly. (e.g. central dispatcher for SpringMVC, object for MyBatis framework)
- Provides production preparation functions such as statistics (run time, etc.), health checks (to monitor whether the project is functioning properly), and external configurations (classes such as attribute profiles)
- No code will be generated, no xml configuration file is required
2.2 Create Spring Boot Project
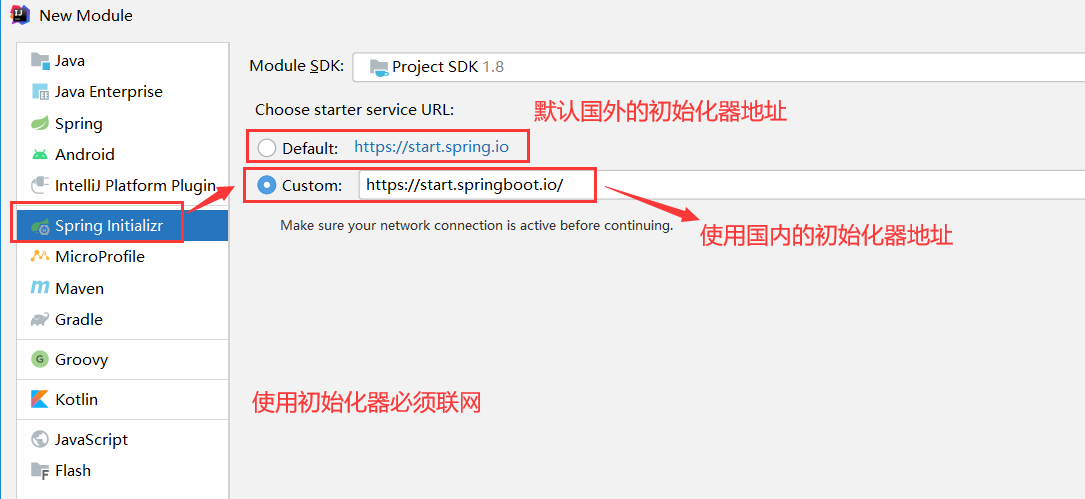
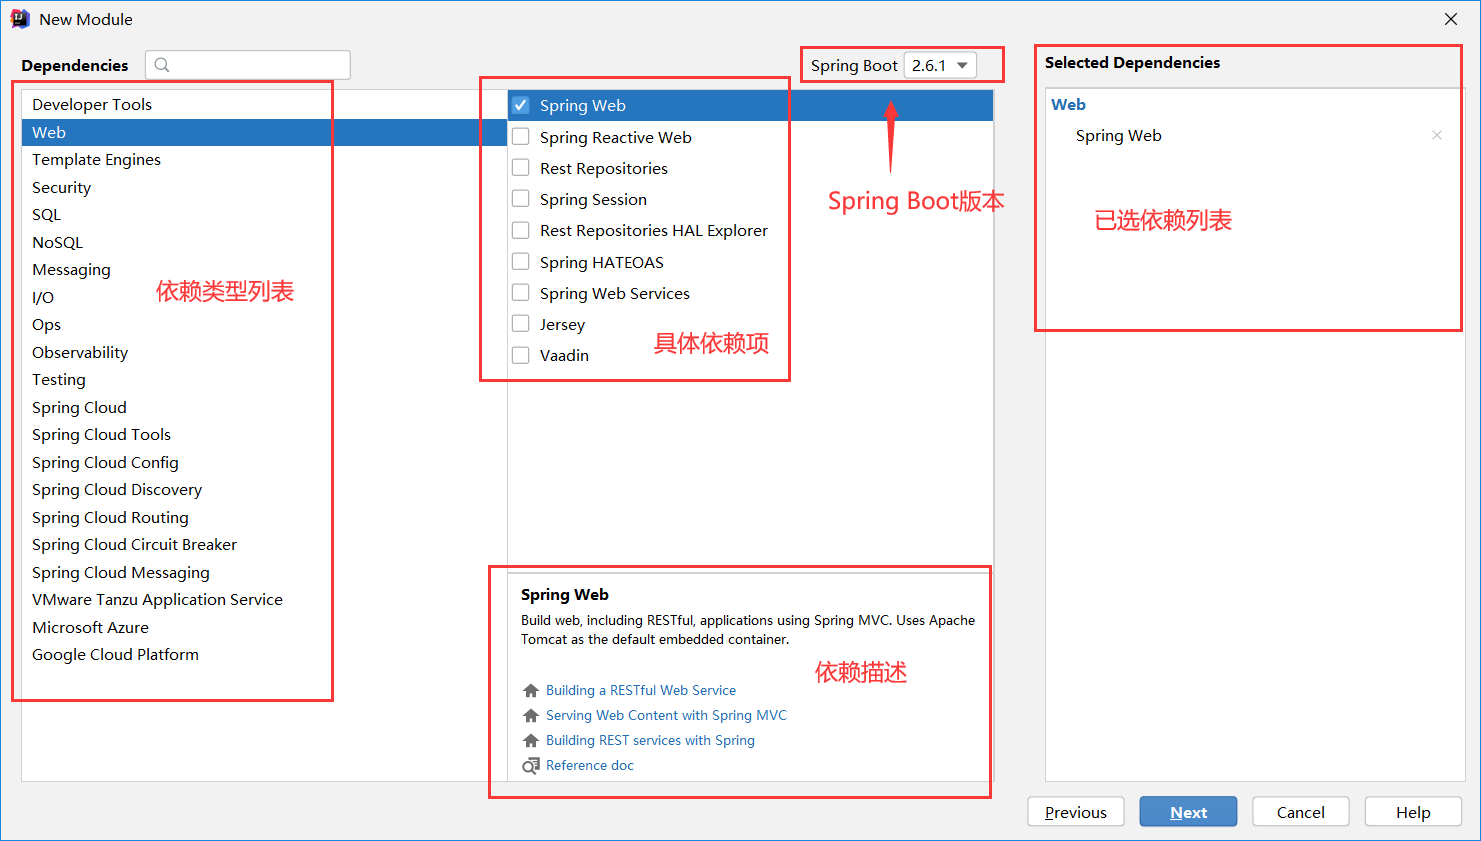
2.2. Mode 1: Use the initializer provided by Spring Boot
Foreign address: https://start.spring.io/
Domestic address: https://start.springboot.io/
Steps:
1. New projects
(2) Initialization settings

3. Adding dependencies
(4) Setting up project path and creating

Project structure
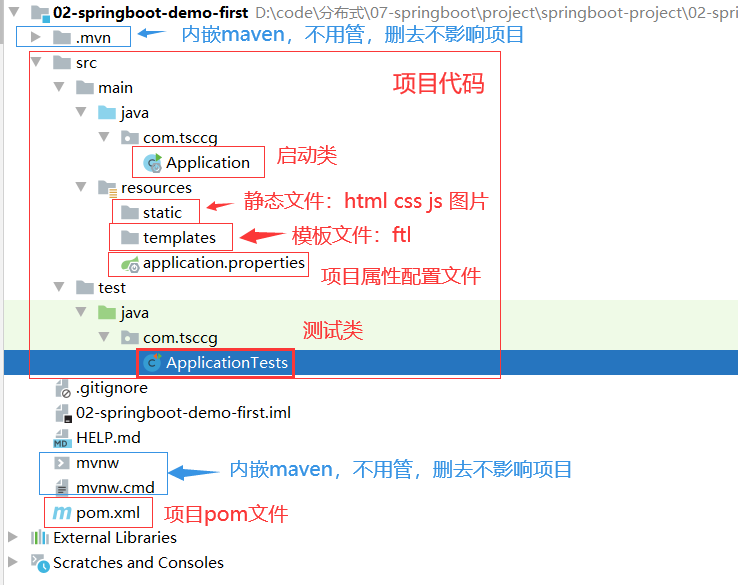
Startup class: Application.java
package com.tsccg;

import org.springframework.boot.SpringApplication;
import org.springframework.boot.autoconfigure.SpringBootApplication;

@SpringBootApplication
public class Application {
    public static void main(String[] args) {
        SpringApplication.run(Application.class, args);
    }
}
Test class: ApplicationTests.java
package com.tsccg;

import org.junit.jupiter.api.Test;
import org.springframework.boot.test.context.SpringBootTest;

@SpringBootTest
class ApplicationTests {
    @Test
    void contextLoads() {
    }
}
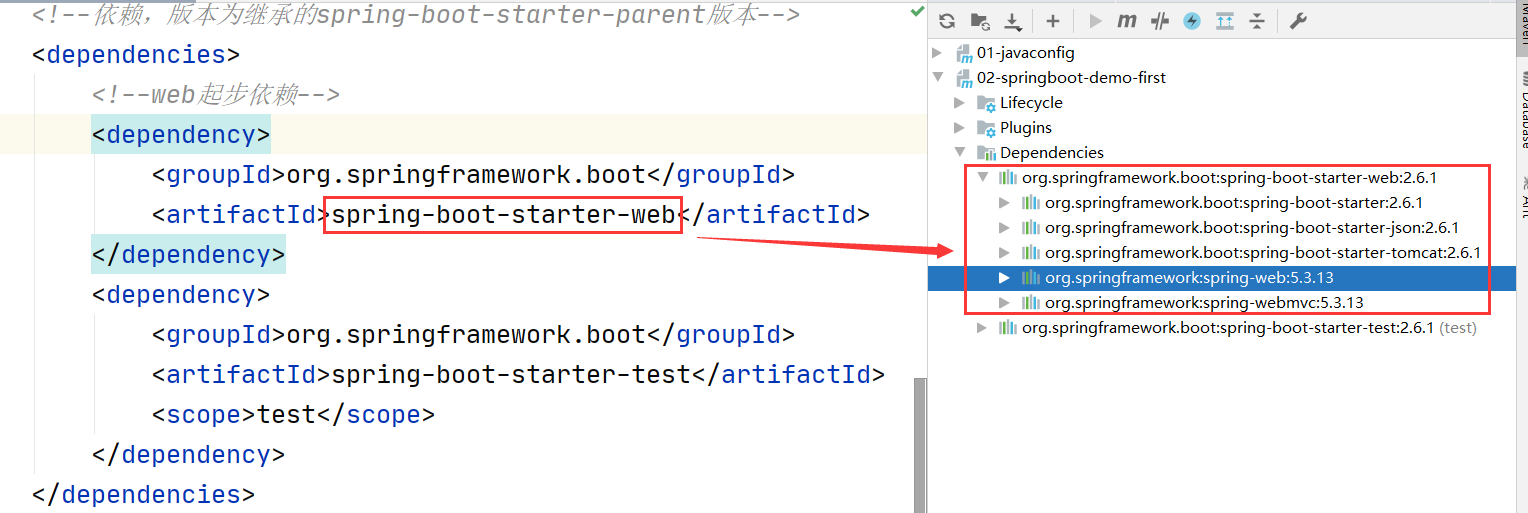
Project dependency
<?xml version="1.0" encoding="UTF-8"?>
<project xmlns="http://maven.apache.org/POM/4.0.0" xmlns:xsi="http://www.w3.org/2001/XMLSchema-instance"
         xsi:schemaLocation="http://maven.apache.org/POM/4.0.0 https://maven.apache.org/xsd/maven-4.0.0.xsd">
    <modelVersion>4.0.0</modelVersion>
    <!--inherit spring-boot-starter-parent,In warehouse-->
    <parent>
        <groupId>org.springframework.boot</groupId>
        <artifactId>spring-boot-starter-parent</artifactId>
        <version>2.6.1</version>
        <relativePath/> <!-- lookup parent from repository -->
    </parent>
    <!--Coordinates of the current item-->
    <groupId>com.tsccg</groupId>
    <artifactId>02-springboot-demo-first</artifactId>
    <version>0.0.1-SNAPSHOT</version>
    <!--Item description, deletable-->
    <name>02-springboot-demo-first</name>
    <description>Demo project for Spring Boot</description>
    <!--jdk Edition-->
    <properties>
        <java.version>1.8</java.version>
    </properties>
    <!--Dependency, version is inherited spring-boot-starter-parent Specified version-->
    <dependencies>
        <!--web Start Dependency-->
        <dependency>
            <groupId>org.springframework.boot</groupId>
            <artifactId>spring-boot-starter-web</artifactId>
        </dependency>
        <dependency>
            <groupId>org.springframework.boot</groupId>
            <artifactId>spring-boot-starter-test</artifactId>
            <scope>test</scope>
        </dependency>
    </dependencies>
    <!--Compile Plugins-->
    <build>
        <plugins>
            <plugin>
                <groupId>org.springframework.boot</groupId>
                <artifactId>spring-boot-maven-plugin</artifactId>
            </plugin>
        </plugins>
    </build>
</project>
web startup relies on related jar s:
Initializer pages can also be opened through the browser

Download the automatically generated project file and import it locally.
2.2. Mode 2: Using the Maven Wizard
The way to use the Maven wizard is to create a maven project directly and add the required files and configurations according to the Spring Boot project structure.
The advantage of using Maven is that you don't have to go online.
Steps:
1. Create an empty Maven project
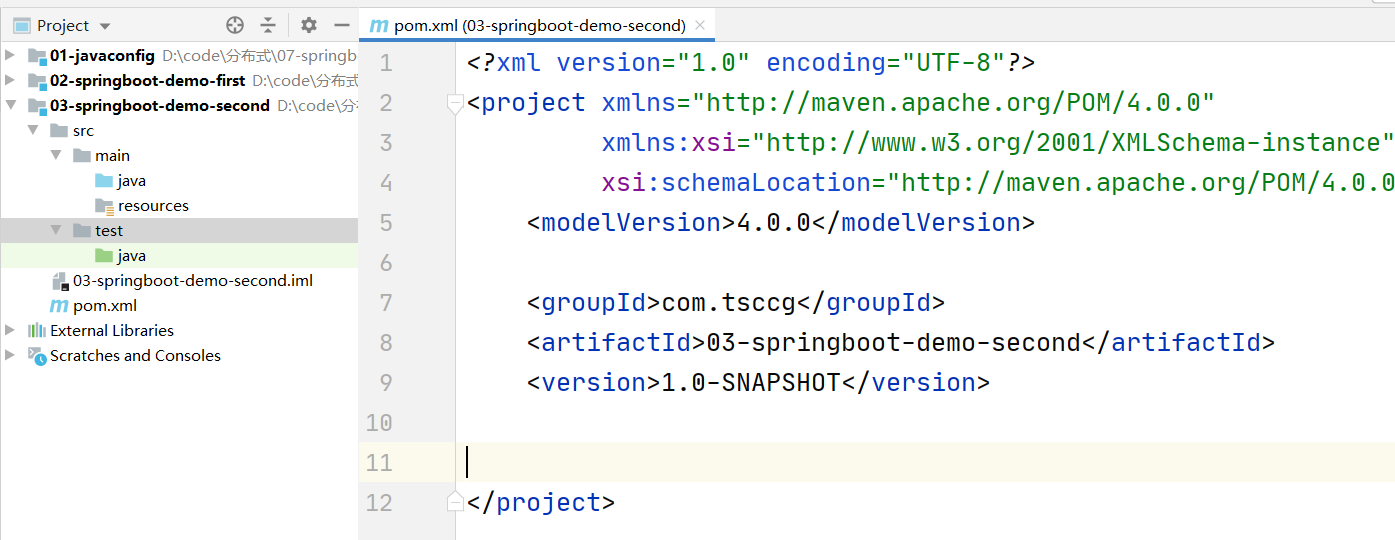
(2) Modify the pom.xml file
1) Add spring-boot-starter-parent coordinates
2) Add web startup dependencies and other configurations
<?xml version="1.0" encoding="UTF-8"?>
<project xmlns="http://maven.apache.org/POM/4.0.0"
         xmlns:xsi="http://www.w3.org/2001/XMLSchema-instance"
         xsi:schemaLocation="http://maven.apache.org/POM/4.0.0 http://maven.apache.org/xsd/maven-4.0.0.xsd">
    <modelVersion>4.0.0</modelVersion>
    <!--Add Parent Coordinates-->
    <parent>
        <groupId>org.springframework.boot</groupId>
        <artifactId>spring-boot-starter-parent</artifactId>
        <version>2.6.1</version>
        <relativePath/> <!-- lookup parent from repository -->
    </parent>

    <groupId>com.tsccg</groupId>
    <artifactId>03-springboot-demo-second</artifactId>
    <version>1.0-SNAPSHOT</version>

    <!--Add additional required configurations-->
    <properties>
        <java.version>1.8</java.version>
    </properties>
    <dependencies>
        <!--web Start Dependency-->
        <dependency>
            <groupId>org.springframework.boot</groupId>
            <artifactId>spring-boot-starter-web</artifactId>
        </dependency>
        <dependency>
            <groupId>org.springframework.boot</groupId>
            <artifactId>spring-boot-starter-test</artifactId>
            <scope>test</scope>
        </dependency>
    </dependencies>
    <!--Compile Plugins-->
    <build>
        <plugins>
            <plugin>
                <groupId>org.springframework.boot</groupId>
                <artifactId>spring-boot-maven-plugin</artifactId>
            </plugin>
        </plugins>
    </build>
</project>
(3) Modify the project structure
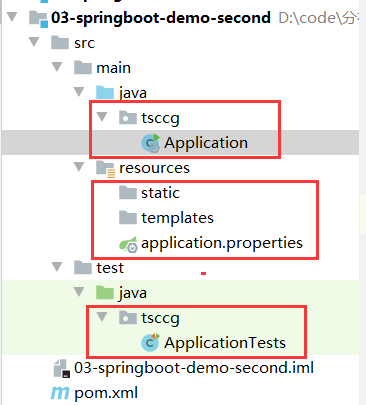
1) Create the startup class Application.java, add the @SpringBootApplication annotation
package com.tsccg;

import org.springframework.boot.SpringApplication;
import org.springframework.boot.autoconfigure.SpringBootApplication;

@SpringBootApplication
public class Application {
    public static void main(String[] args) {
        SpringApplication.run(Application.class, args);
    }
}
2) Create a static, templates folder, springboot core profile application, in the resources directory. Properties
3) Create test class ApplicationTests.java, add the @SpringBootTest comment
package com.tsccg;

import org.junit.jupiter.api.Test;
import org.springframework.boot.test.context.SpringBootTest;

@SpringBootTest
class ApplicationTests {
    @Test
    void contextLoads() {
    }
}
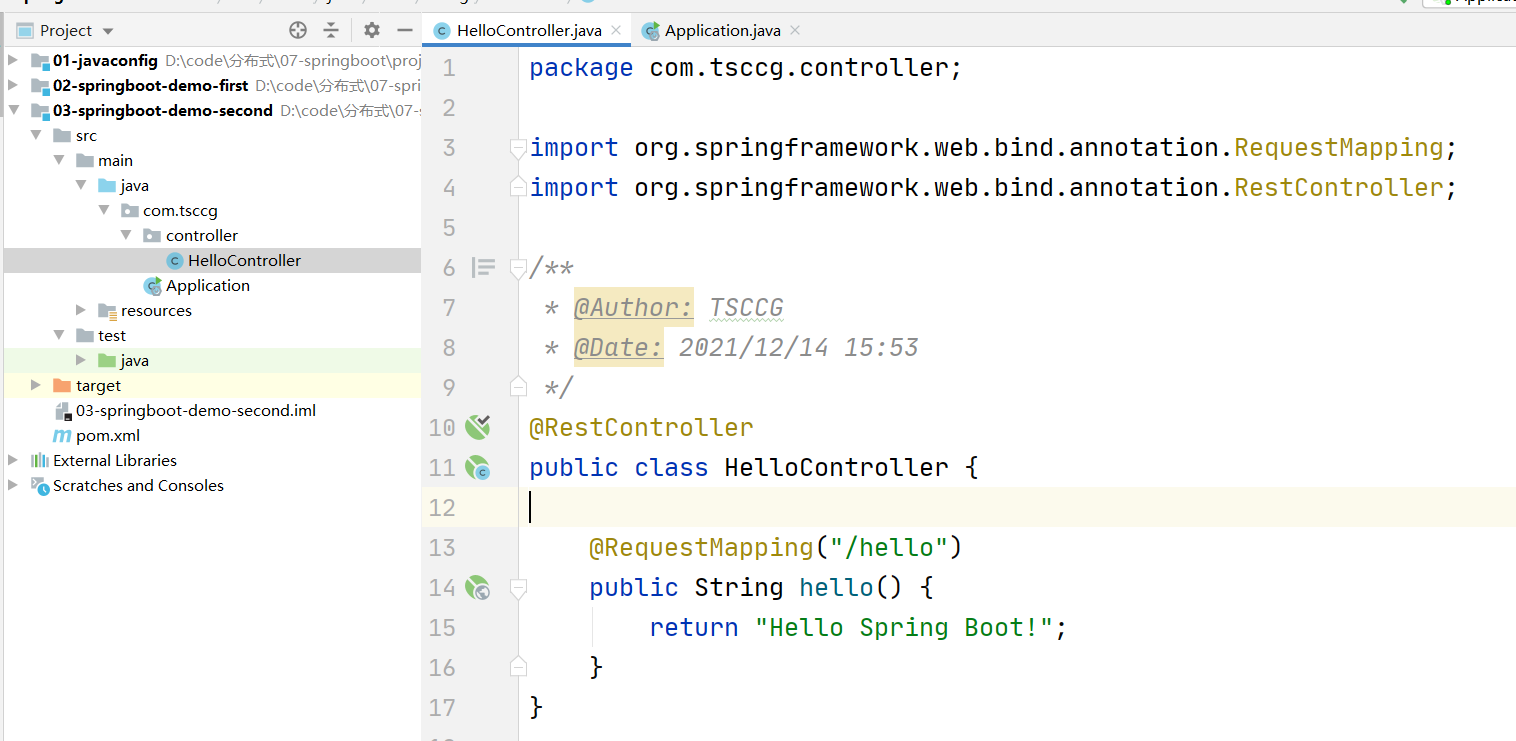
2.3 web example based on SpringBoot
In the SpringBoot project, when using SpringMVC, you don't need to configure it in the configuration file ahead of time, just use it.
Steps:
(1) Based on the Spring Boot project we created earlier, we write a Controller class directly: HelloController
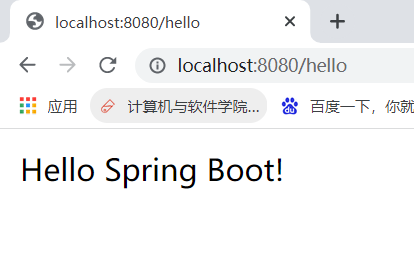
(2) main method of starting the Application class

You can see that the embedded Tomcat is started, defaulting to port 8080.
3. Visit in browser http://localhost:8080/hello
2.4 @SpringBootApplication Annotation Analysis
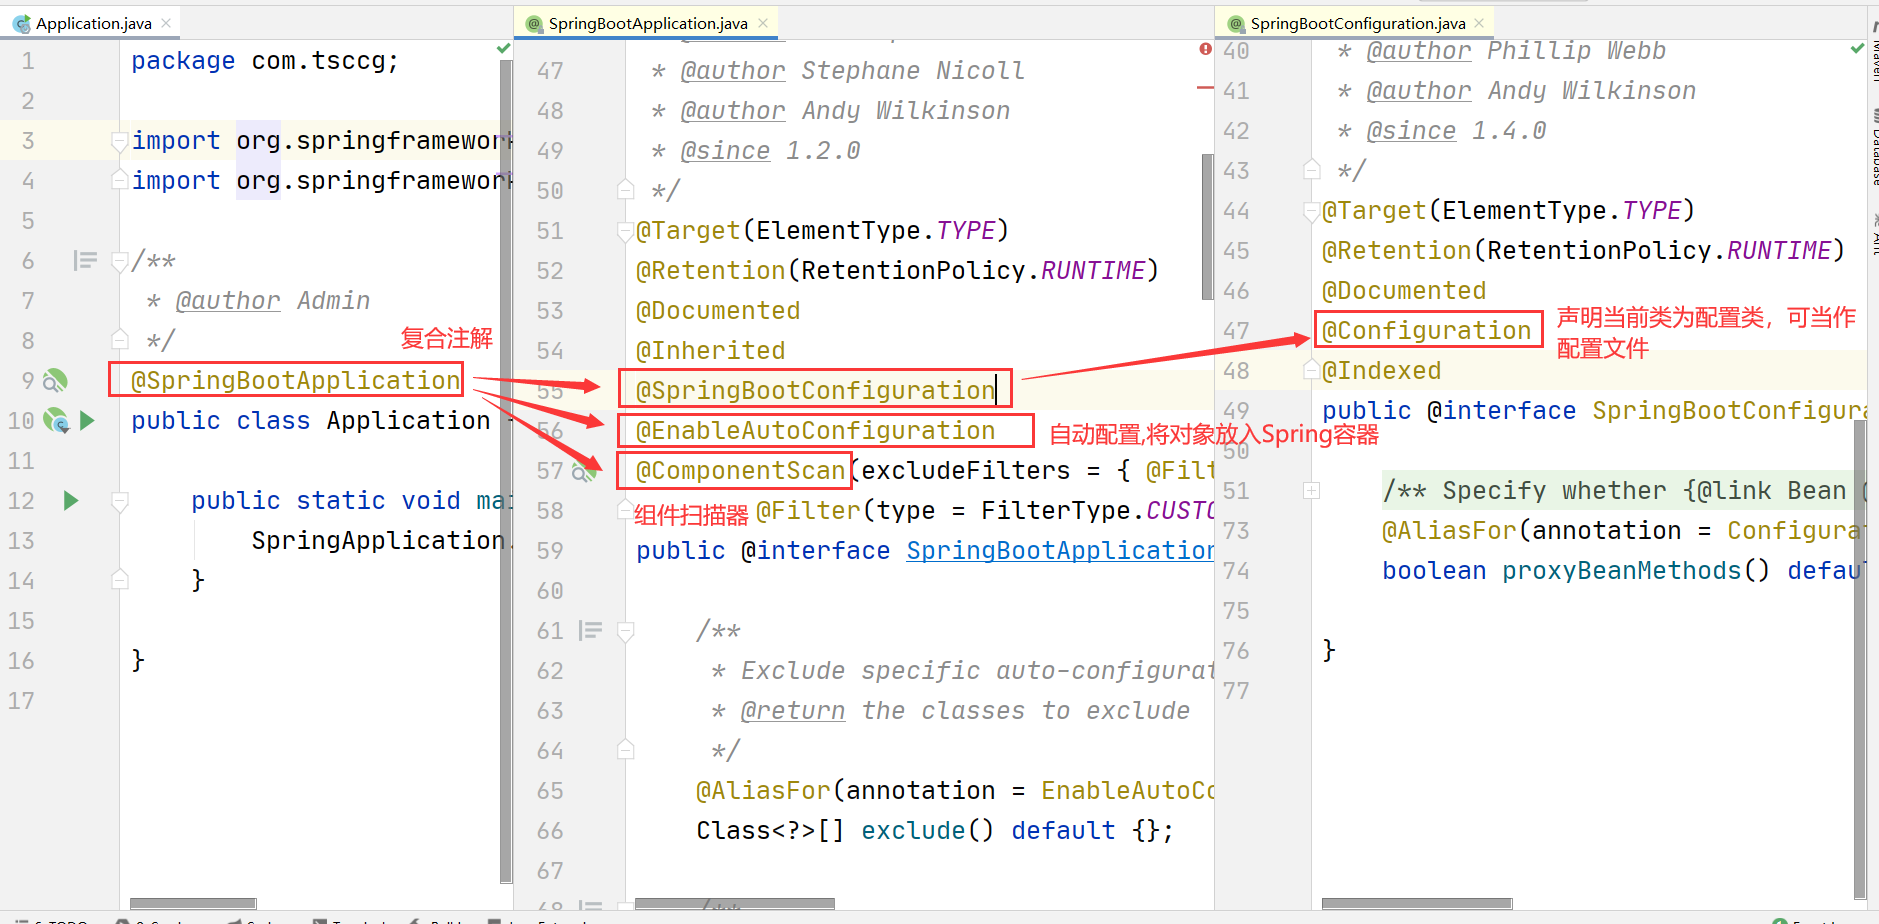
The @SpringBootApplication annotation on the startup class Application is an important annotation for the Spring Boot project.
It is a composite annotation, which mainly contains @SpringBootConfiguration, @EnableAutoConfiguration, @ComponentScan annotations:
- @SpringBootConfiguration: Includes the @Configuration annotation internally to declare the current class as a configuration class and to act as a configuration file.
- @EnableAutoConfiguration: Turn on automatic configuration, configure some java objects, and inject them into the Spring container.
- @ComponentScan: Component scanner, find annotations, create objects based on the capabilities of annotations, assign attributes, etc. The component scanner scans by default the classes where the @ComponentScan annotation is located, the packages and subpackages where the classes are located.
2.5 Spring Boot Core Profile
The core configuration file for Spring Boot is used to configure the Spring Boot program.
The name must start with application, and the suffix has two formats:
-
.properties:
student.name=Zhang San
student.age=21
-
.yml /.yaml:
#Leave two spaces between the property and the parent property, and one space between the value and the previous colon
student:
  name: Zhang San
  age: 21
2.5. 1. Properrties file (default)
Modify based on the previous 2.3 web examples.
1. Modify the application. Properrties property profile, setting the port number and context path that Tomcat opens at startup
application.properties:
#Set Port Number
server.port=8082
#Set Context Path
server.servlet.context-path=/boot
(2) Start application:
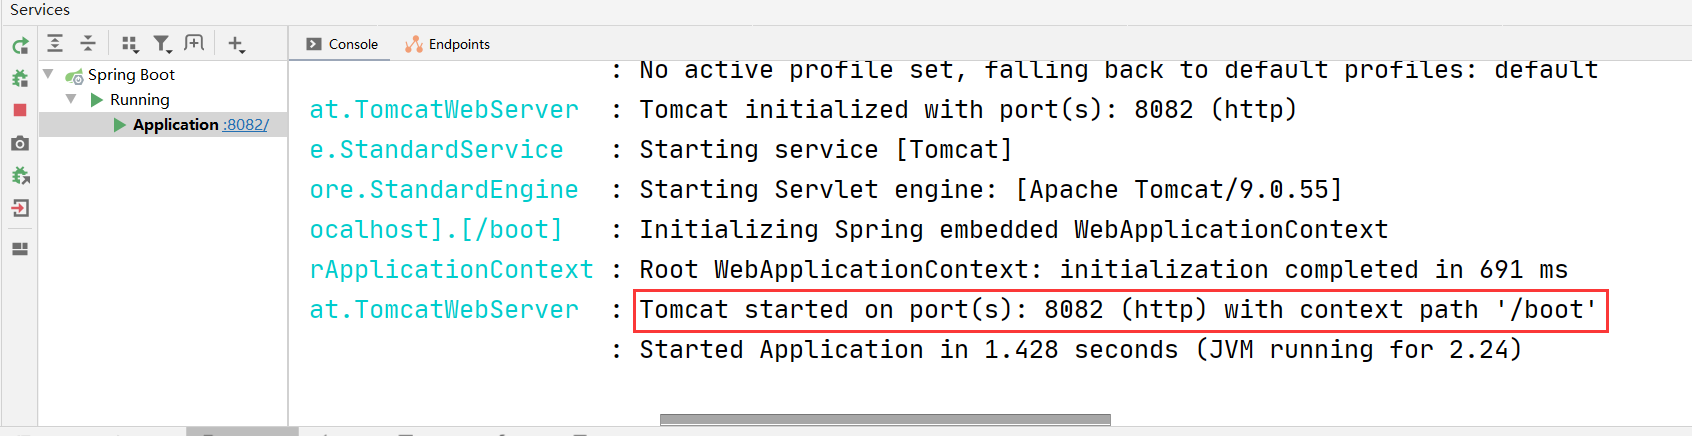
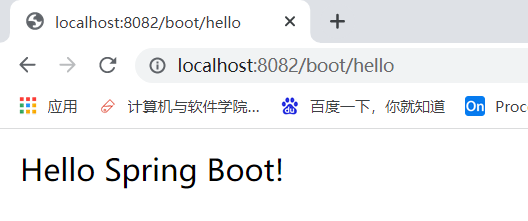
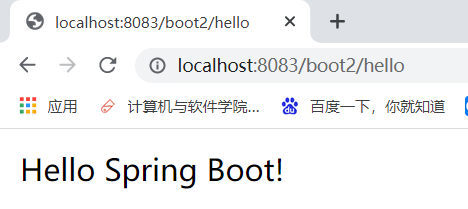
3. Visit in browser http://localhost:8082/boot/hello
2.5. 2. YML file (recommended)
Modify as based on the previous 2.3 web example.
(1) For the original application. Properrties file to delete or modify file name
If both formats exist, application is preferred. Properties
(2) Create an application in the resource directory. YML file, where the port number and context path are set
#Set port number and context path
#Leave two spaces between attribute and parent attribute, and one space between value and previous colon
server:
  port: 8083
  servlet:
    context-path: /boot2
(3) Start application
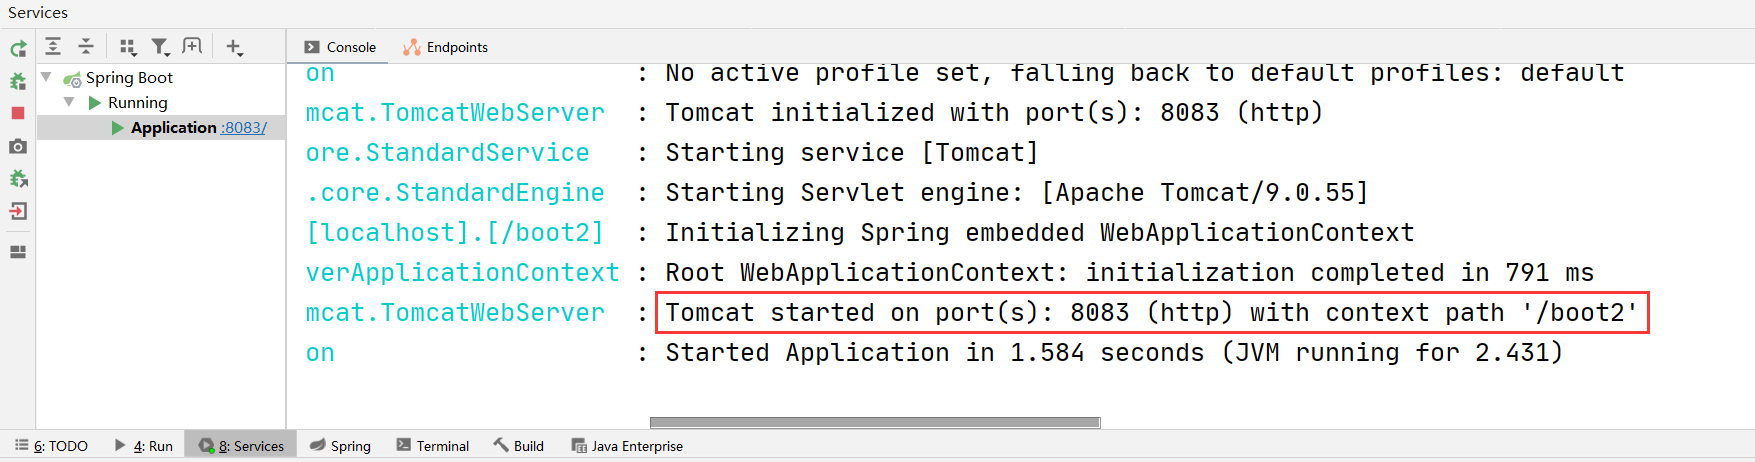
If the configuration is not valid, use maven to perform the clean ->install operation.
(4) Visit in browser http://localhost:8083/boot2/hello
2.5. 3 Multiple Environment Configuration
In the actual development process, our project will go through many stages (development->test->online), and the configuration of each stage will be different. For example, port, context path, database, etc.
To facilitate switching between environments, SpringBoot provides a multi-environment configuration as follows:
Modify the web project based on 2.3.
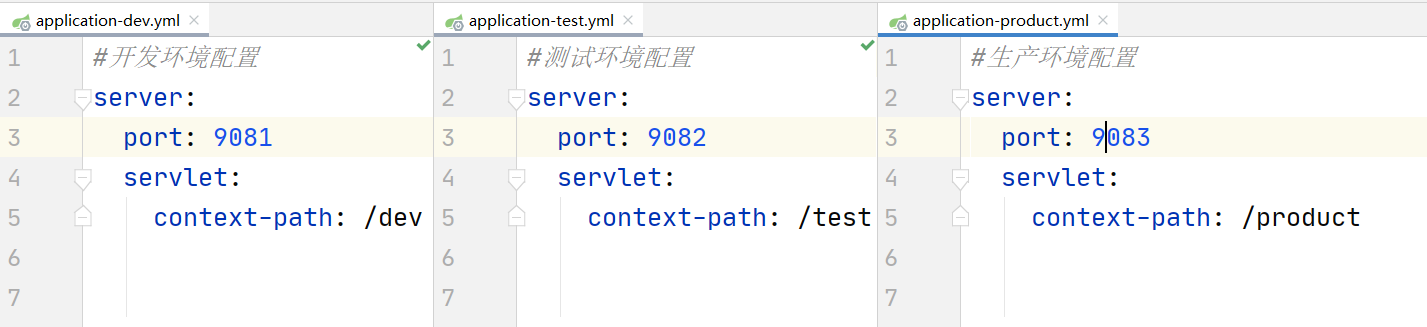
1. Create a configuration file for development, testing, and production environments
Naming must be identified as application-custom environment. properties|yml prevails
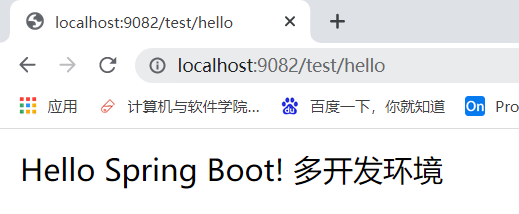
(2) In application. The configuration of which environment to use is specified in YML as follows:

Start the application and access it in the browser http://localhost:9081/dev/hello

(3) Modify the application.yml, specified as test environment

Restart the application and access it in the browser http://localhost:9082/test/hello
2.5. 4 Custom Configuration Items
In the core configuration file of SpringBoot, in addition to using built-in configuration items, we can add custom configuration items and read the properties of the configuration items using @Value or @Configuration Properties.
2.5.4.1@Value
Usage: @Value("${key}"), key from application.properties(yml)
Example: Modify based on a 2.3 web case
In application. Add built-in and custom configuration items to the properties core configuration file
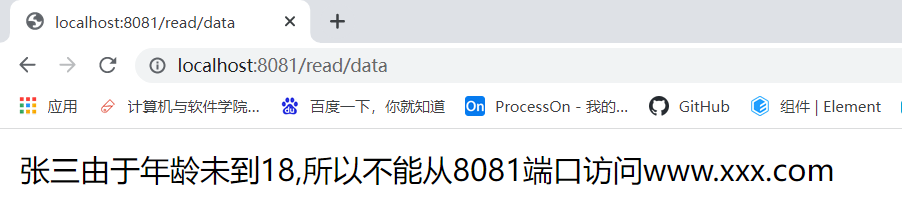
#Built-in Configuration Items
server.port=8081
server.servlet.context-path=/read

#Custom Configuration Items
student.name=Zhang San
student.age=18
wite=www.xxx.com
(2) Modify HelloController
1) Add a private property and read the application with the @Value comment. Data injection into properties file
2) Add Processor Method Responses Properties to Browser
@RestController
public class HelloController {
    @Value("${server.port}")
    private String port;
    @Value("${student.name}")
    private String name;
    @Value("${student.age}")
    private Integer age;
    @Value("${wite}")
    private String wite;

    @RequestMapping("/data")
    public String readData() {
        return name + "Under age" + age + ",So you can't start from" + port + "Port Access" + wite;
    }
}
(3) Start the application and access it in the browser http://localhost:8081/read/data
2.5.4.2@ConfigurationProperties
@ConfigurationProperties: You can map data in a configuration file to java objects, which is suitable for situations where there are many custom configurations. Used on classes or on configuration class methods.
Attribute: prefix, which matches the content at the beginning of some configuration items in the configuration file, such as specifying prefix as student, then student will be matched. Name, student. A configuration item such as age that starts with a student.
Prefix can be unspecified, if not, then it will go to the configuration file to find the configuration item that matches the property name of the class, prefix is used to distinguish the configuration with the same name.
Case demonstration: (based on the previous example)
1. Create a java class Student
1) Create objects and inject containers using the @Component annotation
2) Use the @ConfigurationProperties annotation to read configuration data from the configuration file to inject properties for this class
package com.tsccg.pojo;

import org.springframework.boot.context.properties.ConfigurationProperties;
import org.springframework.stereotype.Component;

@Component
@ConfigurationProperties(prefix = "student")
public class Student {

    private String name;
    private Integer age;

    //get set
    //toString
}
With the Configuration Properties annotation, IDEA has a warning, but it does not affect program execution. After adding the following dependencies to the pom, restarting the project eliminates them.
<!--Processing Usage@ConfigurationProperties Annotation has warning problems-->
<dependency>
    <groupId>org.springframework.boot</groupId>
    <artifactId>spring-boot-configuration-processor</artifactId>
    <optional>true</optional>
</dependency>
(2) Create StudentController class
@RestController
public class StudentController {
    @Resource//Automatic Injection
    private Student student;

    @RequestMapping("/student")
    public String readStudent() {
        return student.toString();
    }
}
3. Open applications and access them in browsers http://localhost:8081/read/student

2.6 Use JSP in the Spring Boot project
Spring Boot does not support JSP by default, but uses template technology instead of jsp.
The following configuration is required to use jsp:
1. Add Dependency
<!--Introduce Spring Boot embedded Tomcat Yes JSP Parse packs cannot be parsed without jsp page-->
<!--If you only use JSP Pages can add only that dependency-->
<dependency>
    <groupId>org.apache.tomcat.embed</groupId>
    <artifactId>tomcat-embed-jasper</artifactId>
</dependency>
<!--If you want to use servlet The following two dependencies must be added-->
<!--servlet Dependent jar package-->
<dependency>
    <groupId>javax.servlet</groupId>
    <artifactId>javax.servlet-api</artifactId>
</dependency>
<!--jsp rely on jar package-->
<dependency>
    <groupId>javax.servlet.jsp</groupId>
    <artifactId>javax.servlet.jsp-api</artifactId>
    <version>2.3.1</version>
</dependency>

<!--If used JSTL This dependency must be added-->
<!--jstl Label Dependent jar package start-->
<dependency>
    <groupId>javax.servlet</groupId>
    <artifactId>jstl</artifactId>
</dependency>
(2) Specify the directory to store the compiled jsp files
SpringBoot requires that jsp files must be compiled into the specified META-INF/resources directory to be accessed, otherwise they cannot be accessed.
In pom. The build tag configuration for XML is as follows
<resources>
    <resource>
        <!--Source File Location-->
        <directory>src/main/webapp</directory>
        <!--Specify compilation to META-INF/resource,This directory cannot be freely written-->
        <targetPath>META-INF/resources</targetPath>
        <!--Specify which files to compile into,**Express webapp Catalog and sub
 Catalog,*.*Represents all files-->
        <includes>
            <include>**/*.*</include>
        </includes>
    </resource>
    <!--Include all files below src/main/resources in the classes directory-->
    <resource>
        <directory>src/main/resources</directory>
        <includes>
            <include>**/*.*</include>
        </includes>
    </resource>
</resources>
(3) Create a directory to store jsp files in src/main/directory: webapp, specify as Web Resource Directory in the project, and create a jsp file index.jsp

(4) in index. Get data for request scope in JSP
<%@ page contentType="text/html;charset=UTF-8" language="java" %>
<html>
<head>
    <title>Title</title>
</head>
<body>
    ${data}
</body>
</html>
In application. Configuring view resolver in SpringMVC in properties configuration file
server.port=9090
#View Prefix
spring.mvc.view.prefix=/
#View Suffix
spring.mvc.view.suffix=.jsp
Create JspController, return to view
package com.tsccg.controller;

import org.springframework.stereotype.Controller;
import org.springframework.ui.Model;
import org.springframework.web.bind.annotation.RequestMapping;

@Controller
public class JspController {
    @RequestMapping("/doSome")
    public String doSome(Model model) {
        //Put data into the request scope
        model.addAttribute("data","Spring Boot integration Jsp");
        return "index";
    }
}
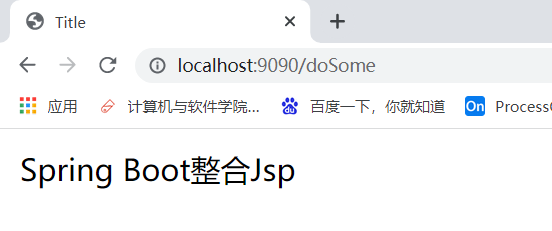
Open applications, access http://localhost:9090/doSome
2.7 Use container objects (ApplicationContext) in Spring Boots
We click on the run method of SpringApplication in the startup class, find that the run method returns a ConfigurationApplicationContext type object, continue clicking on the ConfigurationApplicationContext, and find that it is an interface that inherits the ApplicationContext.
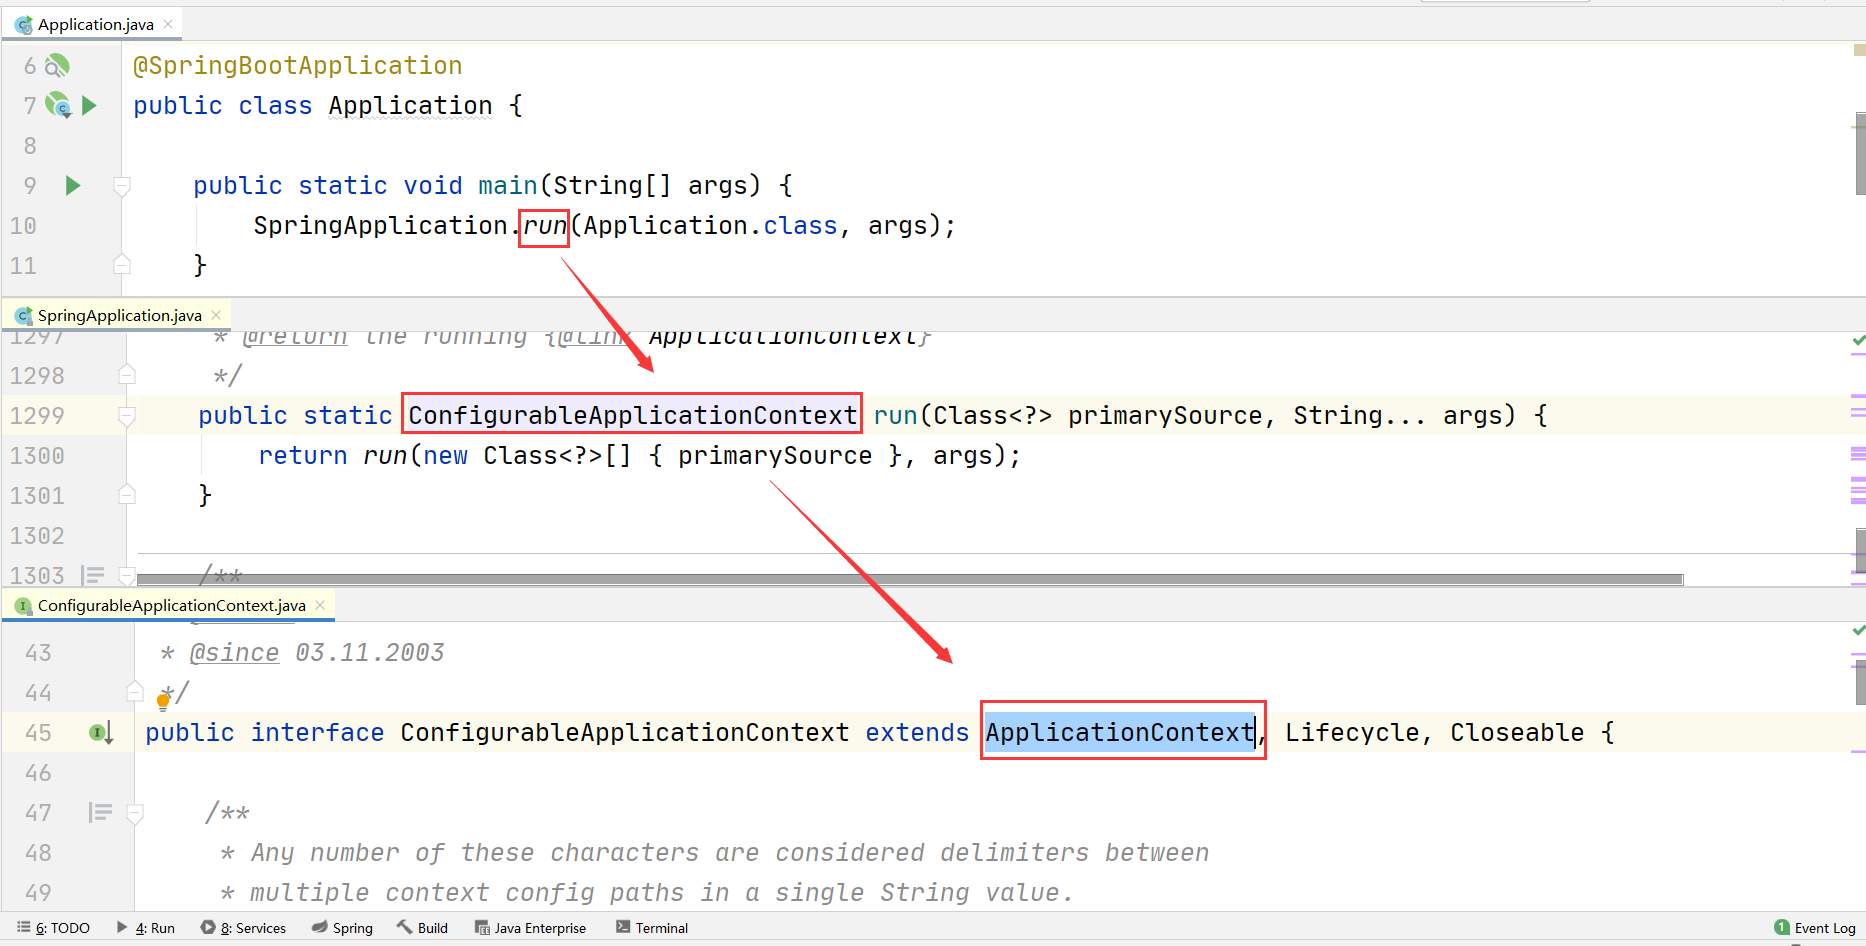
The ApplicationContext is Spring's container object through which Bean objects in the container can be obtained directly.
When we test some code without starting the entire project, we can use SpringApplication in the main method. The run() statement gets the returned Spring container object and gets the business bean to invoke.
Demonstration:
1. Create Business Interface HelloService
package com.tsccg.service;

public interface HelloService {
    void sayHello(String name);
}
(2) Create Business Interface Implementation Class HelloServiceImpl
package com.tsccg.service.impl;

import com.tsccg.service.HelloService;
import org.springframework.stereotype.Service;

@Service(value = "helloService")
public class HelloServiceImpl implements HelloService {
    @Override
    public void sayHello(String name) {
        System.out.println("Hello " + name);
    }
}
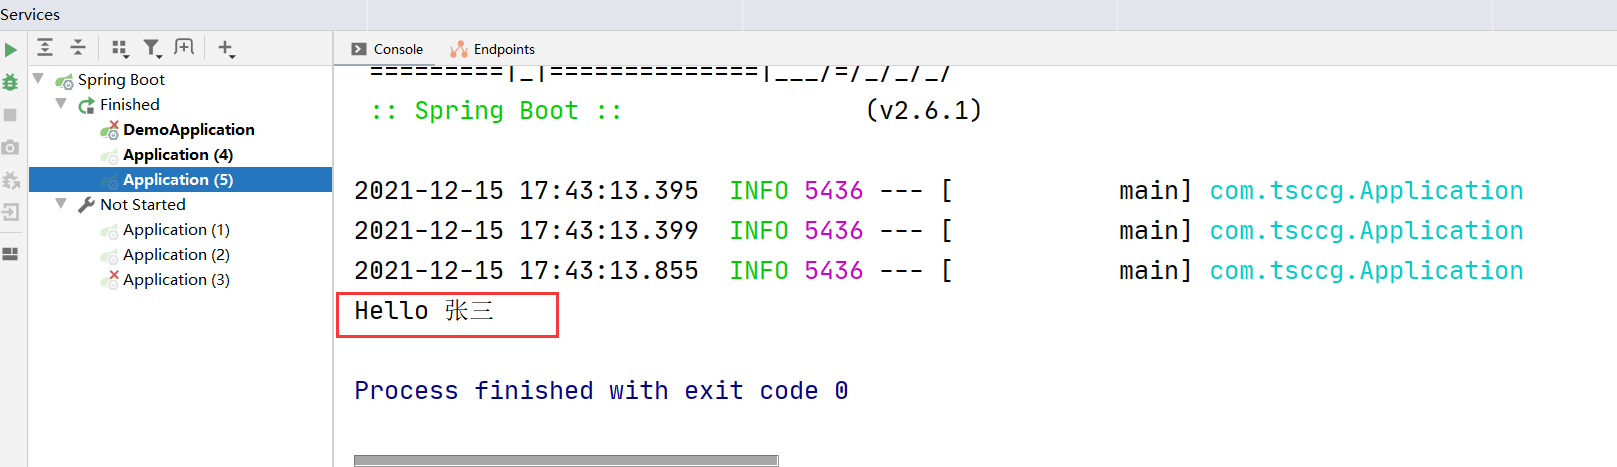
(3) In the startup class main method, get the container object, take out the business bean object and call its method
@SpringBootApplication
public class Application {

    public static void main(String[] args) {
        //Get Container Object
        ConfigurableApplicationContext app = SpringApplication.run(Application.class, args);
        //Get Business bean Object
        HelloService helloService = (HelloService) app.getBean("helloService");
        //Call Method
        helloService.sayHello("Zhang San");
    }
}
(4) Start application
2.8 CommandLineRunner interface
There may be scenarios in development where something needs to be done after the container is started, such as reading configuration files, database connections, and so on. SpringBoot provides us with two interfaces to help us meet this need, either
- CommandLineRunner
- ApplicationRunner
When they are executed when the container is started, both interfaces have a run Abstract method, which we only need to implement. The two interfaces differ in that:
- The run method parameter in the ApplicationRunner interface is ApplicationArguments
- The parameter of the run method in the CommandLineRunner interface is a String array
@FunctionalInterface
public interface CommandLineRunner {
	void run(String... args) throws Exception;
}

@FunctionalInterface
public interface ApplicationRunner {
    void run(ApplicationArguments args) throws Exception;
}
Demonstration uses:
Modify based on the example in 2.7.
1. Modify Startup Class
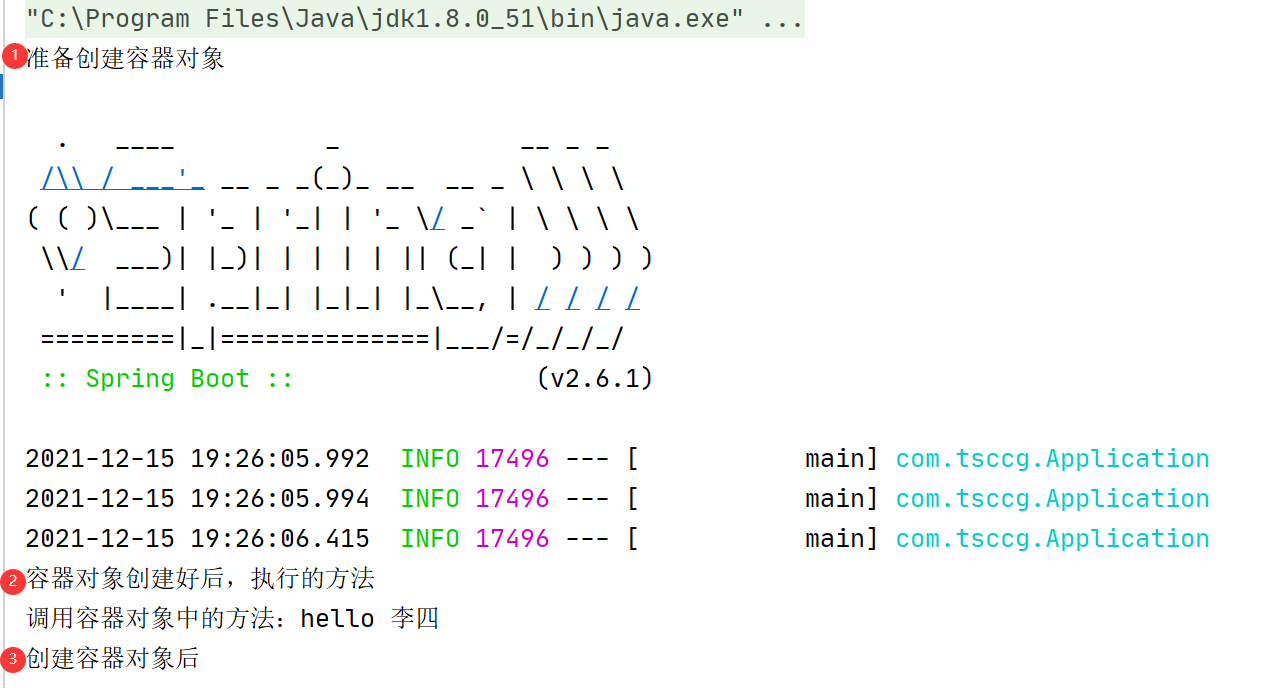
Make the startup class implement the CommandLineRunner interface and its run method
@SpringBootApplication
public class Application implements CommandLineRunner {
    @Resource
    private HelloService helloService;

    public static void main(String[] args) {
        System.out.println("Preparing to create container objects");
        SpringApplication.run(Application.class, args);
        System.out.println("After creating container object");
    }

    @Override
    public void run(String... args) throws Exception {
        System.out.println("Method to execute when container object is created");
        String result = helloService.sayHello("Li Si");
        System.out.println("Call methods in container objects:" + result);
    }
}
(2) Open applications
Chapter 3 Spring Boot and web Components
Three things:
- Interceptor HandlerInterceptor
- Servlet
- Filter Filter
3.1 Interceptor
Interceptors are objects in SpringMVC that can intercept requests to ontrollers and preprocess requests.
3.1. 1 Review the use of interceptors in Spring MVC
1. Customize interceptor to implement HandlerInterceptor interface
public interface HandlerInterceptor {

 default boolean preHandle(HttpServletRequest request, HttpServletResponse response, Object handler) throws Exception {
     return true;
 }

 default void postHandle(HttpServletRequest request, HttpServletResponse response, Object handler, @Nullable ModelAndView modelAndView) throws Exception {
 }

 default void afterCompletion(HttpServletRequest request, HttpServletResponse response, Object handler, @Nullable Exception ex) throws Exception {
 }
}
Register interceptor classes in the Spring MVC configuration file
<mvc:interceptors>
	<mvc:interceptor>
    	<mvc:mapping path="Intercepted url" />
        <bean class="Interceptor class fully qualified name"/>
    </mvc:interceptor>
</mvc:interceptors>
3.1. 2 Use interceptors in SpringBoot
Using interceptors in Spring Boot is roughly the same as using them in Spring MVC, where interceptors are customized and registered with the project.
It's just registering the interceptor in the Spring Boot with the @Configuration decorated configuration class.
Specific steps:
1. Custom interceptor
Create a java class to implement the HandlerInterceptor interface and implement the preHandle method
package com.tsccg.handlerInterceptor;

import org.springframework.web.servlet.HandlerInterceptor;

import javax.servlet.http.HttpServletRequest;
import javax.servlet.http.HttpServletResponse;

public class MyLoginInterceptor implements HandlerInterceptor {
    @Override
    public boolean preHandle(HttpServletRequest request, HttpServletResponse response, Object handler) throws Exception {
        System.out.println("Executed custom interceptor preHandle Method");
        return true;
    }
}
(2) Register interceptors
- Create a java class to implement the WebMvcConfigurer interface, implement its addInterceptors method, and decorate the class with the @Configuration annotation
- Register custom interceptor objects into the project, set URLs for interception and release
package com.tsccg.config;
import com.tsccg.handlerInterceptor.MyLoginInterceptor;
import org.springframework.context.annotation.Configuration;
import org.springframework.web.servlet.config.annotation.InterceptorRegistry;
import org.springframework.web.servlet.config.annotation.WebMvcConfigurer;
/**
* Equivalent to SpringMVC profile
*/
@Configuration
public class MyAppConfig implements WebMvcConfigurer {
/**
* Register Interceptor
* @param registry Interceptor objects available in the registration system
*/
@Override
public void addInterceptors(InterceptorRegistry registry) {
//Intercepted url
String path = "/user/**";
//Released url
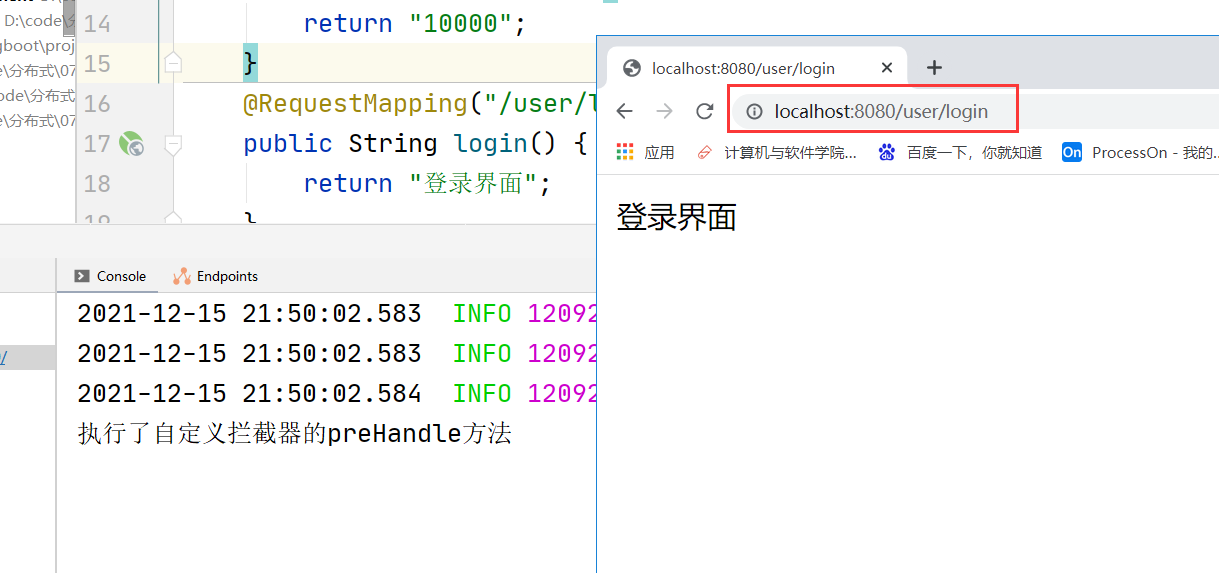
String excludePath = "/user/login";
registry.addInterceptor(new MyLoginInterceptor())
.addPathPatterns(path).excludePathPatterns(excludePath);
}
}
3. Create Controller for testing
@RestController
public class UserController {
    @RequestMapping("/user/account")
    public String account() {
        return "10000";
    }
    @RequestMapping("/user/login")
    public String login() {
        return "Login interface";
    }
}
(4) Start application
1) Access blocked URLs through a browser: http://localhost:8080/user/account
You can see that after sending the request, a custom interceptor method is executed in the background

2) Access the released url through a browser: http://localhost:8080/user/login
Visible, no interceptor method is executed in the background after the request is sent
3.2 Servlet
ServletRegistrationBean is used to register Servlet objects
Steps to use:
1. Create Servlet
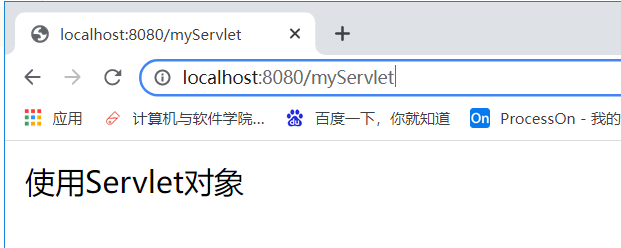
public class MyServlet extends HttpServlet {
    @Override
    protected void doGet(HttpServletRequest req, HttpServletResponse resp) throws ServletException, IOException {
        resp.setContentType("text/html;charset=utf-8");
        PrintWriter out = resp.getWriter();
        out.print("Use Servlet object");
        out.flush();
        out.close();
    }
}
Register Servlet
@Configuration
public class MyAppConfig{
    /**
     * Register Servlet
     * @return
     */
    @Bean
    public ServletRegistrationBean servletRegistrationBean() {
        //ServletRegistrationBean reg = new ServletRegistrationBean(new MyServlet(),"/myServlet");

        ServletRegistrationBean reg = new ServletRegistrationBean();
        //Register Servlet Objects
        reg.setServlet(new MyServlet());
        //Set Request Path
        reg.addUrlMappings("/myServlet");
        return reg;
    }
}
(3) Start the application and access it in the browser http://localhost:8080/myServlet
3.3 Filter
FilterRegistrationBean is used to register Filter objects
Steps to use:
1. Customize the filter to implement javax.servlet.Filter interface
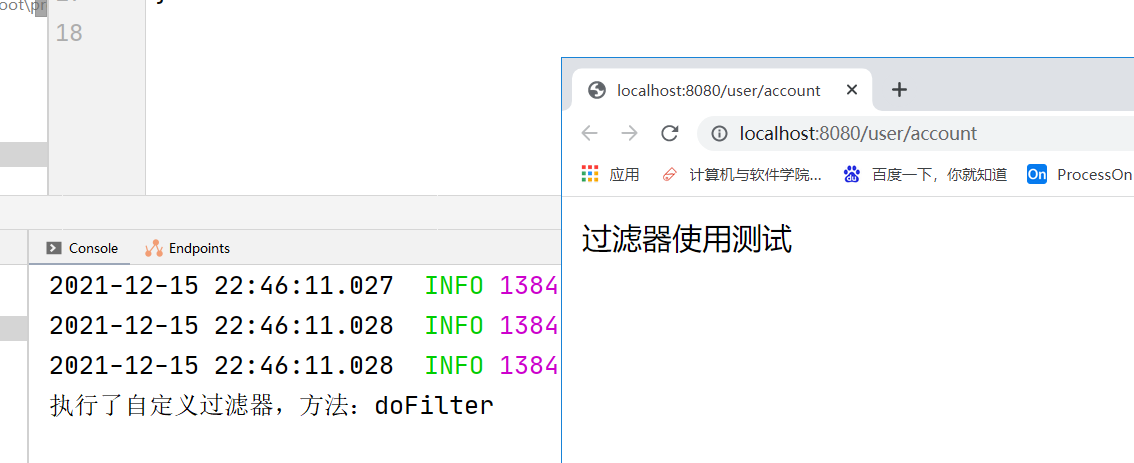
public class MyFilter implements Filter {
    @Override
    public void doFilter(ServletRequest request, ServletResponse response, FilterChain chain) throws IOException, ServletException {
        System.out.println("A custom filter was executed by: doFilter");
        chain.doFilter(request,response);
    }
}
(2) Registration filter
@Configuration
public class MyAppConfig{
    /**
     * Register Filter Object
     * @return
     */
    @Bean
    public FilterRegistrationBean filterRegistrationBean() {
        FilterRegistrationBean bean = new FilterRegistrationBean();
        //Register Custom Filter Object
        bean.setFilter(new MyFilter());
        //Set filtered url
        bean.addUrlPatterns("/user/*");
        return bean;
    }
}
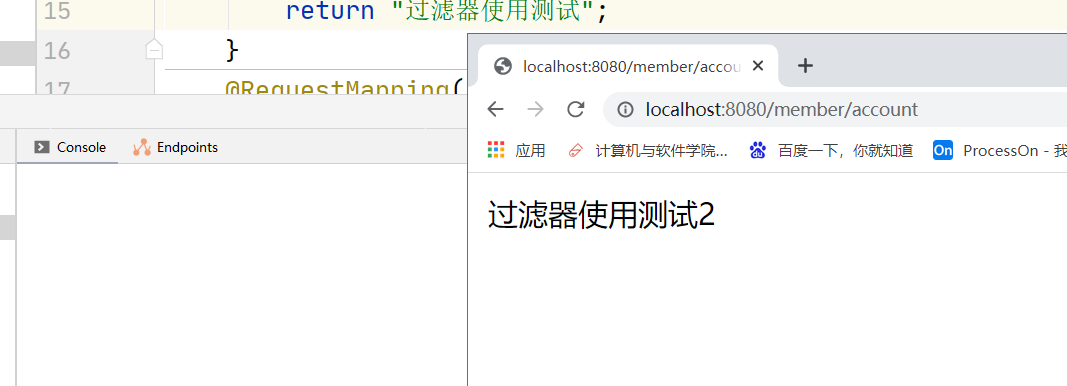
3. Create Controller
@RestController
public class MyController {

    @RequestMapping("/user/account")
    public String userAccount() {
        return "Filter usage test";
    }
    @RequestMapping("/member/account")
    public String memberAccount() {
        return "Filter usage test 2";
    }
}
(4) Start application
1) Access addresses within the range specified by the filter: http://localhost:8080/user/account
2) Access addresses outside the specified range of the filter: http://localhost:8080/member/account
3.4 Character Set Filter
3.4. 1 Review of SpringMVC using character set filters
CharacterEncodingFilter is a character set filter provided by the framework to solve the problem of post ing Chinese characters out of order.
When using this filter through the SpringMVC framework, you need to use it on the web. Register the filter in XML and configure its properties:
<!--Register Character Set Filter-->
<filter>
    <filter-name>characterEncodingFilter</filter-name>
    <filter-class>org.springframework.web.filter.CharacterEncodingFilter</filter-class>
    <init-param>
        <param-name>encoding</param-name>
        <param-value>utf-8</param-value>
    </init-param>
    <init-param>
        <param-name>forceRequestEncoding</param-name>
        <param-value>true</param-value>
    </init-param>
    <init-param>
        <param-name>forceResponseEncoding</param-name>
        <param-value>true</param-value>
    </init-param>
</filter>
<filter-mapping>
    <filter-name>characterEncodingFilter</filter-name>
    <url-pattern>/*</url-pattern>
</filter-mapping>
3.4. 2 Use Character Set Filter in Spring Boot
There are two ways to use this:
1. Register in the configuration class
2. Set in the SpringBoot core configuration file
1. Register in the configuration class
Steps:
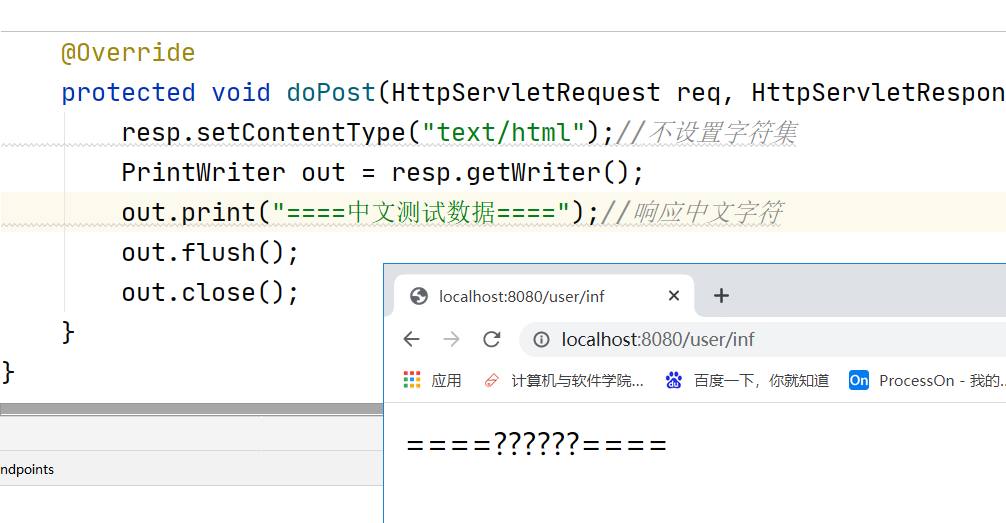
1. Create a Servlet that responds to Chinese characters without setting utf-8
public class MyServlet extends HttpServlet {
    @Override
    protected void doGet(HttpServletRequest req, HttpServletResponse resp) throws ServletException, IOException {
        doPost(req,resp);
    }

    @Override
    protected void doPost(HttpServletRequest req, HttpServletResponse resp) throws ServletException, IOException {
        resp.setContentType("text/html");//Do not set utf-8 character set
        PrintWriter out = resp.getWriter();
        out.print("====Chinese Test Data====");//Response to Chinese characters
        out.flush();
        out.close();
    }
}
Register Servlet
@Configuration
public class MyAppConfig{
    /**
     * Register Servlet
     * @return
     */
    @Bean
    public ServletRegistrationBean servletRegistrationBean() {
        ServletRegistrationBean bean =
                new ServletRegistrationBean(new MyServlet(),"/user/inf");
        return bean;
    }
}
3. Open applications and access them in browsers http://localhost:8080/user/inf
Visible, the Chinese characters of the response are scrambled.
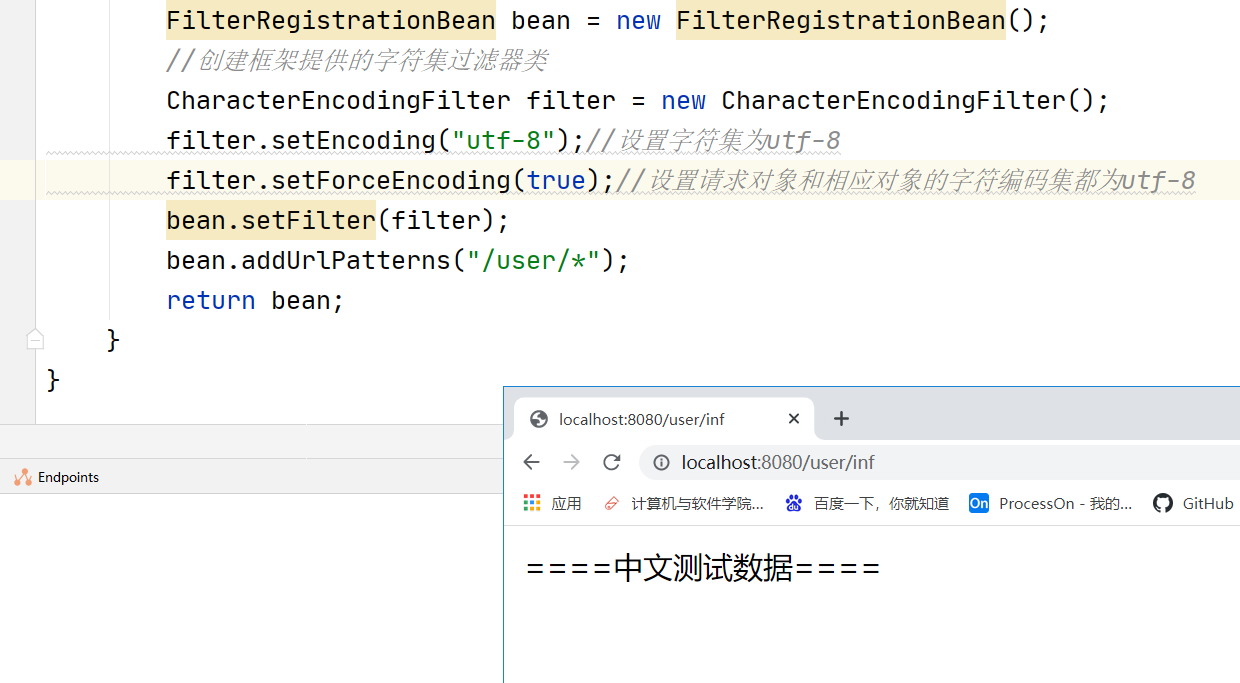
Register Character Set Filter in Configuration Class
@Configuration
public class MyAppConfig{
    /**
     * Register Servlet
     * @return
     */
    @Bean
    public ServletRegistrationBean servletRegistrationBean() {
        ServletRegistrationBean bean =
                new ServletRegistrationBean(new MyServlet(),"/user/inf");
        return bean;
    }

    /**
     * Registration Filter
     * @return
     */
    @Bean
    public FilterRegistrationBean filterRegistrationBean() {
        FilterRegistrationBean bean = new FilterRegistrationBean();
        //Create a character set filter class provided by the framework
        CharacterEncodingFilter filter = new CharacterEncodingFilter();
        filter.setEncoding("utf-8");//Set encoding property to utf-8
        filter.setForceEncoding(true);//Set the character encoding set of request and response objects to match the encoding property
        bean.setFilter(filter);//Register Character Set Filter
        bean.addUrlPatterns("/user/*");//Set filtered url
        return bean;
    }
}
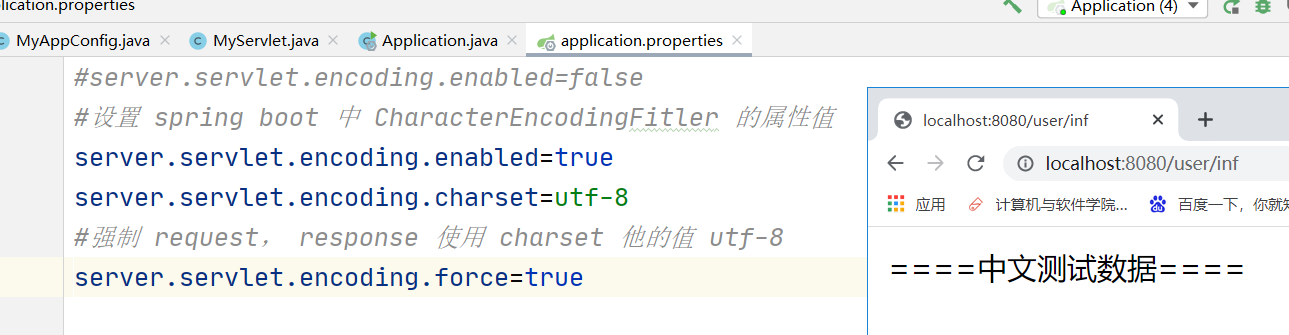
In application. Add the following configuration to properties
server.servlet.encoding.enabled=false
Restart the application and access it again
2. Set in core profile
The Spring Boot project has CharacterEncodingFilter enabled by default, directly in the application. You can set his properties in the properties to:
#Setting the attribute value of CharacterEncodingFitler in spring boot
server.servlet.encoding.enabled=true
server.servlet.encoding.charset=utf-8
#Force request, response uses charset's value utf-8
server.servlet.encoding.force=true
Restart the application and access again:
Chapter 4 ORM Operational Database
Object Relational Mapping (ORM) is a programming technique for converting data between different types of systems in an object-oriented programming language.
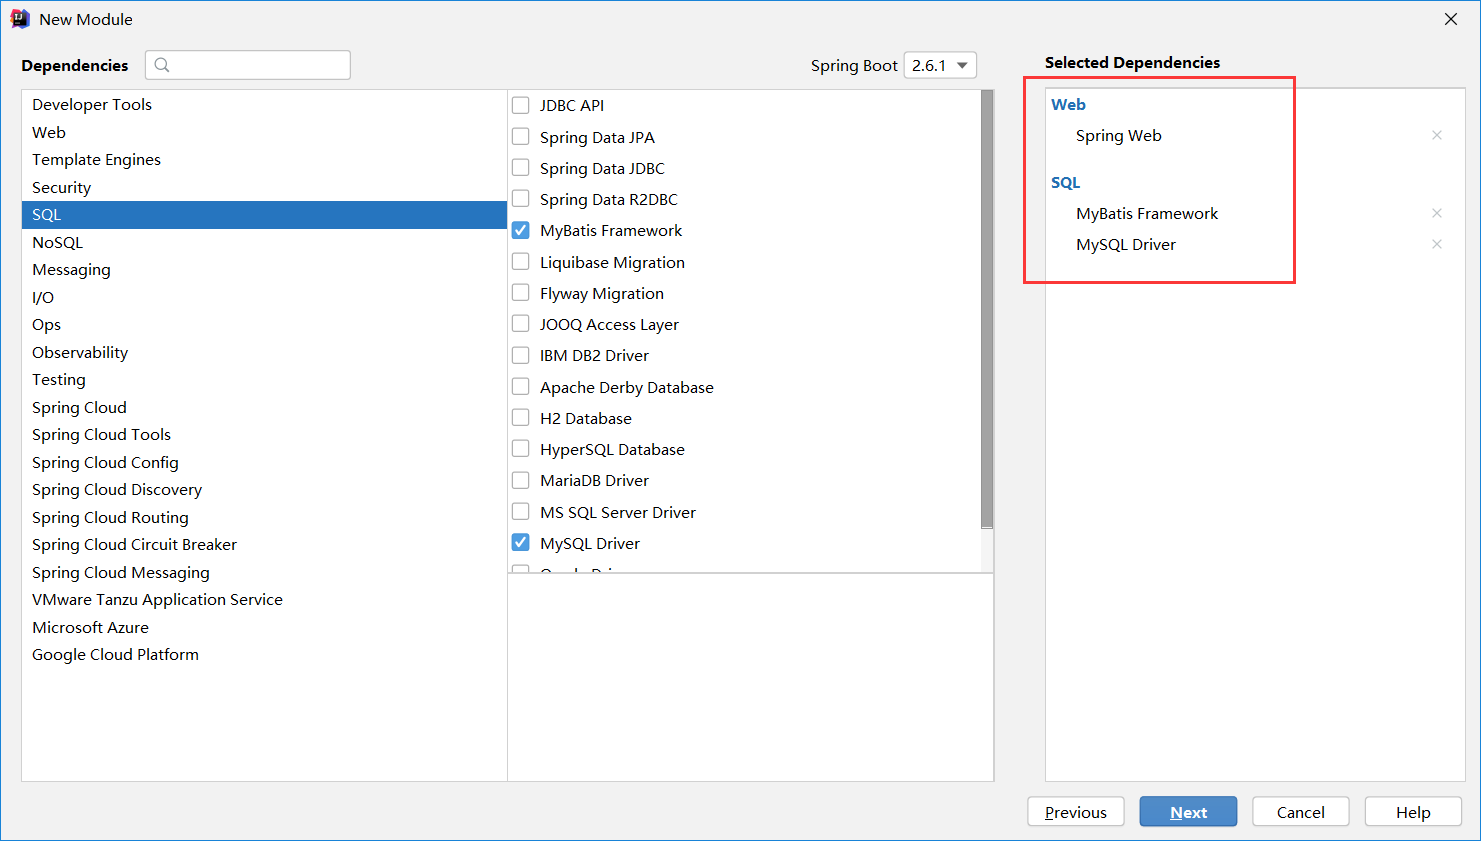
MyBatis is one of the ORM s, and the following shows using MyBatis to manipulate MySQL databases in the Spring Book project.
Table building:

Step analysis:
- Create a Spring Boot project, check Web, MyBatis, MySQL Driver Start Dependencies
- In application. Configure database connection information in properties
- Create Entity Class Student
- Create Controller, receive browser requests, access Service
- Create the Service interface and its implementation class, call the Dao interface method
- Create Dao interface, add query method
- Create corresponding Mapper file in Dao interface sibling directory, specify namespace, write sql statement
- In pom.xml specifies to include xml files from the src/main/java directory in the classpath
There are two ways to create a Dao proxy object:
- Add @Mapper on each Dao interface
- Add @MapperScan on the startup class (basePackages = {"com.tsccg.dao", "com.tsccg.dao2"})
4.1 First way: @Mapper
(1) Create a Spring Boot project and check Web, MyBatis, MySQL Driver Start Dependencies
(2) In application. Configure database connection information in properties
#Project Port Number
server.port=9090
#Database Connection Information
spring.datasource.driver-class-name=com.mysql.cj.jdbc.Driver
spring.datasource.url=jdbc:mysql://localhost:3306/db_mybatis?useUnicode=true&characterEncoding=UTF-8&serverTimezone=GMT%2B8
spring.datasource.username=root
spring.datasource.password=123456
3. Create Student Entity Class
package com.tsccg.pojo;

public class Student {
    private Integer id;
    private String name;
    private String email;
    private Integer age;
	//get set
    //toString
}
(4) Create Controller
package com.tsccg.controller;

@RestController
public class StudentController {
    @Resource
    private StudentService studentService;

    @RequestMapping("/find")
    public String findStudent(Integer id) {
        Student student = studentService.findById(id);
        return student.toString();
    }
}
Create Service
StudentService interface:
package com.tsccg.service;

import com.tsccg.pojo.Student;

public interface StudentService {
    Student findById(Integer id);
}
Interface implementation class:
package com.tsccg.service.impl;

import javax.annotation.Resource;

@Service
public class StudentServiceImpl implements StudentService {
    @Resource
    private StudentDao studentDao;

    @Override
    public Student findById(Integer id) {
        return studentDao.findById(id);
    }
}
Create Dao
StudentDao interface:
package com.tsccg.dao;

import com.tsccg.pojo.Student;
import org.apache.ibatis.annotations.Mapper;

@Mapper//Tell MyBatis that this is the dao interface and create a proxy object for it.
public interface StudentDao {
    Student findById(Integer id);
}
Create StudentDao in the same directory. XML
<?xml version="1.0" encoding="UTF-8" ?>
<!DOCTYPE mapper
        PUBLIC "-//mybatis.org//DTD Mapper 3.0//EN"
        "http://mybatis.org/dtd/mybatis-3-mapper.dtd">
<mapper namespace="com.tsccg.dao.StudentDao">
    <!--according to id Query Student Information-->
    <select id="findById" parameterType="int" resultType="com.tsccg.pojo.Student">
        select id,name,email,age from t_student where id = #{id}
    </select>
</mapper>
Since the mapper map file is created in the src/main/java directory, it needs to be in the pom.xml specifies to include xml files from the src/main/java directory in the classpath
Add the following statement to the build tag:
<resources>
    <resource>
        <directory>src/main/java</directory>
        <includes>
            <include>**/*.xml</include>
        </includes>
    </resource>
</resources>
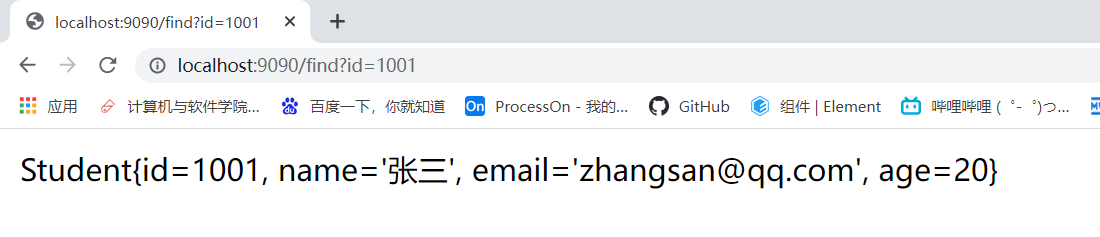
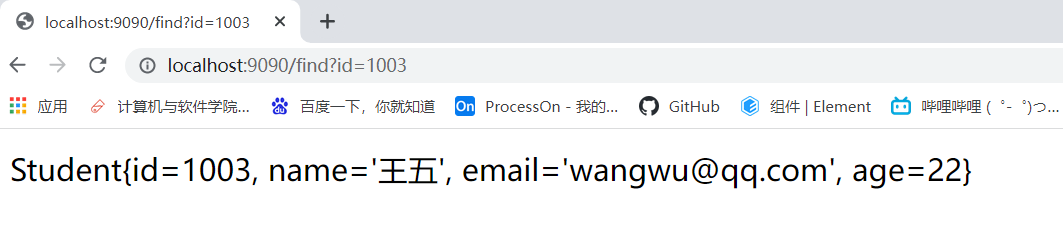
_Open the application and access it in the browser http://localhost:9090/find?id=1001
4.2 Second way: @MapperScan
The first is to add @Mapper to each Dao interface, which is not convenient when there are many Dao interfaces.
This is done by adding @MapperScan(basePackages = "com.tsccg.dao") to the startup class.
@SpringBootApplication
@MapperScan(basePackages = "com.tsccg.dao")
//@MapperScan(basePackages = {"com.tsccg.dao","com.tsccg.dao2"})
public class Application {

    public static void main(String[] args) {
        SpringApplication.run(Application.class, args);
    }

}
4.3 Manage Mapper files separately from java code
We prefer to manage mapper files separately from Java code in our projects by placing mapper files in the src/main/resources directory and Java code in the src/main/java directory.
There are two ways of separation:
- First: Create a COM in the resources directory. Tsccg. Dao directory, so that mapper files and Dao are compiled. Class files together
- Second, create a custom subdirectory in the resources directory, and specify in the core configuration file that the mapper file is found from the directory in the class path
4.3. 1 First separation method
Create a COM in the resources directory. Tsccg. Dao directory, put mapper files in it.
This separation allows you to compile mapper files with StudentDao after the project has been compiled. The class files are grouped together as follows:

Steps:
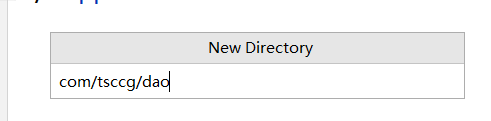
1. Create a COM in the resources directory. Tsccg. Dao directory, move mapper files to that directory.

Note that a com is created in the resources directory. Tsccg. When Dao directories are used, they must be hierarchical, as follows:
Otherwise it will be com.tsccg.dao is treated as a directory name and mapper files are not compiled with StudentDao. Classes together.

(2) In pom. Remark the original resources tag from the xml, otherwise errors will be compiled

(3) Restart the application and access it again through the browser

4.3. 2 Second separation method
The second way is to tell the program where to find the mapper file without having to let the mapper file go with the compiled StudentDao.class is in the same directory.
Steps:
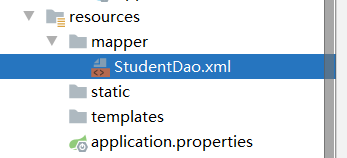
(1) Create a custom subdirectory, such as mapper, in the resources directory, and place the mapper file in it.
(2) In application. Specify the location of the mapper file in the properties core configuration file
#Specify the location of the mapper file
mybatis.mapper-locations=classpath:mapper/*.xml
#Specify logs using mybatis
mybatis.configuration.log-impl=org.apache.ibatis.logging.stdout.StdOutImpl
(3) The POM is also needed. Remark the original resources tag from the xml, otherwise errors will be compiled

(4) Restart the application and revisit the address
4.4 Transactions
It's easy to use transactions in Spring Boot s, but at the bottom, Spring provides transaction management.
Steps to use:
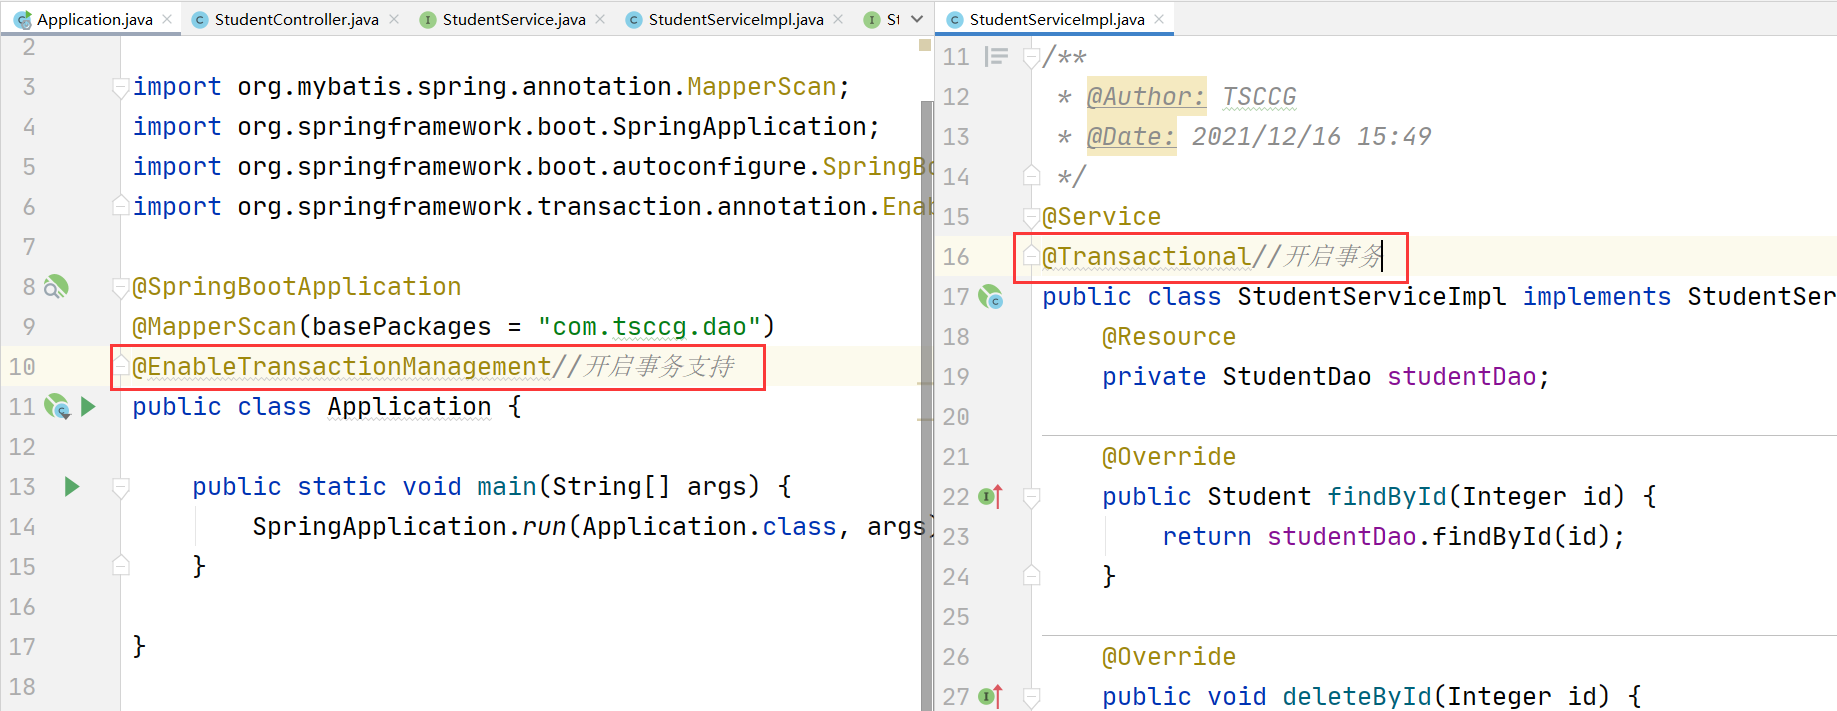
- Add the @EnableTransactionManagement annotation on the entry class to turn on transaction support (default, but preferably)
- Add the @Transactional annotation to the Service interface implementation class that accesses the database
Example demo:
Modify based on the example in 4.1.
(1) Add transaction annotations on the entry class and on the Service interface implementation class, respectively
(2) Add deletion methods in Controller
Use the try...catch statement to monitor if an exception is thrown in the Service and respond to the appropriate information.
@RestController
public class StudentController {
    @Resource
    private StudentService studentService;

    @RequestMapping("/delete")
    public String deleteStudentById(Integer id) {
        try {
            //Delete student information by id
            studentService.deleteById(id);
            return "Delete succeeded";
        } catch (Exception e) {
            e.printStackTrace();
            return "Delete failed";
        }
    }
}
(3) Add delete methods to Service interfaces and implement them in implementation classes
StudentService:
public interface StudentService {
	//Delete student information by id
    void deleteById(Integer id);
}
StudentServiceImpl:
@Service
@Transactional//Open Transaction
public class StudentServiceImpl implements StudentService {
    @Resource
    private StudentDao studentDao;

    @Override
    public void deleteById(Integer id) {
        studentDao.deleteById(id);//Call Dao to delete data
        int a = 10 / 0;//Throw runtime exception
    }
}
(4) Define deletion method in Dao interface and add corresponding sql statement in Mapper file
StudentDao:
public interface StudentDao {

    void deleteById(Integer id);
}
StudentDao.xml:
<?xml version="1.0" encoding="UTF-8" ?>
<!DOCTYPE mapper
        PUBLIC "-//mybatis.org//DTD Mapper 3.0//EN"
        "http://mybatis.org/dtd/mybatis-3-mapper.dtd">
<mapper namespace="com.tsccg.dao.StudentDao">
    <delete id="deleteById" parameterType="int">
        delete from t_student where id = #{id}
    </delete>
</mapper>
Test
Open an application and access it through a browser http://localhost:9090/delete?id=1006
Chapter 5 RESTful Interface Architecture Style
5.1 RESTful Introduction
REST(Representational State Transfer), the state transition of the presentation layer resources.
REST is a style of Internet software architecture design, not a standard, available or unused. It simply presents a set of architecture concepts and design principles for client-server interaction, based on which interfaces can be designed more concise and hierarchical. To put it plainly, it is a unified url naming format that standardizes and unifies the url naming of CRUD operations.
Description of the presentation-level resource state transition concept:
- Presentation layer: is the view layer, which displays resources, and displays the results of operating resources through view pages, jsp s, etc.
- Resources: Server-side dynamic and static resource files, data in database tables, etc. are resources. Each resource is a named abstraction on the server, organized around nouns, such as user representing the user's information in the server-side database. A resource can be identified by one or more urls, which are both the name of the resource and the address on the Web. On clients such as browsers, you can interact with the resource through its url.
- Resource Status: This is the representation of a resource in a different format when we access a video, a piece of text, or a picture through a browser.
- Resource State Transition: Resource State Transition refers to the transfer of resources between the client and the server (request resource-response resource). The purpose of operating resources is achieved by transferring and manipulating the representation of resources.
5.2 Implementation of RESTful
We used a variety of URLs to access a resource in the past, such as accessing a user's information:
http://localhost:8080/findUserById?id=1001 		 GET 		// Query a user's information
http://localhost:8080/addUser 					 POST 	// Add user information
http://localhost:8080/updateUser 				 POST 	// Update user information
http://localhost:8080/deleteUserById?id=1001 	 GET 		// Delete a user's information
These URLs all operate on the same resource, and the operations on that resource are described in the url.
REST is resource-oriented and resources are exposed through urls. In REST, the URL is designed to expose the resource in a reasonable way. The operation on the resource is not related to the url, but is represented by HTTP verbs.
In the HTTP protocol, GET, POST, DELETE, PUT are verbs that indicate how to operate.
They correspond to four basic operations:
- GET: Get resources
- POST: New Resource
- DELETE: Delete resources
- PUT: Update Resources
REST style advocates a uniform style design for url addresses, using nouns to represent resources, and information to access resources. In urls, information to access resources is used/separated.
Modify the url above to REST style:
http://localhost:8080/user/1001 		 GET 		// Query a user's information
http://localhost:8080/user 			 POST 	// Add user information
http://localhost:8080/user/1001 		 DELETE 	// Delete a user's information
http://localhost:8080/user 			 PUT 		// Update user information
Now there are two questions:
- Browsers only support GET and POST requests. How do I send DELETE and PUT requests?
- How do I get the request parameter values spliced into the url?
5.3 Send DELETE and PUT requests
There is a filter in Spring MVC that supports converting POST requests to DELETE, PUT requests.
Filter: org.springframework.web.filter.HiddenHttpMethodFilter
Core approach:
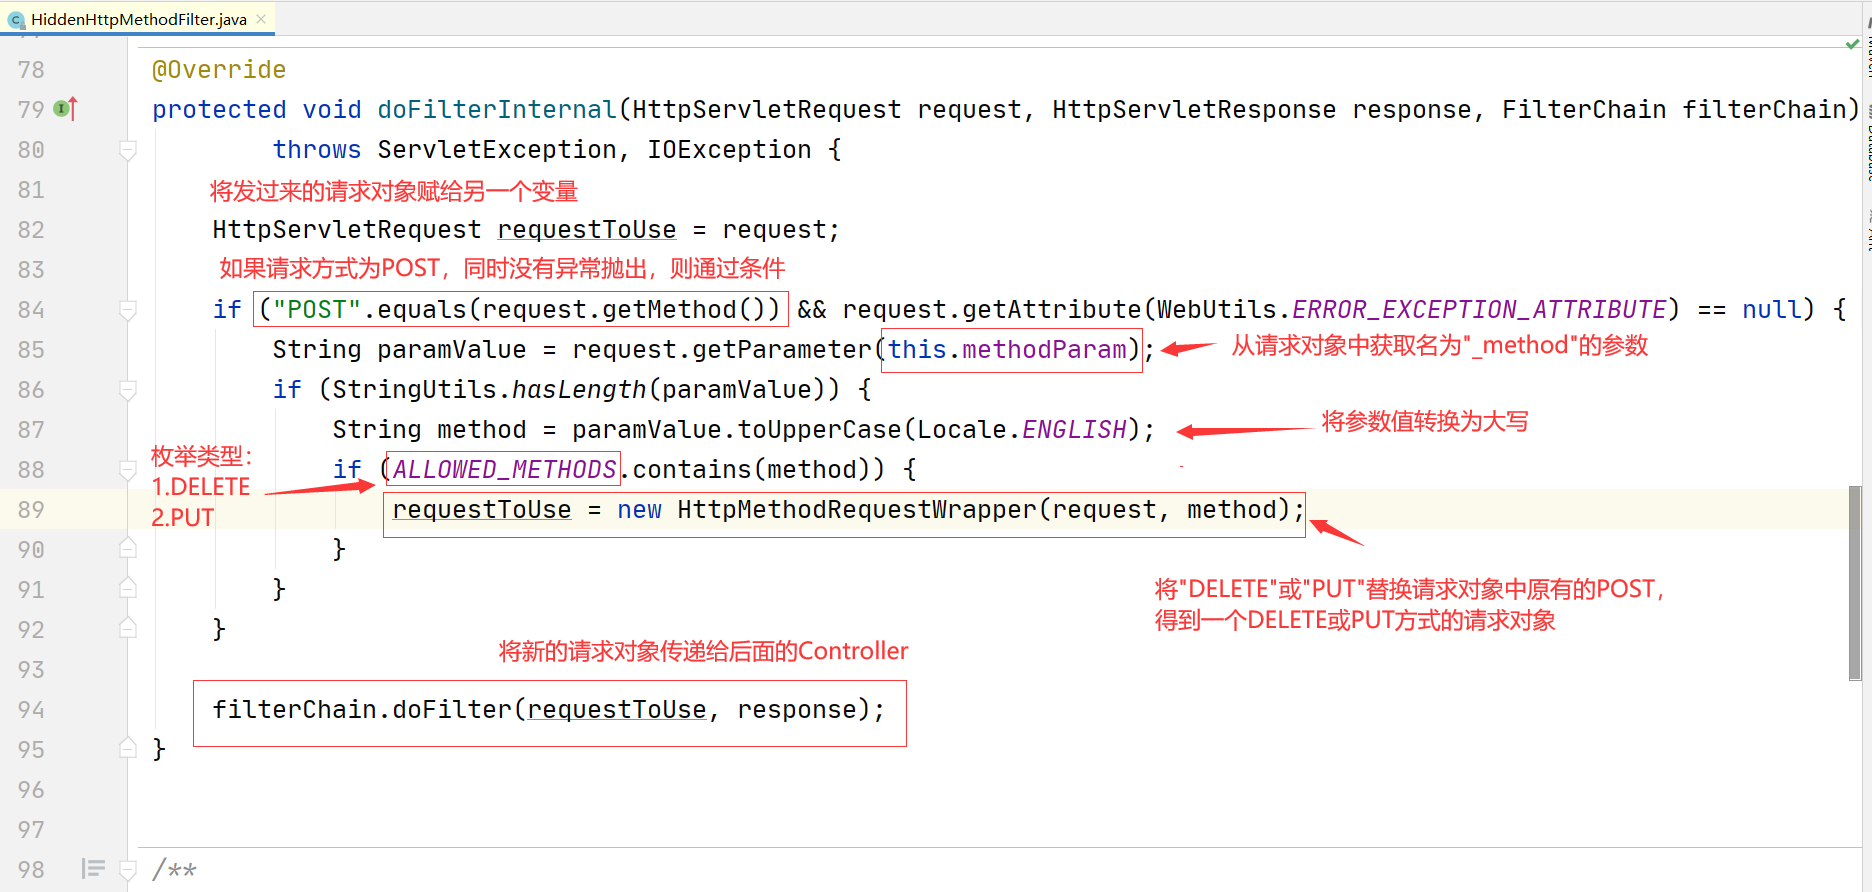
From the filter method, we can form POST requests on the page and add a parameter named _to the carry request parameter. The parameter of the method whose value is DELETE or PUT.
The following:
<form action="/user" method="POST">
    id: <input type="text" name="id"><br/>
    Full name:<input type="text" name="name"><br/>
    <!--Request mode parameter, user does not need to see, so set to hide-->
    <input type="hidden" name="_method" value="PUT"><br/>
    <input type="submit" value="To update">
</form>
Then register the filter in the project to convert the POST request into a PUT request.
In application. Register HiddenHttpMethodFilter filter in properties:
spring.mvc.hiddenmethod.filter.enabled=true
In addition, we can send DELETE or PUT requests through ajax, but only some browsers support them.
5.4 Notes in RESTful
Developing RESTful in SpringBoot is mainly implemented by the following annotations
1@PathVariable: Obtaining parameter data spliced into URLs is the main annotation for RESTful
(2) @GetMapping: Receiving and processing GET-style requests is equivalent to @RequestMapping(method=RequestMethod.GET)
(3) @PostMapping: Receiving and processing POST-style requests is equivalent to @RequestMapping(method=RequestMethod.POST)
(4) @DeleteMapping: Receiving and processing requests in the DELETE manner is equivalent to @RequestMapping(method=RequestMethod.DELETE)
_@PutMapping: Receiving and processing PUT-style requests is equivalent to @RequestMapping(method=RequestMethod.PUT)
5.4 Note Use Practice
Modify based on the example in 4.4.
In application. Register HiddenHttpMethodFilter filter in properties:
#Set Port Number
server.port=9090
#Register HiddenHttpMethodFilter Filter
spring.mvc.hiddenmethod.filter.enabled=true
(2) Writing front-end pages
Create a new index in the resources/static directory. Html, send crud four requests
<!DOCTYPE html>
<html lang="en">
<head>
    <meta charset="UTF-8">
    <title>Title</title>
</head>
<body>
<div id="app">
    <h3>query</h3>
    <a href="/student/1001">query</a>
    <hr>

    <h3>delete</h3>
    <form action="/student/1007" method="POST">
        <input type="hidden" name="_method" value="DELETE"><br>
        <input type="submit" value="delete"><br/>
    </form>
    <hr>

    <h3>Add to</h3>
    <form action="/student" method="POST">
        id: <input type="text" name="id"><br/>
        Full name:<input type="text" name="name"><br/>
        <input type="submit" value="Add to"><br/>
    </form>
    <hr>

    <h3>To update</h3>
    <form action="/student" method="POST">
        id: <input type="text" name="id"><br/>
        Full name:<input type="text" name="name"><br/>
        <input type="hidden" name="_method" value="PUT"><br/>
        <input type="submit" value="To update"><br/>
    </form>
</div>
</body>
</html>
(3) Writing Controller
package com.tsccg.controller;

@RestController
public class StudentController {

    /**
     * Get student information based on id
     * @PathVariable
     * 1.Role: Get the data in the url
     * 2.Location: before processor parameters
     * 3.value: Path variable value {studentId}
     */
    @GetMapping("/student/{studentId}")//Processing GET requests
    public String findStudent(@PathVariable(value="studentId") Integer id) {
        return "Perform a query operation, id="+id;
    }

    /**
     * Add Students
     */
    @PostMapping("/student")//Processing POST requests
    public String addStudent(@RequestParam Map<String,String> student) {
        return "Perform the add operation, student="+student;
    }

    /**
     * Delete student information based on id
     */
    @DeleteMapping("/student/{studentId}")//Processing DELETE requests
    public String deleteStudent(@PathVariable("studentId") Integer id) {
        return "Perform the deletion operation, id="+id;
    }

    /**
     * Update student information
     */
    @PutMapping("/student")//Processing PUT requests
    public String updateStudent(@RequestParam Map<String,String> student) {
        return "Perform update operation,student="+student;
    }
}
(4) Testing
Open the application and access it from the browser http://localhost:9090/index.html

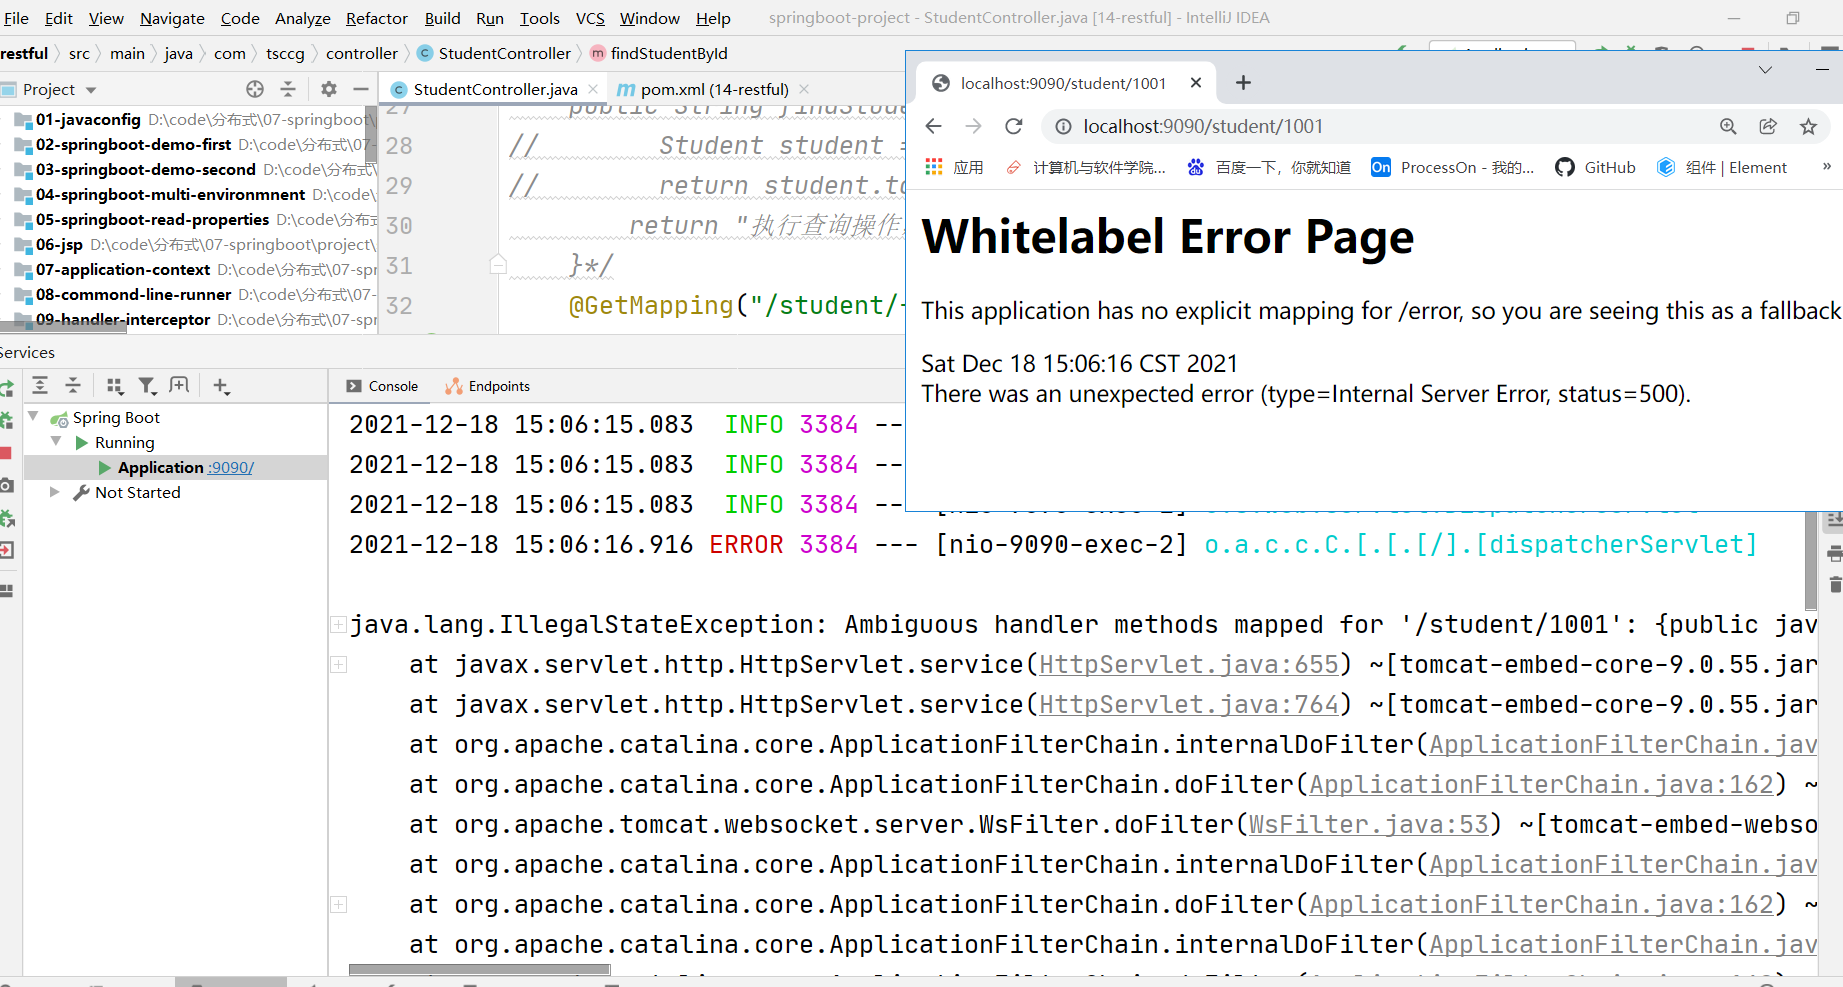
5.5 REST Note that URL+Request must be unique
In REST, you must ensure that the URL + request method is unique, and errors will occur if the following occurs.
@GetMapping("/student/{studentId}")
public String findStudentById(@PathVariable(value="studentId") Integer id) {
    return "according to id Query Student Information";
}
@GetMapping("/student/{studentName}")
public String findStudentByName(@PathVariable(value="studentName") String name) {
    return "Query student information by name";
}
Chapter 6 Spring Boot Integrated Redis
Introduction to 6.1 Redis
Redis is a NoSQL database and is often used as a cache. Redis data can be accessed in programs in multiple languages through the Redis client. Among them, the client libraries used by the java language are Jedis, Lettuce, Redisson, and so on.
So what is the Redis client library used in SpringBoot?
Create a Spring Boot project and check Web and Redis Start Dependencies:
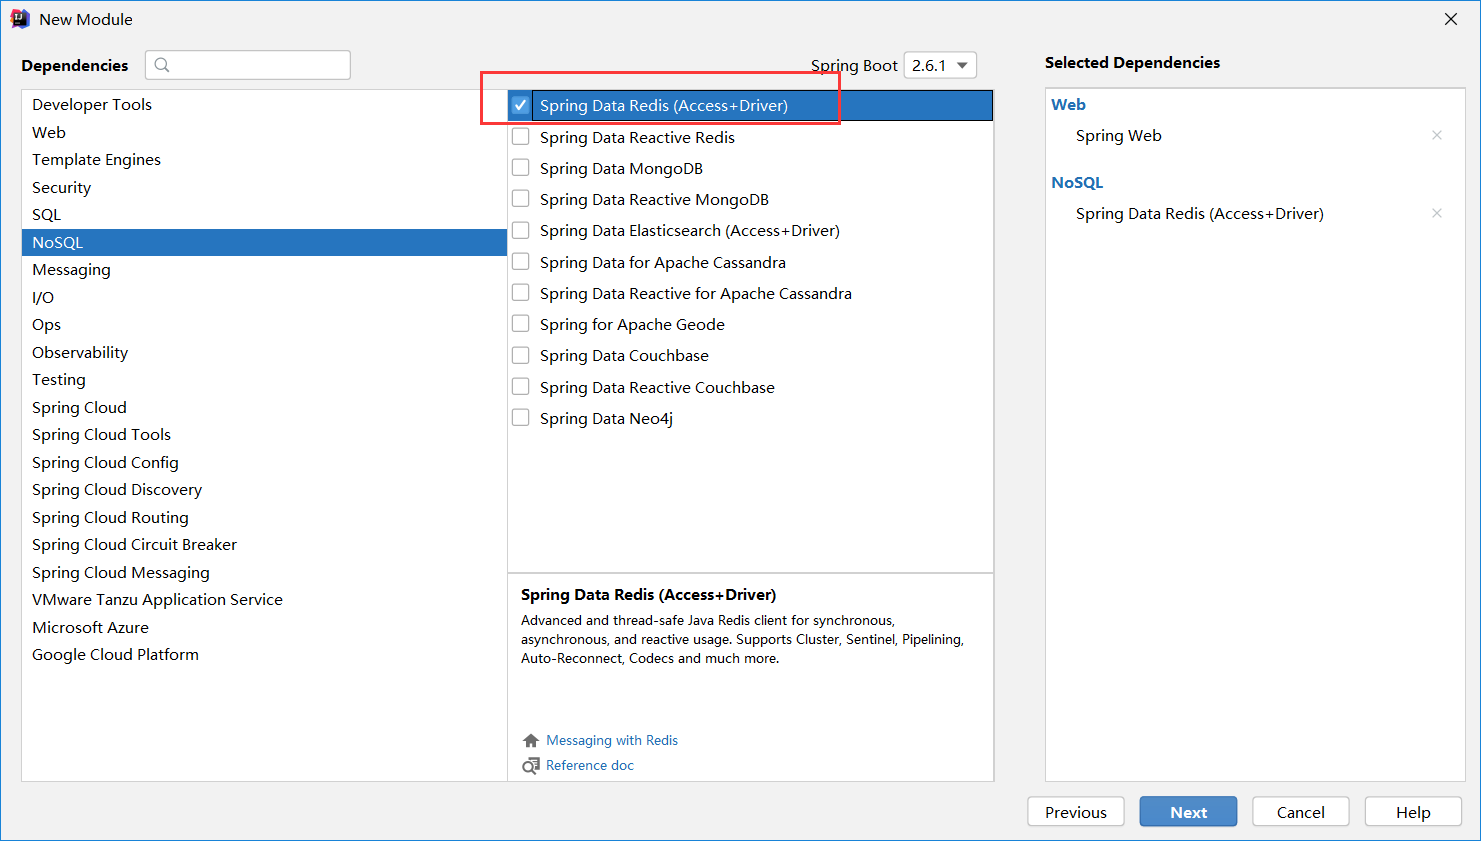
View Redis-related dependencies for project imports:
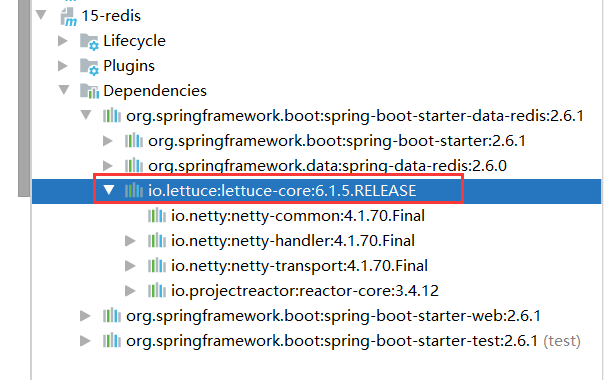
You can see that in SpringBoot, the Redis client library used by default is lettuce
6.2 Demonstrating add and get operations
(1) Create a Spring Boot project, check web and redis start dependencies
Here, Spring Boot creates two objects in the container based on the start dependency of redis:
- RedisTemplate
- SpringRedisTemplate
<!--Spring Boot Two objects are created in the container: RedisTemplate,SpringRedisTemplate-->
<dependency>
    <groupId>org.springframework.boot</groupId>
    <artifactId>spring-boot-starter-data-redis</artifactId>
</dependency>
Using methods of the RedisTemplate class to manipulate redis data in a program is actually a method in the lettuce client that is called
(2) In the core profile application. Configure connection redis information in properties
#Configure port number
server.port=9090

#Configure redis
spring.redis.host=localhost
spring.redis.port=6379
#spring.redis.password=123
3. Create Controller
Inject the RedisTemplate object to get objects that manipulate various types of data in redis using several methods that begin with ops
For example:
- OpsForValue()---->ValueOperations---->String type data
- OpsForHash()---->HashOperations---->Hash type data
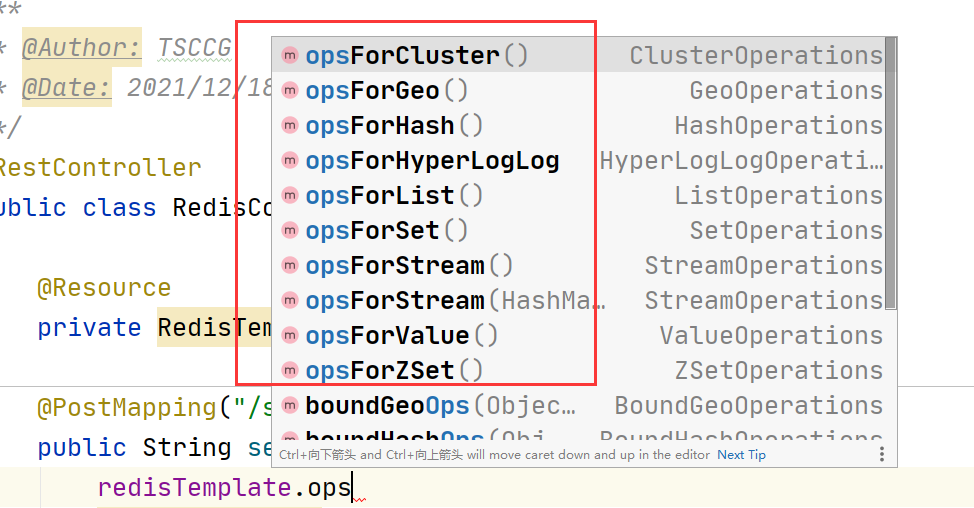
You can then manage the data in redis by executing the set/get method on the acquired object.
package com.tsccg.controller;

import org.springframework.data.redis.core.RedisTemplate;
import org.springframework.data.redis.core.ValueOperations;
import org.springframework.web.bind.annotation.*;

import javax.annotation.Resource;

@RestController
public class RedisController {

    //Inject RedisTemplate object
    @Resource
    private RedisTemplate redisTemplate;

    //Add String-type data to redis
    @PostMapping("/student/{name}")
    public String setKey(@PathVariable String name) {
       	//Get an object of type String in management redis
        ValueOperations valueOperations = redisTemplate.opsForValue();
        //Perform add operation
        valueOperations.set("name",name);
        return "Added students:"+name;
    }

    //Get added data from redis
    @GetMapping("/student")
    public String getValue() {
        //Get an object of type String in management redis
        ValueOperations valueOperations = redisTemplate.opsForValue();
        //Perform get operation
        return (String)valueOperations.get("name");
    }

}
(4) Testing
1) Open the windows redis service

2) Open the project service and send it by POST through the postman client software: http://localhost:9090/student/ Xiao Ming
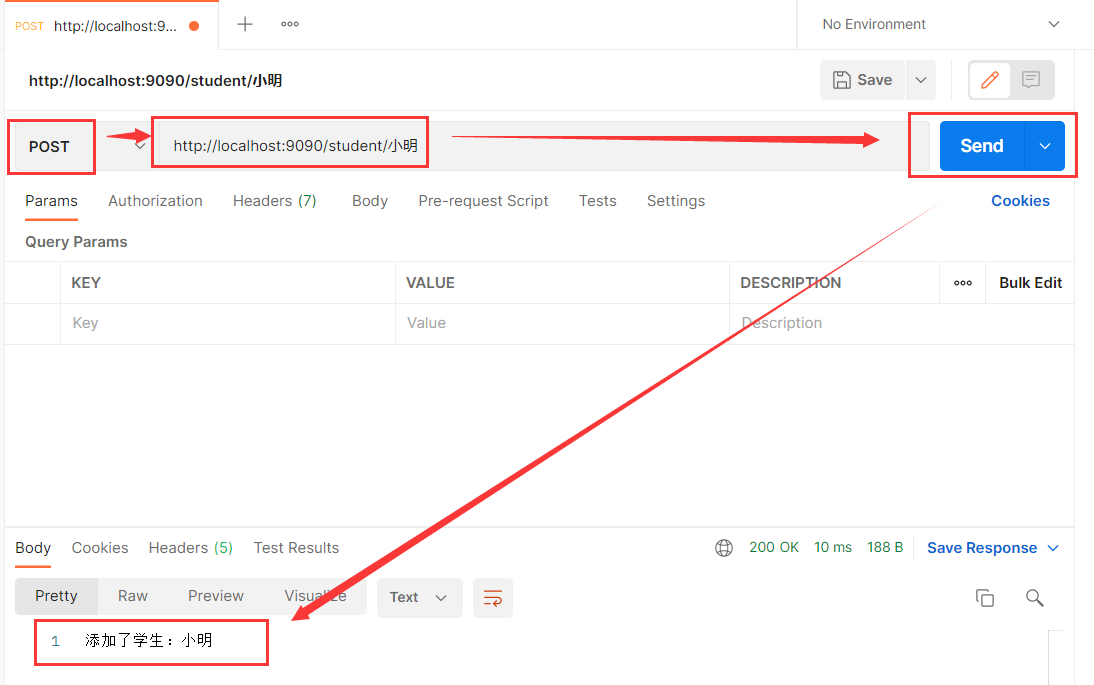
3) Then send the request by GET: http://localhost:9090/student
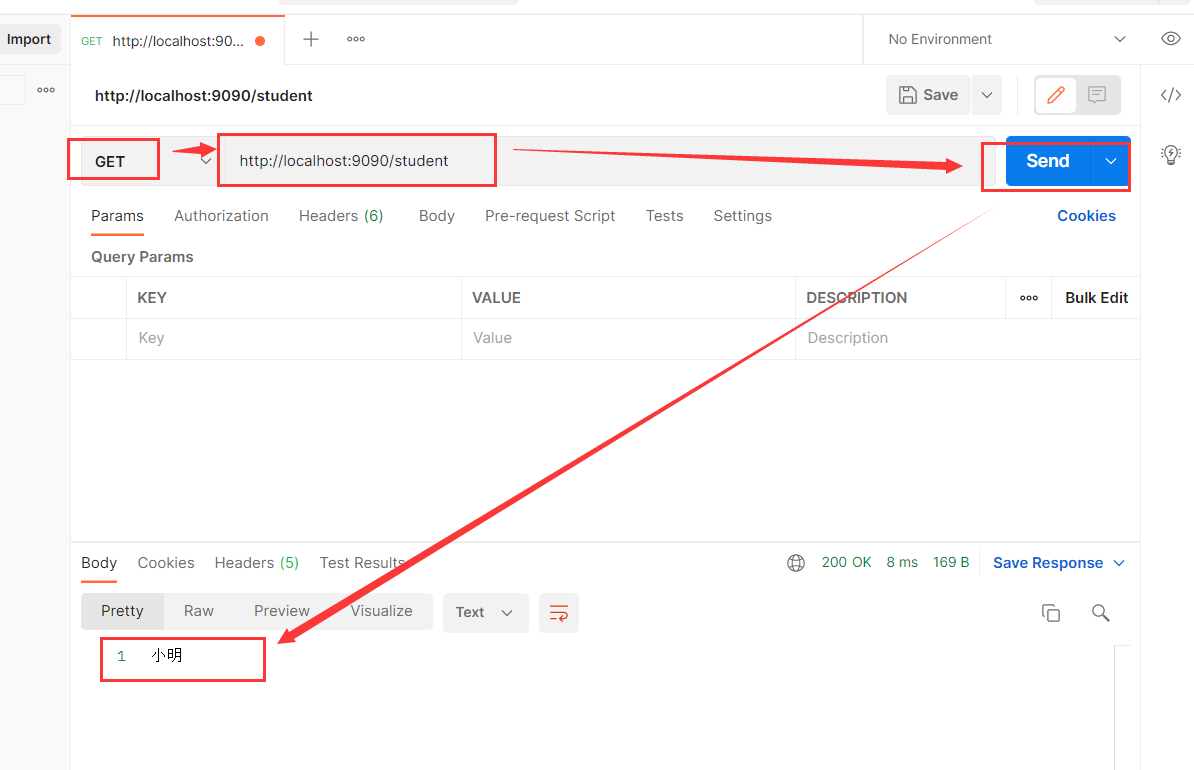
4) View the data just inserted through the Redis Desktop Manager desktop tool

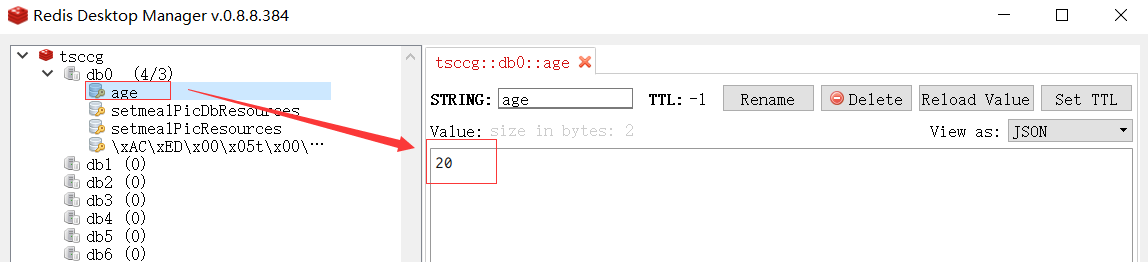
The data added to redis was found to be serialized.
Modify the Controller and inject the StringRedisTemplate object
package com.tsccg.controller;

import org.springframework.data.redis.core.RedisTemplate;
import org.springframework.data.redis.core.StringRedisTemplate;
import org.springframework.data.redis.core.ValueOperations;
import org.springframework.web.bind.annotation.*;

import javax.annotation.Resource;

@RestController
public class RedisController {
    //Modify Injection StringRedisTemplate Object
    @Resource
    private StringRedisTemplate stringRedisTemplate;

    //Modify the added data to age
    @PostMapping("/student/{age}")
    public String setKey(@PathVariable String age) {
        //Obtaining objects that manipulate Stirng-type data through the StringRedisTemplate object
        ValueOperations valueOperations = stringRedisTemplate.opsForValue();
        valueOperations.set("age",age);
        return "Age added:"+age;
    }
	//Modify the acquired data to age
    @GetMapping("/student")
    public String getValue() {
        ValueOperations valueOperations = stringRedisTemplate.opsForValue();
        return (String)valueOperations.get("age");
    }

}
Retest
Restart the application and resend the add request:

Look again at the data stored in the redis library:
It is normal to find data stored in redis this time.
6.3 Comparing RedisTemplate with String RedisTemplate
RedisTemplate: Keys and value s are serialized into redis and are serialized and not directly recognized. The default is jdk's serialization method, which can be modified to other serialization methods.
String RedisTemplate: Treat key and value as strings, using the serialization of strings, and making them readable.
Serialization and Deserialization:
- Serialization: The process of converting an object into a transportable byte sequence is called serialization
- Deserialization: The process of reverting a sequence of bytes to an object is called deserialization.
Why serialize?
In our actual project development, redis are all placed on linux, and in order for data objects to be stored on Linux systems from elsewhere across platforms, they must be serialized.
The ultimate goal of serialization is to allow objects to be stored across platforms and transported over the network. The way we store and transfer across platforms is IO, which supports data formats such as byte arrays. We must specify a rule (serialization) before converting an object to an array of bytes, which will restore the object when we read data from the IO stream. (Deserialization)
Common ways to serialize:
Serialization is just a rule for disassembling and assembling objects, and there are many different rules. For example, the commonly used serialization methods are: JDK (cross-language is not supported), JSON, XML, Hessian, Kryo (cross-language is not supported), Thrift, Protofbuff, and so on.
-
Serialization of jdk: converting java objects to byte[], binary data
-
JSON serialization: JSON serialization can convert objects to or from JSON format to objects. For example, convert a Student object to a JSON string {"name": "Li-4", "age": 29}), and deserialize (convert the JSON string {"name": "Li-4", "age": 29} to a Student object)
6.4 Set the serialization of key and value
Redis data is serialized in the following ways:
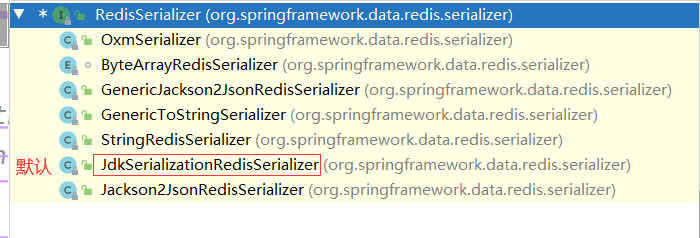
The default serialization method is jdk serialization, which converts key s and value s to binary byte arrays.
6.4. 1 Set to String serialization mode
1. Modify Controller
@RestController
public class RedisController {
@Resource
private RedisTemplate redisTemplate;
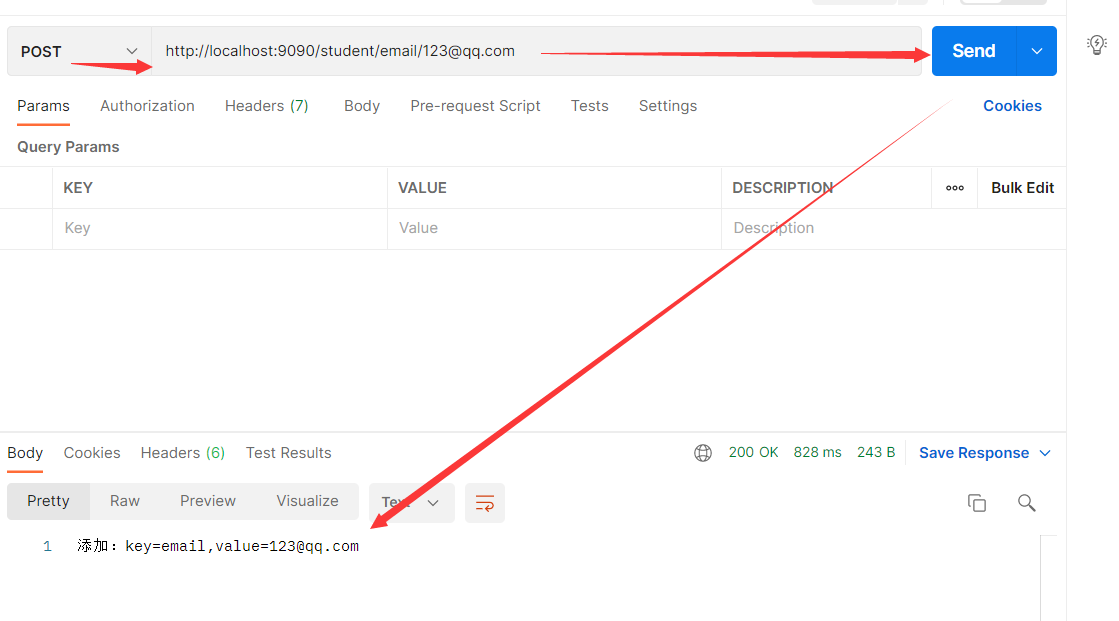
@PostMapping("/student/{key}/{value}")
public String setKey(@PathVariable String key,@PathVariable String value) {
// Using RedisTemplate, set serialization before accessing values
//Set key serialization to String
redisTemplate.setKeySerializer(new StringRedisSerializer());
//Set the serialization of value to String
redisTemplate.setValueSerializer(new StringRedisSerializer());
ValueOperations valueOperations = redisTemplate.opsForValue();
valueOperations.set(key,value);
return "Add to:" + "key=" + key + ",value=" + value;
}
@GetMapping("/student/{key}")
public String getValue(@PathVariable String key) {
ValueOperations valueOperations = redisTemplate.opsForValue();
return (String)valueOperations.get(key);
}
}
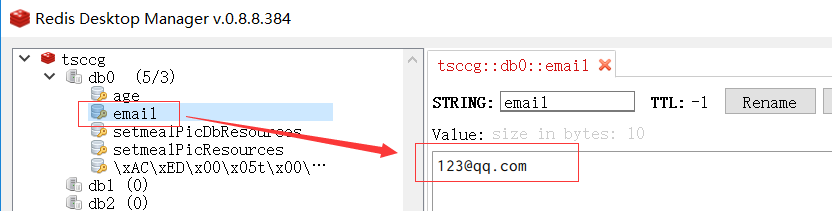
(2) Send POST requests: http://localhost:9090/student/email/123@qq.com
(3) View the redis library:
6.4. 2 Set to JSON serialization mode
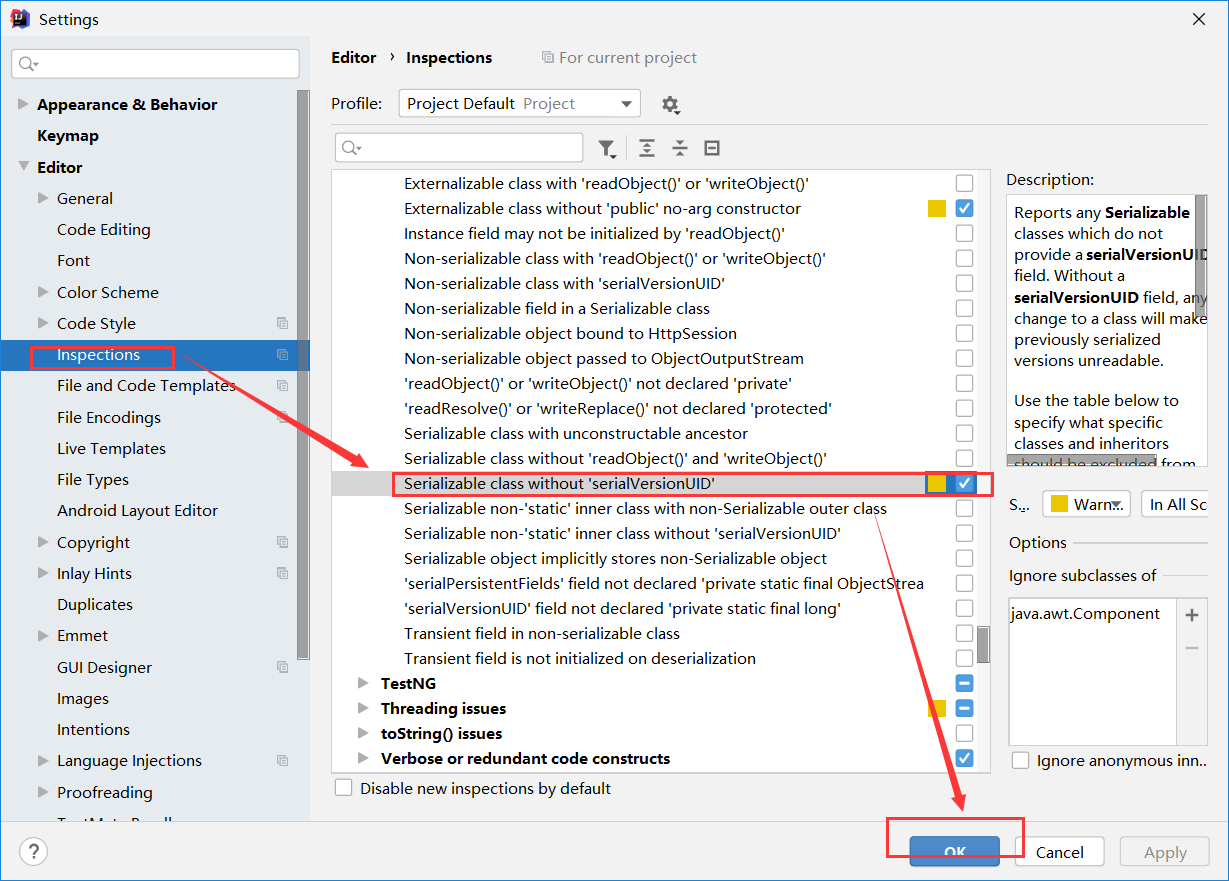
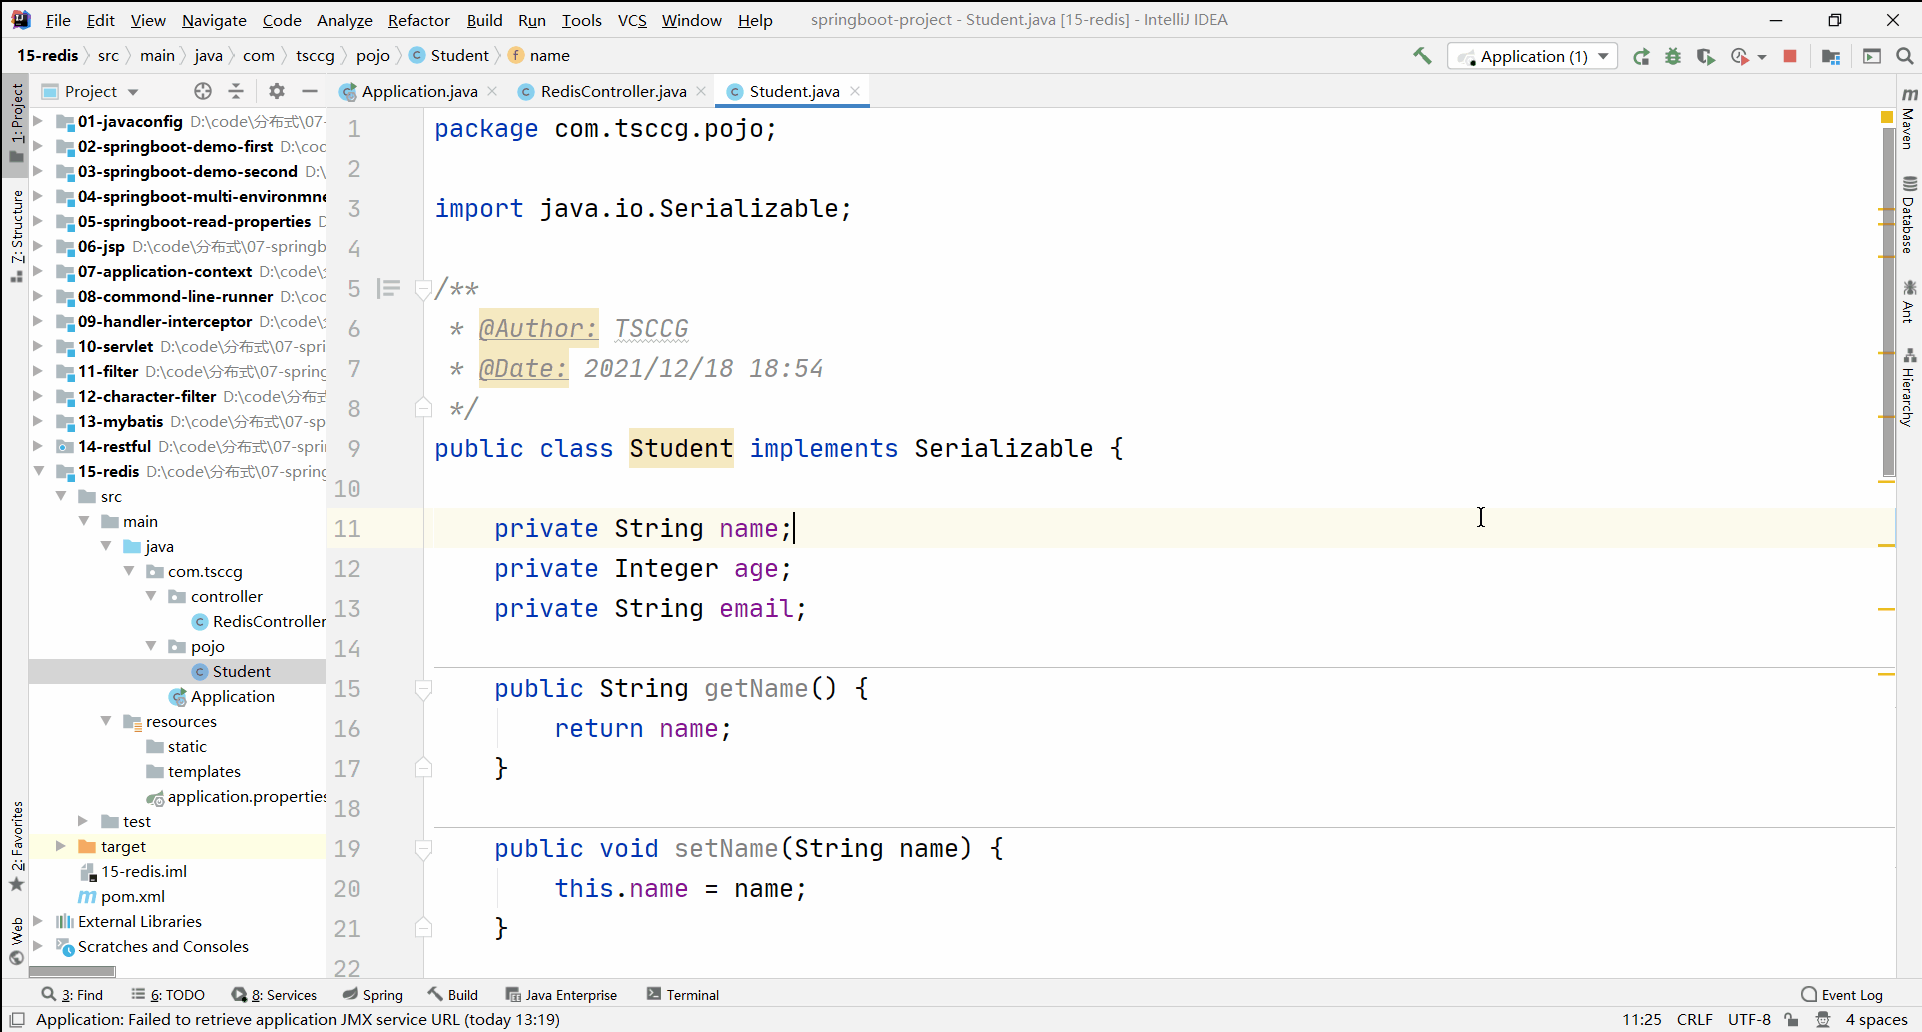
Setting Idea to automatically generate serialized version numbers
(2) Create entity classes, implement serialization interfaces, and automatically generate serialization version numbers in entity classes
(3) Modify Controller to set value as JSON serialization mode
@Resource
private RedisTemplate redisTemplate;

@PostMapping("/student")
public String addJson() {
    //Create a Student Object
    Student student = new Student();
    student.setName("Tom");
    student.setAge(40);
    student.setEmail("tom@163.com");
    //Set key serialization to String
    redisTemplate.setKeySerializer(new StringRedisSerializer());
    //Set the serialization of value to JSON
    redisTemplate.setValueSerializer(new Jackson2JsonRedisSerializer(Student.class));
    //Add Action
    redisTemplate.opsForValue().set("myStudent",student);
    return "Add to:"+student.toString();
}

@GetMapping("/student")
public String getValue() {
    //Set key serialization to String
    redisTemplate.setKeySerializer(new StringRedisSerializer());
    //Set the serialization of value to JSON
    redisTemplate.setValueSerializer(new Jackson2JsonRedisSerializer(Student.class));
    ValueOperations valueOperations = redisTemplate.opsForValue();
    return valueOperations.get("myStudent").toString();
}
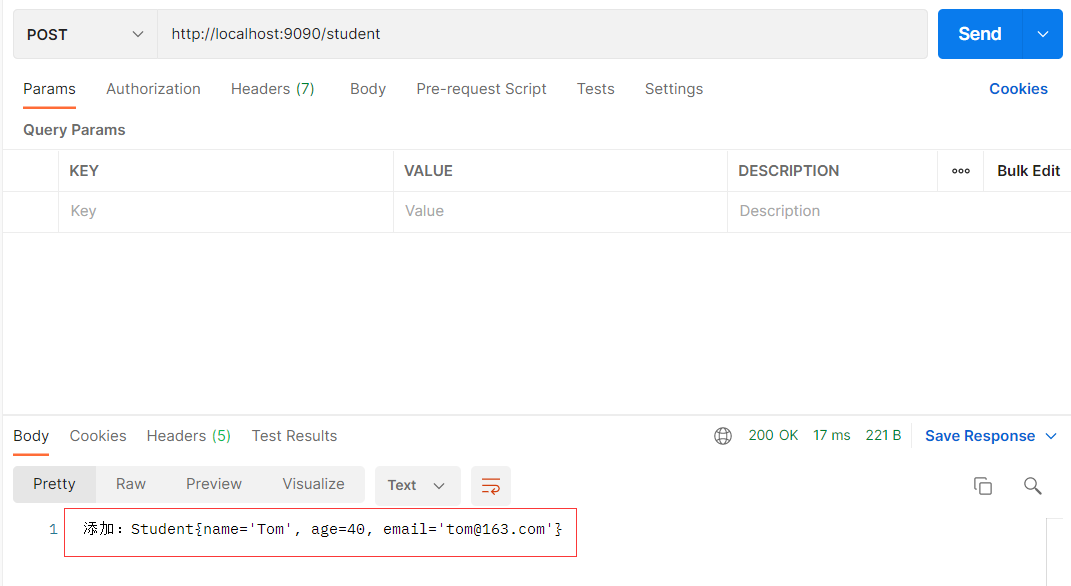
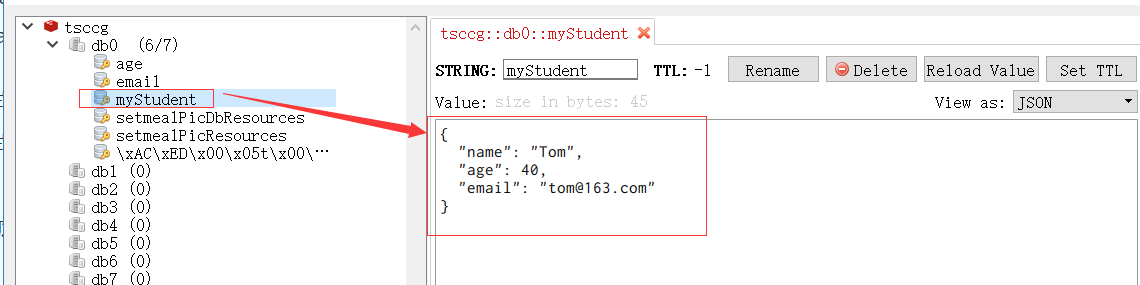
(4) Send a post request: http://localhost:9090/student (serialization)
View the redis Library
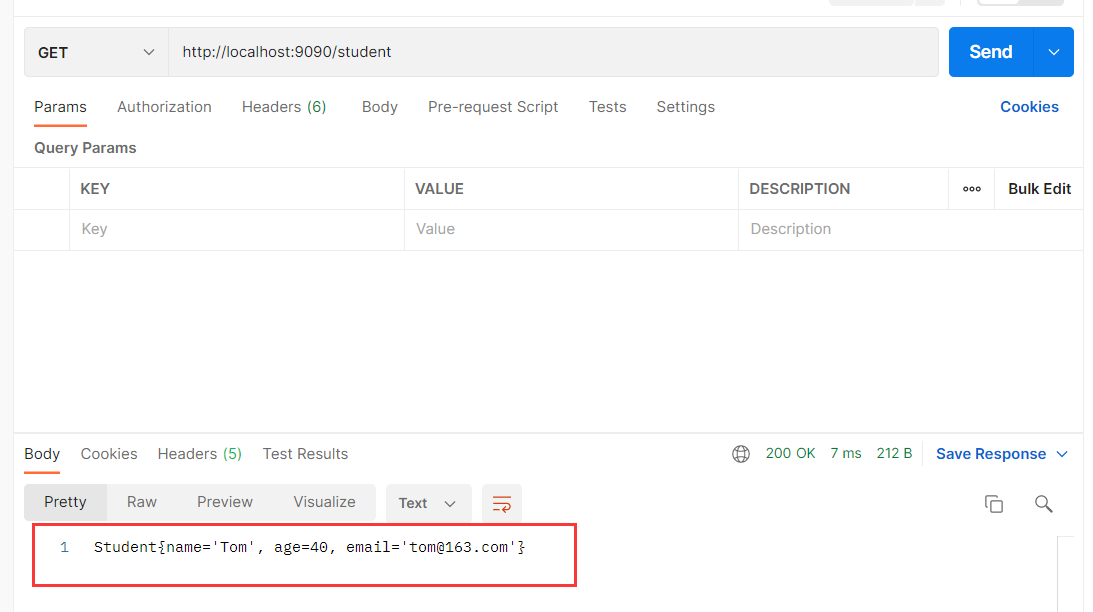
Send get request: http://localhost:9090/student Deserialize
Chapter 7 Spring Boot Integration Dubbo
7.1 Create parent module
Create a normal maven module as the parent module with the module name 16-dubbo-parent
Do the following:
1) Delete src directory
2) Modify the pom.xml, specified as POM
3) Inherit the spring-boot-starter-parent module
4) Add dubbo and zookeeper start dependencies
<?xml version="1.0" encoding="UTF-8"?>
<project xmlns="http://maven.apache.org/POM/4.0.0" xmlns:xsi="http://www.w3.org/2001/XMLSchema-instance"
         xsi:schemaLocation="http://maven.apache.org/POM/4.0.0 https://maven.apache.org/xsd/maven-4.0.0.xsd">
    <modelVersion>4.0.0</modelVersion>
    <!--inherit Spring Boot Parent Module-->
    <parent>
        <groupId>org.springframework.boot</groupId>
        <artifactId>spring-boot-starter-parent</artifactId>
        <version>2.6.1</version>
        <relativePath/>
    </parent>

    <groupId>com.tsccg</groupId>
    <artifactId>16-dubbo-parent</artifactId>
    <version>0.0.1-SNAPSHOT</version>
    <packaging>pom</packaging><!--Specify how to package pom-->

    <properties>
        <java.version>1.8</java.version>
    </properties>
    <dependencies>
        <!--Add to dubbo Start Dependency-->
        <dependency>
            <groupId>org.apache.dubbo</groupId>
            <artifactId>dubbo-spring-boot-starter</artifactId>
            <version>2.7.8</version>
        </dependency>
        <!--Add to zookeeper rely on-->
        <dependency>
            <groupId>org.apache.dubbo</groupId>
            <artifactId>dubbo-dependencies-zookeeper</artifactId>
            <version>2.7.8</version>
            <type>pom</type>
            <!--dubbo Start dependencies are already included log4j Dependency, Exclusion zookeeper Duplicate dependencies contained in dependencies-->
            <exclusions>
                <exclusion>
                    <groupId>org.slf4j</groupId>
                    <artifactId>slf4j-log4j12</artifactId>
                </exclusion>
            </exclusions>
        </dependency>
    </dependencies>
    <build>
        <plugins>
            <plugin>
                <groupId>org.springframework.boot</groupId>
                <artifactId>spring-boot-maven-plugin</artifactId>
            </plugin>
        </plugins>
    </build>
</project>
7.2 Create Common Interface Module
Create a generic maven module, without a parent, in which only public interfaces and entity classes are defined.
Module name: common-interface
GAV coordinates:
<groupId>com.tsccg</groupId>
<artifactId>common-interface</artifactId>
<version>0.0.1-SNAPSHOT</version>
Create entity class Student to implement serialization interface
package com.tsccg.pojo;

import java.io.Serializable;

public class Student implements Serializable {
    private String name;
    private Integer age;
    private String email;
	//get set
    //toString
}
Create a public interface StudentService, define the method
package com.tsccg.pojo.com.tsccg.service;

import com.tsccg.pojo.Student;

public interface StudentService {
    //Get Studnet Data
    Student getStudent();
}
7.3 Create Service Consumer Module
Create a normal maven module: server-consumer, inherit parent module 16-dubbo-parent
Then do the following:
At pom. Adding dependencies to XML
1) Declare Spring Boot's web Start dependency
2) Add common interface module dependencies
<dependencies>
    <!--statement web Start Dependency-->
    <dependency>
        <groupId>org.springframework.boot</groupId>
        <artifactId>spring-boot-starter-web</artifactId>
    </dependency>
    <!--Add Common Interface Module Dependency-->
    <dependency>
        <groupId>com.tsccg</groupId>
        <artifactId>common-interface</artifactId>
        <version>0.0.1-SNAPSHOT</version>
    </dependency>
</dependencies>
(2) Create an application in the resources directory. Properties core profile, configuring dubbo
#Service Exposure Interface
server.port=8081

##Configure dubbo
#Service Name
spring.application.name=server-consumer
#Scan the package where dubbo annotations are located
dubbo.scan.base-packages=com.tsccg.service
#Specify the registry address, using the local zookeeper
dubbo.registry.address=zookeeper://localhost:2181
3. Create a COM in the java directory. Tsccg. Application Startup Class
Add a comment to open Dubbo: @EnableDubbo
package com.tsccg;

import org.apache.dubbo.config.spring.context.annotation.EnableDubbo;
import org.springframework.boot.SpringApplication;
import org.springframework.boot.autoconfigure.SpringBootApplication;

@SpringBootApplication
@EnableDubbo//Open dubbo
public class Application {
    public static void main(String[] args) {
        SpringApplication.run(Application.class,args);
    }
}
(4) Create Controller
Remote injection of StudentService objects using @DubboReference annotation
package com.tsccg.controller;

import com.tsccg.pojo.Student;
import com.tsccg.pojo.com.tsccg.service.StudentService;
import org.apache.dubbo.config.annotation.DubboReference;
import org.springframework.web.bind.annotation.GetMapping;
import org.springframework.web.bind.annotation.RestController;

@RestController
public class StudentController {

    @DubboReference(version = "1.0")//dubbo remote injection
    private StudentService  studentService;

    @GetMapping("/student")
    public String getStudent() {
        //Invoke Service Method
        Student student = studentService.getStudent();
        return student.toString();
    }
}
7.4 Creating a Service Provider Module
With the service consumer, create a generic maven module: server-provider, inherit parent module
Do the following:
1. Add Dependency
<dependencies>
    <!--statement web Start Dependency-->
    <dependency>
        <groupId>org.springframework.boot</groupId>
        <artifactId>spring-boot-starter-web</artifactId>
    </dependency>
    <!--Public interface dependency-->
    <dependency>
        <groupId>com.tsccg</groupId>
        <artifactId>common-interface</artifactId>
        <version>0.0.1-SNAPSHOT</version>
    </dependency>
</dependencies>
(2) Create a core configuration file: application.properties, configure dubbo
#Exposing service interfaces
server.port=8080

##Configure dubbo
#Service Name
spring.application.name=server-provider
#Scan the package where dubbo annotations are located
dubbo.scan.base-packages=com.tsccg.service
#Specify Registry Address
dubbo.registry.address=zookeeper://localhost:2181
3. Create startup class: Application, add open dubbo annotation
package com.tsccg;

import org.apache.dubbo.config.spring.context.annotation.EnableDubbo;
import org.springframework.boot.SpringApplication;
import org.springframework.boot.autoconfigure.SpringBootApplication;

@SpringBootApplication
@EnableDubbo//Open dubbo
public class Application {
    public static void main(String[] args) {
        SpringApplication.run(Application.class, args);
    }
}
(4) Creating service implementation classes
package com.tsccg.service.impl;

import com.tsccg.pojo.Student;
import com.tsccg.pojo.com.tsccg.service.StudentService;
import org.apache.dubbo.config.annotation.DubboService;

//Using the @DubboService annotation provided by Dubbo, specify that the interface class is StudentService.class
@DubboService(interfaceClass = StudentService.class,version = "1.0")
public class StudentServiceImpl implements StudentService{

    @Override
    public Student getStudent() {
        //Create a Student Object
        Student student = new Student();
        student.setName("Jerry");
        student.setAge(30);
        student.setEmail("jerry@qq.com");
        return student;
    }
}
7.5 Test
1 Open zookeeper

(2) Run service providers and service consumers'applications successively
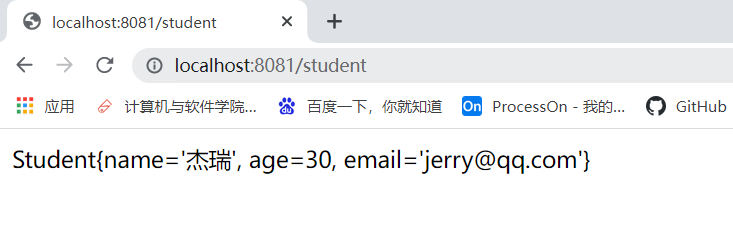
(3) Send requests in the browser: http://localhost:8081/student
Chapter 8 Spring Boot Packaging
Spring Boot s can be packaged as war s or jar files. Publish applications in two ways.
8.1 dozen war bags
Steps:
1. Create a Spring Boot project to add Web Start Dependencies
2. Modify the pom.xml
1) Add embedded Tomcat parse package dependency on jsp
<!--Use jsp-->
<dependency>
    <groupId>org.apache.tomcat.embed</groupId>
    <artifactId>tomcat-embed-jasper</artifactId>
</dependency>
2) Specify the jsp compilation directory
<build>
    <!--jsp The file must be compiled to the specified META-INF/resources Catalog-->
    <resources>
        <resource>
            <!--Source File Location-->
            <directory>src/main/webapp</directory>
            <!--Specify compilation to META-INF/resource,This directory cannot be freely written-->
            <targetPath>META-INF/resources</targetPath>
            <!--Specify which files to compile into,**Express webapp Catalogs and subdirectories,*.*Represents all files-->
            <includes>
                <include>**/*.*</include>
            </includes>
        </resource>
        <!--Include all files below src/main/resources in the classes directory-->
        <resource>
            <directory>src/main/resources</directory>
            <includes>
                <include>**/*.*</include>
            </includes>
        </resource>
    </resources>
</build>
3) Specify packaging as war

4) Specify the name of the package generated after packaging
Add the following statement to the build tag:
<!--Specify the final packaged package name-->
<finalName>myBoot</finalName>
5) Complete pom.xml content
<?xml version="1.0" encoding="UTF-8"?>
<project xmlns="http://maven.apache.org/POM/4.0.0" xmlns:xsi="http://www.w3.org/2001/XMLSchema-instance"
         xsi:schemaLocation="http://maven.apache.org/POM/4.0.0 https://maven.apache.org/xsd/maven-4.0.0.xsd">
    <modelVersion>4.0.0</modelVersion>
    <parent>
        <groupId>org.springframework.boot</groupId>
        <artifactId>spring-boot-starter-parent</artifactId>
        <version>2.6.1</version>
        <relativePath/> <!-- lookup parent from repository -->
    </parent>
    <groupId>com.tsccg</groupId>
    <artifactId>17-package-war</artifactId>
    <version>0.0.1-SNAPSHOT</version>
    <packaging>war</packaging><!--Specify a packaging type of war-->

    <properties>
        <java.version>1.8</java.version>
    </properties>
    <dependencies>
        <dependency>
            <groupId>org.springframework.boot</groupId>
            <artifactId>spring-boot-starter-web</artifactId>
        </dependency>
        <!--Add to jsp rely on-->
        <dependency>
            <groupId>org.apache.tomcat.embed</groupId>
            <artifactId>tomcat-embed-jasper</artifactId>
        </dependency>
    </dependencies>

    <build>
        <!--jsp The file must be compiled to the specified META-INF/resources Catalog-->
        <resources>
            <resource>
                <!--Source File Location-->
                <directory>src/main/webapp</directory>
                <!--Specify compilation to META-INF/resource,This directory cannot be freely written-->
                <targetPath>META-INF/resources</targetPath>
                <!--Specify which files to compile into,**Express webapp Catalogs and subdirectories,*.*Represents all files-->
                <includes>
                    <include>**/*.*</include>
                </includes>
            </resource>
            <!--Include all files below src/main/resources in the classes directory-->
            <resource>
                <directory>src/main/resources</directory>
                <includes>
                    <include>**/*.*</include>
                </includes>
            </resource>
        </resources>
        <!--Specify the final packaged package name-->
        <finalName>myBoot</finalName>
        <plugins>
            <plugin>
                <groupId>org.springframework.boot</groupId>
                <artifactId>spring-boot-maven-plugin</artifactId>
            </plugin>
        </plugins>
    </build>
</project>
3. Create a webapp and introduce a project in which to create an index.jsp as view
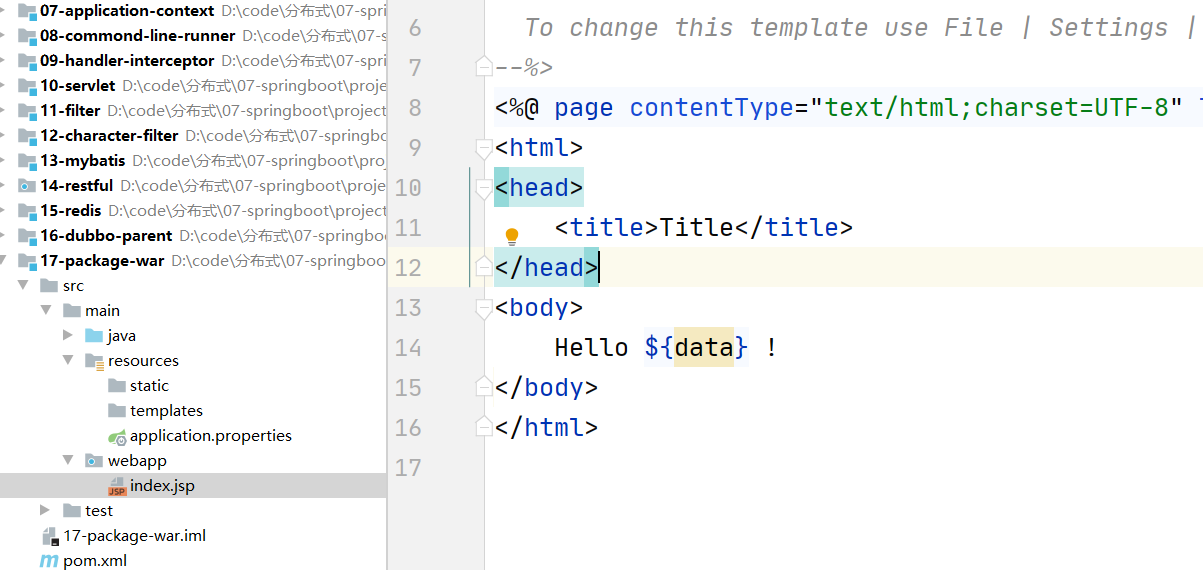
4. Configure View Parser
In the core profile application. Add the following to the properties:
#prefix
spring.mvc.view.prefix=/
#Suffix
spring.mvc.view.suffix=.jsp
5. Create Controller
package com.tsccg.controller;

import org.springframework.stereotype.Controller;
import org.springframework.ui.Model;
import org.springframework.web.bind.annotation.RequestMapping;
import org.springframework.web.servlet.ModelAndView;

@Controller
public class WarController {

    @RequestMapping("/doSome")
    public String doSome(Model model) {
        model.addAttribute("data","war package");
        return "index";
    }
}
6. Test, open applications, access in browsers http://localhost:8080/doSome

7. Let the startup class inherit SpringBootServletInitializer
Only if this class is inherited and its configure method is overridden, the resulting war package can be deployed separately to an external server.
SpringBootServletInitializer is the original web. Replacement of XML file. An embedded Servlet is used and jsp is not supported by default.
package com.tsccg;

import org.springframework.boot.SpringApplication;
import org.springframework.boot.autoconfigure.SpringBootApplication;
import org.springframework.boot.builder.SpringApplicationBuilder;
import org.springframework.boot.web.servlet.support.SpringBootServletInitializer;

@SpringBootApplication
public class Application extends SpringBootServletInitializer {

    public static void main(String[] args) {
        SpringApplication.run(Application.class, args);
    }

    @Override
    protected SpringApplicationBuilder configure(SpringApplicationBuilder builder) {
        return builder.sources(Application.class);
    }
}
8. Deploy to an external stand-alone server
1) Deploy the generated war package to an external Tomcat server
After performing clean---->package through maven, copy the war file from the target directory to the tomcat server webapps directory

2) Start Tomcat
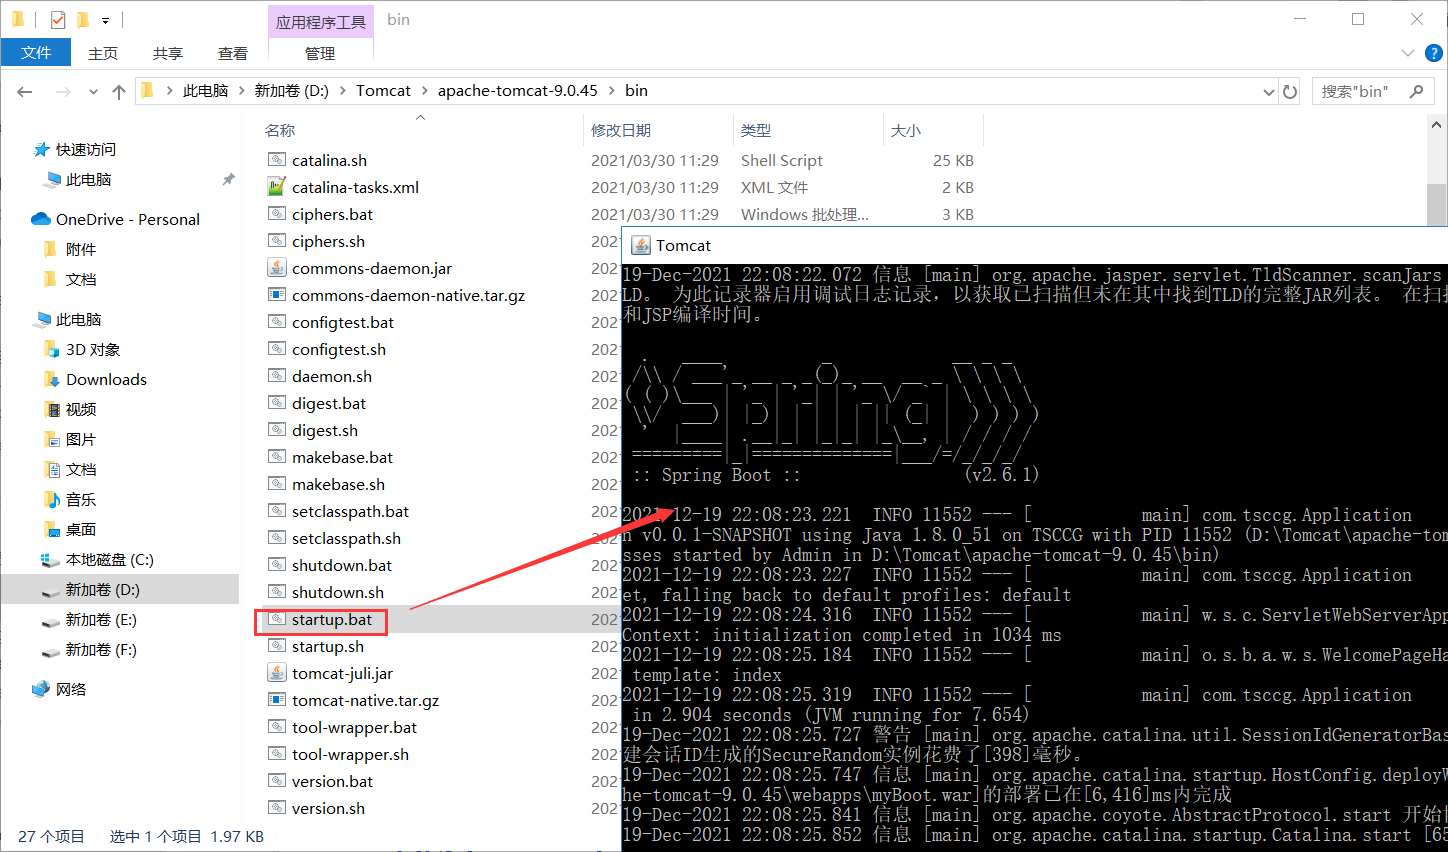
3) Access in browser http://localhost:8080/myBoot/doSome
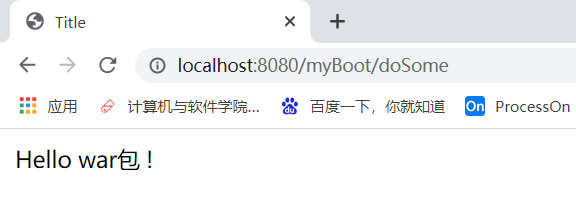
The extra / myBoot is due to the fact that we automatically unzip the war file when we start tomcat, and our project files are all in the unzipped folder.
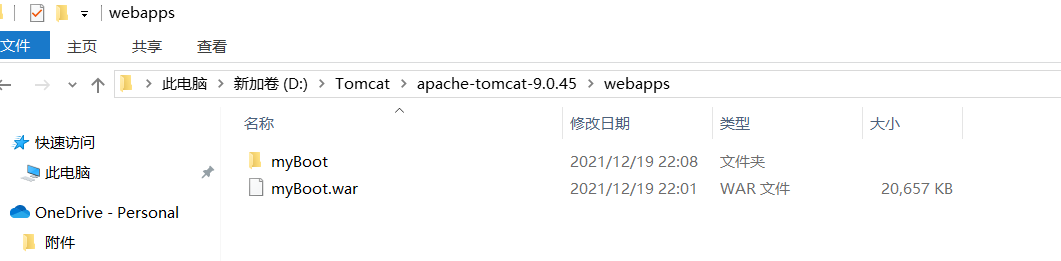
8.2 dozen jar bags
Make modifications based on the previous example of batching.
1. Modify the pom.xml
1) Specify packaging method as jar
The default packaging type is jar. Delete the original specified war package statement
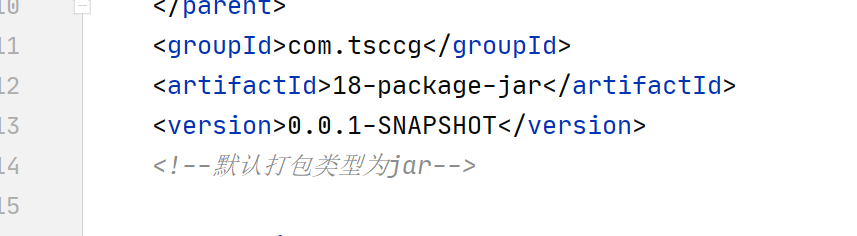
2) Specify the springboot-maven-plugin version
When Packaging Jars with jsp files, you must specify that the version of the maven-plugin plugin is 1.4.2.RELEASE
<plugins>
    <plugin>
        <groupId>org.springframework.boot</groupId>
        <artifactId>spring-boot-maven-plugin</artifactId>
        <!--Appoint maven-plugin Plug-in version 1.4.2.RELEASE-->
        <version>1.4.2.RELEASE</version>
    </plugin>
</plugins>
3) Modify Controller
@RequestMapping("/doOther")
public String doOther(Model model) {
    model.addAttribute("data","jar package");
    return "index";
}
4) Modify the main startup class without inheriting SpringBootServletInitializer
@SpringBootApplication
public class Application {
    public static void main(String[] args) {
        SpringApplication.run(Application.class, args);
    }
}
2. Execute the packaging, run the jar package through the cmd window, and start the built-in Tomcat
1) Make myBoot by executing clean ->package with maven. Jar
2) Enter myBoot. The directory where the jar package is located, open the cmd window
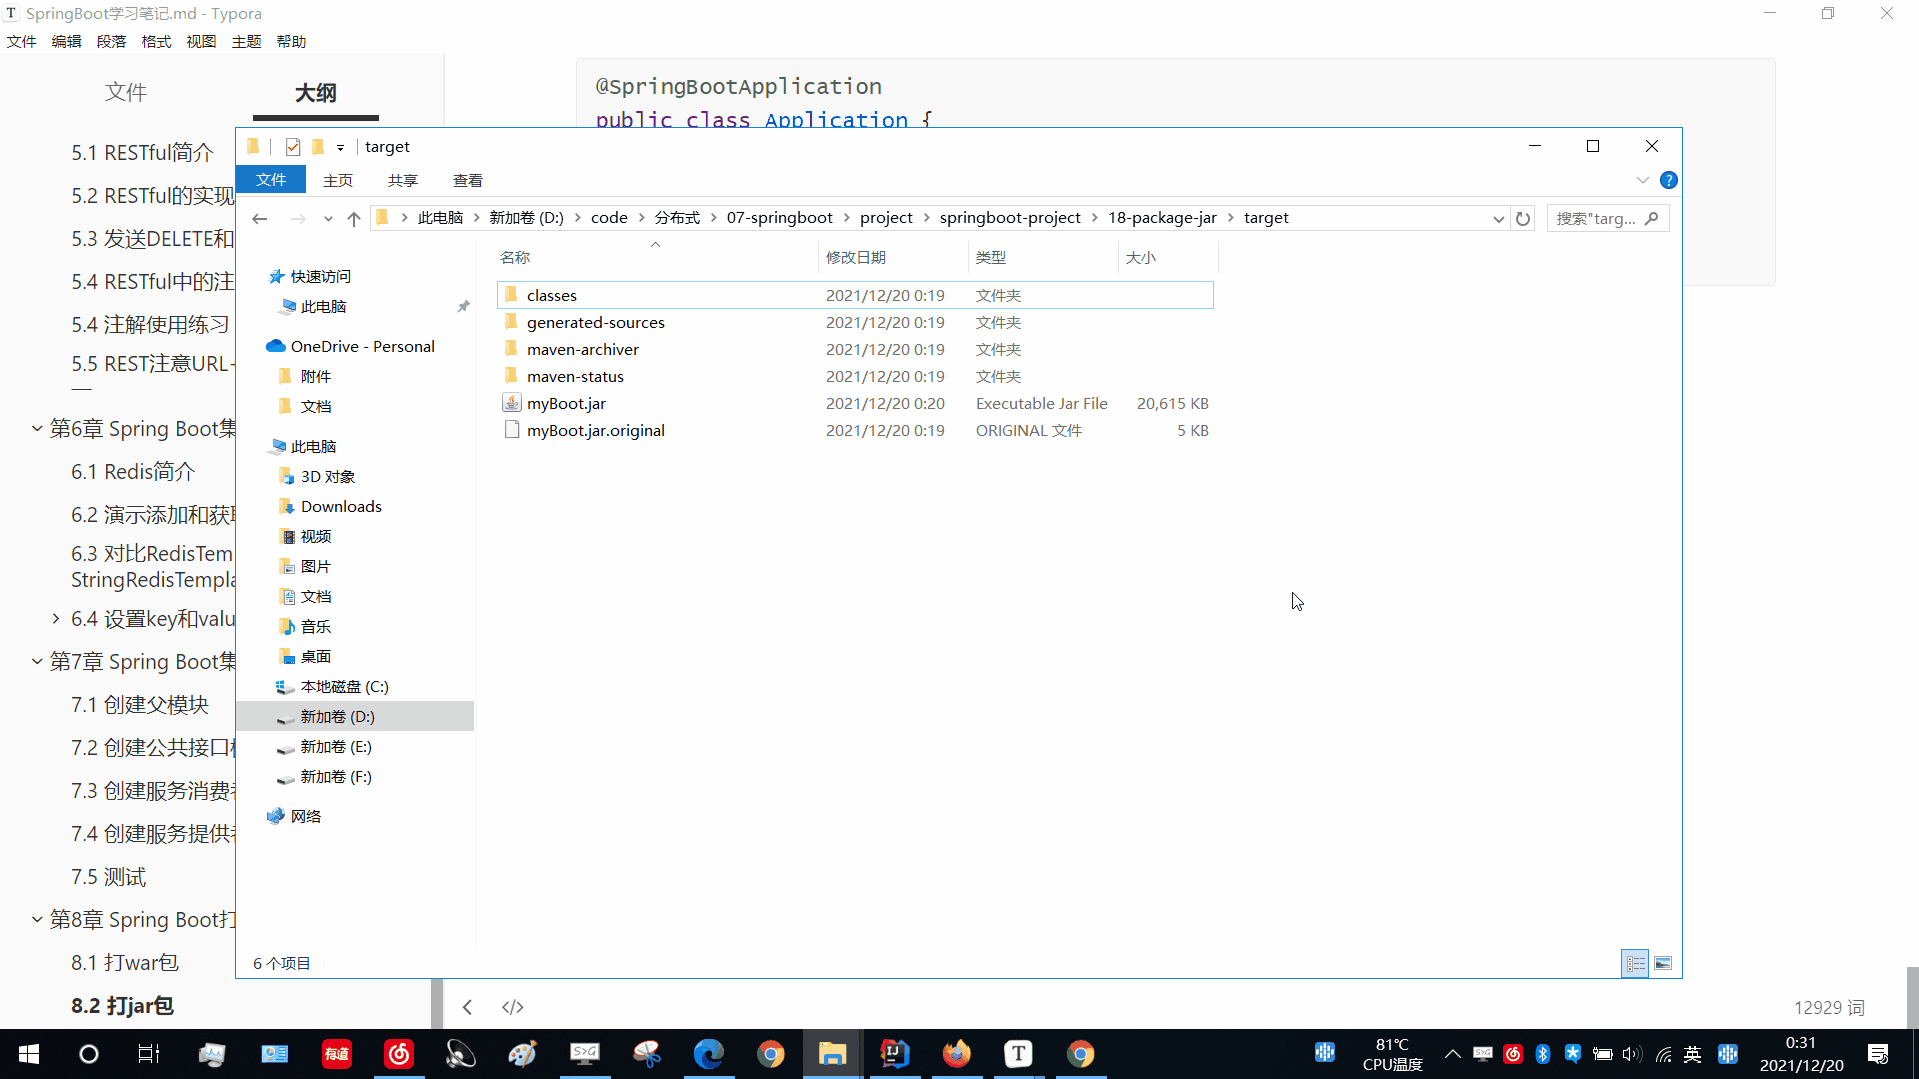
3) Run the startup command to start the built-in Tomcat
java -jar myBoot.jar

4) Send requests in the browser http://localhost:8080/doOther

Differences between 8.3 war package deployment and jar package deployment
Warpackages must be deployed on separate external servers and use a lot of resources. However, stand-alone servers have more functionality, which makes better use of the server.
The jar package can be run separately through the built-in tomcat, which takes up less resources. However, the built-in server functionality is less and the performance is not as good as the war package approach.
8.4 Summary of how Spring Boot projects are deployed and run
8.4. 1 Development phase
Run the main method of the main startup class directly in IDEA.
8.4. 2 Online Deployment Phase
1. Make jar packages
Items are packaged as jar packages in IDEA through the maven plug-in, using java-jar xxx. The jar command starts the built-in Tomcat.
When deploying online to a Linux system, you can encapsulate the command in a Shell script as follows:
(1) Create a shell script in the jar package sibling directory and write the following
run.sh:
#!/bin/sh
java -jar xxx.jar
(2) Grant privileges
chmod 777 run.sh
(3) Start shell script
./run.sh
2. Make a war bag
Items are packaged as war s in IDEA using maven plug-ins and run separately in the publishing directory of servers such as tomcat