Foreword: We now have a system developed with the micro-service architecture model. There is a commodity service and order service in the system, and they are all synchronous communication.
At present, the communication mode between commodity service and order service is synchronous. When business expands, if we continue to use synchronous communication mode between services, the coupling between services will increase. For example, our login operation may require simultaneous invocation of user services, integral services, short message services, etc., and services may depend on other services, so that such a login process will take a lot of time, resulting in a reduction in user experience.
So how do we decouple the communication between services under the micro-service architecture? This requires the use of message middleware. Message middleware can help us transform synchronous communication into asynchronous communication. It only needs to publish and subscribe messages between services to decouple the communication dependence between services.
At present, the mainstream message middleware is:
- RabbitMQ
- Kafka
- ActiveMQ
Asynchronous communication characteristics:
- Client requests do not block the process, and server responses can be non-instantaneous.
Common forms of asynchrony:
- Push Notice
- Request/Asynchronous Response
- Message queue
MQ application scenario:
- Asynchronous processing
- Flow peaking
- Log Processing
- Application decoupling
For more descriptions of message middleware, you can refer to another article of mine:
Basic Use of RabbitMQ (Part I)
In the foregoing. Spring Cloud Config - Unified Configuration Center In this article, we have demonstrated using Docker to install RabbitMQ, so we won't waste any more space on this demonstration.
Directly to the topic, we take order service and commodity service as examples. Firstly, we add mq dependency to the project of order service:
<dependency>
    <groupId>org.springframework.boot</groupId>
    <artifactId>spring-boot-starter-amqp</artifactId>
</dependency>
Add RabbitMQ related configuration items in the configuration file: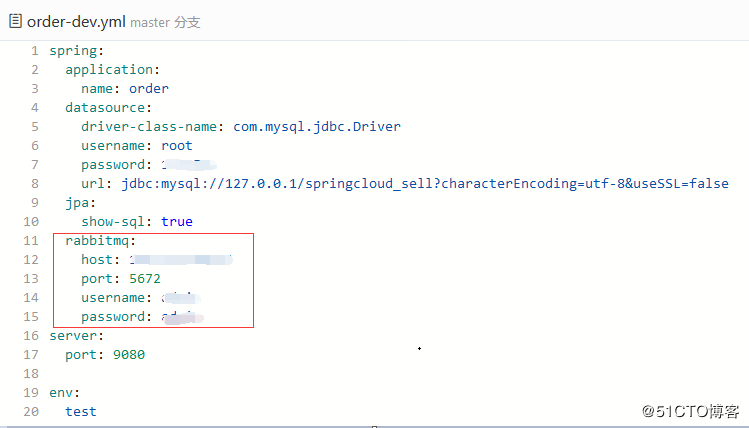
In the order service project, create a new message package and create an MqReceiver class in the package. Let's take a look at the basic operation of RabbitMQ. The code is as follows:
package org.zero.springcloud.order.server.message;

import lombok.extern.slf4j.Slf4j;
import org.springframework.amqp.rabbit.annotation.RabbitListener;
import org.springframework.stereotype.Component;

/**
 * @program: sell_order
 * @description: Receiving messages, that is, consumers
 * @author: 01
 * @create: 2018-08-21 22:24
 **/
@Slf4j
@Component
public class MqReceiver {

    /**
     * Receive messages and print them
     *
     * @param message message
     */
    @RabbitListener(queues = "myQueue")
    public void process(String message) {
        // @ The RabbitListener annotation is used to listen on RabbitMQ, and queues specify which queue to listen on.
        log.info(message);
    }
}
Because there is no myQueue queue on RabbitMQ, we have to create this queue on the management interface of RabbitMQ, as follows: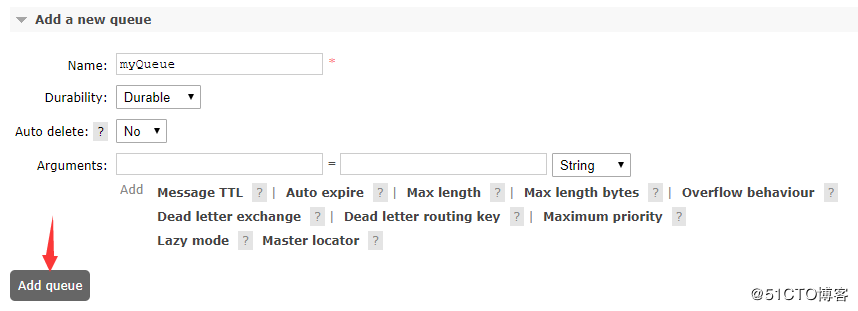
Then a new test class is created to send messages to the queue. The code is as follows:
package org.zero.springcloud.order.server;

import org.junit.Test;
import org.junit.runner.RunWith;
import org.springframework.amqp.core.AmqpTemplate;
import org.springframework.beans.factory.annotation.Autowired;
import org.springframework.boot.test.context.SpringBootTest;
import org.springframework.test.context.junit4.SpringRunner;

/**
 * @program: sell_order
 * @description: Send a message, that is, a message publisher
 * @author: 01
 * @create: 2018-08-21 22:28
 **/
@RunWith(SpringRunner.class)
@SpringBootTest
public class MqSenderTest {

    @Autowired
    private AmqpTemplate amqpTemplate;

    @Test
    public void send() {
        for (int i = 0; i < 100; i++) {
            amqpTemplate.convertAndSend("myQueue", "The first" + i + "Message");
        }
    }
}
Run the test class and go to the console of OrderApplication to see if the received message has been received and printed. Normal conditions should be as follows: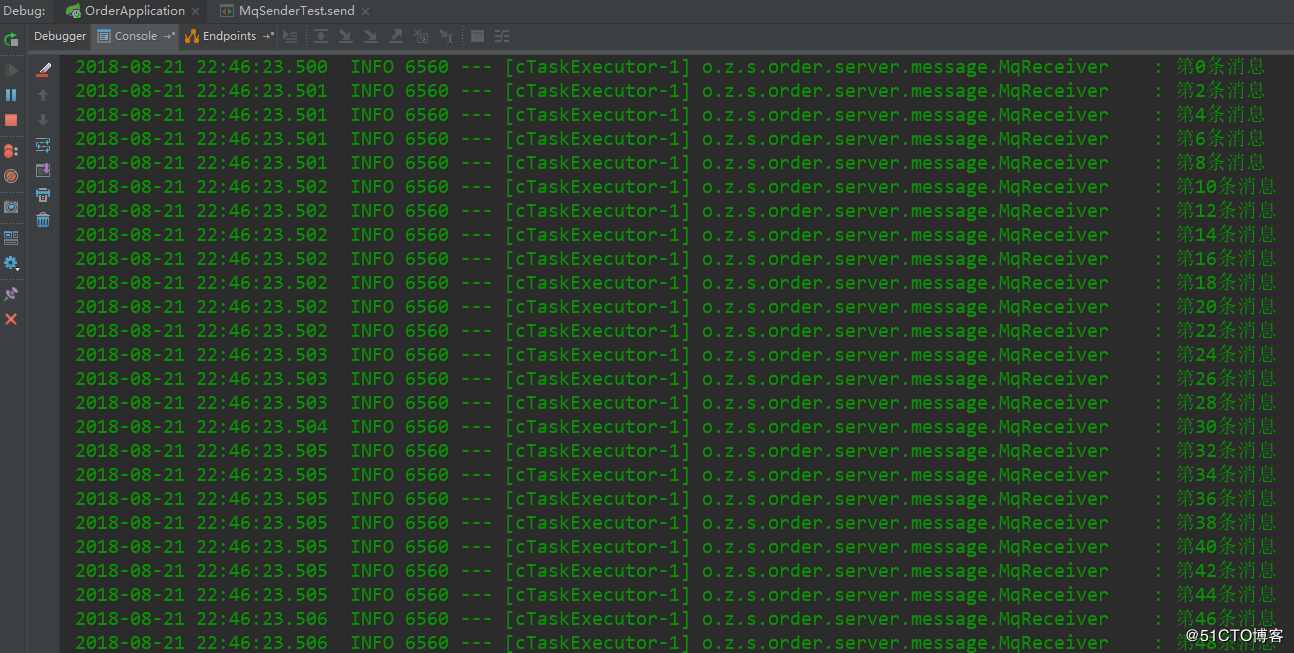
Basic consumer and publisher code has been written and tested successfully. But there is a small problem. When we want to monitor a non-existent queue, we need to manually build the new queue. It feels very troublesome to build the new queue manually every time. Is there any way to automatically create a queue when it does not exist? The answer is yes. Still use the previous comment, but this time the parameter is changed to queuesToDeclare. The sample code is as follows:
package org.zero.springcloud.order.server.message;

import lombok.extern.slf4j.Slf4j;
import org.springframework.amqp.rabbit.annotation.Queue;
import org.springframework.amqp.rabbit.annotation.RabbitListener;
import org.springframework.stereotype.Component;

/**
 * @program: sell_order
 * @description: Receiving messages, that is, consumers
 * @author: 01
 * @create: 2018-08-21 22:24
 **/
@Slf4j
@Component
public class MqReceiver {

    /**
     * Receive and print messages
     * Queues can be created automatically when they do not exist
     *
     * @param message message
     */
    @RabbitListener(queuesToDeclare = @Queue("myQueue"))
    public void process2(String message) {
        // @ The RabbitListener annotation is used to listen for RabbitMQ, and queuesToDeclare can create a specified queue
        log.info(message);
    }
}
Basic Use of RabbitMQ (Part II)
Above, we briefly introduce the sending and receiving of messages and the creation of queues through examples. In this section, we introduce the automatic binding method of exchange. When we need to automatically bind exchange, we can also do it through the bindings parameter. The sample code is as follows:
package org.zero.springcloud.order.server.message;

import lombok.extern.slf4j.Slf4j;
import org.springframework.amqp.rabbit.annotation.Exchange;
import org.springframework.amqp.rabbit.annotation.Queue;
import org.springframework.amqp.rabbit.annotation.QueueBinding;
import org.springframework.amqp.rabbit.annotation.RabbitListener;
import org.springframework.stereotype.Component;

/**
 * @program: sell_order
 * @description: Receiving messages, that is, consumers
 * @author: 01
 * @create: 2018-08-21 22:24
 **/
@Slf4j
@Component
public class MqReceiver {

    /**
     * Receive and print messages
     * Queues can be created automatically when they do not exist, and Exchange s specified can be automatically bound.
     * @param message message
     */
    @RabbitListener(bindings = @QueueBinding(
            value = @Queue("myQueue"),
            exchange = @Exchange("myExchange")
    ))
    public void process3(String message) {
        // @ The RabbitListener annotation is used to listen for RabbitMQ, and bindings can create a specified queue and automatically bind Exchange.
        log.info(message);
    }
}
Message grouping can also be accomplished through bindings parameters, such as a digital vendor service and a fruit vendor service, which listen to the message queue of the same order service. But I hope the message of digital order is consumed by digital supplier service, and the message of fruit order is consumed by fruit supplier service. So we need to use message grouping. The sample code is as follows:
package org.zero.springcloud.order.server.message;

import lombok.extern.slf4j.Slf4j;
import org.springframework.amqp.rabbit.annotation.Exchange;
import org.springframework.amqp.rabbit.annotation.Queue;
import org.springframework.amqp.rabbit.annotation.QueueBinding;
import org.springframework.amqp.rabbit.annotation.RabbitListener;
import org.springframework.stereotype.Component;

/**
 * @program: sell_order
 * @description: Receiving messages, that is, consumers
 * @author: 01
 * @create: 2018-08-21 22:24
 **/
@Slf4j
@Component
public class MqReceiver {

    /**
     * Digital Provider Services - Receiving Messages
     *
     * @param message message
     */
    @RabbitListener(bindings = @QueueBinding(
            value = @Queue("computerOrder"),
            exchange = @Exchange("myOrder"),
            key = "computer"  // The key of the specified routing
    ))
    public void processComputer(String message) {
        log.info("computer message : {}", message);
    }

    /**
     * Fruit Supplier Service - Receiving Messages
     *
     * @param message message
     */
    @RabbitListener(bindings = @QueueBinding(
            value = @Queue("computerOrder"),
            exchange = @Exchange("myOrder"),
            key = "fruit"  // The key of the specified routing
    ))
    public void processFruit(String message) {
        log.info("fruit message : {}", message);
    }
}
The test code is as follows. Messages are grouped by specifying key and sent to digital vendor service.
package org.zero.springcloud.order.server;

import org.junit.Test;
import org.junit.runner.RunWith;
import org.springframework.amqp.core.AmqpTemplate;
import org.springframework.beans.factory.annotation.Autowired;
import org.springframework.boot.test.context.SpringBootTest;
import org.springframework.test.context.junit4.SpringRunner;

/**
 * @program: sell_order
 * @description: Send a message, that is, a message publisher
 * @author: 01
 * @create: 2018-08-21 22:28
 **/
@RunWith(SpringRunner.class)
@SpringBootTest
public class MqSenderTest {

    @Autowired
    private AmqpTemplate amqpTemplate;

    @Test
    public void sendOrder() {
        for (int i = 0; i < 100; i++) {
            // The first parameter specifies the queue, the second parameter specifies the key of the route, and the third parameter specifies the message.
            amqpTemplate.convertAndSend("myOrder", "computer", "The first" + i + "Message");
        }
    }
}
After restarting the project, run the above test code. The console output is as follows. It can be seen that only the digital supplier service can receive the message, but the fruit supplier service can not receive it. This completes message grouping: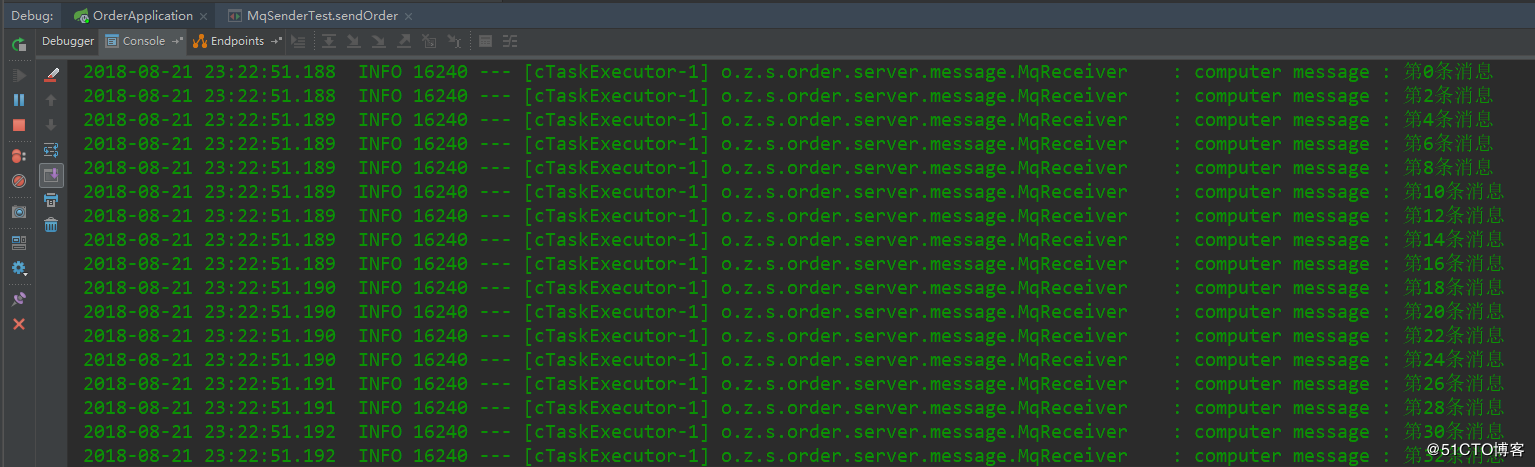
Use of Spring Cloud Stream (Part I)
Spring Cloud Stream is a framework for building message-driven capabilities for micro-service applications. It can create independent Spring applications based on Spring Boot that can be used for production. He uses Spring Integration to connect message broker middleware to achieve message event driven. Spring Cloud Stream provides personalized automated configuration implementations for some vendors'messaging middleware products, citing three core concepts: publish-subscribe, consumer group and partition. RabbitMQ and Kafka are currently supported only.
What is Spring Integration? Integration integration
Enterprise Application Integration (EAI) is an application technology that integrates data and services between applications. Four integration styles:
- File Transfer: Two systems generate files, and the payload of the file is the message processed by another system. One example of this style is to poll directories or FTP directories for files and process them.
- Shared database: Two systems query the same database to obtain the data to be transferred. One example is that you deploy two EAR applications whose entity classes (JPA, Hibernate, etc.) share the same table.
- Remote procedure invocation: Both systems expose another invokable service. Examples of this type are EJB services, or SOAP and REST services.
- Message: Two systems connect to a common message system, exchange data with each other, and invoke behavior using messages. An example of this style is the well-known hub-and-spoke JMS architecture.
As an enterprise integration framework, Spring Integration complies with the classic book Enterprise Integration Model, which provides a convenient implementation mode for developers. Spring Integration builds on Spring Control Inversion Design pattern, abstracts message source and target, and integrates various components in application environment by message transmission and message operation. Messages and integration concerns are handled by frameworks, so business components can be better isolated from infrastructure, thereby reducing the complex integration responsibilities faced by developers.
Model diagram: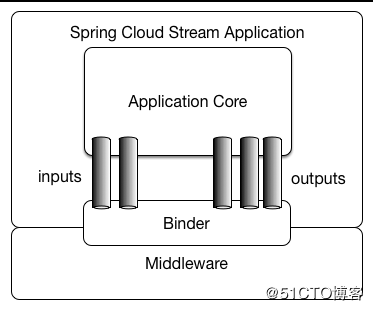
Now let's take a look at the basic use of Spring Cloud Stream and add the following dependencies to order service items:
<dependency>
    <groupId>org.springframework.cloud</groupId>
    <artifactId>spring-cloud-starter-stream-rabbit</artifactId>
</dependency>
Then in the configuration file, we configure rabbitmq information, but we have configured it before, so we don't need to configure it.
Let's see how to use Spring Cloud Stream to send and receive messages. First, we create an interface that defines input and output methods. The code is as follows:
package org.zero.springcloud.order.server.message;

import org.springframework.cloud.stream.annotation.Input;
import org.springframework.cloud.stream.annotation.Output;
import org.springframework.messaging.MessageChannel;
import org.springframework.messaging.SubscribableChannel;

public interface StreamClient {

    // Receive messages, entries
    @Input("myMessageInput")
    SubscribableChannel input();

    // Send a message,
    @Output("myMessageOutput")
    MessageChannel output();
}
Create a message receiver. The code is as follows:
package org.zero.springcloud.order.server.message;

import lombok.extern.slf4j.Slf4j;
import org.springframework.cloud.stream.annotation.EnableBinding;
import org.springframework.cloud.stream.annotation.StreamListener;
import org.springframework.stereotype.Component;

/**
 * @program: sell_order
 * @description: Message Receiver
 * @author: 01
 * @create: 2018-08-22 22:16
 **/
@Slf4j
@Component
@EnableBinding(StreamClient.class)
public class StreamReceiver {

    @StreamListener("myMessageOutput")
    public void process(String message) {
        log.info("message : {}", message);
    }
}
Message sender, which exists here as a Controller. The code is as follows:
package org.zero.springcloud.order.server.controller;

import org.springframework.beans.factory.annotation.Autowired;
import org.springframework.messaging.support.MessageBuilder;
import org.springframework.web.bind.annotation.GetMapping;
import org.springframework.web.bind.annotation.RestController;
import org.zero.springcloud.order.server.message.StreamClient;

/**
 * @program: sell_order
 * @description: message sender
 * @author: 01
 * @create: 2018-08-22 22:18
 **/
@RestController
public class SendMessageController {

    private final StreamClient streamClient;

    @Autowired
    public SendMessageController(StreamClient streamClient) {
        this.streamClient = streamClient;
    }

    @GetMapping("/send/msg")
    public void send() {
        for (int i = 0; i < 100; i++) {
            MessageBuilder<String> messageBuilder = MessageBuilder.withPayload("This is the first" + i + "Message");
            streamClient.output().send(messageBuilder.build());
        }
    }
}
Because our microservice may deploy multiple instances, if multiple instances need to group messages, otherwise all service instances will receive the same message. In the configuration file, add the following configuration completion message grouping:
spring:
  ...
  cloud:
    ...
    stream:
      bindings:
        myMessageOutput:
          group: order
...
Restart the project and visit http://localhost:9080/send/msg. The console output is as follows: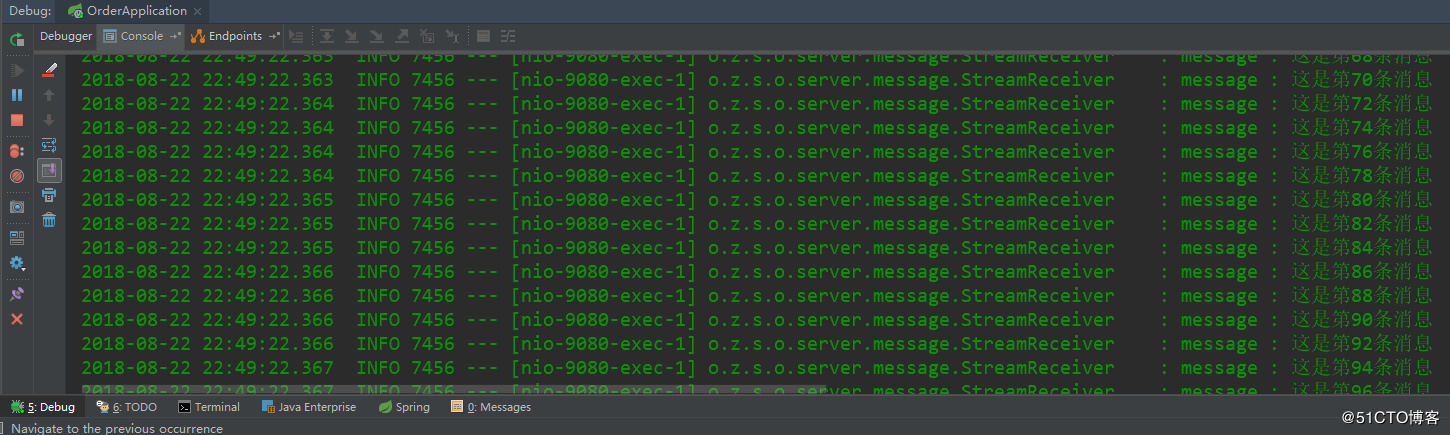
Note: Spring Cloud Stream can automatically create queues at project startup and delete queues when project closes
Use of Spring Cloud Stream (Part II)
In actual development, the message we send is usually a java object rather than a string. So let's look at how to send objects, which is almost the same as sending strings. The message sender code is as follows:
package org.zero.springcloud.order.server.controller;

import org.springframework.beans.factory.annotation.Autowired;
import org.springframework.messaging.support.MessageBuilder;
import org.springframework.web.bind.annotation.GetMapping;
import org.springframework.web.bind.annotation.RestController;
import org.zero.springcloud.order.server.dto.OrderDTO;
import org.zero.springcloud.order.server.message.StreamClient;

/**
 * @program: sell_order
 * @description: message sender
 * @author: 01
 * @create: 2018-08-22 22:18
 **/
@RestController
public class SendMessageController {

    private final StreamClient streamClient;

    @Autowired
    public SendMessageController(StreamClient streamClient) {
        this.streamClient = streamClient;
    }

    /**
     * Sending OrderDTO objects
     */
    @GetMapping("/send/msg")
    public void send() {
        OrderDTO orderDTO = new OrderDTO();
        orderDTO.setOrderId("123465");

        MessageBuilder<OrderDTO> messageBuilder = MessageBuilder.withPayload(orderDTO);
        streamClient.output().send(messageBuilder.build());
    }
}
The message receiver only needs to declare the type of the object on the method parameter. The code is as follows:
package org.zero.springcloud.order.server.message;

import lombok.extern.slf4j.Slf4j;
import org.springframework.cloud.stream.annotation.EnableBinding;
import org.springframework.cloud.stream.annotation.StreamListener;
import org.springframework.stereotype.Component;
import org.zero.springcloud.order.server.dto.OrderDTO;

/**
 * @program: sell_order
 * @description: Message Receiver
 * @author: 01
 * @create: 2018-08-22 22:16
 **/
@Slf4j
@Component
@EnableBinding(StreamClient.class)
public class StreamReceiver {

    /**
     * Receiving OrderDTO objects
     * @param message message
     */
    @StreamListener("myMessageOutput")
    public void process(OrderDTO message) {
        log.info("message : {}", message);
    }
}
Another point to mention is that by default, java objects exist in the message queue as base64 encoding, and we all know that Base64 is unreadable. In order to view the object data piled up in the message queue conveniently, we hope that the java object is presented as a string in json format, which is convenient for us to read. As for this problem, we just need to add a section of content-type configuration in the configuration file. As follows:
spring:
  ...
  cloud:
    ...
    stream:
      bindings:
        myMessageOutput:
          group: order
          content-type: application/json
...
Restart the project and visit http://localhost:9080/send/msg. The console output is as follows:
2018-08-22 23:32:33.704 INFO 12436 --- [nio-9080-exec-4] o.z.s.o.server.message.StreamReceiver : message : OrderDTO(orderId=123465, buyerName=null, buyerPhone=null, buyerAddress=null, buyerOpenid=null, orderAmount=null, orderStatus=null, payStatus=null, createTime=null, updateTime=null, orderDetailList=null)
When we receive a message, we may need to return a specific message to indicate that the message has been received or something. As for this function, we can do it through the @SendTo annotation. The code is as follows:
package org.zero.springcloud.order.server.message;

import lombok.extern.slf4j.Slf4j;
import org.springframework.cloud.stream.annotation.EnableBinding;
import org.springframework.cloud.stream.annotation.StreamListener;
import org.springframework.messaging.handler.annotation.SendTo;
import org.springframework.stereotype.Component;
import org.zero.springcloud.order.server.dto.OrderDTO;

/**
 * @program: sell_order
 * @description: Message Receiver
 * @author: 01
 * @create: 2018-08-22 22:16
 **/
@Slf4j
@Component
@EnableBinding(StreamClient.class)
public class StreamReceiver {

    /**
     * Receiving OrderDTO objects
     * @param message message
     */
    @StreamListener("myMessageOutput")
    @SendTo("myMessageInput")
    public String process(OrderDTO message) {
        log.info("message : {}", message);

        return "success";
    }

    @StreamListener("myMessageInput")
    public void success(String message) {
        log.info("message : {}", message);
    }
}
Restart the project and visit http://localhost:9080/send/msg. The console output is as follows:
Reprinted from: http://blog.51cto.com/zero01/2173288