Why learn Spring Cloud
In project development, with more and more businesses, it leads to high coupling between functions, low development efficiency, slow system operation, difficult to maintain and unstable. Microservice architecture can solve these problems, and Spring Cloud is the most popular implementation of microservice architecture, so let's learn about Spring Cloud today.
1. System architecture evolution
With the development of the Internet, the scale of website applications continues to expand and the demand surges, followed by technical pressure. Therefore, the system architecture continues to evolve, upgrade and iterate. From single application, to vertical splitting, to distributed services, to SOA, and now hot micro service architecture.
1.1. Centralized architecture
When the website traffic is small, only one application is needed to deploy all functions together to reduce deployment nodes and costs.
advantage:
- Fast system development
- Low maintenance cost
- It is suitable for systems with low concurrency requirements
Disadvantages:
- High code coupling and difficult later maintenance
- Cannot optimize for different modules
- Cannot expand horizontally
- Low single point fault tolerance and poor concurrency
1.2. Vertical split
When the number of visits increases gradually and a single application cannot meet the requirements, in order to meet higher concurrency and business requirements, we split the system according to business functions:
advantage:
- The system split realizes traffic sharing and solves the problem of concurrency
- It can be optimized for different modules
- Convenient horizontal expansion, load balancing and improved fault tolerance
Disadvantages:
- The systems are independent of each other, and there will be a lot of repeated development work, which will affect the development efficiency
1.3. Distributed services
When there are more and more vertical applications, the interaction between applications is inevitable. Extract the core business as an independent service, and gradually form a stable service center, so that the front-end applications can respond to the changing market demand more quickly. At this time, distributed invocation for improving business reuse and integration is the key.
advantage:
- The basic services are extracted, and the systems call each other, which improves the code reuse and development efficiency
Disadvantages:
- The coupling between systems becomes higher, and the call relationship is complex and difficult to maintain
1.4. Service governance (SOA)
SOA (Service Oriented Architecture): it is a design method, which contains multiple services. Services eventually provide a series of functions through interdependence. A service usually exists in an independent form in the operating system process. Each service is called through the network.
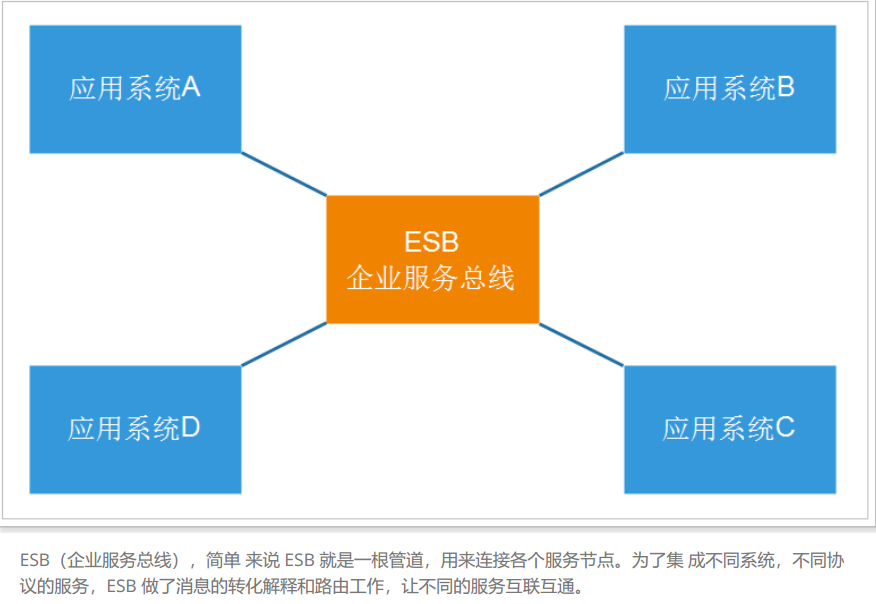
Disadvantages of SOA: there are deviations in ESB products provided by each supplier, and its own implementation is complex; The granularity of application services is large, and ESB integration integrates all services, protocols and data conversion, making operation and maintenance, test and deployment difficult. All services communicate through one channel, which directly reduces the communication speed.
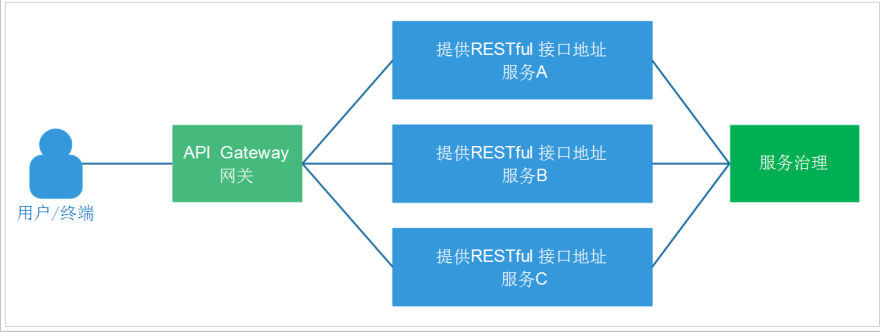
1.5. Microservices
Microservice architecture is a way or way to use a set of small services to develop a single application. Each service is built based on a single business capability, runs in its own process, communicates using lightweight mechanisms, usually HTTP API s, and can be deployed independently through automatic deployment mechanisms. These services can be implemented in different programming languages and different data storage technologies, and maintain a minimum of centralized management. Microservice structure diagram:
Characteristics of microservices:
- Single responsibility: each service in the micro service corresponds to a unique business capability to achieve a single responsibility
- Service oriented: service oriented means that each service should expose the service interface API. It doesn't care about the technical implementation of the service. It has nothing to do with the platform and language, and it is not limited to what technology to implement, as long as the REST interface is provided.
- Autonomy: autonomy means that services are independent and do not interfere with each other
1. Team independence: each service is an independent development team.
2. Technology independence: because it is service-oriented and provides REST interfaces, there is no interference with the technology used
3. Front and rear end separation: the front and rear end separation development is adopted to provide a unified REST interface, and the back end does not need to develop different interfaces for PC and mobile section
4. Database separation: each service uses its own data source
Comparison between microservices and SOA:
| function | SOA | Microservices |
|---|---|---|
| Component size | Block business logic | Individual tasks or small pieces of business logic |
| coupling | Usually loosely coupled | Always loose coupling |
| Administration | Focus on central management | Focus on decentralized management |
| target | Ensure that applications can interoperate | Easy to maintain, easy to expand, lighter interaction |
2. Remote call mode
Both microservices and SOA are faced with remote invocation between services. So what are the remote invocation methods between services?
Common remote calling methods are as follows:
- RPC: Remote Procedure Call, similar to RMI. Custom data format, based on native TCP communication, fast and efficient. Early web services, now popular Dubbo, are typical of RPC.
- Http: http is actually a network transmission protocol, which specifies the format of data transmission based on TCP. At present, the communication between client browser and server basically adopts HTTP protocol. It can also be used for remote service calls. The disadvantage is that the message encapsulation is bloated. Now the popular REST style can be realized through HTTP protocol.
2.1. Understanding RPC
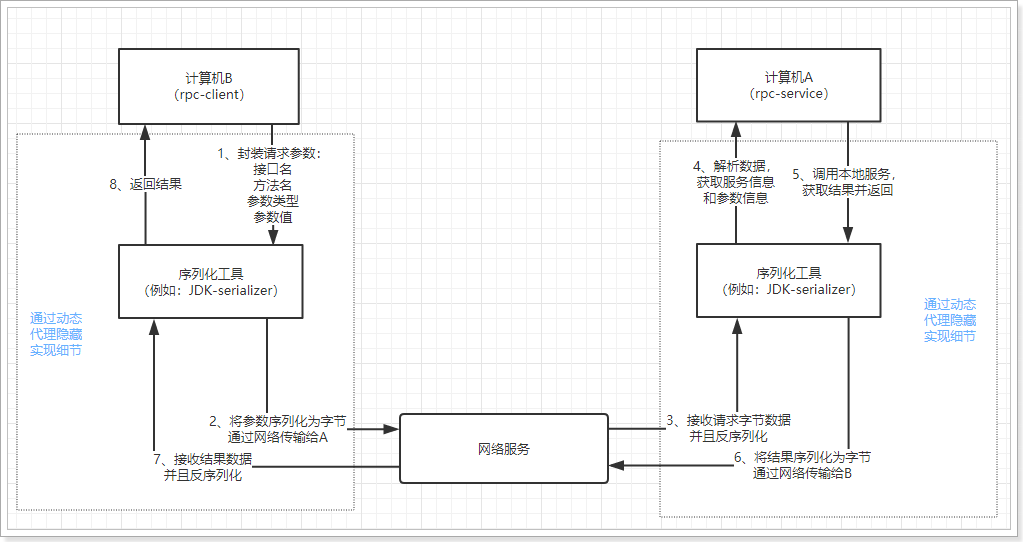
RPC, or Remote Procedure Call, is A computer communication protocol. The protocol allows A program running on one computer to call A subroutine of another computer without extra programming for this interaction. To put it more popularly, computer A provides A service, and computer B can call the service of computer A like calling A local service.
RPC call flow chart:
2.2. Understanding HTTP
HTTP is actually a network transmission protocol. It works at the application layer based on TCP and specifies the format of data transmission. Now the communication between the client browser and the server basically adopts HTTP protocol, which can also be used for remote service calls. The disadvantage is that the message encapsulation is bloated. The advantage is that there are no technical restrictions on the service provider and caller. It is free and flexible, which is more in line with the concept of microservice. Now the popular REST style can be realized through HTTP protocol.

2.3. How to select?
The mechanism of RPC is defined according to the language API, not according to the network-based application. If your company adopts Java technology stack, it is a good choice to use Dubbo as micro service architecture.
On the contrary, if the company's technology stack is diversified and you prefer the spring family, Spring Cloud is the best choice to build microservices. Spring Cloud suite will be selected, so HTTP will be used to implement inter service calls.
3. Introduction to spring cloud
3.1. Introduction
Spring Cloud is one of the projects under spring, Click to enter the official website address
Spring is best at integration, taking the best framework in the world and integrating it into its own project.
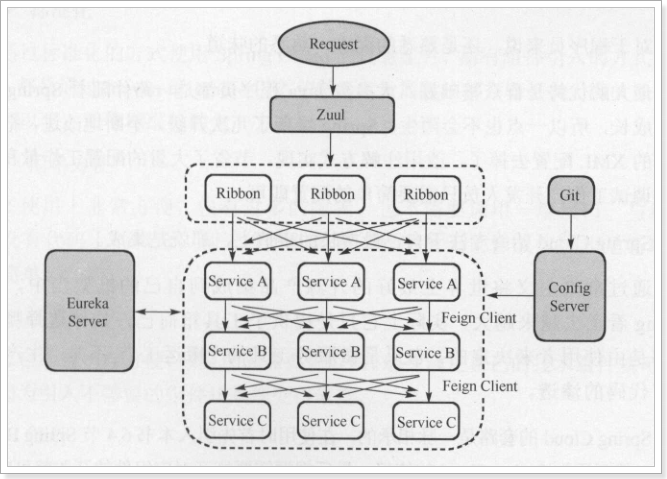
Spring Cloud is the same. It integrates some popular technologies and realizes functions such as configuration management, service discovery, intelligent routing, load balancing, fuse, control bus, cluster status and so on. The main components involved include:
Netflix
- Eureka: Registration Center
- Zuul: service gateway
- Ribbon: load balancing
- Feign: service call
- Hystrix: fuse
The above is only a part of it. The architecture diagram is as follows:
3.2. Version
The naming of Spring Cloud is special because it is not A component, but A collection of many components. Its name is composed of some words with letters A to Z (actually the name of London Underground Station):
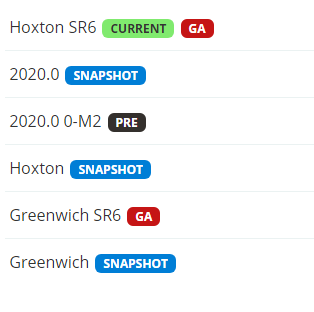
Correspondence between spring clone and Spring Boot versions
| Release Train | Boot Version |
|---|---|
| Hoxton | 2.2.x |
| Greenwich | 2.1.x |
| Finchley | 2.0.x |
| Edgware | 1.5.x |
| Dalston | 1.5.x |
4. Microservice scenario simulation
Simulate a service invocation scenario. Easy to learn later courses
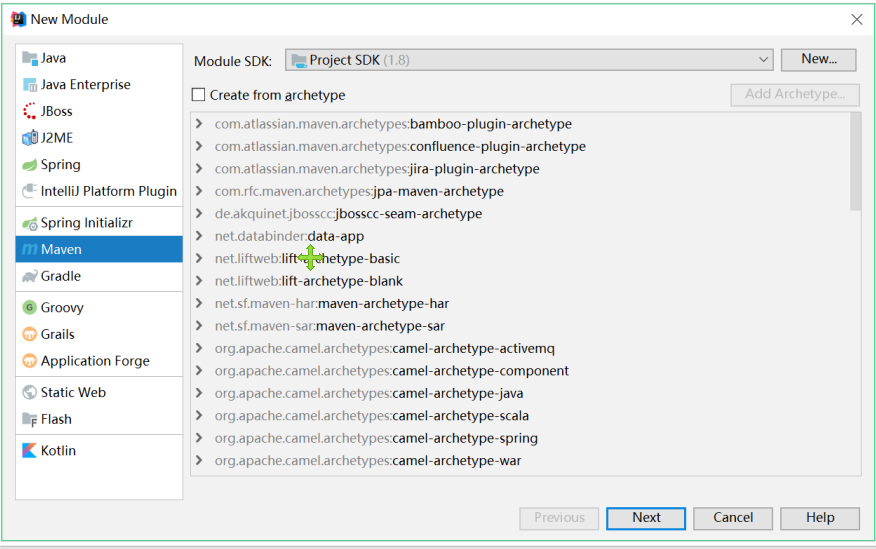
4.1. Create parent project
In microservices, multiple projects need to be created at the same time. In order to facilitate classroom demonstration, first create a parent project, and subsequent projects take this project as the parent, using Maven's aggregation and inheritance. Uniformly manage the version and configuration of subprojects
pom.xml file:
<?xml version="1.0" encoding="UTF-8"?>
<project xmlns="http://maven.apache.org/POM/4.0.0"
         xmlns:xsi="http://www.w3.org/2001/XMLSchema-instance"
         xsi:schemaLocation="http://maven.apache.org/POM/4.0.0 http://maven.apache.org/xsd/maven-4.0.0.xsd">
    <modelVersion>4.0.0</modelVersion>

    <groupId>com.lxs</groupId>
    <artifactId>lxs-springcloud</artifactId>
    <packaging>pom</packaging>
    <version>1.0-SNAPSHOT</version>

    <parent>
        <groupId>org.springframework.boot</groupId>
        <artifactId>spring-boot-starter-parent</artifactId>
        <version>2.1.5.RELEASE</version>
        <relativePath/>
    </parent>

    <properties>
        <java.version>1.8</java.version>
        <spring-cloud.version>Greenwich.SR1</spring-cloud.version>
        <mapper.starter.version>2.1.5</mapper.starter.version>
        <mysql.version>5.1.46</mysql.version>
    </properties>

    <dependencyManagement>
        <dependencies>
            <!-- springCloud -->
            <dependency>
                <groupId>org.springframework.cloud</groupId>
                <artifactId>spring-cloud-dependencies</artifactId>
                <version>${spring-cloud.version}</version>
                <type>pom</type>
                <scope>import</scope>
            </dependency>
            <!-- currency Mapper starter -->
            <dependency>
                <groupId>tk.mybatis</groupId>
                <artifactId>mapper-spring-boot-starter</artifactId>
                <version>${mapper.starter.version}</version>
            </dependency>
            <!-- mysql drive -->
            <dependency>
                <groupId>mysql</groupId>
                <artifactId>mysql-connector-java</artifactId>
                <version>${mysql.version}</version>
            </dependency>
        </dependencies>
    </dependencyManagement>
    <dependencies>
        <dependency>
            <groupId>org.projectlombok</groupId>
            <artifactId>lombok</artifactId>
        </dependency>
    </dependencies>

    <build>
        <plugins>
            <plugin>
                <groupId>org.springframework.boot</groupId>
                <artifactId>spring-boot-maven-plugin</artifactId>
            </plugin>
        </plugins>
    </build>
</project>
be careful: spring clound and spring boot Corresponding version of greenwich edition clound corresponding spring boot 2.1.x
 Note: aggregate parent project <packaging>pom</packaging>
Most of the dependent versions to be used have been managed here to facilitate subsequent use
4.2. Service providers
We will create a new project to provide external services for querying users.
4.2.1. Create Module
Select LXS spring cloud to create a sub project:
pom.xml file
<?xml version="1.0" encoding="UTF-8"?>
<project xmlns="http://maven.apache.org/POM/4.0.0"
         xmlns:xsi="http://www.w3.org/2001/XMLSchema-instance"
         xsi:schemaLocation="http://maven.apache.org/POM/4.0.0 http://maven.apache.org/xsd/maven-4.0.0.xsd">
    <parent>
        <artifactId>lxs-springcloud</artifactId>
        <groupId>com.lxs</groupId>
        <version>1.0-SNAPSHOT</version>
    </parent>
    <modelVersion>4.0.0</modelVersion>

    <artifactId>user-service</artifactId>

    <dependencies>
        <dependency>
            <groupId>org.springframework.boot</groupId>
            <artifactId>spring-boot-starter-web</artifactId>
        </dependency>
        <!-- currency Mapper starter -->
        <dependency>
            <groupId>tk.mybatis</groupId>
            <artifactId>mapper-spring-boot-starter</artifactId>
        </dependency>
        <!-- mysql drive -->
        <dependency>
            <groupId>mysql</groupId>
            <artifactId>mysql-connector-java</artifactId>
        </dependency>

        <dependency>
            <groupId>org.springframework.cloud</groupId>
            <artifactId>spring-cloud-starter-netflix-eureka-client</artifactId>
        </dependency>
        <dependency>
            <groupId>org.springframework.cloud</groupId>
            <artifactId>spring-cloud-starter-config</artifactId>
        </dependency>

        <dependency>
            <groupId>org.springframework.cloud</groupId>
            <artifactId>spring-cloud-bus</artifactId>
        </dependency>
        <dependency>
            <groupId>org.springframework.cloud</groupId>
            <artifactId>spring-cloud-stream-binder-rabbit</artifactId>
        </dependency>
        <dependency>
            <groupId>org.springframework.boot</groupId>
            <artifactId>spring-boot-starter-actuator</artifactId>
        </dependency>

    </dependencies>
</project>
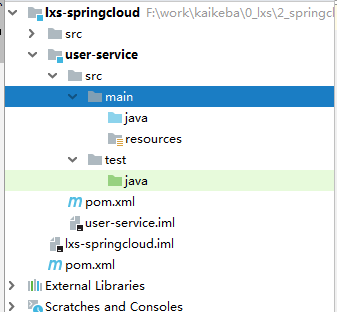
Project structure
4.2.2. Preparation of configuration file
Create the user service \ SRC \ main \ resources \ application.yml property file. Here, we use yaml syntax instead of properties:
server:
	port: 9091
spring:
	datasource:
		driver-class-name: com.mysql.jdbc.Dri
		url: jdbc:mysql://localhost:3306/springclound
		username: root
		password: root
mybatis:
	type-aliases-package: com.lxs.user.pojo
Use the Mysql graphical interface tool to import the springcloud.sql script
4.2.3. Code writing
Startup class
@SpringBootApplication
@MapperScan("com.lxs.user.mapper")
public class UserApplication {
	public static void main(String[] args) {
		SpringApplication.run(UserApplication.class, args);
	}
}
Entity class
@Data
@Table(name = "tb_user")
public class User{
    // id
    @Id
    @GeneratedValue(strategy = GenerationType.IDENTITY)
    private Long id;

    // user name
    private String userName;

    // password
    private String password;

    // full name
    private String name;

    // Age
    private Integer age;

    // Gender, 1 male, 2 female
    private Integer sex;

    // date of birth
    private Date birthday;

    // Creation time
    private Date created;

    // Update time
    private Date updated;

    // remarks
    private String note;
}
UserMapper
public interface UserMapper extends Mapper<User> {

}
service:
@Service
public class UserService {

    @Autowired
    private UserMapper userMapper;

    public User queryById(Long id) {
        return userMapper.selectByPrimaryKey(id);
    }
}
controller
Provide REST style web Services externally, and query users according to their id
@RestController
@RequestMapping("/user")
@RefreshScope //Profile change auto refresh attribute
public class UserController {

    @Autowired
    private UserService userService;

    @GetMapping("/{id}")
    public User queryById(@PathVariable Long id) {
        return userService.queryById(id);
    }
}
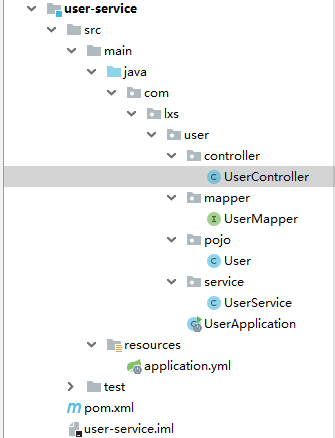
Project structure after completing the above code
4.2.4. Start and test
Start project, access http://localhost:9091/user/7

4.3. Service callers
4.3.1. Create project
Similar to the above, we won't repeat it here. It should be noted that we can call the user service, so we don't need Mybatis. We rely on the user service module before copying to change the coordinates of the response
pom:
<?xml version="1.0" encoding="UTF-8"?>
<project xmlns="http://maven.apache.org/POM/4.0.0"
xmlns:xsi="http://www.w3.org/2001/XMLSchema-instance"
xsi:schemaLocation="http://maven.apache.org/POM/4.0.0 http://maven.apache.org/xsd/maven-4.0.0.xsd">
<parent>
<artifactId>lxs-springcloud</artifactId>
<groupId>com.lxs</groupId>
<version>1.0-SNAPSHOT</version>
</parent>
<modelVersion>4.0.0</modelVersion>
<artifactId>consumer-demo</artifactId>
<dependencies>
<dependency>
<groupId>org.springframework.boot</groupId>
<artifactId>spring-boot-starter-web</artifactId>
</dependency>
<dependency>
<groupId>org.springframework.cloud</groupId>
<artifactId>spring-cloud-starter-netflix-eureka-client</artifactId>
</dependency>
<dependency>
<groupId>org.springframework.boot</groupId>
<artifactId>spring-boot-starter-test</artifactId>
</dependency>
<dependency>
<groupId>org.springframework.cloud</groupId>
<artifactId>spring-cloud-starter-netflix-hystrix</artifactId>
</dependency>
<dependency>
<groupId>org.springframework.cloud</groupId>
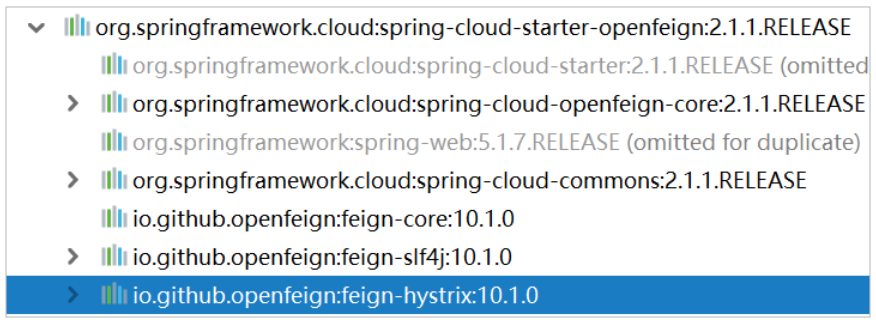
<artifactId>spring-cloud-starter-openfeign</artifactId>
</dependency>
</dependencies>
</project>
The project structure is as follows:
4.3.2. Code writing
Starter:
@SpringCloudApplication
@EnableFeignClients //Enable feign function
public class ConsumerApplication {
    public static void main(String[] args) {
        SpringApplication.run(ConsumerApplication.class, args);
    }

    @Bean
    @LoadBalanced
    public RestTemplate restTemplate() {
        return new RestTemplate();
    }
}
Spring provides a RestTemplate template tool class, encapsulates the HTTP based client, and implements the serialization and deserialization of objects and json, which is very convenient. RestTemplate does not limit the HTTP client type, but abstracts it. Currently, three commonly used types are supported:
- HTTPClient
- OkHTTP
- JDK native URLConnection (default)
Entity class
@Data
public class User {

    // id
    private Long id;

    // user name
    private String userName;

    // password
    private String password;

    // full name
    private String name;

    // Age
    private Integer age;

    // Gender, 1 male, 2 female
    private Integer sex;

    // date of birth
    private Date birthday;

    // Creation time
    private Date created;

    // Update time
    private Date updated;

    // remarks
    private String note;
}
controller
@RestController
@RequestMapping("/consumer")
public class ConsumerController {

    @Autowired
    private RestTemplate restTemplate;

    @GetMapping("/{id}")
    public String queryById(@PathVariable Long id) {
        String url = "HTTP://localhost:9091/user/" + id;
        return restTemplate.getForObject(url, String.class);
    }
}
4.3.3. Start up test:
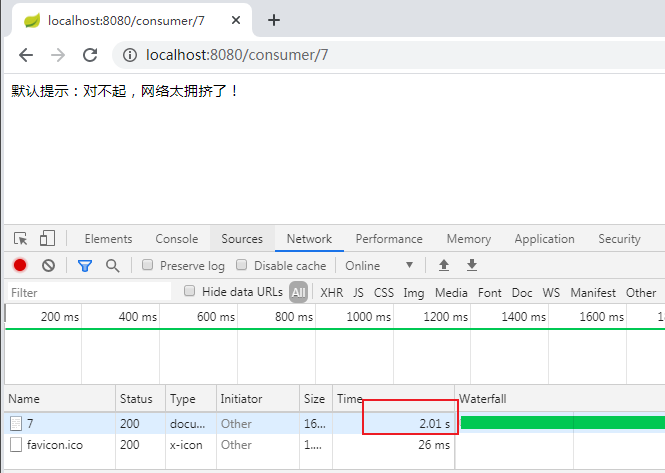
Because we do not configure ports, the default is 8080. We visit: http://localhost:8080/consume/7

A simple remote service invocation case is implemented.
5.4. Thinking
Briefly review what we just wrote:
- User service: provides an external interface for querying users
- Consumer Demo: accessed through RestTemplate http://locahost:9091/user/ {id} interface, what is the problem with querying user data?
- In the consumer, we hard code the url address into the code, which is not convenient for later maintenance
- The consumer needs to remember the address of the user service. If there is a change, it may not be notified, and the address will become invalid
- The consumer does not know the status of the user service, nor does it know that the service is down
- There is only one user service, which is not highly available
- Even if user services form clusters, consumer s need to achieve load balancing by themselves
In fact, the problems mentioned above are the problems that distributed services must face:
- Service management
1. How to automatically register and discover
2. How to realize status supervision
3. How to implement dynamic routing - How do services achieve load balancing
- How does the service solve the problem of disaster recovery
- How to realize unified configuration of services
All the above questions will be answered in spring cloud.
6.Eureka registry
6.1 introduction to Eureka
problem analysis
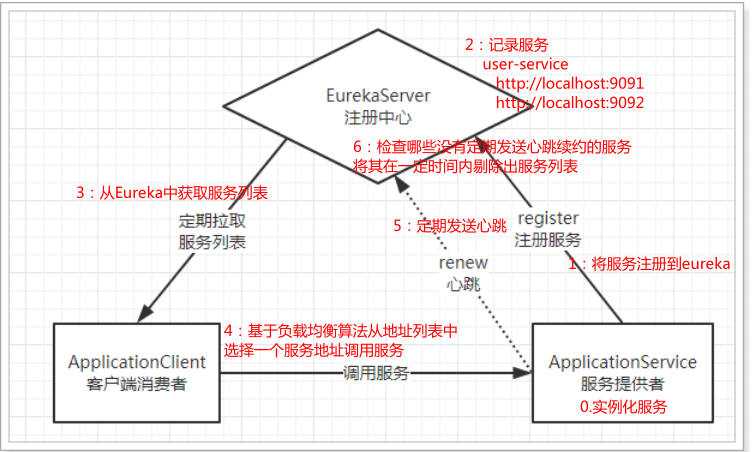
In the case just now, the user service needs to expose its address when providing services externally. The consumer (caller) needs to record the address of the service provider. If the address changes in the future, it needs to be updated in time. This doesn't seem to matter when there are few services, but in today's increasingly complex Internet environment, a project will certainly split into more than a dozen or even dozens of micro services. At this time, if you still manage the address artificially, it will not only be difficult to develop, but also very troublesome to test, release and go online in the future, which runs counter to the idea of DevOps.
Online car Hailing
This is like before the emergence of online car hailing, people can only call a taxi when they go out to call a car. Some private cars want to rent but are not qualified. They are called black cars. Many people want to make an appointment, but there are too few taxis, which is inconvenient. There are a lot of private cars, but they dare not stop, and there are cars all over the street. Who knows which one is willing to carry people. One wants and the other is willing to give, which is the lack of introduction and management.
At this time, an online car Hailing platform like didi appears. All private cars that want to carry passengers register with didi and record your model (service type) and identity information (contact information). Such private cars can be found in didi at a glance.
At this time, the person who wants to call a car only needs to open the APP, enter your destination, select the model (service type), and didi will automatically arrange a car that meets the needs to serve you. Perfect!
What does Eureka do?
Eureka is like Didi, responsible for managing and recording the information of service providers. Service callers do not need to find services themselves, but tell Eureka their needs, and Eureka will tell you the services that meet your needs.
At the same time, the service provider and Eureka are monitored through the "heartbeat" mechanism. When a service provider has a problem, Eureka will naturally remove it from the service list.
This realizes the automatic registration, discovery and status monitoring of services.
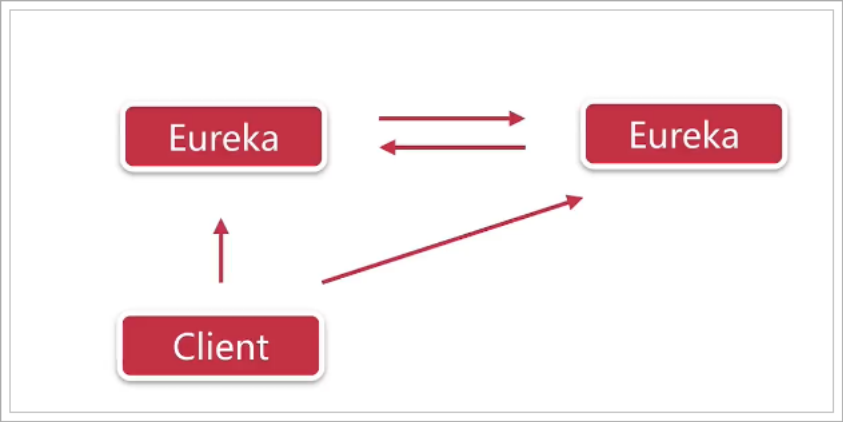
6.2. Schematic diagram
Basic architecture:
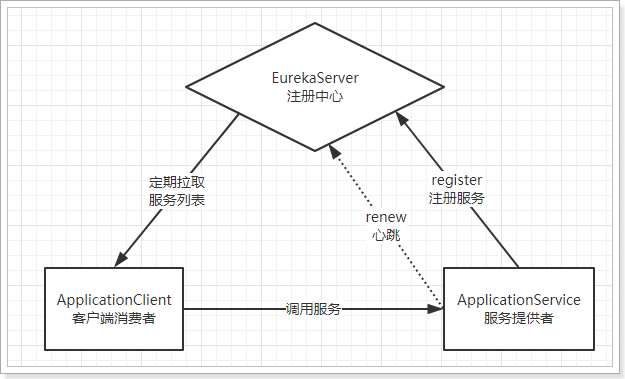
- Eureka: it's a service registry (which can be a cluster) that exposes its own address
- Provider: register your information with Eureka after startup (address, what services to provide)
- Consumer: subscribe to the service from Eureka. Eureka will send the address list of all providers of the corresponding service to consumers and update it regularly
- Heartbeat (renewal): the provider periodically updates its status to Eureka through HTTP
6.3. Introduction cases
6.3.1. Write EurekaServer
Eureka is a service registration center, which only does service registration; It does not provide services or consume services. You can build Web projects using Eureka or Spring Boot.
pom.xml
<?xml version="1.0" encoding="UTF-8"?>
<project xmlns="http://maven.apache.org/POM/4.0.0"
         xmlns:xsi="http://www.w3.org/2001/XMLSchema-instance"
         xsi:schemaLocation="http://maven.apache.org/POM/4.0.0 http://maven.apache.org/xsd/maven-4.0.0.xsd">
    <parent>
        <artifactId>lxs-springcloud</artifactId>
        <groupId>com.lxs</groupId>
        <version>1.0-SNAPSHOT</version>
    </parent>
    <modelVersion>4.0.0</modelVersion>

    <artifactId>eureka-server</artifactId>

    <dependencies>
        <dependency>
            <groupId>org.springframework.cloud</groupId>
            <artifactId>spring-cloud-starter-netflix-eureka-server</artifactId>
        </dependency>
    </dependencies>

</project>
Write startup class:
@SpringBootApplication
@EnableEurekaServer
public class EurekaServerApplication {
    public static void main(String[] args) {
        SpringApplication.run(EurekaServerApplication.class, args);
    }
}
Write configuration:
server:
  port: 10086
spring:
  application:
    name: eureka-server
eureka:
  client:
    service-url:
      # The address of the eureka service. For clustering, you need to specify other eureka addresses
      defaultZone: http://127.0.0.1:10086/eureka
    #Don't register yourself
    register-with-eureka: false
    #No pull service
    fetch-registry: false
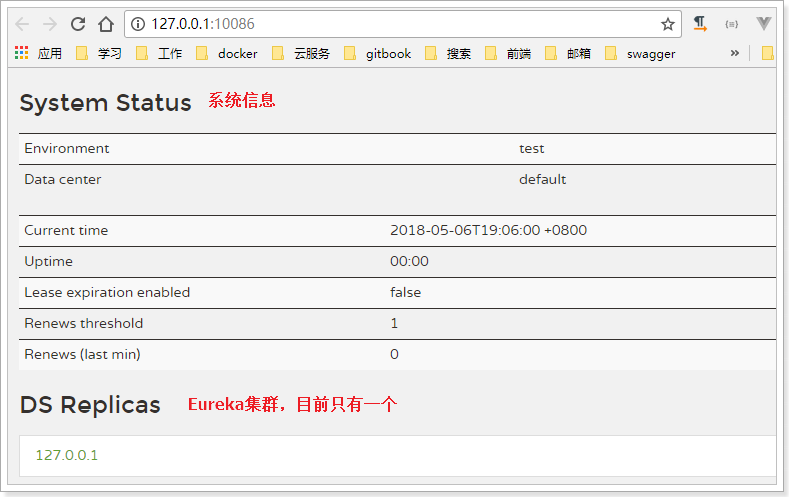
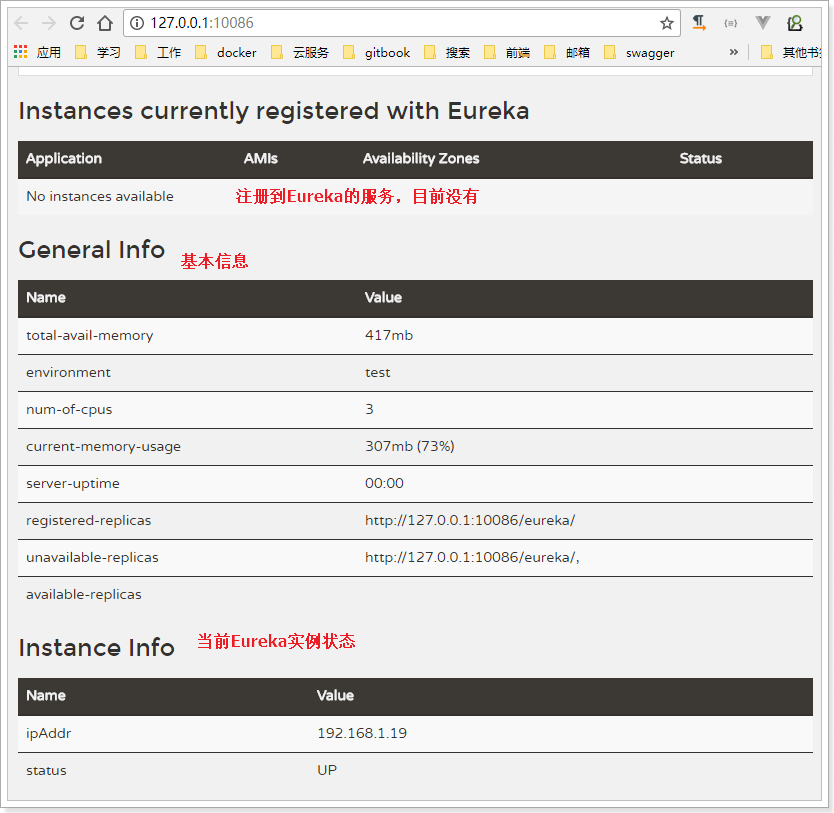
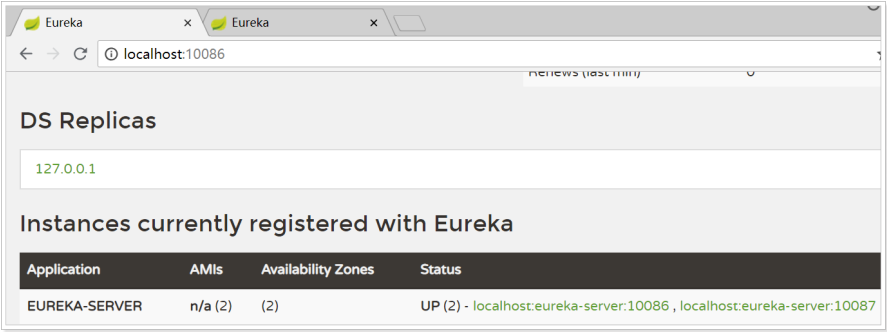
Start the service and access: http://127.0.0.1:10086/
6.3.2. Service registration
Add Eureka client dependency on the service providing project user service; Automatically register the service with EurekaServer service address list.
Add dependency
<!-- Eureka client -->
<dependency>
	<groupId>org.springframework.cloud</groupId>
	<artifactId>spring-cloud-starter-netflix-eureka-client</artifactId>
</dependency>
Enable Eureka client function on startup class
Enable Eureka client functionality by adding @ EnableDiscoveryClient
@SpringBootApplication
@MapperScan("com.lxs.user.mapper")
@EnableDiscoveryClient //Enable Eureka client discovery
public class UserApplication {
    public static void main(String[] args) {
        SpringApplication.run(UserApplication.class, args);
    }
}
Write configuration
server:
	port: 9091
Srping:
	datasource:
		driver-class-name: com.mysql.jdbc.Driver
		url: jdbc:mysql://localhost:3306/springcloud
		username: root
		password: root
	application:
		name: user-service
mybatis:
	type-aliases-package: com.lxs.user.pojo
eureka:
	client:
	service-url:
		defaultZone: HTTP://127.0.0.1:10086/eureka
be careful:
- Here, we added the spring.application.name attribute to specify the application name, which will be used as the application id in the future.
- Do not specify register with Eureka and fetch registry, because the default is true
Restart project, access http://127.0.0.1:10086/eureka Page view
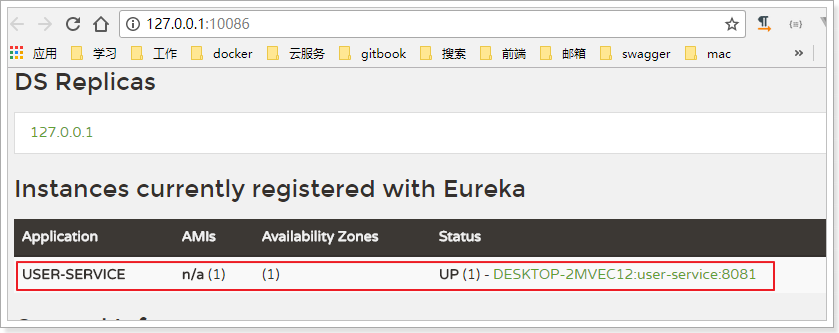
We found that the user service service has been registered successfully
6.3.3. Service discovery
Add Eureka client dependency on the consumer demo of the service consumption project; You can use the tool class DiscoveryClient to obtain the corresponding service address list according to the service name.
1) Add dependency:
<!-- Eureka client -->
<dependency>
	<groupId>org.springframework.cloud</groupId>
	<artifactId>spring-cloud-starter-netflix-eureka-client</artifactId>
</dependency>
2) Add the annotation to start Eureka client discovery in the startup class
@SpringBootApplication
@EnableDiscoveryClient //Enable Eureka client discovery
@EnableCircuitBreaker //Open fuse
public class ConsumerApplication {
    public static void main(String[] args) {
        SpringApplication.run(ConsumerApplication.class, args);
    }

    @Bean
    @LoadBalanced
    public RestTemplate restTemplate() {
        return new RestTemplate();
    }
}
3) Modify configuration:
spring:
  application:
    name: consumer-demo
eureka:
  client:
    service-url:
      defaultZone: http://127.0.0.1:10086/eureka
4) Modify the code and use the method of DiscoveryClient class to obtain the service instance according to the service name:
@RestController
@RequestMapping("/consumer")
public class ConsumerController {
@Autowired
private RestTemplate restTemplate;
@Autowired
private DiscoveryClient discoveryClient;
@GetMapping("/{id}")
public String queryById(@PathVariable Long id) {
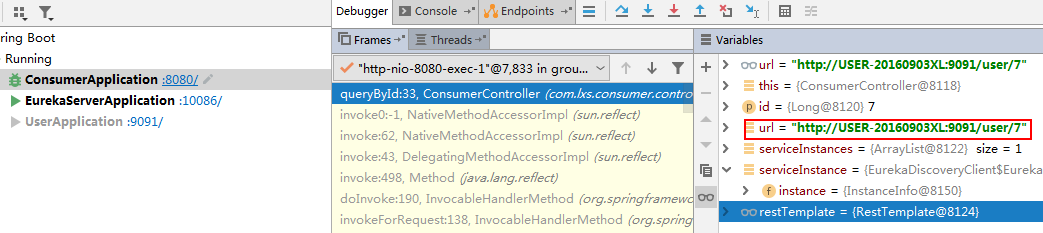
String url = "http://localhost:9091/user/" + id;
List<ServiceInstance> serviceInstances = discoveryClient.getInstances("user-service");
ServiceInstance serviceInstance = serviceInstances.get(0);
url = "http://" + serviceInstance.getHost() + ":" + serviceInstance.getPort() + "/user/" + id;
return restTemplate.getForObject(url, User.class);
}
}
5) Debug trace run:
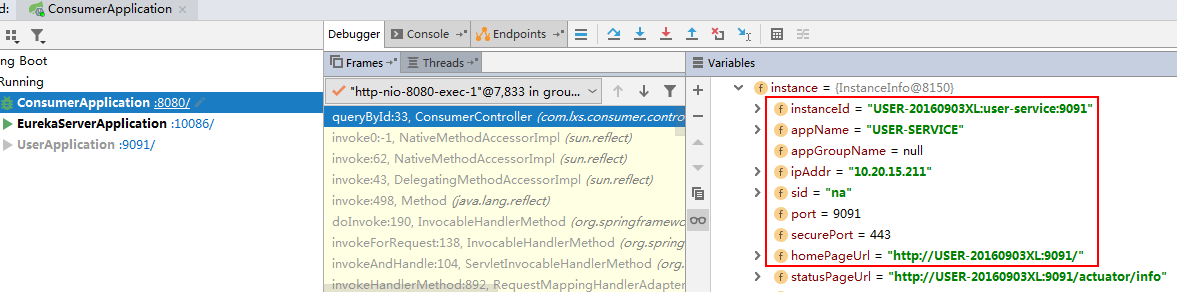
Generated URL:
Access results:

6.4. Detailed explanation of Eureka
Next, we will explain the principle and configuration of Eureka in detail.
6.4.1. Infrastructure
Three core roles in Eureka architecture:
- Service registry
Eureka's server application, which provides service registration and discovery functions, is the Eureka server we just established - Service provider
The applications that provide services can be Spring Boot applications or any other technology implementation, as long as they provide REST style services. In this example, we implement the user service - Service consumers
The consumer application obtains the service list from the registry, so as to know the information of each service provider and where to call the service provider. In this example, we implement the consumer demo
6.4.2. Highly available Eureka Server
Eureka Server is the service registry. In the case just now, we only have one Eureka Server. In fact, Eureka Server can also be a cluster to form a highly available Eureka center.
Eureka Server is a web application that can start multiple instances (configure different ports) to ensure high availability of Eureka Server.
Service synchronization
Multiple Eureka servers will also register as services. When the service provider registers with a node in the Eureka Server cluster, the node will synchronize the service information to each node in the cluster, so as to realize data synchronization. Therefore, no matter the client accesses any node in the Eureka Server cluster, it can obtain the complete service list information.
As a client, you need to register the information in each Eureka
If there are three Eureka servers, each Eureka server needs to register with several other Eureka services.
For example, if three are 10086, 10087 and 10088 respectively, then:
- 10086 to register on 10087 and 10088
- 10087 to register on 10086 and 10088
- 10088 to register on 10086 and 10087
Build a highly available Eureka server
Suppose we want to build two Eureka server clusters with ports 10086 and 10087 respectively
1) We modified the original EurekaServer configuration:
server:
	port: ${port:10086}
spring:
	application:
		name: eureka-server
eureka:
	client:
		#The service address of eureka. If it is a cluster, you need to specify the eureka address of other clusters
		service-url:
			defaultZone: ${defaultZone:http://127.0.0.1:10086/eureka}
			# Don't register yourself
			#register-with-eureka: false
			# Do not grab service
			#fetch-registry: false
The so-called high availability registry actually registers EurekaServer itself as a service, so that multiple eurekaservers can find each other and form a cluster. Therefore, we have made the following modifications:
- The two configurations register with Eureka = false and fetch registry = false are deleted. Because the default value is true, you will register yourself in the registry.
- Change the value of the service URL to the address of another Eureka server instead of your own
2) The other can specify port and defaultZone configuration when starting:
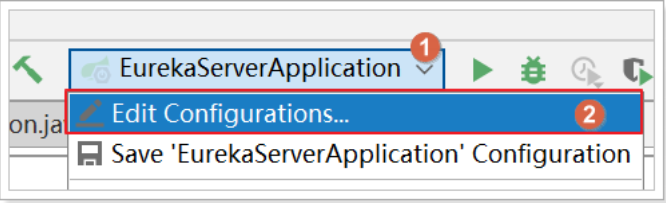
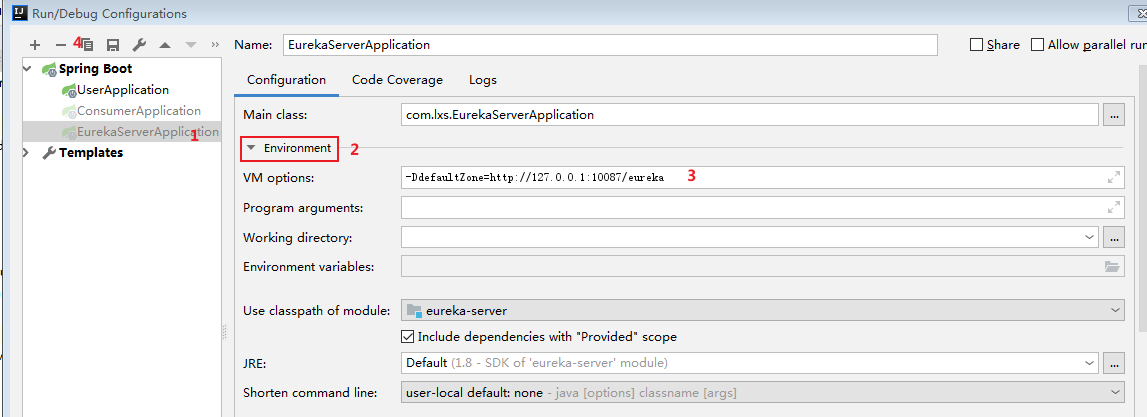
Modify the original startup configuration component; In VM options in the following interface
Setting - DdefaultZone=http:127.0.0.1:10087/eureka
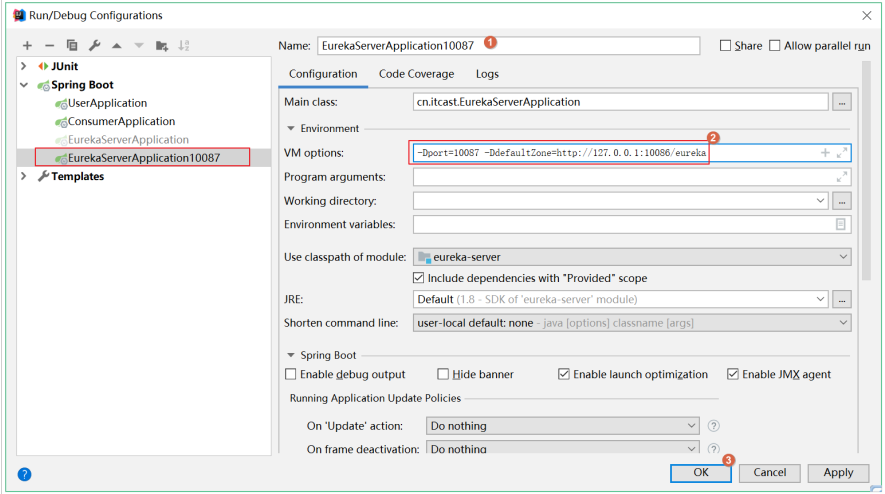
Make a copy and modify it; Set - Dport=10087 - DdefaultZone=http:127.0.0.1:10086/eureka in VM options in the following interface
3) Start up test; Start two Eureka servers at the same time
4) The client registers the service to the cluster
Since there is more than one EurekaServer, the service URL parameter needs to be changed when registering the service:
eureka:
	client:
		service-url: # EurekaServer address. Multiple addresses are separated by ','
			defaultZone: http://127.0.0.1:10086/eureka,http://127.0.0.1:10087/eureka
In order to facilitate the class and the following content modification, you can change back to a single eureka server after testing the above configuration.
6.4.3.Eureka client and server configuration
In this section, we perform a series of configurations:
The service provider should register the service with EurekaServer and complete service renewal.
Service registration
When the service provider starts, it will check whether the parameter Eureka. Client. Register with erueka = true in the configuration attribute is true. In fact, the default is true. If the value is true, it will send a Rest request to EurekaServer and carry its own metadata information. EurekaServer will save these information in a double-layer Map structure.
- The Key of the first layer Map is the service id, which is generally the spring.application.name attribute and user service in the configuration
- The key of the second layer Map is the instance id of the service. General host+ serviceId + port, for example: localhost: User Service: 8081
- Value is the instance object of the service, that is, a service. In this way, multiple different instances can be started at the same time to form a cluster.
By default, the host name or localhost is used for registration. If you want to register with ip, you can add the following configuration in user service:
eureka:
	instance:
		ip-address: 127.0.0.1 # ip address
		prefer-ip-address: true # Prefer to use ip rather than host name
After modification, restart user service and consumer demo successively; It becomes an ip address when calling the service; It should be noted that the console service instance status is not displayed in eureka.
Service renewal
After the registration service is completed, the service provider will maintain a heartbeat (regularly send a Rest request to EurekaServer) and tell EurekaServer: "I'm still alive". This is what we call service renew al;
There are two important parameters that can modify the behavior of service renewal; You can add the following configuration items in user service:
eureka:
	instance:
		lease-expiration-duration-in-seconds: 90
		lease-renewal-interval-in-seconds: 30
- Lease renewal interval in seconds: the interval of service renewal. The default is 30 seconds
- Lease expiration duration in seconds: the default value is 90 seconds
In other words, by default, the service will send a heartbeat to the registry every 30 seconds to prove that it is still alive. If no heartbeat is sent for more than 90 seconds, EurekaServer will consider the service down and remove it from the service list. These two values need not be modified in the production environment, but can be modified by default.
Get service list
When the service consumer starts, it will detect the value of the Eureka. Client. Fetch registry = true parameter. If it is true, it will pull a read-only backup from the list of Eureka Server services and cache it locally. And the data will be pulled and updated every 30 seconds. You can modify the following parameters in the consumer demo project
eureka:
	client:
		registry-fetch-interval-seconds: 30
In the production environment, we do not need to modify this value.
However, in order to quickly get the latest status of services in the development environment, we can set it smaller.
6.4.5. Failure elimination and self-protection
The following configurations are performed on the Eureka Server server server:
Service offline
When the service is shut down normally, it will trigger a REST request for service offline to Eureka Server and tell the service registry: "I'm going offline". After receiving the request, the service center will set the service to offline status
Failure elimination
Sometimes our service may not work normally due to memory overflow or network failure, and the service registry has not received the request for "service offline". Compared with the "service renewal" operation of the service provider, the service registry will create a scheduled task when starting. By default, the services in the current list that have timed out (90 seconds by default) and have not renewed will be rejected every other period of time (60 seconds by default). This operation is called invalidation rejection. You can modify it through the eureka.server.eviction-interval-timer-in-ms parameter. The unit is milliseconds.
Self protection
When we shut down a service, we will see a warning on the Eureka panel:

This triggered Eureka's self-protection mechanism. When a service fails to renew its heartbeat on time, Eureka will count whether the proportion of service instances with heartbeat failure in the last 15 minutes exceeds 85%. When Eureka server node loses too many clients in a short time (network partition failure may occur). In the production environment, due to network delay and other reasons, the proportion of heartbeat failure instances is likely to exceed the standard, but it is not appropriate to remove the service from the list at this time, because the service may not be down. Eureka will protect the registration information of the current instance and will not eliminate it. This is effective in a production environment, ensuring that most services are still available.
However, this brings trouble to our development, so we will turn off the self-protection mode in the development stage:
eureka:
	server:
		enable-self-preservation: false # Turn off self-protection mode (on by default)
		eviction-interval-timer-in-ms: 1000 # Scan the interval between failed services (60*1000ms by default)
Summary:
- user-service
eureka:
	client:
		service-url:
			defaultZone: http://127.0.0.1:10086/eureka
	instance:
		# Prefer ip addresses to host names
		prefer-ip-address: true
		# ip address
		ip-address: 127.0.0.1
		# Renewal interval: 30 seconds by default
		lease-renewal-interval-in-seconds: 5
		# Service failure time, 90 seconds by default
		lease-expiration-duration-in-seconds: 5
- consumer-demo
eureka:
	client:
		service-url:
			defaultZone: http://127.0.0.1:10086/eureka
		# The interval between obtaining the service address list is 30 seconds by default
		registry-fetch-interval-seconds: 10
- eureka-server
eureka:
	server:
		# Service failure elimination interval: 60 seconds by default
		eviction-interval-timer-in-ms: 60000
		# Turn off self-protection mode (on by default)
		enable-self-preservation: false
7. Load balancing Ribbon
In the case just now, we started a user service, then obtained the service instance information through the discovery client, and then obtained the ip and port for access.
However, in the actual environment, we often start many user service clusters. At this point, there will be multiple services in the service list. Which one should we access?
Generally, in this case, we need to write a load balancing algorithm to select from multiple instance lists.
However, Eureka has helped us integrate the load balancing component: Ribbon, which can be used simply by modifying the code.
What is Ribbon:

Next, let's use Ribbon to achieve load balancing.
7.1. Start two service instances
First, we start two user service instances, one 9091 and one 9092.
Configure the following ports in user service:
server:
	port: ${port:9091}
Configure the following in startup configuration
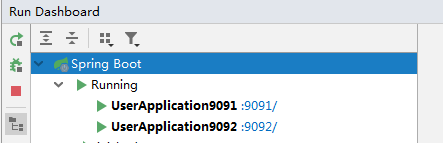
Eureka monitoring panel:

7.2. Turn on load balancing
Because Ribbon has been integrated in Eureka, we do not need to introduce new dependencies. Modify code directly:
Add @ LoadBalanced annotation on the configuration method of RestTemplate:
@Bean
@LoadBalanced
public RestTemplate restTemplate() {
	return new RestTemplate();
}
Modify the calling method. Instead of manually obtaining the ip and port, it is called directly through the service name:
@GetMapping("/{id}")
public User queryById(@PathVariable("id") Long id) {
	String url = "http://user-service/user/" + id;
	return restTemplate.getForObject(url, User.class);
}
Visit the page to view the results:

Perfect!
Visit the page to view the results; You can also view the execution status on the console of 9091 and 9092:
7.3. Source code tracking
Why can you access the service only by entering the service name? Also get the ip and port before.
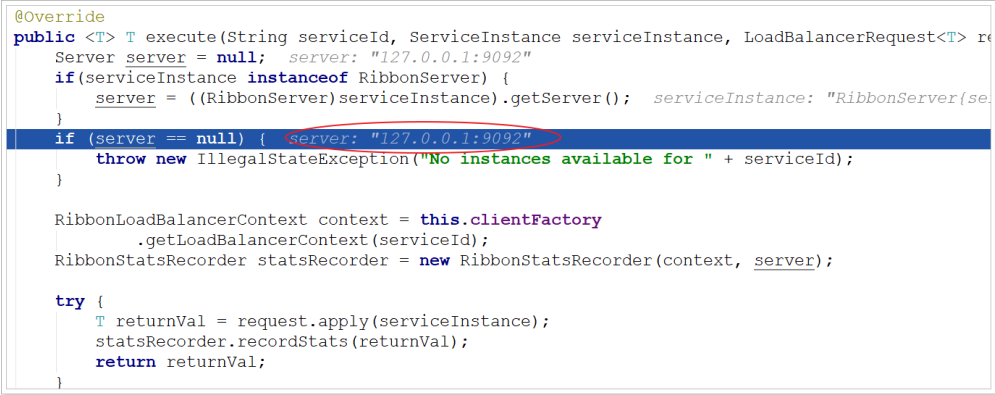
Obviously, a component obtains the ip and port of the service instance according to the service name. Because the consumer demo uses the RestTemplate, spring uses the LoadBalancerInterceptor interceptor. This class intercepts the RestTemplate request, then obtains the service list from Eureka according to the service id, and then uses the load balancing algorithm to obtain the real service address information and replace the service id.
We track the source code:
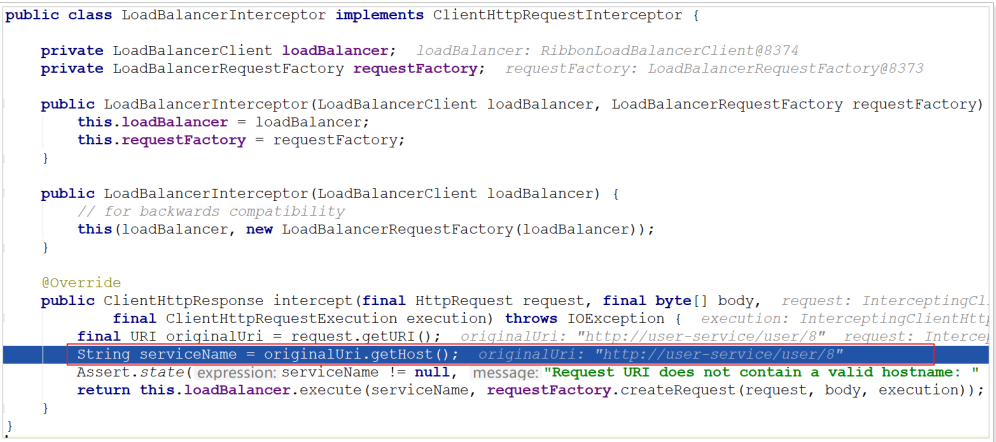
Continue to follow the execute method: it is found that the service obtained port 9092
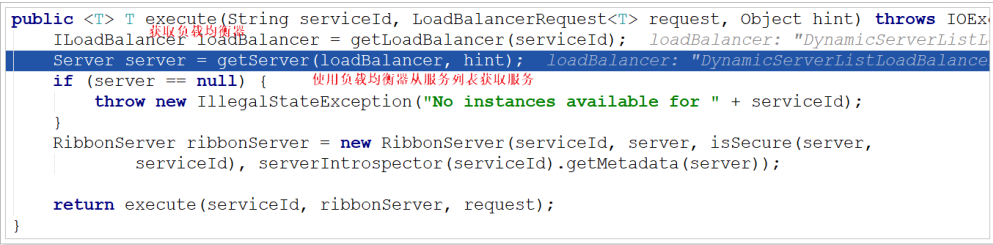
Next time, it is found that 9091 is obtained:
7.4. Load balancing strategy
The default load balancing policy of Ribbon is simple polling. We can test it:
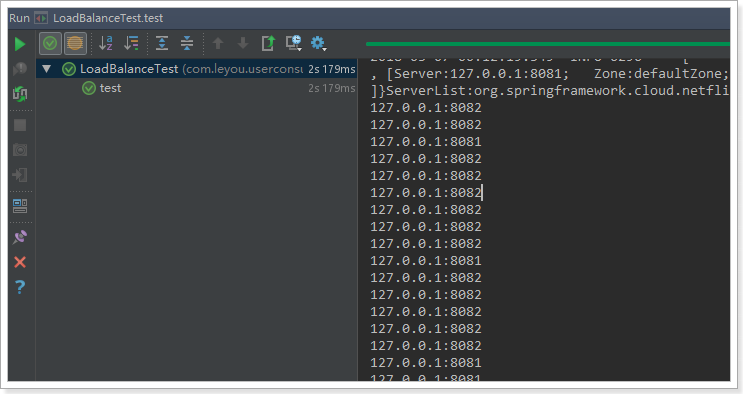
Write a test class. In the source code just now, we see that the RibbonLoadBalanceClient is used for load balancing in interception. There is a choose method, which is introduced as follows:
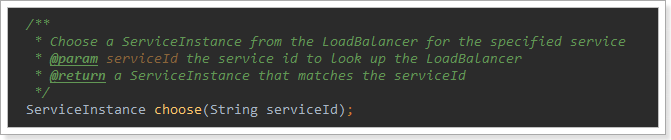
Now this is the method of load balancing to obtain instances.
We inject the object of this class, and then test it:
@RunWith(SpringRunner.class)
@SpringBootTest(classes = UserConsumerDemoApplication.class)
public class LoadBalanceTest {

    @Autowired
    private RibbonLoadBalancerClient client;

    @Test
    public void test() {
        for (int i=0; i < 100; i++) {
            ServiceInstance instance = client.choose("user-service");
            System.out.println(instance.getHost() + ":" + instance.getPort());
        }
    }

}
result:
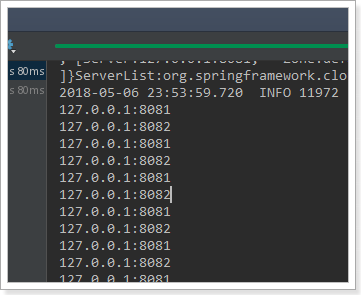
It is in line with our expectation and speculation. It is indeed a polling method.
SpringBoot also provides us with a configuration entry to modify load balancing rules:
user-service:
	ribbon:
		NFLoadBalancerRuleClassName: com.netflix.loadbalancer.RandomRule
The format is: {service name}. ribbon.NFLoadBalancerRuleClassName, and the value is the implementation class of IRule.
When tested again, it was found that the results became random:
8.Hystrix
8.1. Introduction
Home page: https://github.com/Netflix/Hystrix/
Hystix is an open source delay and fault tolerance Library of Netflix, which is used to isolate access to remote services and prevent cascading failures.
8.2. Avalanche problem
In microservices, the calling relationship between services is complex. A request may need to call multiple microservice interfaces to realize, which will form a very complex calling link:
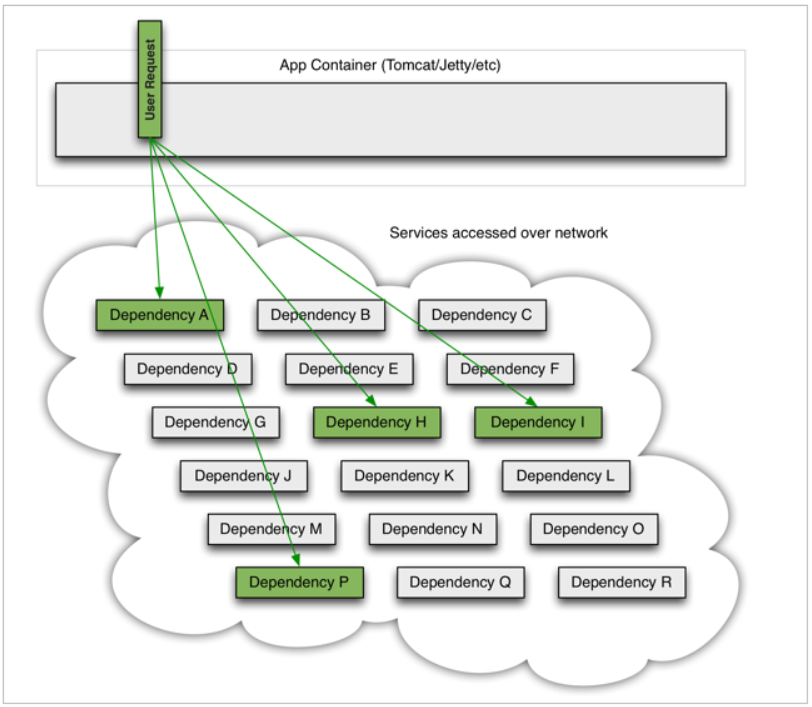
As shown in the figure, A business request needs to call four services A, P, H and I, which may call other services. If an exception occurs in A service at this time:
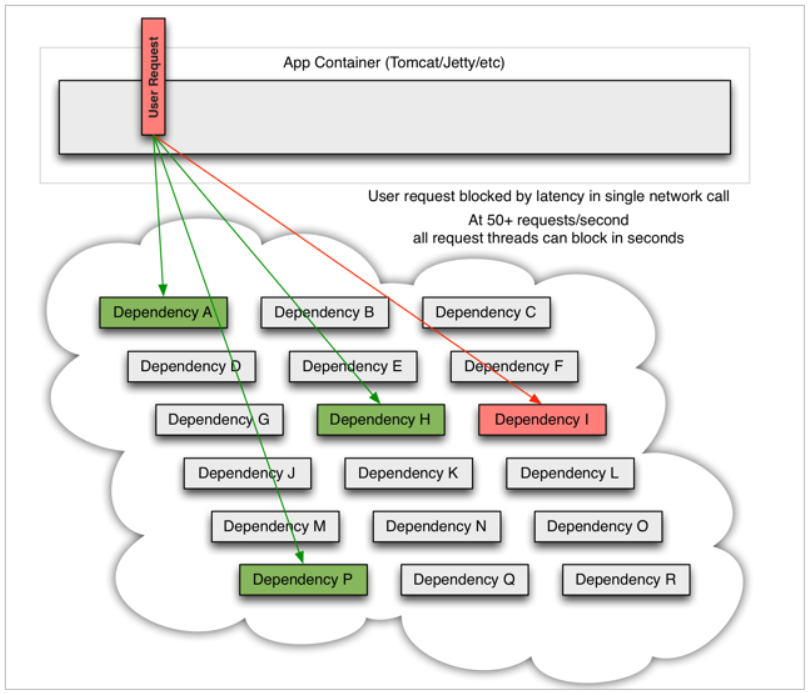
For example, if an exception occurs in microservice I and the request is blocked, the user request will not be responded to, and the thread of tomcat will not be released. Therefore, more and more user requests come and more threads will be blocked:
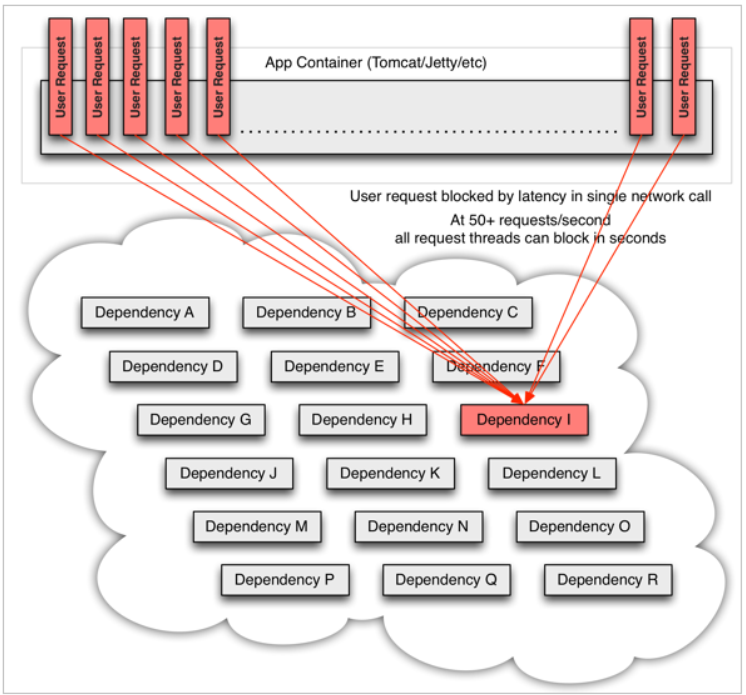
The number of threads and concurrency supported by the server is limited, and the requests are blocked all the time, which will lead to the depletion of server resources, resulting in the unavailability of all other services, forming an avalanche effect.
This is like an automobile production line that needs different parts to produce different cars. If a part cannot be used for various reasons, the whole car will not be able to assemble and fall into the state of waiting for parts. Assembly can not continue until the parts are in place. At this time, if many models need this part, the whole factory will fall into a waiting state, resulting in the paralysis of all production. The scope of a part is expanding.
The methods used by Hystrix to solve the avalanche problem mainly include:
- Thread isolation
- service degradation
8.3. Thread isolation & service degradation
8.3.1 principle
Thread isolation diagram
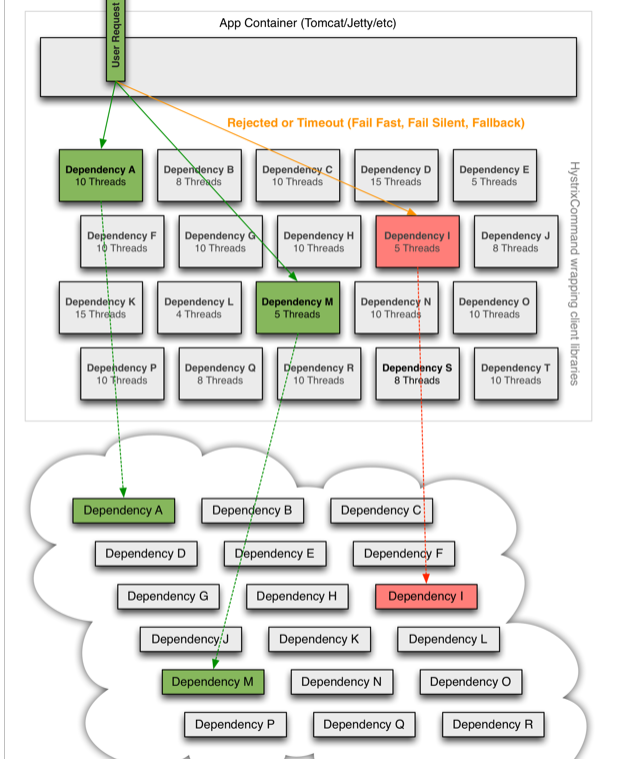
Interpretation:
- Hystrix allocates a small thread pool for each dependent service call. If the thread pool is full, the call will be rejected immediately. By default, queuing is not used to speed up the failure determination time.
- The user's request will no longer directly access the service, but through the idle thread in the thread pool. If the thread pool is full or the request times out, it will be degraded.
Service degradation: core services can be guaranteed first.
When the user's request fails, it will not be blocked, nor will it wait endlessly or see the system crash. At least one execution result can be seen (for example, return a friendly prompt).
Although service degradation will lead to request failure, it will not lead to blocking. At most, it will affect the resources in the thread pool corresponding to the dependent service and will not respond to other services. Conditions that trigger the degradation of the Hystrix service:
- Thread pool full
- request timeout
8.3.2. Hands on practice
Service degradation: timely return the result of service call failure, so that the thread will not be blocked by waiting for the service
- Introduce dependency
Add the following dependencies in the pom.xml file of the consumer demo consumer system:
<dependency>
	<groupId>org.springframework.cloud</groupId>
	<artifactId>spring-cloud-starter-netflix-hystrix</artifactId>
</dependency>
- Open fuse
Add a comment on the startup class ConsumerApplication: @ enablercircuitbreaker
@SpringBootApplication
@EnableDiscoveryClient
@EnableCircuitBreaker
public class ConsumerApplication {
	// ...
}
We can see that there are more and more annotations on our classes. The above three annotations are often introduced into micro services, so Spring provides a composite annotation: @ SpringCloudApplication
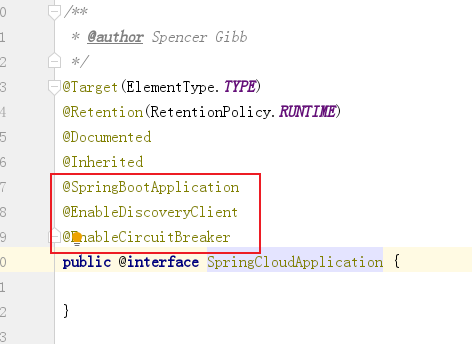
Therefore, we can use this combined annotation instead of the previous three annotations
@SpringCloudApplication
public class ConsumerApplication {
	// ...
}
- Write degradation logic
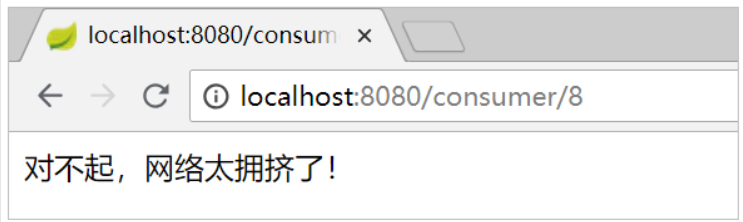
When the call of the target service fails, we hope to fail quickly and give the user a friendly prompt. Therefore, it is necessary to write the degradation processing logic in case of failure in advance, and use hystrix command to complete it.
Modify the ConsumerController.java processor class as follows:
@RestController
@RequestMapping("/consumer")
@Slf4j
public class ConsumerController {

    @Autowired
    private RestTemplate restTemplate;

    @Autowired
    private DiscoveryClient discoveryClient;

    @GetMapping("/{id}")
	@HystrixCommand(fallbackMethod = "queryByIdFallback")
    public String queryById(@PathVariable Long id) {

        String url = "http://user-service/user/" + id;
        return restTemplate.getForObject(url, String.class);
    }

    public String queryByIdFallback(Long id) {
        log.error("Failed to query user information. id: {}", id);
        return "Sorry, the Internet is too crowded!";
    }
}
- Pay attention to; Because the degraded logic method must guarantee the same parameter list and return value declaration as the normal logic method.
- The User object returned in the failure logic does not make much sense. Generally, a friendly prompt will be returned. Therefore, the method of queryById is transformed to return String, which is also Json data anyway. In this way, it is more convenient to return an error description in the failure logic.
explain:
- @HystrixCommand(fallbackMethod = "queryByIdFallBack"): method test used to declare a degraded logic:
Test:
When the user service provides services normally, the access is the same as before. However, when you shut down the user service, you will find that the page returns the degradation processing information:
- Default fallback
The fallback was written on a business method just now. If there are many such methods, wouldn't it be necessary to write a lot. Therefore, the fallback configuration can be added to the class to realize the default fallback; Transform ConsumerController.java again
@RestController
@RequestMapping("/consumer")
@Slf4j
@DefaultProperties(defaultFallback = "defaultFallback")
public class ConsumerController {

    @Autowired
    private RestTemplate restTemplate;

    @Autowired
    private DiscoveryClient discoveryClient;

    @GetMapping("/{id}")
//    @HystrixCommand(fallbackMethod = "queryByIdFallback")
    @HystrixCommand
    public String queryById(@PathVariable Long id) {
        if (id == 1) {
            throw new RuntimeException("Too busy");
        }

        String url = "http://user-service/user/" + id;
        return restTemplate.getForObject(url, String.class);
    }

    public String queryByIdFallback(Long id) {
        log.error("Failed to query user information. id: {}", id);
        return "Sorry, the Internet is too crowded!";
    }

    public String defaultFallback() {
        return "Default prompt: sorry, the network is too crowded!";
    }
}
@DefaultProperties(defaultFallback = "defaultFallBack"): indicates the unified failure degradation method on the class; The return type of all methods in this class should be consistent with the return type of the failed method.

- Timeout setting
In the previous case, the request will return an error message after more than 1 second. This is because the default timeout of Hystrix is 1. We can modify this value through configuration; Modify consumer demo \ SRC \ main \ resources \ application.yml and add the following configuration:
hystrix:
  command:
    default:
      execution:
        isolation:
          thread:
            timeoutInMilliseconds: 2000 #Service degradation timeout
This configuration applies to all global methods. To facilitate copying to the yml configuration file, you can copy
hystrix.command.default.execution.isolation.thread.timeoutInMilliseconds=2000 will be automatically formatted in the yml file and then modified.
To trigger timeout, you can sleep for 2 seconds in the method of user service \ SRC \ main \ Java \ com \ LXS \ user \ service \ userservice.java;
@RequestMapping("/{id}")
public User queryById(@PathVariable("id") Long id) {
	try {
		Thread.sleep(2000);
	}catch (InterruptedException e) {
		e.printStackTrace();
	}
	return userService.queryById(id);
}
Test:
It can be found that the requested time has reached 2s +, which proves that the configuration is effective. If the modification time is modified to less than 2 seconds, it can be accessed normally.
8.4 service fuse
8.4.1 fusing principle
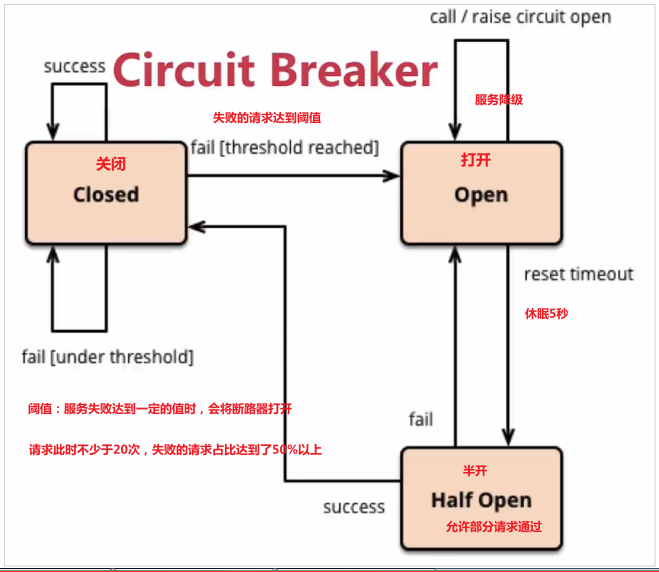
In service fusing, the fuse used is also called Circuit Breaker, and its English word is: Circuit Breaker fusing mechanism is similar to the circuit fusing principle used at home; In case of short circuit, the circuit can be fused immediately to avoid disaster. After the application service is fused in the distributed system; The service caller can judge which services are slow or have a large number of timeouts, and can actively fuse these services to prevent the whole system from being dragged down.
The service fuse mechanism of Hystrix can realize elastic fault tolerance; When the service request situation improves, it can be reconnected automatically. The subsequent requests are directly rejected by means of circuit breaking. After a period of time (5 seconds by default), some requests are allowed to pass. If the call is successful, the circuit breaker will return to the closed state. Otherwise, it will continue to open and reject the requested service.
Fuse state machine model of Hystrix:

The state machine has three states:
- Closed: closed state (circuit breaker closed), all requests are accessed normally.
- Open: open status (circuit breaker open), all requests will be degraded. Hystrix will count the request conditions. When the percentage of failed requests reaches the threshold within a certain time, it will trigger the fuse and the circuit breaker will be fully opened. The default threshold of failure ratio is 50%, and the number of requests is no less than 20.
- Half Open: Half Open state, not permanent. After the circuit breaker is opened, it will enter sleep time (5S by default). Then the circuit breaker will automatically enter the Half Open state. At this time, some requests will be released to pass. If these requests are healthy, the circuit breaker will be closed. Otherwise, it will remain open and sleep timing will be performed again.
Analysis diagram:
8.4.2 hands on practice
In order to accurately control the success or failure of the request, a section of logic is added to the processor business method of the consumer demo; Modify ConsumerController.java
@GetMapping("{id}")
@HystrixCommand
public String queryById(@PathVariable Long id) {
	if (id == 1) {
		throw new RuntimeException("Too busy");
	}
	String url = "http://user-service/user/" + id;
	String user = restTemplate.getForObject(url, String.class);
	return user;
}
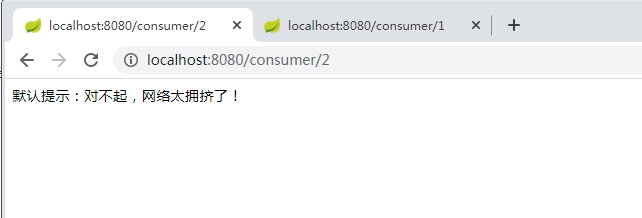
In this way, if the parameter id is 1, it will fail and all other cases will succeed( Don't forget to clear the sleep logic in the user service) we prepare two request windows:
-
A request: http://localhost:8080/consumer/1 , doomed to failure
-
A request: http://localhost:8080/consumer/2 , sure to succeed
When we madly access a request with id 1 (more than 20 times), a fuse will be triggered. The circuit breaker will open and all requests will be degraded.
At this time, when you access the request with id 2, you will find that the returned request also fails, and the failure time is very short, only about 20 milliseconds; Because 2 is OK after entering the half open state.
However, the default fusing trigger has high requirements and short sleep time window. For the convenience of testing, we can modify the fusing strategy through configuration:
hystrix:
  command:
    default:
      execution:
        isolation:
          thread:
            timeoutInMilliseconds: 2000 #Service degradation timeout
      circuitBreaker:
        errorThresholdPercentage: 50 # Trigger fusing error proportional threshold, default 50%
        sleepWindowInMilliseconds: 10000 # Sleep duration after fusing, the default value is 5 seconds
        requestVolumeThreshold: 10 # The minimum number of fuse trigger requests. The default value is 20
To facilitate copying the above configuration, you can use the following format to copy it into the yml file, which will be automatically formatted:
hystrix.command.default.circuitBreaker.requestVolumeThreshold=10
hystrix.command.default.circuitBreaker.sleepWindowInMilliseconds=10000
hystrix.command.default.circuitBreaker.errorThresholdPercentage=50
hystrix.command.default.execution.isolation.thread.timeoutInMilliseconds=2000
The above configuration items can refer to the HystrixCommandProperties class.
9.Feign
In the previous study, we used Ribbon's load balancing function to greatly simplify the code when calling remotely:
String baseUrl = "http://user-service/user/";
User user = this.restTemplate.getForObject(baseUrl + id, User.class)
If you learn this, you may need to write a lot of similar repetitive code in the future. The format is basically the same, but the parameters are different. Is there a more elegant way to optimize this code again?
This is the function of Feign we will learn next.
2.1. Introduction
Why camouflage?
Feign can hide the Rest request and disguise it as a Controller similar to spring MVC. You don't have to splice URLs, splice parameters and so on. Let feign do everything.
Project home page: https://github.com/OpenFeign/feign
2.2. Quick start
2.2.1. Import dependency
<dependency>
	<groupId>org.springframework.cloud</groupId>
	<artifactId>spring-cloud-starter-openfeign</artifactId>
</dependency>
2.2.2.Feign's client
@FeignClient("user-service")
public interface UserClient {
	//http://user-service/user/123
	@GetMapping("/user/{id}")
	User queryById(@PathVariable("id") Long id);
}
- First, this is an interface. Feign will help us generate implementation classes through dynamic proxies. This is very similar to Mybatis's mapper
- @FeignClient, declare that this is a Feign client, and specify the service name through the value attribute
- The methods defined in the interface completely adopt the annotations of spring MVC. Feign will help us generate URL s according to the annotations and access the results
- @/ user in GetMapping, please don't forget; Because Feign needs to splice accessible addresses
Write a new controller class ConsumerFeignController and use UserClient to access:
@RestController
@RequestMapping("/cf")
public class ConsumerFeignController {

    @Autowired
    private UserClient userClient;

    @GetMapping("/{id}")
    public User queryById(@PathVariable Long id) {
        return userClient.queryById(id);
    }
}
2.2.3. Enable Feign function
On the ConsumerApplication startup class, add an annotation to enable the Feign function
@SpringCloudApplication
@EnableFeignClients //Enable feign function
public class ConsumerApplication {
    public static void main(String[] args) {
        SpringApplication.run(ConsumerApplication.class, args);
    }

    @Bean
    @LoadBalanced
    public RestTemplate restTemplate() {
        return new RestTemplate();
    }
}
Ribbon load balancing has been automatically integrated in Feign, so you don't need to define your own RestTemplate for load balancing configuration.
2.2.4. Start up test:
Access interface: http://localhost:8080/cf/2

The results were obtained normally.
2.3. Load balancing
Ribbon dependency and automatic configuration have been integrated in Feign itself:
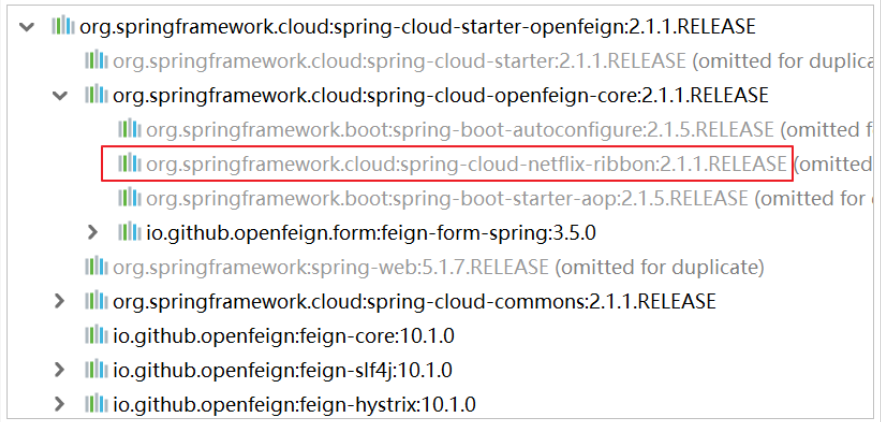
Therefore, there is no need to introduce additional dependencies and register the RestTemplate object.
The ribbon built in Fegin sets the request timeout length by default, which is 1000 by default. We can modify the timeout length through manual configuration:
ribbon:
	ReadTimeout: 2000 # Read timeout length
	ConnectTimeout: 1000 # Timeout for establishing link
Or specify for a specific service
user-service
	ribbon:
		ReadTimeout: 2000 # Read timeout length
		ConnectTimeout: 1000 # Timeout for establishing link
Add sleep time 2s test in user service
Because the ribbon has an internal retry mechanism, once it times out, it will automatically re initiate the request. If you do not want to retry, you can add a configuration:
Modify consumer demo \ SRC \ main \ resources \ application.yml and add the following configuration:
ribbon:
	ConnectTimeout: 1000 # Connection timeout duration
	ReadTimeout: 2000 # Data communication timeout duration
	MaxAutoRetries: 0 # Number of retries for the current server
	MaxAutoRetriesNextServer: 0 # How many service retries
	OkToRetryOnAllOperations: false # Do you want to retry all request methods
2.4.Hystrix support
Feign also integrates with Hystrix by default:
However, it is off by default. It needs to be enabled through the following parameters:
- Modify consumer demo \ SRC \ main \ resources \ application.yml and add the following configuration:
feign:
	hystrix:
		enabled: true # Turn on the fusing function of Feign
However, the Fallback configuration in Feign is not as simple as that in Ribbon.
- First, define a class to implement the UserFeignClient just written as the fallback processing class
@Component
public class UserClientFallback implements UserClient {

    @Override
    public User queryById(Long id) {
        User user = new User();
        user.setName("User exception");
        return user;
    }
}
- Then, in UserClient, specify the implementation class just written
@FeignClient(value = "user-service", fallback = UserFeignClientFallback.class)
public interface UserFeignClient {
	@GetMapping("/user/{id}")
	User queryUserById(@PathVariable("id") Long id);
}
- Restart test:
Restart, start the consumer demo and close the user service service, and then visit the following page: http://localhost:8080/cf/7

2.5. Request compression (understand)
Spring Cloud Feign supports GZIP compression of requests and responses to reduce performance loss during communication. The compression function of request and response can be enabled through the following parameters:
feign:
	compression:
		request:
			enabled: true # Turn on request compression
		response:
			enabled: true # Turn on response compression
At the same time, we can also set the requested data type and the lower limit of the size to trigger compression:
feign:
	compression:
		request:
			enabled: true # Turn on request compression
			mime-types: text/html,application/xml,application/json # Set compressed data type
			min-request-size: 2048 # Sets the lower limit of the size that triggers compression
Note: the above data type and the lower limit of compression size are the default values.
2.6. Log level (understand)
As mentioned earlier, set the log level through logging.level.lxs.xx=debug. However, this will not work for the Fegin client. Because a new instance of Fegin.Logger will be created when the client modified by the @ FeignClient annotation is proxy. We need to specify the level of this log.
- In the configuration file of consumer demo, set the log level under the com.lxs package to debug. Modify consumer-demo \ SRC \ main \ resources \ application.yml and add the following configuration:
logging:
	level:
		com.lxs: debug
- Write a configuration class to define the log level
@Configuration
public class FeignConfig {
    @Bean
    public Logger.Level feignLoggerLevel() {
    	//Record the details of all requests and responses, including header information, request body and metadata
        return Logger.Level.FULL;
    }
}
The Level specified here is FULL. Feign supports four levels:
- NONE: no log information is recorded, which is the default value.
- BASIC: only record the requested method, URL, response status code and execution time
- HEADERS: on the basis of BASIC, additional header information of request and response is recorded
- FULL: records the details of all requests and responses, including header information, request body and metadata.
- Specify the configuration class in the @ FeignClient annotation on the UserClient interface class of the consumer Demo:
Don't forget to remove the sleep time of user service
@FeignClient(value = "user-service", fallback = UserClientFallback.class, configuration = FeignConfig.class)
public interface UserClient {

    //String url = "http://user-service/user/" + id;
    @GetMapping("/user/{id}")
    public User queryById(@PathVariable Long id);

}
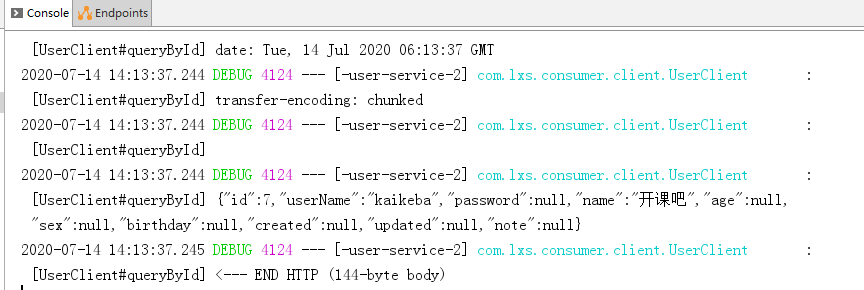
- Restart the project to see the log of each access:
10. Spring Cloud Gateway
10.1. Introduction
- Spring Cloud Gateway is a gateway service developed on the spring official website based on Spring 5.0, Spring Boot 2.0, Project Reactor and other technologies.
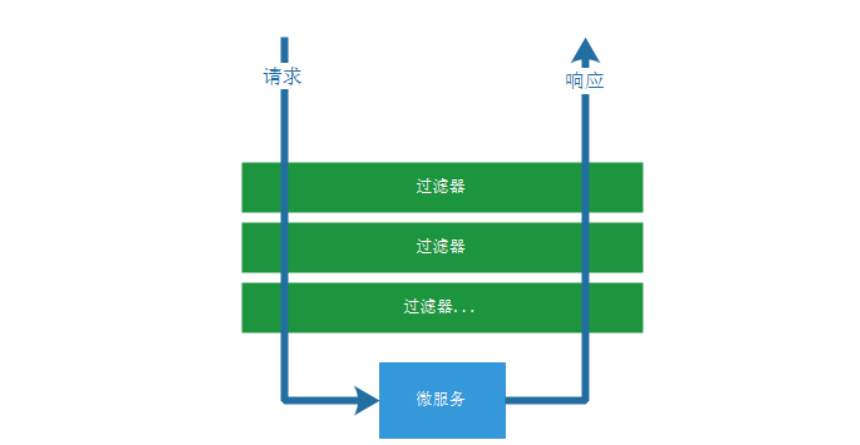
- Spring Cloud Gateway provides the basic functions of the gateway based on the Filter chain: security, monitoring / embedding point, current limiting, etc.
- Spring Cloud Gateway provides a simple, effective and unified API routing management method for microservice architecture.
- Spring Cloud Gateway is a solution to replace Netflix Zuul.
The core of the Spring Cloud Gateway component is a series of filters that can forward (route) requests sent by clients to corresponding microservices. Spring Cloud Gateway is a firewall and agent added at the forefront of the whole microservice to hide the IP port information of microservice nodes, so as to strengthen security protection. Spring Cloud Gateway itself is also a micro service, which needs to be registered with Eureka service registry.
The core functions of the gateway are: filtering and routing
10.2 architecture after gateway is added
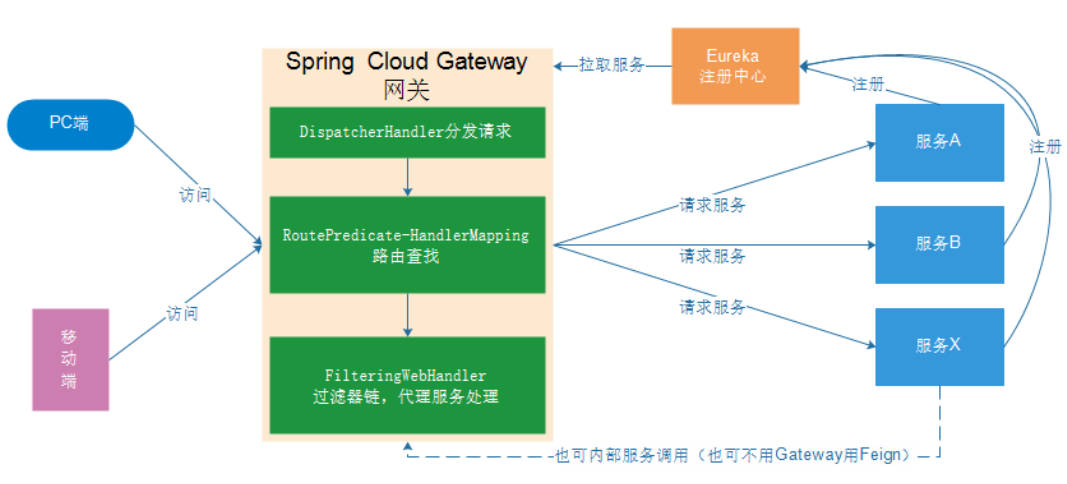
Whether it is a request from the client (PC or mobile terminal) or an internal call of the service. All requests for services can pass through the Gateway, and then the Gateway can realize authentication, dynamic routing and so on. The Gateway is the unified entrance to our services.
10.3. Core concepts
- Route: consists of an ID, a destination URL, a set of assertion factories, and a set of filters. If the route assertion is true, the request URL matches the configured route.
- Predicate the input type of the assertion function in the Spring Cloud Gateway is ServerWebExchange in the Spring 5.0 framework. The assertion function of Spring Cloud Gateway allows developers to define and match any information from HTTP Request, such as request header and parameters.
- Filter a standard Spring WebFilter. There are two types of filters in Spring Cloud Gateway: Gateway Filter and Global Filter. The filter will modify the request and response.
10.4. Quick start
Requirement: route the request containing / user to via the LXS gateway system http://127.0.0.1:9091/user/ User id
10.4.1. New construction

Open the LXS springcloud \ LXS gateway \ pom.xml file and modify it as follows:
<?xml version="1.0" encoding="UTF-8"?>
<project xmlns="http://maven.apache.org/POM/4.0.0"
xmlns:xsi="http://www.w3.org/2001/XMLSchema-instance"
xsi:schemaLocation="http://maven.apache.org/POM/4.0.0 http://maven.apache.org/xsd/maven-4.0.0.xsd">
<parent>
<artifactId>lxs-springcloud</artifactId>
<groupId>com.lxs</groupId>
<version>1.0-SNAPSHOT</version>
</parent>
<modelVersion>4.0.0</modelVersion>
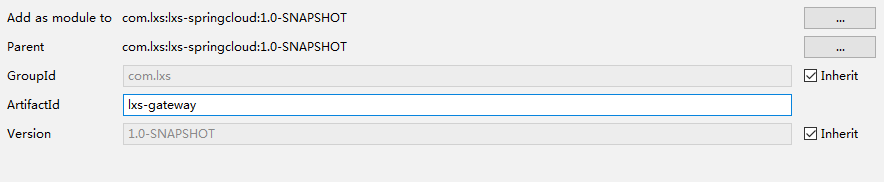
<artifactId>lxs-gateway</artifactId>
<dependencies>
<dependency>
<groupId>org.springframework.cloud</groupId>
<artifactId>spring-cloud-starter-gateway</artifactId>
</dependency>
<dependency>
<groupId>org.springframework.cloud</groupId>
<artifactId>spring-cloud-starter-netflix-eureka-client</artifactId>
</dependency>
</dependencies>
</project>
10.4.2. Write startup class
Create the com.lxs.gateway.GatewayApplication startup class in LXS gateway
@SpringBootApplication
@EnableDiscoveryClient //Enable eureka registration discovery function
public class GatewayApplication {
    public static void main(String[] args) {
        SpringApplication.run(GatewayApplication.class, args);
    }
}
10.4.2. Write configuration
Create the LXS gateway \ SRC \ main \ resources \ application.yml file as follows:
server:
  port: 10010
spring:
  application:
    name: api-gateway
eureka:
  client:
    service-url:
      defaultZone: http://127.0.0.1:10086/eureka
  instance:
    prefer-ip-address: true
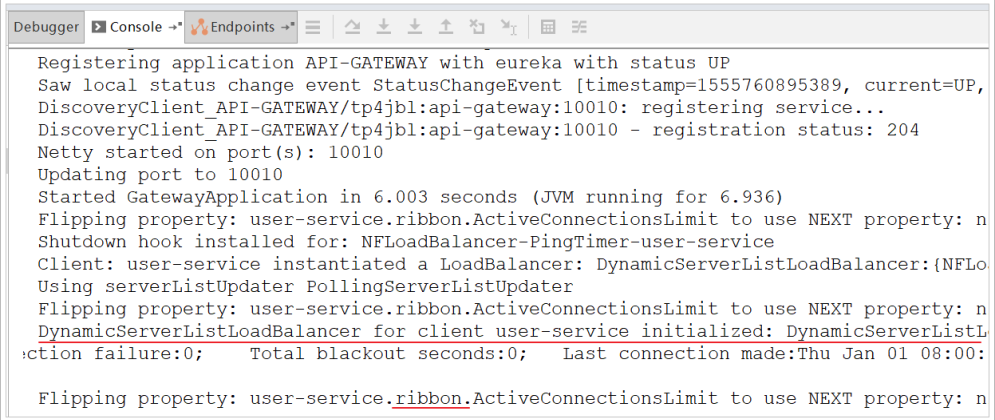
You need to use the gateway to proxy the user service. First look at the service status in the control panel:

- ip: 127.0.0.1
- Port: 9091
Modify the LXS gateway \ SRC \ main \ resources \ application.yml file to:
server:
  port: 10010
spring:
  application:
    name: api-gateway
  cloud:
    gateway:
      routes:
        #The id of the route can be arbitrary
        - id: user-service-rote
          #Proxy's microservice address
          #uri: http://127.0.0.1:9091
          uri: lb://user-service
          #Route assertion: mapping paths can be configured
          predicates:
            - Path=/api/user/**
eureka:
  client:
    service-url:
      defaultZone: http://127.0.0.1:10086/eureka
  instance:
    prefer-ip-address: true
All requests that conform to the Path rule are proxied to the address specified by the uri parameter. In this example, we will proxy requests starting with / user / * * in the Path to http://127.0.0.1:9091
10.4.5. Start up test
The mapping path of the configuration rule needs to be added to the access path. We access: http://localhost:10010/user/7

http://localhost:10010/user/7 -> http://localhost:9091/user/7
10.5. Service oriented routing
In the routing rule just now, the service address corresponding to the path is written dead! This is obviously unreasonable if there are multiple instances of the same service. According to the name of the service, go to Eureka registry to find the list of all instances corresponding to the service, and then conduct dynamic routing!
10.5.1. Modify the mapping configuration and obtain it through the service name
Modify the LXS gateway \ SRC \ main \ resources \ application.yml file as follows:
server:
  port: 10010
spring:
  application:
    name: api-gateway
  cloud:
    gateway:
      routes:
        #The id of the route can be arbitrary
        - id: user-service-rote
          #Proxy's microservice address
          #uri: http://127.0.0.1:9091
          uri: lb://user-service
          #Route assertion: mapping paths can be configured
          predicates:
            - Path=/api/user/**
eureka:
  client:
    service-url:
      defaultZone: http://127.0.0.1:10086/eureka
  instance:
    prefer-ip-address: true
When the protocol used in the uri in the routing configuration is lb (take uri: LB: / / user service as an example), the gateway will use the LoadBalancerClient to parse the user service into the actual host and port through eureka, and carry out ribbon load balancing.
10.5.2. Start up test
Start LXS gateway again. This time, when the gateway acts as an agent, it will use the Ribbon for load balancing access: http://localhost:10010/user/8 You can see from the log that the load balancer is used:
10.6. Routing prefix
If the request address of the client is inconsistent with the service address of the microservice, you can add and remove the path prefix by configuring the path filter.
Address of service provider: http://127.0.0.1:9091/user/8
-
Add prefix: add a prefix path to the request address and then use it as the service address of the agent;
http://127.0.0.1:10010/8 --> http://127.0.0.1:9091/user/8 Add prefix path / user -
Remove prefix: remove some prefix paths from the path in the request address, and then serve as the service address of the agent;
http://127.0.0.1:10010/api/user/8 --> http://127.0.0.1:9091/user/8 Remove prefix path / api
10.6.1. Add prefix
In the gateway, you can add the address in the mapping path by configuring the filter PrefixPath of the route;
Modify the LXS gateway \ SRC \ main \ resources \ application.yml file:
server:
  port: 10010
spring:
  application:
    name: api-gateway
  cloud:
    gateway:
      routes:
        #The id of the route can be arbitrary
        - id: user-service-rote
          #Proxy's microservice address
          #uri: http://127.0.0.1:9091
          uri: lb://user-service
          #Route assertion: mapping paths can be configured
          predicates:
            - Path=/api/user/**
          filters:
            # Add prefix to request path
            - PrefixPath=/user
eureka:
  client:
    service-url:
      defaultZone: http://127.0.0.1:10086/eureka
  instance:
    prefer-ip-address: true

PrefixPath=/xxx specifies the prefix to be added to the route. That is:
- PrefixPath=/user http://localhost:10010/8 -->http://localhost:9091/user/8
- PrefixPath=/user/abc http://localhost:10010/8 -->http://localhost:9091/user/abc/8
10.6.2. Remove prefix
In the gateway, the address in the mapping path can be removed by configuring the route filter StripPrefix;
Modify the LXS gateway \ SRC \ main \ resources \ application.yml file:
server:
  port: 10010
spring:
  application:
    name: api-gateway
  cloud:
    gateway:
      routes:
        #The id of the route can be arbitrary
        - id: user-service-rote
          #Proxy's microservice address
          #uri: http://127.0.0.1:9091
          uri: lb://user-service
          #Route assertion: mapping paths can be configured
          predicates:
            - Path=/api/user/**
          filters:
            # 1: Remove one path, 2: remove 2 paths, and so on
            - StripPrefix=1
eureka:
  client:
    service-url:
      defaultZone: http://127.0.0.1:10086/eureka
  instance:
    prefer-ip-address: true
The number of prefixes to be removed from the route is specified by StripPrefix=1. For example, the path / api/user/1 will be proxied to / user/1. That is:
- StripPrefix=1 http://localhost:10010/api/user/8 -->http://localhost:9091/user/8
- StripPrefix=2 http://localhost:10010/api/user/8 -->http://localhost:9091/8
and so on

10.7. Filter
10.7.1. Introduction
One of the important functions of Gateway is to realize the authentication of request. This action is often implemented through the filter provided by the Gateway. The functions in the previous routing prefix chapter are also implemented using filters.
The Gateway has dozens of built-in filters, and the common built-in filters are:
| Filter name | explain |
|---|---|
| AddRequestHeader | Add a Header to the matching request |
| AddRequestParameters | Add parameters to the request route on the match |
| AddResponseHeader | Add a Header for the response returned from the gateway |
| StripPrefix | Remove the prefix from the request path on the match |
Detailed description reference Official website link
Configure global default filters
server:
port: 10010
spring:
application:
name: api-gateway
cloud:
gateway:
routes:
#The id of the route can be arbitrary
- id: user-service-rote
#Proxy's microservice address
#uri: http://127.0.0.1:9091
uri: lb://user-service
#Route assertion: mapping paths can be configured
predicates:
- Path=/api/user/**
filters:
# 1: Remove one path, 2: remove 2 paths, and so on
- StripPrefix=1
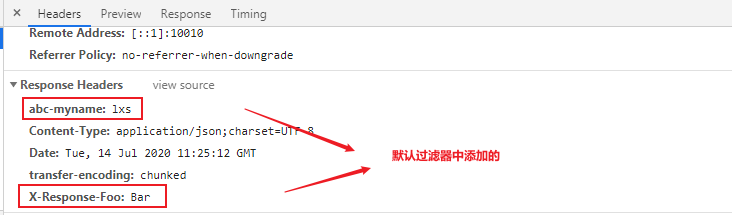
default-filters:
- AddResponseHeader=X-Response-Foo, Bar
- AddResponseHeader=myname, lxs
eureka:
client:
service-url:
defaultZone: http://127.0.0.1:10086/eureka
instance:
prefer-ip-address: true
After the above configuration, access http://localhost:10010/api/user/7 If necessary; The following information can be viewed from its response:
Filter type: there are two types of filters in Gateway implementation;
- Local filter: configured through spring.cloud.gateway.routes.filters under specific routes and only works on the current route;
If spring.cloud.gateway.default-filters is configured, it will take effect for all routes, which is also regarded as a global filter; However, the implementation of these filters is to implement the GatewayFilterFactory interface. - Global filter: it does not need to be configured in the configuration file and acts on all routes; Just implement the GlobalFilter interface.
10.7.2. Execution life cycle
The Filter life cycle of Spring Cloud Gateway is similar to that of Spring MVC. There are two interceptors: "pre" and "post"“ Pre "and" post "will be called after the request is executed and executed.
The pre and post here can be implemented before and after the filter method is executed by the GatewayFilterChain of the filter
10.7.3. Usage scenario
Common application scenarios are as follows:
- Request authentication: generally, before the GatewayFilterChain executes the filter method, if it is found that there is no access permission, it will directly return null.
- Exception handling: generally, after the GatewayFilterChain executes the filter method, the exception is recorded and returned.
- Statistics of service call duration: the gateway filterchain performs statistics according to the time before and after the filter method is executed.
10.8. Custom filter
10.8.1. Custom local filter
Requirements:
In the filter (MyParamGatewayFilterFactory) http://localhost:10010/api/user/8?name=lxs The value of the parameter name in is obtained and output to the console; And the parameter name is variable, that is, it may not always be name; You can configure the parameter name when configuring the filter.
Configure a filter for a route in application.yml. The filter can specify the value of the request parameter with the name in the console output configuration file.
- Write filter
@Component
public class MyParamGatewayFilterFactory extends AbstractGatewayFilterFactory<MyParamGatewayFilterFactory.Config> {

    public MyParamGatewayFilterFactory() {
        super(Config.class);
    }

    public List<String> shortcutFieldOrder() {
        return Arrays.asList("param");
    }

    @Override
    public GatewayFilter apply(Config config) {
        return (exchange, chain) -> {
            //http://localhost:10010/api/user/8?name=lxs config.param = name
            ServerHttpRequest request = exchange.getRequest();
            if (request.getQueryParams().containsKey(config.param)) {
                request.getQueryParams().get(config.param).forEach((v) -> {
                    System.out.printf("--Local filter--Get parameters %s = %s ----", config.param, v);
                });
            }

            return chain.filter(exchange); //Execute request
        };
    }


    //Read parameters of filter configuration
    public static class Config {
        //Corresponds to the filter parameters configured in the application.yml configuration file
        private String param;

        public String getParam() {
            return param;
        }

        public void setParam(String param) {
            this.param = param;
        }
    }

}
- Modify profile
server:
  port: 10010
spring:
  application:
    name: api-gateway
  cloud:
    gateway:
      routes:
        #The id of the route can be arbitrary
        - id: user-service-rote
          #Proxy's microservice address
          #uri: http://127.0.0.1:9091
          uri: lb://user-service
          #Route assertion: mapping paths can be configured
          predicates:
            - Path=/api/user/**
          filters:
            # 1: Remove one path, 2: remove 2 paths, and so on
            - StripPrefix=1
            - MyParam=name
      default-filters:
        - AddResponseHeader=X-Response-Foo, Bar
        - AddResponseHeader=myname, lxs
eureka:
  client:
    service-url:
      defaultZone: http://127.0.0.1:10086/eureka
  instance:
    prefer-ip-address: true
Note: the name of the custom filter should be * * * GatewayFilterFactory
Test access: http://localhost:10010/api/user/7?name=lxs Check whether the background outputs name and lxs; But if you visit http://localhost:10010/api/user/7?name2=kaikeba Will not be output
10.8.2. User defined global filter
Requirement: write a global filter and check whether the request carries the token request header in the filter. If the token request header exists, it will be released; If the token is empty or does not exist, set the returned status code as: unauthorized and no longer executed.
Write the global filter class MyGlobalFilter in the LXS Gateway project
@Component
public class MyGlobalFilter implements GlobalFilter, Ordered {

    @Override
    public Mono<Void> filter(ServerWebExchange exchange, GatewayFilterChain chain) {
        System.out.println("Global filter");
        String token = exchange.getRequest().getHeaders().getFirst("token");
        if (StringUtils.isBlank(token)) {
            exchange.getResponse().setStatusCode(HttpStatus.UNAUTHORIZED);
            return exchange.getResponse().setComplete();
        }

        return chain.filter(exchange);
    }

    @Override
    public int getOrder() {
        //The smaller the value, about the first execution
        return 1;
    }
}
visit http://localhost:10010/api/user/7
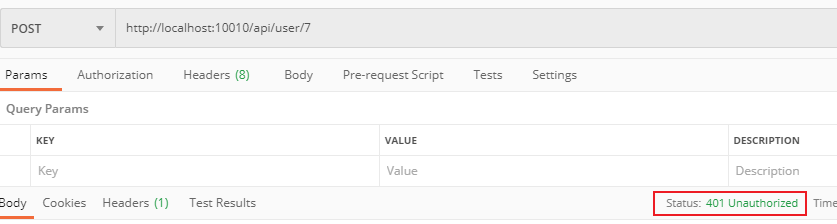
visit http://localhost:10010/api/user/7?token=abc
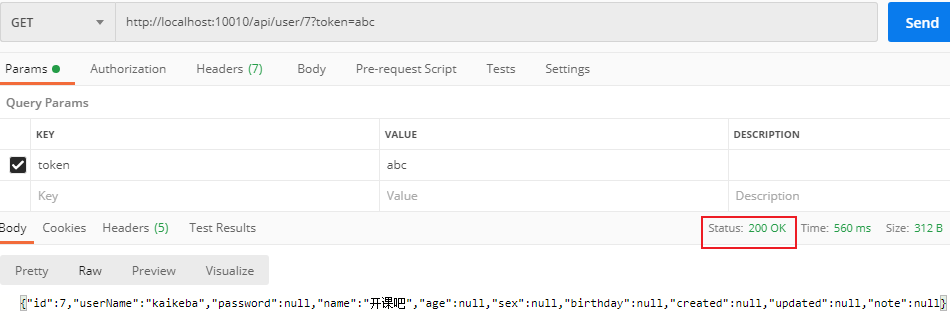
10.9. Load balancing and fusing (understand)
By default, Ribbon load balancing and Hystrix fuse mechanism have been integrated in the Gateway. However, all timeout policies are the default values. For example, the fuse timeout is only 1S, which is easy to trigger. Therefore, it is recommended to configure manually:
hystrix:
  command:
    default:
      execution:
        isolation:
          thread:
            timeoutInMilliseconds: 6000 #Service degradation timeout, 1S by default
ribbon:
  ConnectTimeout: 1000 # Connection timeout duration
  ReadTimeout: 2000 # Data communication timeout duration
  MaxAutoRetries: 0 # Number of retries for the current server
  MaxAutoRetriesNextServer: 0 # How many service retries
10.10. Gateway cross domain configuration
Generally, the gateway is the unified entrance of all micro services, and cross domain problems will inevitably occur when called.
Cross domain: in js request access, if the access address is inconsistent with the domain name, ip or port number of the current server, it is called cross domain request. If it is not solved, the return result of the corresponding address cannot be obtained.
For example, from http://localhost:9090 js access in http://localhost:9000 Because the ports are different, the data is also a cross domain request.
If there is a cross domain problem when accessing the Spring Cloud Gateway server; You can configure the gateway server to determine which services can be requested across domains; The specific configuration is as follows:
server:
  port: 10010
spring:
  application:
    name: api-gateway
  cloud:
    gateway:
      routes:
        #The id of the route can be arbitrary
        - id: user-service-rote
          #Proxy's microservice address
          #uri: http://127.0.0.1:9091
          uri: lb://user-service
          #Route assertion: mapping paths can be configured
          predicates:
            - Path=/api/user/**
          filters:
            # 1: Remove one path, 2: remove 2 paths, and so on
            - StripPrefix=1
            - MyParam=name
      default-filters:
        - AddResponseHeader=X-Response-Foo, Bar
        - AddResponseHeader=myname, lxs
      globalcors:
        corsConfigurations:
          '[/**]':
            #allowedOrigins: * # This way of writing or the following can be used, * means all
            allowedOrigins:
              - "http://docs.spring.io"
            allowedMethods:
              - GET
eureka:
  client:
    service-url:
      defaultZone: http://127.0.0.1:10086/eureka
  instance:
    prefer-ip-address: true

hystrix:
  command:
    default:
      execution:
        isolation:
          thread:
            timeoutInMilliseconds: 6000 #Service degradation timeout, 1S by default
ribbon:
  ConnectTimeout: 1000 # Connection timeout duration
  ReadTimeout: 2000 # Data communication timeout duration
  MaxAutoRetries: 0 # Number of retries for the current server
  MaxAutoRetriesNextServer: 0 # How many service retries
explain
The above configuration indicates that it is allowed to http://docs.spring.io Get service data by get request.
allowedOrigins specifies the server address allowed to access, such as: http://localhost:10000 It's OK.
'[/ * *]' indicates the address of all requests to access the gateway server
Specific instructions on the official website: https://cloud.spring.io/spring-cloud-static/spring-cloud- gateway/2.1.1.RELEASE/multi/multi__cors_configuration.html
10.11. High availability of gateway (understand)
Start multiple Gateway services and automatically register with Eureka to form a cluster. In case of internal service access, access the Gateway and automatic load balancing. No problem.
However, the Gateway is more external access, such as PC terminal, mobile terminal, etc. They can't load balance through Eureka, so what should I do? At this time, other service gateways can be used to proxy the Gateway. For example: Nginx
10.12. Difference between gateway and Feign
- As the traffic entrance of the whole application, the Gateway receives all requests, such as PC and mobile terminal, and forwards different requests to different processing micro service modules, which can be regarded as nginx; In most cases, it is used for permission authentication and server-side flow control
- Feign exposes some service interfaces of the current microservices and is mainly used for service calls between microservices
11.Spring Cloud Config distributed configuration center
3.1. Introduction
In the distributed system, due to the large number of services, the configuration files are scattered in different micro service projects, which is inconvenient to manage. In order to facilitate centralized management of configuration files, distributed configuration center components are required. In Spring Cloud, Spring Cloud Config is provided. It supports placing configuration files locally in the configuration service and in remote Git warehouses (GitHub and code cloud).
The architecture after using the Spring Cloud Config configuration center is shown in the figure below
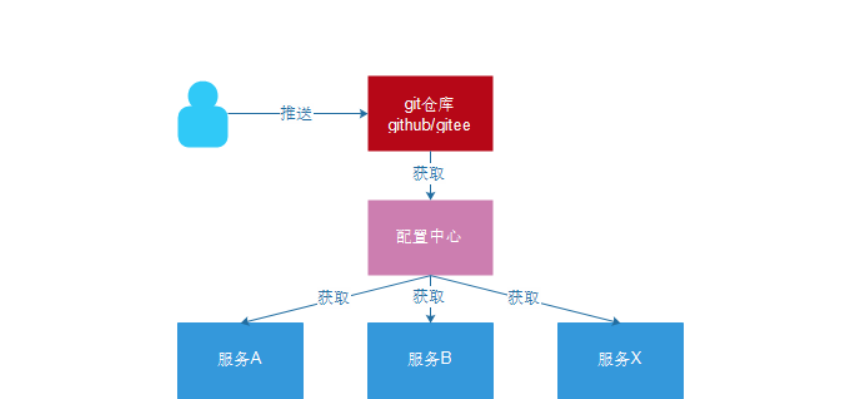
The configuration center is also a micro service in essence. You also need to register with Eureka service registry!
3.2. Git configuration management
Well known Git remote warehouses include foreign GitHub and domestic gitee; However, when using GitHub, domestic users often encounter the problem that the access speed is too slow, and sometimes they can't connect. If you want to experience better, you can use the domestic Git hosting service - Code cloud (gitee.com). Compared with GitHub, codecloud also provides a free Git warehouse. In addition, it also integrates code quality detection, project demonstration and other functions. For team collaborative development, code cloud also provides project management, code hosting and document management services. The remote Git warehouse used in this chapter is code cloud.
Code cloud access address: https://gitee.com/
3.2.2. Create remote warehouse
First, to use the private remote git warehouse on the code cloud, you need to register an account first; Please visit the website and register your account, then use the account login code to the cloud console and create a public warehouse.
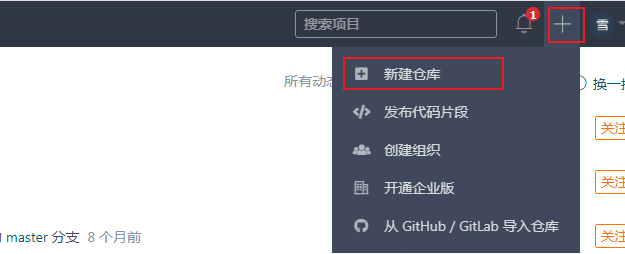
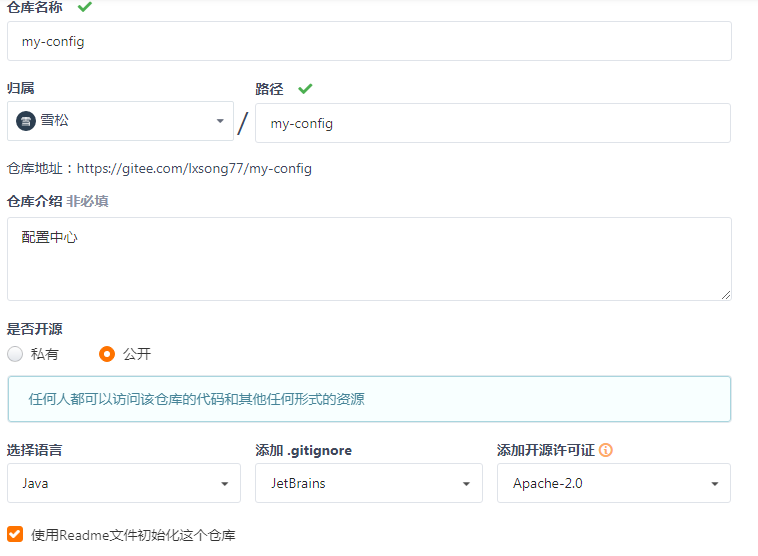
3.2.3. Create profile
Create a configuration file that needs to be uniformly configured and managed in the new warehouse.
Naming method of configuration file: {application}-{profile}.yml or {application}-{profile}.properties
- Application is the name of the application
- profile is used to distinguish development environment, test environment, production environment, etc
For example, user-dev.yml represents the configuration file used in the user microservice development environment.
Here, copy the contents of the configuration file application.yml of the user service project as the contents of the user-dev.yml file. The specific configuration is as follows:
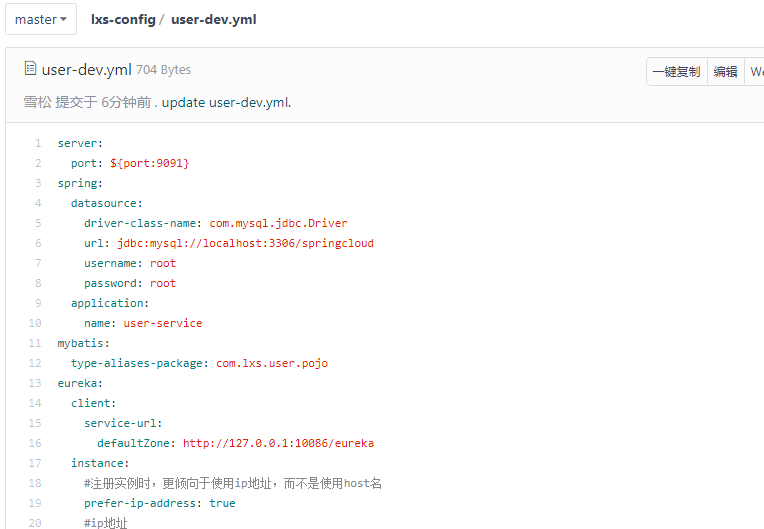
After creating the user-dev.yml configuration file, the repository in gitee is as follows:
3.3. Build micro service of configuration center
3.3.1. Create project
To create a configuration center microservice project:

Add dependency and modify config server \ pom.xml as follows:
<?xml version="1.0" encoding="UTF-8"?>
<project xmlns="http://maven.apache.org/POM/4.0.0"
         xmlns:xsi="http://www.w3.org/2001/XMLSchema-instance"
         xsi:schemaLocation="http://maven.apache.org/POM/4.0.0 http://maven.apache.org/xsd/maven-4.0.0.xsd">
    <parent>
        <artifactId>lxs-springcloud</artifactId>
        <groupId>com.lxs</groupId>
        <version>1.0-SNAPSHOT</version>
    </parent>
    <modelVersion>4.0.0</modelVersion>

    <artifactId>config-server</artifactId>

    <dependencies>
        <dependency>
            <groupId>org.springframework.cloud</groupId>
            <artifactId>spring-cloud-starter-netflix-eureka-client</artifactId>
        </dependency>
        <dependency>
            <groupId>org.springframework.cloud</groupId>
            <artifactId>spring-cloud-config-server</artifactId>
        </dependency>

    </dependencies>

</project>
3.3.2. Startup
Create the startup class of config server of the configuration center project;
Config server \ SRC \ main \ Java \ com \ LXS \ config \ configserverapplication.java is as follows:
@SpringBootApplication
@EnableConfigServer //Open configuration service
public class ConfigApplication {
    public static void main(String[] args) {
        SpringApplication.run(ConfigApplication.class, args);
    }
}
3.3.3. Configuration file
server:
  port: 12000
spring:
  application:
    name: config-server
  cloud:
    config:
      server:
        git:
          uri: https://gitee.com/lxsong77/my-config.git
eureka:
  client:
    service-url:
      defaultZone: http://127.0.0.1:10086/eureka
Note that the above spring.cloud.config.server.git.uri is the warehouse address created in the code cloud; You can modify the warehouse address created for yourself
3.3.4. Start up test
Start the eureka registry and configuration center; Then visit http://localhost:12000/user-dev.yml , check whether the user-dev.yml file managed in code cloud storage can be output. In addition, you can modify user-dev.yml on gitee and refresh the above test address, and you can also get the latest data in time.
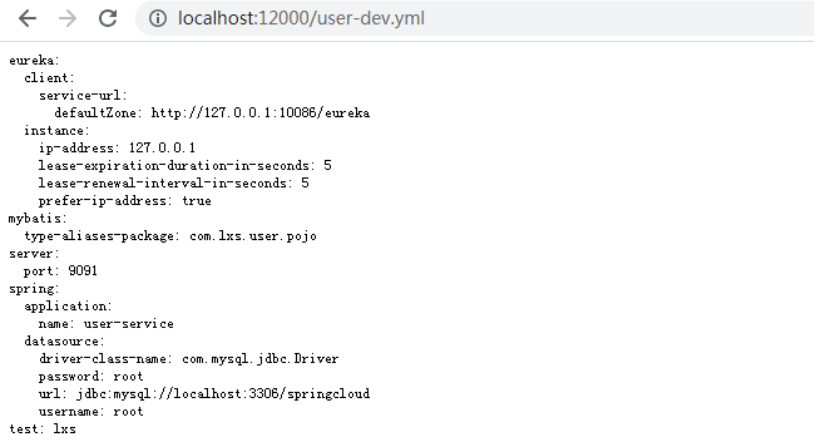
3.4. Get configuration center configuration
The microservice of the configuration center has been built. Next, we need to transform the user microservice user service. The configuration file information is no longer provided by the microservice project, but obtained from the configuration center. The user service project is reconstructed as follows.
3.4.1. Add dependency
Add the following dependencies to the pom.xml file in the user service project:
<dependency>
	<groupId>org.springframework.cloud</groupId>
	<artifactId>spring-cloud-starter-config</artifactId>
</dependency>
3.4.2. Modify configuration
- Delete the user service \ SRC \ main \ resources \ application.yml file of the user service project (because it is obtained from the configuration center)
- Create user service project user service \ SRC \ main \ resources \ bootstrap.yml configuration file
spring:
  cloud:
    config:
      #The application of configuration file in git warehouse is consistent
      name: user
      #The configuration files in git warehouse are consistent with each other
      profile: dev
      #git warehouse branch is consistent
      label: master
      discovery:
        # Use configuration center
        enabled: true
        # Configuration center service name
        service-id: config-server
eureka:
  client:
    service-url:
      defaultZone: http://127.0.0.1:10086/eureka
Modified structure of user service project:
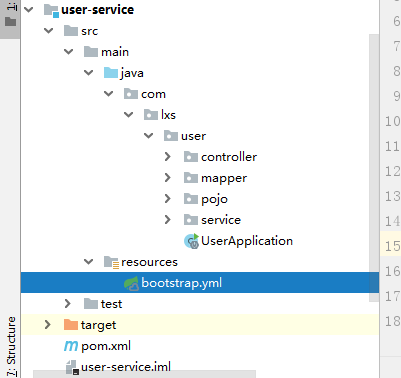
- The bootstrap.yml file is also the default configuration file for Spring Boot, and its loading time is earlier than that of application.yml.
- Although application.yml and bootstrap.yml are the default configuration files of Spring Boot, their positioning is different. Bootstrap.yml can be understood as some system level parameter configurations, which are generally unchanged. Application.yml can be used to define application level parameters. If used in conjunction with spring cloud config, the files defined in application.yml can be dynamically replaced.
- To sum up, the bootstrap.yml file is equivalent to the boot file when the project is started, and the content is relatively fixed. application.yml file is some general configuration parameters of microservices, which change frequently.
3.4.3. Start up test
Start the registration center Eureka server, the configuration center config server, and the user service user service. If no error is reported, the configuration center content has already been used. You can go to the registration center and check the user service.

12.Spring Cloud Bus service bus
12.1. Problems
Previously, it has been completed to store the configuration files in the micro service in the remote git warehouse, and pull the configuration files from the GIT warehouse through the micro service in the configuration center. When the user micro service is started, it will connect to the configuration center to obtain the configuration information, so as to start the user micro service. If we update the configuration file in Git warehouse, can the user micro service receive the new configuration information and update it in time
12.1.1. Modify remote Git configuration
Modify the user-dev.yml file on the code cloud and add an attribute test.name.

12.1.2. Modifying UserController
Modify the processor class in the user service project; User service \ SRC \ main \ Java \ com \ LXS \ user \ controller \ usercontroller.java is as follows:
@RestController
@RequestMapping("/user")
@RefreshScope //Profile change auto refresh attribute
public class UserController {

    @Autowired
    private UserService userService;

    @Value("${test.name}")
    private String name;

    @GetMapping("/{id}")
    public User queryById(@PathVariable Long id) {
        System.out.println("Configuration center configured test.name = " + name);
        return userService.queryById(id);
    }
	@RequestMapping("/user/all")
	public String all() {
		return "return all user list..........";
	}
}
12.1.3. Test
Start the registration center Eureka server, configuration center config server and user service in turn; Then modify the configuration information in the Git warehouse, access the user's Micro service and view the output content.
Conclusion: by viewing the output results of the user microservice console, we can find that the modification of the configuration file in Git warehouse has not been updated to the user microservice in time. It can take effect only by restarting the user microservice.
How to update the configuration without restarting the microservice? Spring Cloud Bus can be used to automatically update the configuration.
It should be noted that the underlying layer of Spring Cloud Bus is implemented based on RabbitMQ. By default, the local message queue service is used, so the local RabbitMQ service needs to be started in advance (only after RabbitMQ is installed), as follows:
12.2. Introduction to spring cloud bus
Spring Cloud Bus connects distributed nodes with lightweight message broker, which can be used to change broadcast configuration files or monitor and manage services. That is, the message bus can monitor microservices and realize the communication between applications. The optional message brokers for Spring Cloud Bus are RabbitMQ and Kafka.
After using Bus:
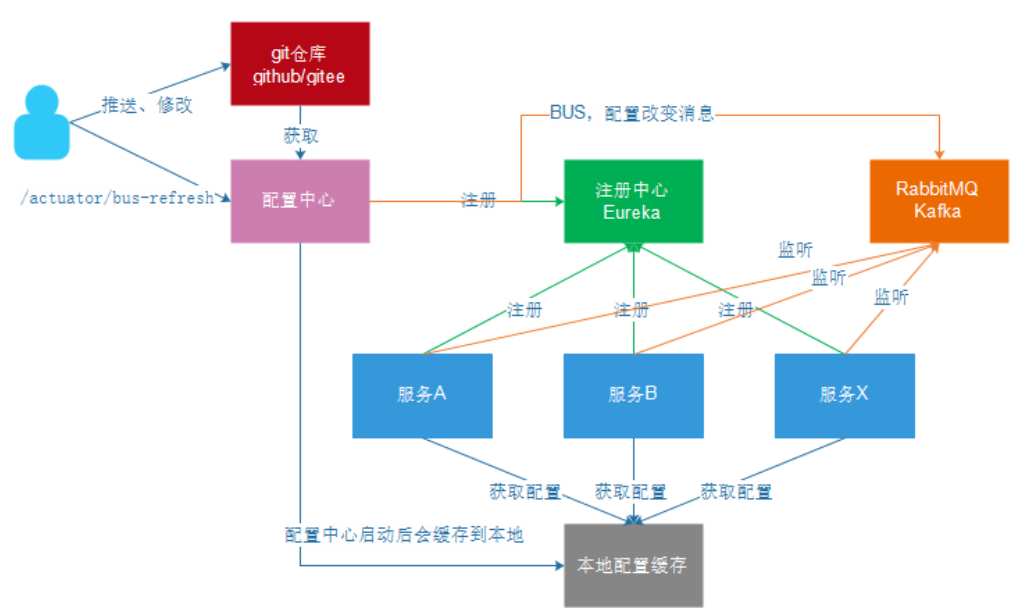
preparation
In the installation data \ otp_win64_23.0.exe and rabbitmq-server-3.8.5.exe
12.3. Transformation of configuration center
Add Spring Cloud Bus related dependencies in the pom.xml file of the config server project
<dependency>
	<groupId>org.springframework.cloud</groupId>
	<artifactId>spring-cloud-bus</artifactId>
</dependency>
<dependency>
	<groupId>org.springframework.cloud</groupId>
	<artifactId>spring-cloud-stream-binder-rabbit</artifactId>
</dependency>
In the config server project, modify the application.yml file as follows:
server:
  port: 12000
spring:
  application:
    name: config-server
  cloud:
    config:
      server:
        git:
          uri: https://gitee.com/lxsong77/my-config.git
  # Configure rabbitmq information; If both are consistent with the default values, no configuration is required
  rabbitmq:
    host: localhost
    port: 5672
    username: guest
    password: guest
eureka:
  client:
    service-url:
      defaultZone: http://127.0.0.1:10086/eureka
management:
  endpoints:
    web:
      exposure:
        # Expose the address of the trigger message bus
        include: bus-refresh
12.4. Transformation of user services
- Add Spring Cloud Bus related dependencies in pom.xml of user microservice user service project
<dependency>
	<groupId>org.springframework.cloud</groupId>
	<artifactId>spring-cloud-bus</artifactId>
</dependency>
<dependency>
	<groupId>org.springframework.cloud</groupId>
	<artifactId>spring-cloud-stream-binder-rabbit</artifactId>
</dependency>
<dependency>
	<groupId>org.springframework.boot</groupId>
	<artifactId>spring-boot-starter-actuator</artifactId>
</dependency>
- Modify the bootstrap.yml of the user service project as follows
spring:
  cloud:
    config:
      #The application of configuration file in git warehouse is consistent
      name: user
      #The configuration files in git warehouse are consistent with each other
      profile: dev
      #git warehouse branch is consistent
      label: master
      discovery:
        # Use configuration center
        enabled: true
        # Configuration center service name
        service-id: config-server
  # Configure rabbitmq information; If both are consistent with the default values, no configuration is required
  rabbitmq:
    host: localhost
    port: 5672
    username: guest
    password: guest
eureka:
  client:
    service-url:
      defaultZone: http://127.0.0.1:10086/eureka
- User controller of user micro service user service project
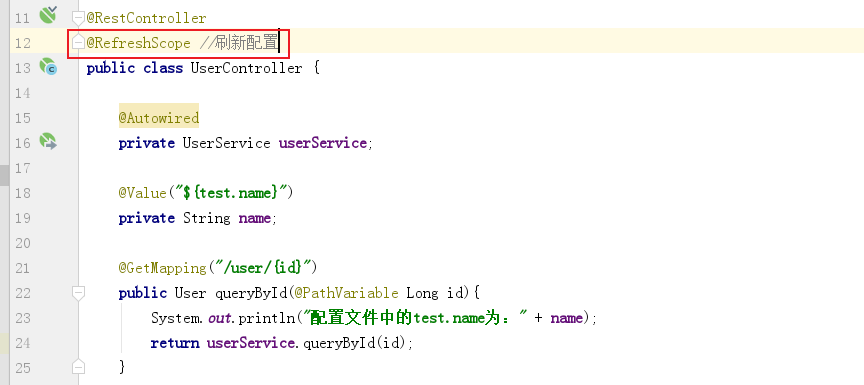
12.5. Testing
The transformation of the configuration center microservice and user microservice has been completed. Let's test whether the user microservice can automatically update the configuration information without restarting when we modify the configuration file in Git warehouse. Test steps:
- Step 1: start the registration center Eureka server, the configuration center config server, and the user service user service in turn
- Step 2: access user microservices http://localhost:9091/user/7 ; View IDEA console output
- Step 3: modify the test.name content of the configuration file user-dev.yml in the Git repository
- Step 4: use the Postman or RESTClient tool to send a POST request to access the address http://127.0.0.1:12000/actuator/bus-refresh
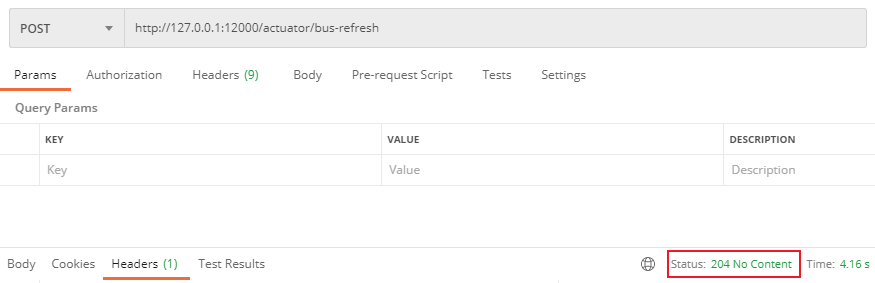
- Step 5: visit the user micro service system console to view the output results
explain:
- Postman or RESTClient is a tool that can simulate a browser to send various requests (POST, GET, PUT, DELETE, etc.).
- Request address http://127.0.0.1:12000/actuator/bus -The / actor in refresh is fixed.
- request http://127.0.0.1:12000/actuator/bus -The refresh address is used to access the message bus service of the configuration center. After receiving the request, the message bus service will send a message to the message queue, and each micro service will listen to the message queue. When the micro service receives the message in the queue, it will re obtain the latest configuration information from the configuration center.
12.6. Complete architecture diagram of spring cloud