The previous article used maven to build a web environment, which records how to use spring to integrate spring MVC and hibernate, that is, spring + spring MVC + Hibernate framework integration.
Step 1: configure spring first
- Configure the spring configuration file applicationContext.xmls
 1 <?xml version="1.0" encoding="UTF-8"?>
 2 <beans xmlns="http://www.springframework.org/schema/beans"
 3     xmlns:xsi="http://www.w3.org/2001/XMLSchema-instance" xmlns:p="http://www.springframework.org/schema/p"
 4     xmlns:context="http://www.springframework.org/schema/context"
 5     xmlns:aop="http://www.springframework.org/schema/aop" xmlns:tx="http://www.springframework.org/schema/tx"
 6     xmlns:mvc="http://www.springframework.org/schema/mvc"
 7     xsi:schemaLocation="http://www.springframework.org/schema/beans
 8        http://www.springframework.org/schema/beans/spring-beans-3.0.xsd
 9        http://www.springframework.org/schema/context
10        http://www.springframework.org/schema/context/spring-context-3.0.xsd
11        http://www.springframework.org/schema/tx
12        http://www.springframework.org/schema/tx/spring-tx-3.0.xsd
13        http://www.springframework.org/schema/aop
14        http://www.springframework.org/schema/aop/spring-aop-3.0.xsd">
15     <!-- Automatic scanning -->
16     <context:component-scan base-package="com.mvn" />
17     <!-- Configuration automation aop -->
18     <aop:aspectj-autoproxy />
19
20 </beans>
- Configure the web.xml file
<! -- configuration file to be read to configure spring context -- >
    <context-param>
        <param-name>contextConfigLocation</param-name>
        <param-value>classpath:applicationContext.xml</param-value>
    </context-param>
    <! -- configure spring listener to automatically initialize spring when the web container starts -- >
    <listener>
        <listener-class>org.springframework.web.context.ContextLoaderListener</listener-class>
    </listener>
Step 2: configure spring mvc
- Configure the spring mvc configuration file spring-web.xmls
 1 <?xml version="1.0" encoding="UTF-8"?>
 2 <beans xmlns="http://www.springframework.org/schema/beans"
 3     xmlns:xsi="http://www.w3.org/2001/XMLSchema-instance" xmlns:p="http://www.springframework.org/schema/p"
 4     xmlns:context="http://www.springframework.org/schema/context"
 5     xmlns:aop="http://www.springframework.org/schema/aop" xmlns:tx="http://www.springframework.org/schema/tx"
 6     xmlns:mvc="http://www.springframework.org/schema/mvc"
 7     xsi:schemaLocation="http://www.springframework.org/schema/beans
 8        http://www.springframework.org/schema/beans/spring-beans-3.0.xsd
 9        http://www.springframework.org/schema/context
10        http://www.springframework.org/schema/context/spring-context-3.0.xsd
11        http://www.springframework.org/schema/tx
12        http://www.springframework.org/schema/tx/spring-tx-3.0.xsd
13        http://www.springframework.org/schema/aop
14        http://www.springframework.org/schema/aop/spring-aop-3.0.xsd
15        http://www.springframework.org/schema/mvc
16        http://www.springframework.org/schema/mvc/spring-mvc-3.0.xsd">
17     <!-- Automatic scanning com.mvn.controller File, initializing the processor-->
18     <context:component-scan base-package="com.mvn.controller" />
19
20     <!-- Configure the attempt parser (renderer) -->
21     <bean id="viewResolver"
22         class="org.springframework.web.servlet.view.UrlBasedViewResolver">
23         <property name="viewClass"
24             value="org.springframework.web.servlet.view.JstlView" />
25         <property name="prefix" value="WEB-INF/jsp/" />
26         <property name="suffix" value=".jsp" />
27     </bean>
28
29 </beans>
- Configure the web.xml file
 1 <!-- To configure spring mvc Dispenser -->
 2     <servlet>
 3         <servlet-name>springmvc</servlet-name>
 4         <servlet-class>org.springframework.web.servlet.DispatcherServlet</servlet-class>
 5         <!-- Initialization spring mvc Location of profile -->
 6         <init-param>
 7             <param-name>contextConfigLocation</param-name>
 8             <param-value>classpath:spring-web.xml</param-value>
 9         </init-param>
10         <!-- web Load when container starts springmvc -->
11         <load-on-startup>1</load-on-startup>
12     </servlet>
13
14     <servlet-mapping>
15         <servlet-name>springmvc</servlet-name>
16         <url-pattern>*.do</url-pattern>
17     </servlet-mapping>
Step 3: configure hibernate
- Put hibernate related configuration into the spring configuration file applicationContext.xml
<!-- Auto read profile -->
    <context:property-placeholder location="classpath:spring.properties" />
    <!-- Configure data sources -->
    <bean id="dataSource" class="org.apache.commons.dbcp2.BasicDataSource"
        destroy-method="close">

        <property name="driverClassName" value="${jdbc.driverClassName}" />
        <property name="url" value="${jdbc.url}" />
        <property name="username" value="${jdbc.username}" />
        <property name="password" value="${jdbc.password}" />
    </bean>
    <!-- To configure sessionFactory-->
    <bean id="sessionFactory"
        class="org.springframework.orm.hibernate3.annotation.AnnotationSessionFactoryBean">
        <property name="dataSource" ref="dataSource"></property>
        <!-- hibernate Auto scan entity class-->
        <property name="packagesToScan">
            <list>
                <value>com.mvn.entity</value>
            </list>
        </property>
        <!-- hibernate attribute -->
        <property name="hibernateProperties">
            <value>
                hibernate.hbm2ddl.auto=${jdbc.hibernate.hbm2ddl.auto}
                hibernate.dialect=${jdbc.hibernate.dialect}
                hibernate.show_sql=${jdbc.hibernate.show_sql}

            </value>
        </property>

    </bean>
    <!-- Transaction manager -->
    <bean id="transactionManager"
        class="org.springframework.orm.hibernate3.HibernateTransactionManager">
        <property name="sessionFactory" ref="sessionFactory" />
    </bean>
    <tx:annotation-driven transaction-manager="transactionManager" />
- Because it needs to read the property file, it needs to add
1 jdbc.driverClassName=com.mysql.jdbc.Driver
2 jdbc.url=jdbc:mysql://localhost:3306/mvn
3 jdbc.username=root
4 jdbc.password=root
5
6 jdbc.hibernate.dialect=org.hibernate.dialect.MySQL5Dialect
7 jdbc.hibernate.show_sql=true
8 jdbc.hibernate.hbm2ddl.auto=update
Step 4: write the corresponding java and jsp code
- Create entity class
 1 package com.mvn.entity;
 2
 3 import javax.persistence.Entity;
 4 import javax.persistence.GeneratedValue;
 5 import javax.persistence.Id;
 6 import javax.persistence.Table;
 7
 8 @Entity
 9 @Table(name="t_user")
10 public class User {
11
12     private Integer id;
13     private String name;
14     private String password;
15
16     @Id
17     @GeneratedValue
18     public Integer getId() {
19         return id;
20     }
21     public void setId(Integer id) {
22         this.id = id;
23     }
24     public String getName() {
25         return name;
26     }
27     public void setName(String name) {
28         this.name = name;
29     }
30     public String getPassword() {
31         return password;
32     }
33     public void setPassword(String password) {
34         this.password = password;
35     }
36
37 }
- Create dao class
 1 package com.mvn.dao;
 2
 3 import javax.annotation.Resource;
 4
 5 import org.hibernate.SessionFactory;
 6 import org.hibernate.classic.Session;
 7 import org.springframework.stereotype.Repository;
 8
 9 import com.mvn.entity.User;
10
11 @Repository
12 public class UserDao {
13
14     @Resource
15     SessionFactory sessionFactory;
16
17     public void save(User user){
18         Session session = sessionFactory.openSession();
19         session.save(user);
20
21     }
22 }
- Create service class
 1 package com.mvn.service;
 2
 3 import javax.annotation.Resource;
 4
 5 import org.springframework.stereotype.Service;
 6 import org.springframework.transaction.annotation.Transactional;
 7
 8 import com.mvn.dao.UserDao;
 9 import com.mvn.entity.User;
10
11 @Service
12 public class UserService {
13     @Resource
14     UserDao userDao;
15
16     @Transactional
17     public void save(User user){
18         userDao.save(user);
19     }
20
21 }
- Create controller
 1 package com.mvn.controller;
 2
 3 import javax.annotation.Resource;
 4
 5 import org.springframework.stereotype.Controller;
 6 import org.springframework.web.bind.annotation.RequestMapping;
 7
 8 import com.mvn.entity.User;
 9 import com.mvn.service.UserService;
10
11 @Controller
12 public class SaveUser {
13
14     @Resource
15     UserService userService;
16
17     @RequestMapping(value="/saveUser")
18     public String saveUser(User user){
19         userService.save(user);
20         return "saveSucess";
21     }
22 }
- Create JSP file: WEB-INF \ JSP \ savesupplies.jsp
 1 <%@ page language="java" contentType="text/html; charset=UTF-8"
 2     pageEncoding="UTF-8"%>
 3 <!DOCTYPE html PUBLIC "-//W3C//DTD HTML 4.01 Transitional//EN" "http://www.w3.org/TR/html4/loose.dtd">
 4 <html>
 5 <head>
 6 <meta http-equiv="Content-Type" content="text/html; charset=UTF-8">
 7 <title>Insert title here</title>
 8 </head>
 9 <body>
10 Hello
11 Congratulations!
12 Integration success
13 </body>
14 </html>
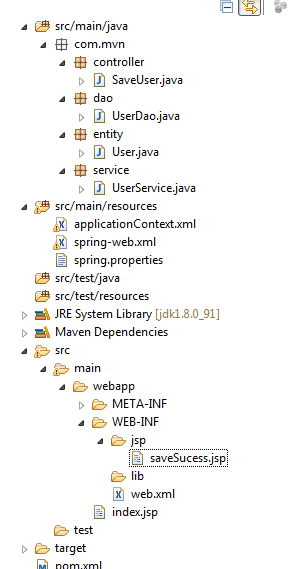
Now that the code is finished, the complete directory structure is:
Step 5: Test
- Create database

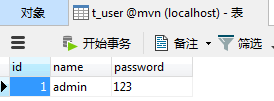
- Start tomcat. Since we have configured the hibernate attribute hibernate.hbm2ddl.auto=update, the table t ﹐ user will be generated automatically after tomcat is started
- Access through page

4. Data generated by database
So far, the integration is completed.