In this article, I will set up a personal blog, which contains articles written in the way of Markdown.
We will use Spring Boot to develop the project and some other tools and libraries. We will push the project to the GitHub repository and post the post to our blog using Heroku's automatic deployment function.
In addition, we will use the remote MySQL service to host our remote MySQL database. In order to communicate with the database, we will need MySQL connectors for Java and Spring Data JPA.
To render our view, we will use Thymeleaf.
Throughout the tutorial, I will use the IntelliJ IDEA Community Edition as the IDE. There may be some IntelliJ specific shortcuts and hotkeys everywhere, but you can continue to use the IDE you choose.
Let's start now!
Build project
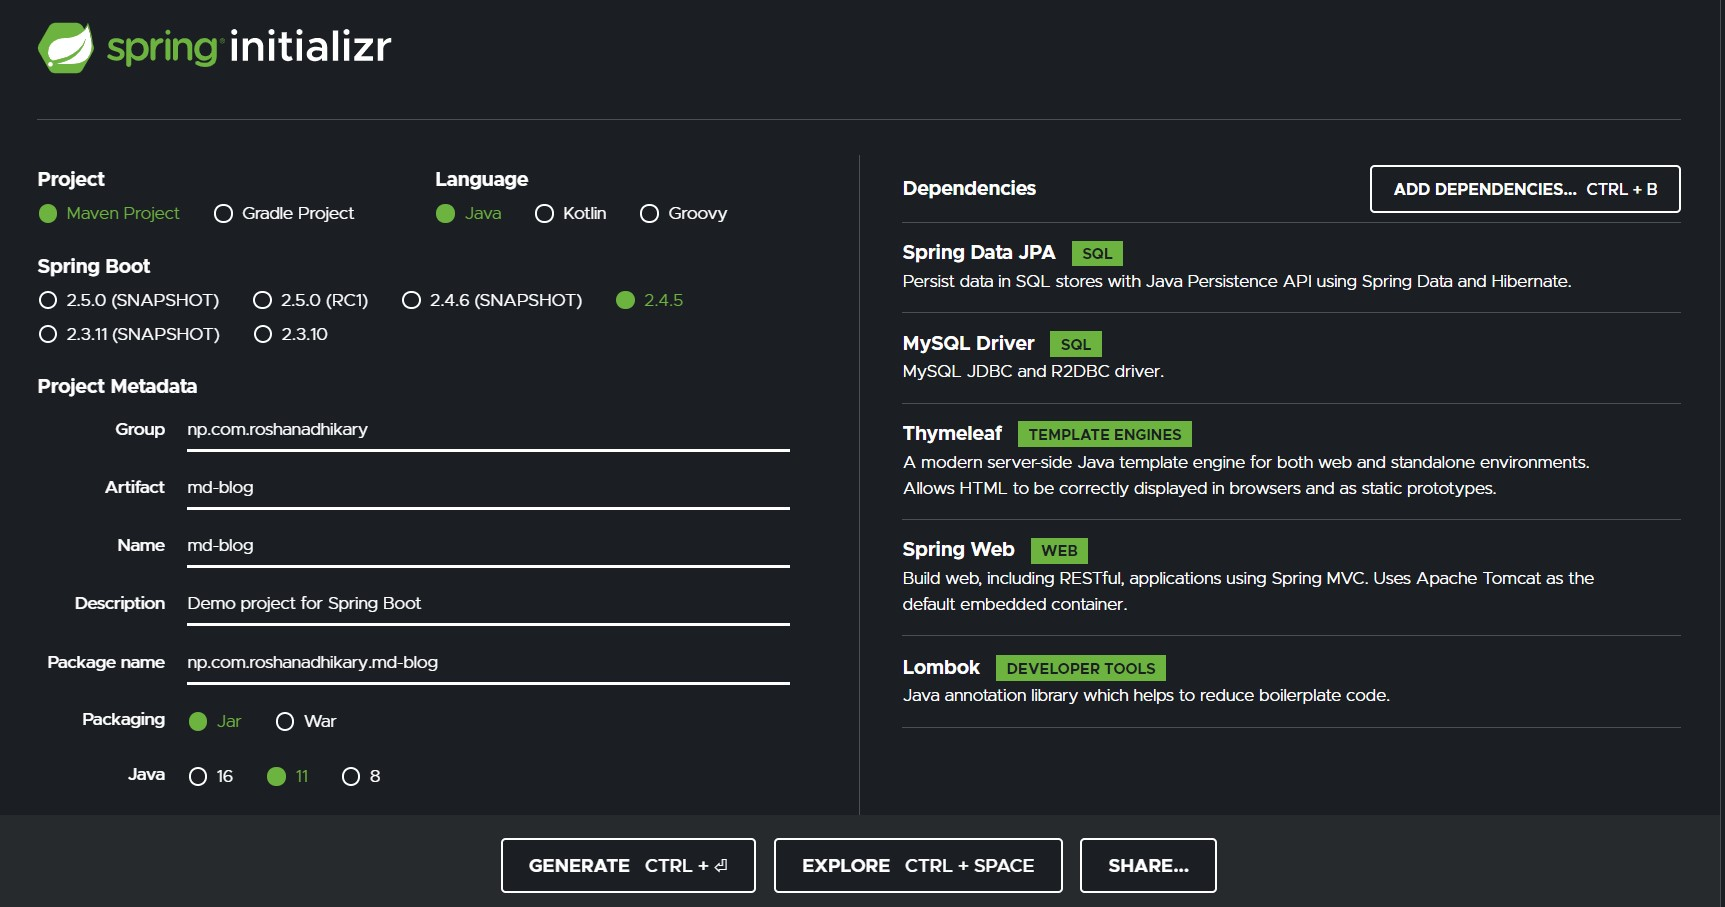
Create a SpringBoot project through Spring Initializr and configure our project.
Select the Maven project option and select Java as the language.
Choose a non snapshot version of Spring Boot (I chose 2.4.5).
Then, fill in your project metadata - including group, artifact, name, description and package name.
We will use Jar packaging, so please choose Jar. Then, select 11 as the Java version.
For dependencies, we will need the following:
- Spring Data JPA
- MySQL Driver
- Thymeleaf
- Spring Web
- Lombok
Finally, click the generate button to generate the project structure.
Extract the generated zip file, you can start!
Open project
Extraction zip file, you can import the project into the IDE.
With IntelliJ IDEA, you can open a project by pointing IntelliJ to the root folder of the project, which contains the pom.xml file as a direct subfolder.

After opening the project, take a look at the directory and file structure generated by Spring Intializr.
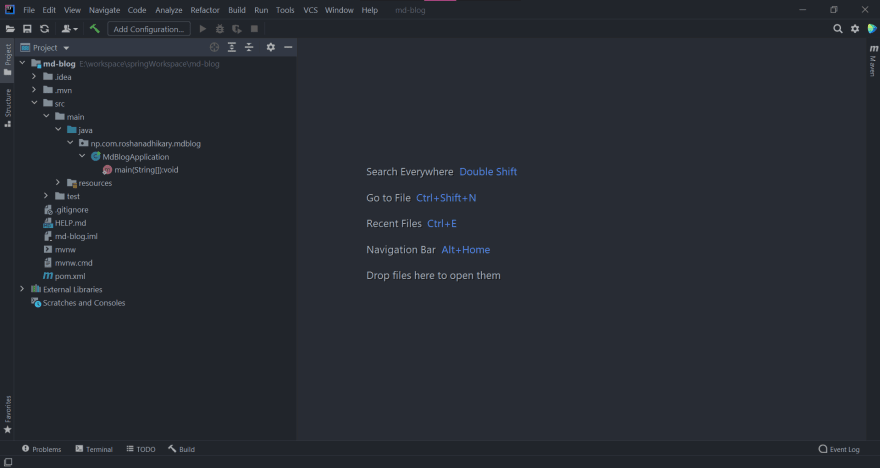
pom. The XML file is critical to the Maven project.
It is full of dependencies that we selected from the small configuration session of Spring Initialzr.
Since Spring Boot is a self righteous framework, its launcher dependencies contain a collection of other dependencies that Spring Boot itself has managed.
Define entity
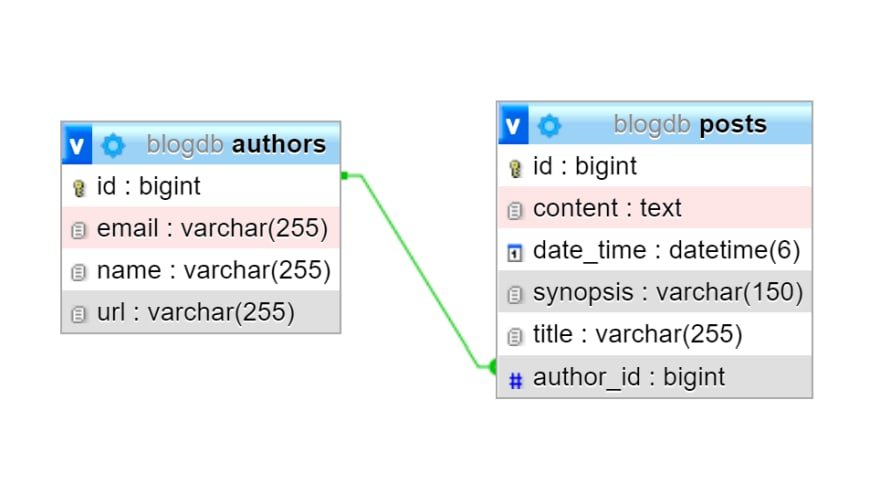
Create two entities: posts and authors
The authors entity contains: email,name,url
The posts entity contains: content,date_time,synopsis,title,author_id
Define POJO
The Java object (POJO) of the entity is defined as follows.
package np.com.roshanadhikary.mdblog.entities;

import lombok.Data;
import javax.persistence.*;
import java.time.LocalDateTime;
import np.com.roshanadhikary.mdblog.util.LocalDateTimeConverter;

@Data
@Entity
@Table(name = "posts")
public class Post {
	@Id
	@GeneratedValue(strategy= GenerationType.IDENTITY)
	@Column
	private long id;

	@Column
	private String title;

	@Column(columnDefinition = "TEXT")
	private String content;

	@Column(length = 150)
	private String synopsis;

	@ManyToOne
	@JoinColumn(name = "author_id")
	private Author author;

	@Column
	@Convert(converter = LocalDateTimeConverter.class)
	private LocalDateTime dateTime;
}
package np.com.roshanadhikary.mdblog.entities;

import lombok.Data;
import javax.persistence.*;
import java.util.*;

@Data
@Entity
@Table(name = "authors")
public class Author {
	@Id
	@GeneratedValue(strategy = GenerationType.IDENTITY)
	@Column
	private long id;

	@Column
	private String name;

	@Column
	private String email;

	@Column
	private String url;

	@Column
	@OneToMany(mappedBy = "author")
	private List<Post> posts;
}
We use JPA annotations to specify a one to many relationship between posts and authors.
In addition, to map the attributes of Java's LocalDateTime type to the columns of MySQL's datetime type, we need to convert between the two types (from LocalDateTime to TimeStamp, and vice versa).
To do this, we define a new LocalDateTimeConverter class, as shown below.
package np.com.roshanadhikary.mdblog.util;

import javax.persistence.AttributeConverter;
import javax.persistence.Converter;
import java.sql.Timestamp;
import java.time.LocalDateTime;

@Converter(autoApply = true)
public class LocalDateTimeConverter implements AttributeConverter<LocalDateTime, Timestamp> {
	@Override
	public Timestamp convertToDatabaseColumn(LocalDateTime localDateTime) {
		return localDateTime == null ? null : Timestamp.valueOf(localDateTime);
	}

	@Override
	public LocalDateTime convertToEntityAttribute(Timestamp timestamp) {
		return timestamp == null ? null : timestamp.toLocalDateTime();
	}
}
Define database
Spring Data provides several Repository abstractions designed to reduce the amount of artificially generated code for the data access layer. The two abstractions that our blog needs are CrudRepository and pagingandsorting Repository.
The CrudRepository interface provides various methods for performing CRUD operations on entities. On the other hand, pagingandsorting repository is an extension of CrudRepository, which provides other methods to retrieve entities using paging and sorting abstractions.
The repository of our entity is defined as follows.
@Controller
@RequestMapping("/posts")
public class PostController {

	// ... instance variable and constructor
  // ... getPaginatedPosts method

	@GetMapping("/{id}")
	public String getPostById(@PathVariable long id, Model model) {
		Optional<Post> postOptional = postRepository.findById(id);

		if (postOptional.isPresent()) {
			model.addAttribute("post", postOptional.get());
		} else {
			model.addAttribute("error", "no-post");
		}
		return "post";
	}
}
package np.com.roshanadhikary.mdblog.repositories;

import np.com.roshanadhikary.mdblog.entities.Author;
import org.springframework.data.repository.CrudRepository;

public interface AuthorRepository extends CrudRepository<Author, Long> {
}
Since we do not need to implement paging or sorting for Author entities, we can extend CrudRepository for AuthorRepository. On the other hand, since we will use paging and sorting abstractions to retrieve posts, we need to extend pagingandsorting repository for PostRepository.
Notice how CrudRepository and pagingandsortingreposition take the type of domain class and domain class ID to be managed as type parameters.
Another thing to note is that we don't need to annotate the Repository interface with @ Repository or @ Component. This is because the CrudRepository and PagingAndSorting interfaces are annotated with @ NoRepositoryBean, making them intermediate interfaces. The Spring container does not pick up intermediate interfaces, so it does not instantiate them into beans.
However, any derived classes of such interfaces that do not use the @ NoRepositoryBean annotation (in our example, AuthorRepository and PostRepository) will be automatically instantiated by the Spring container.
Define controller
Now start defining the controller for the blog. These will handle requests to our Web application and are responsible for passing the appropriate views to the client.
We need to define two classes - RootController and PostController - each class will handle its own request.
RootController
RootController will be mapped to handle GET / requests.
package np.com.roshanadhikary.mdblog.controllers;

import org.springframework.stereotype.Controller;
import org.springframework.web.bind.annotation.GetMapping;
import org.springframework.web.bind.annotation.RequestMapping;

@Controller
@RequestMapping("/")
public class RootController {

	@GetMapping("")
	public String index() {
		return "redirect:/posts";
	}
}
As we can see, all GET requests to / route will be redirected to / posts route.
PostController
The PostController will be mapped to handle GET / posts / * requests.
package np.com.roshanadhikary.mdblog.controllers;

import np.com.roshanadhikary.mdblog.repositories.PostRepository;
import org.springframework.beans.factory.annotation.Autowired;
import org.springframework.stereotype.Controller;
import org.springframework.web.bind.annotation.RequestMapping;

@Controller
@RequestMapping("/posts")
public class PostController {
	private final PostRepository postRepository;
	private final int PAGINATIONSIZE = 2;

	@Autowired
	public PostController(PostRepository postRepository) {
		this.postRepository = postRepository;
	}
}
At this time, there is no handler method defined in this class. We defined an instance variable named PAGINATIONSIZE, which indicates the size of the page - that is, the number of Posts rendered at one time.
Then, we inject the implementation of PostRepository.
We will define two other methods to handle requests for GET / posts and GET / posts / {id}.
@Controller
@RequestMapping("/posts")
public class PostController {

	// ... instance variable and constructor

	@GetMapping("")
	public String getPaginatedPosts(
			@RequestParam(value = "page", defaultValue = "0") int page,
			@RequestParam(value="size", defaultValue = "" + PAGINATIONSIZE) int size,
			Model model) {

		Pageable pageRequest = PageRequest.of(page, size, Sort.by(Sort.Direction.DESC, "id"));
		Page<Post> postsPage = postRepository.findAll(pageRequest);
		List<Post> posts = postsPage.toList();

		long postCount = postRepository.count();
		int numOfPages = (int) Math.ceil((postCount * 1.0) / PAGINATIONSIZE);

		model.addAttribute("posts", posts);
		model.addAttribute("postCount", postCount);
		model.addAttribute("pageRequested", page);
		model.addAttribute("paginationSize", PAGINATIONSIZE);
		model.addAttribute("numOfPages", numOfPages);
		return "posts";
	}
}
The getPaginatedPosts method has three parameters - the requested web page, the size of each web page, and model add properties.
We use three parameters to get the instance of PageRequest - page, size and publishing order.
The order of posts should be in descending order of their ID, because the larger the ID, the closer the post was written. This is because when we retrieve posts, we need to sort them in descending order.
Then, since PostRepository extends pagingandsortingreposition, its findAll method can take the above PageRequest instance, which returns a Pages Page. You can convert this instance of Page type to List type, and that's what we do.
Then, using the total number of posts available, calculate the total number of pages to be provided to customers.
Finally, we add these values as properties of the Model parameter.
Next, we define a getPostById method.
@Controller
@RequestMapping("/posts")
public class PostController {

	// ... instance variable and constructor
  // ... getPaginatedPosts method

	@GetMapping("/{id}")
	public String getPostById(@PathVariable long id, Model model) {
		Optional<Post> postOptional = postRepository.findById(id);

		if (postOptional.isPresent()) {
			model.addAttribute("post", postOptional.get());
		} else {
			model.addAttribute("error", "no-post");
		}
		return "post";
	}
}
The getPostById method takes two parameters - the ID of the post to retrieve and the model to which the attribute is to be added.
Using the findById method of PostRepository, we retrieve the Optional instance of Post type. This provides a sense of null security when we reduce the chance of encountering a Null Pointer Exception.
We add the post as a model property only if the Optional instance contains a non null value (that is, there is a post with this ID).
Define application properties
In application In the properties file, we specify the database URL, user name, password and database initialization method.
<dependencies>

  <!-- other dependencies -->

  <dependency>
    <groupId>org.commonmark</groupId>
    <artifactId>commonmark</artifactId>
    <version>0.17.1</version>
  </dependency>

</dependencies>
The first three attribute names are easy to interpret, as are their values.
The last attribute is spring jpa. Hibernate. DDL auto specifies the database schema generation method. Using the value of create drop, we instruct Hibernate to delete the database schema, and then recreate the database schema using the entity model as a reference.
Now, when we run the @ SpringBootApplication class (MdBlogApplication in my case), we should create the database with the name specified in the database URL.
After that, we began to read and parse the Markdown file of the blog post. First, let's add CommonMark as one of our dependencies.
Add CommonMark to POM
<dependencies>

  <!-- other dependencies -->

  <dependency>
    <groupId>org.commonmark</groupId>
    <artifactId>commonmark</artifactId>
    <version>0.17.1</version>
  </dependency>

</dependencies>
CommonMark will help us parse Markdown content from Markdown files and render HTML blog posts from that content.
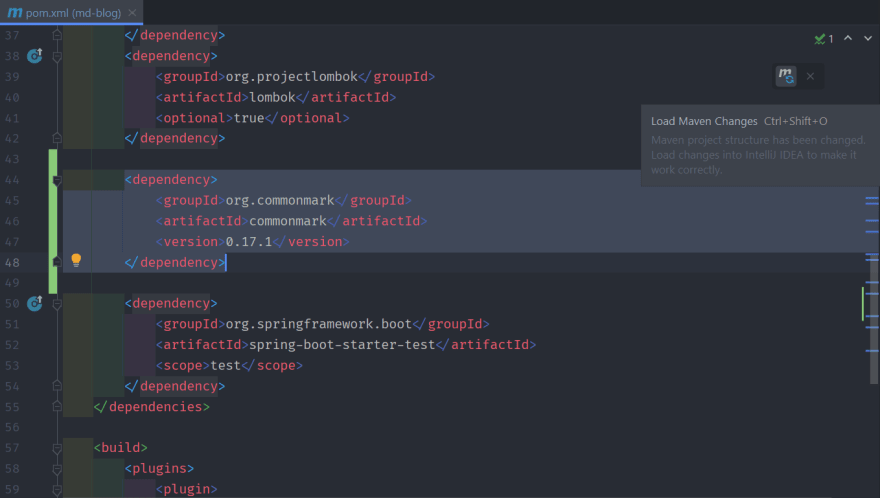
After adding the CommonMark dependency, IntelliJ IDEA will display a small icon so that we can load Maven changes. In this way, the relevant files will be downloaded and integrated into our classpath.
Now we're going to parse some Markdown!
Conventions for Markdown files
From this point on, we will assume that our blog posts will be stored as Markdown files in the resources / posts / directory.
Each file will be named using the following format: mark down_ Hello_ World!. md
Let's deconstruct the file name:
1: This is the ID of the Post. It should be unique because our entity Post has a unique and automatically generated ID field.
_: We will use underscore () As a separator to separate the ID from the post title and separate the words in the title.
Hello_World!: The title of our blog post.
. MD: extension of markdown file.
Once we start reading lines from the tag file, the reason for using these conventions is obvious.
Read line from Markdown file
We need to write a utility class whose methods are used to read rows from the Markdown file, retrieve ID s from the file name, and retrieve titles from the file name.
Now, let's implement the method of reading a single row.
package np.com.roshanadhikary.mdblog.util;

import org.springframework.core.io.ClassPathResource;

import java.io.BufferedReader;
import java.io.IOException;
import java.io.InputStream;
import java.io.InputStreamReader;
import java.util.List;
import java.util.stream.Collectors;

public class MdFileReader {

	public static List<String> readLinesFromMdFile(String filename) {
		try {
			InputStream iStream = new ClassPathResource("/posts/" + filename)
				.getInputStream();
			BufferedReader bReader = new BufferedReader(new InputStreamReader(iStream));
			return bReader.lines()
					.collect(Collectors.toList());
		} catch (IOException e) {
			e.printStackTrace();
			return null;
		}
	}

	public static String getTitleFromFileName(String filename) {
	}

	public static long getIdFromFileName(String filename) {
	}
}
The readLinesFromMdFile method takes a file name as a parameter and creates an InputStream from the available resources / positions / directories using the internal name under ClassPathResource.
We use InputStream to create a BufferedReader instance, and then collect the lines in the file into a List instance, which is returned from the method.
Now start retrieving the ID and title sections from the file name.
package np.com.roshanadhikary.mdblog.util;

import java.util.Arrays;

public class MdFileReader {

	// ... readLinesFromMdFile method

	public static String getTitleFromFileName(String filename) {
		String fileNameBeforeExtension = filename.split(".md")[0];
		String[] tokens = fileNameBeforeExtension.split("_");

		String[] titleTokens = Arrays.copyOfRange(tokens, 1, tokens.length);
		return String.join(" ", titleTokens);
	}

	public static long getIdFromFileName(String filename) {
		String fileNameBeforeExtension = filename.split(".md")[0];
		return Long.parseLong(fileNameBeforeExtension.split("_")[0]);
	}
}
In the getTitleFromFileName method, we separate the extension (. md) from the rest of the file name and split the rest of the string except the ID part.
Similarly, in the getIdFromFileName method, we separate the extension from the rest of the file names. Then, we parse the ID part into a long value.
Now we can finally render HTML content from the Markdown row list.
Render HTML
We need to use a method to write another utility class, which can parse the List of passed Markdown lines and return the String of rendered HTML content.
package np.com.roshanadhikary.mdblog.util;

import org.commonmark.node.Node;
import org.commonmark.parser.Parser;
import org.commonmark.renderer.html.HtmlRenderer;

import java.util.List;

public class MdToHtmlRenderer {
	/**
	 * Parse List of Markdown lines passed as argument, and render
	 * corresponding HTML
	 */
	public static String render(List<String> markdownLines) {
		Parser parser = Parser.builder().build();
		HtmlRenderer renderer = HtmlRenderer.builder().build();

		StringBuilder renderedSB = new StringBuilder();
		for (String markdownLine : markdownLines) {
			Node document = parser.parse(markdownLine);
			renderedSB.append(renderer.render(document));
		}
		return new String(renderedSB);
	}
}
In the render method, we use the CommonMark type such as Parser to parse the Markdown content, and use HtmlRenderer to render the parsed Markdown content as HTML.
Finally, we return a String representing an HTML blog post.
Summary
The first part of the code is over here, and will be updated in the next part