What are the fragments
Fragment is a UI fragment that can be embedded in activities, which can make the program more reasonable and make full use of the space of the large screen. Therefore, it is widely used in tablets.
Use of fragments
Simple use of fragments
Left layout_ fragment. xml
<LinearLayout xmlns:android="http://schemas.android.com/apk/res/android"
    android:layout_width="match_parent"
    android:layout_height="match_parent"
    android:orientation="vertical">

    <Button
        android:id="@+id/button"
        android:layout_width="wrap_content"
        android:layout_height="wrap_content"
        android:layout_gravity="center_horizontal"
        android:text="button"/>

</LinearLayout>
Right layout_ fragment. xml
<LinearLayout xmlns:android="http://schemas.android.com/apk/res/android"
    android:orientation="vertical"
    android:background="#0361AB"
    android:layout_width="match_parent"
    android:layout_height="match_parent">

    <TextView
        android:layout_width="wrap_content"
        android:layout_height="wrap_content"
        android:layout_gravity="center_horizontal"
        android:textSize="20sp"
        android:text="This is a right fragment"/>
</LinearLayout>
LeftFragment.java and rightfragment java
Create a LeftFragment 'class and let it inherit the Fragment. Using the Fragment in the support-v4 library can maintain the functional consistency of the Fragment in all Android system versions.
inflate(): left_fragment is loaded in.
public class LeftFragment extends Fragment {

    @Override
    public View onCreateView(LayoutInflater inflater, ViewGroup container, Bundle savedInstanceState) {
        View view = inflater.inflate(R.layout.left_fragment,container,false);
        return view;
    }
}
Similarly, create a RightFragment
public class RightFragment extends Fragment {

    @Override
    public View onCreateView(LayoutInflater inflater, ViewGroup container, Bundle savedInstanceState) {
        View view = inflater.inflate(R.layout.right_fragment,container,false);
        return view;
    }
}
activity_main.xml
android:name: displays the name of the fragment class to be added
<LinearLayout xmlns:android="http://schemas.android.com/apk/res/android"
    android:layout_width="match_parent"
    android:layout_height="match_parent">

    <fragment
        android:id="@+id/left_fragment"
        android:name="com.example.fragmenttest.LeftFragment"
        android:layout_width="0dp"
        android:layout_height="match_parent"
        android:layout_weight="1"/>

    <fragment
        android:id="@+id/right_fragment"
        android:name="com.example.fragmenttest.RightFragment"
        android:layout_width="0dp"
        android:layout_height="match_parent"
        android:layout_weight="1"/>

</LinearLayout>
Dynamically add fragments
The power of fragments is that they can be dynamically added to activities when the program is running
another_right_fragment.xml
<LinearLayout xmlns:android="http://schemas.android.com/apk/res/android"
    android:orientation="vertical"
    android:background="#FFEB3B"
    android:layout_width="match_parent"
    android:layout_height="match_parent">

    <TextView
        android:layout_width="wrap_content"
        android:layout_height="wrap_content"
        android:layout_gravity="center_horizontal"
        android:textSize="20sp"
        android:text="This is another right fragment"/>

</LinearLayout>
AnotherRightFragment.java
public class AnotherRightFragment extends Fragment {

    @Override
    public View onCreateView(LayoutInflater inflater,ViewGroup container,Bundle savedInstanceState) {
        View view = inflater.inflate(R.layout.another_right_fragment,container,false);
        return view;
    }
}
activity_main.xml
FrameLayout: the simplest layout. All controls are placed in the upper left corner of the layout by default
<LinearLayout xmlns:android="http://schemas.android.com/apk/res/android"
    android:layout_width="match_parent"
    android:layout_height="match_parent">

    <fragment
        android:id="@+id/left_fragment"
        android:name="com.example.fragmenttest.LeftFragment"
        android:layout_width="0dp"
        android:layout_height="match_parent"
        android:layout_weight="1"/>

    <FrameLayout
        android:id="@+id/right_layout"
        android:layout_width="0dp"
        android:layout_height="match_parent"
        android:layout_weight="1">
    </FrameLayout>

</LinearLayout>
MainActivity.java
First we registered a click event on the button in the left fragment, then called the replaceFragment() method to dynamically add the RightFragment fragment. When the button in the left fragment is clicked, the replaceFragment() method will be called again to replace the right fragment with AnotherRightFragment. As can be seen from the code in the replaceFragment() method, adding fragments dynamically is mainly divided into five steps.
- Create the fragment instance to be added.
- Get the FragmentManager, which can be obtained directly by calling the getSupportFragmentManager() method in the activity.
- Start a transaction by calling the beginTransaction() method.
- Adding or replacing fragments to the container is generally implemented using the replace() method. You need to pass in the id of the container and the fragment instance to be added.
- Commit the transaction and call the commit() method to complete it.
public class MainActivity extends AppCompatActivity implements View.OnClickListener{

    @Override
    protected void onCreate(Bundle savedInstanceState) {
        super.onCreate(savedInstanceState);
        setContentView(R.layout.activity_main);
        Button button = (Button) findViewById(R.id.button);
        button.setOnClickListener(this);
        replaceFragment(new RightFragment());
    }

    @Override
    public void onClick(View view) {
        switch(view.getId()){
            case R.id.button:
                replaceFragment(new AnotherRightFragment());
            default:
                break;
        }
    }

    private void replaceFragment(Fragment fragment) {
        FragmentManager fragmentManager = getSupportFragmentManager();
        FragmentTransaction transaction = fragmentManager.beginTransaction();
        transaction.replace(R.id.right_layout,fragment);
        transaction.commit();
    }
}
Simulated return stack
MainActivity.java
addToBackStack(): add a transaction to the return stack and receive a name to describe the status of the return stack. Generally, null is passed in
private void replaceFragment(Fragment fragment) {
        FragmentManager fragmentManager = getSupportFragmentManager();
        FragmentTransaction transaction = fragmentManager.beginTransaction();
        transaction.replace(R.id.right_layout,fragment);
        transaction.addToBackStack(null);
        transaction.commit();
    }
Communication between debris and activities
- Findfragmentbyid(): get fragment instance from layout file. For example:
RightFragment rightFragment = (RightFragment) getFragmentManager().findFragmentById(R.id.right_fragment);
- getActivity(): get the activity instance related to the current fragment This method can also be used when using the Context object in the fragment, because the obtained activity itself is a Context object
MainActivity activity = (MainActivity) getActivity();
Life cycle fragment
- onAttach() is called when the fragment is associated with the activity.
- onCreateView() is called when you create a view (load layout) for the fragment.
- onActivityCreated() is called when the activity associated with the fragment must have been created.
- onDestroyView() is called when the view associated with the fragment is removed.
- onDetach() is called when the fragment is disassociated from the activity.
Experience the fragment life cycle
RightFragment.java
public class RightFragment extends Fragment {
    public static final String TAG = "RightFragment";

    @Override
    public void onAttach(Context context) {
        super.onAttach(context);
        Log.d(TAG,"onAttach");
    }

    @Override
    public void onCreate(Bundle savedInstanceState) {
        super.onCreate(savedInstanceState);
        Log.d(TAG,"onCreate");
    }

    @Override
    public View onCreateView(LayoutInflater inflater, ViewGroup container, Bundle savedInstanceState) {
        Log.d(TAG,"onCreateView");
        View view = inflater.inflate(R.layout.right_fragment,container,false);
        return view;
    }

    @Override
    public void onActivityCreated(Bundle savedInstanceState) {
        super.onActivityCreated(savedInstanceState);
        Log.d(TAG,"onActivityCreated");
    }

    @Override
    public void onStart() {
        super.onStart();
        Log.d(TAG,"onStart");
    }

    @Override
    public void onResume() {
        super.onResume();
        Log.d(TAG,"onResume");
    }

    @Override
    public void onPause() {
        super.onPause();
        Log.d(TAG,"onPause");
    }

    @Override
    public void onStop() {
        super.onStop();
        Log.d(TAG,"onStop");
    }

    @Override
    public void onDestroyView() {
        super.onDestroyView();
        Log.d(TAG,"onDestroyView");
    }

    @Override
    public void onDestroy() {
        super.onDestroy();
        Log.d(TAG,"onDestroy");
    }

    @Override
    public void onDetach() {
        super.onDetach();
        Log.d(TAG,"onDetach");
    }
}
In the fragment, you can also save data through onSaveInstanceState(). The saved data is in onCreate(), onCreateView(), onActivityCreated()
Dynamic loading layout
Use qualifier
Determine whether single page or two page mode:
layout/activity_ The main layout contains only one fragment, that is, the single page mode, while the layout - largelactivity_ The main layout contains two fragments, the two page mode. Large is a qualifier. Devices whose screens are considered to be large will automatically load the layout under the layout large folder, while devices with small screens will still load the layout under the layout folder.
layout\activity_main.xml
<LinearLayout xmlns:android="http://schemas.android.com/apk/res/android"
    android:layout_width="match_parent"
    android:layout_height="match_parent">

    <fragment
        android:id="@+id/left_fragment"
        android:name="com.example.fragmenttest.LeftFragment"
        android:layout_width="match_parent"
        android:layout_height="match_parent" />
</LinearLayout>
large\activity_main.xml
Under res, create a new layout large folder, where you can create an activity_main.xml
<LinearLayout xmlns:android="http://schemas.android.com/apk/res/android"
    android:orientation="horizontal"
    android:layout_width="match_parent"
    android:layout_height="match_parent">

    <fragment
        android:id="@+id/left_fragment"
        android:name="com.example.fragmenttest.LeftFragment"
        android:layout_width="0dp"
        android:layout_height="match_parent"
        android:layout_weight="1"/>

    <fragment
        android:id="@+id/right_fragment"
        android:name="com.example.fragmenttest.RightFragment"
        android:layout_width="0dp"
        android:layout_height="match_parent"
        android:layout_weight="3"/>

</LinearLayout>

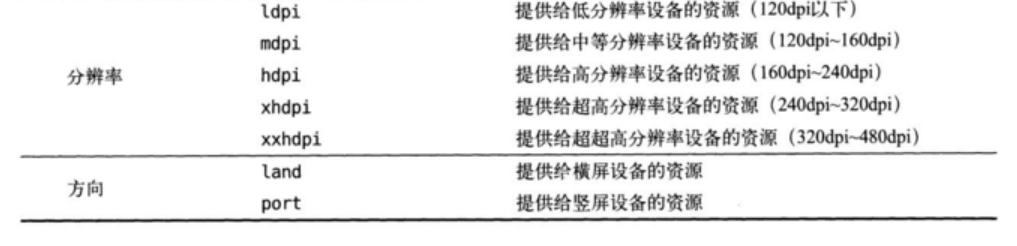
Use minimum width qualifier
The minimum width qualifier allows us to specify a minimum value (in dp) for the screen width, and then take this minimum value as the critical point. Devices with a screen width greater than this value load one layout, and devices with a screen width less than this value load another layout.
Create a new layout-sw600dp folder under res and create an activity in it_ main. xml
sw600dp\activity_main.xml
<LinearLayout xmlns:android="http://schemas.android.com/apk/res/android"
    android:orientation="horizontal"
    android:layout_width="match_parent"
    android:layout_height="match_parent">

    <fragment
        android:id="@+id/left_fragment"
        android:name="com.example.fragmenttest.LeftFragment"
        android:layout_width="0dp"
        android:layout_height="match_parent"
        android:layout_weight="1"/>

    <fragment
        android:id="@+id/right_fragment"
        android:name="com.example.fragmenttest.RightFragment"
        android:layout_width="0dp"
        android:layout_height="match_parent"
        android:layout_weight="3"/>

</LinearLayout>
Simple news application
Create a new project FragmentBestPractice in build Add under gradle
implementation 'androidx.recyclerview:recyclerview:1.0.0'
- In two page mode:
news.java
New news class
public class News {
    private String title;

    private String content;

    public String getTitle() {
        return title;
    }

    public String getContent() {
        return content;
    }

    public void setContent(String content) {
        this.content = content;
    }

    public void setTitle(String title) {
        this.title = title;
    }
}
news_content_frag.xml
view: used to display a straight line
android:padding: make the content in the control a certain distance from the edge of the control
<RelativeLayout xmlns:android="http://schemas.android.com/apk/res/android"
    android:layout_width="match_parent"
    android:layout_height="match_parent">

    <LinearLyout
        android:id="@+id/visible_layout"
        android:layout_width="match_parent"
        android:layout_height="wrap_content"
        android:gravity="center"
        android:textSize="20dp">

        <TextView
            android:id="@+id/news_title"
            android:layout_width="match_parent"
            android:lauoyt_height="wrap_content"
            android:gravity="center"
            android:padding="10dp"
            android:textSize="20sp"/>
        <View
            android:layout_width="match_parent"
            android:layout_heigjt="1dp"
            android:background="#000"/>

        <TextView
            android:id="@+id/news_content"
            android:layout_width="match_parent"
            android:lauoyt_height="0dp"
            android:weight="1"
            android:padding="15dp"
            android:textSize="18sp"/>

    </LinearLyout>

    <View
        android:layout_width="1dp"
        android:layout_height="match_parent"
        android:layout_alignParentBottom="true"
        android:background="#000"/>

</RelativeLayout>
NewsContentFragment.java
Create a new NewsContentFragment inheritance Fragment class
public class NewsContentFragment extends Fragment {
    private View view;


    @Override
    public View onCreateView(LayoutInflater inflater, ViewGroup container, Bundle savedInstanceState) {
        view = inflater.inflate(R.layout.news_content_frag,container,false);
        return view;
    }

    public void refresh(String newsTitle,String newsContent){   //Display the title and content of the news on the interface
        View visibilityLayout = view.findViewById(R.id.visible_layout);
        visibilityLayout.setVisibility(view.VISIBLE);
        TextView newsTitleText = (TextView) view.findViewById(R.id.news_title);
        TextView newsContentText = (TextView) view.findViewById(R.id.news_content);
        newsTitleText.setText(newsTitle);    //Refresh the title of the news
        newsContentText.setText(newsContent); //Refresh news content
    }
}
- Single page mode
newsContentActivity.java
public class newsContentActivity extends AppCompatActivity {

    public static void actionStart(Context context,String newsTitle,String newsContent){
        Intent intent = new Intent(context,NewsContentFragment.class);
        intent.putExtra("new_title",newsTitle);  //Temporarily store the data you want to transfer in intent
        intent.putExtra("news_content",newsContent);
        context.startActivity(intent);
    }

    @Override
    protected void onCreate(Bundle savedInstanceState) {
        super.onCreate(savedInstanceState);
        setContentView(R.layout.news_content);
        String newsTitle = getIntent().getStringExtra("news_title");  //Get incoming news headlines
        String newsContent = getIntent().getStringExtra("news_content");  //Get incoming news content
        //Refresh the newsContentFragment interface
        NewsContentFragment newsContentFragment = (NewsContentFragment) getSupportFragmentManager().findFragmentById(R.id.news_content_fragment);
    }
}
news_title_frag.xml
Displays the layout of the news list
<LinearLayout xmlns:android="http://schemas.android.com/apk/res/android"
    android:orientation="horizontal"
    android:layout_width="match_parent"
    android:layout_height="match_parent">

    <androidx.recyclerview.widget.RecyclerView
        android:id="@+id/news_title_recycler_view"
        android:layout_width="match_parent"
        android:layout_height="match_parent"/>

</LinearLayout>
news_item.xml
Layout as a RecyclerView child
android:singleLine="true": can only be displayed in a single line
android:ellipsize="end": set the text abbreviation when the text content exceeds the width of the control. Specify end here to indicate the abbreviation at the end
<TextView xmlns:android="http://schemas.android.com/apk/res/android"
    android:id="@+id/news_title"
    android:layout_width="match_parent"
    android:layout_height="wrap_content"
    android:singleLine="true"
    android:ellipsize="end"
    android:textSize="18sp"
    android:paddingLeft="10dp"
    android:paddingRight="10dp"
    android:paddingTop="15dp"
    android:paddingBottom="15dp"/>
NewsTitleFragment.java
public class NewsTitleFragment extends Fragment {
    private boolean isTwoPane;


    @Override
    public View onCreateView(LayoutInflater inflater,ViewGroup container,Bundle savedInstanceState) {
        View view = inflater.inflate(R.layout.news_content_frag,container,false);
        return view;
    }

    @Override
    public void onActivityCreated(Bundle savedInstanceState) {
        super.onActivityCreated(savedInstanceState);
        if(getActivity().findViewById(R.id.news_content_layout) !=null){
            isTwoPane = true;   //You can find news_content_layout is in two page mode
        }else{
            isTwoPane = false;  //Single page mode not found
        }
    }
}
activity_main.xml
In single page mode, only one fragment of news title will be loaded
<FrameLayout xmlns:android="http://schemas.android.com/apk/res/android"

    android:layout_width="match_parent"
    android:layout_height="match_parent">

    <fragment
        android:id="@+id/news_title_fragment"
        android:name="com.example.fragmengbestpractice.NewsTitleFragment"
        android:layout_width="match_parent"
        android:layout_height="match_parent"/>

</FrameLayout>
sw600dp\activity_main.xml
<LinearLayout xmlns:android="http://schemas.android.com/apk/res/android"
    android:orientation="horizontal"
    android:layout_width="match_parent"
    android:layout_height="match_parent">

    <fragment
        android:id="@+id/news_title_fragment"
        android:name="com.example.fragmengbestpractice.NewsTitleFragment"
        android:layout_width="0dp"
        android:layout_height="match_parent"
        android:layout_weight="1"/>

    <FrameLayout
        android:id="@+id/news_content_layout"
        android:layout_width="0dp"
        android:layout_height="match_parent"
        android:layout_weight="3">

        <fragment
            android:id="@+id/news_content_fragment"
            android:name="com.example.fragmengbestpractice.NewsContentFragment"
            android:layout_width="match_parent"
            android:layout_height="match_parent" />
    </FrameLayout>

</LinearLayout>
NewsTitleFragment.java
Add the inner class NewsAdapter in NewsTitleFragment as the adapter of RecyclerView
class NewsAdapter extends RecyclerView.Adapter<NewsAdapter.ViewHolder>{
        private List<News> mNewsList;

        public NewsAdapter(List<News> newsList){
            mNewsList = newsList;
        }

        @Override
        public ViewHolder onCreateViewHolder(ViewGroup parent, int viewType) {
            View view = LayoutInflater.from(parent.getContext()).inflate(R.layout.news_item,parent,false);
            final ViewHolder holder = new ViewHolder(view);
            view.setOnClickListener(new View.OnClickListener() {
                @Override
                public void onClick(View view) {
                    News news = mNewsList.get(holder.getAdapterPosition());
                    if(isTwoPane){  //If it is a two page mode, refresh the content in NewsContentFragment
                        NewsContentFragment newsContentFragment = (NewsContentFragment) getFragmentManager().findFragmentById(R.id.news_content_fragment);
                        newsContentFragment.refresh(news.getTitle(),news.getContent());
                    }else{  //If it is in single page mode, start NewsContentActivity directly
                        NewsContentActivity.actionStart(getActivity(),news.getTitle(),news.getContent());
                    }
                }
            });
            return holder;
        }

        @Override
        public void onBindViewHolder(NewsTitleFragment.NewsAdapter.ViewHolder holder, int position) {
            News news = mNewsList.get(position);
            holder.newsTitleText.setText(news.getTitle());
        }

        @Override
        public int getItemCount() {
            return mNewsList.size();
        }

        class ViewHolder extends RecyclerView.ViewHolder{
            TextView newsTitleText;
            public ViewHolder(View view) {
                super(view);
                newsTitleText = (TextView)view.findViewById(R.id.news_title);
            }
        }
    }