The content is self-taught from station B AV244462117, P6
This article is only a self-study record, not a tutorial, and there may be fallacies
System environment: WIN10, UE4 (engine version 4.27.1), Visual Studio 2022 Community
1. Create a new plug-in
Create a stand-alone window plug-in in UE4 editor menu

2. c + + code modification
To VS file, the path is:
D:\UE4\Project\PluginsSlate (your project name) \ Test01 (your project name) \ Plugins\InDepWindow
(your plugin name) \ Source\InDepWindow (your plugin name) \ private \ indepwindow cpp
First, the system automatically generates two functions to create editor buttons, which are created by "new method".
The function to create the editor button is written under RegisterMenus. The specific statement is as follows:
FToolMenuOwnerScoped OwnerScoped(this);
	{
		UToolMenu* Menu = UToolMenus::Get()->ExtendMenu("LevelEditor.MainMenu.Window");
		{
			FToolMenuSection& Section = Menu->FindOrAddSection("WindowLayout");
			Section.AddMenuEntryWithCommandList(FInDepWindowCommands::Get().
            OpenPluginWindow, PluginCommands);
		}
	}
"LevelEditor.MainMenu.Window" means to add a button under the window tab in the main menu of the editor, and "WindowLayout" means to add a button after the window layout section of the window tab drop-down menu. In addition, you can add buttons almost anywhere in the editor, just modify the above two fields.
2.1 header file and pre name declaration
First add the header file:
#include "Widgets/Input/SSlider.h"
This step is mainly to add the Tab with slider in the future. If this function is not required, there is no need to declare the header file.
Define the name of Tab:
static const FName MyTab01("MyTab01");
static const FName MyTab02("MyTab02");
The names of two custom tabs are declared here.
2.2 style and function of tab
This part is written in StartupModule and uses Slate statement. Although it is also a C + + statement, it is not very similar to our common C + + statements in appearance. We need to be familiar with this expression. The following is a statement to create a new Tab in the outgoing independent window with a button in the Tab:
FGlobalTabmanager::Get()->RegisterNomadTabSpawner(MyTab01,
			FOnSpawnTab::CreateLambda([](const FSpawnTabArgs& SpawnTabArgs) {
				FText WidgetText = LOCTEXT("WindowMyTab1Text", "MyButton");
				return SNew(SDockTab)
					.TabRole(ETabRole::NomadTab)
					[
						// Put your tab content here!
						SNew(SButton)
						.HAlign(HAlign_Fill)
						.VAlign(VAlign_Fill)
						.OnClicked_Lambda(
							[]() {
								UE_LOG(LogTemp, Warning, TEXT("Successfully invoked!"));
								return FReply::Handled();
							}
					)
					[
						SNew(STextBlock)
						.Text(WidgetText)
					]
					];
				}))
				.SetDisplayName(LOCTEXT("MyTab0TabTitle", "MyTab0"))
				.SetMenuType(ETabSpawnerMenuType::Enabled);
In the first line, MyTab01 is the facing Tab object. The Slate statement constrains the style of the Tab and specifically creates a button. The button is filled with tabs vertically and horizontally. After clicking the button, we can see the printed statement "Successfully invoked" in the UE4 output log to remind us that the function of the button has been compiled successfully.
2.3 click button to call function statement
If we only carry out steps 2.1 ~ 2.2 and write our functions, but do not create a causal relationship between "what we click this button to do" and "what we want to achieve", then our previous work is in vain.
You need to make a declaration under PluginButtonClicke:
FGlobalTabmanager::Get()->TryInvokeTab(MyTab01);
The following figure shows the button style after the function is realized:

Open the output log window through window → developer tools → output log, and click the button to observe:
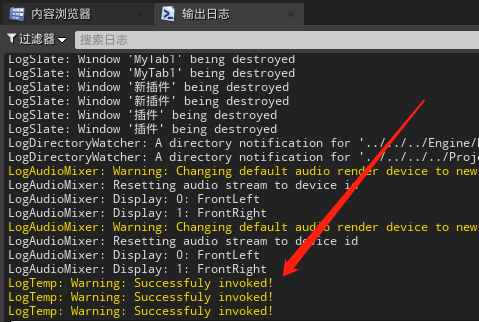
If the predetermined statement appears (click three times, so it appears three times), the function is successfully realized
*Attention *
1. There is also a progress bar style Tab in the up main tutorial, which is not described here.
2. In the current attempt, the changes made will not be immediately displayed in the UE4 editor after C + + code compilation, and the changes cannot be realized by refreshing the vs file of upproject. The changes can only be seen by closing UE4 and reopening the project.
3. If the plug-in is created successfully, the Settings button will not be used in the toolbar after the plug-in is created successfully. 3. If the plug-in is created successfully, the plug-in will not be used in the same place.