This article is excerpted from Blob Detection Using OpenCV ( Python, C++ ) The summary of image block detection methods is used for later learning and engineering application.
§ 00 preamble
This article is excerpted from Blob Detection Using OpenCV ( Python, C++ ) The summary of image block detection methods is used for later learning and engineering application.
this paper will introduce a simple image block detection algorithm using OpenCV.
0.1 what is an image block?
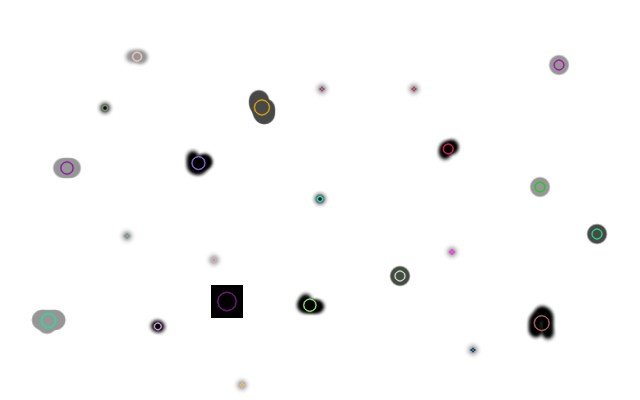
the so-called image block is a group of adjacent pixel regions with the same characteristics (such as gray value) in the image. In the previous image, those adjacent black pixel areas are image blocks. Image block detection is to find and mark these areas.
0.2 sample code of detection
OpenCV provides a convenient way to detect image blocks and filter them out using different features. Let's start with a simple example:
- Python
# Standard imports
import cv2
import numpy as np;

# Read image
im = cv2.imread("blob.jpg", cv2.IMREAD_GRAYSCALE)

# Set up the detector with default parameters.
detector = cv2.SimpleBlobDetector()

# Detect blobs.
keypoints = detector.detect(im)

# Draw detected blobs as red circles.
# cv2.DRAW_MATCHES_FLAGS_DRAW_RICH_KEYPOINTS ensures the size of the circle corresponds to the size of blob
im_with_keypoints = cv2.drawKeypoints(im, keypoints, np.array([]), (0,0,255), cv2.DRAW_MATCHES_FLAGS_DRAW_RICH_KEYPOINTS)

# Show keypoints
cv2.imshow("Keypoints", im_with_keypoints)
cv2.waitKey(0)
- C++
using namespace cv;
// Read image
Mat im = imread( "blob.jpg", IMREAD_GRAYSCALE );

// Set up the detector with default parameters.
SimpleBlobDetector detector;

// Detect blobs.
std::vector<KeyPoint> keypoints;
detector.detect( im, keypoints);

// Draw detected blobs as red circles.
// DrawMatchesFlags::DRAW_RICH_KEYPOINTS flag ensures the size of the circle corresponds to the size of blob
Mat im_with_keypoints;
drawKeypoints( im, keypoints, im_with_keypoints, Scalar(0,0,255), DrawMatchesFlags::DRAW_RICH_KEYPOINTS );

// Show blobs
imshow("keypoints", im_with_keypoints );
waitKey(0);
§ 01 test method
1.1 test standard
SimpleBlockDetector, like the name of the function, is based on the simple algorithm described below. Control the algorithm through parameters (black bold font in the text below) and use the following steps to realize it. Learn how these parameters are set through the following section.
- Thresholding : Convert the source images to several binary images by thresholding the source image with thresholds starting at minThreshold. These thresholds are incremented by thresholdStep until maxThreshold. So the first threshold is minThreshold, the second is minThreshold + thresholdStep, the third is minThreshold + 2 x thresholdStep, and so on.
- Grouping : In each binary image, connected white pixels are grouped together. Let's call these binary blobs.
- Merging : The centers of the binary blobs in the binary images are computed, and blobs located closer than minDistBetweenBlobs are merged.
- Center & Radius Calculation : The centers and radii of the new merged blobs are computed and returned.
1.2 test parameters
the detection principle is through the color, size and shape of the image block. The detection method is formulated by setting the parameters of SimpleBlobDetector, so as to filter out the corresponding image blocks.
1.2.1 color
the detection algorithm based on this feature seems to be unsustainable. Through the test of the code, he showed that there was a logical error.
to start, you need to set filterByColor=1. Set blockColor=0 to select a black image, and blockcolor = 255 is to detect a bright image block. Through size: you can select different image blocks based on the size through the parameter filterByArea=1, select the appropriate minarea and maxarea parameters, and set the detection range. For example, setting minArea=100 means that the image block has at least 100 pixels. Through the shape method: with three different parameters. The following are given in turn.
1.2.2 roundness
this is used to measure the similarity between the image block and the circle. A regular hexagon is closer to a circle than the positive direction. Select the roundness method by setting filterByCircularity=1. Select the appropriate parameter roundness range of mincircularity and maxcircularity. Roundness is defined as:
C i r c u l a r i t y = 4 π A r e a ( P e r i m e t e r ) 2 Circularity = {{4\pi Area} \over {\left( {Perimeter} \right)^2 }} Circularity=(Perimeter)24πArea
this indicates that the roundness of the circle is 1, the roundness of the square is 0.785, and so on.
1.2.3 convexity
a picture is worth a thousand words. Convexity is defined as (area of image block / area covered by convexity). Convex covering is a convex figure that tightly surrounds the image. Set filterByConvexity=1 to select convexity to detect the image, and use 0 ≤ minConvexity ≤ 1 and maxConvexity ≤ 1 to indicate the detection parameter range.
1.2.4 inertia ratio
don't scare you because of this noun. Using these difficult words in mathematics can describe the characteristics of objects very concisely. What you need to know is that the inertia ratio is a measure of how a shape is elongated. For example, a circle, the inertia ratio is 1. The inertia ratio of an ellipse is between 0 and 1, and for a straight line, the corresponding inertia ratio is 0 To filter the image block by using the inertia ratio, you need to set filterByInertia=1, and indicate the detection parameter range through the miniinertialratio and maxiinertiaratio parameters between 0 and 1.
§ 02 implementation code
setting up SimpleBlobDetector is very easy. The corresponding code example is given below.
- Python
# Setup SimpleBlobDetector parameters.
params = cv2.SimpleBlobDetector_Params()

# Change thresholds
params.minThreshold = 10;
params.maxThreshold = 200;

# Filter by Area.
params.filterByArea = True
params.minArea = 1500

# Filter by Circularity
params.filterByCircularity = True
params.minCircularity = 0.1

# Filter by Convexity
params.filterByConvexity = True
params.minConvexity = 0.87

# Filter by Inertia
params.filterByInertia = True
params.minInertiaRatio = 0.01

# Create a detector with the parameters
ver = (cv2.__version__).split('.')
if int(ver[0]) < 3 :
	detector = cv2.SimpleBlobDetector(params)
else :
	detector = cv2.SimpleBlobDetector_create(params)
- C++
compared with OpenCV3, there is a slight difference in setting the SimpleBlobDetector parameter in OpenCV2. The following code uses macros to define CVs_ MAJOR_ Version to check the version of OpenCV. In OpenCV3, the SimpleBlobDetector::create method creates a flexible pointer. The following code gives the corresponding usage:
// Setup SimpleBlobDetector parameters.
SimpleBlobDetector::Params params;

// Change thresholds
params.minThreshold = 10;
params.maxThreshold = 200;

// Filter by Area.
params.filterByArea = true;
params.minArea = 1500;

// Filter by Circularity
params.filterByCircularity = true;
params.minCircularity = 0.1;

// Filter by Convexity
params.filterByConvexity = true;
params.minConvexity = 0.87;

// Filter by Inertia
params.filterByInertia = true;
params.minInertiaRatio = 0.01;

#if CV_MAJOR_VERSION < 3   // If you are using OpenCV 2

  // Set up detector with params
  SimpleBlobDetector detector(params);

  // You can use the detector this way
  // detector.detect( im, keypoints);

#else

  // Set up detector with params
  Ptr<SimpleBlobDetector> detector = SimpleBlobDetector::create(params);

  // SimpleBlobDetector::create creates a smart pointer.
  // So you need to use arrow ( ->) instead of dot ( . )
  // detector->detect( im, keypoints);

#endif

※ general ※ conclusion ※
this article Blob Detection Using OpenCV ( Python, C++ ) Si is introduced in
summarize the usage of the mpleBlobDetector function for future learning and use.
■ links to relevant literature:
● links to relevant charts: