kubeadm is a tool launched by the official community for rapid deployment of kubernetes clusters.
This tool can deploy a kubernetes cluster through two instructions:
# Create a Master node
kubeadm init

# Add a Node to the current cluster
kubeadm join <Master Nodal IP And ports >
Build K8S cluster in kubedm mode
Building a K8s cluster using kubedm is mainly divided into the following steps
- Prepare three virtual machines and install the operating system CentOS 7 x
- Initialize the three installed operating systems
- Install docker kubelet kubedm kubectl on three nodes
- Execute the kubedm init command on the master node to initialize
- Execute the kubedm join command on the node node to add the node node to the current cluster
- Configure CNI network plug-in for connectivity between nodes [if it fails, you can try several more times]
- By pulling an nginx for testing, can you test the Internet
Installation requirements
Before you start, you need to meet the following conditions to deploy Kubernetes cluster machines:
- One or more machines, operating system centos7 x-86_ x64
- Hardware configuration: 2GB or more RAM, 2 CPUs or more CPUs, 30GB or more hard disk [note that the master requires two cores] (set the memory and CPU here in advance, otherwise there will be problems later, and it needs to be reset at that time)
- You can access the external network and need to pull the image. If the server cannot access the Internet, you need to download the image in advance and import the node
- Disable swap partition
Prepare environment
| role | Own host IP address |
|---|---|
| master | 192.168.56.129 |
| node1 | 192.168.56.130 |
| node2 | 192.168.56.131 |
Then start executing the following commands on each machine
# Turn off firewall
systemctl stop firewalld
systemctl disable firewalld

# Close selinux
# Permanent shutdown
sed -i 's/enforcing/disabled/' /etc/selinux/config
# Temporarily Closed
setenforce 0

# Close swap
# temporary
swapoff -a
# Permanent shutdown
sed -ri 's/.*swap.*/#&/' /etc/fstab

# Set the host name according to the plan [operate on the master node]
hostnamectl set-hostname k8smaster
# Set the host name according to the plan [node1 node operation]
hostnamectl set-hostname k8snode1
# Set the host name according to the plan [node2 node operation]
hostnamectl set-hostname k8snode2

# Add hosts in master
cat >> /etc/hosts << EOF
192.168.56.129 k8smaster
192.168.56.130 k8snode1
192.168.56.131 k8snode2
EOF

# The chain that passes bridged IPv4 traffic to iptables
cat > /etc/sysctl.d/k8s.conf << EOF
net.bridge.bridge-nf-call-ip6tables = 1
net.bridge.bridge-nf-call-iptables = 1
EOF
# take effect
sysctl --system

# time synchronization
yum install ntpdate -y
ntpdate time.windows.com
Install docker / kubedm / kubelet
Docker / kubedm / kubelet is installed on all nodes. By default, the CRI (container runtime) of Kubernetes is docker, so docker is installed first
Install Docker
First, configure the Alibaba yum source of Docker
cat >/etc/yum.repos.d/docker.repo<<EOF
[docker-ce-edge]
name=Docker CE Edge - \$basearch
baseurl=https://mirrors.aliyun.com/docker-ce/linux/centos/7/\$basearch/edge
enabled=1
gpgcheck=1
gpgkey=https://mirrors.aliyun.com/docker-ce/linux/centos/gpg
EOF
Then install docker using yum or up2date
# Install using yum or up2date
yum -y install docker-ce

# View docker version
docker --version

# Start docker
systemctl enable docker
systemctl start docker
Configure the image source of docker
cat >> /etc/docker/daemon.json << EOF
{
  "registry-mirrors": ["https://b9pmyelo.mirror.aliyuncs.com"]
}
EOF
Then restart docker
systemctl restart docker
Add kubernetes software source
Then we need to configure yum's k8s software source
cat > /etc/yum.repos.d/kubernetes.repo << EOF
[kubernetes]
name=Kubernetes
baseurl=https://mirrors.aliyun.com/kubernetes/yum/repos/kubernetes-el7-x86_64
enabled=1
gpgcheck=0
repo_gpgcheck=0
gpgkey=https://mirrors.aliyun.com/kubernetes/yum/doc/yum-key.gpg https://mirrors.aliyun.com/kubernetes/yum/doc/rpm-package-key.gpg
EOF
Install kubedm, kubelet, and kubectl
You need to install the following packages on each machine:
- Kubedm: the instruction used to initialize the cluster.
- kubelet: used to start pod s, containers, etc. on each node in the cluster.
- kubectl: command line tool used to communicate with the cluster.
Kubedm cannot install or manage kubelet or kubectl for you, so you need to ensure that they match the version of the control plane installed through kubedm. If this is not done, there is a risk of version deviation, which may lead to some unexpected errors and problems.
Due to frequent version updates, the version number deployment is specified here:
# Install kubelet, kubedm, kubectl, and specify the version
yum install -y kubelet-1.20.1 kubeadm-1.20.1 kubectl-1.20.1
# Set startup
systemctl enable kubelet
Deploy Kubernetes Master node
On the master node:
[root@master ningan]# kubeadm init --apiserver-advertise-address=192.168.56.129 --image-repository registry.aliyuncs.com/google_containers --kubernetes-version v1.20.1 --service-cidr=10.96.0.0/12 --pod-network-cidr=10.244.0.0/16
Due to the default pull image address k8s gcr. IO cannot be accessed in China. Specify the address of Alibaba cloud image warehouse here. [it will be slow to execute the above command because the background is actually pulling images]
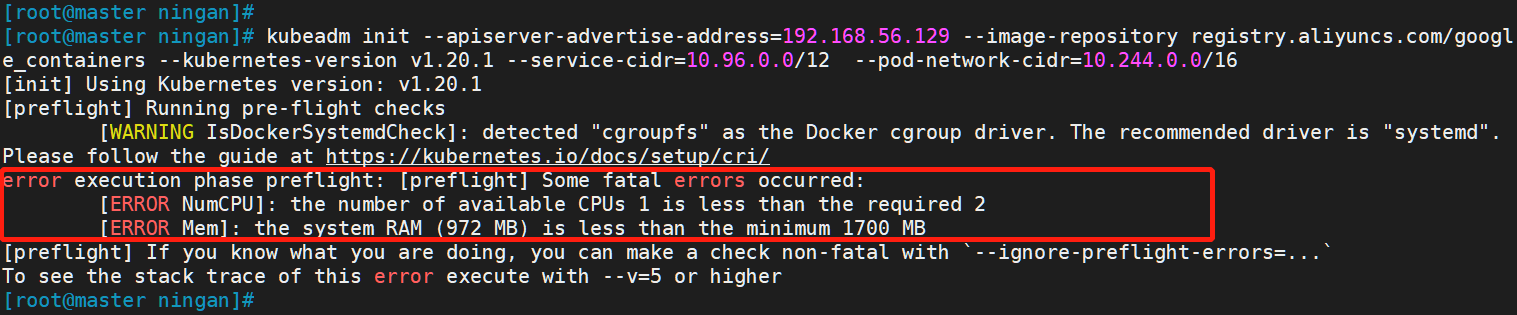
Modify the number of CPU cores to: 2
Modified memory size: 2G(2048)
Restart (it seems that it's OK not to restart...)
Re execute the above command: when the following occurs, it indicates that the kubernetes image has been installed successfully
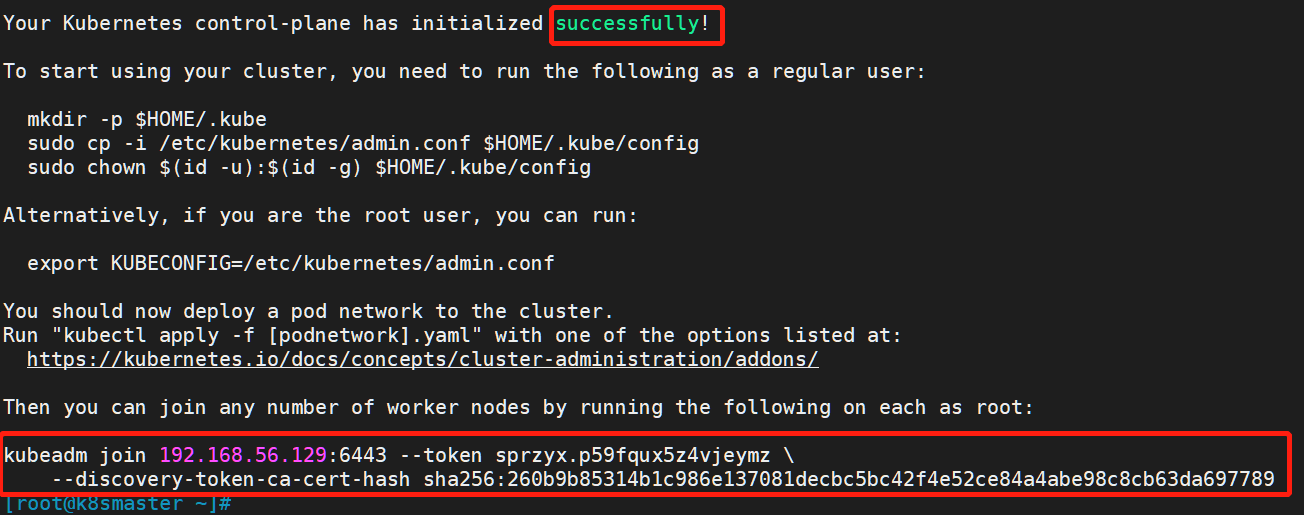
Save the following token, which will be used later when adding the node node to the master node.
kubeadm join 192.168.56.129:6443 --token sprzyx.p59fqux5z4vjeymz \
    --discovery-token-ca-cert-hash sha256:260b9b85314b1c986e137081decbc5bc42f4e52ce84a4abe98c8cb63da697789
kubectl certification
After the cluster master node is started, we need to use kubectl to manage the cluster. Before starting, we need to set its configuration file for authentication.
Use kubectl tool [master node operation]
mkdir -p $HOME/.kube
sudo cp -i /etc/kubernetes/admin.conf $HOME/.kube/config
sudo chown $(id -u):$(id -g) $HOME/.kube/config
After execution, we use the following command to view the nodes we are running
kubectl get nodes


You can see that a master node has been running, but it is not ready
Next, we need to execute other commands on the Node node to add node1 and node2 to our master Node
Join node
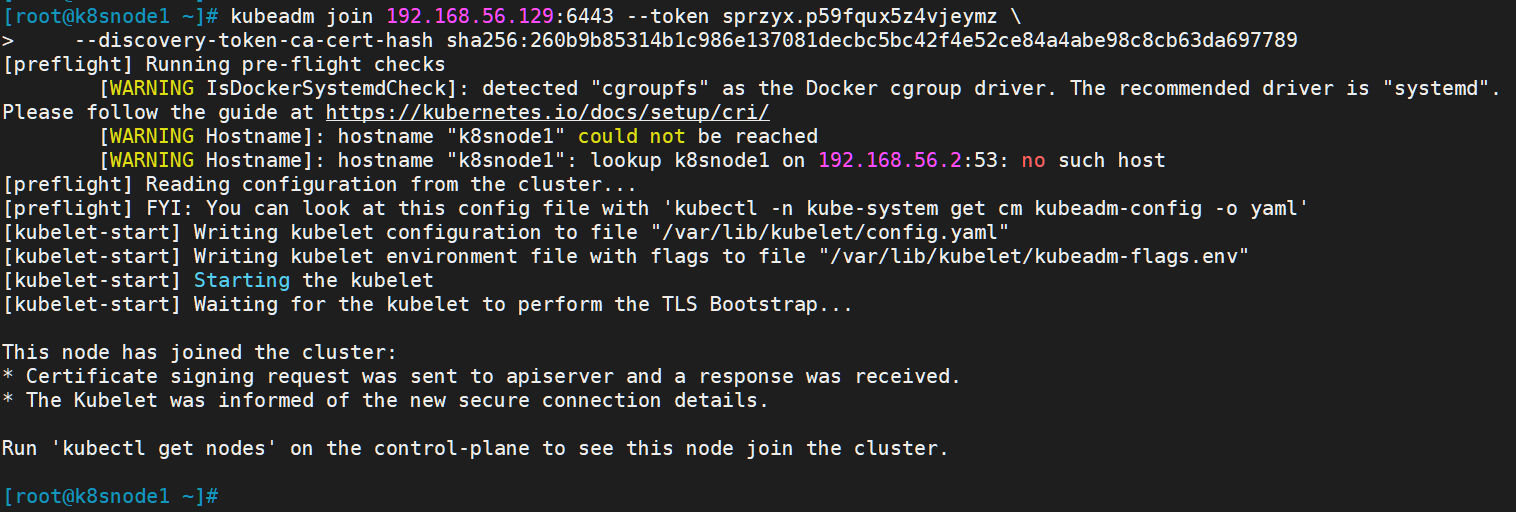
Next, we need to go to node1 and node2 servers and execute the following code to add new nodes to the cluster
Execute the kubedm join command output in kubedm init:
Note that the following commands are different for everyone after master initialization!!! You need to copy your own generated
kubeadm join 192.168.56.129:6443 --token sprzyx.p59fqux5z4vjeymz \
    --discovery-token-ca-cert-hash sha256:260b9b85314b1c986e137081decbc5bc42f4e52ce84a4abe98c8cb63da697789
The default token is valid for 24 hours. When it expires, the token will not be available. In this case, you need to re create the token, as follows:
kubeadm token create --print-join-command
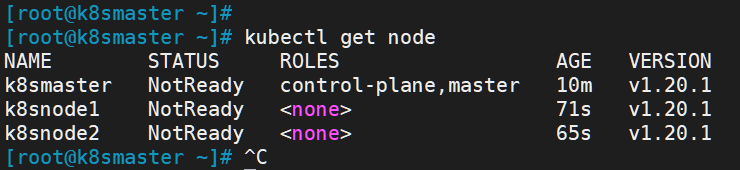
After we add both nodes, we can go to the Master node and execute the following command to check the situation
kubectl get node
Copy admin Conf and set the configuration
In order to use kubectl on the work node, the kubectl command needs to be run using kubernetes admin. Therefore, we need to copy the [/ etc/kubernetes/admin.conf] file in the master node to the same directory of the work node. scp is recommended here. The syntax is as follows:
#Copy admin Conf, execute this command on the master server
scp /etc/kubernetes/admin.conf {Current work node IP}:/etc/kubernetes/admin.conf
The specific implementation contents are as follows:
scp /etc/kubernetes/admin.conf 192.168.56.130:/etc/kubernetes/admin.conf

scp /etc/kubernetes/admin.conf 192.168.56.131:/etc/kubernetes/admin.conf
When copying, you need to enter the password of the root account of the relevant node:
After the replication is completed, we can set the kubectl configuration file so that we can also use kubectl to manage k8s clusters on the work node:
#Set kubeconfig file
export KUBECONFIG=/etc/kubernetes/admin.conf
echo "export KUBECONFIG=/etc/kubernetes/admin.conf" >> ~/.bash_profile
So far, the deployment of k8s work nodes has been preliminarily completed. Next, we need to add other work nodes to the cluster in the same way.
View cluster node status
After the cluster is created, we can enter the following command to view the current node status:
kubectl get nodes
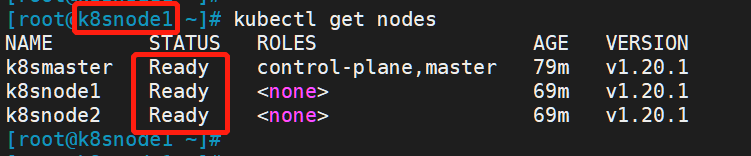
Note: This is ready because I first implemented the following steps to deploy CNI network plug-ins, and then returned to this step.
At this point, kubectl can also be used for node nodes!
Deploy CNI network plug-in
The above status is NotReady. Next, we need a network plug-in to access the network
# Download network plug-in configuration
wget https://raw.githubusercontent.com/coreos/flannel/master/Documentation/kube-flannel.yml
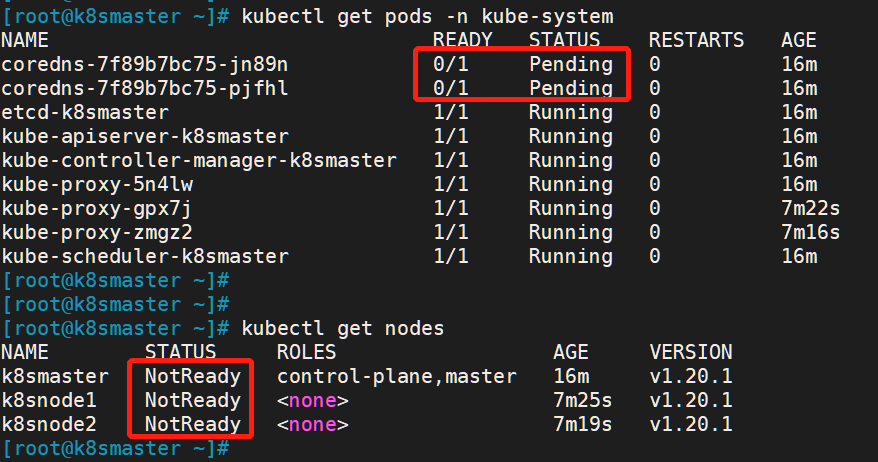
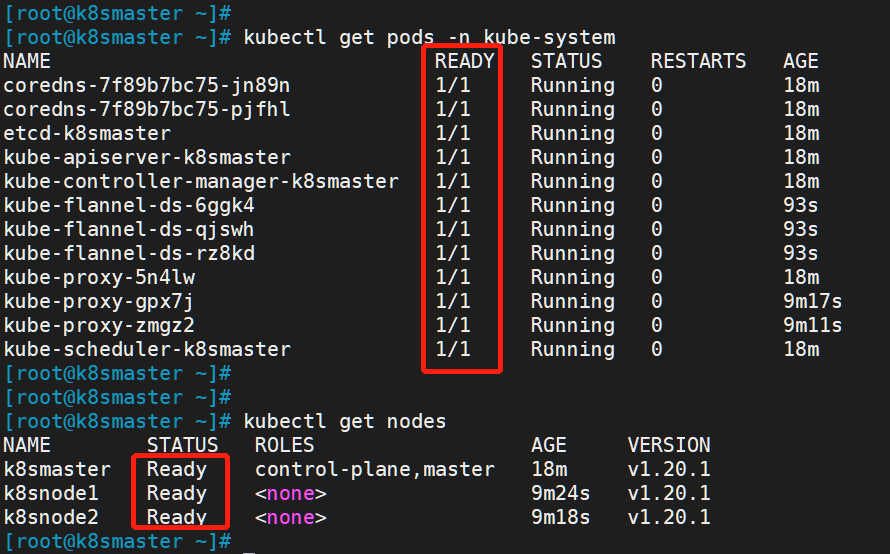
# add to
kubectl apply -f https://raw.githubusercontent.com/coreos/flannel/master/Documentation/kube-flannel.yml
# The command "kubectl apply" can be used to create and update resources. The above command uses yaml of the network path to create the flanner, that is, you can directly use the network path to apply without downloading to the local

# Check the status [Kube system is the smallest unit in k8s]
kubectl get pods -n kube-system
After running, we can find that it has changed to Ready status by checking the status
If a node is in NotReady status after the above operations are completed, you can delete the node on the Master
# master node delete this node
kubectl delete node k8snode1

# Then reset to the k8snode1 node
 kubeadm reset
# Join after reset
kubeadm join 192.168.56.129:6443 --token sprzyx.p59fqux5z4vjeymz \
    --discovery-token-ca-cert-hash sha256:260b9b85314b1c986e137081decbc5bc42f4e52ce84a4abe98c8cb63da697789
Testing kubernetes clusters: deploying applications
We all know that K8S is a container technology. It can download images online and start in a container way
Create a pod in the Kubernetes cluster and verify that it works normally:
# Download nginx [pull nginx image online]
kubectl create deployment nginx --image=nginx
# View status
kubectl get pod
If we are in Running status, it means that we have run successfully

Next, we need to expose the port so that other outsiders can access it
# Exposed port
kubectl expose deployment nginx --port=80 --type=NodePort
# Check the external port
kubectl get pod,svc

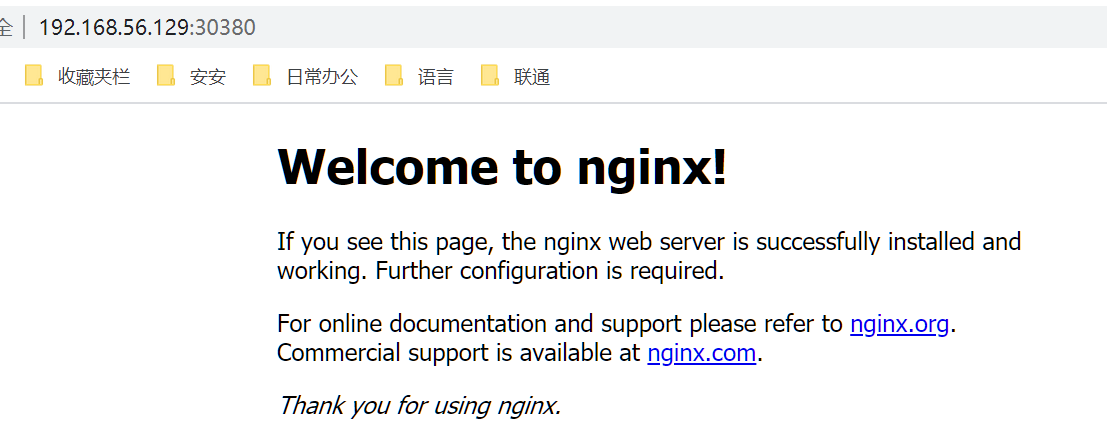
We can see that we have successfully exposed port 80 to 30380
We go to our host browser and visit the following address:
http://192.168.56.129:30380
It is found that our nginx has been successfully started
So far, we have built a single master k8s cluster. success!
Summary: v1 20.1 the construction is relatively simple without so many problems. Before using v1 Many problems occurred during the construction of 18.0, which are summarized as follows: [error resolution] kubedm is used in centos to build a single master K8S cluster , you can refer to it if necessary!