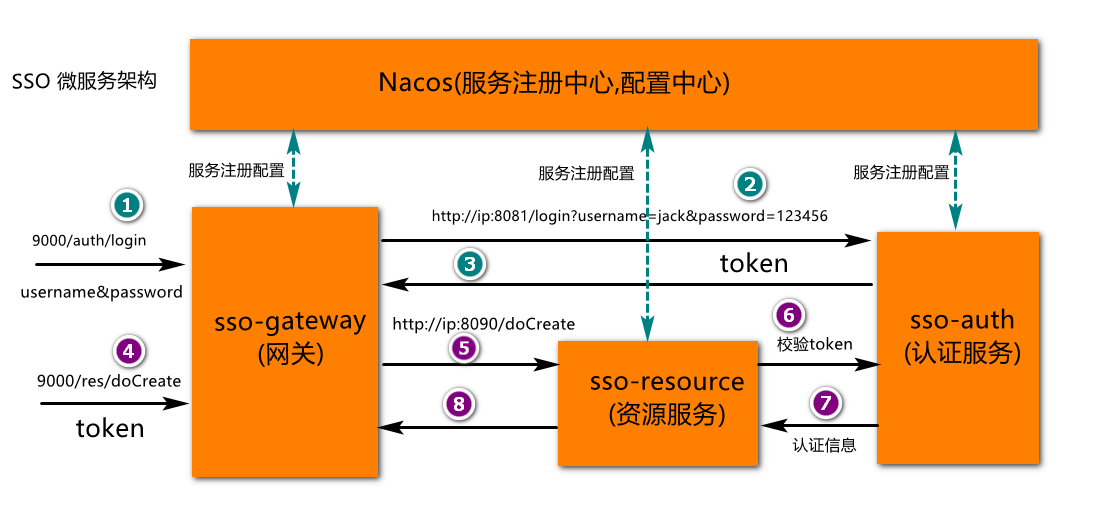
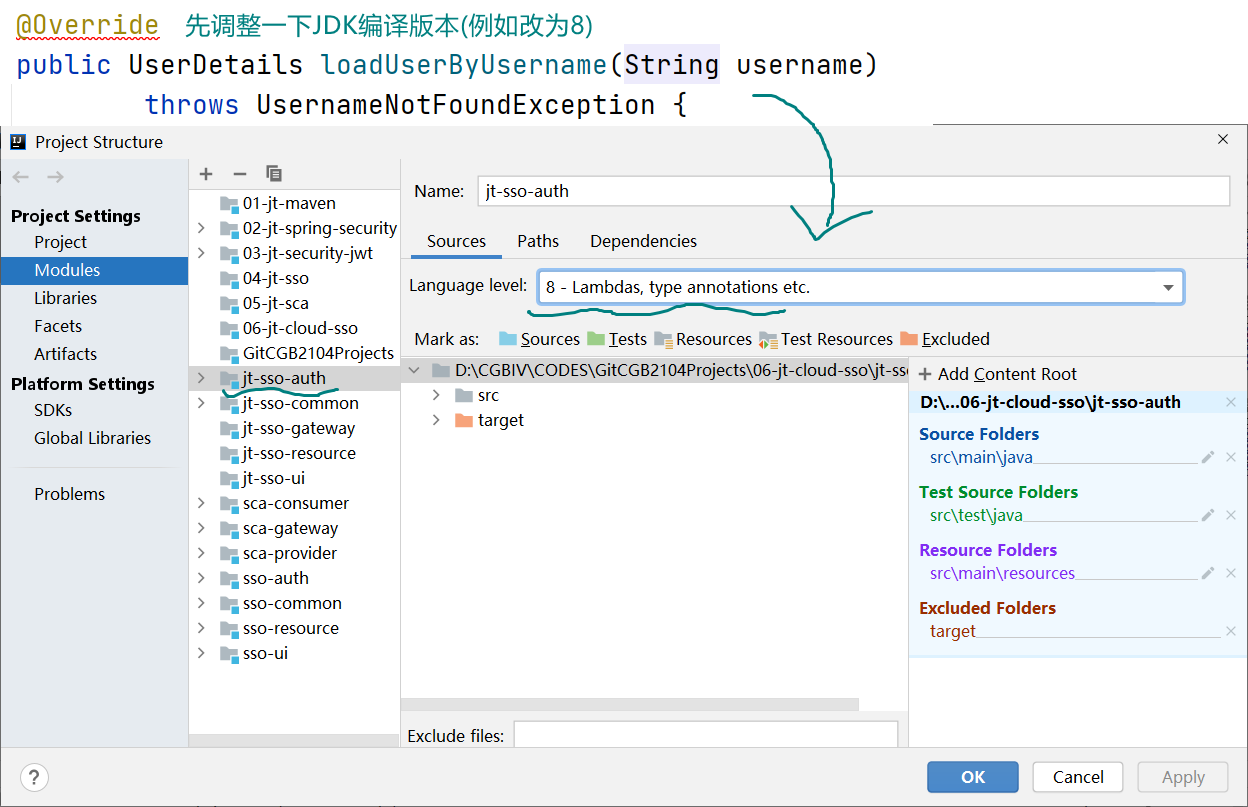
Create aggregation project
Project architecture
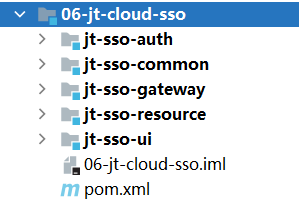
engineering structure
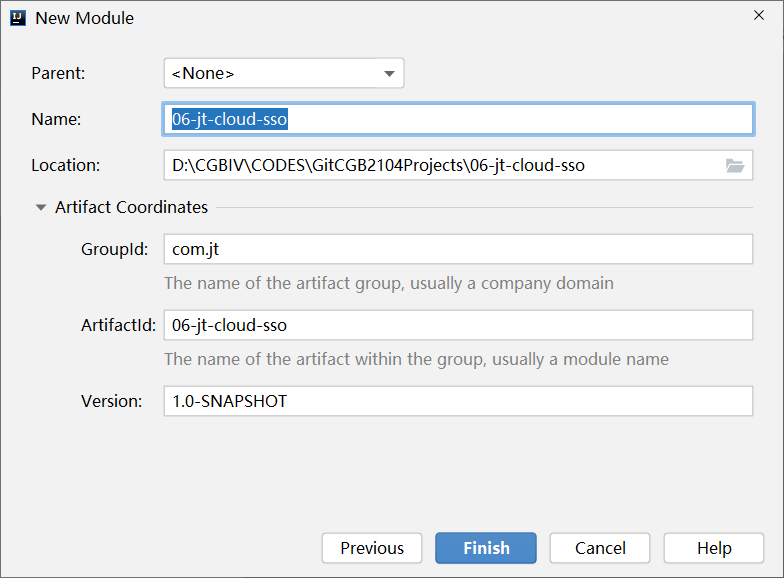
Create project
Step 1: create a parent project, for example:
Step 2: create JT SSO auth project
Step 3: create a JT SSO resource project

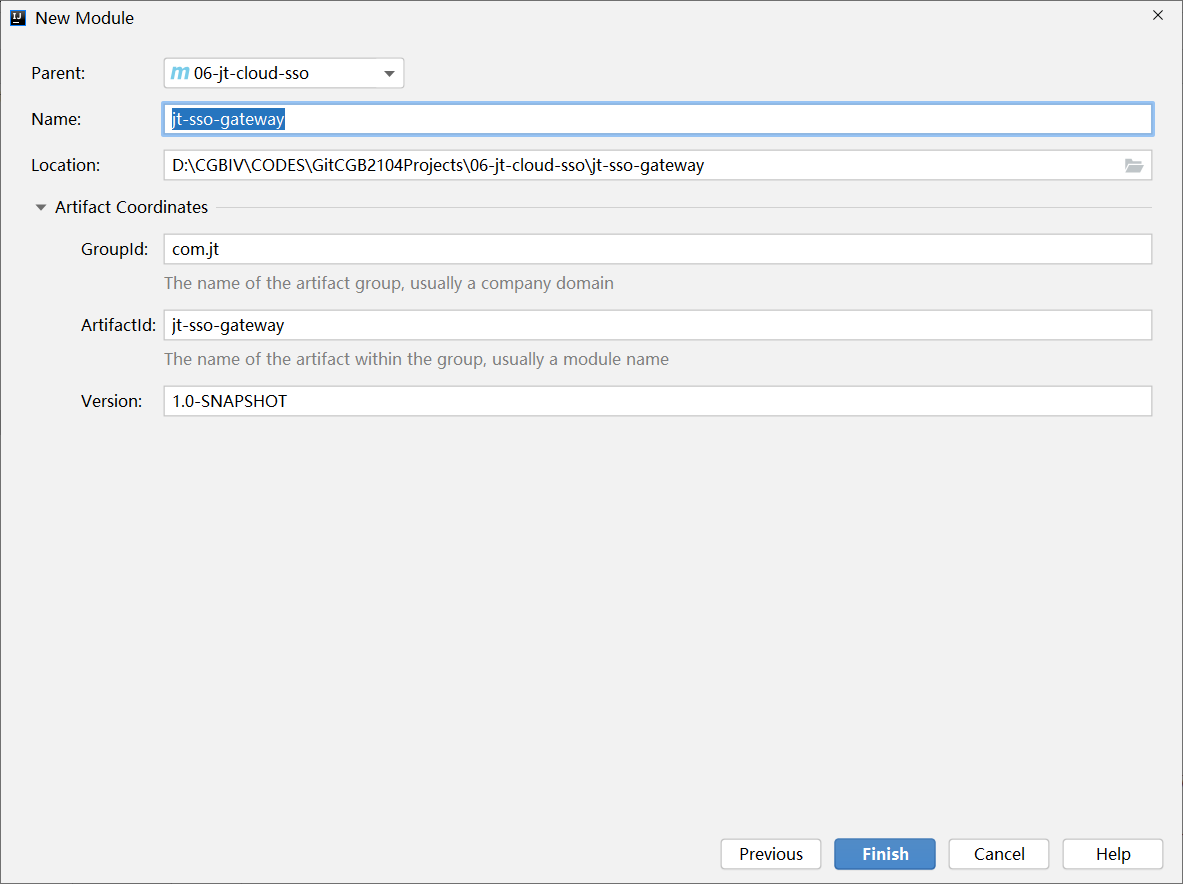
Step 4: create a JT SSO Gateway project
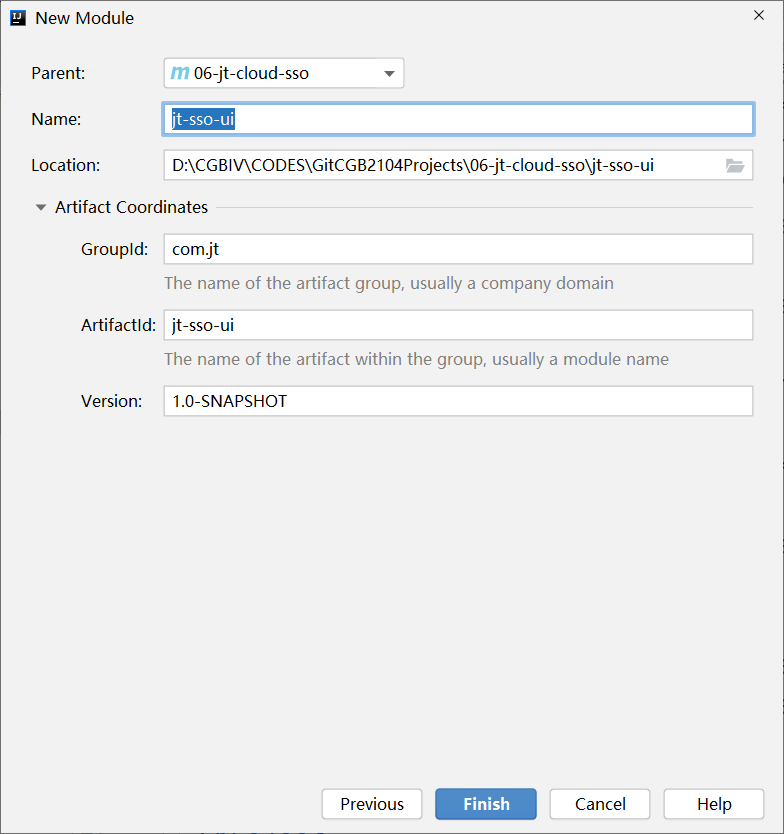
Step 5: create a JT SSO UI project
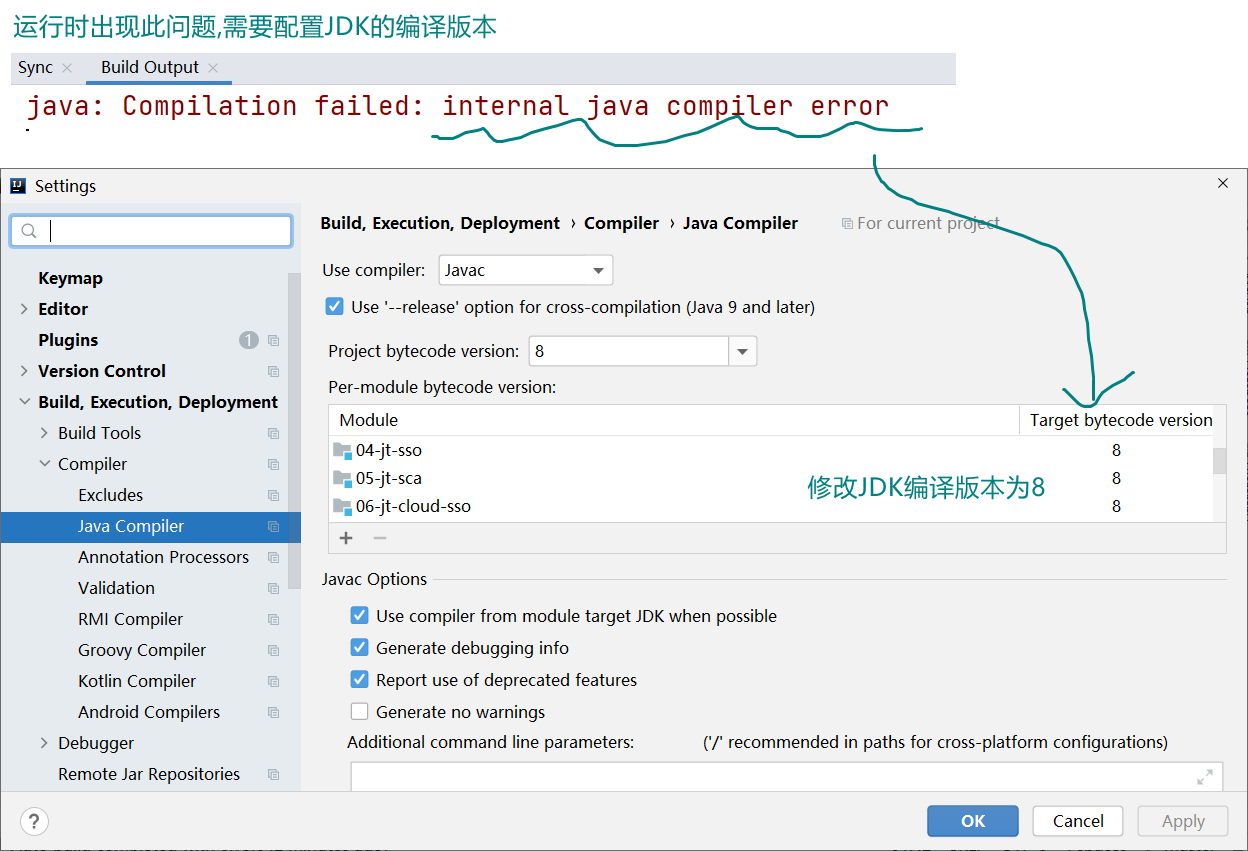
Configuration project engineering
jt-cloud-sso
Open the project pom file and add the dependency configuration. The code is as follows:
   <dependencyManagement>
        <!--Spring Framework And SpringBoot Relationship between
        Spring Framework is the framework of resource integration,be based on IOC Resource integration of ideas.SpringBoot be based on Spring frame,
        For simplification Spring Engineering framework for integrating resources,At the same time, it provides more convenient conditions for the creation and configuration of microservice engineering
        -->
        <dependencies>
            <!--Spring Boot rely on(spring-boot-starter-parent)
            reflection:05-jt-sca How to add dependencies in a project-->
            <dependency>
                <groupId>org.springframework.boot</groupId>
                <artifactId>spring-boot-dependencies</artifactId>
                <version>2.3.2.RELEASE</version>
                <scope>import</scope>
                <type>pom</type>
            </dependency>
            <!--Spring Cloud rely on(Defines the microservice specification)-->
            <dependency>
                <groupId>org.springframework.cloud</groupId>
                <artifactId>spring-cloud-dependencies</artifactId>
                <version>Hoxton.SR8</version>
                <scope>import</scope>
                <type>pom</type>
            </dependency>
            <!--Spring Cloud Alibaba rely on(be based on spring The microservice specification has been specifically implemented)-->
            <dependency>
                <groupId>com.alibaba.cloud</groupId>
                <artifactId>spring-cloud-alibaba-dependencies</artifactId>
                <version>2.2.5.RELEASE</version>
                <scope>import</scope>
                <type>pom</type>
            </dependency>
        </dependencies>
    </dependencyManagement>
- 1
- 2
- 3
- 4
- 5
- 6
- 7
- 8
- 9
- 10
- 11
- 12
- 13
- 14
- 15
- 16
- 17
- 18
- 19
- 20
- 21
- 22
- 23
- 24
- 25
- 26
- 27
- 28
- 29
- 30
- 31
- 32
- 33
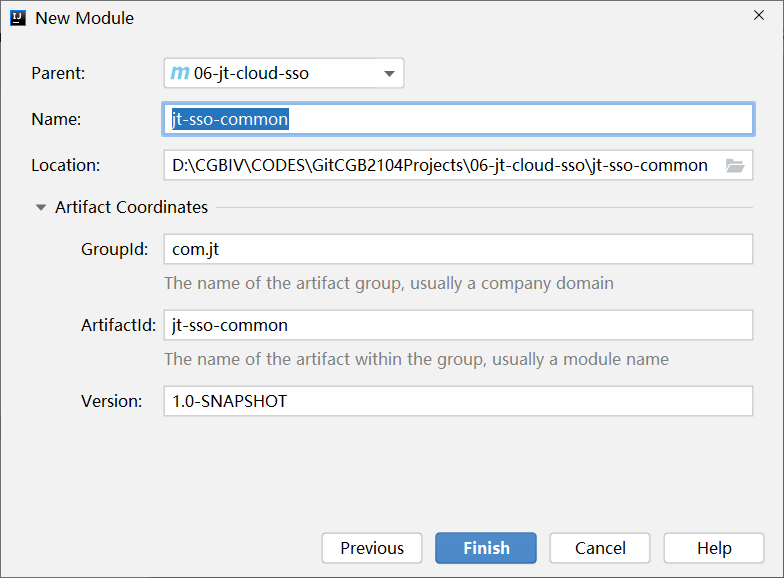
jt-sso-common
Open the project pom file and add the dependency configuration. The code is as follows:
<dependencies>
    <dependency>
        <groupId>org.springframework.boot</groupId>
        <artifactId>spring-boot-starter-web</artifactId>
        <!--provided Indicates that this dependency is only valid at compile time-->
        <scope>provided</scope>
    </dependency>
</dependencies>
- 1
- 2
- 3
- 4
- 5
- 6
- 7
- 8
jt-sso-auth
pom.xml
<dependencies>
<!--spring web -->
<dependency>
<groupId>org.springframework.boot</groupId>
<artifactId>spring-boot-starter-web</artifactId>
</dependency>
<!--spring security -->
<dependency>
<groupId>org.springframework.boot</groupId>
<artifactId>spring-boot-starter-security</artifactId>
</dependency>
<!-- jwt -->
<dependency>
<groupId>io.jsonwebtoken</groupId>
<artifactId>jjwt</artifactId>
<version>0.9.1</version>
</dependency>
<!--mysql-->
<dependency>
<groupId>mysql</groupId>
<artifactId>mysql-connector-java</artifactId>
</dependency>
<!--mybatis-->
<dependency>
<groupId>org.mybatis.spring.boot</groupId>
<artifactId>mybatis-spring-boot-starter</artifactId>
<version>2.2.0</version>
</dependency>
<!--spring cloud alibaba nacos discovery -->
<dependency>
<groupId>com.alibaba.cloud</groupId>
<artifactId>spring-cloud-starter-alibaba-nacos-discovery</artifactId>
</dependency>
<!--spring cloud alibaba nacos config -->
<dependency>
<groupId>com.alibaba.cloud</groupId>
<artifactId>spring-cloud-starter-alibaba-nacos-config</artifactId>
</dependency>
<!--jt-common-->
<dependency>
<groupId>com.jt</groupId>
<artifactId>jt-sso-common</artifactId>
<version>1.0-SNAPSHOT</version>
</dependency>
<span class="token tag"><span class="token tag"><span class="token punctuation"></</span>dependencies</span><span class="token punctuation">></span></span>
- 1
- 2
- 3
- 4
- 5
- 6
- 7
- 8
- 9
- 10
- 11
- 12
- 13
- 14
- 15
- 16
- 17
- 18
- 19
- 20
- 21
- 22
- 23
- 24
- 25
- 26
- 27
- 28
- 29
- 30
- 31
- 32
- 33
- 34
- 35
- 36
- 37
- 38
- 39
- 40
- 41
- 42
- 43
- 44
- 45
- 46
bootstrap.yml
Create a bootstrap in the resource directory YML configuration file with the following code:
server:
  port: 8081
spring:
  application:
    name: jt-sso-auth
  datasource:
    url: jdbc:mysql:///jt_security?serverTimezone=Asia/Shanghai&characterEncoding=utf8
    username: root
    password: root
  cloud:
    nacos:
      discovery:
        server-addr: localhost:8848
      config:
        server-addr: localhost:8848
        file-extension: yml
logging:
  level:
    com.jt: debug
- 1
- 2
- 3
- 4
- 5
- 6
- 7
- 8
- 9
- 10
- 11
- 12
- 13
- 14
- 15
- 16
- 17
- 18
- 19
Startup class
package com.jt.sso;
@SpringBootApplication
public class AuthApplication {
    public static void main(String[] args) {
        SpringApplication.run(AuthApp.class,args);
    }
}
- 1
- 2
- 3
- 4
- 5
- 6
- 7
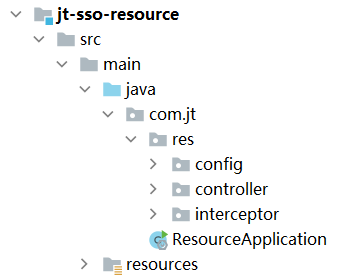
jt-sso-resource
pom.xml
<dependencies>
        <dependency>
            <groupId>org.springframework.boot</groupId>
            <artifactId>spring-boot-starter-web</artifactId>
        </dependency>
        <dependency>
            <groupId>org.springframework.boot</groupId>
            <artifactId>spring-boot-starter-security</artifactId>
        </dependency>
        <dependency>
            <groupId>com.alibaba.cloud</groupId>
            <artifactId>spring-cloud-starter-alibaba-nacos-discovery</artifactId>
        </dependency>
        <dependency>
            <groupId>com.alibaba.cloud</groupId>
            <artifactId>spring-cloud-starter-alibaba-nacos-config</artifactId>
        </dependency>
        <dependency>
            <groupId>com.jt</groupId>
            <artifactId>jt-sso-common</artifactId>
            <version>1.0-SNAPSHOT</version>
        </dependency>
    </dependencies>
- 1
- 2
- 3
- 4
- 5
- 6
- 7
- 8
- 9
- 10
- 11
- 12
- 13
- 14
- 15
- 16
- 17
- 18
- 19
- 20
- 21
- 22
- 23
bootstrap.yml
server:
  port: 8090
spring:
  application:
    name: jt-sso-resource
  cloud:
    nacos:
      discovery:
        server-addr: localhost:8848
      config:
        server-addr: localhost:8848
        file-extension: yml
logging:
  level:
    com.jt: debug
- 1
- 2
- 3
- 4
- 5
- 6
- 7
- 8
- 9
- 10
- 11
- 12
- 13
- 14
- 15
Startup class
package com.jt;
@EnableGlobalMethodSecurity(prePostEnabled = true)
@SpringBootApplication
public class ResourceApplication {
    public static void main(String[] args) {
        SpringApplication.run(ResourceApplication.class,args);
    }
}
- 1
- 2
- 3
- 4
- 5
- 6
- 7
- 8
jt-sso-gateway
pom.xml
<dependencies>
    <dependency>
        <groupId>org.springframework.cloud</groupId>
        <artifactId>spring-cloud-starter-gateway</artifactId>
    </dependency>
    <dependency>
        <groupId>com.alibaba.cloud</groupId>
        <artifactId>spring-cloud-starter-alibaba-nacos-discovery</artifactId>
    </dependency>
    <dependency>
        <groupId>com.alibaba.cloud</groupId>
        <artifactId>spring-cloud-starter-alibaba-nacos-config</artifactId>
    </dependency>
</dependencies>
- 1
- 2
- 3
- 4
- 5
- 6
- 7
- 8
- 9
- 10
- 11
- 12
- 13
- 14
bootstrap.yml
server:
  port: 9000
spring:
  application:
    name: jt-sso-gateway
  cloud:
    nacos:
      discovery: #Service discovery
        server-addr: localhost:8848
      config: #Service configuration
        server-addr: localhost:8848
        file-extension: yml
    gateway:
      discovery:
        locator:
          enabled: true  #Enable to find service instance based on service name
      routes:
        - id: router01
          uri: lb://JT SSO auth #jt SSO auth service name
          predicates:
            - Path=/auth/login
          filters:
            - StripPrefix=1  #Remove the first level directory from the request path
- 1
- 2
- 3
- 4
- 5
- 6
- 7
- 8
- 9
- 10
- 11
- 12
- 13
- 14
- 15
- 16
- 17
- 18
- 19
- 20
- 21
- 22
- 23
Startup class
package com.jt;
@SpringBootApplication
public class GatewayApplication {
    public static void main(String[] args) {
        SpringApplication.run(GatewayApplication.class,args);
    }
}
- 1
- 2
- 3
- 4
- 5
- 6
- 7
jt-sso- ui
pom.xml
<dependencies>
    <dependency>
        <groupId>org.springframework.boot</groupId>
        <artifactId>spring-boot-starter-web</artifactId>
    </dependency>
</dependencies>
- 1
- 2
- 3
- 4
- 5
- 6
application.yml
server:
  port: 80
- 1
- 2
Startup class
package com.jt;
@SpringBootApplication
public class UIApplication {
public static void main(String[] args) {
SpringApplication.run(UIApplication.class,args);
}
}
- 1
- 2
- 3
- 4
- 5
- 6
- 7
- 8
Implementation of engineering business code
jt-sso-common
Code structure
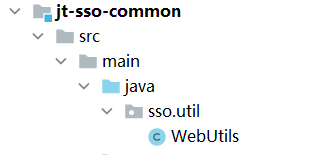
Note: the en route code can be copied from the single sign on system written above.
problem analysis
For the web dependency added in this project, why is the value of the scope element added provided
jt-sso-auth
Code structure
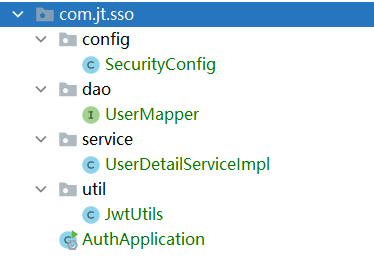
Note: the en route code can be copied from the single sign on system written above.
AuthController
The AuthController object is created for the resolution task of providing external tokens. The code is as follows:
package com.jt.sso.controller;
@RestController
public class AuthController {
    @GetMapping("/auth/info")
    public Map<String,Object> getAuthentication(String token){
        System.out.println("token==="+token);
        Claims claims=JwtUtils.getClaimsFromToken(token);
        boolean flag=claims.getExpiration().before(new Date());
        String username=(String)claims.get("username");
        List<String> list=(List<String>)
                claims.get("authorities");
        Map<String,Object> map=new HashMap<>();
        map.put("expired",flag);
        map.put("username",username);
        map.put("authorities",list);
        return map;
    }
}
- 1
- 2
- 3
- 4
- 5
- 6
- 7
- 8
- 9
- 10
- 11
- 12
- 13
- 14
- 15
- 16
- 17
- 18
After defining the controller, you need to modify the configure(HttpSecurity http) method in the SpringConfig class to release the / auth/info path for parsing tokens, for example
...
http.authorizeRequests()
            .antMatchers("/auth/info")
            .permitAll()
            .anyRequest()//All requests - > corresponding to any resource
            .authenticated();//Must be certified
- 1
- 2
- 3
- 4
- 5
- 6
- 7
problem analysis
jt-sso-resource
Code structure
RestTemplate service call
Step 1: in the startup class, initialize a RestTemplate object, for example:
@Bean
@LoadBalanced
public RestTemplate restTemplate(){
  return new RestTemplate();
}
- 1
- 2
- 3
- 4
- 5
Step 2: add the following code in TokenInterceptor to initialize the RestTemplate object
private RestTemplate restTemplate;
public TokenInterceptor(RestTemplate restTemplate) {
    this.restTemplate = restTemplate;
}
- 1
- 2
- 3
- 4
Step 3: modify the preHandle method and call the remote service based on RestTemplate. The code is as follows:
@Override
public boolean preHandle(HttpServletRequest request,
                             HttpServletResponse response,
                             Object handler) throws Exception {
        //1. Get the token object from the request (how to get depends on how you pass the token: header,params)
        String token=request.getHeader("token");
        //2. Verify whether the token exists
        if(token==null||"".equals(token))
            throw new RuntimeException("Please log in first");//WebUtils.writeJsonToClient
        //3. Verify whether the token has expired, and analyze the authentication and permission information in the token (generally stored in the load part of jwt format)
       //Remote service invocation based on restTemplate
        String url="http://jt-sso-auth/auth/info?token="+token;
        Map<String,Object> map= restTemplate.getForObject(url,Map.class);
        Boolean expired=(Boolean)map.get("expired");
        if(expired)throw new RuntimeException("login timeout ");
        String username=(String)map.get("username");
        List<String> list=(List<String>)map.get("authorities");
        //4. Encapsulate and store authentication and authority information
        //4.1 build UserDetail object (symbol of user identity - similar to a business card, QR code of wechat)
        UserDetails userDetails=User.builder()
                .username(username)
                .password("")
                .authorities(list.toArray(new String[]{}))
                .build();
        //4.2 build Security permission interaction object (remember, fixed writing method)
        PreAuthenticatedAuthenticationToken authToken=
                new PreAuthenticatedAuthenticationToken(
                        userDetails,//User identity
                        userDetails.getPassword(),
                        userDetails.getAuthorities());
        //4.3 bind the permission interaction object to the current request
        authToken.setDetails(new WebAuthenticationDetails(request));
        //5.4. Store the authenticated token in the Security context (session object)
        SecurityContextHolder.getContext().setAuthentication(authToken);
        return true;
    }
- 1
- 2
- 3
- 4
- 5
- 6
- 7
- 8
- 9
- 10
- 11
- 12
- 13
- 14
- 15
- 16
- 17
- 18
- 19
- 20
- 21
- 22
- 23
- 24
- 25
- 26
- 27
- 28
- 29
- 30
- 31
- 32
- 33
- 34
- 35
- 36
Step 4: in the interceptor configuration class, modify the following code:
  @Autowired
  private RestTemplate restTemplate;
  @Override
  public void addInterceptors(InterceptorRegistry registry) {
        registry.addInterceptor(new TokenInterceptor(restTemplate))
                 //Configure the url to intercept
                .addPathPatterns("/**");//doCreate,doUpdate,doDelete
  }
- 1
- 2
- 3
- 4
- 5
- 6
- 7
- 8
Step 5: start the project and conduct access test based on postman
Feign mode service call
Step 1: add Feign dependency
org.springframework.cloud
spring-cloud-starter-openfeign
Step 2: add the Feign application annotation on the startup class
@EnableFeignClients
- 1
Step 3: define feign remote call interface
package com.jt.res.service;
@FeignClient(name = "jt-sso-auth",contextId = "remoteAuthService")
public interface RemoteAuthService {
//@The address in GetMapping is an address in the JT SSO auth service
@GetMapping("/auth/info")
public Map<String,Object> getAuthentication(
@RequestParam("token") String token);
}
- 1
- 2
- 3
- 4
- 5
- 6
- 7
- 8
- 9
Step 4: define RemoteAuthService attribute and construction method in TokenInterceptor. The code is as follows:
private RemoteAuthService remoteAuthService;
public TokenInterceptor(RemoteAuthService remoteAuthService) {
this.remoteAuthService = remoteAuthService;
}
- 1
- 2
- 3
- 4
- 5
- 6
Step 5: modify the preHandle method of the interceptor and call the remote service based on Feign. The code is as follows:
@Override
    public boolean preHandle(HttpServletRequest request, HttpServletResponse response, Object handler) throws Exception {
        //1. Get the token object from the request (how to get depends on how you pass the token: header,params)
        String token=request.getHeader("token");
        //2. Verify whether the token exists
        if(token==null||"".equals(token)) throw new RuntimeException("Please log in first");//WebUtils.writeJsonToClient
        //3. Verify whether the token has expired, and analyze the authentication and permission information in the token (generally stored in the load part of jwt format)
        //Go to the certification center to get these data? (job - RestTemplate or Feign)
       //Remote service invocation based on feign
        Map<String,Object> map=remoteAuthService.getAuthentication(token);
        Boolean expired=(Boolean)map.get("expired");
        if(expired)throw new RuntimeException("login timeout ");
        String username=(String)map.get("username");
        List<String> list=(List<String>)map.get("authorities");
    <span class="token comment">//4. Encapsulate and store authentication and authority information</span>
    <span class="token comment">//4.1 build UserDetail object (symbol of user identity - similar to a business card, QR code of wechat)</span>
    <span class="token class-name">UserDetails</span> userDetails<span class="token operator">=</span><span class="token class-name">User</span><span class="token punctuation">.</span><span class="token function">builder</span><span class="token punctuation">(</span><span class="token punctuation">)</span>
            <span class="token punctuation">.</span><span class="token function">username</span><span class="token punctuation">(</span>username<span class="token punctuation">)</span>
            <span class="token punctuation">.</span><span class="token function">password</span><span class="token punctuation">(</span><span class="token string">""</span><span class="token punctuation">)</span>
            <span class="token punctuation">.</span><span class="token function">authorities</span><span class="token punctuation">(</span>list<span class="token punctuation">.</span><span class="token function">toArray</span><span class="token punctuation">(</span><span class="token keyword">new</span> <span class="token class-name">String</span><span class="token punctuation">[</span><span class="token punctuation">]</span><span class="token punctuation">{<!-- --></span><span class="token punctuation">}</span><span class="token punctuation">)</span><span class="token punctuation">)</span>
            <span class="token punctuation">.</span><span class="token function">build</span><span class="token punctuation">(</span><span class="token punctuation">)</span><span class="token punctuation">;</span>
    <span class="token comment">//4.2 build Security permission interaction object (remember, fixed writing method)</span>
    <span class="token class-name">PreAuthenticatedAuthenticationToken</span> authToken<span class="token operator">=</span>
            <span class="token keyword">new</span> <span class="token class-name">PreAuthenticatedAuthenticationToken</span><span class="token punctuation">(</span>
                    userDetails<span class="token punctuation">,</span><span class="token comment">//User identity</span>
                    userDetails<span class="token punctuation">.</span><span class="token function">getPassword</span><span class="token punctuation">(</span><span class="token punctuation">)</span><span class="token punctuation">,</span>
                    userDetails<span class="token punctuation">.</span><span class="token function">getAuthorities</span><span class="token punctuation">(</span><span class="token punctuation">)</span><span class="token punctuation">)</span><span class="token punctuation">;</span>
    <span class="token comment">//4.3 bind the permission interaction object to the current request</span>
    authToken<span class="token punctuation">.</span><span class="token function">setDetails</span><span class="token punctuation">(</span><span class="token keyword">new</span> <span class="token class-name">WebAuthenticationDetails</span><span class="token punctuation">(</span>request<span class="token punctuation">)</span><span class="token punctuation">)</span><span class="token punctuation">;</span>
    <span class="token comment">//5.4. Store the authenticated token in the Security context (session object)</span>
    <span class="token class-name">SecurityContextHolder</span><span class="token punctuation">.</span><span class="token function">getContext</span><span class="token punctuation">(</span><span class="token punctuation">)</span><span class="token punctuation">.</span><span class="token function">setAuthentication</span><span class="token punctuation">(</span>authToken<span class="token punctuation">)</span><span class="token punctuation">;</span>
    <span class="token keyword">return</span> <span class="token boolean">true</span><span class="token punctuation">;</span>
<span class="token punctuation">}</span>
- 1
- 2
- 3
- 4
- 5
- 6
- 7
- 8
- 9
- 10
- 11
- 12
- 13
- 14
- 15
- 16
- 17
- 18
- 19
- 20
- 21
- 22
- 23
- 24
- 25
- 26
- 27
- 28
- 29
- 30
- 31
- 32
- 33
- 34
Step 6: in the interceptor configuration class, modify the following code:
 @Autowired
 private RemoteAuthService remoteAuthService;
@Override
public void addInterceptors(InterceptorRegistry registry) {
    registry.addInterceptor(new TokenInterceptor(remoteAuthService))
             //Configure the url to intercept
             .addPathPatterns("/**");//doCreate,doUpdate,doDelete
}
- 1
- 2
- 3
- 4
- 5
- 6
- 7
- 8
Step 7: start the project and conduct access test based on postman
problem analysis
- Dependency injection problem (spring only assigns attribute values to the objects it manages)
- Feign mode and RestTemplate mode service call process.
jt-sso-gateway
Cross domain design
When the client accesses the server-side resources based on ajax, because the cross domain problem cannot be accessed directly, we can turn on cross domain access through the filter on the server-side. For example:
package com.jt.gateway.config;
@Configuration
public class CorsFilterConfig {
@Bean
public CorsWebFilter corsFilter(){
System.out.println("corsWebFilter()");
UrlBasedCorsConfigurationSource source = new UrlBasedCorsConfigurationSource(new PathPatternParser());
CorsConfiguration corsConfiguration = new CorsConfiguration();
//1. Configure cross domain
//Which request headers are allowed to cross domains
corsConfiguration.addAllowedHeader("");
//Which method types are allowed to cross domain get post delete put
corsConfiguration.addAllowedMethod("");
//Which request sources are allowed to cross domains
corsConfiguration.addAllowedOrigin("*");
//Whether to carry cookie s across domains
corsConfiguration.setAllowCredentials(true);
//Allow cross domain paths
source.registerCorsConfiguration("/**",corsConfiguration);
return new CorsWebFilter(source);
}
}
- 1
- 2
- 3
- 4
- 5
- 6
- 7
- 8
- 9
- 10
- 11
- 12
- 13
- 14
- 15
- 16
- 17
- 18
- 19
- 20
- 21
- 22
- 23
- 24
Step 6: in the interceptor configuration class, modify the following code:
jt-sso- ui
Code structure
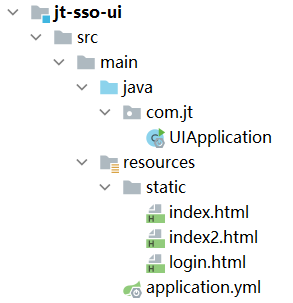
Copy the static directory in the ui project to the current project when you used to do single sign on, and then modify login html,index. Access the url of the gateway in HTML, rebuild the static directory, and then start the project for access test