1. Initialize configuration
1.1 required software
1. Anaconda: python environment management tool
2. Pycharm Professional Edition: a development tool. Compared with the Community Edition, it integrates django and other project frameworks, and has the function of webapi debugging. This article uses PyCharm2020 professional edition
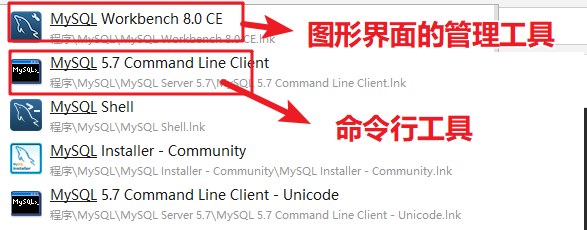
3. mysql database and Navicat Premium 12 database management tools. In fact, mysql comes with its own management tools. The database used in this example is a common mysql database.
4. Interface test tool postman
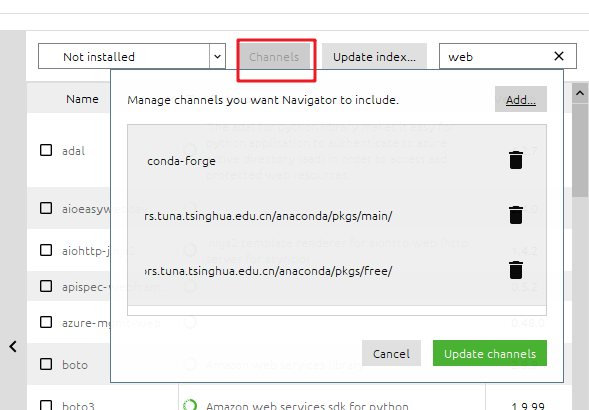
Anaconda is simple to use, as shown in the figure below. You can use Anaconda search to install various Python packages, or you can use the terminal command pip install to install packages in Python. Both methods will download appropriate packages according to the python version. Anaconda may download the py package slowly. Download the py package directly to the local computer and load it into the py environment; You can also modify the default download address of anaconda.
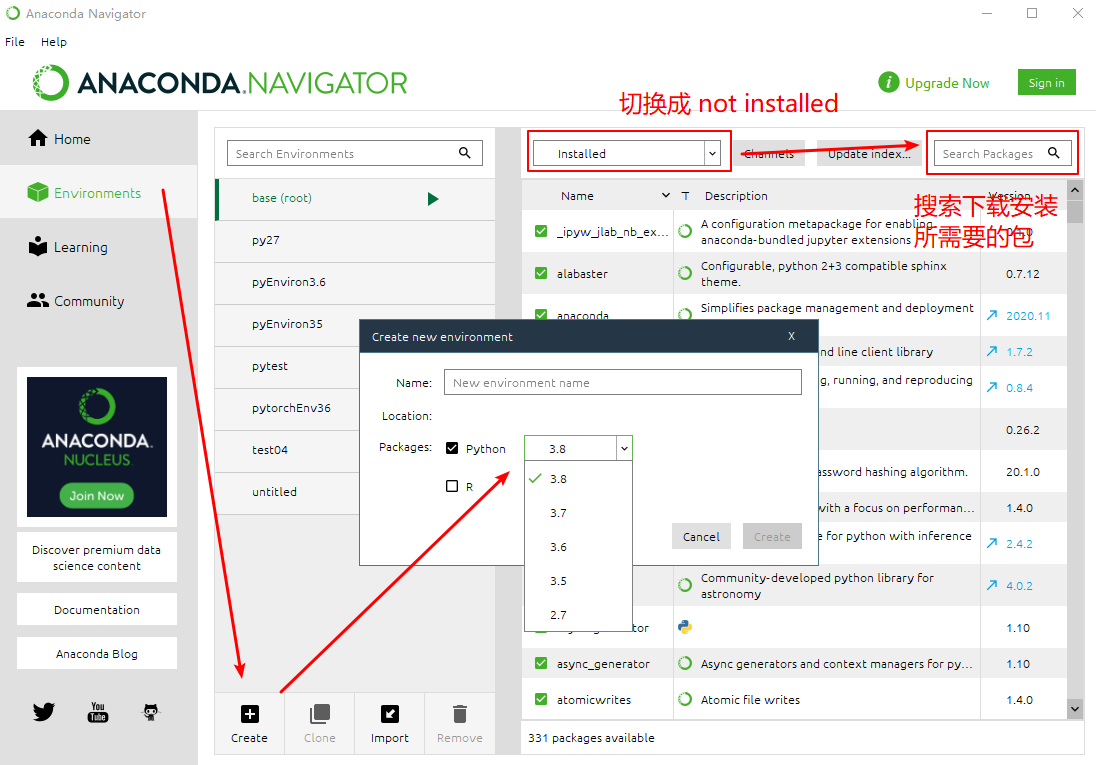
Modify the default download address of Anaconda:
1.2. Configure python environment with Anaconda or other tools
1.3. Database establishment
This example is to establish the database first, and then in pycharm Reverse generate the model in the django project.
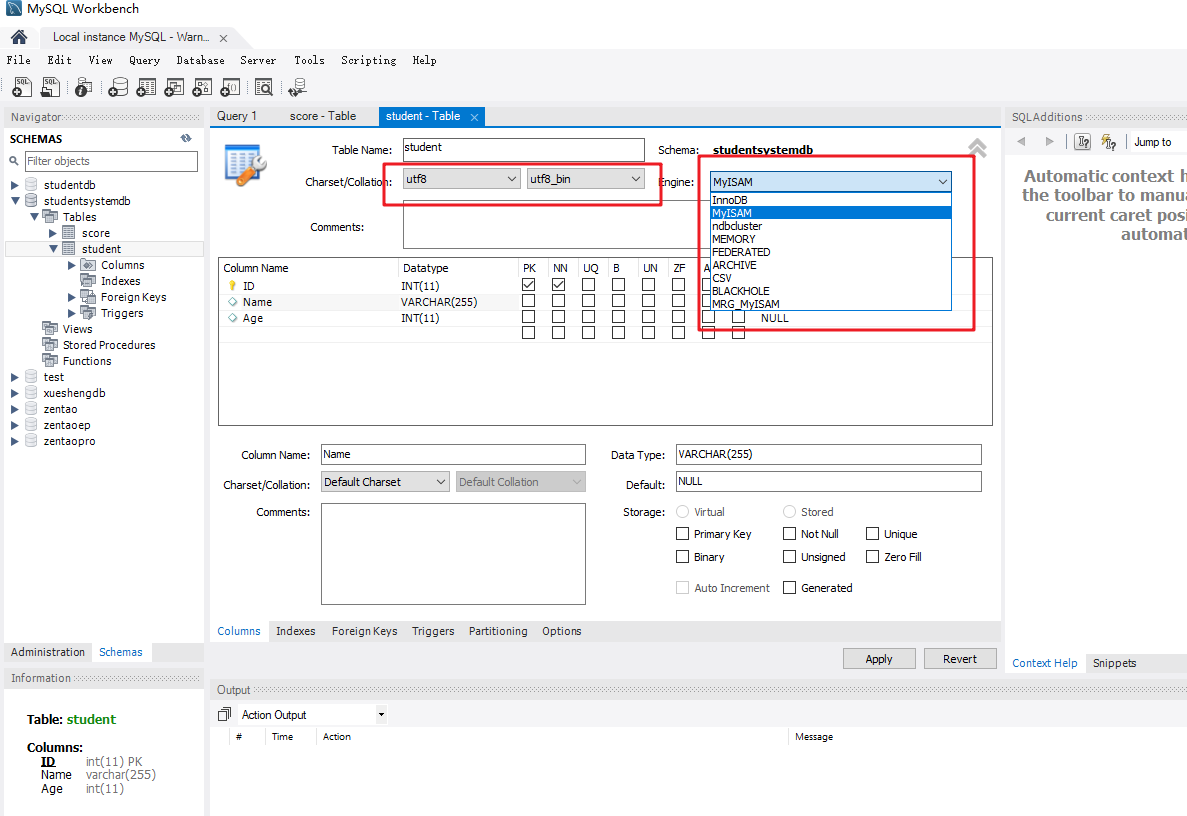
Create database tables in mysql workbench. Note 2 points:
1. The character set of the table is selected as utf8, and the field is also utf8. Otherwise, Chinese characters are garbled.
2. The mysql storage engine in this example is version 5.7. The default is myisam (it does not support the establishment of foreign key relationships). (I don't know why it can't be changed to innodb). innodb supports the establishment of foreign key relationships. If foreign key relationships cannot be established, you can't use django's own orm frame cross table query (score.objects.filter (student_id = studentID) needs to set foreign key relationships), You need to use native SQL cross table queries or single table queries in turn.
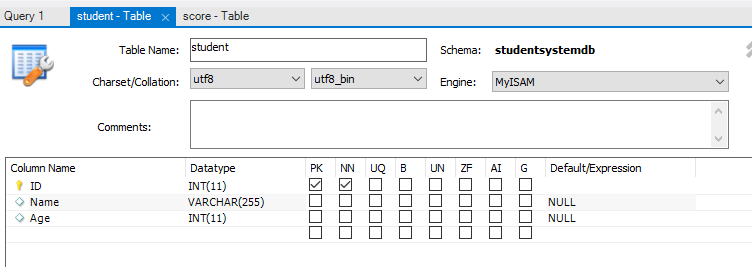
student table structure
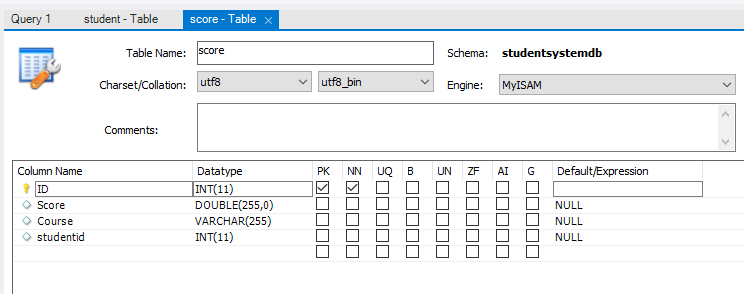
score table structure
2. Developing django's webapi project with pycharm Professional Edition
2.1 project establishment and configuration
1. After setting the project file location and py environment, you can create the project.
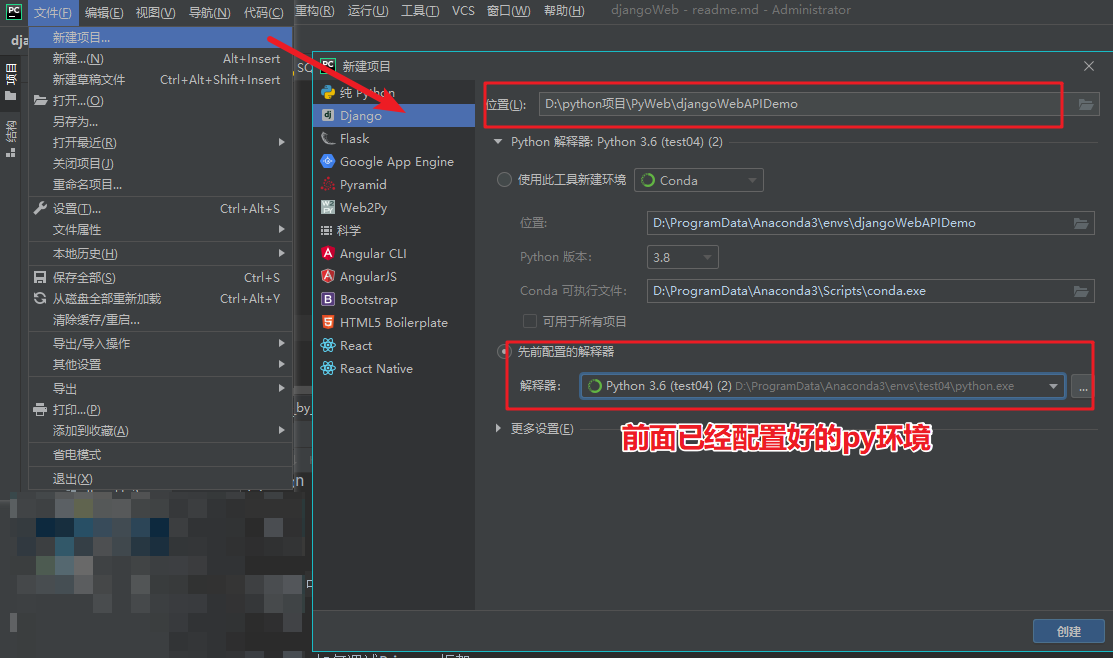
2. Project configuration after creation
Can refer to Basic usage of Python Django webapi
For ease of introduction, the project name has been changed to djangoWeb
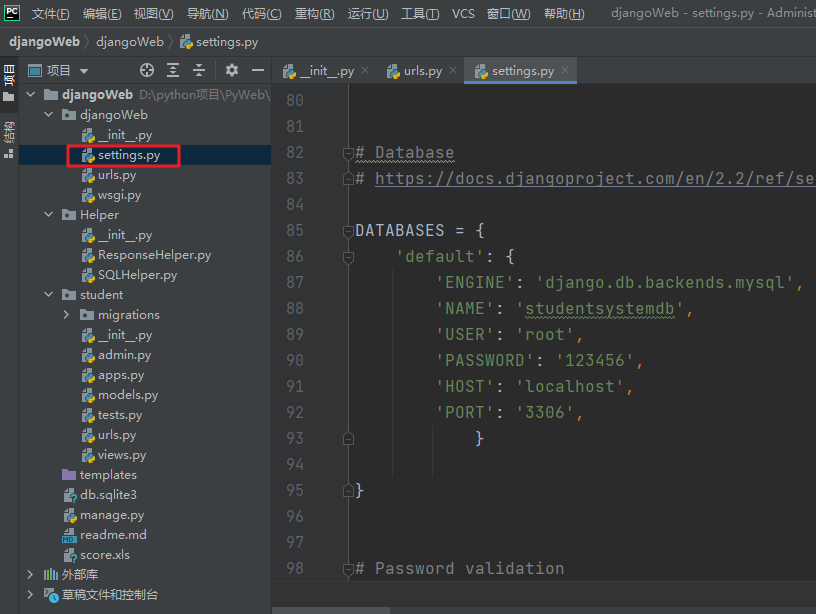
2.1. In settings Py modify the database to mysql
DATABASES = {
    'default': {
        'ENGINE': 'django.db.backends.mysql',
        'NAME': 'studentsystemdb',
        'USER': 'root',
        'PASSWORD': 'qwertvd',
        'HOST': 'localhost',
        'PORT': '3306',
            }
}
2.2. In settings Py turn off global validation to avoid cross domain problems
MIDDLEWARE = [
    'django.middleware.security.SecurityMiddleware',
    'django.contrib.sessions.middleware.SessionMiddleware',
    'django.middleware.common.CommonMiddleware',
    # 'django.middleware.csrf.CsrfViewMiddleware', #Turn off global verification to avoid cross domain problems; When the system is officially launched, pay attention to cancel the comments to truly solve the cross domain problem.
    'django.contrib.auth.middleware.AuthenticationMiddleware',
    'django.contrib.messages.middleware.MessageMiddleware',
    'django.middleware.clickjacking.XFrameOptionsMiddleware',
]
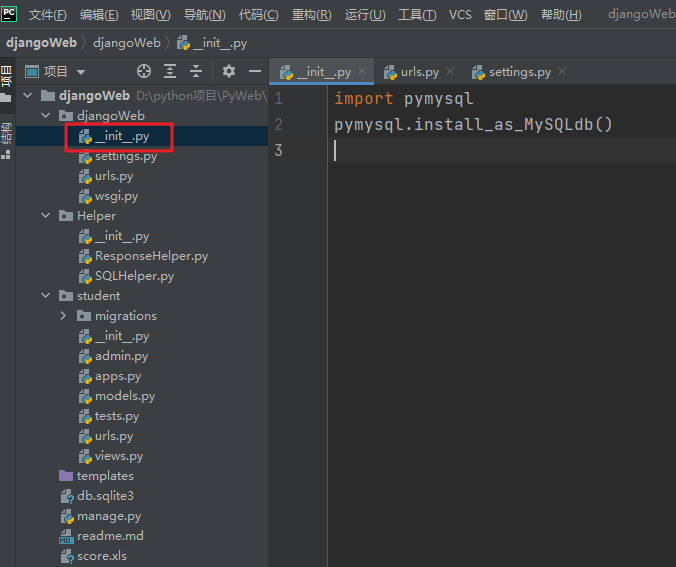
2.3. In__ init__. pymysql configuration is added to py to reverse generate the model. If it is not added, errors may occur.
import pymysql
pymysql.install_as_MySQLdb()
2.2. Create an application and its configuration
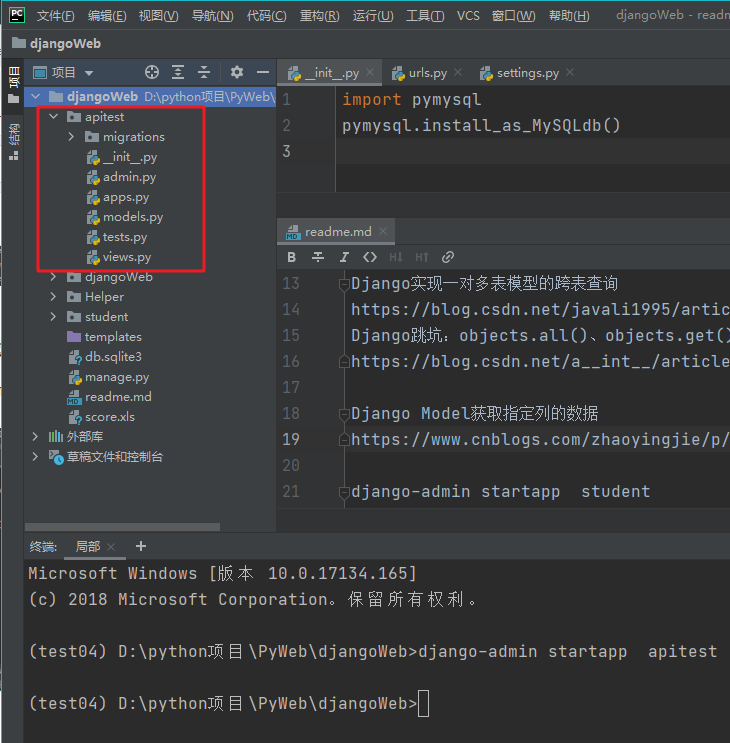
1. Create an application at the pycahrm terminal using the following command
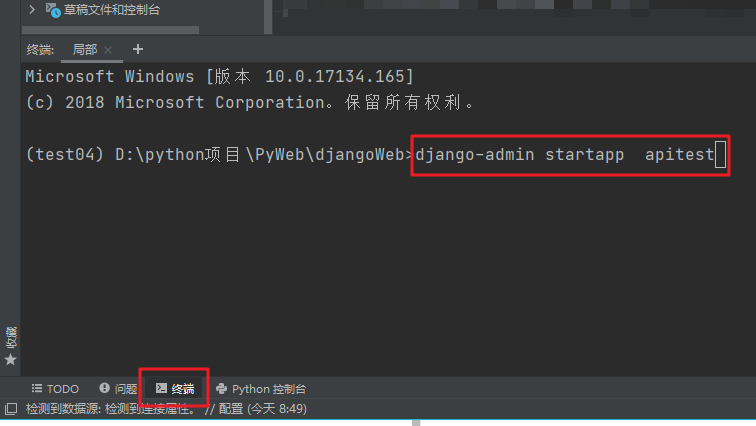
#The two commands are equivalent. Use one of them
django-admin startapp  apitest
python manage.py startapp apitest
Refresh the project file (collapse and expand) and a new application will appear. The following is a student application for convenience.
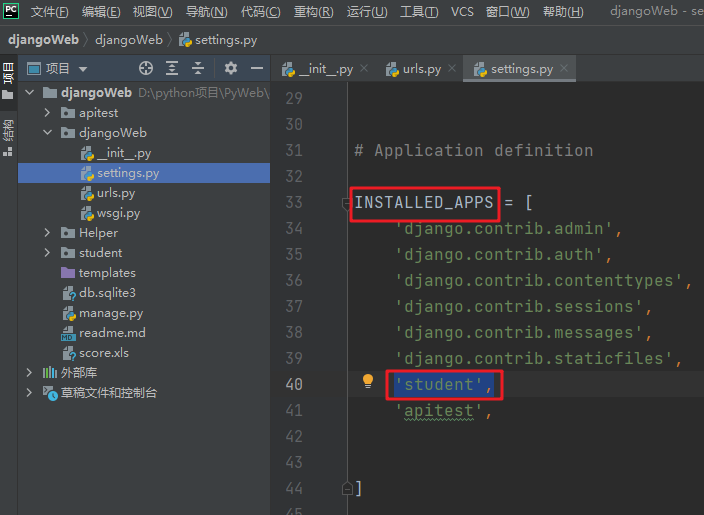
2. Load the application into the project, as shown below
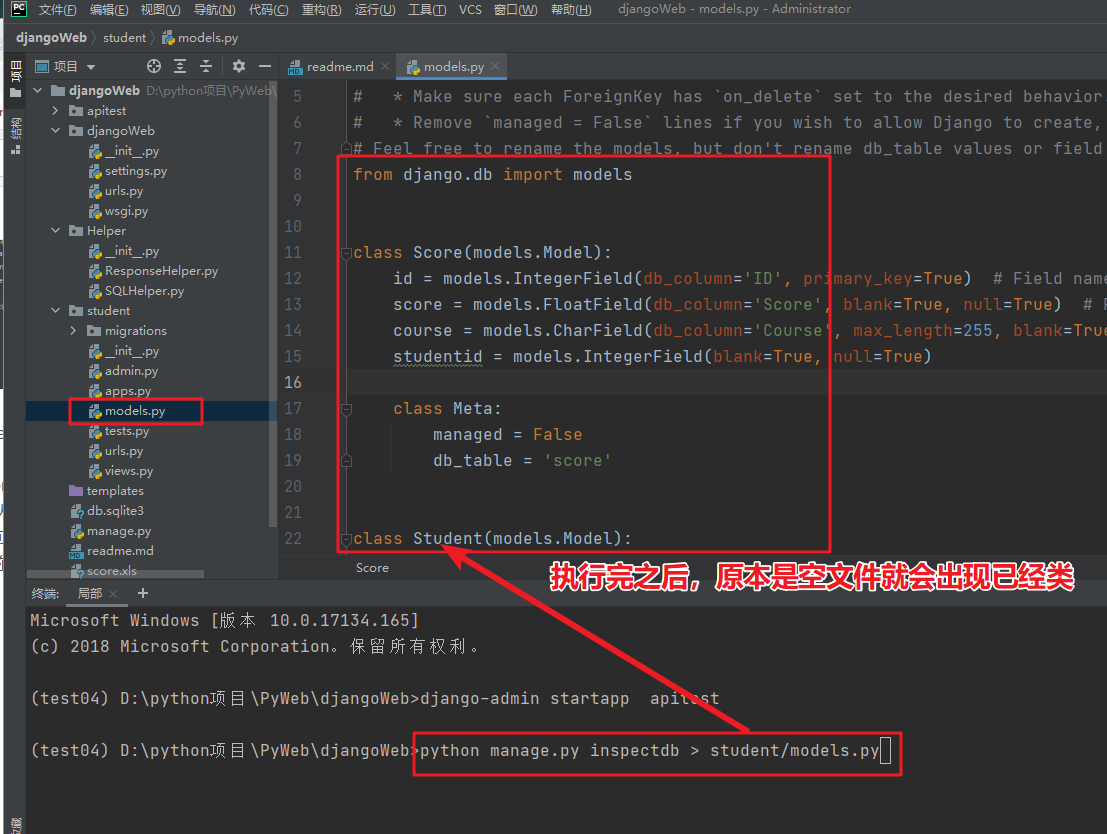
3. Before writing the webapi, create a model. (this step is the same as the general software development process. The so-called object-oriented programming must have existing classes, which can be created manually or automatically generated by ORM framework. For example, in. net+EF or other ORM frameworks, classes corresponding to database tables can be directly mapped from the database (database first), or automatically generate database tables from defined classes, which is also called in. net development Code priority
Reverse generation of models in Django
https://www.cnblogs.com/harryblog/p/10218412.html
python manage.py inspectdb > student/models.py
2.3. Start writing the first webapi
Next, you can painfully write webapi.
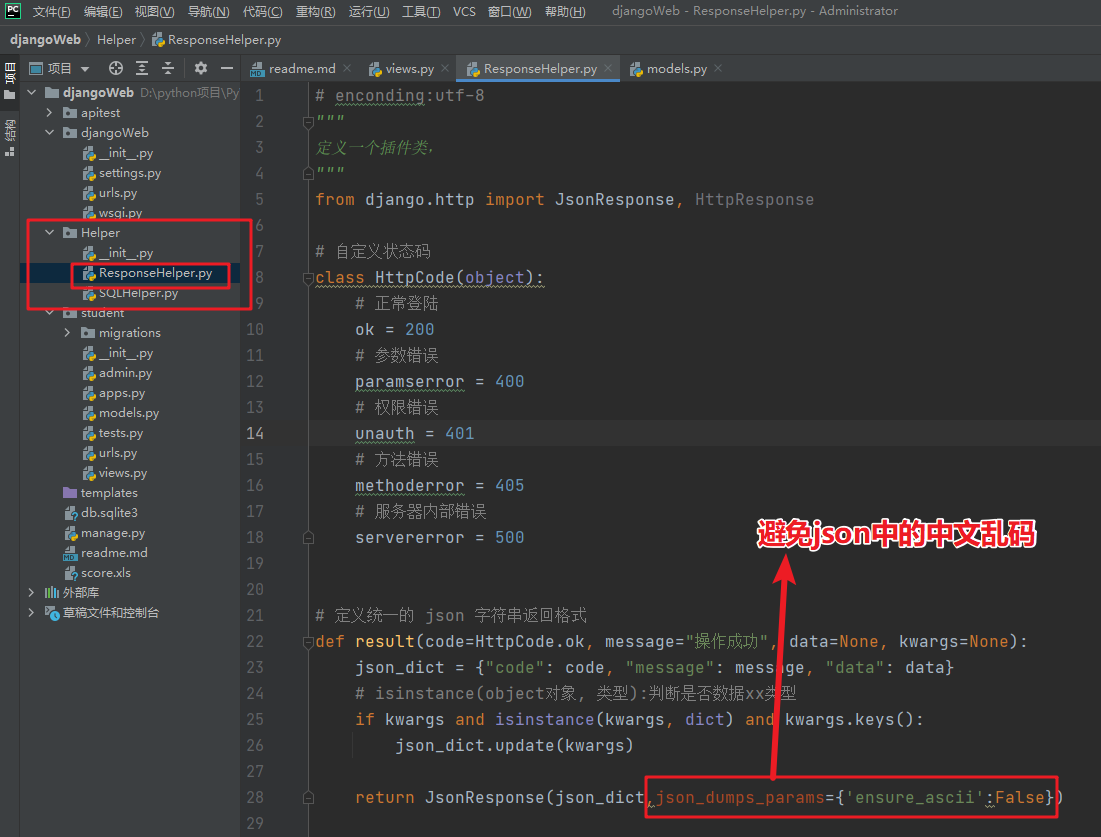
- In order to standardize the return of a unified webAPI interface to the front end, you need to create a new unified interface return value function. To this end, a new Helper package and ResponseHelper are created, and a unified return value is written in ResponseHelper.
I copied the following. The only change is to add json_dumps_params={'ensure_ascii':False}
The definition of django unifies the return data format and GET/POST decorator
https://www.cnblogs.com/jingxuan-li/p/9721369.html
2. Now views Py can write business code for addition, deletion, modification and query.
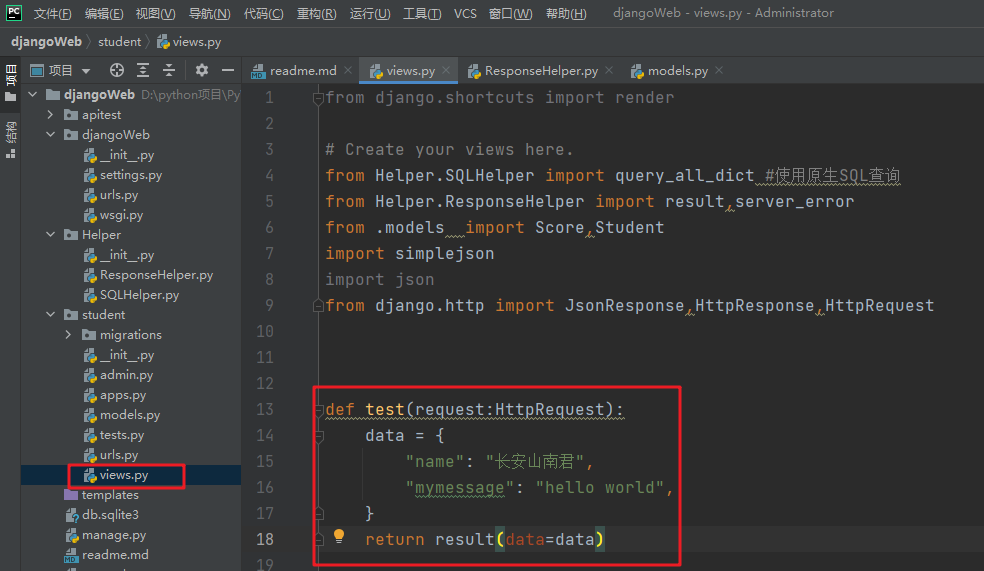
First hello world code:
from Helper.SQLHelper import query_all_dict #Use native SQL queries
from Helper.ResponseHelper import result,server_error #Unified return value
from .models import Score,Student #Import business class
import simplejson #Using json
from django.http import JsonResponse,HttpResponse,HttpRequest
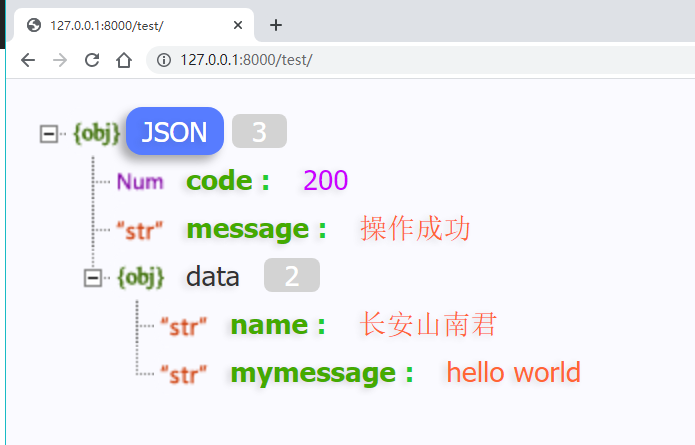
def test(request:HttpRequest):
data = {
"name": "Nanjun of Chang'an mountain",
"mymessage": "hello world",
}
return result(data=data)
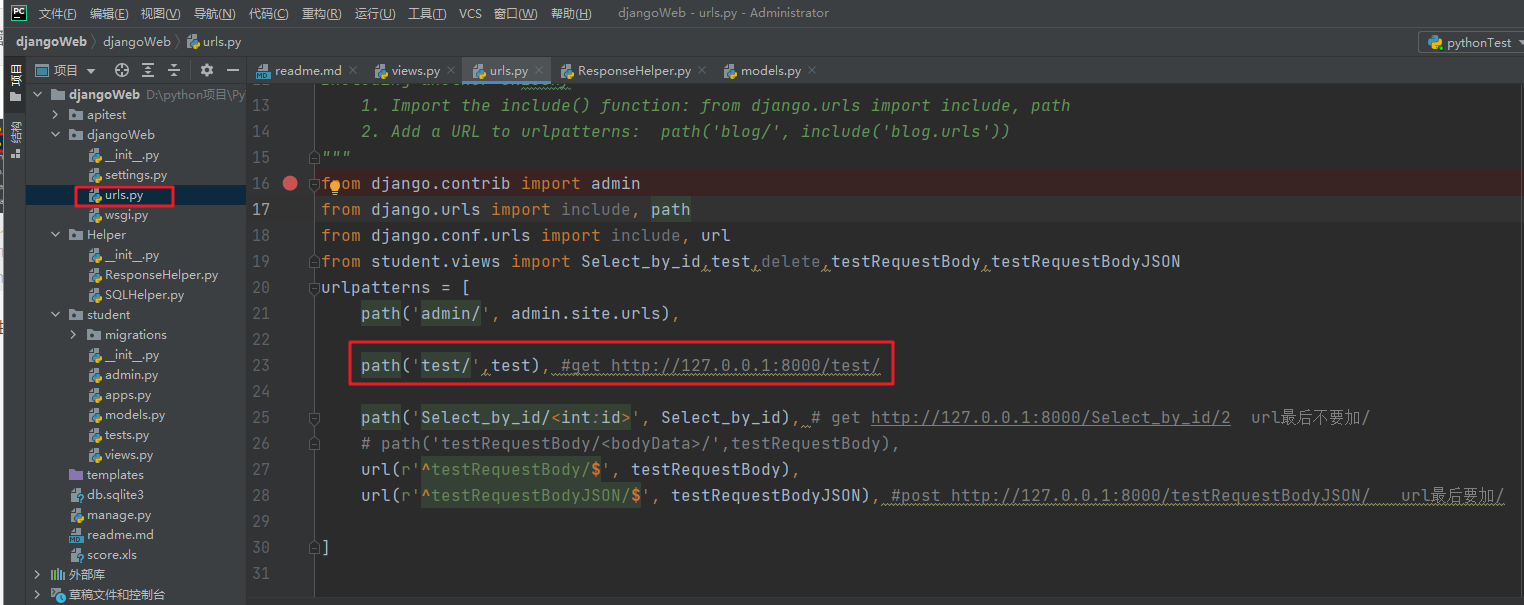
3. Configure the route and conduct call test
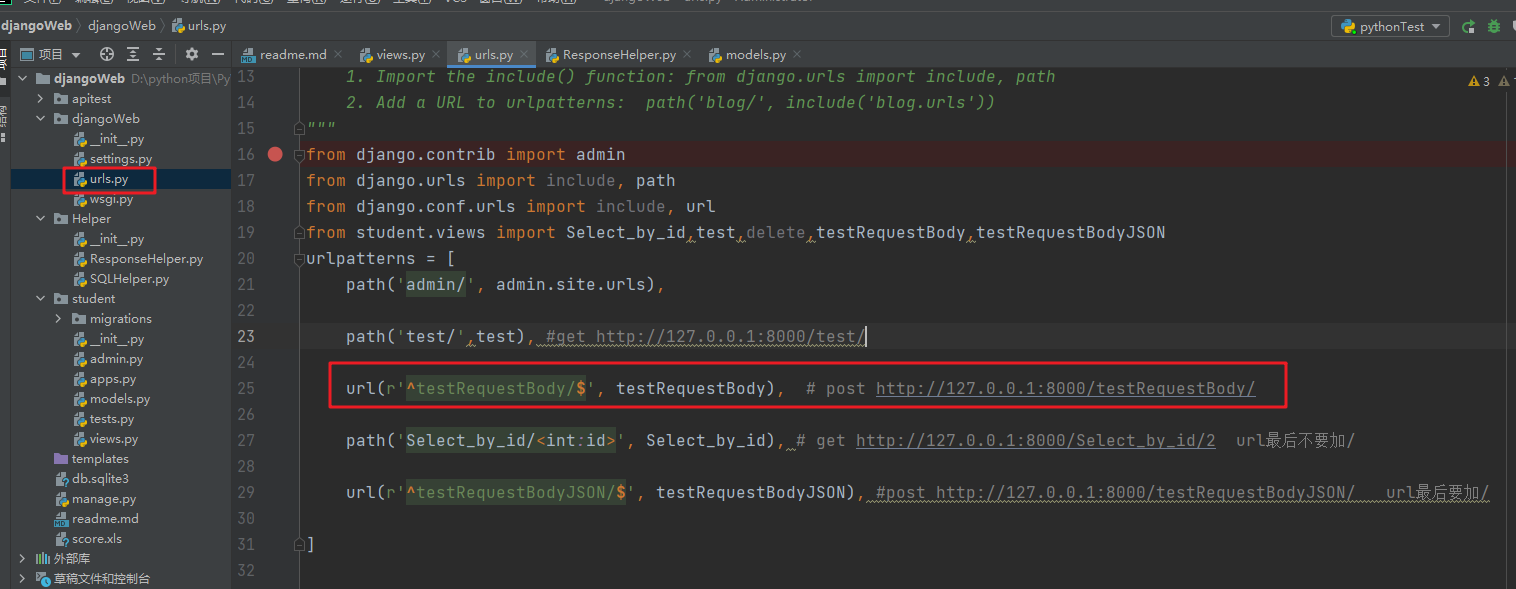
from django.contrib import admin
from django.urls import include, path
from django.conf.urls import include, url
from student.views import Select_by_id,test,delete,testRequestBody,testRequestBodyJSON
urlpatterns = [
    path('admin/', admin.site.urls),

    path('test/',test), #get http://127.0.0.1:8000/test/

    path('Select_by_id/<int:id>', Select_by_id), # get  http://127.0.0.1:8000/Select_by_id/2 Don't add the URL at the end/
    # path('testRequestBody/<bodyData>/',testRequestBody),
    url(r'^testRequestBody/$', testRequestBody),
    url(r'^testRequestBodyJSON/$', testRequestBodyJSON), #post  http://127.0.0.1:8000/testRequestBodyJSON/ The URL should be added at the end/
]
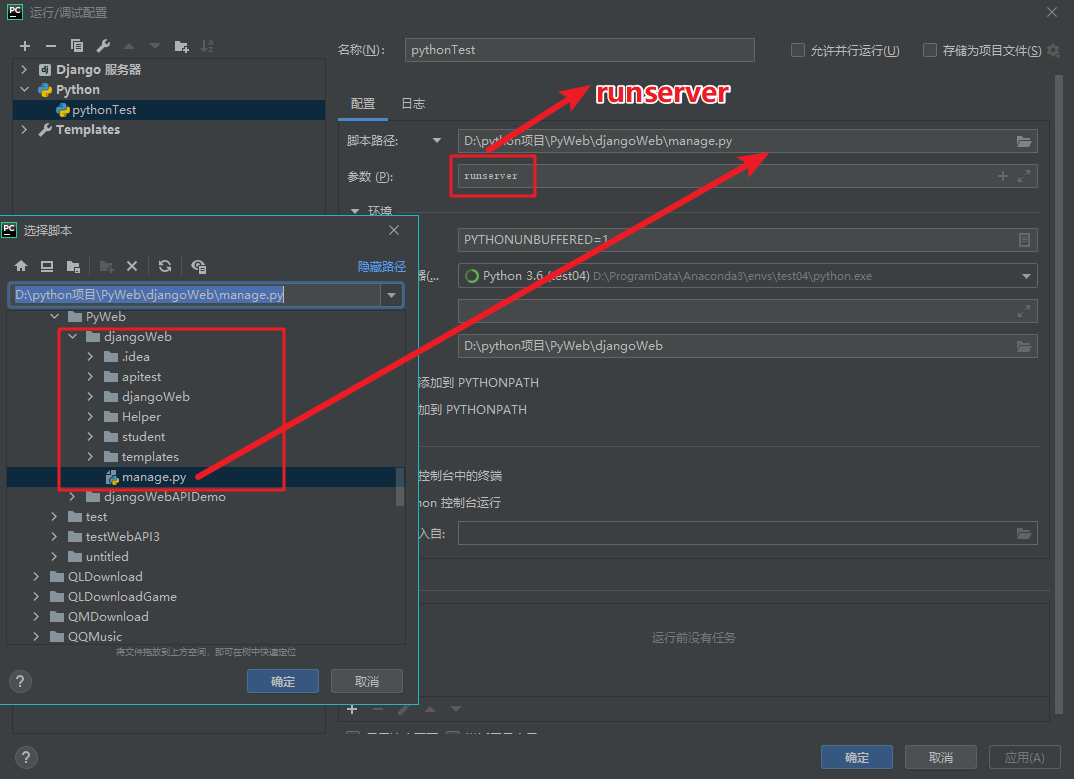
Run the project. I have configured "run configuration" and can run it directly.
It can also be used on the terminal: Python manage Py runserver runs directly.
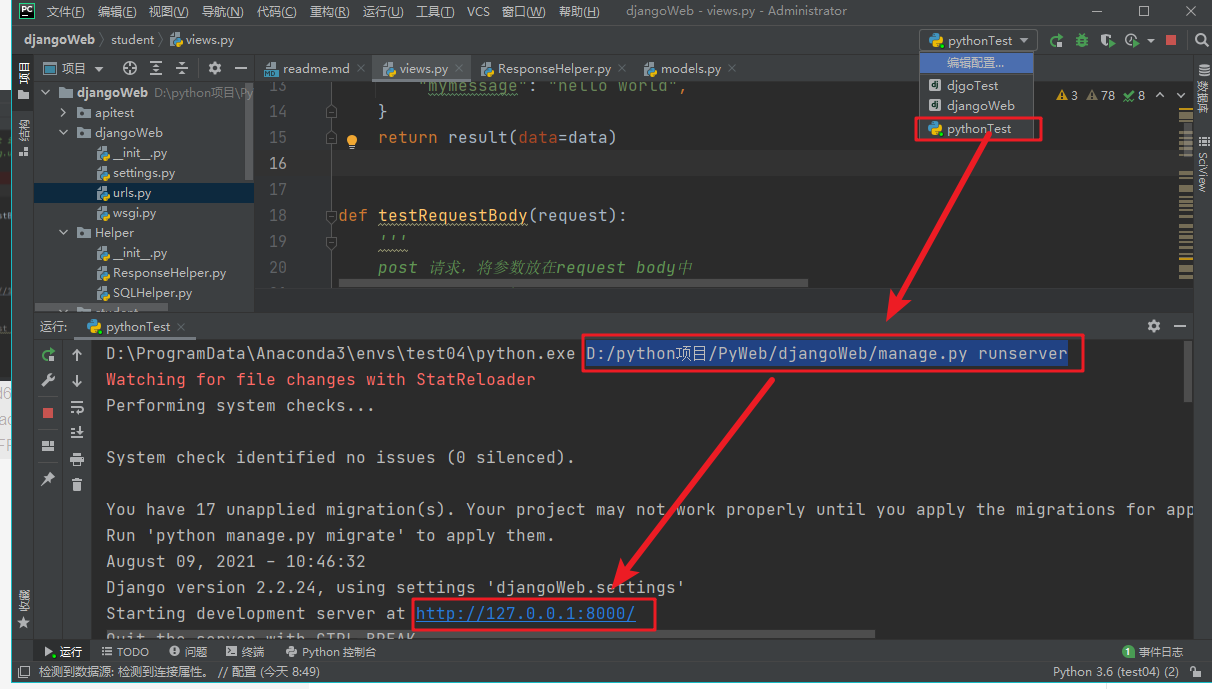
Access on the browser side or in postman

3. webapi advanced
This paper mainly introduces the model query, native SQL statement execution and routing mode of django project based on parameter transfer
3.1 transmission and reception of body parameters of webapi
Put the parameters in the body
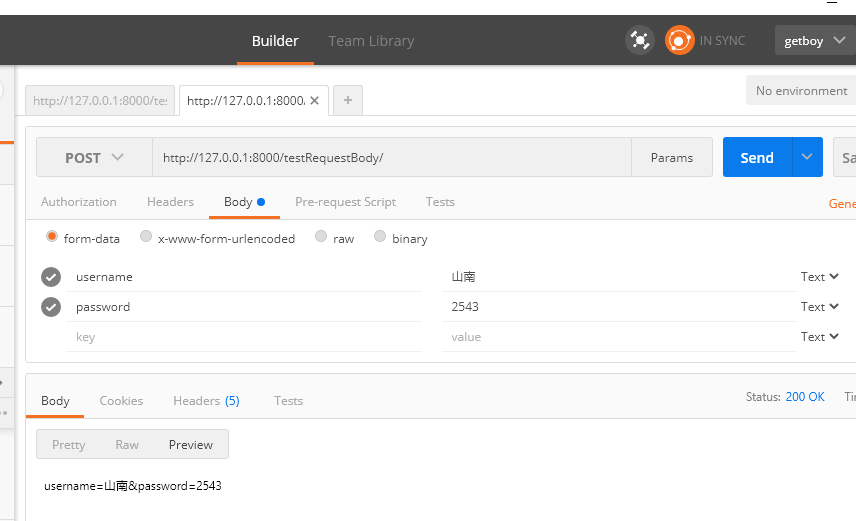
Backend code:
def testRequestBody(request):
    '''
    post Request, put parameters in request body in
    :param request:
    :return:
    '''

    print("=======Called testRequestBody======")
    username = request.POST.get('username', 'Default name') #request. POST. The second parameter in get is the default value
    password = request.POST['password'] #request.POST.get('password', '')
    return HttpResponse('username=' + username + "&password=" + password)
Backend routing configuration:
Front end call and response in postman:
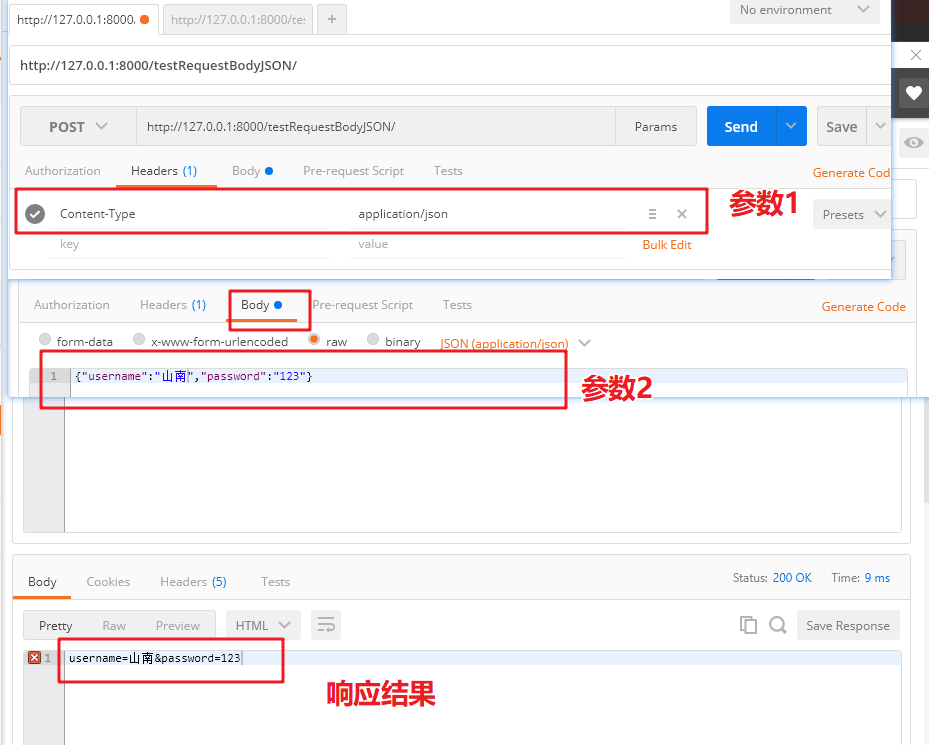
3.2 passing and receiving json parameters of webapi
Backend code:
def testRequestBodyJSON(request):
    '''
    post Request, will json Put on request body in  postman send out json Formatted post request https://www.cnblogs.com/shimh/p/6093229.html
    :param request:
    :return:
    '''
    print("=======testRequestBodyJSON======")
    print(request.body)
    requestJson = simplejson.loads(request.body)
    print(requestJson)
    username = requestJson['username']
    password = requestJson['password']
    return HttpResponse('username=' + username + "&password=" + password)
Back end route: URL (R '^ testrequestbodyjson / $', testrequestbodyjson), #post http://127.0.0.1:8000/testRequestBodyJSON/ The URL should be added at the end/
Front end call and response in postman:
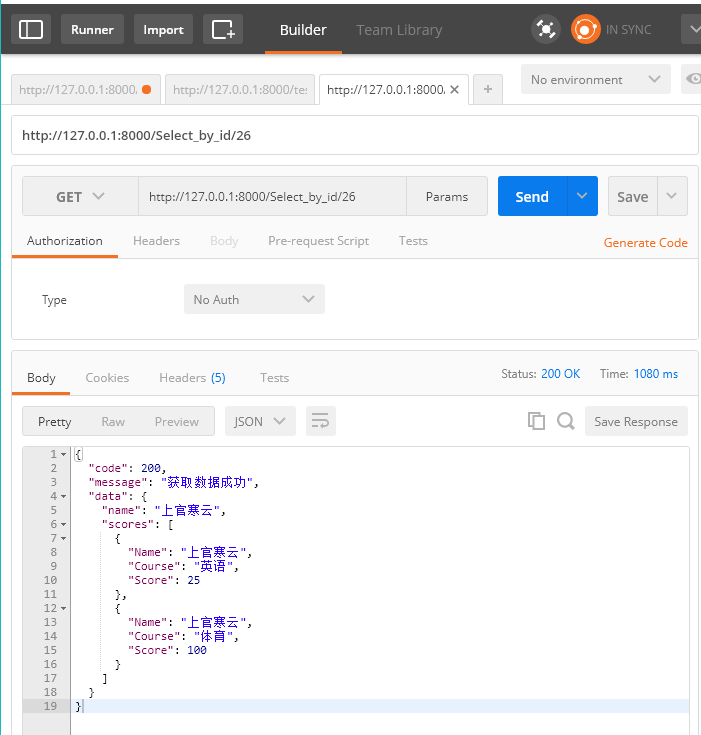
3.3 transfer, reception and return of json parameters of webapi
Backend code:
#Query student name and score
def Select_by_id(request: HttpRequest,id):
    print(id)
    try:
        studentId = id
        stu = Student.objects.get(id=studentId)
        print(stu.name)
        if stu:  # If it exists in the database
            scores=Score.objects.values("course","score").filter(studentid=studentId) #scores=Score.objects.filter(studentid=studentId) gets all the fields of score
            listres=list(scores)   # scores=Score.objects.values("course","score").filter(studentid=studentId) only gets some fields and converts them into a list
            print(scores)
            print(scores.values())
            print(scores[0])
            print(scores[0]['score']) #scores[0].score will make an error
            print(scores[0]['course'])

            #Try a native SQL statement to cross table query score objects. values("course","score"). Filter (student_id = studentID) needs to set the foreign key relationship
            SQLstr="select  Name,score.Course,score.Score from student left join score on studentid=student.ID where studentid="+str(studentId);
            raw = query_all_dict(SQLstr)
            print(raw)
            listres = list(raw)

            data={
                "name":stu.name,
                "scores":listres
            }
            return result(message="Data acquisition succeeded",data=data)
        else:
            return JsonResponse({'Status': 'There is no student information in the database'})
    except Exception as e:
        return server_error()
Backend route: path ('select_by_id / < int: ID > ', select_by_id), # get http://127.0.0.1:8000/Select_by_id/2 Don't add the URL at the end/
This involves the help class from helper for SQL native queries SQLHelper import query_ all_ Dict # uses native SQL queries
Can refer to: teach you to use Django to execute native
Front end call and response in postman: