✨✨✨
Thank you for opening Xiaobai's article
"I hope you have made a little progress today and come closer to a better life!" 🌈
catalogue
🚀 Previous review
| Basic image processing (I) | (1 message) basic image processing (I)_ am_student blog - CSDN blog |
| Basic image processing (2) | (1 message) basic processing of pictures (II)_ am_student blog - CSDN blog |
| Basic image processing (3) | (1 message) basic image processing (III)_ am_student blog - CSDN blog |
| Basic image processing (4) | (1 message) after learning these image processing, I took it to my girlfriend to fix the picture_ am_student blog - CSDN blog |
🍉 preface
ImageDraw module realizes the drawing function, which can draw 2D images by creating pictures; You can also draw on the original picture, which has achieved the purpose of modifying the picture or annotating the picture.
When drawing in the ImageDraw module, you need to first create an ImageDraw Draw object and provide parameters to the file. Then reference the created draw object method to draw. Finally, save or directly output the drawn image.
drawObject=ImageDraw.Draw(black)
🍉 Basic function application
🍋 (1) Draw a line
drawObject.line([x1,y1,x2,y2],fill = None,width = 0,joint = None )
It means to draw a straight line with (x1,y1) as the starting point and (x2,y2) as the ending point. [x1,y1,x2,y2] can also be written as (x1,y1,x2,y2), [(x1,y1),(x2,y2)], etc; fill is used to set the specified line color; Width sets the width of the line; joint represents the union type between a series of lines. It can be a "curve".
🍋 (2) Draw an arc
drawObject.arc([x1,y1,x2,y2],start,end,fill = None,width = 0 )
In the rectangular area where the upper left corner coordinates are (x1,y1) and the lower right corner coordinates are (x2,y2), in the full circle O, take start as the starting angle and end as the ending angle, intercept part of the arc of circle O and draw it. If the [x1,y1,x2,y2] region is not square, the segment is intercepted according to the angle in the largest ellipse in the region. The parameters fill and width are the same as the line method.
🍋 (3) Draw ellipse
drawObject.ellipse([x1,y1,x2,y2],fill = None,outline = None,width = 0 )
Similar to arc, it is used to draw a circle (or ellipse). outline indicates that only the color of the circle is specified.
🍋 (4) The usage of drawing strings is similar to arc. It is used to draw strings from start to end in a circle.
drawObject.chord([x1,y1,x2,y2],start,end,fill = None,outline = None,width = 0 )
fill indicates that the space between the chord and the arc is filled with the specified color. Setting it to outline indicates that only the color of the chord is specified.
🍋 (5) The usage of drawing sector is similar to elipse. It is used to draw the sector area between the start and end angles.
drawObject.pieslice([x1,y1,x2,y2],start,end,fill = None,outline = None,width = 0 )
fill indicates that the sector area is filled with the specified color, and set to outline indicates that the area outline is drawn only with the specified color.
🍋 (6) Draw polygons draw polygons according to coordinates,
drawObject.polygon([x1,y1,x2,y2,....],fill = None,outline = None )
Python will connect the whole graph according to the (x,y) coordinate pair in the first parameter. Fill means to fill the polygon area with the specified color. Outline is only used to set the specified color to draw the area outline.
🍋 (7) Draw rectangle
drawObject.rectangle([x1,y1,x2,y2],fill = None,outline = None,width = 0 )
Draw a rectangle in the specified area, (x1,y1) represents the coordinates of the upper left corner of the rectangle, and (x2,y2) represents the coordinates of the lower right corner of the rectangle. Fill is used to fill the color of the rectangular area, and outline is used to outline the area.
🍋 (8) Draw text
drawObject.text(position,text,fill = None,font = None,anchor = None,spacing = 0, align ="left",direction = None,features = None,language = None )
Add text to the image. The parameter position is a binary, which is used to specify the coordinates of the upper left corner of the text; Text indicates the text content to be written; fill indicates the color of the text; Font must be the font type specified in ImageFont; spacing represents the number of pixels between rows; align indicates the position "left", "center" or "right"; Direction indicates the direction of the text. It can be 'rtl' (right to left), 'ltr' (left to right), or 'ttb' (top to bottom).
🍋 (9) Draw pointdraws a point (single pixel) at a given coordinate.
drawObject.point(xy,fill = None )
🍉 Application example I
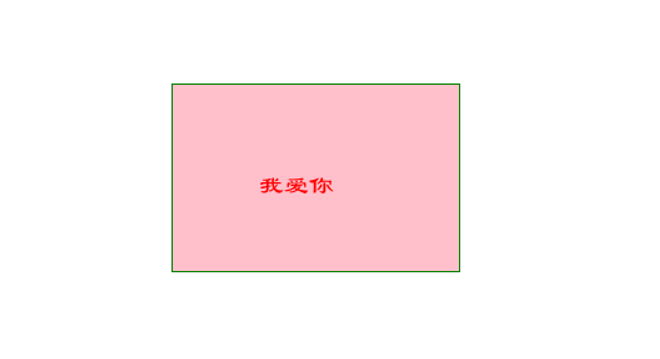
from PIL import Image,ImageDraw,ImageFont
#Create an image with a white background
img=Image.new('RGB',(300,300),'white')
#Draw a rectangle
draw_obj=ImageDraw.Draw(img)
draw_obj.rectangle((50,50,280,200),fill='pink',outline='green')
font=ImageFont.truetype('SIMLI.TTF',20)
draw_obj.text((120,120),'I love you!♥',font=font,fill='red')
img.show()
Result display:
🍉 Application example II
from PIL import Image,ImageDraw
img=Image.open('lena.jpg')
width,height=img.size
#Create drawing objects
draw_obj=ImageDraw.Draw(img)
draw_obj.arc((0,0,width-1,height-1),0,360,fill='blue')
img.save('circle.jpg')
Result display:

Code examples can be used to capture official account numbers: