Original link: http://www.juzicode.com/image-ocr-python-easyocr
Orange fungus before Pytes seract extracts and recognizes the text in the picture How to use tesseract to extract and recognize text in pictures in Python is described in. Today, let's talk about EasyOcr. It is also a very excellent OCR package, which is quite easy to use.
1. Install easyocr package
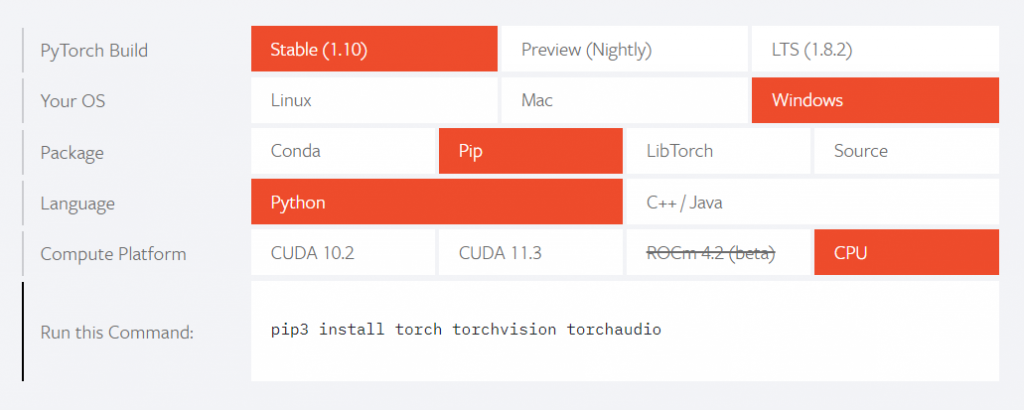
Take the windows system as an example. You need to install pytorch first pytorch official website You can find the installation method according to the language version, operating system and other information:

pip3 install torch torchvision torchaudio
To install easyocr:
pip3 install easyocr
After installation, you can use easyocr__ version__ View version number:
import easyocr
print(easyocr.__version__)
2. Install detection model and recognition model (language pack)
If the detection model and recognition model are not installed in advance, two model files will be automatically downloaded when the script is executed for the first time:


This way of downloading is slow and error prone, resulting in download interruption. It can be downloaded and installed manually.
Enter the esayocr official website and select the model to download( Jaided AI: EasyOCR model hub).
First download the text detection model:

Next, download the recognition model, which corresponds to various language packs. The following figure shows the recognition models in simplified Chinese and English:

Unzip the downloaded model file and copy it to the directory of the currently logged in user In the EasyOCR\model folder, the Windows system is: C: \ users \ yourname \ EasyOCR\model, where yourname is the login user name.
[note] the file name of the recognition model (language pack) downloaded here does not exactly correspond to the language type seen later. For example, the language type ch_sim in the code corresponds to simplified Chinese (zh_sim_g2) and en corresponds to english_g2.
3. Method of use
The use of EsayOcr is as simple as its name. There are two steps. Step 1 creates a Reader() instance, and step 2 detects and identifies it with the readtxt() method.
Create Reader() instance
The parameters to initialize the Reader() instance are:
- lang_list (list): identify language codes, such as ['ch_sim', 'en'] for simplified Chinese and English respectively.
- GPU (bool, string, default = True): whether to enable GPU. It is valid only when the GPU version is installed.
- model_storage_directory (string, default = None): the storage location of the model. Find the system variable EasyOCR in turn_ MODULE_ PATH (preferred),MODULE_PATH (if defined) or ~ / EasyOCR / path.
- download_enabled (bool, default = True): if there is no corresponding model file, the model will be downloaded automatically.
- user_network_directory (bool, default = None): the user-defined path to identify the network. If it is not specified, it is in MODULE_PATH + ‘/user_ Network '(~ /. EasyOCR/user_network) directory.
- recog_network (string, default = 'standard'): replaces the standard model and uses a custom identification network.
- detector (bool, default = True): whether to load the detection model.
- recognizer (bool, default = True): whether to load the recognition model.
After the instance is created, its readtext() method is used to identify text.
Detect and identify readtext() method
The following is the simplest application example. First create a reader object, pass in the language package to be used (recognition model), and then pass in the file name to be recognized in the readtext method of the reader object:

#juzicode.com / vx: Orange code
import easyocr
reader = easyocr.Reader(['ch_sim','en'])
result = reader.readtext('road-poetry.png')
for res in result:
     print(res)
Operation results:
([[151, 101], [195, 101], [195, 149], [151, 149]], 'west', 0.9816301184856115)
([[569, 71], [635, 71], [635, 131], [569, 131]], 'east', 0.9986620851098884)
([[218, 92], [535, 92], [535, 191], [218, 191]], 'Poetry and distant road', 0.8088406614287519)
([[137, 217], [177, 217], [177, 257], [137, 257]], 'W', 0.8304899668428476)
([[209, 217], [525, 217], [525, 257], [209, 257]], 'Poetry And The Places Afar Rd. ', 0.40033782611925706)
([[571, 207], [611, 207], [611, 251], [571, 251]], 'C', 0.1553293824532922)
The readtext() method returns a tuple containing multiple elements. Each element consists of three parts: the recognized text frame, text content, and credibility.
In addition to the file name passed in by readtext() in the previous example, you can also pass in the numpy array of the image in the readtext() method, such as the numpy array obtained by reading the image file with opencv:
#juzicode.com / vx: Orange code
import easyocr
import cv2
reader = easyocr.Reader(['ch_sim','en'])
img = cv2.imread('road-poetry.png' )
result = reader.readtext(img)

color=(0,0,255)
thick=3
for res in result:
    print(res)
    pos = res[0]
    text = res[1]
    for p in [(0,1),(1,2),(2,3),(3,0)]:
        cv2.line(img,pos[p[0]],pos[p[1]],color,thick)
cv2.imwrite('bx-road-poetry.jpg',img)
Operation results:
([[151, 101], [195, 101], [195, 149], [151, 149]], 'west', 0.9805448761688105)
([[569, 71], [635, 71], [635, 131], [569, 131]], 'east', 0.9985224701960114)
([[217, 91], [534, 91], [534, 194], [217, 194]], 'Poetry and distant road', 0.8750403596327564)
([[137, 217], [177, 217], [177, 257], [137, 257]], 'W', 0.7520859053705777)
([[209, 217], [523, 217], [523, 257], [209, 257]], 'Poetry And The Places Afar Rd. ', 0.3012721541954036)
([[571, 207], [611, 207], [611, 251], [571, 251]], 'C', 0.15253169048338933)

The third method is to pass in the read original byte content in readtext(). Note that the picture file is read in rb mode:
#juzicode.com / vx: Orange code
import easyocr
reader = easyocr.Reader(['ch_sim','en'])
with open('road-poetry.png','rb') as pf:
    img = pf.read()
    result = reader.readtext(img)
    for res in result:
        print(res)
Operation results:
([[151, 101], [195, 101], [195, 149], [151, 149]], 'west', 0.673960519698312)
([[569, 71], [635, 71], [635, 131], [569, 131]], 'east', 0.9128537192685862)
([[218, 92], [535, 92], [535, 191], [218, 191]], 'Poetry and distant road', 0.7941057755221305)
([[137, 217], [177, 217], [177, 257], [137, 257]], 'W', 0.7182424534268108)
([[209, 217], [525, 217], [525, 257], [209, 257]], 'Poetry And The Places Afar Rd. ', 0.5591090091224509)
([[571, 207], [611, 207], [611, 251], [571, 251]], 'C', 0.1532075452826911)
EasyOcr, so easy, have you failed?
Recommended reading:
Blur photo repair artifact GFPGAN
Fresh Python 3 10. Try a match case
Using wechat code scanning function in Python
Customize your own two-dimensional code (amzqr) in one line of code
Let's see how to use OpenCV to deconstruct the visual illusion of Twitter Daniel