Relevant introduction
OpenCV is based on Apache 2 Cross platform for 0 licensed (open source) distribution computer vision and machine learning Software library, which can run in Linux,Windows,Android and Mac OS On the operating system. It is lightweight and efficient - it is composed of a series of C functions and a small number of C + + classes. At the same time, it provides interfaces with Python, Ruby, MATLAB and other languages image processing And many general algorithms in computer vision. It also supports many AI functions. Here we mainly use Opencv for image processing, and the recognition work is completed by Mediapipe. The functions related to Opencv are I explained it on my previous blog.
Mediapipe is an open-source framework of Google. It supports many common AI functions, such as face detection, gesture tracking, human posture detection, etc. this time, we need to use mediapipe's gesture model, which is an officially trained and open-source tool for gesture detection by Google, so we don't need to train the model ourselves, Just call this tool.
Detection principle
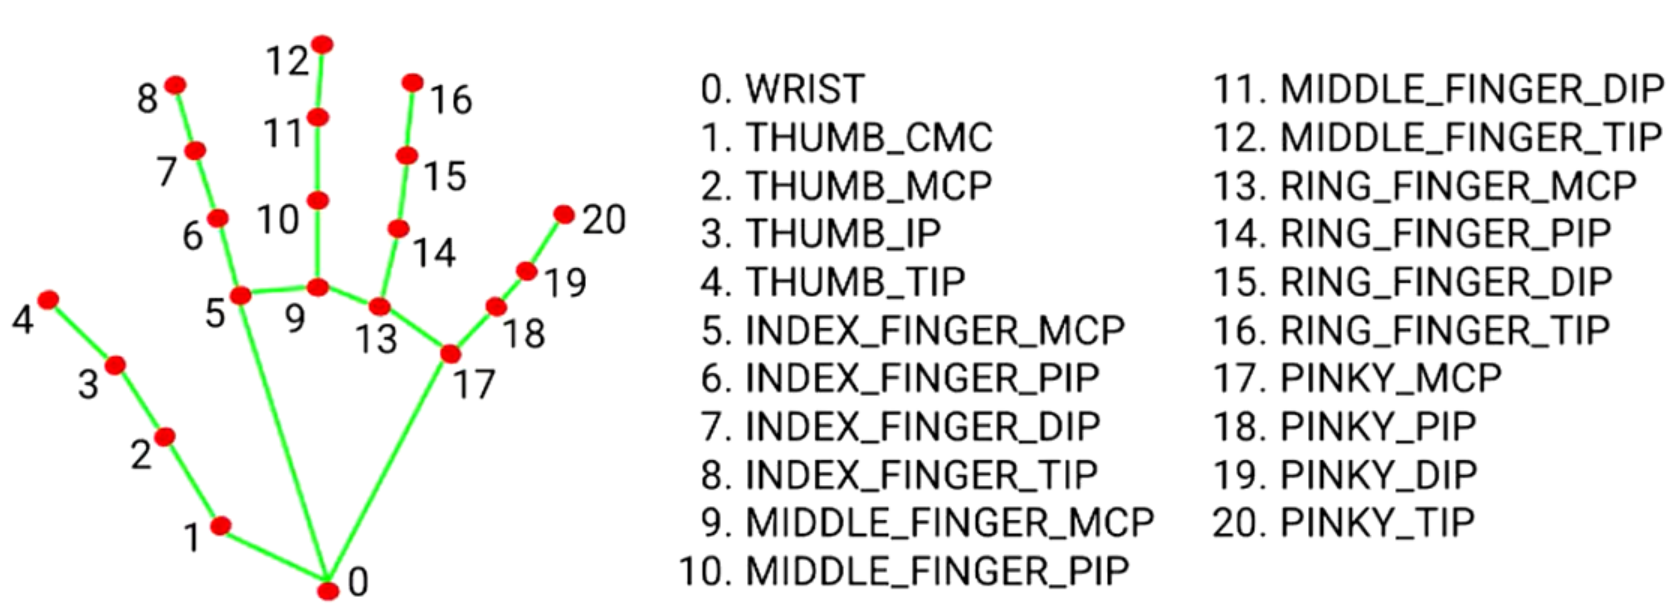
Through the trained model, the hands detection module of Mediapipe can detect 21 joint nodes on the human hand and return their positions (three-dimensional) in the image. By marking them in the image and connecting them with lines, the following complete gestures can be obtained. Simple gesture discrimination can be realized by calculating the distance and depth between each point.
About environment configuration
Here, I use pycharm or other development environments. When I download and install mediapipe, I find that I can't install it with version 3.9. Later, I switched to version 3.7 and there's no problem (it may also be caused by other reasons)
Procedural thinking
After importing the relevant function package, capture the built-in camera of the notebook (of course, it can also be changed to usb connected camera by modifying the parameters, such as 1), then simplify the function name (otherwise it is too long), and then call the hands module to configure the parameters of recognition (including recognition rigor, tracking trust, etc., which are introduced below), Then simplify the functions used to draw points and lines. Then you can start to set the color and thickness of points and lines, and then assign the two variables to 0 (which will be used to calculate the number of frames per second later). Then write a simple cycle of reading video (this cycle is included in the previous blog, which will not be described here). Then, in the cycle, you need to convert BGR images into RGB images, Because mediapipe reads RGB by default and Opencv is BGR, and then imports the converted image into the module for recognition. Then, you need to get the height and width of each frame of image in the video, and call Shape function, and then judge that if the hand is recognized after module recognition, it will cycle the coordinates obtained and call draw_ The landmarks function draws lines and points, and then lists the data and its subscripts using the enimerate function (so as to indicate which point the joint is), and then you need to multiply the obtained coordinates by the previous ones The function obtained from the shape calculates the real X and Y coordinates and converts them into integers (this is because the landmark of media returns the percentage coordinates of X and Y in the image. We need to multiply the width and height to get the numerical coordinates). Then we can apply the obtained joint coordinates, call the function to draw the corresponding number next to the joint, and print the real-time joint coordinates, Next, we write a small algorithm with the time module to get the number of frames per second and write it on the image. Finally, judge that if you press the q key, the cycle will be terminated and the camera will be turned off).
Source code
import cv2
import mediapipe as mp
import time#Used to know the current time
cap = cv2.VideoCapture(0,cv2.CAP_DSHOW)#Capture camera, 0 is generally the built-in camera of the notebook, and 1, 2, 3 and so on are the cameras connected to the usb port
mpHands = mp.solutions.hands#Simplified function name
hands = mpHands.Hands(False,4,1,0.7,0.7)#Configure relevant parameters during detection
mpDraw = mp.solutions.drawing_utils#Functions for drawing points
handLmStyle = mpDraw.DrawingSpec(color = (0,0,255),thickness = 5)#Point style,#Line style BGR, the first parameter is color, and the last parameter is thickness
handConStyle = mpDraw.DrawingSpec(color = (0,255,0),thickness = 10)#Style of line BGR,#Line style BGR, the first parameter is color, and the last parameter is thickness
pTime = 0
cTime = 0
while True:#Cycle of reading video
    ret,img = cap.read()#Read in each frame of image
    if ret:#If the read value is not null, the screen is displayed
        imgRGB = cv2.cvtColor(img,cv2.COLOR_BGR2RGB)#Convert BGR image to RGB image, because mediapie needs RGB
        result = hands.process(imgRGB)#Import image for recognition
        #print(result.multi_hand_landmarks)
        imgHeight = img.shape[0]#Get the height of the image
        imgWeight = img.shape[1]#Get the width of the image
        if result.multi_hand_landmarks:
            for handLms in result.multi_hand_landmarks:#Cycle through all the coordinates
                mpDraw.draw_landmarks(img,handLms,mpHands.HAND_CONNECTIONS,handLmStyle,handConStyle)#Draw points and lines
                for i,lm in enumerate(handLms.landmark):
                    xPos = int(imgWeight*lm.x)#Convert coordinates to integers
                    yPos = int(imgHeight*lm.y)
                    cv2.putText(img,str(i),(xPos-25,yPos+5),cv2.FONT_HERSHEY_PLAIN,1,(0,0,255),2)#Print the number of the corresponding point on the hand on the picture
                    print(i,xPos,yPos)#Print out the coordinates
    cTime = time.time()#Get current time
    fps = 1/(cTime-pTime)#Divide 1 by the time it takes to play a frame to get the number of frames per second
    pTime = cTime#Get the time at the end of this frame
    cv2.putText(img,f"FPS:{int(fps)}",(30,50),cv2.FONT_HERSHEY_PLAIN,2,(255,0,0),2)#Print the obtained frame number information on the picture
    cv2.imshow("img", img)#Show pictures
    if cv2.waitKey(1) ==ord("q"):#If the q key is pressed, the cycle is terminated
        break
Function introduction (not very accurate, it's better to see the official website for detailed introduction)
mpHands.Hands(False,4,1,0.7,0.7): configure relevant parameters in the detection process (line 6)
False means that the image to be recognized is not a single image, but a video stream, and motion tracking needs to be added. If it is changed to True, it means to read a single image. Here 4 means to recognize up to 4 hands, which can be set according to the situation, 1 refers to the accurate recognition mode (it will consume a little computing performance, but it has little impact. Generally, it will bring the movement. Instead, it can reduce the computational burden, but it will reduce the accuracy). The first 0.7 means that the matching degree needs to be greater than 70%. The second 0.7 means that the matching degree when tracking hand movement also needs to be greater than 70%, but the higher these two parameters are set, The longer the recognition and judgment time is required, so it needs to be set in combination with the actual situation.
mpDraw.draw_landmarks(img,handLms,mpHands.HAND_CONNECTIONS,handLmStyle,handConStyle): draw points and lines (line 22)
img is the incoming image to draw points and lines, handLms is the coordinates of points, mphands HAND_ Connections is the type of line. Here, gesture line is selected, handLmStyle is the style of point, and handConStyle is the style of line.
cv2. putText(img,str(i),(xPos-25,yPos+5),cv2. FONT_ HERSHEY_ Plan, 2, (0,0255), 2): print the number of the corresponding point on the hand on the picture (twenty-six lines)
img is the image of the incoming content to be printed, str(i) is the character content to be printed, CV2 FONT_ HERSHEY_ Plan is a font, 1 is the line thickness of the font, (0,0255) is the color setting, and 2 is the font size.
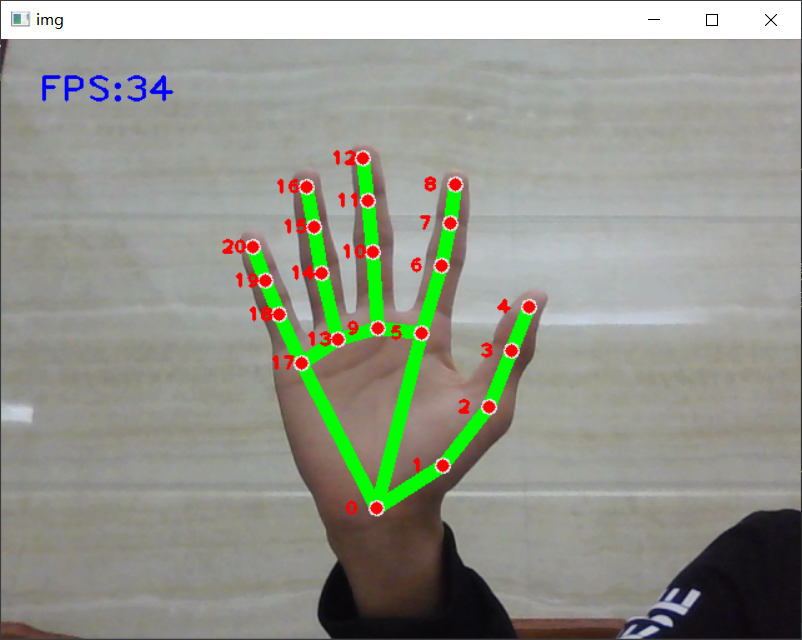
Operation effect (screenshots are displayed when the video cannot be played)
Curved fingers can also be recognized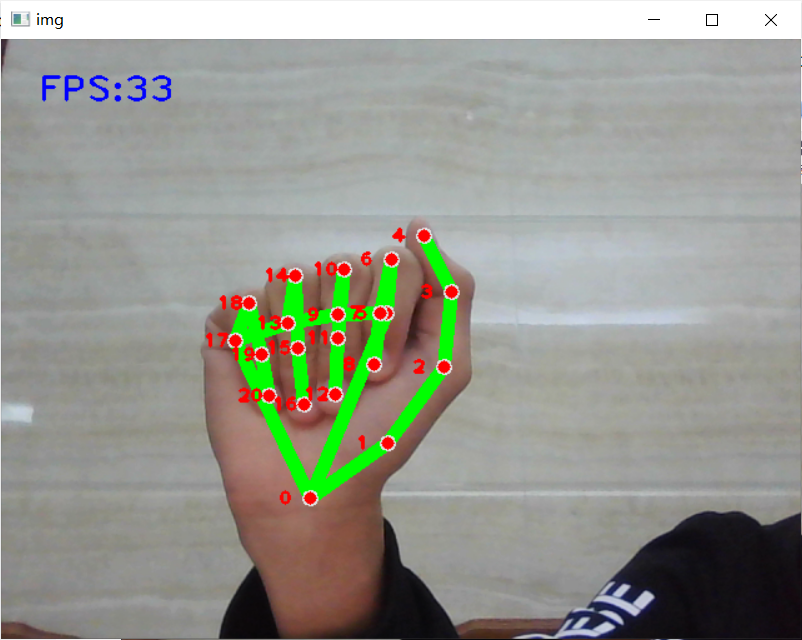
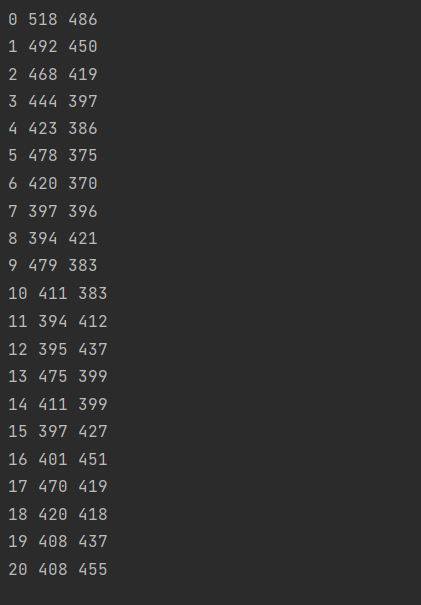
The real-time coordinates of each joint printed out
Conclusion: the recognition module provided by mediapipe is relatively convenient. At the same time, it also provides many other modules such as human trunk and face detection. It is a commonly used framework.