The content shared in this article comes from the book "learning OpenCV 4: Python based algorithm practice", which is as follows:
Chapter 1 OpenCV Quick start;
Chapter 2 image reading and writing module imgcodecs;
Chapter 3 core library module core;
Chapter 4 image processing module imgproc(1) (a);
Chapter 5 image processing module imgproc(2) (a);
Chapter 6 visualization module highgui;
Chapter 7 video processing module videoio;
Chapter 8 video analysis module video;
Chapter 9 photo processing module photo;
Chapter 10 2 D Feature module features2d;
Chapter 11 camera calibration and 3D reconstruction module calib3d;
Chapter 12 traditional target detection module objdetect;
Chapter 13 machine learning module ml;
Chapter 14 deep neural network module dnn
Welcome to the books "deep learning computer vision practice" and "learning OpenCV4: Python based algorithm practice".
This section describes the watershed algorithm, GrabCut algorithm and overflow filling algorithm, which will be introduced in the next two sharing. Welcome to continue to pay attention.
When there is no background template available, the watershed algorithm first calculates the gradient of the intensity image (such as looking for the contour). The lines formed form mountains or ridges, and the basins or valleys are formed where there is no texture. Then, water is poured into the basins from the specified points. When the image is filled, all marked areas are divided, This is the segmentation idea of watershed algorithm.
OpenCV provides the watershed function of watershed algorithm, which is defined as follows:
markers = watershed(image, markers)
The parameters are described as follows:
image, input image, and input 8-bit 3-channel image;
markers, a marker image with the same size as the input image (return value).
The case code used in this case comes from the sample in the OpenCV source code. The location is "samples/cpp/watershed.cpp". In order to facilitate understanding, some adjustments have been made to the source code, such as adding Chinese comments. In the case, the mouse is used to mark the segmentation target (the marked point is the water injection point), and then the watershed algorithm is used for image segmentation. The case code is as follows:
#include <opencv2/core/utility.hpp>
#include "opencv2/imgproc.hpp"
#include "opencv2/imgcodecs.hpp"
#include "opencv2/highgui.hpp"

#include <cstdio>
#include <iostream>

using namespace cv;
using namespace std;

//Help description
static void help(char** argv)
{
    //The first parameter is the input image, and the default is fruits jpg
    cout << "\nThis program demonstrates the famous watershed segmentation algorithm in OpenCV: watershed()\n"
        "Usage:\n" << argv[0] << " [image_name -- default is fruits.jpg]\n" << endl;

    //Operation keys: drag the left mouse button to select the foreground; ESC exit operation; r image restoration; w or spacebar
    cout << "Hot keys: \n"
        "\tESC - quit the program\n"
        "\tr - restore the original image\n"
        "\tw or SPACE - run watershed segmentation algorithm\n"
        "\t\t(before running it, *roughly* mark the areas to segment on the image)\n"
        "\t\t(before that, roughly outline several markers on the image)\n";
}
Mat markerMask, img;
Point prevPt(-1, -1);

//Mouse event
static void onMouse(int event, int x, int y, int flags, void*)
{
    //If there is a problem with the image or the current mouse point is outside the image, it will be returned without processing
    if (x < 0 || x >= img.cols || y < 0 || y >= img.rows)
        return;
    //Lift the left mouse button
    if (event == EVENT_LBUTTONUP || !(flags & EVENT_FLAG_LBUTTON))
        prevPt = Point(-1, -1);
    //Press the left mouse button
    else if (event == EVENT_LBUTTONDOWN)
        prevPt = Point(x, y);
    //Mouse movement
    else if (event == EVENT_MOUSEMOVE && (flags & EVENT_FLAG_LBUTTON))
    {
        Point pt(x, y);
        if (prevPt.x < 0)
            prevPt = pt;
        //Draw marker lines
        line(markerMask, prevPt, pt, Scalar::all(255), 5, 8, 0);
        line(img, prevPt, pt, Scalar::all(255), 5, 8, 0);
        prevPt = pt;
        imshow("image", img);
    }
}

//Execute main function, program entry
int main(int argc, char** argv)
{
    //Parameter analysis
    cv::CommandLineParser parser(argc, argv, "{help h | | }{ @input | fruits.jpg | }");
    if (parser.has("help"))
    {
        help(argv);
        return 0;
    }
    //Get input image file name
    string filename = samples::findFile(parser.get<string>("@input"));
    Mat img0 = imread(filename, 1), imgGray;

    if (img0.empty())
    {
        cout << "Couldn't open image ";
        help(argv);
        return 0;
    }
    //Create image window
    namedWindow("image", 1);

    img0.copyTo(img);
    cvtColor(img, markerMask, COLOR_BGR2GRAY);
    cvtColor(markerMask, imgGray, COLOR_GRAY2BGR);
    markerMask = Scalar::all(0);
    imshow("image", img);
    //Mouse event callback function
    setMouseCallback("image", onMouse, 0);

    for (;;)
    {
        char c = (char)waitKey(0);

        //ESC key exit
        if (c == 27)
            break;

        //r key image restore
        if (c == 'r')
        {
            markerMask = Scalar::all(0);
            img0.copyTo(img);
            imshow("image", img);
        }

        //w or spacebar to execute the algorithm
        if (c == 'w' || c == ' ')
        {
            int i, j, compCount = 0;
            vector<vector<Point> > contours;
            vector<Vec4i> hierarchy;

            //Find profile
            findContours(markerMask, contours, hierarchy, RETR_CCOMP, CHAIN_APPROX_SIMPLE);

            if (contours.empty())
                continue;
            Mat markers(markerMask.size(), CV_32S);
            markers = Scalar::all(0);
            int idx = 0;
            //Draw outline
            for (; idx >= 0; idx = hierarchy[idx][0], compCount++)
                drawContours(markers, contours, idx, Scalar::all(compCount + 100), -1, 8, hierarchy, INT_MAX);

            if (compCount == 0)
                continue;

            vector<Vec3b> colorTab;
            for (i = 0; i < compCount; i++)
            {
                int b = theRNG().uniform(0, 255);
                int g = theRNG().uniform(0, 255);
                int r = theRNG().uniform(0, 255);

                colorTab.push_back(Vec3b((uchar)b, (uchar)g, (uchar)r));
            }

            double t = (double)getTickCount();
            imwrite("markers.jpg", markers);
            //Perform watershed algorithm
            watershed(img0, markers);
            t = (double)getTickCount() - t;
            //Print processing time
            printf("execution time = %gms\n", t * 1000. / getTickFrequency());

            Mat wshed(markers.size(), CV_8UC3);
            cout << wshed.at<int>(0, 0) << endl;

            // Draw watershed images and color different segmented regions
            for (i = 0; i < markers.rows; i++) {
                for (j = 0; j < markers.cols; j++)
                {
                    int index = markers.at<int>(i, j);
                    if (index == -1)
                        wshed.at<Vec3b>(i, j) = Vec3b(255, 255, 255);
                    else if (index <= 0 || index > compCount)
                        wshed.at<Vec3b>(i, j) = Vec3b(0, 0, 0);
                    else
                        wshed.at<Vec3b>(i, j) = colorTab[index - 1];
                }
            }

            //Displays the split line of the watershed algorithm
            imshow("watershed", wshed);
            wshed = wshed * 0.5 + imgGray * 0.5;
            //Displays the results of the watershed algorithm
            imshow("watershed_result", wshed);
        }
    }

    return 0;
}
The input image used in this case is shown in Figure 5.26.
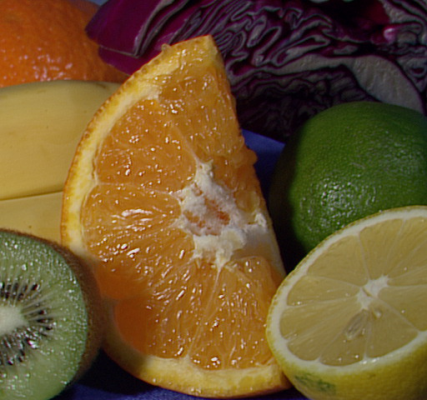
Figure 5.26
Mark the target to be segmented with the left mouse button in the image, as shown in Figure 5.27.
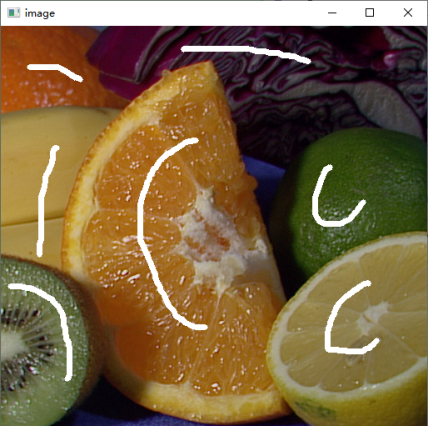
Figure 27.5
Press w or spacebar to execute the segmentation algorithm, and the segmentation result is shown in Figure 5.28.
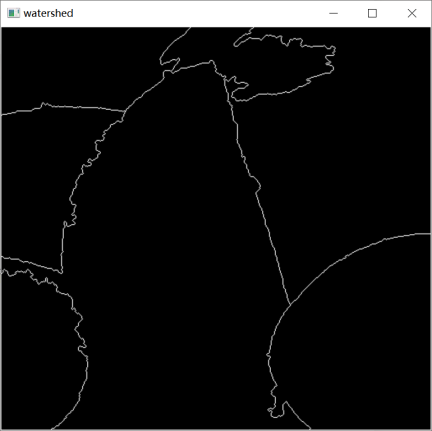
Figure 5.28
The segmentation result drawn in the input image is shown in Figure 5.29.
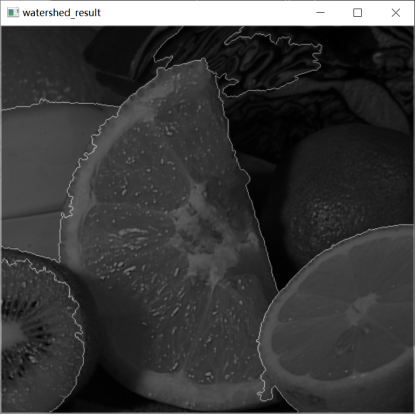
Figure 29.5