Recently, in mending opencv, I started the actual combat of this small project under the condition of less serious learning in the early stage, and identified the bank card number based on template matching.
Overall idea:
First of all, for this project, we need to consider how to make the computer successfully identify the card number of the bank card and correctly identify the number corresponding to each card number. Then we provide an idea here. First, we recognize the contour of the bank card image, then get the contour part of the corresponding card number we need, then further recognize the contour in the contour, get the contour of each number, and finally draw the circumscribed rectangle of each number, Then, according to the external rectangular contour of the template identified in advance, the template matching can successfully identify the correct number.
preparation:
1. Convert the image to a grayscale image
2. Binary image processing
3. Draw the contour, get the contour part we need according to the different contour ratio (here we use to compare the length and width of the contour, then judge the length and width ratio of each contour, and then get the correct length and width ratio part through limited conditions), and filter out other image information on the bank card at the same time
4. Finally, do some morphological operations, such as opening and closing operations, to make the digital image information more obvious and accurate
5. After training the template, it should be noted that for the bank card number, we need to find a digital template similar to the digital style of the bank card number, otherwise the subsequent matching results will be affected;
Matching result:

Test drawing and template drawing


Process:
Template image processing
The whole preprocessing process is gray-scale image, binarization, contour search, contour drawing, resize() contour size, and all contours are sorted in order from 0 to 9, so as to facilitate the subsequent digital acquisition after matching;
Template drawing after completion of appeal operation:

Related code
#1. Read template
img=cv2.imread('number.png')
cv_show('number',img)
#2. Convert template to grayscale image
gray=cv2.cvtColor(img,cv2.COLOR_BGR2GRAY)
cv_show('gray',gray)
#3. Change to binary image
ref,thre=cv2.threshold(gray,10,255,cv2.THRESH_BINARY_INV)
cv_show('ref',thre)
#4. Calculate the profile
refCnts,hierarchy=cv2.findContours(thre.copy(),cv2.RETR_EXTERNAL,cv2.CHAIN_APPROX_SIMPLE)
cv2.drawContours(img,refCnts,-1,(0,0,255),3)#Draw the outline. Only the outer outline is drawn here. There are 10 outlines 0 ~ 9 in total
cv_show('imgLK',img)
refCnts=sort(refCnts,"left-to-right")[0]
digits={}

#Traverse each contour:
for(i,c) in enumerate(refCnts):#Calculate the circumscribed rectangle and resize to the appropriate size
    (x,y,w,h)=cv2.boundingRect(c)
    roi=thre[y:y+h,x:x+w]
    roi=cv2.resize(roi,(57,88))

    #Each number has a template
    digits[i]=roi#Corresponding digital template of 0 ~ 9
Original image processing
Compared with the template, the primary operation of the original image processing is the same, that is, gray processing first, and then binarization. Most of them are some morphological operations. The main purpose is to remove the noise, and then strengthen the contour and some important features. After completing these, we get some contour information we need through the aspect ratio of the contour, After getting it, continue the contour processing, draw a rectangle outside, compare, and finally get the result.
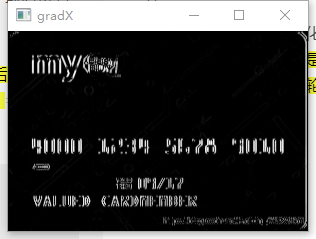
After gray and binarization of the original image, we do a top hat operation;
Because the result of the open operation is to enlarge the crack or local low brightness area, the effect image obtained by subtracting the opened image from the original image highlights the area brighter than the area around the contour of the original image, and this operation is related to the size of the selected core.
design sketch:

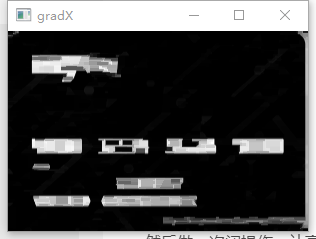
Then find the gradient in the X direction and get the highlighted part in the above figure:
Then do a close operation to make the highlighted area appear in blocks:
Then do a binarization to highlight the blocking part, and remove other miscellaneous information in the image:
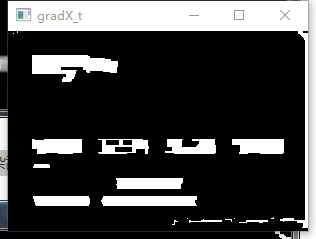
Then do a closing operation to fill in the blank part of the area;
After completing the above operations, you can draw the contour, then filter the contour, and finally get the required contour, then carry out the above operations to get the data information in each contour, and then carry out template matching;
Complete code snippet:
import cv2
import numpy as np
from imutils import contours
from matplotlib import pyplot as plt
#Bank card practical small project
def cv_show(name,img):
cv2.imshow(name,img)
cv2.waitKey(0)
cv2.destroyAllWindows()
def sort(cnts,method="left-to-right"):
reverse=False
i=0
if method=="right-to-left" or method=="bottom-to-top":
reverse=True
if method=="top-to-bottom" or method=="bottom-to-top":
i=1
boundingBoxes=[cv2.boundingRect(c) for c in cnts]#Use a smallest rectangle to wrap the found shapes, and then sort the smallest coordinates
(cnts,boundingBoxes) = zip(*sorted(zip(cnts,boundingBoxes),key=lambda b:b[1][i],reverse=reverse))
return cnts,boundingBoxes
#1. Read template
img=cv2.imread('number.png')
cv_show('number',img)
#2. Convert template to grayscale image
gray=cv2.cvtColor(img,cv2.COLOR_BGR2GRAY)
cv_show('gray',gray)
#3. Change to binary image
ref,thre=cv2.threshold(gray,10,255,cv2.THRESH_BINARY_INV)
cv_show('ref',thre)
#4. Calculate the profile
refCnts,hierarchy=cv2.findContours(thre.copy(),cv2.RETR_EXTERNAL,cv2.CHAIN_APPROX_SIMPLE)
cv2.drawContours(img,refCnts,-1,(0,0,255),3)#Draw the outline. Only the outer outline is drawn here. There are 10 outlines 0 ~ 9 in total
cv_show('imgLK',img)
refCnts=sort(refCnts,"left-to-right")[0]
digits={}#It is used to store the number corresponding to the template number
#Traverse each contour:
for(i,c) in enumerate(refCnts):#Calculate the circumscribed rectangle and resize to the appropriate size
(x,y,w,h)=cv2.boundingRect(c)
roi=thre[y:y+h,x:x+w]
roi=cv2.resize(roi,(57,88))
#Each number has a template
digits[i]=roi#Corresponding digital template of 0 ~ 9
#Initialize the convolution kernel and do morphological processing. The size of the kernel can be defined according to the actual situation
rectKernel=cv2.getStructuringElement(cv2.MORPH_RECT,(9,3))
sqKernel=cv2.getStructuringElement(cv2.MORPH_RECT,(5,5))
#Read the original image and preprocess
image=cv2.imread('bank_testI.png')
cv_show('card',image)
image=cv2.resize(image,(300,200))
#Gray processing
image_gray=cv2.cvtColor(image,cv2.COLOR_BGR2GRAY)
cv_show('gray',image_gray)
#Top hat operation, highlighting bright areas
tophat=cv2.morphologyEx(image_gray,cv2.MORPH_TOPHAT,rectKernel)
cv_show('tophat',tophat)
#Calculate the gradient of the boundary
gradX=cv2.Sobel(tophat,ddepth=cv2.CV_32F,dx=1,dy=0,ksize=-1)
gradX=np.absolute(gradX)#Take absolute value
(minVal,maxVal)=(np.min(gradX),np.max(gradX))
gradX=(255*((gradX-minVal)/(maxVal-minVal))) #normalization
gradX=gradX.astype("uint8")
cv_show('gradX',gradX)
#Execute the closing operation to make the image information appear in blocks
gradX=cv2.morphologyEx(gradX,cv2.MORPH_CLOSE,rectKernel)
cv_show('gradX',gradX)
thresh=cv2.threshold(gradX,0,255,cv2.THRESH_BINARY | cv2.THRESH_OTSU)[1]#The threshold is set to 0 because the automatic judgment threshold is set in the function, which is generally applicable to bimodal cases
cv_show('gradX_t',thresh)
#Perform another closing operation to make the image information appear in groups and fill in the blank part
thresh=cv2.morphologyEx(thresh,cv2.MORPH_CLOSE,sqKernel)
conts,hiera=cv2.findContours(thresh.copy(),cv2.RETR_EXTERNAL,cv2.CHAIN_APPROX_SIMPLE)
cont=conts
curImag=image.copy()
tmp=cv2.drawContours(curImag,cont,-1,(0,0,255),3)#Draw the outline in the image after a series of processing
locs=[]
for(i,c) in enumerate(cont):
(x,y,w,h)=cv2.boundingRect(c) #Draw the circumscribed rectangle of each area, and then filter the required parts according to the length width ratio of the circumscribed rectangle
ar=w/float(h)
if ar>2.5 and ar<4.0 :
if (w>40 and w<55) and (h>10 and h<20): #Select the box that meets the conditions
locs.append((x,y,w,h))
locs=sorted(locs,key=lambda x:x[0])#Sort the filtered contour data
output=[]
for(i,(gx,gy,gw,gh)) in enumerate(locs):
groupOuput=[]
group=image_gray[gy-5:gy+gh+5,gx-5:gx+gw+5]#Obtain the contour and its surrounding data. The function of plus five and minus five is to offset the obtained coordinate positions up, down, left and right a little, so as to facilitate matching
cv_show('group',group)
group=cv2.threshold(group,0,255,cv2.THRESH_BINARY | cv2.THRESH_OTSU)[1]#Again, the data in each large frame is binarized and the boundary is measured
digitsCont,hieraD=cv2.findContours(group.copy(),cv2.RETR_EXTERNAL,cv2.CHAIN_APPROX_SIMPLE)#Then carry out contour detection
digitsCont=sort(digitsCont,method="left-to-right")[0]
for c in digitsCont:#Calculate the value of each small box
(x,y,w,h)=cv2.boundingRect(c)#Do the same, draw the circumscribed rectangle, and then pattern match
roi=group[y:y+h,x:x+w]
roi=cv2.resize(roi,(57,88))
scores=[]
for (digit,digitROI) in digits.items():
result=cv2.matchTemplate(roi,digitROI,cv2.TM_CCOEFF)#Match and return the highest value
(_,score,_,_)=cv2.minMaxLoc(result)#Make 10 matches and take the maximum value
scores.append(score)
groupOuput.append(str(np.argmax(scores)))
cv2.rectangle(image,(gx-5,gy-5),(gx+gw+5,gy+gh+5),(0,0,255),1)
cv2.putText(image,"".join(groupOuput),(gx,gy-15),cv2.FONT_HERSHEY_SIMPLEX,0.65,(0,0,255),2)
output.extend(groupOuput)
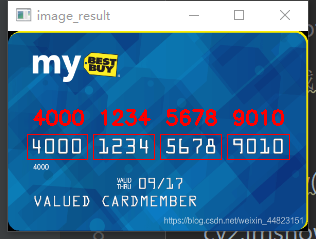
print("The Card's number is :{}",format("".join(output)))
cv_show('image_result', image)
Summary:
The whole practical project is not very difficult, but it is troublesome for me as a novice. After all, it is the first practical battle, so the whole process is still in an imitation stage. The whole process does not have its own independent thinking, but more is the personal understanding and learning of the whole process. Therefore, after the follow-up in-depth study, Further improvements can be made to the project. If you are lucky to see my article, if you have better learning suggestions and opinions, please leave a message in the message area ~ or if you don't understand, you can also leave a message in the message area to discuss learning together!!