PIL library basic operation quick start
PIL (pilot) -- image processing library of python
1. How to read in a picture?
PIL(python Imaging Library, python Image processing library) provides Image processing functions, including Image scaling, acquisition, selection, reading and writing, among which the most important module is Image.
Next, let's learn how PIL reads pictures through the Image module:
from PIL import Image
import matplotlib.pyplot as plt
img=Image.open('../img/leshan.jpg')
print(type(img))
<class 'PIL.JpegImagePlugin.JpegImageFile'>
You can see that the Image can be read into a PIL object through the open function of Image, which is similar to the array in numpy.
Further, we all know that grayscale images are relatively simple and easy to handle. If you need to convert them into grayscale images, you can use the convert method of this object.
img=img.convert('L')
# Generally speaking, our commonly used mode s are RGB and L
Incidentally, how the RGB image of three channels is converted into the gray image of one channel through convert is the same as the formula in the official function document:
When translating a color image to greyscale (mode "L"),
the library uses the ITU-R 601-2 luma transform::
L = R * 299/1000 + G * 587/1000 + B * 114/1000
This means that ITU-R 601-2 conversion will be used when converting a color image into a gray image: the pixel value matrices of the three channels will be expanded and changed respectively, and then superimposed together.
2. How to save a picture?
It is worth mentioning that the save function of Image can not only be used to save pictures with a certain format for PIL objects, but also automatically identify the save name to use the corresponding picture storage format.
If the corresponding PIL object does not meet the corresponding format when saving, a corresponding error will be prompted.
# Save our grayscale image
img.save('../img/leshan_grey.jpg')
img.close()
Um... This picture of the scenery around Leshan Giant Buddha seems to be gray... Change a picture!
img2=Image.open('../img/crisis2.jpg').convert('L')
img2.save("../img/crisis2_grey.jpg")
plt.imshow(img2)
img2.close()
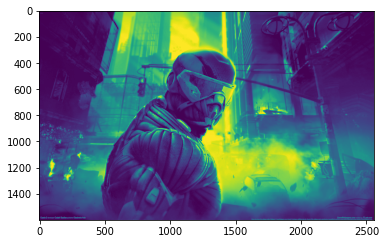
Of course, if you don't want to use the show function of Image, you can also use imshow of pyplot (compatible with PIL objects)
3. Generate thumbnails
The so-called thumbnail, in fact, is to reduce and compress the content of the picture, which is convenient for storage, and the content is no different from the original picture.
img3=Image.open('../img/crisis2.jpg')
img3.thumbnail((128,128))   # Enter the specified pixel value
# The image is compressed
plt.imshow(img3)
img3.close()

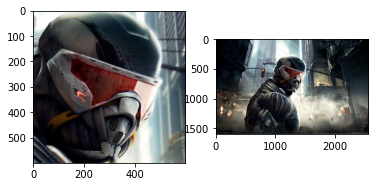
4. Copy and paste image area
This function feels like PS. since I want to copy an area, I have to determine a bounding box first - it's a bit like target detection.
Let's use this box to frame the face armor of nano armor.
img3=Image.open('../img/crisis2.jpg')
plt.imshow(img3)
# About x [1000 (left): 1600 (right)], y [300 (top): 900 (bottom)]
box=(1000,300,1600,900)
# Tips:box rule is based on the operation with the upper left corner of the picture as (0,0) and box = (left, top, right, bottom)
area=img3.crop(box)
plt.subplot(1,2,1)
plt.imshow(area)
plt.subplot(1,2,2)
plt.imshow(img3)
<matplotlib.image.AxesImage at 0x272ddd4efd0>
It can be seen that copying is not cutting. It doesn't let our protagonist of island crisis 2 "act separately". However, we can make a 180 degree selection for its head, that is, image flipping, which requires the keyword rotate.
area=area.transpose(Image.ROTATE_180)
# Transfer feels like compose in torchvision. It takes an operation function as parameter input
img3.paste(area,box)
plt.imshow(img3)
<matplotlib.image.AxesImage at 0x272dddd1a00>
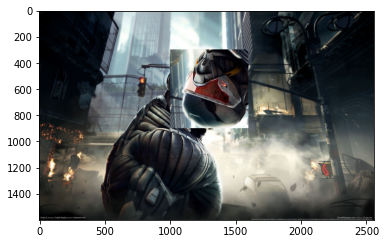
Well, I can only say I want to laugh, but I can't laugh=-= I just hope he doesn't come to me with his invisible knife behind him (funny. jpg)
5. Size (resolution) adjustment and rotation
Well, since we just mentioned image rotation and scaling, let's go straight to it.
img3=img3.resize((128,128))
plt.subplot(1,2,1)
plt.imshow(img3)
img3=img3.rotate(90)    # Enter in degrees
plt.subplot(1,2,2)
plt.imshow(img3)
img3.close()
