Some of the tools and methods implemented in this paper are in the early / test stage and are still under continuous optimization. They are only for reference
At Ubuntu 20 Developed / tested on 04, available for electron project, test version: Electron@8.2.0 / 9.3. five
Contents
├── Contents (you are here!)
│
├── I. preface
├── II. Architecture diagram
│
├── III.electron-re What can it be used for?
│   ├── 1) be used for Electron application
│   └── 2) be used for Electron/Nodejs application
│
├── IV. UI Function introduction
│   ├── main interface
│   ├── Function 1: Kill process
│   ├── Function 2: one key on DevTools
│   ├── Function 3: view process log
│   ├── Function 4: view process CPU/Memory Occupancy trend
│   └── Function 5: View MessageChannel Request to send log
│
├── V. New feature: process pool load balancing
│   ├── About load balancing
│   ├── Description of load balancing strategy
│   ├── Simple implementation of load balancing strategy
│   ├── Implementation of load balancer
│   └── Process pool coordination LoadBalancer To achieve load balancing
│
├── VI. New feature: intelligent start and stop of sub process
│   ├── Various ways to hibernate a process
│   ├── life cycle LifeCycle Implementation of
│   └── Prototype of process mutex
│
├── VII. Known problems
├── VIII. Next To Do
│
├── IX. Several practical examples
│   ├── 1) Service/MessageChannel Use example
│   ├── 2) An example of a practical production project
│   ├── 3) ChildProcessPool/ProcessHost Use example
│   ├── 3) test Test catalog example
│   └── 4) github README explain
│
1. Foreword
Before doing Electron application development, I wrote an Electron process management tool electron-re It supports Electron/Node multi process management, service simulation, process real-time monitoring (UI function), and node JS process pool and other features. It has been released as an npm component and can be installed directly (the latest features have not been released online and need to be tested again):
$: npm install electron-re --save
# or
$: yarn add electron-re
Two previous articles on this topic:
- Electron/Node multi process tool development diary The development background, problem scenarios and detailed application methods of electron re are described.
- Electron multi process tool development diary 2 This paper introduces the development and use of the new feature "multi process management UI". The UI interface is driven by the existing BrowserService/MessageChannel and ChildProcessPool/ProcessHost infrastructure of electron re, and is developed using React17 / Babel7.
This article mainly describes the new features of the recently supported process pool module - "process pool load balancing" and "intelligent start and stop of sub processes", as well as the related basic implementation principles. At the same time, I put forward some problems I encountered, as well as my thoughts and solutions to these problems, and some ideas for subsequent version iterations, etc.
II. Electron re architecture diagram
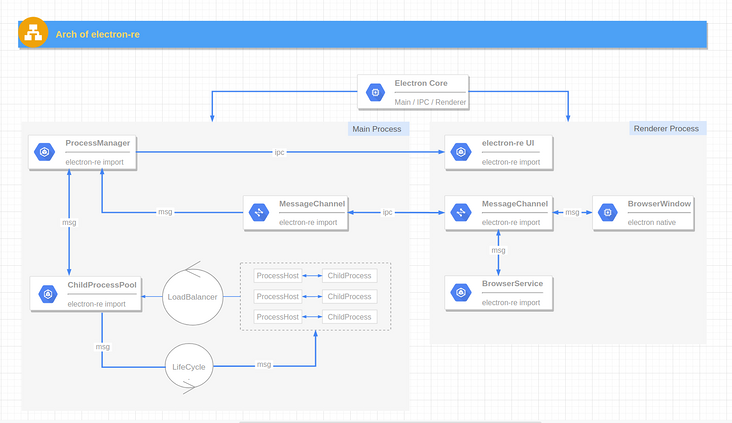
- Electron Core: a series of core functions of electron application, including the main process, rendering process, window, etc. (provided by electron).
- BrowserWindow: the process of rendering window, which is generally used for UI rendering (provided by Electron).
- ProcessManager: Process Manager, which is responsible for collecting resources occupied by processes, asynchronously refreshing UI, responding to and sending various process management signals, and providing services to other modules and UI as an observer object (introduced by electron re).
- MessageChannel: a message sending tool suitable for main process, rendering process and Service process. It is based on the native IPC encapsulation and mainly serves BrowserService. It can also replace the native IPC communication method (introduced by electron re).
- ChildProcess: by child_ process. The fork method generates sub processes, but adds simple process sleep and wake-up logic to them in the form of decorators (introduced by electron re).
- ProcessHost: a tool used with process pool. I call it "process transaction center", which encapsulates process send / process. On basic logic, which provides the call mode of Promise, making the IPC message communication between the main process / sub process easier (introduced by electron re).
- LoadBalancer: load balancer serving the process pool (introduced by electron re).
- LifeCycle: the LifeCycle of the process pool (introduced by electron re).
- ChildProcessPool: Based on node js - child_ process. The process pool implemented by fork method internally manages multiple ChildProcess instance objects, and supports custom load balancing strategy, intelligent start and stop of sub processes, automatic restart after abnormal exit of sub processes, etc. (introduced by electron re).
- BrowserService: the Service process based on BrowserWindow can be regarded as a hidden rendering window process running in the background. Node injection is allowed, but it only supports the CommonJs specification (introduced by electron re).
3. What can electron re be used for?
1. For Electron applications
- BrowserService
- MessageChannel
In some of Electron's "best practices", it is recommended to put cpu consuming code in the rendering process rather than directly in the main process. Here is the architecture diagram of chromium:
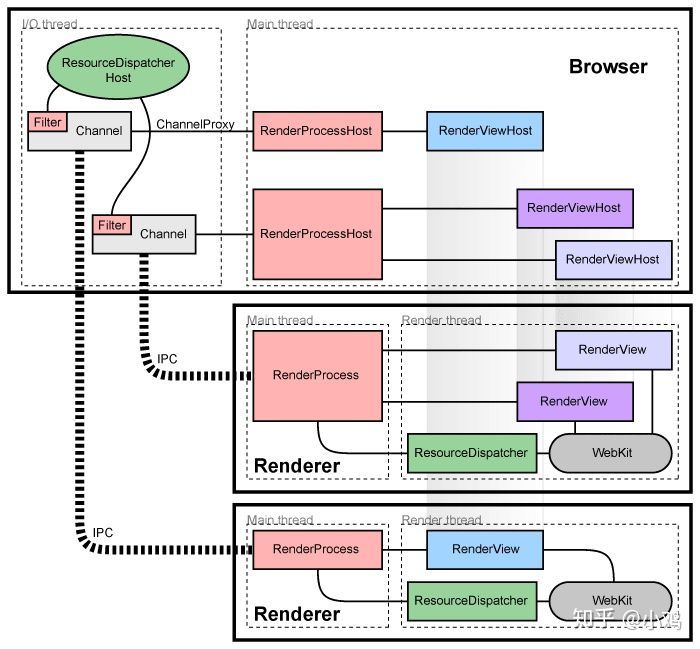
Each rendering process has a global object RenderProcess, which is used to manage the communication with the parent browser process and maintain a global state. The browser process maintains a RenderProcessHost object for each rendering process to manage the browser state and communication with the rendering process. The browser process and rendering process communicate using chromium's IPC system. In chromium, during page rendering, the UI process needs to be continuously synchronized with the main process. If the main process is busy at this time, the UIprocess will block during IPC. Therefore, if the main process continues to perform tasks that consume CPU time or block synchronous IO tasks, it will be blocked to a certain extent, which will affect the IPC communication between the main process and each rendering process. If the IPC communication is delayed or blocked, the rendering process window will be stuck, or even stuck in serious cases.
Therefore, based on Electron's existing Main Process and Renderer Process rendering process logic, Electron re establishes a separate service concept. Service is a background process that does not need to display the interface. It does not participate in UI interaction and provides services for the Main Process or other rendering processes. Its underlying implementation is a process that allows node injection and remote call__ Hide the render window process _.
In this way, the cpu consuming operations in the code (such as maintaining a queue of thousands of upload tasks in file upload) can be written into a separate js file, and then use the BrowserService constructor to construct a Service instance with the address path of the js file as the parameter, so as to separate them from the main process. If you say that this part of cpu consuming operations can be directly put into the rendering window process? In fact, it depends on the architecture design of the project itself and the trade-offs between processes in terms of data transmission performance loss and transmission time. Create a simple example of a Service:
const { BrowserService } = require('electron-re');
const myServcie = new BrowserService('app', path.join(__dirname, 'path/to/app.service.js'));
If BrowserService is used, if you want to send messages among the main process, rendering process and service process, you need to use the MessageChannel communication tool provided by Electron re. Its interface design is basically consistent with the built-in IPC of Electron. The bottom layer is also implemented based on the native IPC asynchronous communication principle. A simple example is as follows:
/* ---- main.js ---- */
const { BrowserService } = require('electron-re');
// Send a message to a service 'app' in the main process
MessageChannel.send('app', 'channel1', { value: 'test1' });
2. For Electron/Nodejs applications
- ChildProcessPool
- ProcessHost
In addition, If you want to create some sub processes that do not depend on the Electron runtime (refer to nodejs child_process for details). You can use the process pool ChildProcessPool provided by Electron re, which is specially written for nodejs runtime. Because the process itself requires a lot of overhead, the process pool is used to reuse the created sub processes to maximize the performance benefits brought by the multi process architecture. A simple example is as follows:
/* --- In main process--- */
const { ChildProcessPool, LoadBalancer } = require('electron-re');

const pool = new ChildProcessPool({
  path: path.join(app.getAppPath(), 'app/services/child.js'), // Subprocess execution file path
  max: 3, // Maximum processes
  strategy: LoadBalancer.ALGORITHM.WEIGHTS, // Load balancing strategy - weight
  weights: [1, 2, 3], // Weight distribution
});

pool
  .send('sync-work', params)
  .then(rsp => console.log(rsp));
Generally, in our sub process execution file, in order to synchronize data between the main process and the sub process, we can use process Send ('channel ', params) and process On ('channel ', function) (provided that the process creates or manually starts IPC communication in the form of fork). However, while processing business logic, this also forces us to pay attention to the communication between processes. You need to know when the sub processes can be processed, and then use process Send returns the data to the main process, which is cumbersome.
Electron re introduces the concept of process host, which I call "process transaction center". In actual use, in the sub process execution file, you only need to pass each task function through ProcessHost Registry ('task name ', function) registers multiple monitored transactions, and then cooperates with the childprocesspool of the process pool Send ('task name ', params) to trigger the call of child process transaction logic, childprocesspool Send() will also return a Promise instance to get callback data. A simple example is as follows:
/* --- In child process--- */
const { ProcessHost } = require('electron-re');

ProcessHost
  .registry('sync-work', (params) => {
    return { value: 'task-value' };
  })
  .registry('async-work', (params) => {
    return fetch(params.url);
  });
4. UI function introduction
The UI function is developed based on the electronic re infrastructure. It communicates with the ProcessManager of the main process through asynchronous IPC to refresh the process status in real time. The operator can manually Kill the process through the UI, view the process console data, view the CPU/Memory occupation trend of the number of processes, and view the request sending record of the MessageChannel tool.
main interface
UI reference electronic process manager design
Preview:

The main functions are as follows:
- Show all open processes in the Electron application, including the main process, ordinary rendering process, Service process (introduced by Electron re) and child process created by ChildProcessPool (introduced by Electron re).
- The process list displays the process number, process ID, parent process number, memory occupation size, CPU occupation percentage, etc. all process IDs are divided into: Main (main process), service (service process), renderer (rendering process) and node (process pool sub process). Click the table header to sort an item incrementally / decrementally.
- After selecting a process, you can Kill the process, view the process Console console data, and view the CPU/Memory occupation trend of the process within 1 minute. If the process is a rendering process, you can also open the built-in debugging tool with one click through the DevTools button.
- The child process created by ChildProcessPool does not support directly opening DevTools for debugging, but because the -- inspect parameter is added when creating the child process, you can use Chrome's chrome://inspect Perform remote debugging.
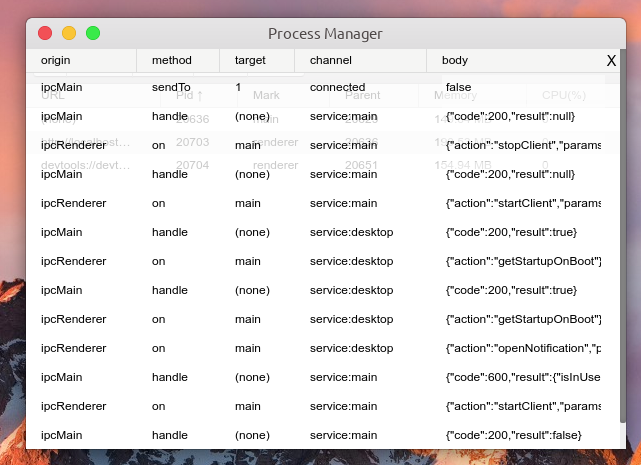
- Click Signals to view the request sending log of MessageChannel tool, including simple request parameters, request name, request return data, etc.
Function: Kill process

Function: one click to open DevTools
Function: view process log
Function: view the CPU/Memory usage trend of the process
Function: view MessageChannel request sending log
5. New feature: process pool load balancing
Simplified first edition implementation
➣ about load balancing
"Load Balance", the English name is Load Balance, which means to balance the load (work task) and allocate it to multiple operating units for operation, such as FTP server, Web server, enterprise core application server and other main task servers, so as to complete the work tasks together.
Load balancing is built on the original network structure. It provides a transparent, cheap and effective method to expand the bandwidth of servers and network equipment, strengthen network data processing capacity, increase throughput, and improve network availability and flexibility. "-- Baidu Encyclopedia
➣ description of load balancing strategy
In the previous implementation, after the process pool is created, when the pool is used to send requests, the request sending strategy is processed in two ways:
- By default, the polling policy is used to select a child process to process requests, which can only ensure the average distribution of basic requests.
- Another use case is to manually specify the additional parameter id: pool Send (channel, params, id), so that requests with the same child id are sent to the same child process. An applicable scenario is: the first time we send a request to a child process, the child process processes the request and stores some processing results in its runtime memory space. Then, in a certain case, we need to take the processing results generated by the previous request back to the main process. At this time, we need to use id to distinguish requests.
The new version introduces some load balancing strategies, including:
- POLLING - POLLING: child processes take turns processing requests
- WEIGHTS - weight: the child process processes the request according to the set weight
- RANDOM - RANDOM: subprocesses process requests randomly
- SPECIFY - SPECIFY: the child process processes the request according to the specified process id
- WEIGHTS_POLLING - weight polling: the weight polling policy is similar to the polling policy, but the weight polling policy will calculate the polling times of sub processes according to the weight, so as to stabilize the average number of requests processed by each sub process.
- WEIGHTS_RANDOM - random weight: the random weight strategy is similar to the random strategy, but the random weight strategy will calculate the random number of sub processes according to the weight, so as to stabilize the average number of processing requests of each sub process.
- MINIMUM_CONNECTION - minimum number of connections: select the child process with the minimum number of connection activities on the child process to process the request.
- WEIGHTS_MINIMUM_CONNECTION - weighted minimum number of connections: the weighted minimum number of connections strategy is similar to the minimum number of connections strategy, but the probability of each sub process being selected is determined by the number of connections and weight.
➣ easy implementation of load balancing strategy
Parameter Description:
- tasks: task array, an example: [{id: 11101, weight: 2}, {id: 11102, weight: 1}].
- currentIndex: the current task index. The default value is 0. Each call will automatically add 1. If it exceeds the length of the task array, it will automatically take the module.
- Context: the main process parameter context, which is used to dynamically update the current task index and weight index.
- weightIndex: weight index. It is used for weight policy. The default value is 0. Each call will automatically add 1. When the weight sum is exceeded, the module will be automatically taken.
- weightTotal: weight sum, used for weight policy related calculation.
- connectionsMap: the mapping of the number of active connections of each process, which is used for the calculation of the minimum number of connections policy.
1. Polling policy
Principle: the index value is incremented. Each call will automatically add 1. When the length of the task array is exceeded, the module will be automatically taken to ensure the average call.
Time complexity O(n) = 1
/* polling algorithm */
module.exports = function (tasks, currentIndex, context) {
  if (!tasks.length) return null;

  const task = tasks[currentIndex];
  context.currentIndex ++;
  context.currentIndex %= tasks.length;

  return task || null;
};
2. Weight strategy (WEIGHTS)
Principle: each process generates the final calculated value according to (weight value + (weight sum * random factor)), and the maximum value in the final calculated value is hit.
Time complexity O(n) = n
/* weight algorithm */
module.exports = function (tasks, weightTotal, context) {

  if (!tasks.length) return null;

  let max = tasks[0].weight, maxIndex = 0, sum;

  for (let i = 0; i < tasks.length; i++) {
    sum = (tasks[i].weight || 0) + Math.random() * weightTotal;
    if (sum >= max) {
      max = sum;
      maxIndex = i;
    }
  }

  context.weightIndex += 1;
  context.weightIndex %= (weightTotal + 1);

  return tasks[maxIndex];
};
3. Random strategy (RANDOM)
Principle: random function can select any index in [0, length)
Time complexity O(n) = 1
/* random algorithm */
module.exports = function (tasks) {

  const length = tasks.length;
  const target = tasks[Math.floor(Math.random() * length)];

  return target || null;
};
4. Weights_polling
Principle: it is similar to the polling strategy, but the polling interval is: [minimum weight value, weight sum], and the hit interval is calculated according to the cumulative value of each weight. The weight index will be automatically increased by 1 when calling each time, and the module will be automatically taken when exceeding the total weight.
Time complexity O(n) = n
/* weights polling */
module.exports = function (tasks, weightIndex, weightTotal, context) {

  if (!tasks.length) return null;

  let weight = 0;
  let task;

  for (let i = 0; i < tasks.length; i++) {
    weight += tasks[i].weight || 0;
    if (weight >= weightIndex) {
      task = tasks[i];
      break;
    }
  }

  context.weightIndex += 1;
  context.weightIndex %= (weightTotal + 1);

  return task;
};
5. Weights_random strategy
Principle: the calculated value is generated by (sum of weights * random factor), and each weight value is subtracted from it. The first final value not greater than zero is hit.
Time complexity O(n) = n
/* weights random algorithm */
module.exports = function (tasks, weightTotal) {
  let task;
  let weight = Math.ceil(Math.random() * weightTotal);

  for (let i = 0; i < tasks.length; i++) {
    weight -= tasks[i].weight || 0;
    if (weight <= 0) {
      task = tasks[i];
      break;
    }
  }

  return task || null;
};
6. Minimum_connection policy
Principle: directly select the item with the smallest number of current connections.
Time complexity O(n) = n
/* minimum connections algorithm */
module.exports = function (tasks, connectionsMap={}) {
  if (tasks.length < 2) return tasks[0] || null;

  let min = connectionsMap[tasks[0].id];
  let minIndex = 0;

  for (let i = 1; i < tasks.length; i++) {
    const con = connectionsMap[tasks[i].id] || 0;
    if (con <= min) {
      min = con;
      minIndex = i;
    }
  }

  return tasks[minIndex] || null;
};
7. Weights_minimum_connection
Principle: the final value is calculated by three factors: weight + (sum of weights of random factors) + (sum of weights of connections). The item represented by the minimum value is hit according to the size of the final value.
Time complexity O(n) = n
/* weights minimum connections algorithm */
module.exports = function (tasks, weightTotal, connectionsMap, context) {

  if (!tasks.length) return null;

  let min = tasks[0].weight, minIndex = 0, sum;

  const connectionsTotal = tasks.reduce((total, cur) => {
    total += (connectionsMap[cur.id] || 0);
    return total;
  }, 0);

  // algorithm: (weight + connections'weight) + random factor
  for (let i = 0; i < tasks.length; i++) {
    sum =
      (tasks[i].weight || 0) + (Math.random() * weightTotal) +
      (( (connectionsMap[tasks[i].id] || 0) * weightTotal ) / connectionsTotal);
    if (sum <= min) {
      min = sum;
      minIndex = i;
    }
  }

  context.weightIndex += 1;
  context.weightIndex %= (weightTotal + 1);

  return tasks[minIndex];
};
➣ implementation of load balancer
The code is not complex. There are several points to be explained:
- The params object stores some parameters used for various policy calculations, such as weight index, weight sum, number of connections, CPU/Memory occupation, and so on.
- The scheduler object is used to call various policies for calculation Calculate () returns a hit process id.
- targets refers to all target processes used for calculation, but only the pid of the target process and its weight: [{id: [pid], weight: [number]},...].
- algorithm is a specific load balancing policy, and the default value is polling policy.
- __ ProcessManager.on('refresh', this.refreshParams)__, The load balancer periodically updates the calculation parameters of each process by listening to the refresh event of the processmanager. There is a timer in the processmanager, which will collect the resource occupation of each monitored process every other period of time, carry the collected data and trigger a refresh event.
const CONSTS = require("./consts");
const Scheduler = require("./scheduler");
const {
  RANDOM,
  POLLING,
  WEIGHTS,
  SPECIFY,
  WEIGHTS_RANDOM,
  WEIGHTS_POLLING,
  MINIMUM_CONNECTION,
  WEIGHTS_MINIMUM_CONNECTION,
} = CONSTS;
const ProcessManager = require('../ProcessManager');

/* Load Balance Instance */
class LoadBalancer {
  /**
    * @param  {Object} options [ options object ]
    * @param  {Array } options.targets [ targets for load balancing calculation: [{id: 1, weight: 1}, {id: 2, weight: 2}] ]
    * @param  {String} options.algorithm [ strategies for load balancing calculation : RANDOM | POLLING | WEIGHTS | SPECIFY | WEIGHTS_RANDOM | WEIGHTS_POLLING | MINIMUM_CONNECTION | WEIGHTS_MINIMUM_CONNECTION]
    */
  constructor(options) {
    this.targets = options.targets;
    this.algorithm = options.algorithm || POLLING;
    this.params = { // data for algorithm
      currentIndex: 0, // index
      weightIndex: 0, // index for weight alogrithm
      weightTotal: 0, // total weight
      connectionsMap: {}, // connections of each target
      cpuOccupancyMap: {}, // cpu occupancy of each target
      memoryOccupancyMap: {}, // cpu occupancy of each target
    };
    this.scheduler = new Scheduler(this.algorithm);
    this.memoParams = this.memorizedParams();
    this.calculateWeightIndex();
    ProcessManager.on('refresh', this.refreshParams);
  }

  /* params formatter */
  memorizedParams = () => {
    return {
      [RANDOM]: () => [],
      [POLLING]: () => [this.params.currentIndex, this.params],
      [WEIGHTS]: () => [this.params.weightTotal, this.params],
      [SPECIFY]: (id) => [id],
      [WEIGHTS_RANDOM]: () => [this.params.weightTotal],
      [WEIGHTS_POLLING]: () => [this.params.weightIndex, this.params.weightTotal, this.params],
      [MINIMUM_CONNECTION]: () => [this.params.connectionsMap],
      [WEIGHTS_MINIMUM_CONNECTION]: () => [this.params.weightTotal, this.params.connectionsMap, this.params],
    };
  }

  /* refresh params data */
  refreshParams = (pidMap) => { ... }

  /* pick one task from queue */
  pickOne = (...params) => {
    return this.scheduler.calculate(
      this.targets, this.memoParams[this.algorithm](...params)
    );
  }

  /* pick multi task from queue */
  pickMulti = (count = 1, ...params) => {
    return new Array(count).fill().map(
      () => this.pickOne(...params)
    );
  }

  /* calculate weight */
  calculateWeightIndex = () => {
    this.params.weightTotal = this.targets.reduce((total, cur) => total + (cur.weight || 0), 0);
    if (this.params.weightIndex > this.params.weightTotal) {
      this.params.weightIndex = this.params.weightTotal;
    }
  }

  /* calculate index */
  calculateIndex = () => {
    if (this.params.currentIndex >= this.targets.length) {
      this.params.currentIndex = (ths.params.currentIndex - 1 >= 0) ? (this.params.currentIndex - 1) : 0;
    }
  }

  /* clean data of a task or all task */
  clean = (id) => { ... }

  /* add a task */
  add = (task) => {...}

  /* remove target from queue */
  del = (target) => {...}

  /* wipe queue and data */
  wipe = () => {...}

  /* update calculate params */
  updateParams = (object) => {
    Object.entries(object).map(([key, value]) => {
      if (key in this.params) {
        this.params[key] = value;
      }
    });
  }

  /* reset targets */
  setTargets = (targets) => {...}

  /* change algorithm strategy */
  setAlgorithm = (algorithm) => {...}
}

module.exports = Object.assign(LoadBalancer, { ALGORITHM: CONSTS });
➣ process pool cooperates with LoadBalancer to realize load balancing
There are several points to note:
- When we use pool When send ('channel ', params), the getForkedFromPool() function inside the pool will be called. The function selects a process from the process pool to execute the task. If the number of child processes does not reach the maximum set number, a child process will be created first to process the request.
- When a child process is created / destroyed / exited, it is necessary to synchronously update the targets monitored in the LoadBalancer, otherwise the pid of the destroyed process may be returned after the load balancing policy calculation.
- ForkedProcess is a decorator class that encapsulates child_process.fork logic, which adds some additional functions, such as process sleep, wake-up, binding events, sending requests and other basic methods.
const _path = require('path');
const EventEmitter = require('events');

const ForkedProcess = require('./ForkedProcess');
const ProcessLifeCycle = require('../ProcessLifeCycle.class');
const ProcessManager = require('../ProcessManager/index');
const { defaultLifecycle } = require('../ProcessLifeCycle.class');
const LoadBalancer = require('../LoadBalancer');
let { inspectStartIndex } = require('../../conf/global.json');
const { getRandomString, removeForkedFromPool, convertForkedToMap, isValidValue } = require('../utils');
const { UPDATE_CONNECTIONS_SIGNAL } = require('../consts');

const defaultStrategy = LoadBalancer.ALGORITHM.POLLING;

class ChildProcessPool extends EventEmitter {
  constructor({
    path, max=6, cwd, env={},
    weights=[], // weights of processes, the length is equal to max
    strategy=defaultStrategy,
    ...
  }) {
    super();
    this.cwd = cwd || _path.dirname(path);
    this.env = {
      ...process.env,
      ...env
    };
    this.callbacks = {};
    this.pidMap = new Map();
    this.callbacksMap = new Map();
    this.connectionsMap={};
    this.forked = [];
    this.connectionsTimer = null;
    this.forkedMap = {};
    this.forkedPath = path;
    this.forkIndex = 0;
    this.maxInstance = max;
    this.weights = new Array(max).fill().map(
      (_, i) => (isValidValue(weights[i]) ? weights[i] : 1)
    );
    this.LB = new LoadBalancer({
      algorithm: strategy,
      targets: [],
    });

    this.initEvents();
  }

  /* -------------- internal -------------- */

  /* init events */
  initEvents = () => {
    // process exit
    this.on('forked_exit', (pid) => {
      this.onForkedDisconnect(pid);
    });
    ...
  }

  /**
    * onForkedCreate [triggered when a process instance created]
    * @param  {[String]} pid [process pid]
    */
  onForkedCreate = (forked) => {
    const pidsValue = this.forked.map(f => f.pid);
    const length = this.forked.length;

    this.LB.add({
      id: forked.pid,
      weight: this.weights[length - 1],
    });
    ProcessManager.listen(pidsValue, 'node', this.forkedPath);
    ...
  }

  /**
    * onForkedDisconnect [triggered when a process instance disconnect]
    * @param  {[String]} pid [process pid]
    */
   onForkedDisconnect = (pid) => {
    const length = this.forked.length;

    removeForkedFromPool(this.forked, pid, this.pidMap);
    this.LB.del({
      id: pid,
      weight: this.weights[length - 1],
    });
    ProcessManager.unlisten([pid]);
    ...
  }

  /* Get a process instance from the pool */
  getForkedFromPool = (id="default") => {
    let forked;
    if (!this.pidMap.get(id)) {
      // create new process and put it into the pool
      if (this.forked.length < this.maxInstance) {
        inspectStartIndex ++;
        forked = new ForkedProcess(
          this,
          this.forkedPath,
          this.env.NODE_ENV === "development" ? [`--inspect=${inspectStartIndex}`] : [],
          { cwd: this.cwd, env: { ...this.env, id }, stdio: 'pipe' }
        );
        this.forked.push(forked);
        this.onForkedCreate(forked);
      } else {
      // get a process from the pool based on load balancing strategy
        forked = this.forkedMap[this.LB.pickOne().id];
      }
      if (id !== 'default') {
        this.pidMap.set(id, forked.pid);
      }
    } else {
      // pick a special process from the pool
      forked = this.forkedMap[this.pidMap.get(id)];
    }

    if (!forked) throw new Error(`Get forked process from pool failed! the process pid: ${this.pidMap.get(id)}.`);

    return forked;
  }

  /* -------------- caller -------------- */

  /**
  * send [Send request to a process]
  * @param  {[String]} taskName [task name - necessary]
  * @param  {[Any]} params [data passed to process - necessary]
  * @param  {[String]} id [the unique id bound to a process instance - not necessary]
  * @return {[Promise]} [return a Promise instance]
  */
  send = (taskName, params, givenId) => {
    if (givenId === 'default') throw new Error('ChildProcessPool: Prohibit the use of this id value: [default] !')

    const id = getRandomString();
    const forked = this.getForkedFromPool(givenId);
    this.lifecycle.refresh([forked.pid]);

    return new Promise(resolve => {
      this.callbacks[id] = resolve;
      forked.send({action: taskName, params, id });
    });
  }
  ...
}

module.exports = ChildProcessPool;
6. New feature: intelligent start and stop of sub process
This feature I also call process lifecycle.
The main function is: when the child process is not called for a period of time, it will automatically enter the sleep state to reduce CPU occupation (it is difficult to reduce memory occupation). The time to enter the sleep state can be controlled by the creator, and the default is 10 min. When a child process enters hibernation, if a new request arrives and is distributed to the dormant process, it will automatically wake up the process and continue to process the current request. After a period of inactivity, it will enter the sleep state again.
➣ various ways to make the process sleep
1) If the process is suspended, the SIGSTOP signal can be sent to the process, and the SIGCONT signal can be sent to resume the process.
Node.js:
process.kill([pid], "SIGSTOP");
process.kill([pid], "SIGCONT");
Unix System (Windows has not been tested yet):
kill -STOP [pid]
kill -CONT [pid]
2)Node.js NEW Atomic.wait API can also achieve programming control. This method will listen to the value under the given subscript of an Int32Array object. If the value does not change, it will wait (block event loop) until the timeout occurs (determined by the ms parameter). You can manipulate this shared data in the main process, and then release the sleep lock for the child process.
const nil = new Int32Array(new SharedArrayBuffer(4));
const array = new Array(100000).fill(0);
setInterval(() => {
console.log(1);
}, 1e3);
Atomics.wait(nil, 0, 0, Number(600e3));
➣ implementation of life cycle
The code is also very simple. There are several points to explain:
- The mark clearing method is adopted. When the sub process triggers the request, the call time is updated, and the timer cycle is used to calculate the difference (current time - last call time) of each monitored sub process. If there are processes that exceed the set time, a sleep signal is sent and all process PIDs are carried at the same time.
- Each childprocesspool process pool instance will have a processlifecycle instance object to control the sleep / wake-up of processes in the current process pool. ChildProcessPool listens to the ProcessLifeCycle object's sleep event, gets the sleep process pid, and calls ForkedProcess's sleep() method to sleep. When the next request is distributed to the process, the process will wake up automatically.
const EventEmitter = require('events');

const defaultLifecycle = {
  expect: 600e3, // default timeout 10 minutes
  internal: 30e3 // default loop check interval 30 seconds
};

class ProcessLifeCycle extends EventEmitter {
  constructor(options) {
    super();
    const {
      expect=defaultLifecycle.expect,
      internal=defaultLifecycle.internal
    } = options;
    this.timer = null;
    this.internal = internal;
    this.expect = expect;
    this.params = {
      activities: new Map()
    };
  }

  /* task check loop */
  taskLoop = () => {
    if (this.timer) return console.warn('ProcessLifeCycle: the task loop is already running');

    this.timer = setInterval(() => {
      const sleepTasks = [];
      const date = new Date();
      const { activities } = this.params;
      ([...activities.entries()]).map(([key, value]) => {
        if (date - value > this.expect) {
          sleepTasks.push(key);
        }
      });
      if (sleepTasks.length) {
        // this.unwatch(sleepTasks);
        this.emit('sleep', sleepTasks);
      }
    }, this.internal);
  }

  /* watch processes */
  watch = (ids=[]) => {
    ids.forEach(id => {
      this.params.activities.set(id, new Date());
    });
  }

  /* unwatch processes */
  unwatch = (ids=[]) => {
    ids.forEach(id => {
      this.params.activities.delete(id);
    });
  }

  /* stop task check loop */
  stop = () => {
    clearInterval(this.timer);
    this.timer = null;
  }

  /* start task check loop */
  start = () => {
    this.taskLoop();
  }

  /* refresh tasks */
  refresh = (ids=[]) => {
    ids.forEach(id => {
      if (this.params.activities.has(id)) {
        this.params.activities.set(id, new Date());
      } else {
        console.warn(`The task with id ${id} is not being watched.`);
      }
    });
  }
}

module.exports = Object.assign(ProcessLifeCycle, { defaultLifecycle });
➣ prototype of process mutex
I saw about API when I read the article before- Atomic.wait In an article, Atomic can not only be used to realize process sleep, but also understand the implementation principle of process mutex based on it. Here's one Basic prototype It can be used as a reference and relevant documents can be referred to MDN.
The AsyncLock object needs to be introduced in the child process. There is a parameter sab in the constructor for creating AsyncLock that needs attention. This parameter is a SharedArrayBuffer shared data block. This shared data block needs to be created in the main process and then sent to each sub process through IPC communication. Generally, IPC communication will serialize general data such as Object / Array, resulting in that the message receiver and message sender do not get the same object, However, the SharedArrayBuffer object sent via IPC will point to the same memory block.
After creating an AsyncLock instance using SharedArrayBuffer data in a child process, the modification of shared data by any child process will lead to the change of SharedArrayBuffer data content pointing to this memory in other processes, which is the basic point for us to use it to realize process lock.
First, give a brief description of Atomic API:
- __ Atomics.compareExchange(typedArray, index, expectedValue, newValue)__: Atomics. The compareexchange() static method will replace the value on the array with the given replacement value when the value of the array is equal to the expected value, and then return the old value. This atomic operation guarantees that no other write operation will occur before the modified value is written.
- __ Atomics.waitAsync(typedArray, index, value[, timeout])__: Static method atomics Wait () ensures that when the value of a given position in the Int32Array array does not change and is still the given value, the process will sleep until it wakes up or times out. This method returns a string with one of the values "OK", "not equal", or "timed out".
- __ Atomics.notify(typedArray, index[, count])__: Static method atomics Notify() wakes up a specified number of processes sleeping in the waiting queue. If count is not specified, it wakes up all processes by default.
AsyncLock is an asynchronous lock. When waiting for the lock to be released, it will not block the main thread. Mainly focus on the executeAfterLocked() method. Call the method and pass in the callback function. The callback function will execute after the lock is obtained and automatically release the lock after execution. The key of one step is the tryGetLock() function, which returns a Promise object. Therefore, we wait for the logic of lock release to execute in the micro task queue without blocking the main thread.
/**
  * @name AsyncLock
  * @description
  *   Use it in child processes, mutex lock logic.
  *   First create SharedArrayBuffer in main process and transfer it to all child processes to control the lock.
  */

class AsyncLock {
  static INDEX = 0;
  static UNLOCKED = 0;
  static LOCKED = 1;

  constructor(sab) {
    this.sab = sab; // data like this: const sab = new SharedArrayBuffer(16);
    this.i32a = new Int32Array(sab);
  }

  lock() {
    while (true) {
      const oldValue = Atomics.compareExchange(
        this.i32a, AsyncLock.INDEX,
        AsyncLock.UNLOCKED, // old
        AsyncLock.LOCKED // new
      );
      if (oldValue == AsyncLock.UNLOCKED) { // success
        return;
      }
      Atomics.wait( // wait
        this.i32a,
        AsyncLock.INDEX,
        AsyncLock.LOCKED // expect
      );
    }
  }

  unlock() {
    const oldValue = Atomics.compareExchange(
      this.i32a, AsyncLock.INDEX,
      AsyncLock.LOCKED,
      AsyncLock.UNLOCKED
    );
    if (oldValue != AsyncLock.LOCKED) { // failed
      throw new Error('Tried to unlock while not holding the mutex');
    }
    Atomics.notify(this.i32a, AsyncLock.INDEX, 1);
  }

  /**
    * executeLocked [async function to acquired the lock and execute callback]
    * @param  {Function} callback [callback function]
    */
  executeAfterLocked(callback) {

    const tryGetLock = async () => {
      while (true) {
        const oldValue = Atomics.compareExchange(
          this.i32a,
          AsyncLock.INDEX,
          AsyncLock.UNLOCKED,
          AsyncLock.LOCKED
        );
        if (oldValue == AsyncLock.UNLOCKED) { // success if AsyncLock.UNLOCKED
          callback();
          this.unlock();
          return;
        }
        const result = Atomics.waitAsync( // wait when AsyncLock.LOCKED
          this.i32a,
          AsyncLock.INDEX,
          AsyncLock.LOCKED
        );
        await result.value; // return a Promise, will not block the main thread
      }
    }

    tryGetLock();
  }
}
VII. Known problems
- Due to the use of Electron's native remote API, some features (Service related) of Electron re do not support Electron 14 and above (remote has been removed). It is considering using a third-party remote library for alternative compatibility in the near future.
- If the fault tolerance processing is not done well enough, this will become an important optimization point in the future.
- The method of "call count" is adopted when collecting the number of active connections in the process pool. This processing method is not very good and the accuracy is not high enough, but there is no better solution to count the number of active connections in the sub process. I think it still needs to be solved from the bottom, such as macro task and micro task queue, V8 virtual machine, garbage collection, Libuv bottom principle, Node process and thread principle
- The process sleep function has not been tested on the windows platform for the time being. The win platform itself does not support process signals, but Node provides simulation support, but the specific performance needs to be tested.
VIII. Next To Do
- [x] Let the Service automatically restart after the support code is updated
- [x] Add ChildProcessPool sub process scheduling logic
- [x] Optimize ChildProcessPool multiprocess console output
- [x] Add visual process management interface
- [x] Enhance ChildProcessPool process pool functionality
- [] enhance the transaction center function of ProcessHost
- [] implementation of mutex logic between child processes
- [] use external remote library to support the latest version of Electron
- [ ] Kill Bugs 🐛
9. Several practical examples
- electronux -One of my Electron projects uses BrowserService/MessageChannel and comes with a ChildProcessPool/ProcessHost demo.
- Shadow Sock - Electron - my other Electron cross platform desktop application project (no link is provided, you can click the above to view the original text), uses Electron re for debugging and development, and can open the ProcessManager UI in the production environment for CPU/Memory resource occupation monitoring and request log viewing.
- file-slice-upload -A demo about multi file slice parallel upload uses ChildProcessPool and ProcessHost, based on Electron@9.3.5 development.
- You can also view index test. The test sample files in the JS and test directories contain some usage examples.
- Of course, github- README There are also relevant description items.