I will share some of the articles and papers I refer to - the links are posted in the original text. I upload the papers to the resources, and you can download them for free. If you can't find the papers in the resource area that day, wait. They may be under review, and you can download them after review. Let's study together and make progress together! come on.
catalogue
8. Summarize the images into one picture
preface
Image special effect processing is generally to operate the channels and gray values of image pixels to achieve the desired results. The following will show you some simple special effect principles and code implementation one by one, hoping to be of some help to you.
I won't say much. First, the classic operation of this series of articles is to read image information:
"""
Author:XiaoMa
date:2021/11/16
"""
import cv2
import numpy as np
import math
import matplotlib.pyplot as plt

img0 = cv2.imread('E:\From Zhihu\For the desk\cvfifteen1.jpg')
img1 = cv2.cvtColor(img0, cv2.COLOR_BGR2GRAY)
h, w = img0.shape[:2]
print(h, w)
cv2.imshow("W0", img0)
cv2.imshow("W1", img1)
cv2.waitKey(delay = 0)
The obtained image information is as follows:
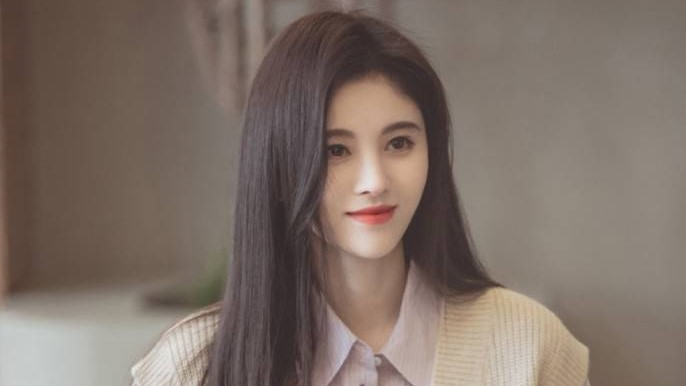

386 686
1. Ground glass effect
The principle of ground glass effect is to randomly take a pixel in the neighborhood of the current pixel to replace it, so as to achieve a fuzzy effect of ground glass. The code is as follows. Comments have been added. If there is something you don't understand, leave a message in the comment area. Let's discuss it together.
#Ground glass effect
img2 = np.zeros((h, w, 3), np.uint8)        #Generate an all zero matrix as large as the original image
for i in range(0, h - 6):                   #Prevent the following random numbers from exceeding the edge
    for j in range(0, w - 6):
        index = int(np.random.random()*6)   #Random number from 0 to 6
        (b, g, r) = img0[i + index, j + index]
        img2[i, j] = (b, g, r)
cv2.imshow("W2", img2)
cv2.waitKey(delay = 0)
The results are as follows:
 Because the pixel values at the edge must be subtracted when taking random numbers, unfilled areas inevitably appear at the right and lower boundaries of the image.
When I was writing my blog, I suddenly had a plan. If we limit the boundary when creating all zero matrix, it would be OK. I tried it and it was OK!! As follows:
#Ground glass effect
img2 = np.zeros((h - 6, w - 6, 3), np.uint8)        #The generated all zero matrix takes into account the range of random numbers and becomes smaller
for i in range(0, h - 6):                   #Prevent the following random numbers from exceeding the edge
    for j in range(0, w - 6):
        index = int(np.random.random()*6)   #Random number from 0 to 6
        (b, g, r) = img0[i + index, j + index]
        img2[i, j] = (b, g, r)
cv2.imshow("W2", img2)
cv2.waitKey(delay = 0)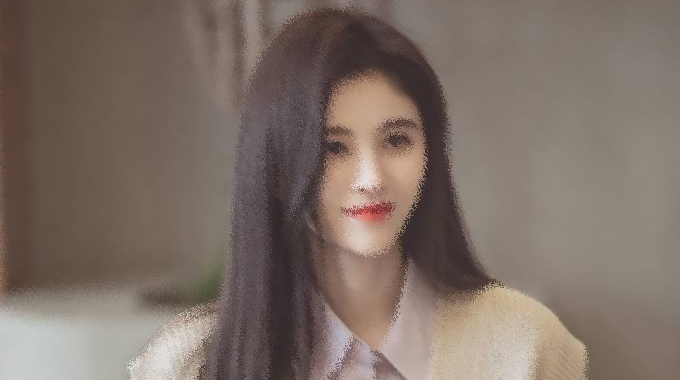
The ground glass effect generated in the above way will not have unfilled parts, but the size of the image is really small.
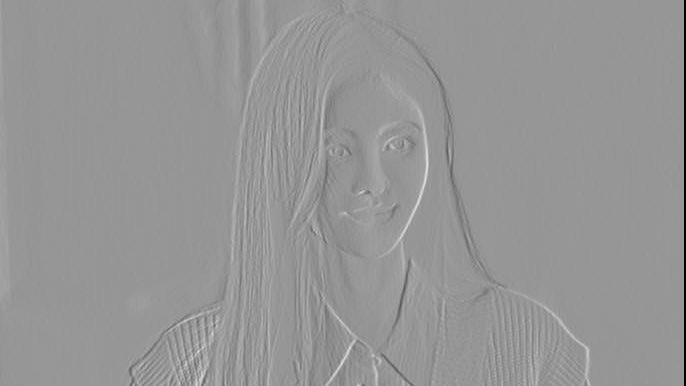
2. Relief effect
The principle of Python to realize relief effect is to first outline the boundary curve of the image, and then reduce the pixel value around the boundary, so as to obtain a three-dimensional relief image.
#Relief effect (operation on gray image is required)
img3 = np.zeros((h, w, 3), np.uint8)
for i in range(0, h):
    for j in range(0, w - 2):                #The effect of subtracting 2 is the same as above
        grayP0 = int(img1[i, j])
        grayP1 = int(img1[i, j + 2])         #Take the point adjacent to the previous pixel
        newP = grayP0 - grayP1 + 150         #Get the difference and add a constant to increase the three-dimensional sense of relief
        if newP > 255:
            newP = 255
        if newP < 0:
            newP = 0
        img3[i, j] = newP
cv2.imshow("W3", img3)
cv2.waitKey(delay = 0)
The results are as follows:
3. Sketch characteristics
The implementation of the special effect is relatively simple, and comments are directly given in the code:
#Sketch effects
img4 = 255 - img1                                               #Invert the pixels of the original gray image
blurred = cv2.GaussianBlur(img4, (21, 21), 0)                   #Gaussian blur
inverted_blurred = 255 - blurred                                #reversal
img4 = cv2.divide(img1, inverted_blurred, scale = 127.0)        #The gray image is divided by the inverted fuzzy image to get the pencil sketch
cv2.imshow("W4", img4)
cv2.waitKey(delay = 0)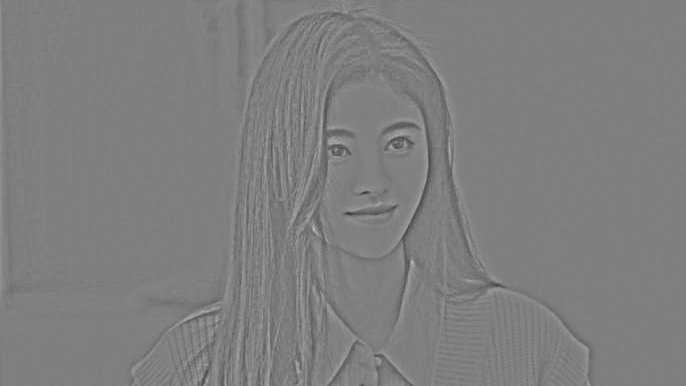
4. Nostalgic effects
Nostalgic effects require a special conversion formula of R, G and B channels to process the three channels of the image. The conversion formula is:
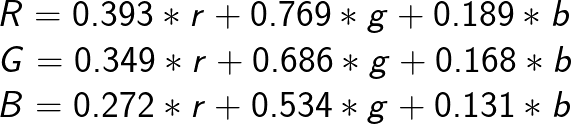
The implementation code is as follows:
#Nostalgic effects
img5 = np.zeros((h, w, 3), np.uint8)
for i in range(0, h):
    for j in range(0, w):
        B = 0.272 * img0[i, j][2] + 0.534 * img0[i, j][1] + 0.131 * img0[i, j][0]
        G = 0.349 * img0[i, j][2] + 0.686 * img0[i, j][1] + 0.168 * img0[i, j][0]
        R = 0.393 * img0[i, j][2] + 0.769 * img0[i, j][1] + 0.189 * img0[i, j][0]
        if B > 255:
            B = 255
        if G > 255:
            G = 255
        if R > 255:
            R = 255
        img5[i, j] = np.uint8((B, G, R))
cv2.imshow("W5", img5)
cv2.waitKey(delay = 0)
The results are as follows:
The calculation of this special effect is a little larger than the previous ones. You need to traverse the pixel points, and then calculate the values of the three channels of each point.
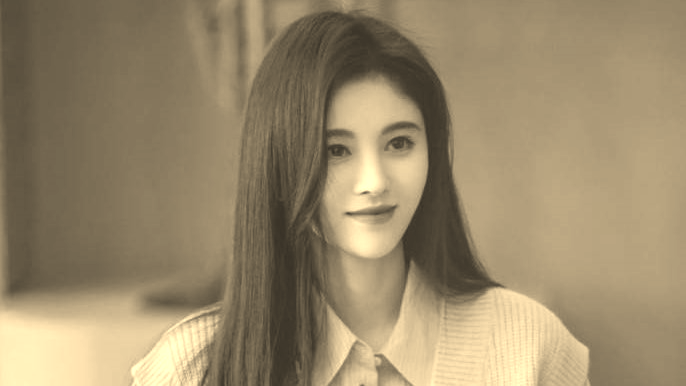
5. Fleeting time effect
Compared with the previous nostalgic effects, the fleeting year effect only needs to simply adjust the blue channel (B) of each pixel of the image. First, open the root sign, and then multiply it by a parameter. The implementation code is as follows:
#Fleeting time effect
img6 = np.zeros((h, w, 3), np.uint8)
for i in range(0, h):
    for j in range(0, w):
        B = math.sqrt(img0[i, j][0]) *14       # The square of the value of channel B is multiplied by parameter 14
        G = img0[i, j][1]
        R = img0[i, j][2]
        if B > 255:
            B = 255
        img6[i, j] = np.uint8((B, G, R))
cv2.imshow("W6", img6)
cv2.waitKey(delay = 0)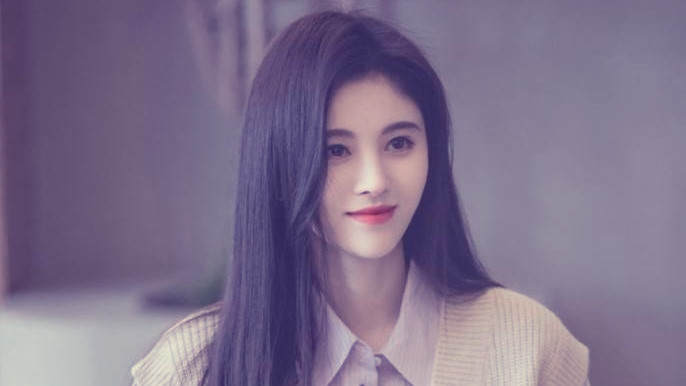
You can modify more parameters for debugging and observe the effects under different parameters.
6. Water wave effect
The water wave special effect is to use the trigonometric function to obtain the ripple transfer function, and then generate the special effect according to the set center. The algorithm of this part is a little difficult. Just try it a few more times. In the future, the blogger will publish a blog about water wave special effect when he has time. The implementation code is as follows:
#Water wave effect
img7 = np.zeros((h, w, 3), np.uint8)
wavelength = 20                                 #Define the wavelength of water wave effect
amplitude = 30                                  #range
phase = math.pi / 4                             #phase
centreX = 0.5                                   #Water wave center point X
centreY = 0.5                                   #Center point of water wave Y
radius = min(h, w) / 2
icentreX = w*centreX                            #Water wave coverage width
icentreY = h*centreY                            #Water wave coverage height
for i in range(0, h):
    for j in range(0, w):
        dx = j - icentreX
        dy = i - icentreY
        distance = dx * dx + dy * dy
        if distance > radius * radius:
            x = j
            y = i
        else:
            # Calculate water wave area
            distance = math.sqrt(distance)
            amount = amplitude * math.sin(distance / wavelength * 2 * math.pi - phase)
            amount = amount * (radius - distance) / radius
            amount = amount * wavelength / (distance + 0.0001)
            x = j + dx * amount
            y = i + dy * amount
        # Boundary judgment
        if x < 0:
            x = 0
        if x >= w - 1:
            x = w - 2
        if y < 0:
            y = 0
        if y >= h - 1:
            y = h - 2
        p = x - int(x)
        q = y - int(y)
        # Image water wave assignment
        img7[i, j, :] = (1 - p) * (1 - q) * img0[int(y), int(x), :] + p * (1 - q) * img0[int(y), int(x), :]
        + (1 - p) * q * img0[int(y), int(x), :] + p * q * img0[int(y), int(x), :]
cv2.imshow("W7", img7)
cv2.waitKey(delay = 0)
The results are as follows: Because this picture is just hair near the ripple, the resulting ripple is not very clear. You can try a few pictures to see the effect of the algorithm.
7. Cartoon effects
The main principle of the special effect is to extract the boundary contour of the image, and then combine it with the original image to obtain the final cartoon effect. The code is as follows, and notes have been added:
#Cartoon effects
num_bilateral = 7                                      #Defines the number of bilateral filters
for i in range(num_bilateral):                         #Bilateral filtering, removing noise and preserving boundary
    img_color = cv2.bilateralFilter(img0, d = 9, sigmaColor = 5, sigmaSpace = 3)
img_blur = cv2.medianBlur(img1, 7)                     # Median filter processing
img_edge = cv2.adaptiveThreshold(img_blur, 255, cv2.ADAPTIVE_THRESH_MEAN_C, cv2.THRESH_BINARY, blockSize = 5, C = 2) #Edge detection and adaptive thresholding, boundary extraction
img_edge = cv2.cvtColor(img_edge, cv2.COLOR_GRAY2RGB)  #Convert back to color image
img8 = cv2.bitwise_and(img0, img_edge)          #And operation of image
cv2.imshow('W8', img8)
cv2.waitKey(delay = 0)
The results are as follows: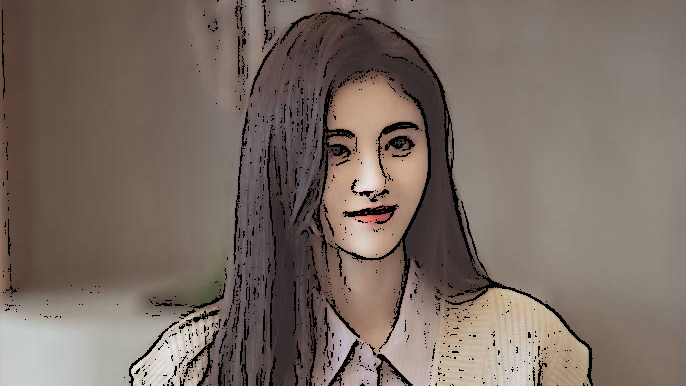 If you are not satisfied with the effect, you can constantly adjust the parameters of bilateral filtering and median filtering until you find a more satisfactory effect.
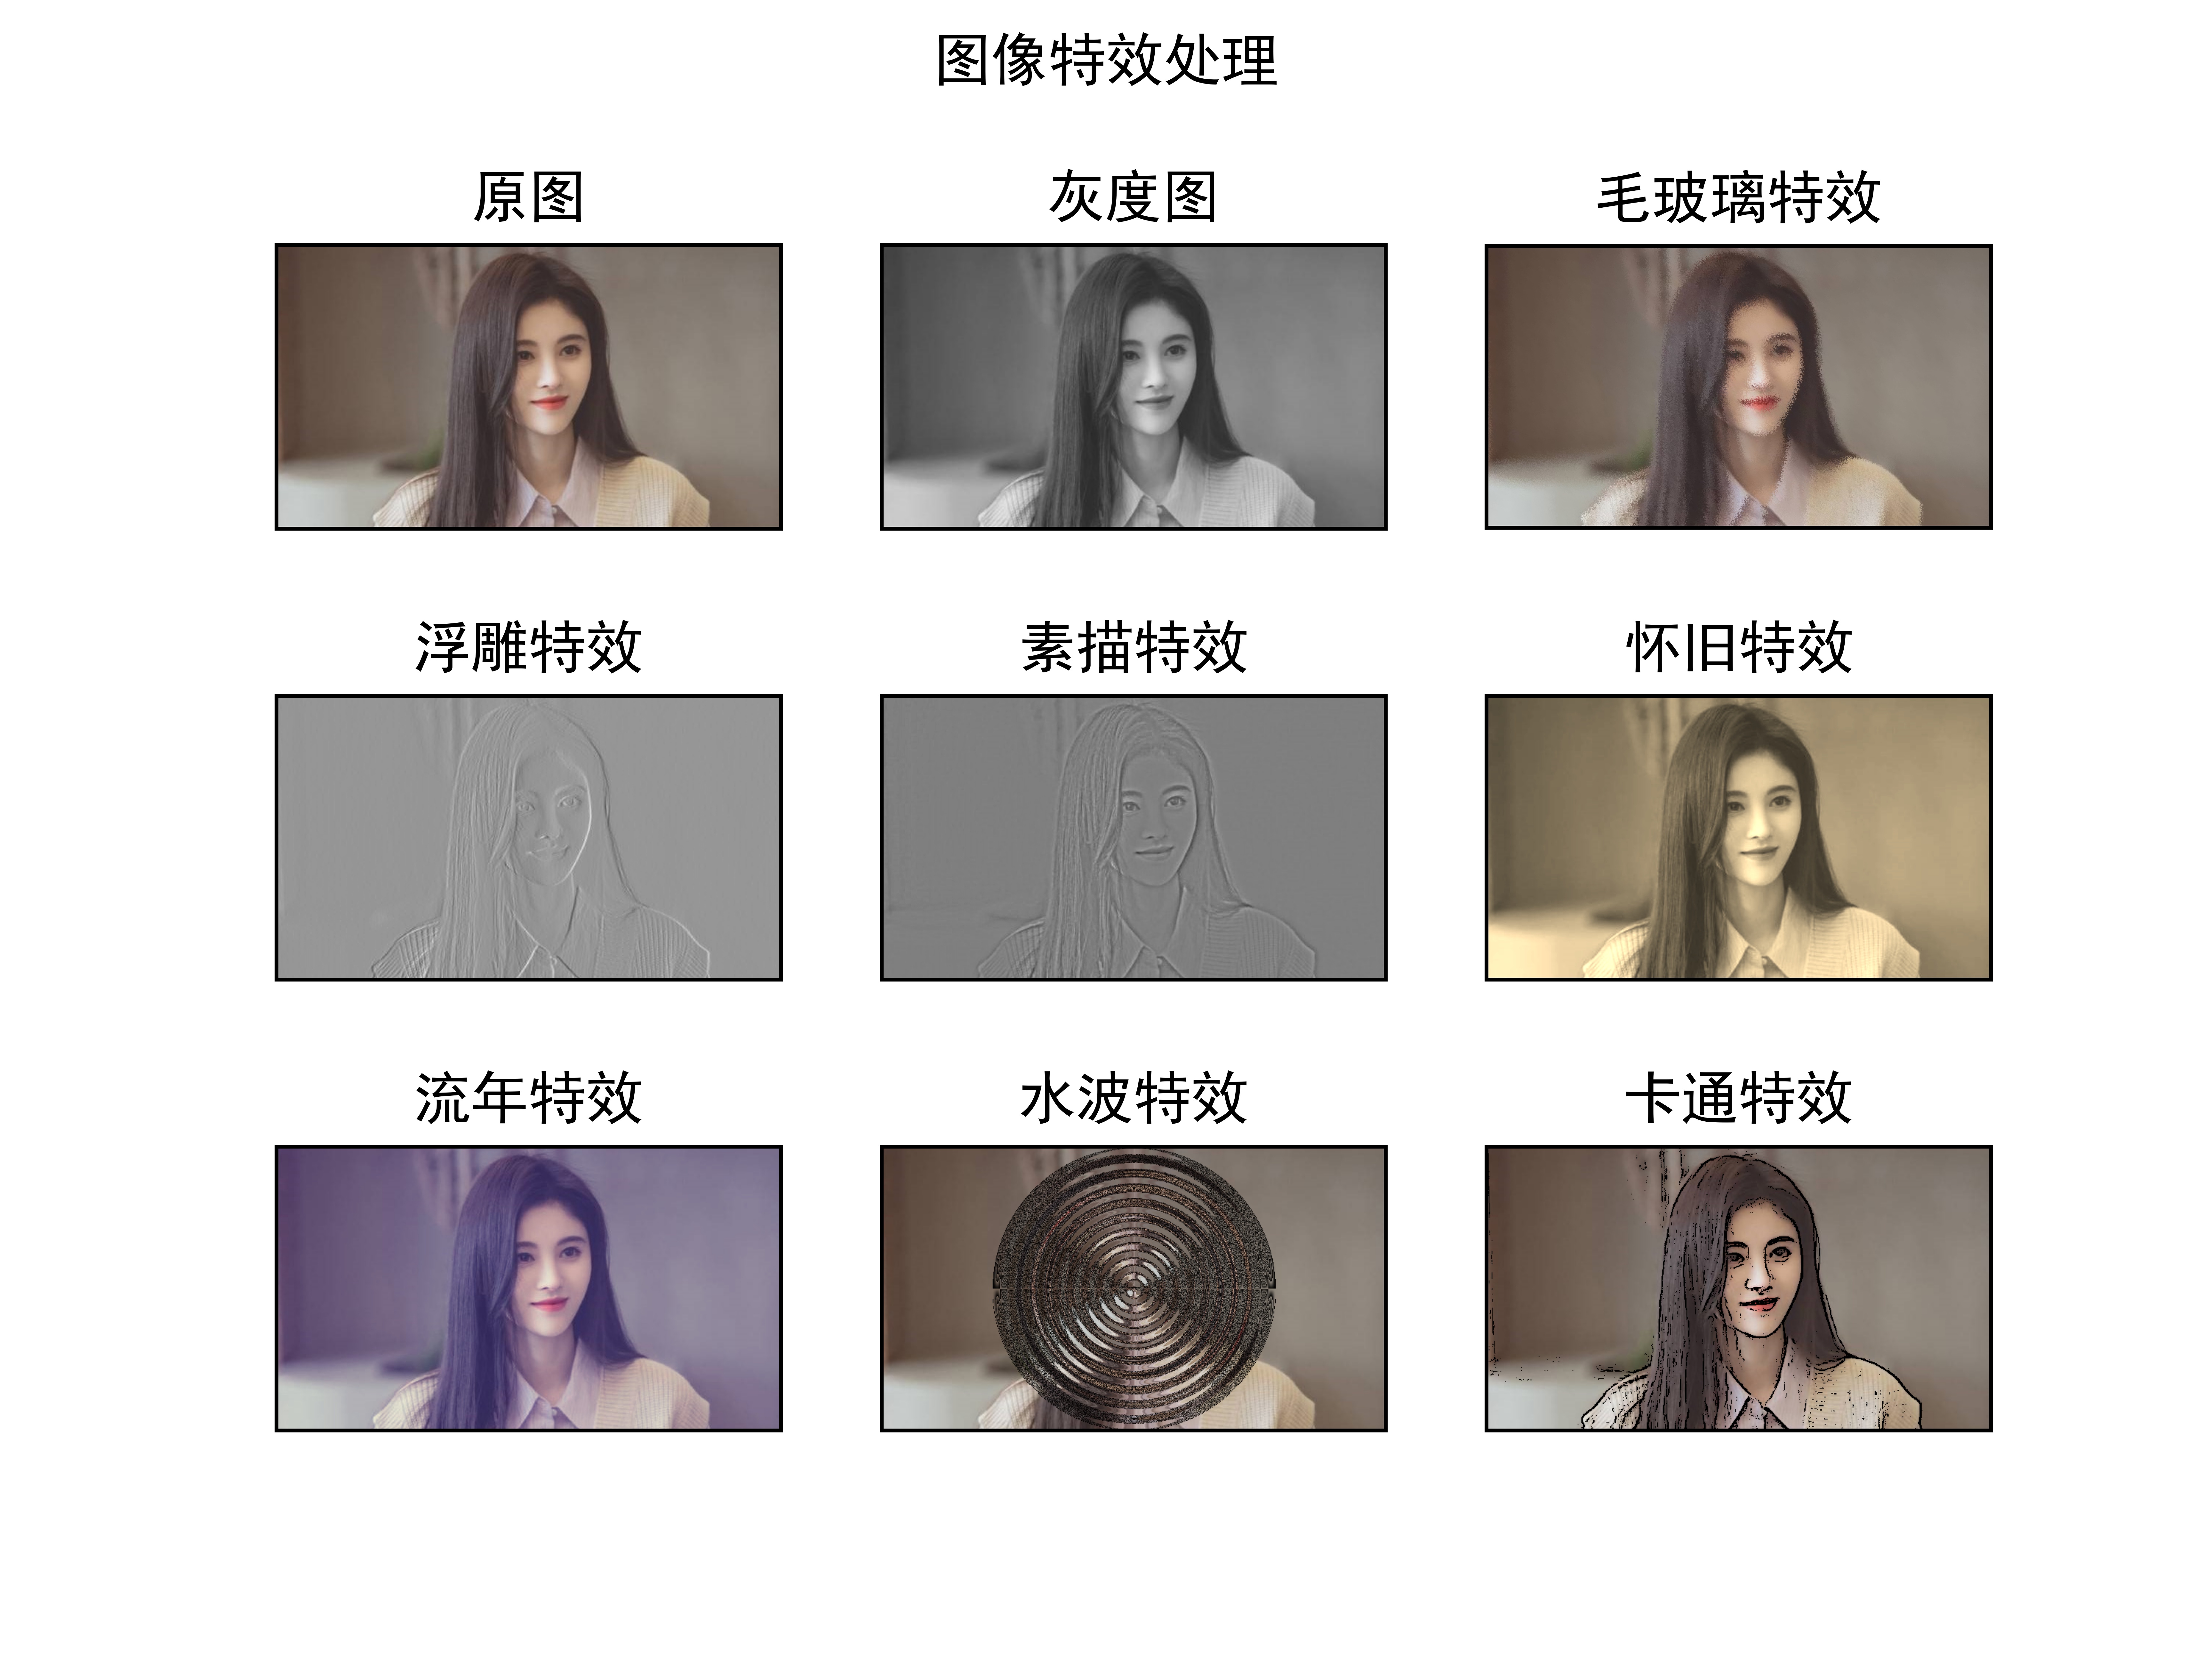
8. Summarize the images into one picture
Basic operations, nothing to comment on, directly on the code:
#Save all images to one drawing
plt.rcParams['font.family'] = 'SimHei'
imgs = [img0, img1, img2, img3, img4, img5, img6, img7, img8]
titles = ['Original drawing', 'Grayscale image', 'Ground glass effect', 'Relief effect', 'Sketch effects', 'Nostalgic effects', 'Fleeting time effect', 'Water wave effect', 'Cartoon effects']
for i in range(9):
    imgs[i] = cv2.cvtColor(imgs[i], cv2.COLOR_BGR2RGB)
    plt.subplot(3, 3, i + 1)
    plt.imshow(imgs[i])
    plt.title(titles[i])
    plt.xticks([])
    plt.yticks([])
plt.suptitle('Image special effect processing')
plt.savefig('E:\From Zhihu\For the desk\cvfifteenresult.jpg', dpi = 1080)
plt.show()
Get the final plot plan:
9. Overall code
Just click the image reading path. If you just want to create a sketch or relief for your girlfriend, it doesn't matter. Hahaha.
"""
Author:XiaoMa
date:2021/11/16
"""
import cv2
import numpy as np
import math
import matplotlib.pyplot as plt

img0 = cv2.imread('E:\From Zhihu\For the desk\cvfifteen1.jpg')
img1 = cv2.cvtColor(img0, cv2.COLOR_BGR2GRAY)
h, w = img0.shape[:2]
print(h, w)
cv2.imshow("W0", img0)
cv2.imshow("W1", img1)
cv2.waitKey(delay = 0)
#Ground glass effect
img2 = np.zeros((h - 6, w - 6, 3), np.uint8)        #The generated all zero matrix takes into account the range of random numbers and becomes smaller
for i in range(0, h - 6):                   #Prevent the following random numbers from exceeding the edge
    for j in range(0, w - 6):
        index = int(np.random.random()*6)   #Random number from 0 to 6
        (b, g, r) = img0[i + index, j + index]
        img2[i, j] = (b, g, r)
cv2.imshow("W2", img2)
cv2.waitKey(delay = 0)
#Relief effect (operation on gray image is required)
img3 = np.zeros((h, w, 3), np.uint8)
for i in range(0, h):
    for j in range(0, w - 2):                #The effect of subtracting 2 is the same as above
        grayP0 = int(img1[i, j])
        grayP1 = int(img1[i, j + 2])         #Take the point adjacent to the previous pixel
        newP = grayP0 - grayP1 + 150         #Get the difference and add a constant to increase the three-dimensional sense of relief
        if newP > 255:
            newP = 255
        if newP < 0:
            newP = 0
        img3[i, j] = newP
cv2.imshow("W3", img3)
cv2.waitKey(delay = 0)
#Sketch effects
img4 = 255 - img1                                               #Invert the pixels of the original gray image
blurred = cv2.GaussianBlur(img4, (21, 21), 0)                   #Gaussian blur
inverted_blurred = 255 - blurred                                #reversal
img4 = cv2.divide(img1, inverted_blurred, scale = 127.0)        #The gray image is divided by the inverted fuzzy image to get the pencil sketch
cv2.imshow("W4", img4)
cv2.waitKey(delay = 0)
#Nostalgic effects
img5 = np.zeros((h, w, 3), np.uint8)
for i in range(0, h):
    for j in range(0, w):
        B = 0.272 * img0[i, j][2] + 0.534 * img0[i, j][1] + 0.131 * img0[i, j][0]
        G = 0.349 * img0[i, j][2] + 0.686 * img0[i, j][1] + 0.168 * img0[i, j][0]
        R = 0.393 * img0[i, j][2] + 0.769 * img0[i, j][1] + 0.189 * img0[i, j][0]
        if B > 255:
            B = 255
        if G > 255:
            G = 255
        if R > 255:
            R = 255
        img5[i, j] = np.uint8((B, G, R))
cv2.imshow("W5", img5)
cv2.waitKey(delay = 0)
#Fleeting time effect
img6 = np.zeros((h, w, 3), np.uint8)
for i in range(0, h):
    for j in range(0, w):
        B = math.sqrt(img0[i, j][0]) *14       # The square of the value of channel B is multiplied by parameter 14
        G = img0[i, j][1]
        R = img0[i, j][2]
        if B > 255:
            B = 255
        img6[i, j] = np.uint8((B, G, R))
cv2.imshow("W6", img6)
cv2.waitKey(delay = 0)
#Water wave effect
img7 = np.zeros((h, w, 3), np.uint8)
wavelength = 20                                 #Define the wavelength of water wave effect
amplitude = 30                                  #range
phase = math.pi / 4                             #phase
centreX = 0.5                                   #Water wave center point X
centreY = 0.5                                   #Center point of water wave Y
radius = min(h, w) / 2
icentreX = w*centreX                            #Water wave coverage width
icentreY = h*centreY                            #Water wave coverage height
for i in range(0, h):
    for j in range(0, w):
        dx = j - icentreX
        dy = i - icentreY
        distance = dx * dx + dy * dy
        if distance > radius * radius:
            x = j
            y = i
        else:
            # Calculate water wave area
            distance = math.sqrt(distance)
            amount = amplitude * math.sin(distance / wavelength * 2 * math.pi - phase)
            amount = amount * (radius - distance) / radius
            amount = amount * wavelength / (distance + 0.0001)
            x = j + dx * amount
            y = i + dy * amount
        # Boundary judgment
        if x < 0:
            x = 0
        if x >= w - 1:
            x = w - 2
        if y < 0:
            y = 0
        if y >= h - 1:
            y = h - 2
        p = x - int(x)
        q = y - int(y)
        # Image water wave assignment
        img7[i, j, :] = (1 - p) * (1 - q) * img0[int(y), int(x), :] + p * (1 - q) * img0[int(y), int(x), :]
        + (1 - p) * q * img0[int(y), int(x), :] + p * q * img0[int(y), int(x), :]
cv2.imshow("W7", img7)
cv2.waitKey(delay = 0)
#Cartoon effects
num_bilateral = 7                                      #Defines the number of bilateral filters
for i in range(num_bilateral):                         #Bilateral filtering processing
    img_color = cv2.bilateralFilter(img0, d = 9, sigmaColor = 5, sigmaSpace = 3)
img_blur = cv2.medianBlur(img1, 7)                     # Median filter processing
img_edge = cv2.adaptiveThreshold(img_blur, 255, cv2.ADAPTIVE_THRESH_MEAN_C, cv2.THRESH_BINARY, blockSize = 5, C = 2) #Edge detection and adaptive thresholding
img_edge = cv2.cvtColor(img_edge, cv2.COLOR_GRAY2RGB)  #Convert back to color image
img8 = cv2.bitwise_and(img0, img_edge)          #And operation of image
cv2.imshow('W8', img8)
cv2.waitKey(delay = 0)
#Save all images to one drawing
plt.rcParams['font.family'] = 'SimHei'
imgs = [img0, img1, img2, img3, img4, img5, img6, img7, img8]
titles = ['Original drawing', 'Grayscale image', 'Ground glass effect', 'Relief effect', 'Sketch effects', 'Nostalgic effects', 'Fleeting time effect', 'Water wave effect', 'Cartoon effects']
for i in range(9):
    imgs[i] = cv2.cvtColor(imgs[i], cv2.COLOR_BGR2RGB)
    plt.subplot(3, 3, i + 1)
    plt.imshow(imgs[i])
    plt.title(titles[i])
    plt.xticks([])
    plt.yticks([])
plt.suptitle('Image special effect processing')
plt.savefig('E:\From Zhihu\For the desk\cvfifteenresult.jpg', dpi = 1080)
plt.show()
Conclusion
This article summarizes the principle and simple implementation of some operations such as ground glass, relief and sketch in image special effect processing. For some complex algorithms, there is time to write a blog post to introduce them. There is also oil painting special effect, which is not introduced in this paper. Because this special effect algorithm is as difficult as water wave special effect, So I'll fill the hole slowly after updating this series.